Wicked Task Manager
With Drupal
Presented By Kathryn Carruthers
Who am I
I'm a freelance webmaster who's worked with labour organizations and nonprofits for most of my career.
I've been making websites since the mid-90s, and using Drupal for most of them for the past 8 years.
What are we doing
Building the single greatest task manager you've ever used!
Or at least the best one you can build in a day.
Agenda
- Get setup with a Drupal site
- Think about what makes a great task manager
- Create some content
- Build a new content type
- Add new functionality (i.e. install modules)
- Build a list of tasks (i.e. Views)
- Add actions to your task list
- Improve the task list UI
- Take home assignments (advanced features)
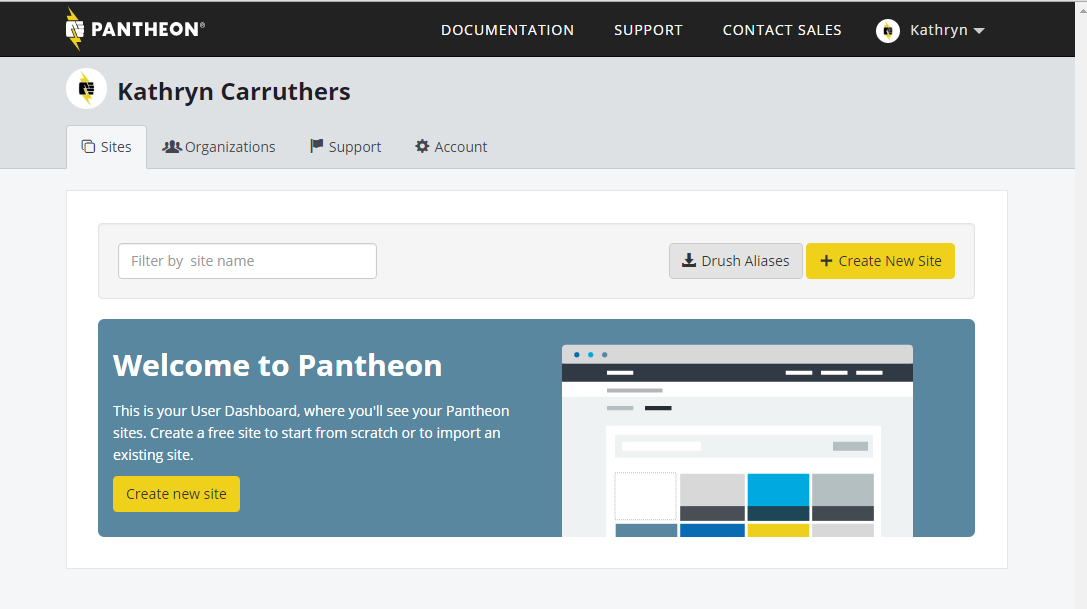
Create Account
Go to getpantheon.com and create your account.
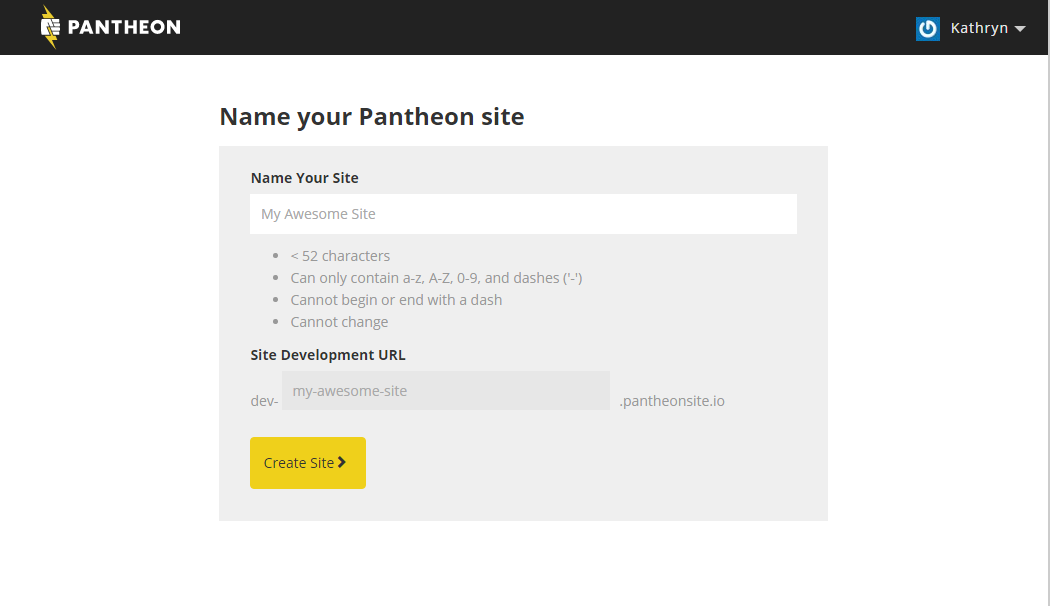
Select a name for your site.
(ex: my-awesome-site)
Your site name has to be unique though (they'll all be living on the same server).
And we wait...
Text
Text
Text
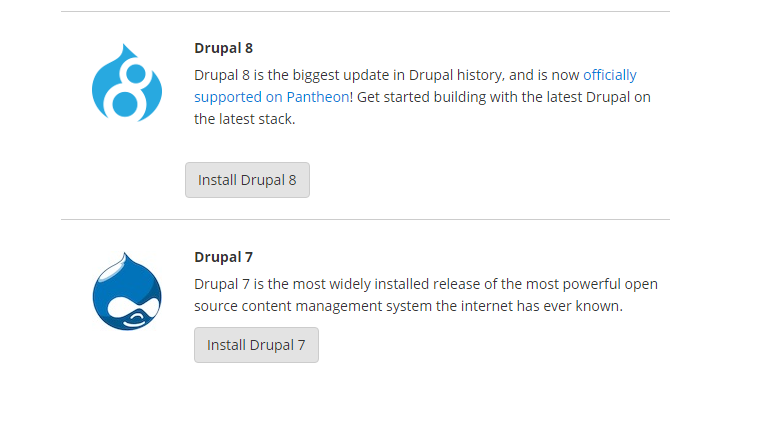
CHOOSE YOUR DRUPAL
Install Drupal 8
Choose Drupal 8 as your site install type.
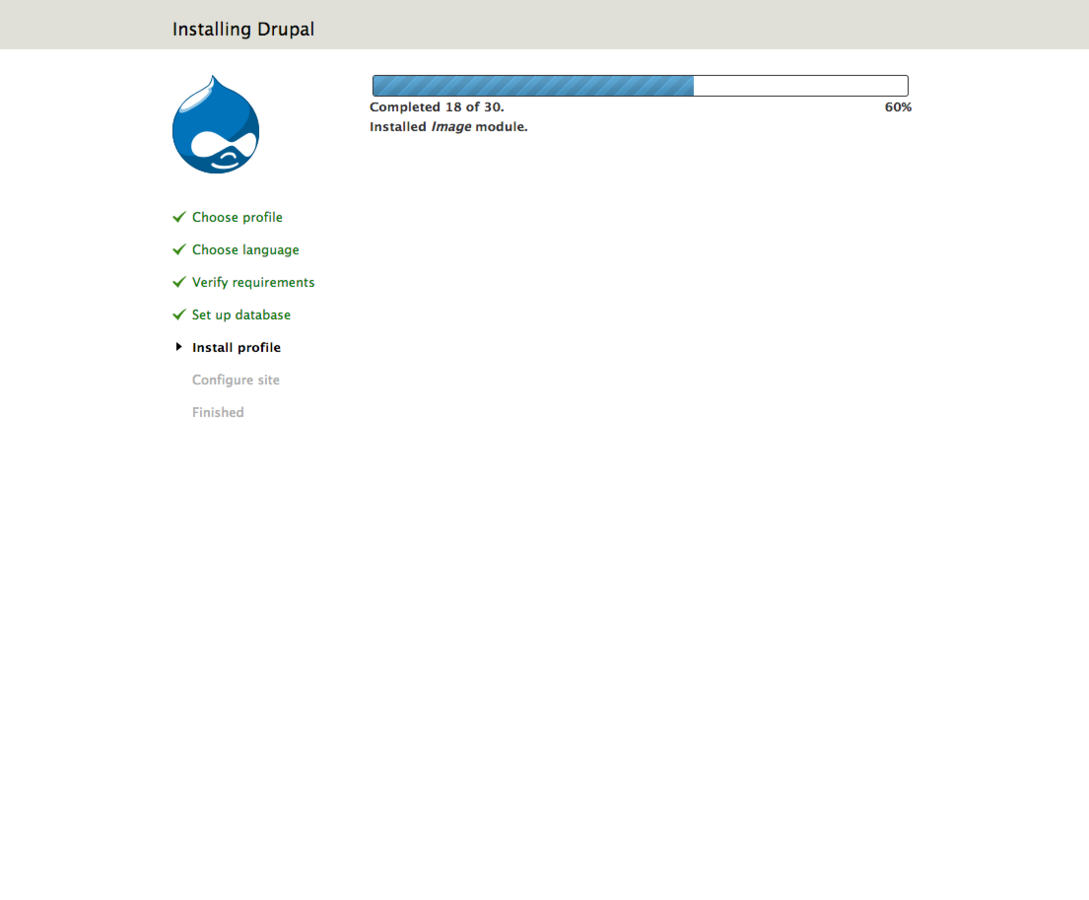
Then visit your site to install it.
Choose "Standard" install.
Fill in all the required fields as necessary.
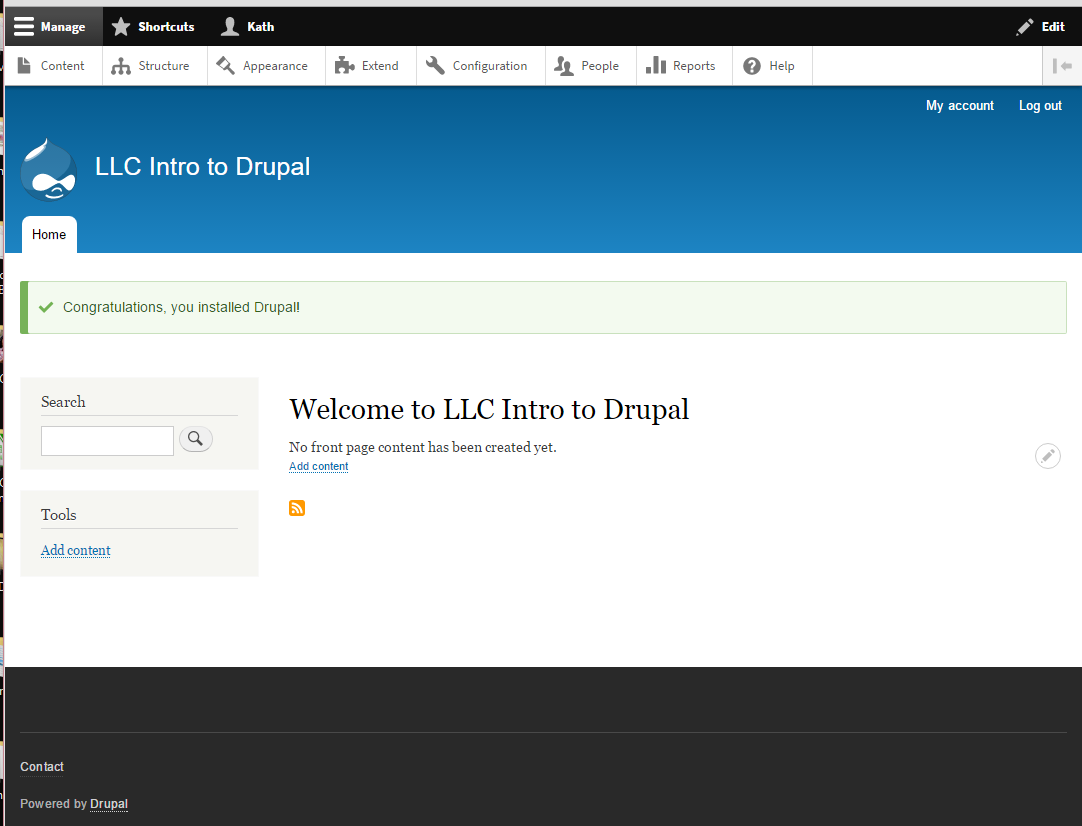
Victory!
Sometimes victory is boring
Step 1
What is A
Task
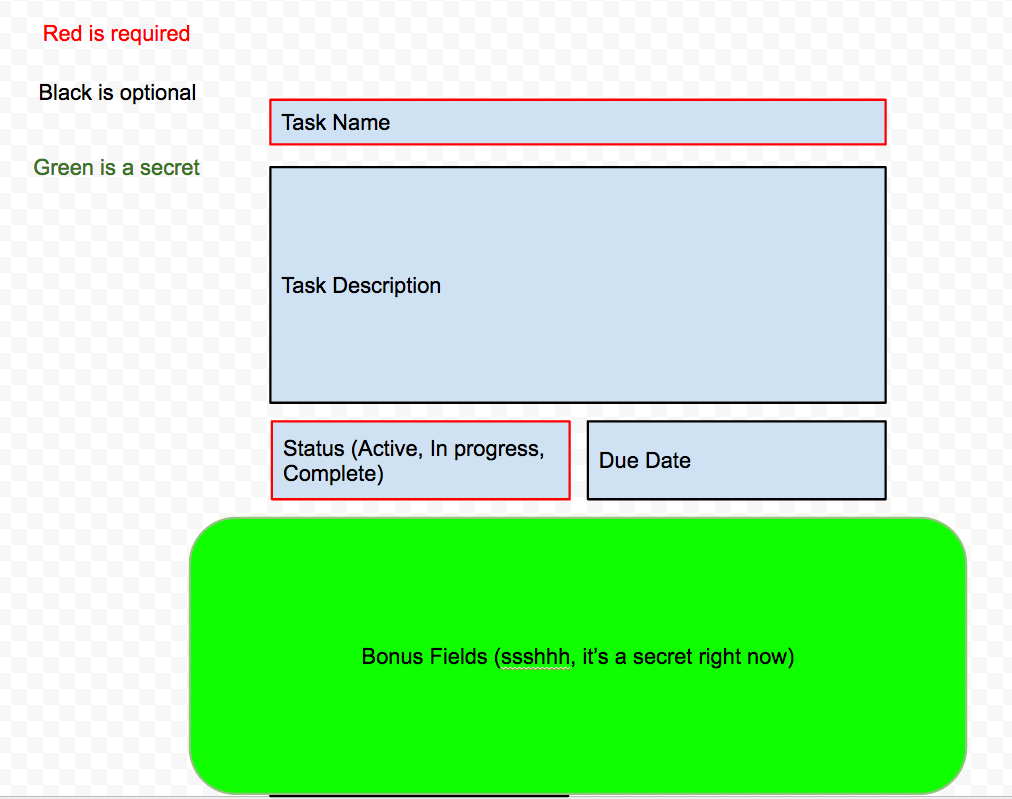
questions you should ask yourself
- Does Drupal Core do this?
- If not, can I configure it to do this?
- If not, can I download a module?
- Well, time to write code...
Check Drupal Core
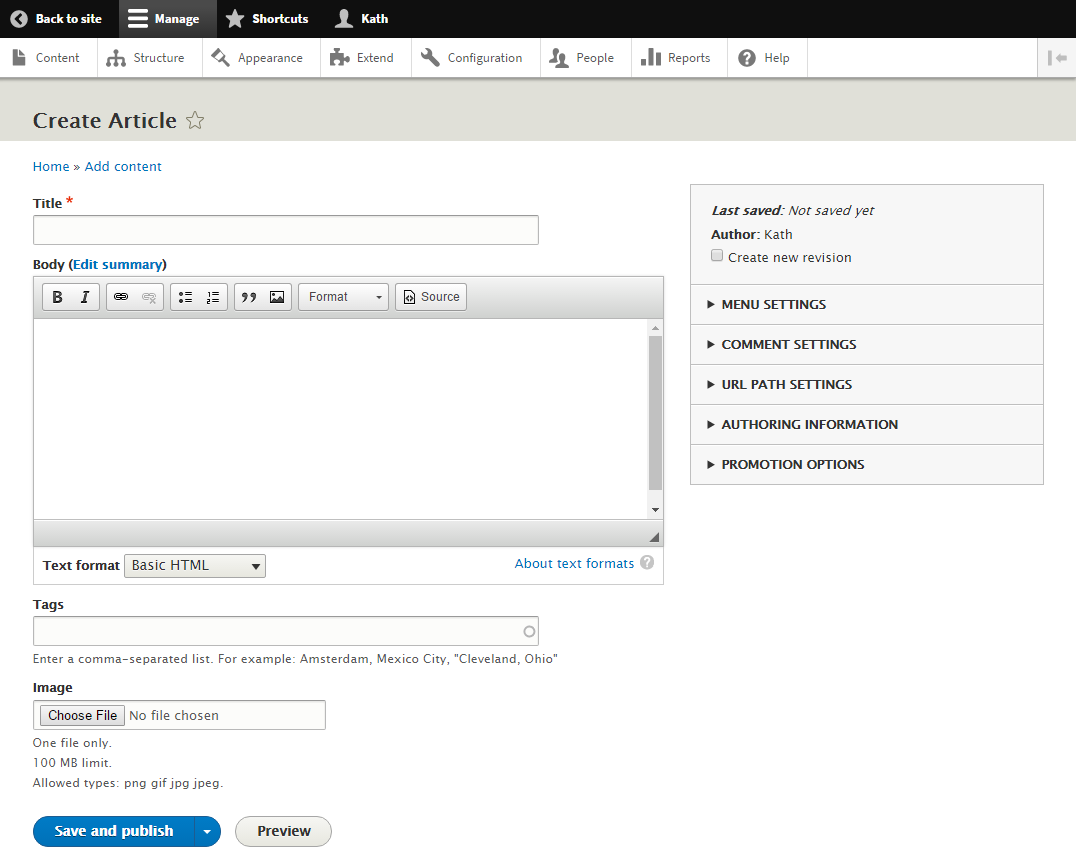
Create an article
Use the Admin Toolbar at the top of the page.
Click on "Content", then "Add Content", then "Add Article".
Let's see if our tasks work well as articles.
What's missing
- Well I've got my tasks in a list.
- I can't mark each one as done.
- I can't really assign a due date to them individually.
- I can comment.
- I can categorize.
- I can't mark one as in progress.
- Still better to use pen/paper
Ok, can I configure Drupal core to do this?
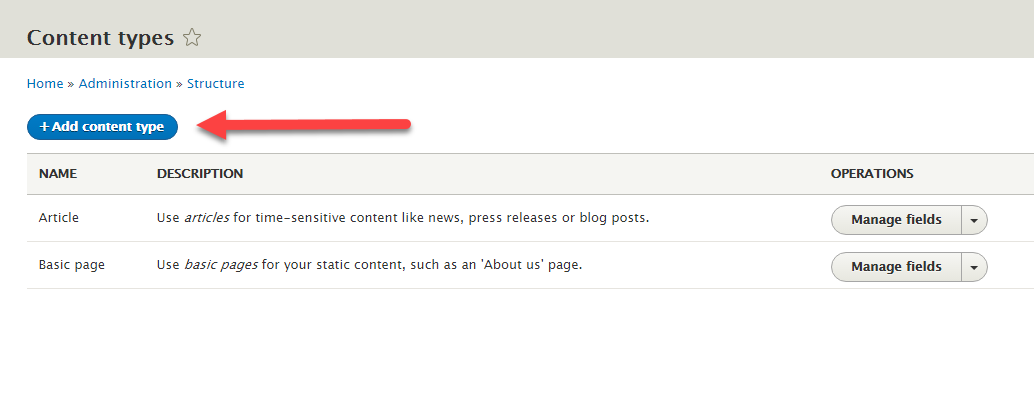
content types
Default container for storing content in Drupal.
You can add your own content types to fit your needs.
Add a "Task" content type.
Click on "Structure" then "Content Types"
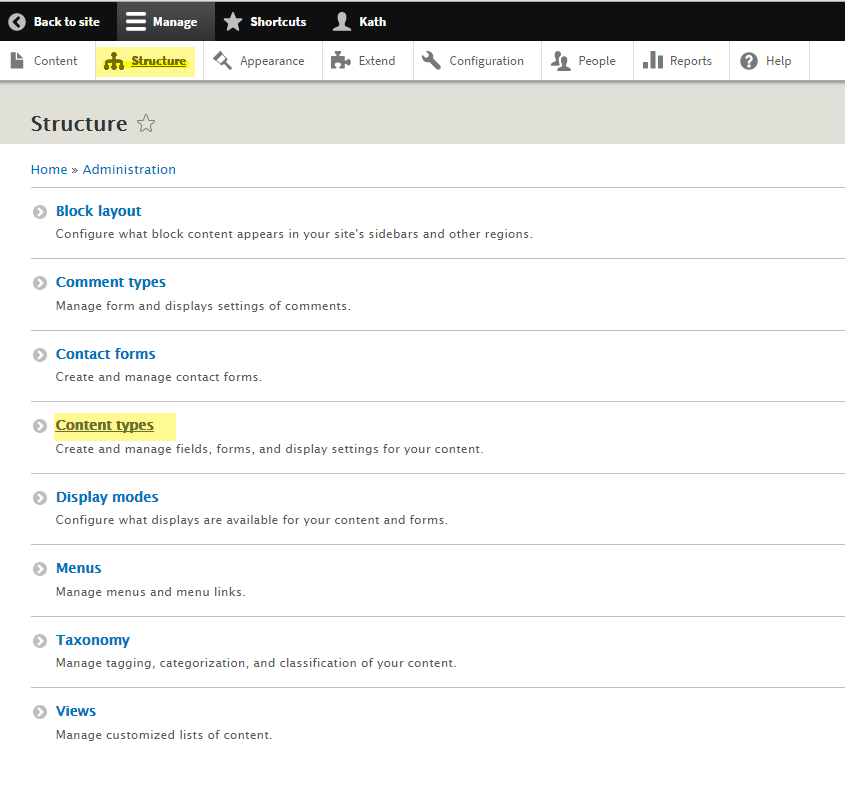
Add a Content Type
Here you can see the current list of content types.
Add one called "Task"
Don't forget to set your publishing options,
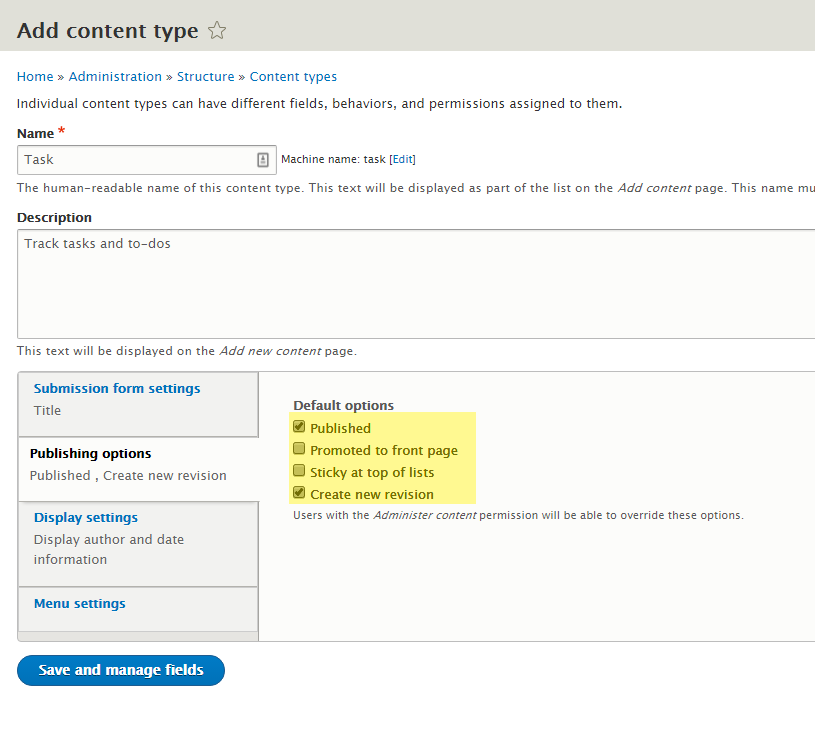
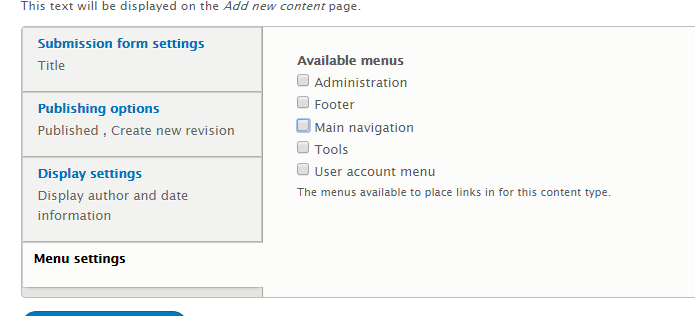
and turn off menus (we'll deal with this later).

Change the Title field label to "Task"
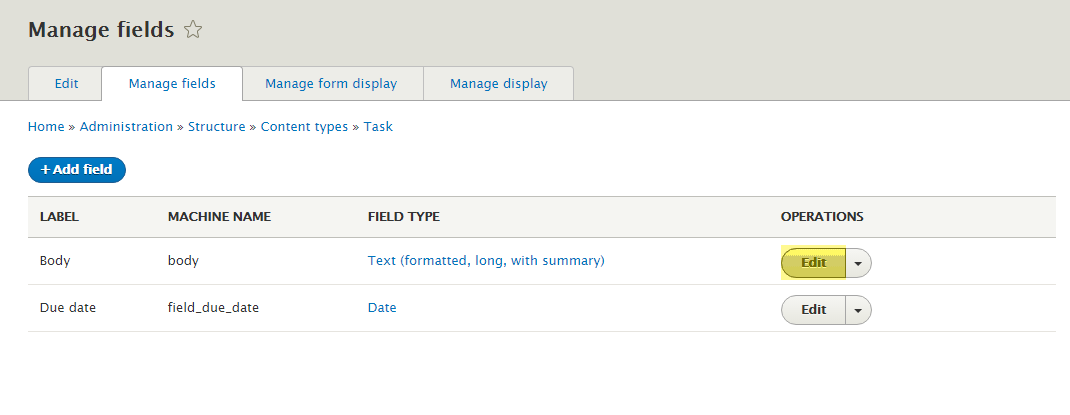
Fields
Content types are made up of "fields". Fields are what make one content type unique compared to one another.
When you create a new content type you get the "Title" and "Body" fields by default.
Let's customize the "Body" field settings.
Field Settings
Field settings are broken into two parts; instance settings and global settings.
Instance settings are the settings specific to this field and this content type.
Changing those settings only affect this field on this content type.
Field Settings
Global field settings affect the field on every content type they're used.
For example, "Article" and "Task" types both use the "Body" field.
If you change the settings in "Task", you'll change the settings for "Article" as well.
Be careful changing global settings.
More About Fields
Of all the things you do with Drupal, you'll more than likely spend your time adding / customizing / removing fields. Be sure you grasp how they work.
It's important.
Everything else we do today will use these fields in one way or another.
Try it out
Create a Task
Click on "Content" then "Add Content". You'll see the "Add Task" option. Fill in the form.
What's Different from Article
What's Missing from our Design?
What do we know about the task status?
- List of options
- Text values
- Mandatory
Field Types
A "Field Type" defines the kind of information you want to store in the field. Drupal has field types for:
- Text
- Numbers
- Decimals
- Long text
- etc...
Field Widgets
A "Field Widget" is the tool which users will use to enter this data.
For example, if you have a list of stuff, you can use the "select list" widget.
Different field types have different widget options.
List (Text)
Since we're storing a list of text values, we'll use the "List (text)" field type.
Users can use the "Select list" widget to make their selection.
Other options include radio buttons and checkboxes.
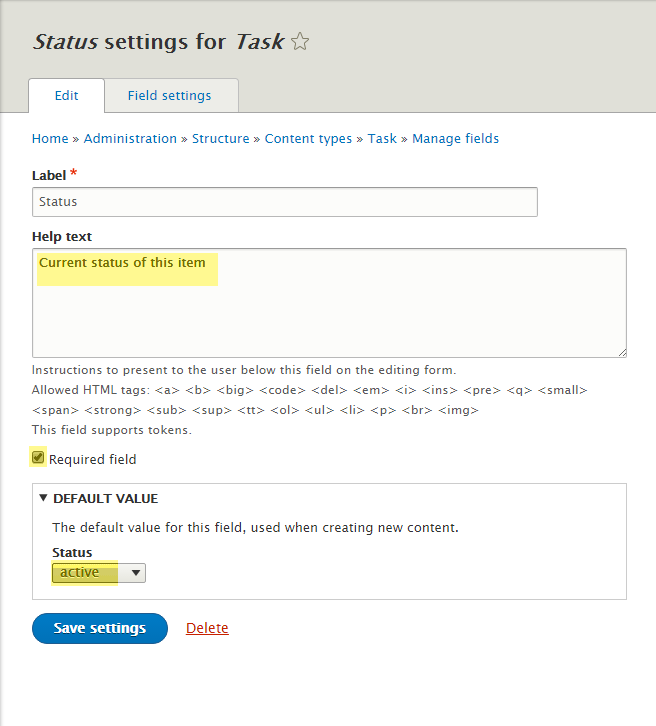
Name your field "Status".
Global Field Settings
When you add a new field, you'll always setup the "global" field settings first.
Add "active" and "complete" to Allowed values list
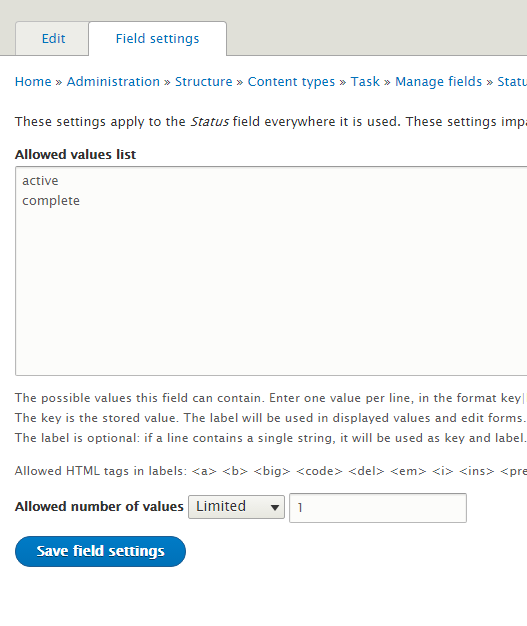
Instance Settings
Next we configure the settings specific to this field on this content type.
Set your help text, default value and required settings.
Achievement Unlocked
Add a New Field
Retrospective
- Did Drupal let me add what I wanted to?
- How was the experience?
- Can we do better?
Yes
We
Can
Modules
What's a module?
Similar to how fields let you customize content types, modules let you customize Drupal itself.
What can they do?
They can do anything!
Modules are what make Drupal great for a lot of different uses.
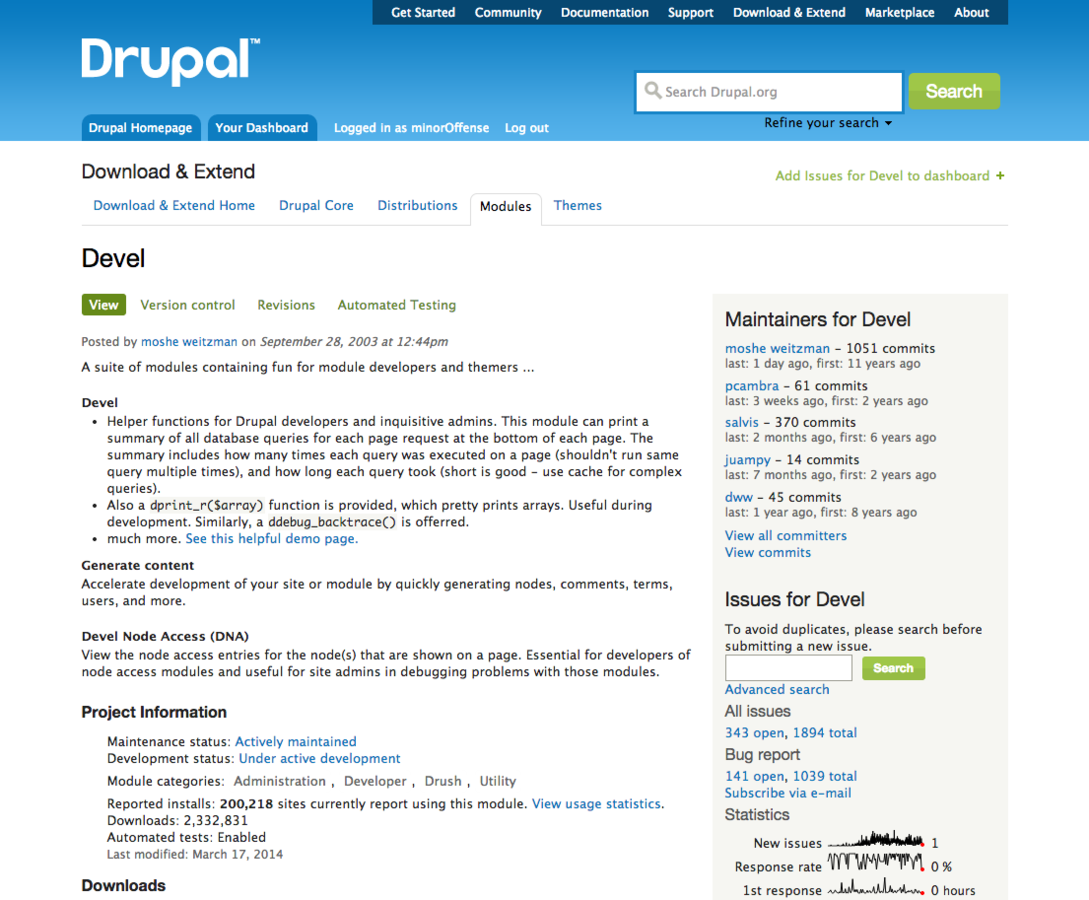
Where to find modules?
Drupal Project Pages
- Description of the module
- How many people are using it
- Versioned releases
What are Project Releases?
Themes, modules and install profiles are all different kinds of projects on Drupal.org.
Each of them let you customize Drupal in a different way.
A "release" is a particular version of that project. Typically you want to stick with "Recommended" releases (the green ones).
If you want the bleeding edge, you can use dev releases. But be warned, these can break your site...
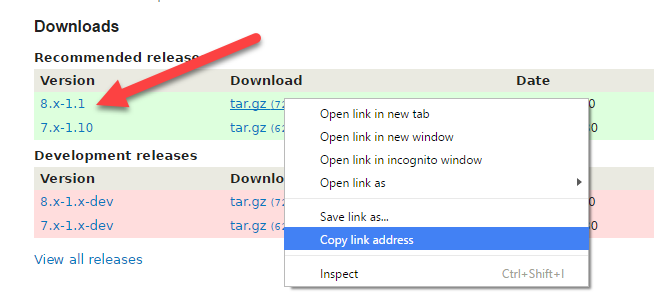
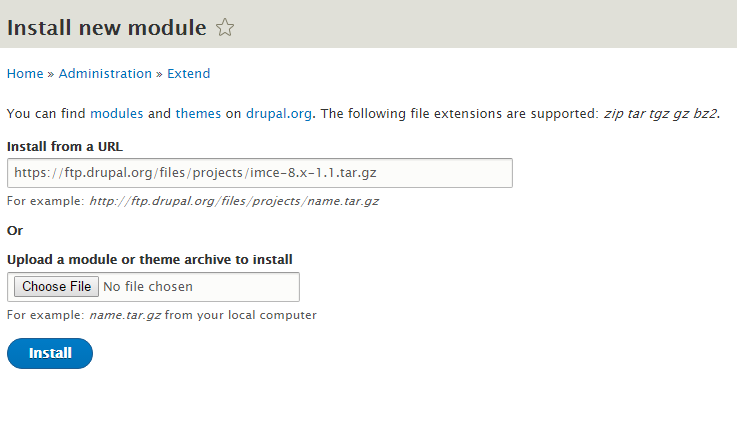
Installing Modules
Adding new modules to your site has three steps.
- Download the module
- Install/enable the module
- Configure the module
Where do I put Modules?
Normally, you put them in "sites/all/modules" on the server.
Pantheon lets you upload them through the UI and puts them in place automatically!
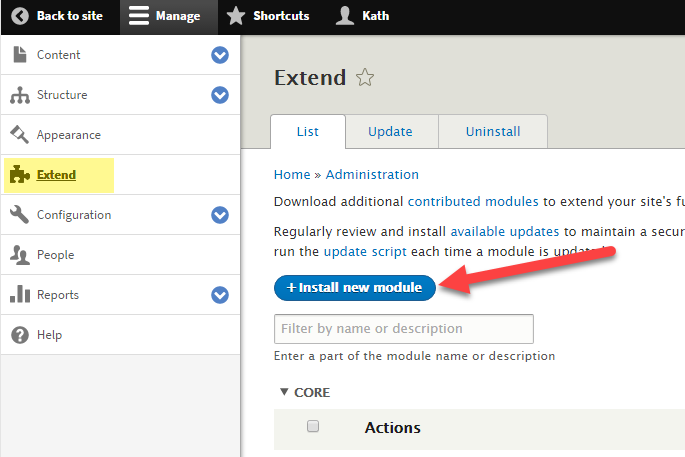
Module Admin
Click on the "Extend" option in the admin toolbar.
Click on "Install new module"
Copy the link from Drupal.org for your release and paste it into the box.
Click "Install"
Achievement Unlocked
Installed Modules
Next Up
Due Date
WHAT DO WE KNOW ABOUT THE Due Date?
- Store date data
- Not required
- Only set future dates
- Only one date allowed
Manage Fields
Go back to manage fields for your Task node type.
Look for a Date field type.
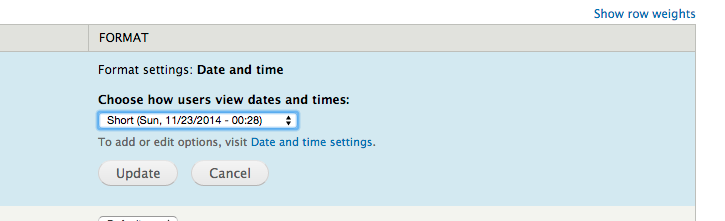
Date Field Settings
Let's set the date granularity and some global settings.
Use the site's timezone.
Turn on cache dates, leave the default settings for that.
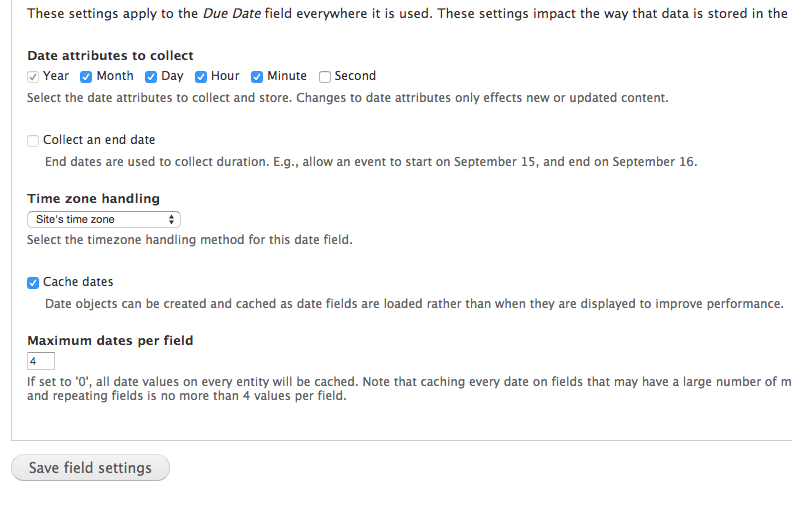
Date Field Instance Settings
Here we setup how users can enter dates.
Choose your date format, starting year, ending year, default date, etc...
Set these settings to whatever you think is right.
Save when you're done
Break Time
- Always save your work
- Commit your changes
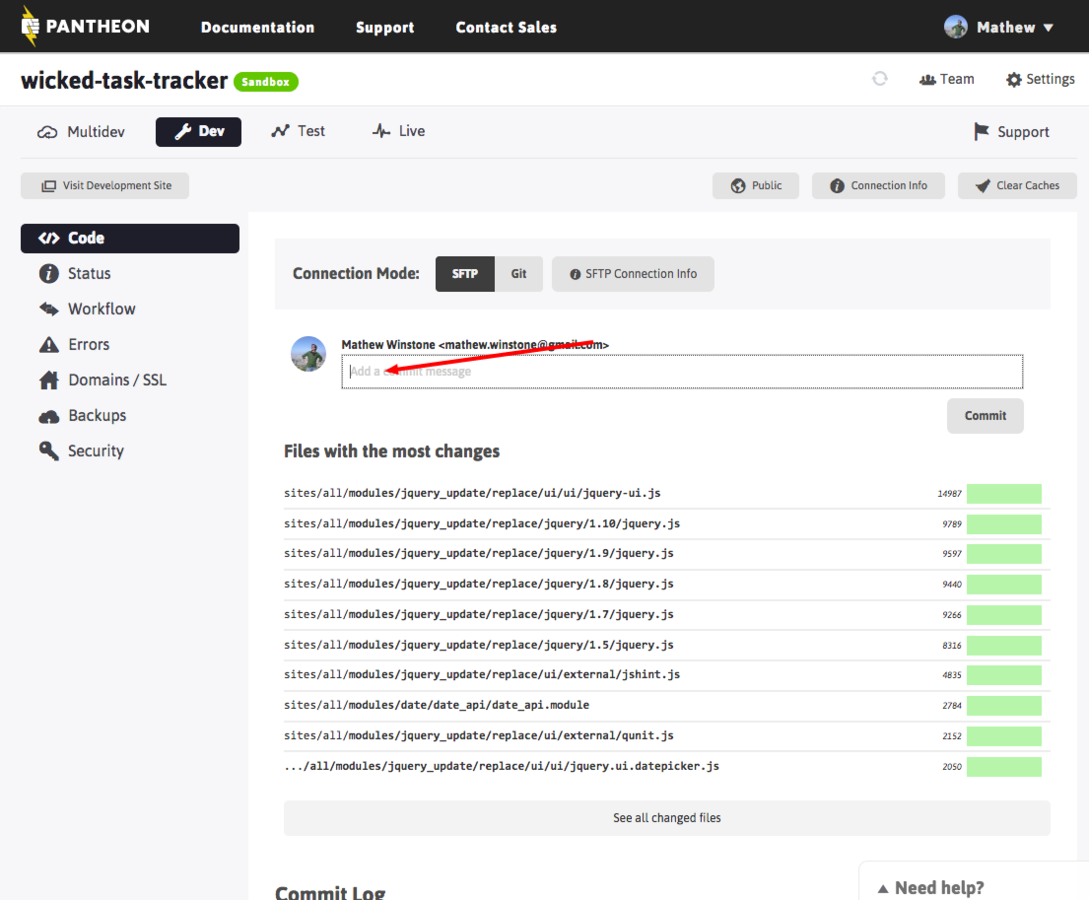
Use the Pantheon Dashboard to save your work
Achievment Unlocked
First Commit
View Modes
View Modes
A view mode is a way to render a single piece of content.
For example, the Article content type has two view modes; default and teaser.
Teaser is the shorter view you see on the homepage.
Default is the full page view with the comment form and all that when you view the article itself.
We can create / use view modes with our Task content as well.
Manage Display
On your content type page, click on the "Manage Display" link.
This will let you control how your fields show up based on the View Mode.
List of available View Modes
The list of enabled view modes for your content type are listed in the tabs at the top right.
Test Task
Let's create a Task and adjust the View modes until we get it displaying the way we want.
Go to "Content" then "Add Content". Click on "Add Task".
Create a task called "Put task information side-by-side"
Fill in a description.
Set a due date.
In the publishing options, Promote to Front Page.
Change Field Display Order
The simplest thing you can do is change the order of your fields.
Drag them around, click save and check out the change on your task.
Try putting date above description.
Try hiding the description in the Teaser view mode
Change the date format to be different in Teaser vs Default (hint: use the gear next to the date field)
Is that all I can do?
Yup. Unless we install a module.
WHat's next on the list
Does Drupal Core do this?If not, can I configure it to do this?- If not, can I download a module?
- Well, time to write code...
Display Suite
This module adds more controls and options to your "Manage Display" page.
Most importantly, it lets you select other layouts other than the standard single column we've been using.
Install and Enable Display Suite
That's right. You're on your own this time. Find the download link, add the module and enable "Display Suite UI" on your site.
I'll wait...
Done yet?
Everyone's waiting... :-P
I'm just teasing. Take your time and do it right.
Achievement Unlocked
New Construction Options
Select a Layout for Teaser
Go back to Manage Display.
Go to the Teaser view mode.
Select the Fluid Two Column stacked layout.
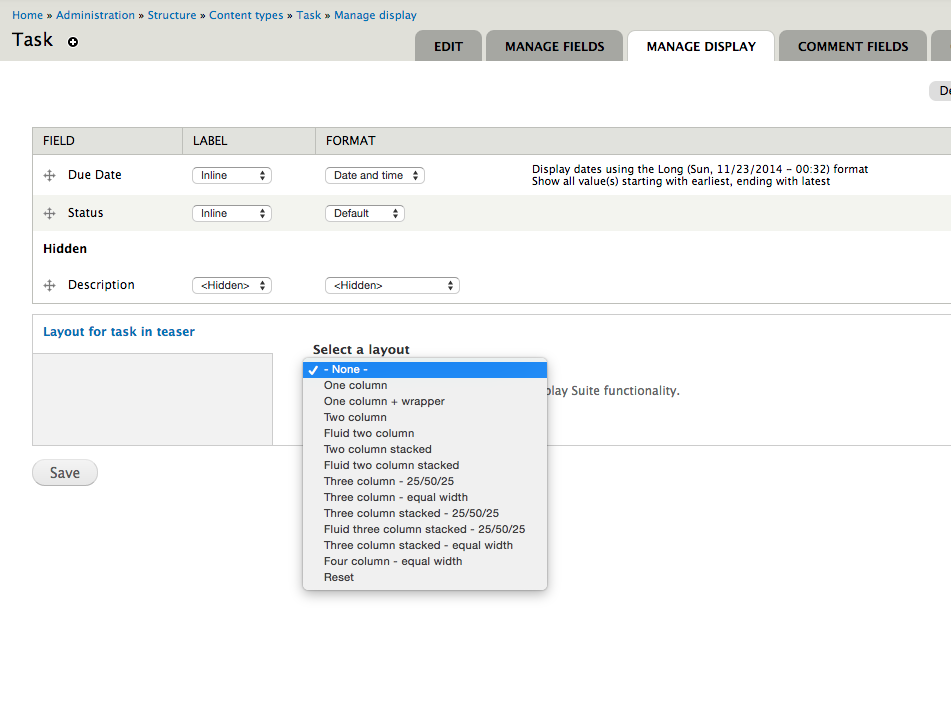
Organize your Fields
You'll notice you have a lot more options now. Display Suite also let's you control non-field items like the content post date, the author, and other stuff.
Place your items in the left or right column as you like.
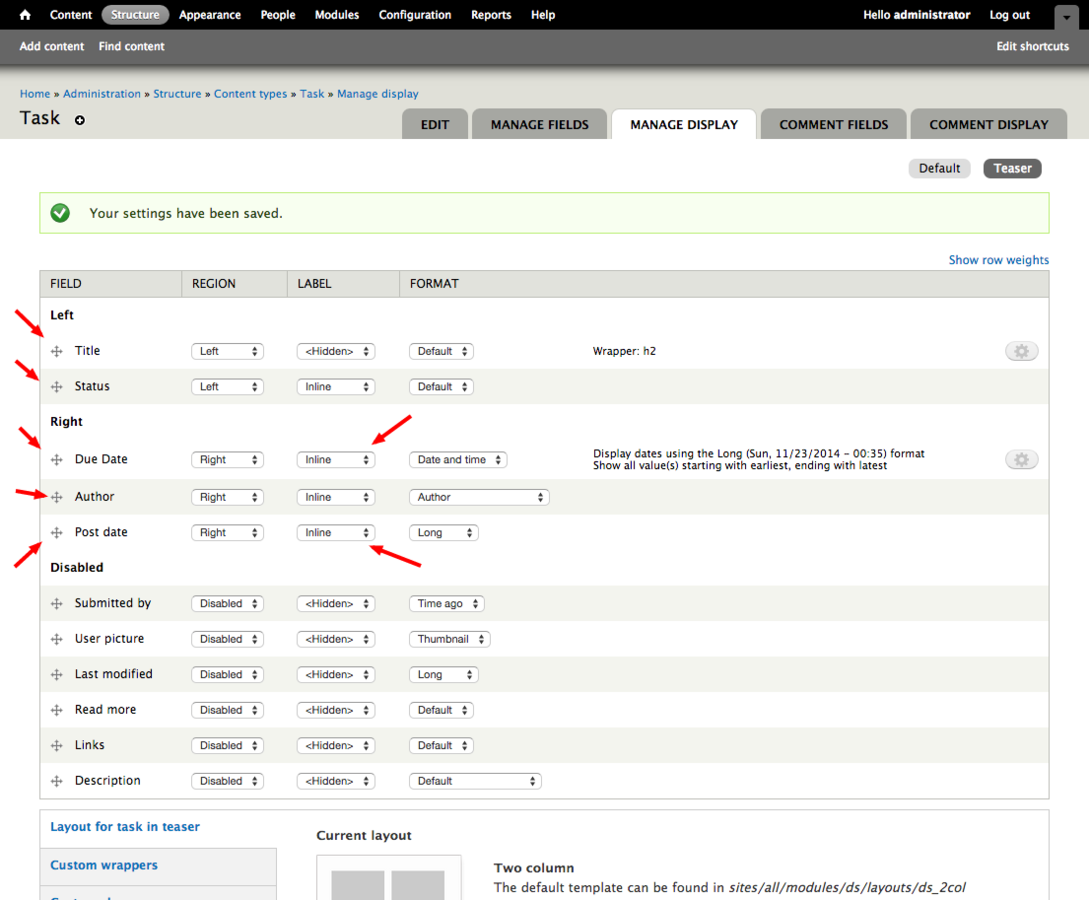
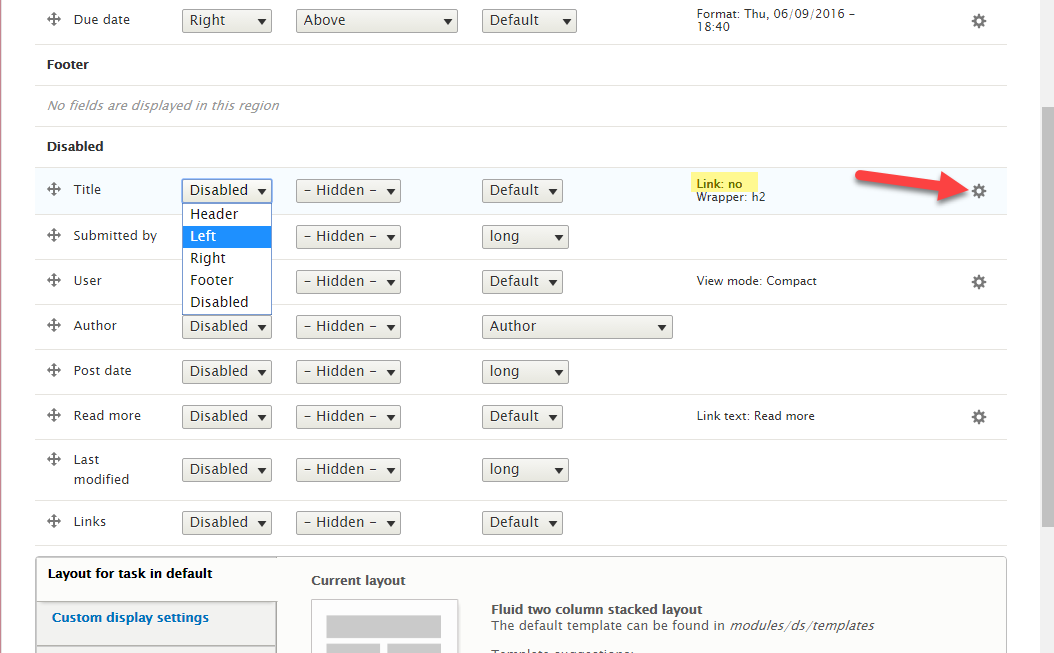
Title (task field)
The title field
(called Task for us)
is a separate block in Drupal 8, so you'll have to find it in the Disabled fields and move it up to the column (Enable it) and then click on the sprocket to turn it into a link
Can we make this look nicer?
Sure can! Let's pick a new theme.
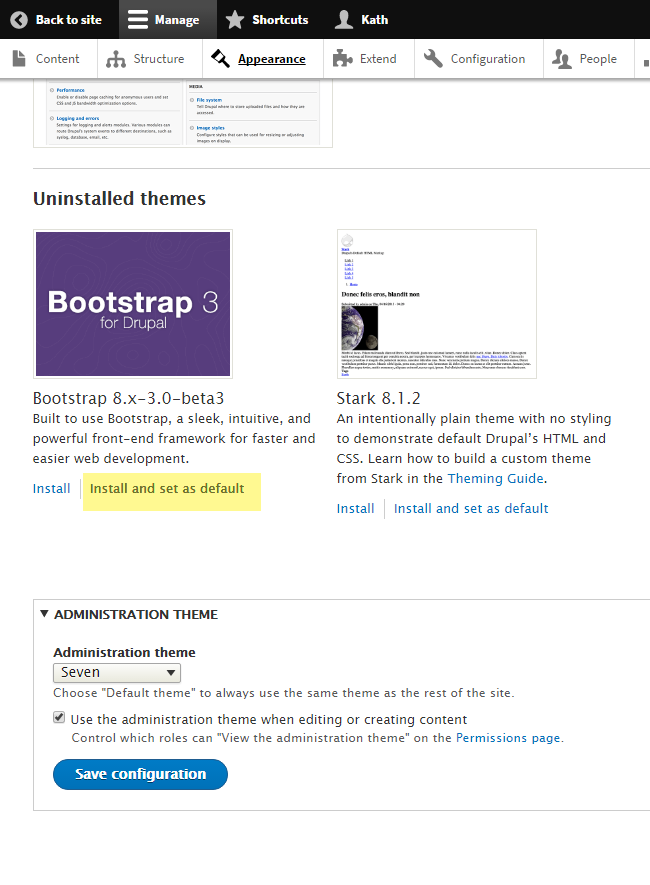
Install Bootstrap Theme
http://drupal.org/project/bootstrap
Enabling Themes
You install themes the same way as modules, but you enable them on a different page.
Click on "Appearance" and you'll see Bootstrap listed.
Click on "Enable and set default"
While we're here
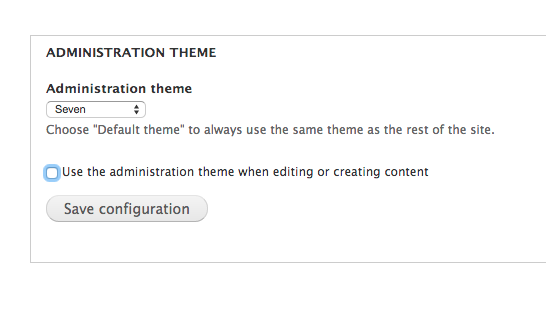
Disable using the admin theme for content editing. Let people use the Bootstrap theme instead.
One more thing
Configuration
The configuration section in Drupal is where you go to change most of the global settings for your site.
Each configuration group contains the core settings as well as any module specific settings.
When you setup a Drupal site, odds are you'll visit this page a lot in the beginning.
But once everything is up and running in production, you probably won't (or shouldn't) change stuff here unless you have to.
Edit your Task
Give a try at editing your task.
You should see the Bootstrap theme now instead of Bartik.
Add More Tasks
Add a task for "Create a task list"
Add a task for "Add a menu for creating tasks"
Add a task for "Link to my task list from the main menu"
Our Problem
Right now, the only way to get a list of our tasks is either by publishing them to the front page (which gets mixed in with other content) or using the admin/content page (which once again, has everything).
Can we solve It With Drupal
You should know what to ask yourself right now.
Lunch
Round
Two
How do we create a list of stuff?
Check the list
- Does Drupal Core do this?
- If not, can I configure it to do this?
- If not, can I download a module?
- Well, time to write code...
Views
It's kind of a big deal...
What are we doing with Views?
Views let's you do three very important things:
- Create a list of content
- Format the output of that content
- Embed that content anywhere on your site
Way down at
the bottom
of Structure
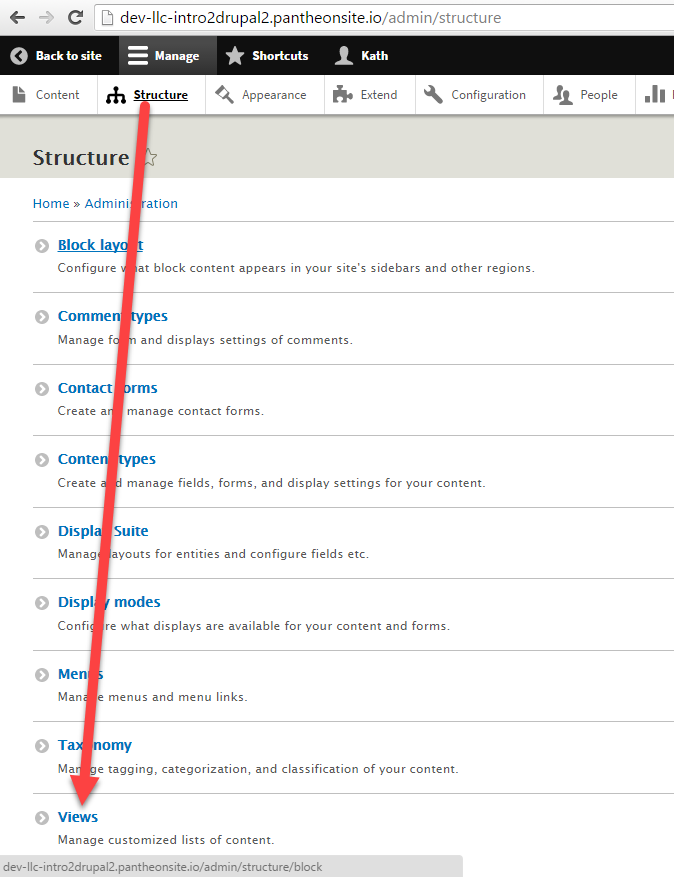
Add a new view
Make a Task List
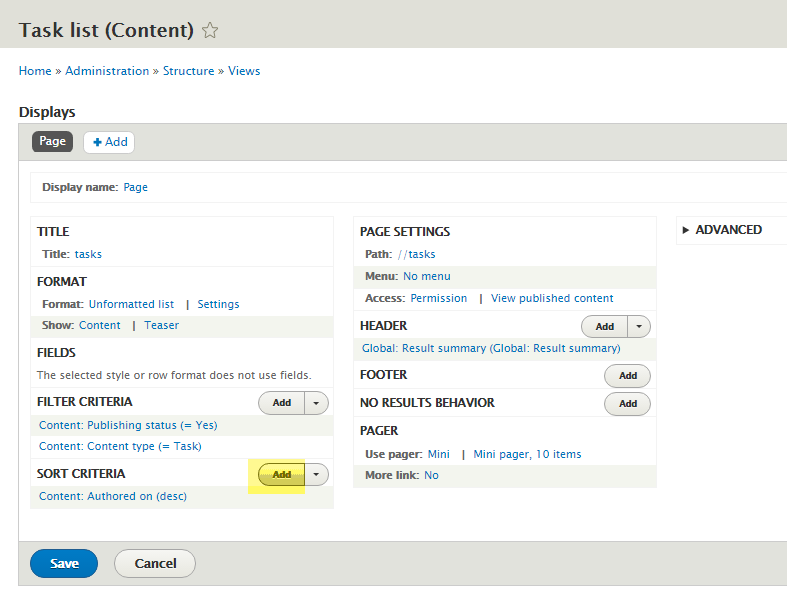
Let's create a list of tasks.
Set the name to "Task list"
Add a description
Show "Content" of type "Task" sorted by "Newest first"
Create a page at "/tasks"
Create a menu link in "Main Navigation" and "Use a Pager"
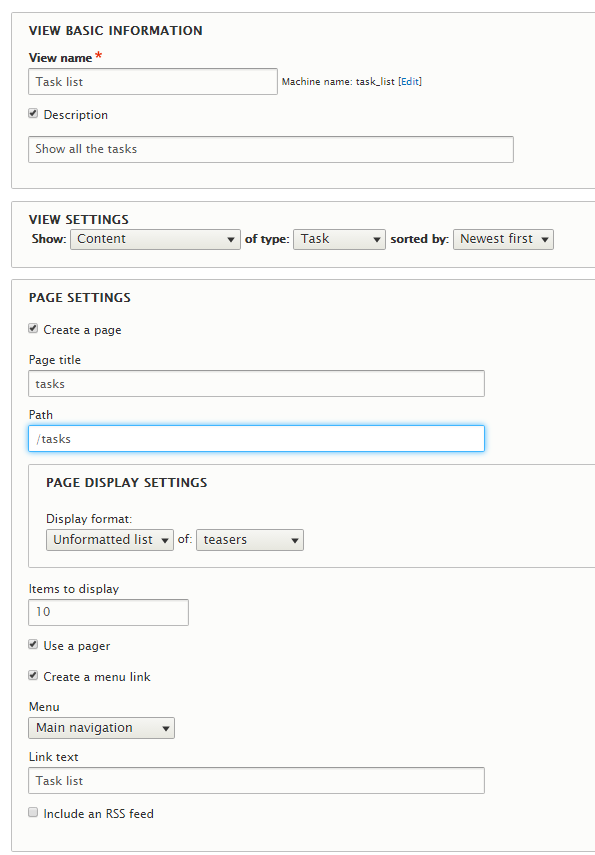
And you have a view!
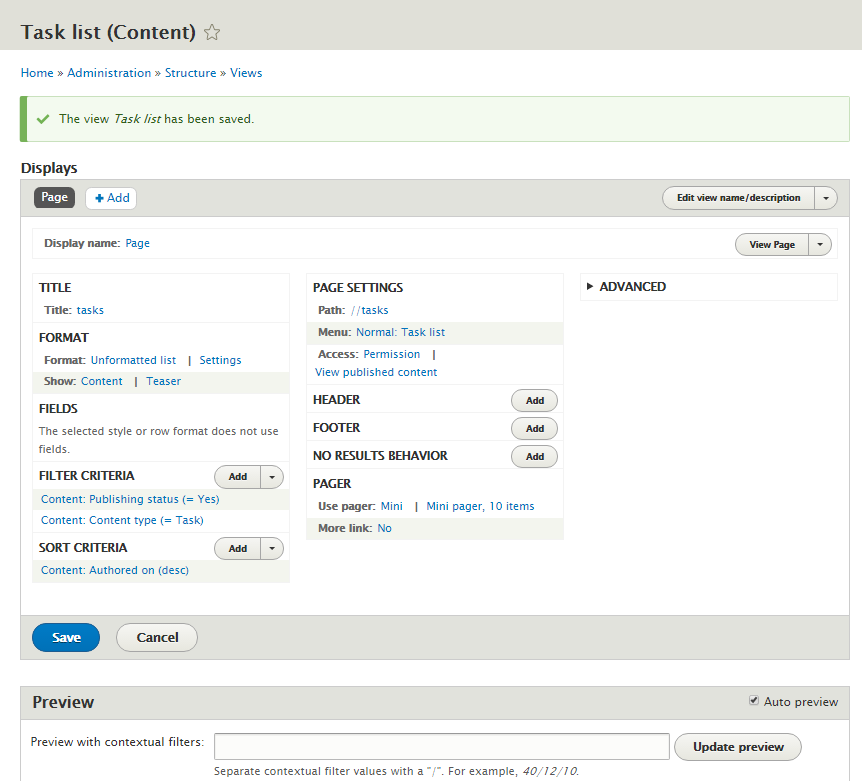
Test it out
Open a new tab and go to "/tasks" on your site.
You should see a list of tasks.
Let's add some tasks to make our task list better!
- Make adding tasks faster
- Show how many tasks I have
- Allow images with tasks
- Make the tasks show their status
- Let me sort by due date
- Let filter by status
- Add a tab for "completed" tasks
- Filter out "completed" tasks
Faster Task Add
Go to Structure, Menus
At Tools, Edit menu
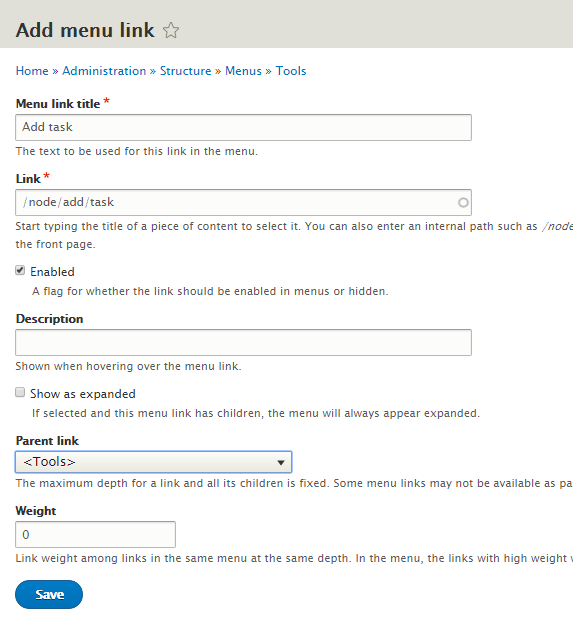
Set the Order
Change the order of the links. Use the handles to move the links up/down in the menu
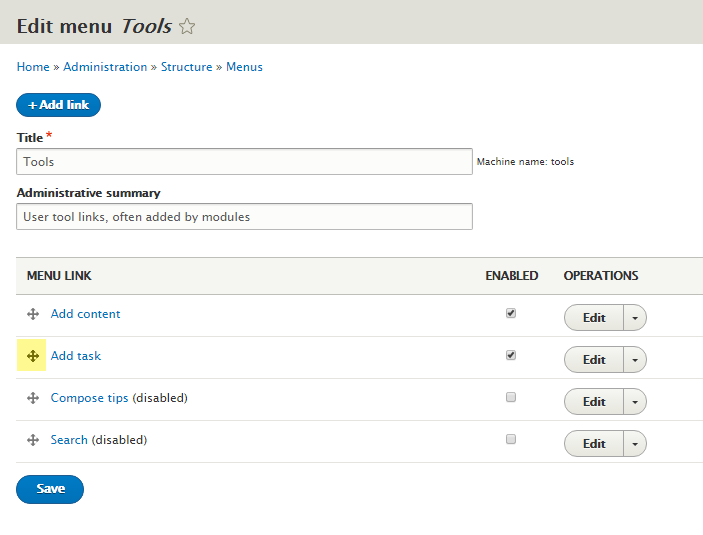
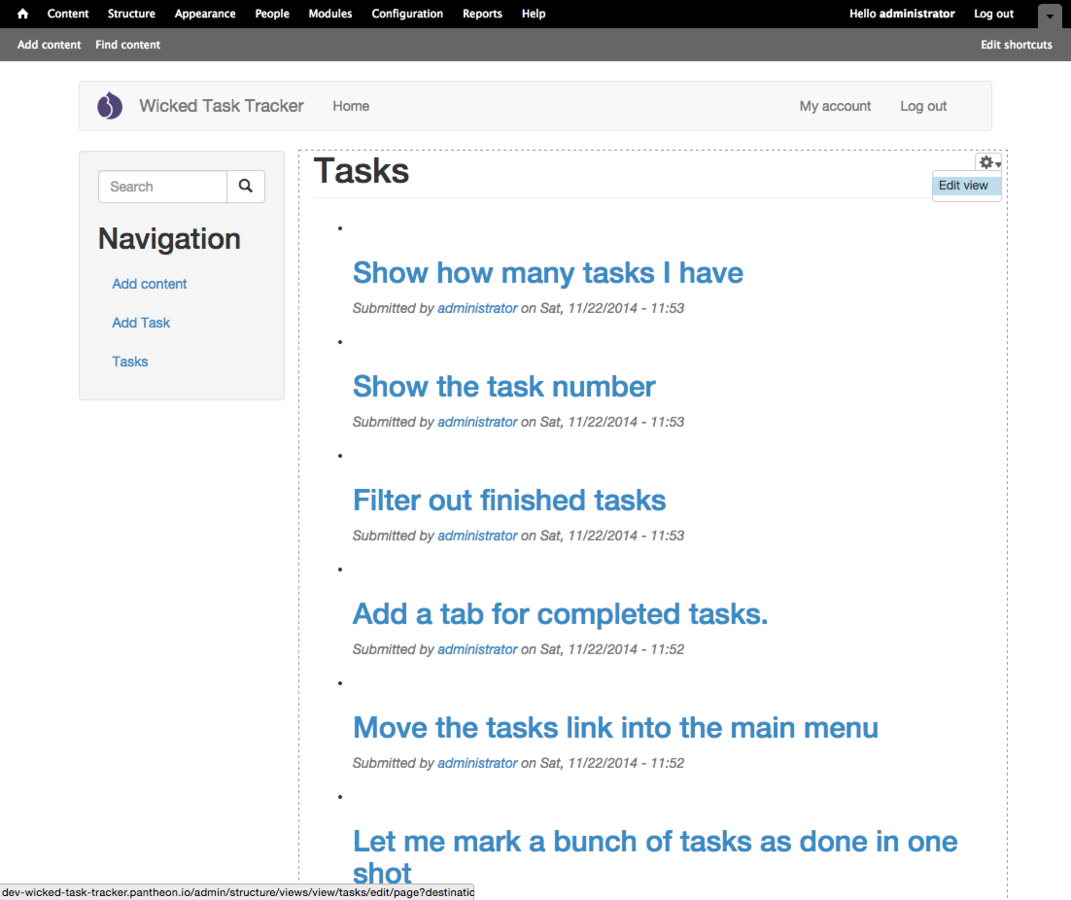
Go back to your Task list
Go back to /tasks
You can now in one click add a task.
Todos
Make adding tasks fasterShow how many tasks I have- Allow images with tasks
- Make the tasks show their status
- Let me sort by due date
- Let filter by status
- Add a tab for "completed" tasks
- Filter out "completed" tasks
Add Count
Let's get Views to output the count of the results above the list.
Click on Add next to "Header" in the "Page Settings" section.
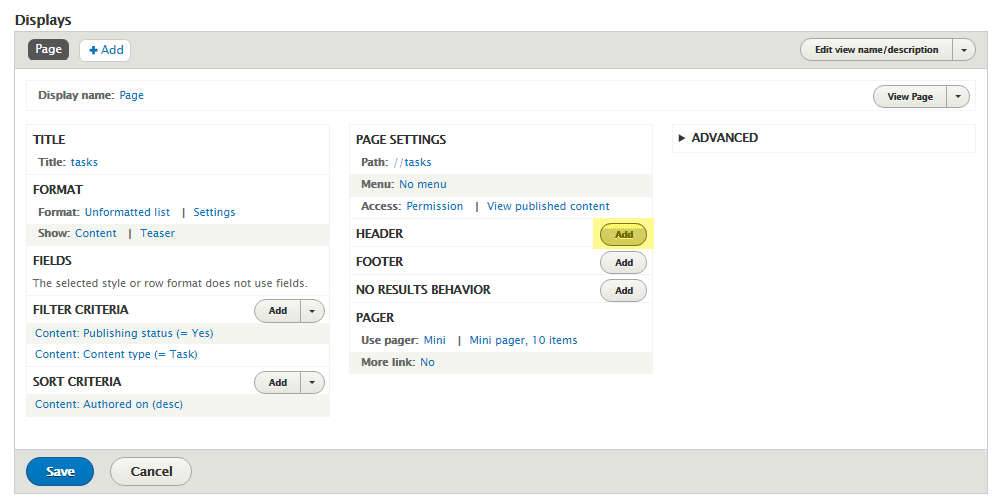
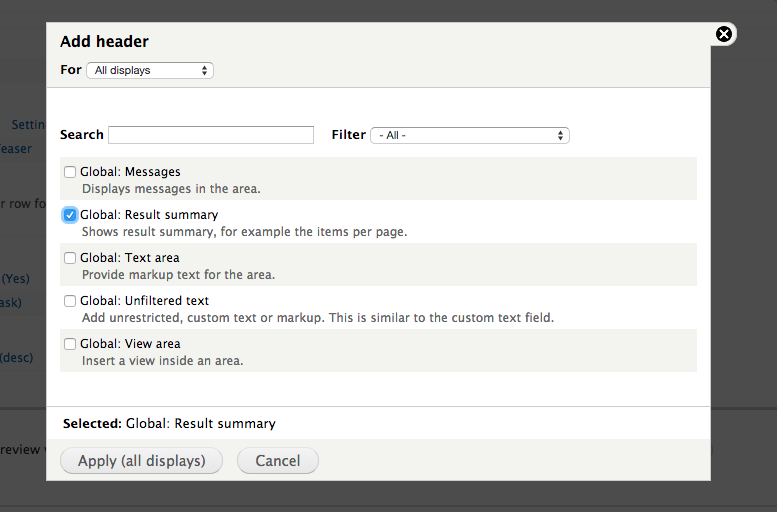
Header Options
The header settings allow you to add content above your Views.
Add a "Global: Result Summary" to the header.
Customize the Text
You'll see some "tokens"
in the text.
Tokens are special words which get replaced with information when the view
is displayed.
Adjust the text as you like.
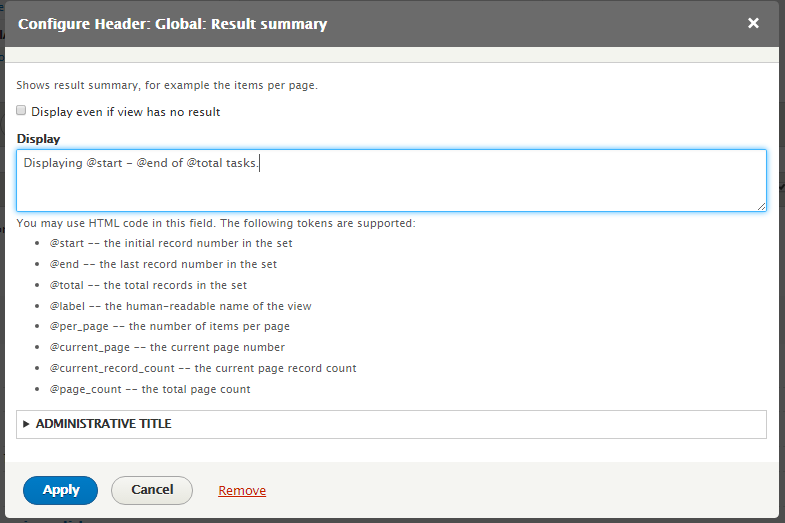
Save and Check out your Task List
You now have the count at the top of the page.
Mark that task as "completed".
Things are starting to come together.
What's next?
Add Images
Why shouldn't we be able to add images to tasks?
Let's go back to Manage Fields
Have a look at the existing image fields (i.e. field_image)
Does it meet our needs? (add the existing field and have a look at the settings)
Field Settings
- Instance Settings
- Global Settings
Pros
- No new fields need to be created
- Simple for users (e.g. limits can be freeing)
- Don't have to deal with displaying all the images together
Cons
- People may want more than one image
- People may end up creating more tasks to have more images
- Probably need some kind of gallery or slider to show them all together effectively
New Field Means New Display Options
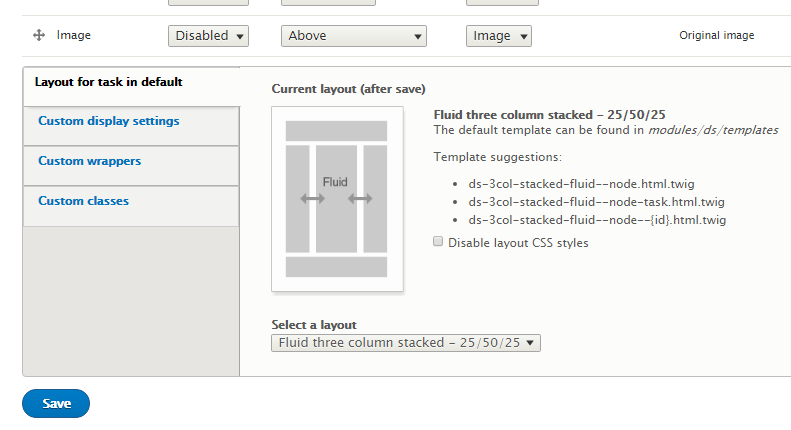
Now that we have a new field, let's setup how we show it.
Go to Manage Display. Choose Teaser view.
Change the layout to "Three Column Fluid"
Configure Image DIsplay
Now that we have an image, let's make sure it gets sized right.
Put the image in the left hand column.
Edit the image field display settings (look for the gear)
Set Image Style
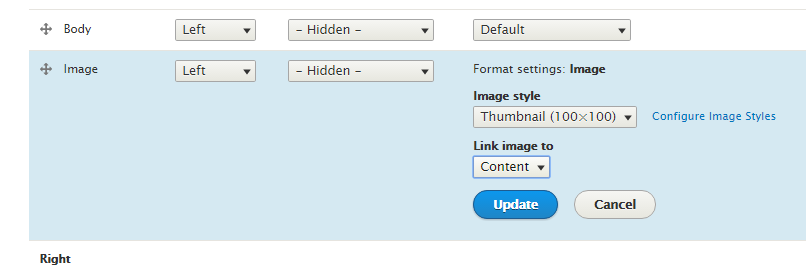
Image Styles
Drupal can resize images automatically for you when they get displayed.
Settings for displaying images are called "Image Styles"
You can add or edit the existing image styles in the Configuration section.
Look for "Image Styles"
We'll create a new image style later. For now, use Thumbnail.
All said and done, your task display should look like this.
Achievement Unlcoked
Perty' Pictures
Todos
Make adding tasks fasterShow how many tasks I haveAllow images with tasksMake the tasks show their status- Let me sort by due date
- Let filter by status
- Add a tab for "completed" tasks
- Filter out "completed" tasks
Go Back to your Task List
Use the gear to edit the Task List view.
Sort Criteria
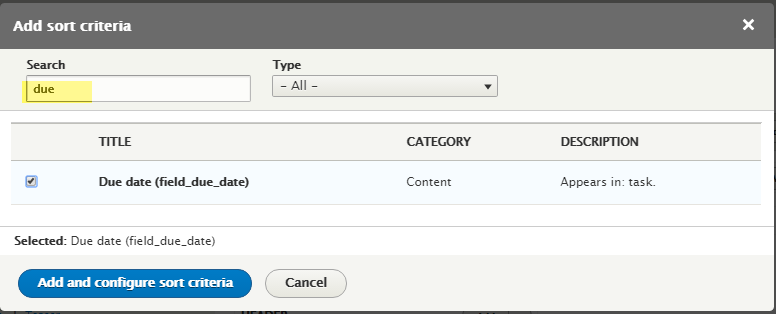
Click "Add" under sort criteria.
Look for "Due Date"
Check the box, click Add.
Add Due Date
Exposed Sorts
Sort criteria in Views can be exposed to the user. That let's the user choose how to sort things.
Check off "Expose this sort..."
Set the default sort to "Ascending"
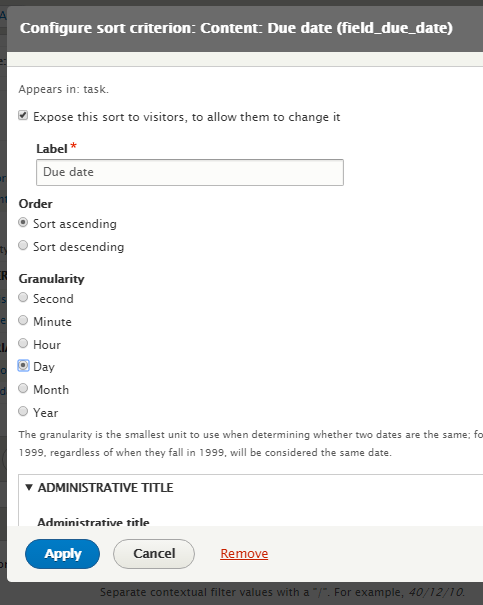
Save your View and voilà
Todos
Make adding tasks fasterShow how many tasks I haveAllow images with tasksMake the tasks show their statusLet me sort by due date- Let filter by status
- Add a tab for "completed" tasks
- Filter out "completed" tasks
Edit your View
In the "Filters" section, Add the "Status" field.
Filters can be exposed just like sorts.
Expose this filter, let people choose their status options.

Save your view and BAM! Filter by status. Getting the hang of things?
Todos
Make adding tasks fasterShow how many tasks I haveAllow images with tasksMake the tasks show their statusLet me sort by due dateLet filter by status- Add a tab for "completed" tasks
- Filter out "completed" tasks
Views Displays
You can reuse a configured View to show the same (or very similar) list of content in different ways.
We'll add a display specifically for Completed tasks.
Add a new Page Display
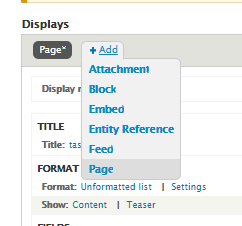
Lots of stuff to setup...
Setting up a new Page display
- Change the Display Name
- Change the Page Title
- Change the Menu Path
- Change the list of content
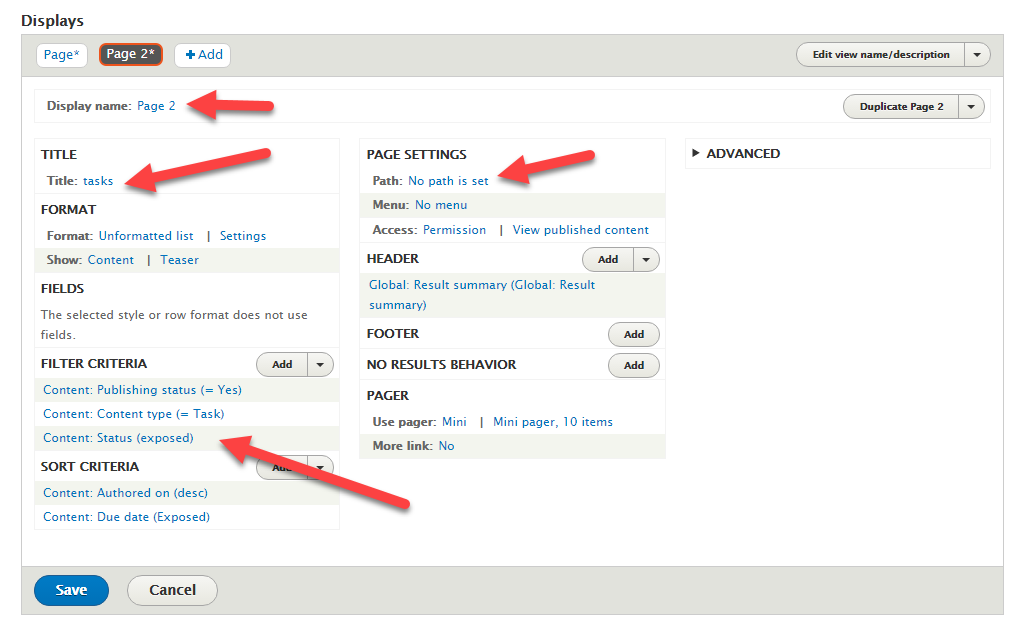
Views Displays
Views displays inherit settings from the default display.
If we want to make changes that only affect this display, we need to make sure we always set...
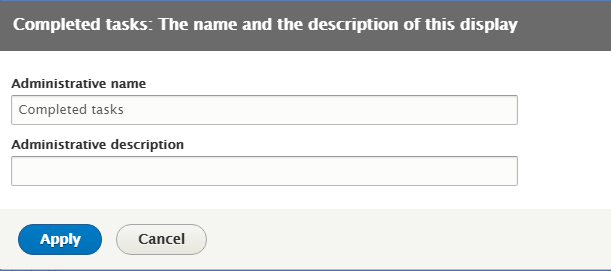
Display Name
The Admin Title is already set for this display, so no button required.
Look for the "Display Name" section.
The Display Name is only used by administrators. Users won't see this.
Title
Now we're getting into overriding settings. Click on the "Title".
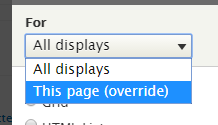
Select "This display
(override)" in the
For select box.
Change the title to "Completed Tasks"
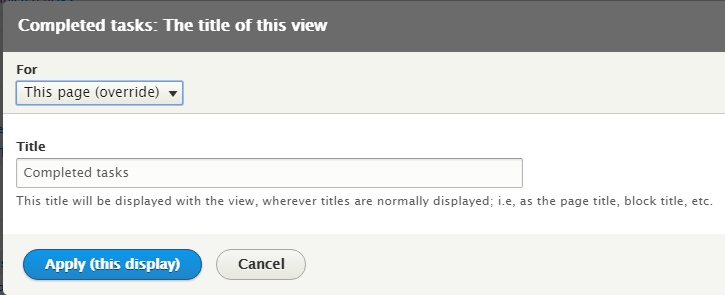
Overridden settings appear italicized
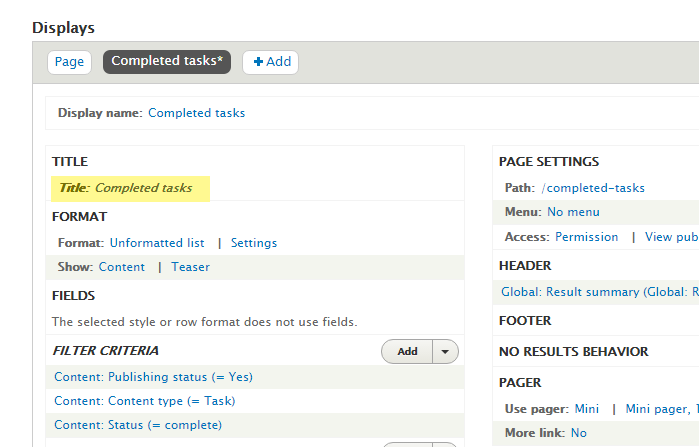
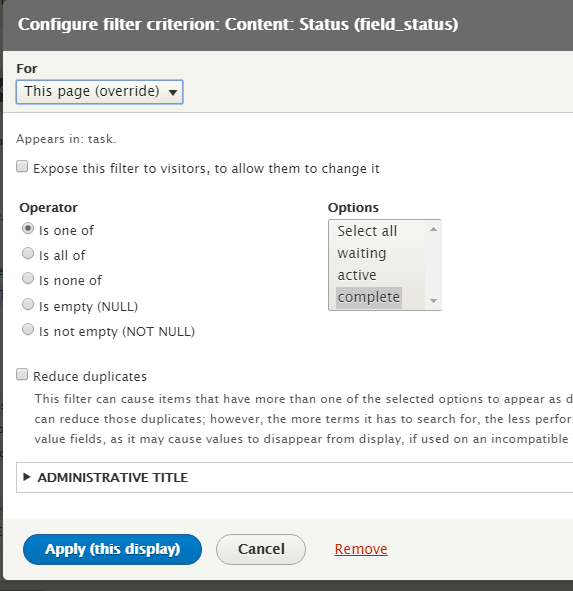
Change the Filter Settings
Instead of exposing the "status" filter, we'll fix it to "completed"
Set to "This page (override)"
Edit the "Status" filter, uncheck "Expose".
Set to "Complete" and "Is one of".
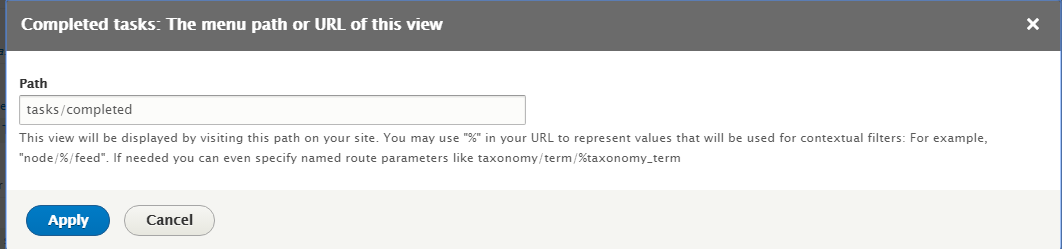
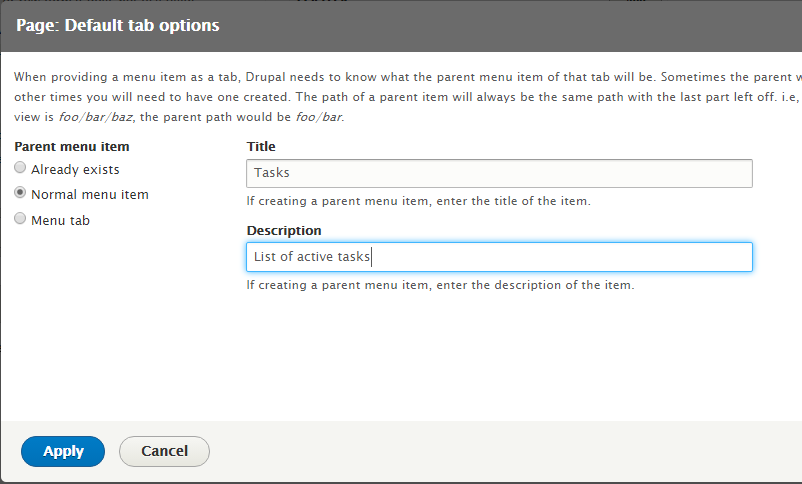
Set the Path
This setting doesn't need to be overridden.
Change the path to "tasks/completed"
Check the Preview at the Bottom. Save if it looks good.
Go to "tasks/completed".
Almost there, but we're missing the tab.
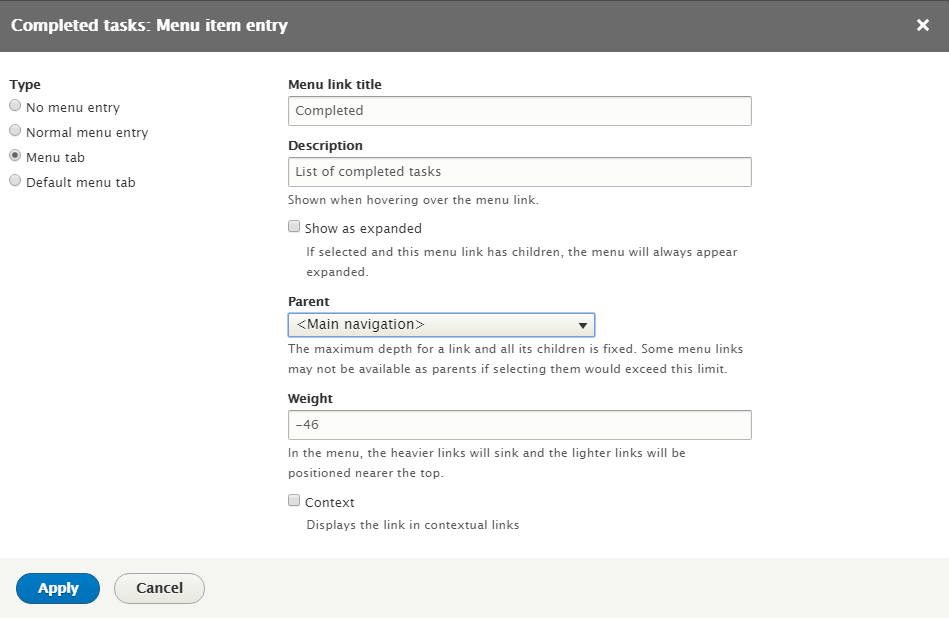
Edit the View, Click on Menu Settings
Select "Menu Tab"
Set the title to "Completed"
Choose "Main Navigation" under "Parent"
One down...
We've setup the "Completed" page to show up as a tab.
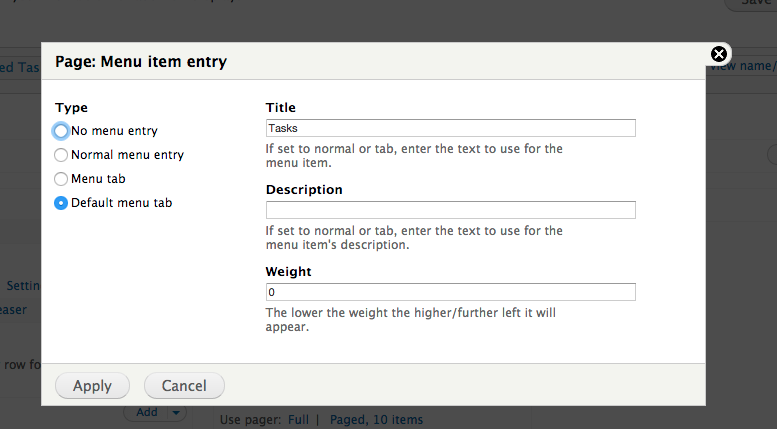
Now we need to change the main "Task" list display as well.
The main task display is our "Default menu tab"
Menus are weird
Drupal's menus are kind of weird. Follow along and don't be afraid to ask questions.
Switch to the Task List Display
Edit Path settings
Change to "tasks/list"
Edit the Menu settings
Change it to "Default Menu Tab"
Set the title to "Tasks"
Set Menu to "Main Menu"
Save and you should have tabs
(It's ok if you don't, menus are weird)
Todos
Make adding tasks fasterShow how many tasks I haveAllow images with tasksMake the tasks show their statusLet me sort by due dateLet filter by statusAdd a tab for "completed" tasks- Filter out "completed" tasks
Quick Review
Added a Views Display
Added menu items
Added filters
Added sorts
Achievement Unlocked
Wizard with Views
Bonus Round
Not for the
Faint hearted
Configuration
Let's go over the Drupal configuration pages
Account settings
Content Authoring
Media
Search and Metadata
Regional and Language
System
User Interface
Development
Web Services
People, Roles and Permissions
Reports
Structure
Content
Appearance
Modules
What about other users?
You can create more user accounts.
Better yet, share a link to your site with a course mate. Have them create an account.
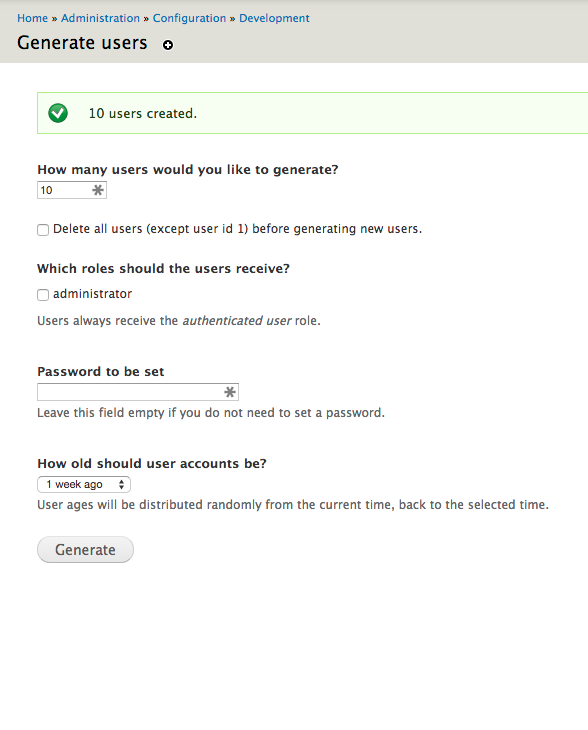
Generate Users
If you don't have anyone to sign up or share you site with, we can generate some users.
Generate Content
If you don't want to have to continue to create new tasks, we can have Drupal generate some dummy content.
Enable "Devel Generate"
This module is strictly a development tool.
But it's super handy.
Configuration then Generate Users
Choose how many to create
Pretty simple list of options.
Create 10 users.
Generate Content
Similarly, you can generate content under the Configuration page.
Typically, you always want to generate users first since content needs a user, but a user doesn't need content.
questions?
Thanks !
kath@alakasam.ca
Learning drupal
Thanks to Mathew Winstone
Coldfront Labs
for the original presentation using
Drupal 7 (when it was a lot harder
to do a lot of these things).
DrupalNorth
June 16-19
Concordia University, Montreal
http://drupalnorth.org
DrupalCamp Ottawa
July 22 at U of O
http://drupalcampottawa.com
check out other classes

http://ladieslearningcode.com