Intro to GitHub / Git
What we'll cover...
- Introduction to GitHub
- Basic GitHub workflows
- Introduction to Git
- Basic Git commands & workflow
- Useful Git & GitHub resources
What is Git?
- System for distributed, decentralized version control
- Facilitates collaboration and non-linear development
- Each "clone" repository is complete - full history, logs, etc.
- Every "clone" is a backup
- Can access via command line or GUI
Distributed version control?
- Compare changes to files over time.
- Keep a backup of earlier versions of files.
- Revert to earlier versions of files.
- Safely experiment.
Version control systems track changes to a file or files over time. This means you can:
Decentralized...
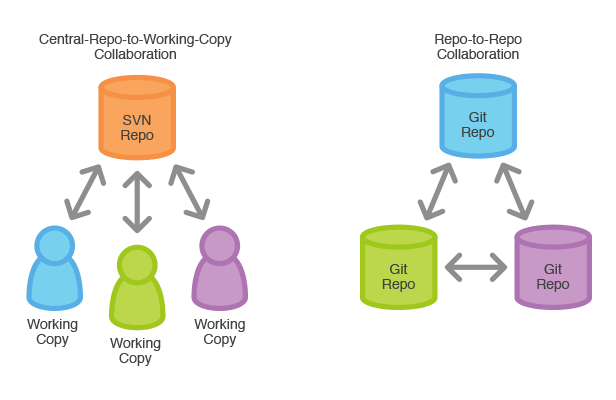
Decentralized...
Understanding Git
Repository
- The data structure Git uses to record everything
- Stored in the same directory as the project itself, in a hidden .git subdirectory
- Once a repository is initialized, Git will track all changes in the project directory
Also called a 'repo'
Commit
- The files themselves
- The directory structure
- A commit object (the tree, the parent commit hash, the author and date of the commit, the commit message)
- A SHA key - a 40 character string that uniquely identifies the commit.
A snapshot of the state of a project at a point in time. It includes:
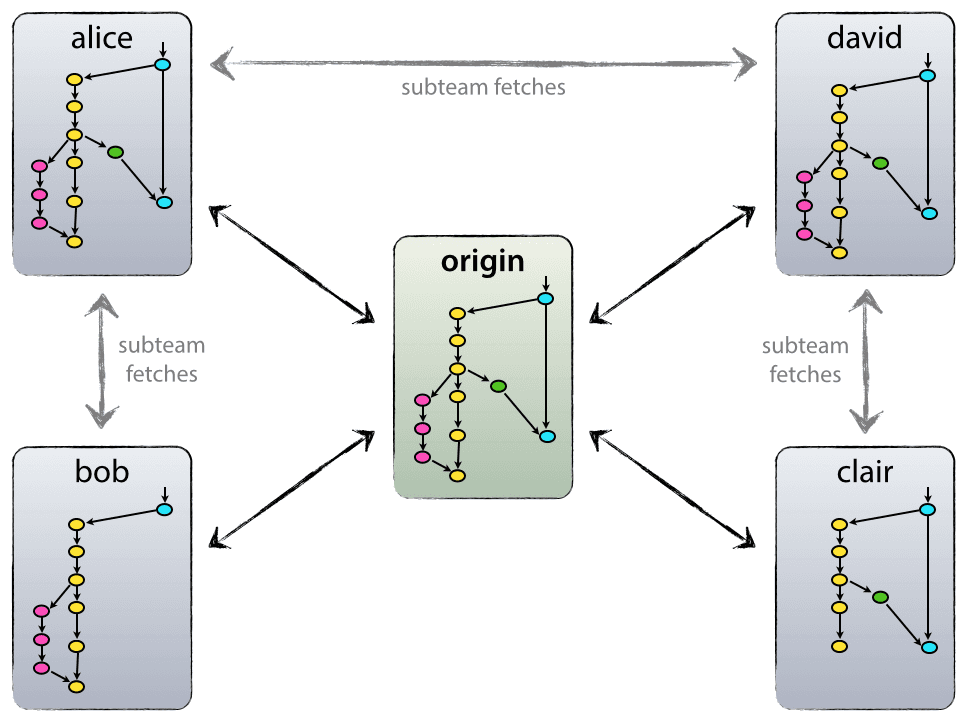
Remote
Collaborating with others (and managing your own code/files on GitHub) involves managing these remote repositories - 'pushing' and 'pulling' code from your machine to and from these remotes.
A remote repository, or 'remote', is a version of your project stored on the internet, or a network, or anywhere other than your machine, to which your local repo is linked. This remote repository is often named 'origin.'
Three Git States
- Modified: You've made changes to files or the directory, but haven't staged them yet.
- Staged: Git takes a snapshot of the modified files and places them in a 'staging area' to be included in the next commit.
- Committed: Git takes the snapshots of the files in the staging area and commits them to the repository.
Working spaces...
Remote
Local
Upstream
Repository
Local
Repository
Index
(Staging)
Workspace
Stash
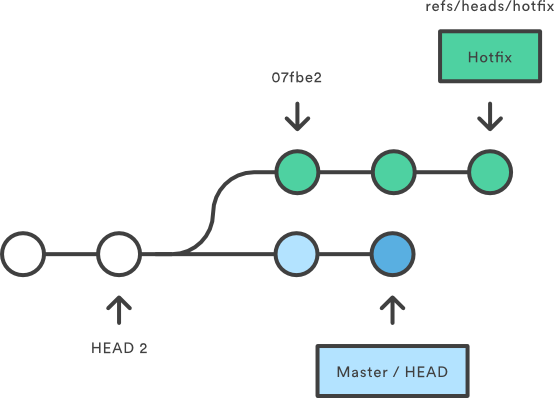
Working with branches is good! Branches allow you to work away from the main line of development.
Branches

GitHub...
- Cloud-based git repository hosting service
- Free for public repositories
- Features: documentation, bug tracking, task management and other collaboration tools
- GitHub Pages for hosting web content
Create repository
It's easy to create a new repo in GitHub. There are two options:
Create a new project in GitHub
~ OR ~
Create a new repo in GitHub as the remote for an existing local project
Fork an existing repo
Forking a repo results in a clone of someone else's repo in your GitHub account. The two remain connected, so you can pull from 'upstream' or send 'pull requests' to the upstream repo.
Origin
Your 'fork' of the original repository. A clone of the original repository that lives on GitHub.
Upstream
The original repository (if applicable)
The local repository on your computer will often have (at least) two remotes: an origin and an upstream.
Pull request
Pull requests send a message to the 'upstream' asking to merge changes from your repo into theirs. This give the repo owner control over what changes will be accepted, while allowing others to contribute.
Hands-on with GitHub (1):
Create a new repository
- Login to GitHub: https://github.com
- Click the green "New repository" button --or-- click the "+" on the top, right corner of the GitHub page and select "New repository"
- Give your new repo a name (and description if you want)
- Public or private?
- Initialize with a README, add license...
- Click "Create repository"
- Now you have a new GitHub repository!
Exploring the repo interface
- Breadcrumbs
- Tabs (Code, Issues, Pull requests, Wiki, Settings)
- Stats (commits, branches, releases, contributors)
- Branch
- File browser
- README.md
Hands-on with GitHub (2):
Editing/adding content to your new repo
- Edit the README.md file
- Click on the README.md file. This gives us a preview of our file.
- To edit the file, click on the pencil icon in the top, right corner of the file
- Now we can edit our file. ".md" files are Markdown files, a simple markup language for formatting text.
- When you are done editing, scroll to the bottom and click on the green "Commit changes" button
- Now let's add a new file to the repo
- Go back to your repo "home", then click the "Create new file" button
- We get the edit view again, but this time we need to give our file a name first
- Edit your file and commit your changes
- Now let's add a folder
- Where's the Create new folder button?!
- There isn't one - but we can create a folder by prepending the filename with a folder + "/" while we are in edit mode :)
GitHub use cases
- Versioning & collaborating on code
- Repository to share datasets and accompanying info
- Collaborative, community, crowd-sourced projects/documentation
- Classroom or workshop materials
- GitHub Pages for publishing scholarly/personal webpages and web-based projects
- GitBook
GitHub Pages
- Host web pages in GitHub (HTML5, Jekyll, etc.)
- Development and hosting in one location
- Can use own domain
- Just place web files in the master branch, in a /docs folder in the master branch, or in a branch named 'gh-pages'
Hands-on with GitHub (3):
A simple website with GitHub Pages
- Go to the top-level of your GitHub repo and create a new folder/file called "docs/index.html"
- Add some html to the new file, something like this, then commit your changes
- Now go to your repo "Settings" tab
- Scroll down until you reach the GitHub Pages section
- Under Source, choose the "master branch /docs folder" option, and click on the Save button
- You should see a blue box with the text "Your site is ready to be published at..." + a URL - you'll want to refresh the page until the box is green and says "Your site is published at..."
- Click on the URL and see your new webpage!
Hands-on with GitHub (4):
Collaborating, Forking, Merging
- Time to partner up! Choose who will be Partner1 and Partner2
- Partner1: Share your repo URL with Partner2
- Partner2: Fork Partner1's repo using the "Fork" button - you'll see an animation of GitHub copying your partner's repo into your account
- Partner2: You now have a copy of Partner1's repo - make a few changes (add files, edit files, etc.)
- Partner2: Once you've committed all your edits, submit a Pull request - this will send a request to Partner1 to merge your edits into their repo
- Partner1: Check the Pull requests tab in your repo and open the request (just click on it)
- Partner1: View the edits and accept or close the pull request
- Now switch roles and repeat :)
Let's learn some Git commands!
git init
Initialize a new local git repository
$ git init starfish
Initialized empty Git repository in /Users/kirschbombe/Sites/
starfish/.git/
$
git add
Add a file to the staging area
$ git add rays.txt

OR

$ git add .
git commit
Add files from the staging area to your local repository
$ git commit -m "add rays.txt"
[master (root-commit) f9d6e54] add rays.txt
 1 file changed, 0 insertions(+), 0 deletions(-)
 create mode 100644 rays.txt
$
git status
Shows the current status of your repository files (unstaged & staged)
$ git status
On branch master

Initial commit

Changes to be committed:
  (use "git rm --cached <file>..." to unstage)

	new file:   rays.txt

Untracked files:
  (use "git add <file>..." to include in what will be committed)

	test.txt

$
rm & mv
$ git rm my-first-file
rm 'my-first-file'

$ git status
On branch my-new-feature
Changes to be committed:
  (use "git reset HEAD <file>..." to unstage)

	deleted:    my-first-file
$ git mv my-first-file other-name
$ git status
On branch my-new-feature
Changes to be committed:
(use "git reset HEAD <file>..." to unstage)
renamed: my-first-file -> other-name$ git log
commit 5e31a9080c7f0a9b0390cd7dd2aa8e59a28a7328
Author: Yves Laroche <yves.laroche@logicnow.com>
Date: Tue Feb 2 20:02:08 2016 +0000
My first commit
# Short
$ git log --oneline
5e31a90 My first commit
# Limit number of commits
$ git log -10
$ git log --since=1.week
$ git log --after='2016-01-10'git log
History of commits sent to the repository
$ cat starfish/.gitignore
# Ignore modules, themes, vendors
/core
/modules
/themes
/vendor

# Ignore config files
sites/*/settings*.php
sites/*/services*.yml

# Ignora private files
sites/*/files
sites/*/private
.gitignore
Files that git should ignore
Git workflow
Hands-on with Git (1): A new Git repo
- Make sure you are not in a git repo: git status
- Initialize a git repo: git init [repo_name]
or you can create/navigate to an existing directory and invoke git init from inside - Add files, delete files, edit files
- Stage your changes: git add . or git add [filename]
- Commit your changes: git commit -m "commit message"
- Repeat 3-5
- View your commit history: git log
Remote repositories
Remotes
- Remote repo that is synched with our local repo
- Necessary for working collaboratively
- Push/pull the data from the remote repo to the local repo
Local
Remote (origin)
pull
push
Remember the working spaces...
Remote
Local
Upstream
Repository
Local
Repository
Index
(Staging)
Workspace
Stash
git clone
Create a copy of a git repo
$ git clone git@git.bcash.com.br/bcash/api.git
git push
Push commits from local repo to remote repo

$ git push origin mastergit fetch
Downloads the objects and refs (branches & tags) from the remote to the local repo
Fetch does not merge the new commits from the remote.
$ git fetch origingit pull
Imports remote commits to local repo and merges into working directory
$ git pullgit pull is the same as:
$ git fetch origin
$ git merge
git push
Push commits from local repo to the remote
$ git push origin mastergit remote
Specifies a remote for your local repo to track.
$ git remote add origin https://github.com/kirschbombe/flaneur.gitWith the -v argument, it will show a list of existing remotes and their URL.
$ git remote -v
origin	https://github.com/kirschbombe/flaneur (fetch)
origin	https://github.com/kirschbombe/flaneur (push)
$
Hands-on with Git (2): Cloning a repo
- In your Terminal, navigate back to your Desktop or user folder (and make sure you are not in a git repo with
git status) - From GitHub, copy the URL of your GitHub repo
- Back in your Terminal, clone the repo:
git clone [url_from_github] - Add/modify some files, stage, & commit
- Let's push our changes to our GitHub repository:
git push origin master - Let's see what's happened in GitHub...
- Make a new change in GitHub, then a new change in our local repo
- Push the local changes to GitHub. What happens?
Hint: We'll need to pull the changes from GitHub before we push...
Working with branches
git branch
List, create, name, and delete branches.
$ git branch developCreate a new branch named develop
$ git branch
  develop
* master
List all branches
git checkout
Switch to another branch, like the one we just created using git branch
$ git checkout develop
Switched to branch 'develop'

$
git checkout -b
Create and switch to a new branch.
$ git checkout -b feature
Switched to a new branch 'feature'
$
The same as git branch feature + git checkout feature
git merge
Merge one branch into another
$ git checkout masterTo merge the branch "feature" into the branch "master":
$ git merge --no-ff featureHands-on with Git (3): Branches
- Check to see which branch you are on: git status
- List all branches: git branch
- Create a new branch: git branch [new_branch]
- List your branches again
- Switch to your new branch: git checkout
- Make some changes in your new branch and commit
- Switch back to branch master: git checkout master
- Let's take a look at our files and folders - see how the file system reflects your current branch?
- Merge changes from your new branch into master: git merge [new_branch]
Resources
- GitKraken (GUI)
- SourceTree (GUI)
- Git Cheatsheet (great visual cheatsheet)
- Git documentation (official docs)
- Getting Git Right (lots of specific tutorials)
- Learn Git Branching (interactive tutorial)
- GitFlow (method of working with git)
Questions?
dchildress@library.ucla.edu
@kirschbombe