JEST
& with cocos creator
範例程式碼都可以在 github 找到
Hello world
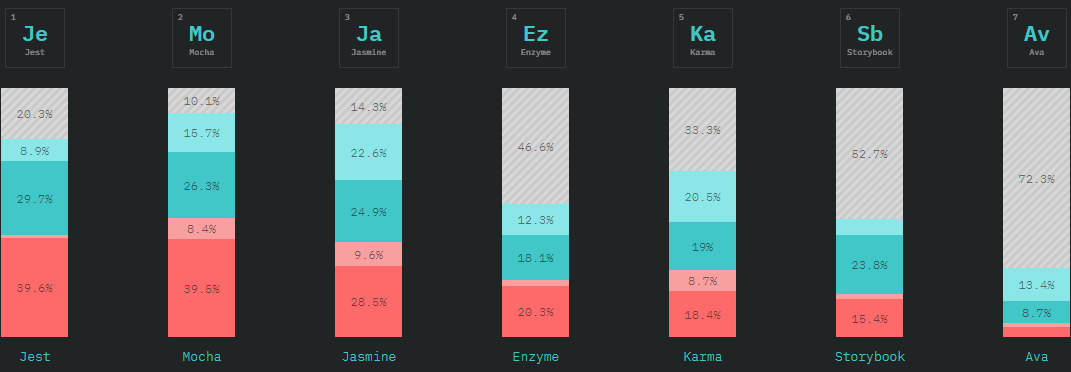

Overall Happiness
TL;DR; Use Jest for unit and integration tests and TestCafe for UI tests.
* In short, if you want to “just get started” or are looking for a fast framework for large projects, you can’t go wrong with Jest.
* If you want a very flexible and extendable configuration, go with Mocha.
* If you are looking for simplicity go with Ava.
* If you want to be really low-level, go with tape.
WHEN YOU HAVE UNIT BUT NO INTEGRATION TESTS
Getting start
npm init -ynpm i jestnpx jest --init產生 package.json
安裝 jest
產生 jest.config.js
Would you like to use Jest when running "test" script in "package.json"? » yes
> npm test 執行測試

Choose the test environment that will be used for testing » node
> jest 執行的環境, jsdom 是在 node 中模擬瀏覽器環境

Do you want Jest to add coverage reports? no
> 不要自動產生測試報告 (html) 要用再打命令去產生

Automatically clear mock calls and instances between every test? yes
> 自動清除 mock
src/ 程式碼放這
建立兩個資料夾
function add(a, b){
  return a + b;
}

export default add
import add from '../src/add';
describe('testing my function', ()=>{
test('2+3', ()=> {
expect(add(2, 3)).toBe(5);
});
it('3+3', ()=> {
expect(add(3, 3)).toBe(6);
});
});test/ 測試放這
jest 中 describe 包裹一組測試
測例可以用 it 或 test
expect(expression).toBe(value);
預期 expression === value
執行測試
npx jestnpm test透過 NPM scripts 執行或是 npx
    SyntaxError: Unexpected token {

      at ScriptTransformer._transformAndBuildScript (node_modules/@jest/transform/build/ScriptTransformer.js:471:17)
      at ScriptTransformer.transform (node_modules/@jest/transform/build/ScriptTransformer.js:513:25)
因為使用了 ES6 module,要再設定 babel
npm i babel-jest @babel/core @babel/preset-env如果你是用 commonJs (require, module.exports) 可以跳過這頁
module.exports = {
    presets: [
        [
            '@babel/preset-env',
            {
                targets: {
                    node: 'current',
                },
            },
        ],
    ],
}
建立 babel.config.js
這邊告訴 babel 把程式碼轉成目前使用的 nodeJs 支援的版本
執行測試
> npm test
 PASS  test/add.test.js
  testing my function
    √ 2+3 (2ms)
    √ 3+3 (1ms)

Test Suites: 1 passed, 1 total
Tests:       2 passed, 2 total
Snapshots:   0 total
Time:        1.323s, estimated 2s
Ran all test suites.
一組 (Test Suites)測試通過
測試時間
兩個 test case
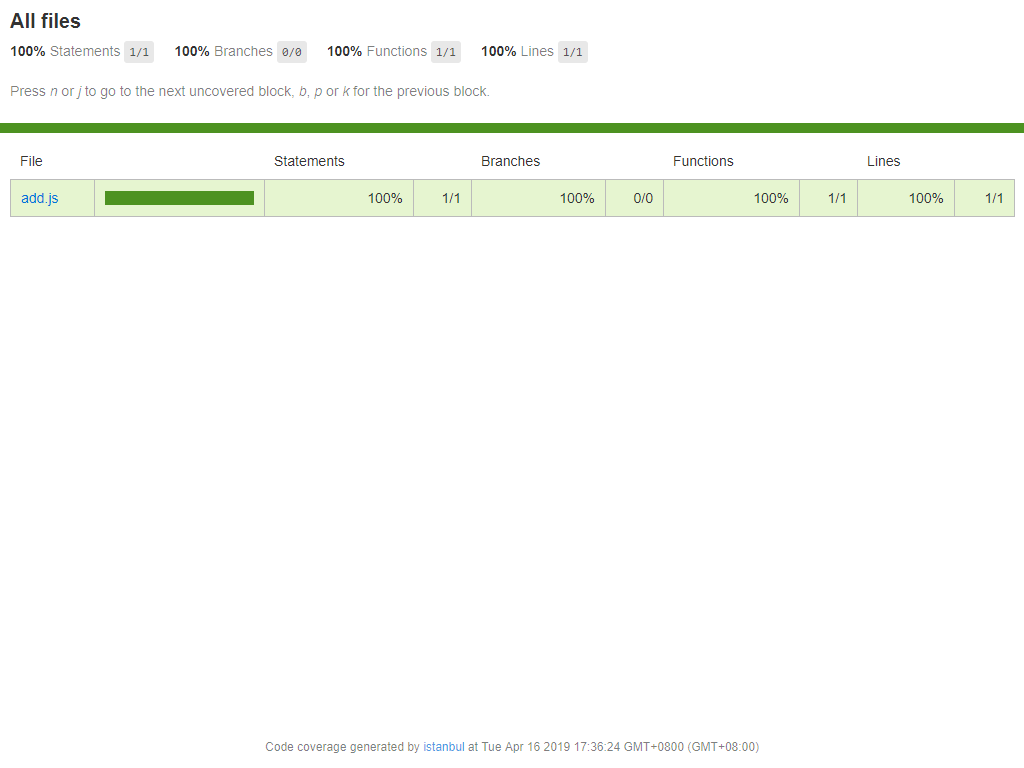
產生測試報告
> npx jest --coverage
 PASS  test/add.test.js
  testing my function
    √ 2+3 (3ms)
    √ 3+3

----------|----------|----------|----------|----------|-------------------|
File      |  % Stmts | % Branch |  % Funcs |  % Lines | Uncovered Line #s |
----------|----------|----------|----------|----------|-------------------|
All files |      100 |      100 |      100 |      100 |                   |
 add.js   |      100 |      100 |      100 |      100 |                   |
----------|----------|----------|----------|----------|-------------------|
Test Suites: 1 passed, 1 total
Tests:       2 passed, 2 total
Snapshots:   0 total
Time:        1.386s, estimated 2s
Ran all test suites.
你可以在 jest.config.js 設定自動產生報告
但會造成測試變慢,建議要產生時再帶命令
npx jest --coverage{
collectCoverage: true,
// ...
}coverage/lcov-report/index.html
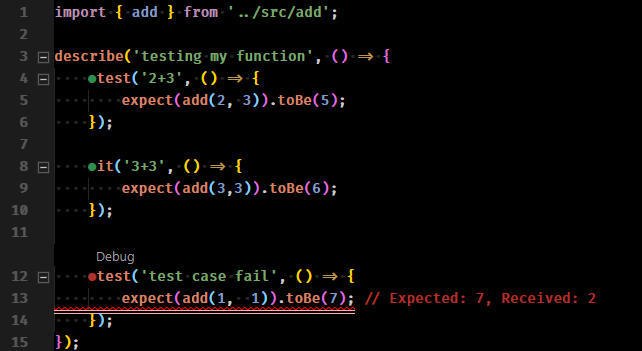
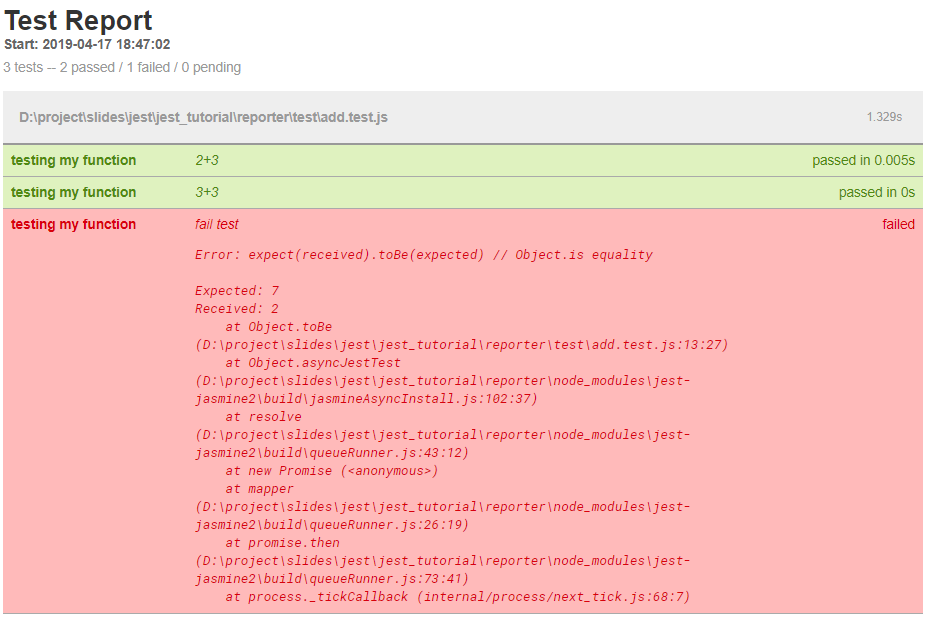
看看失敗的測試失敗的結果
describe('testing my function', () => {
    // ...

    test('test case fail', () => {
        expect(add(1, 1)).toBe(7);
    });
});
expect(2).toBe(7)
> npx jest --coverage
 FAIL  test/add.test.js
  testing my function
    √ 2+3 (2ms)
    √ 3+3
    × test case fail (2ms)

  ● testing my function › test case fail

    expect(received).toBe(expected) // Object.is equality

    Expected: 7
    Received: 2

      11 |
      12 |     test('test case fail', () => {
    > 13 |         expect(add(1,  1)).toBe(7);
         |                            ^
      14 |     });
      15 | });

      at Object.toBe (test/add.test.js:13:28)

----------|----------|----------|----------|----------|-------------------|
File      |  % Stmts | % Branch |  % Funcs |  % Lines | Uncovered Line #s |
----------|----------|----------|----------|----------|-------------------|
All files |      100 |      100 |      100 |      100 |                   |
 add.js   |      100 |      100 |      100 |      100 |                   |
----------|----------|----------|----------|----------|-------------------|
Test Suites: 1 failed, 1 total
Tests:       1 failed, 2 passed, 3 total
Snapshots:   0 total
Time:        1.259s, estimated 2s
Rxpected: 7
Received: 2
VSCode plugins
對檔案案右鍵在預設瀏覽器中開啟
你會常用到這個
這些插件都推薦安裝
功能類似,但幫你開了 http server
根據設定檔掃描測試案例,背景自動執行測試
遇到錯誤會直接顯示在程式碼旁邊
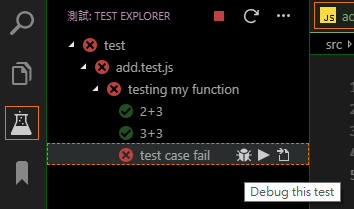
掃描你的測試案例列成清單,讓你方便手動點選測試,另外還能免設定下中斷點,也可以設定自動測試
有依賴套件,看說明

綠圈代表測試通過
紅圈代表失敗,旁邊有原因
空心綠圈代表還沒測試
狀態列也會提示
直接下中斷點 debug
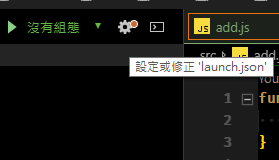
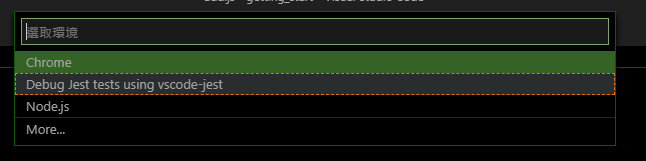
debug 設定
點左上角新增組態
選 Debug Jest tests using vscode-jest
設定斷點後按 F5 偵錯
Matchers
Common Matchers
test('two plus two is four', ()=>{
    expect(2 + 2).toBe(4);
});
.toBe() test a value is with exact equality same as (===)
test('typeof string', ()=>{
    expect(typeof "test").toBe('string');
});
比較資料相等
Common Matchers
.toBe() test a value is with exact equality same as (===)
test('fail to check object', ()=>{
    // test fail
    expect({}).toBe({});
});

>
Expected: {}
Received: {}

  Difference:

  Compared values have no visual difference. Note that you are testing for equality with the stricter `toBe` matcher using `Object.is`. For deep equality only, use `toEqual` instead.
toBe() 是 deep equal
Common Matchers
.toEqual() recursively checks every field of an object or array.
test('object assignment', () => {
  const data = {one: 1};
  data['two'] = 2;
  expect(data).toEqual({one: 1, two: 2});
});
.toEqual() 檢查物件內的 value
test('check array data', () => {
    const ary = [{foo:1}, 2, {bar:3}];

    expect(ary)
      .toEqual([{foo:1}, 2, {bar:3}]);
});
Common Matchers
.not test for the opposite of a matcher
test('2 not equal 3', () => {
    expect(2).not.toBe(3);
});
Truthiness
test('null', () => {
  const n = null;

  expect(n).toBeNull();

  expect(n).toBeDefined();

  expect(n).not.toBeUndefined();

  expect(n).not.toBeTruthy();

  expect(n).toBeFalsy();
});
檢查 undefined, null, false
Numbers
test('test my number', () => {
  const value = 2 + 2;

  expect(value).toBeGreaterThan(3); // >
  expect(value).toBeGreaterThanOrEqual(3.5); // >=
  expect(value).toBeLessThan(5); // <
  expect(value).toBeLessThanOrEqual(4.5); // <=

  // toBe and toEqual are equivalent for numbers
  expect(value).toBe(4);
  expect(value).toEqual(4);
});
String
test('there is no I in team', () => {
    expect('team').not.toMatch(/I/);
});

// 也可以用直接用字串,會檢查子字串
test('there is a "team" in steam', () => {
    expect('steam').toMatch('team');
});

test('match Regex rule', () => {
    expect('abc.jsx').toMatch(/.*[.]js$/);
});
Array
const shoppingList = [
    'diapers',
    'paper towels',
    'beer',
];

test('the shopping list has beer on it', () => {
    expect(shoppingList).toContain('beer');
});
check if an array contains a particular item using .toContain()
Exceptions
If you want to test that a particular function throws an error when it's called, use .toThrow()
function numberFixed(n, digits) {
    n.toFixed(digits);
}

test('RangeError', () => {
    const PI = 3.14159;

    // RangeError: toFixed() digits argument must be between 0 and 100
    expect(() => numberFixed(PI, 100000)).toThrow();
});
Exceptions
class ConfigError extends Error {
    constructor() {
        super();
        this.message = 'you are using the wrong JDK';
    }
}

function compileAndroidCode() {
    throw new ConfigError;
}

test('compiling android goes as expected', () => {
    expect(compileAndroidCode).toThrow();
    expect(compileAndroidCode).toThrow(ConfigError);

    // You can also use the exact error message or a regexp
    expect(compileAndroidCode).toThrow('you are using the wrong JDK');
    expect(compileAndroidCode).toThrow(/JDK/);
});Matchers
Testing Asynchronous Code
Callbacks
function fetchData(cb) {
    setTimeout(() => {
        cb('peanut butter');
    }, 1000);
}

test('the data is peanut butter', done => {
    function callback(data) {
        expect(data).toBe('peanut butter');
        done();
    }

    fetchData(callback);
});
假設你有一個取資料的 fetchData()
接受一個 callback 參數帶回資料
要呼叫 jest 傳進來的 done()
If done() is never called, the test will fail.
Promise
function fetchData() {
    return new Promise((resolve, reject) => {
        setTimeout(() => {
            resolve('peanut butter');
        }, 1000);
    });
}

test('the data is peanut butter', () => {
    return fetchData().then(data => {
        expect(data).toBe('peanut butter');
    });
});
只要測試案例回傳 Promise
JEST就會等它完成
(5000ms timeout)
如果你忘記加 return 會導致這個測試案例直接成功
Promise
function fetchData() {
  return new Promise((resolve, reject) => {
      setTimeout(() => {
          reject('peanut butter not enough');
      }, 1000);
  });
}

test('the data is peanut butter', () => {
  expect.assertions(1);

  return fetchData().catch(e =>
      expect(e)
        .toMatch('peanut butter not enough')
  );
});
用 .catch 測試 Promise 被 reject
記得添加 expect.assertions() 來驗證 expect 發生次數
因為 fulfilled 狀態的 Promise 並不會導致測試失敗
Async / Await
function fetchData() {
    return new Promise((resolve, reject) => {
        setTimeout(() => {
            resolve('peanut butter');
        }, 1000);
    });
}

test('the data is peanut butter', async () => {
    expect.assertions(1);
    const data = await fetchData();
    expect(data).toBe('peanut butter');
});
test case 裡面加上 async
別忘了 expect.assertions()
Async / Await
function fetchData() {
    return new Promise((resolve, reject) => {
        setTimeout(() => {
            reject('peanut butter not enough');
        }, 1000);
    });
}

test('fetch fails with an error', async () => {
    expect.assertions(1);
    try {
        await fetchData();
    } catch (e) {
        expect(e).toMatch('not enough');
    }
});
try cache 捕捉 reject
Setup and Teardown
在你的一組測試 (describe) 或單個測試 (test) 開始與結束時執行指定的程式碼,用來建立測試資料或重設
觸發順序: beforeAll -> beforeEach -> afterEach -> afterAll
describe('beforeEach', () => {
    const data = {};
    beforeEach(() => {
        data.describe = 'beforeEach';
    });

    afterEach(() => {
        console.log('afterEach, data.describe = %s', data.describe);
    });

    test('test 1', () => {
        console.log('test1 data: %s', data.describe);
    });

    test('test 2', () => {
        console.log('test2 data: %s', data.describe);
        data.describe = 'change from test2';
    });
});
console.log test/teardown.test.js:12
test1 data: beforeEach
console.log test/teardown.test.js:8
afterEach, data.describe = beforeEach
console.log test/teardown.test.js:15
test2 data: beforeEach
console.log test/teardown.test.js:8
afterEach, data.describe = change from test2const data = {};
beforeAll(() => {
return new Promise((resolve, reject) => {
setTimeout(() => {
data.describe = 'async setup';
resolve();
}, 1000);
});
});
test('test 1', () => {
expect(data.describe).toBe('async setup');
});teardown 也可以異步執行
最後 return Promise 或是使用 async/await
TearDown Scoping
如果 before、after 寫在 describe 裡
它就只會影響它所在的 describe block
beforeAll(() => console.log('1 - beforeAll'));
afterAll(() => console.log('1 - afterAll'));
beforeEach(() => console.log('1 - beforeEach'));
afterEach(() => console.log('1 - afterEach'));
test('', () => console.log('1 - test'));
describe('Scoped / Nested block', () => {
  beforeAll(() => console.log('2 - beforeAll'));
  afterAll(() => console.log('2 - afterAll'));
  beforeEach(() => console.log('2 - beforeEach'));
  afterEach(() => console.log('2 - afterEach'));
  test('', () => console.log('2 - test'));
});

// 1 - beforeAll
// 1 - beforeEach
// 1 - test
// 1 - afterEach
// 2 - beforeAll
// 1 - beforeEach
// 2 - beforeEach
// 2 - test
// 2 - afterEach
// 1 - afterEach
// 2 - afterAll
// 1 - afterAll
Timeout
jest 預設的 timeout 時間是 5 秒,任何測試超過這個時間就算失敗
你可以透過 jest.setTimeout() 修改時間或是 test case 指定允許的等待時間
function fn() {
  return new Promise((resolve, reject) => {
      setTimeout(() => {
          resolve('end');
      }, 6000);
  });
}

test('case1', async() => {
  const data = await fn();
  expect(data).toBe('end');
});
> npx jest

 FAIL  test/timeout.test.js (6.228s)
  timeout
    × case1 (5001ms)

  ● timeout › case1

    Timeout - Async callback was not invoked within the 5000ms timeout specified by jest.setTimeout.Error:
delay 6 秒
Timeout
jest 預設的 timeout 時間是 5 秒,任何測試超過這個時間就算失敗
你可以透過 jest.setTimeout() 修改時間或是 test case 指定允許的等待時間
function fn() {
    return new Promise((resolve, reject) => {
        setTimeout(() => {
            resolve('end');
        }, 6000);
    });
}

test('case1', async () => {
    const data = await fn();
    expect(data).toBe('end');
}, 10000);
允許執行最多 10 秒
>npx jest

 allow timeout
    √ case1 (6002ms)
Timeout
jest 預設的 timeout 時間是 5 秒,任何測試超過這個時間就算失敗
你可以透過 jest.setTimeout() 修改時間或是 test case 指定允許的等待時間
beforeAll(() => {
    jest.setTimeout(10000);
});

function fn() {
    return new Promise((resolve, reject) => {
        setTimeout(() => {
            resolve('end');
        }, 6000);
    });
}

test('case1', async () => {
    const data = await fn();
    expect(data).toBe('end');
});
允許執行最多 10 秒
>npx jest

 allow timeout
    √ case1 (6002ms)
Fake Timer
當你不想等原生 timer (etTimeout,setInterval,clearTimeout,clearInterval) 時間到才觸發你的程式碼,就會用到 jest.useFakeTimers();
function timer(cb) {
    console.log('timer start.');
    setTimeout(() => {
        console.log('timer stop');
        return cb && cb('end');
    }, 6000);
}
export { timer };
import { timer } from '../src/timer';
jest.useFakeTimers();
test('timer will end after 1 sec.', () => {
timer();
expect(setTimeout).toBeCalledTimes(1);
expect(setTimeout).lastCalledWith(expect.any(Function), 6000);
});Fake Timer
當你不想等原生 timer (etTimeout,setInterval,clearTimeout,clearInterval) 時間到才觸發你的程式碼,就會用到 jest.useFakeTimers();
function timer(cb) {
    console.log('timer start.');
    setTimeout(() => {
        console.log('timer stop');
        return cb && cb('end');
    }, 6000);
}
export { timer };
test('test callback', () => {
const cb = jest.fn();
timer(cb);
expect(setTimeout).toBeCalledTimes(1);
jest.advanceTimersByTime(6000);
// same as cb .toHaveBeenCalledWith('end')
expect(cb.mock.calls[0][0]).toBe('end');
});Skip test
有時候你只想處理有問題的測試,而不要再跑一次通過的測試,或是跳過某幾隻測試
可以使用 only 或 skip
describe.only('only test this', ()=>{
  // ...
})

describe('other test', ()=>{
  // ... will be skip
})
describe('foo', ()=>{
  // be testing
})

describe.skip('bar', ()=>{
  // will be skip
})
其它還有 test.only 、 test.skip 等等,你可以到 jest api 觀看更多範例
ESlint
前面提到測試可以寫 it, test,還有 skip 跳過測試案例,可以在 linter 中設定規範
npm i eslint-plugin-jest -D安裝
連同 EsLint 一起安裝
npm i eslint-plugin-jest eslint-config-airbnb-base eslint-plugin-import eslint -DESlint
module.exports = {
  extends:[
    // ...
    // 直接使用建議設定
    'plugin:jest/recommended',
  ],
  plugins: ['jest'],
  overrides: [
    {
      env: {
        jest: true
      },
      // 指定到你的測試檔案目錄
      files: ['test/**/*.js'],
      rules: {
        'func-names': 0,
        'import/extensions': [0, 'always'],
        // 測試可以用 `it` 或 `test` 開頭,指定用 `test`
        'jest/consistent-test-it': [2, {'fn': 'test'}],
        // 強制你的測試裡面一定要寫 expect,避免漏寫
        'jest/expect-expect': 2,
        'jest/lowercase-name': 2,
      },
      globals: {
        page: true,
        browser: true,
        context: true.
        jestPuppeteer: true,
        '__require': true,
      }
    }
  ]
}
.eslintrc.js:
- 限定用 it
- 禁止 skip
- 強制要寫 expect
- describe 描述內容首字小寫
Generate Report
預設情況下 Jest 不會產生報告,要手動增加 --coverage 參數
// jest.config.json
{
  coverageDirectory: 'path'
}
預設路徑
npx jest --coverage --no-cache如果產生報告遇到錯誤可以試試 --no-cache

{
  // 收集目錄
  collectCoverageFrom: ['<rootDir>/src/**/*.js'],

  // 測試覆蓋率通過閥值,預設為空
  // 可設定整體與指定目錄
  coverageThreshold: {
    global: {
      branches: 95,
      functions: 95,
      lines: 95,
      statements: 95,
    },
    './src/reducers/**/*.js': {
      branches: 90,
    }
}
預設情況下 Jest 只會在命令列 (console) 顯示這次測試的結果
而覆蓋率(coverage)報告 就算有錯誤也會產生
npm i jest-html-reporter -D需要另外安裝 reporter 來產生結果 html 報告 jest-html-reporter
module.exports = {
  // ...
  reporters: [
    'default',
    ['./node_modules/jest-html-reporter', {
        pageTitle: 'Test Report',
        includeFailureMsg: true,
        outputPath: 'coverage/report/test-report.html'
        // includeConsoleLog: true,
    }]
  ],
}
jest.config.json:
Mocks
Mocks 主要的目的是產生假的接口,讓程式測試時不必執行真正的代碼,只要能呼叫或回傳指定值讓你的 test case 可以運作就好,我們不關心這些接口內部實際上是怎麼實做的
- Manual Mocks : 手動撰寫
- Auto Mocks : 在你的 ES6 Class 或是模組被引用(import) 時,自動把它們的 function 做 Mocks
- Timer Mocks : 針對 timer functions 提供一系列的工具,你不必真的等 Timer 執行 100 秒才觸發你的測試程式
這邊僅列出 Mock function 的寫法,其它請見官方範例
假設你寫了一個 forEach 的功能,想要驗證它是否正常:
function forEach(items, callback) {
  for (let index = 0; index < items.length; index++) {
    callback(items[index]);
  }
}
這時候你可以做一個 mock function,來檢查被呼叫的次數與參數是否正確
const mockCallback = jest.fn(x => 42 + x);

test('mock', () => {
  forEach([0, 1], mockCallback);
  // The mock function is called twice
  expect(mockCallback.mock.calls.length).toBe(2);

  // The first argument of the first call to the function was 0
  expect(mockCallback.mock.calls[0][0]).toBe(0);

  // The first argument of the second call to the function was 1
  expect(mockCallback.mock.calls[1][0]).toBe(1);

  //The return value of the first call to the function was 42
  expect(mockCallback.mock.results[0].value).toBe(42);
})
.mock property
所有的 mock function 都會有一個 .mock 屬性,用來檢查每次被呼叫或帶入的參數
你也可以檢查 function 產生的 instance:
const myMock = jest.fn();

const a = new myMock();
const b = {};
const bound = myMock.bind(b);
bound();

console.log(myMock.mock.instances);
// > [ <a>, <b> ]
return values (1/2)
jest.fn() 產生的 mock 可以不帶 callback 或是指定每次的回傳值
const myMock = jest.fn();
console.log(myMock());
// > undefined

myMock
  .mockReturnValueOnce(10)
  .mockReturnValueOnce('x')
  .mockReturnValue(true);

console.log(myMock(), myMock(), myMock(), myMock());
// > 10, 'x', true, true
return values (2/2)
mockImplementation
const myMockFn = jest.fn(() =>  'default')
  .mockImplementationOnce(() =>  'first call')
  .mockImplementationOnce(() =>  'second call');
console.log(myMockFn(), myMockFn(), myMockFn(), myMockFn());
// \> 'first call', 'second call', 'default', 'default'
Testing with Cocos Creator
前面先介紹了 mock 的概念,這邊再列出 creator 怎麼搭配 Jest 來做測試:
- Jest 測試時是在 NodeJs 環境執行的,所以有些瀏覽器的特性無法使用
- creator 在瀏覽器上執行時前會把程式碼做一些處理,preview 時只會針對 module import 的部份做一些包裝,build 則還會透過 Babel 把 ES6 轉成 ES5 。導入為插件的腳本還有 creator plugin 的腳本則不會轉
- Jest 在 NodeJs 中透過 JSDom 模擬瀏覽器 DOM,可以讓我們做一些相關操作 (例如 local storage) , 但注意它沒有實做 CanvasAPI
cc.Class({
    extends: cc.Component,
    properties:{
      //  ...
    }
});
這是一個 component 的程式碼,可以注意到它沒有 export,因為 creator 在編譯時會幫你加
這導致在 jest 中我們要對 module 做測試時, import 不到任何東西,需要利用 babel plugin 對其處理
另外,如果能直接把整個 cocos engine js 放進 nodeJs 下執行,可以少寫很多 mock
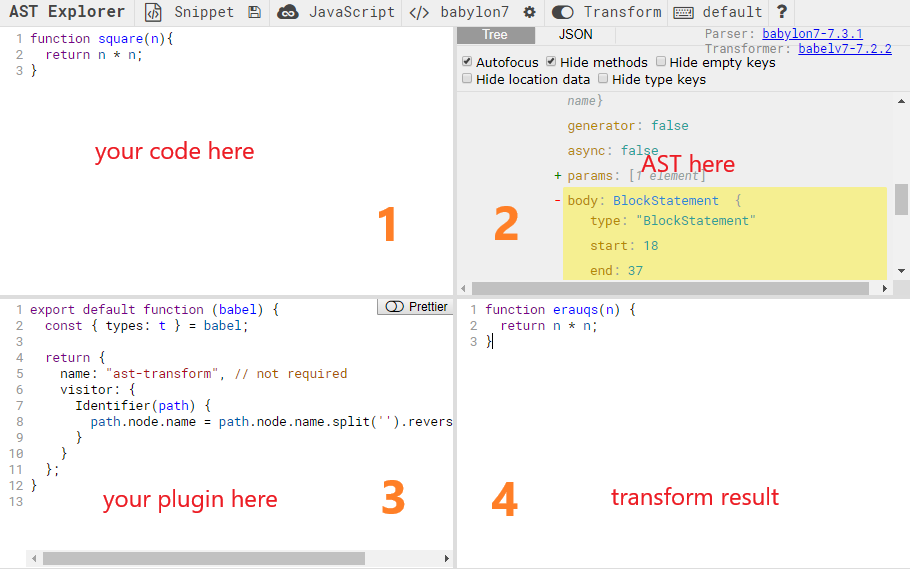
先介紹 babel-plugin 的部份
module.exports = (babel) => {
  const { types: t } = babel;
  return {
    visitor: {
      AssignmentExpression(path) {
        // 直接跳過有 module.exports 的 path
        path.skip();
      },
      CallExpression(path) {
        /* 判斷是不是 cc.Class 形式 */
        // 檢查是呼叫某類別裡面的 member method
        if (!t.isMemberExpression(path.node.callee)) return;
        // 檢查是 .cc 物件
        if (!t.isIdentifier(path.node.callee.object, { name: 'cc' })) return;
        // 檢查是 Class
        if (!t.isIdentifier(path.node.callee.property, { name: 'Class' })) return;

        // 建立 MemberExpression modules.exports
        const moduleExports = t.memberExpression(t.identifier('module'), t.identifier('exports'));
        const assignment = t.assignmentExpression('=', moduleExports, path.node);


        path.replaceWith(assignment);
        // 避免 traverse children 造成 infinite loop
        path.skip();
      },
    },
  };
};
babel_plugin/babel-cc-class.js
先介紹 babel-plugin 的部份
module.exports = {
    plugins:['./babel_plugin/babel-cc-class.js'],
    presets: [
        [
        '@babel/preset-env',
        {
          targets: {
              node: 'current',
          },
        },
      ],
    ],
    ignore: [
        '**/cocos2d-js-for-preview.js',
    ]
};
babel.config.js
module.exports = {
  // ...
  transformIgnorePatterns: [
      'cocos2d-js-for-preview.js',
  ],
}
jest.config.js
jest transformIgnorePatterns 與 babel 的 ignore 要設定一樣
接著設定 jest 在跑測時先把 cocos2d engine 載進來
module.exports = {
  // ...
  setupFiles: [
      'jest-canvas-mock', // npm 套件只需要名稱
      '<rootDir>/test_tool/cocos2d-js-for-preview.js',
  ],
}
jest.config.js
這邊要多裝 jest-cavnas-mock
cocos 有用到 canvas api,注意載入順序
npm i jest-canvas-mock -Dcocos2d-js-for-preview.js 從 CocosCreator\resources\engine\bin\ 複製出來
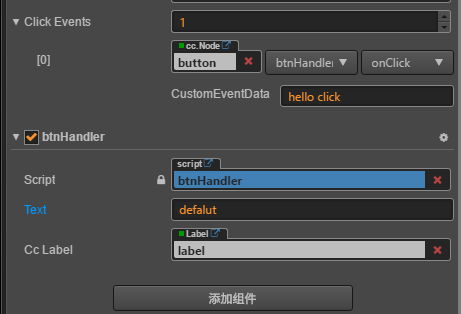
接著直接看例子,component btnHandler 會把 ccLabel 上面的文字替換成 click event 傳來的 data,我們要測試這個組件
cc.Class({
    extends: cc.Component,
    properties: {
        text: {
            default: 'click',
        },

        ccLabel: {
            default: null,
            type: cc.Label,
        },
    },

    onClick(event, data) {
        cc.log(event, data);
        if (this.ccLabel) {
            this.ccLabel.string = typeof data === 'string' ? data : this.text;
        }
    },
});
接著直接看例子,component btnHandler 會把 ccLabel 上面的文字替換成 click event 傳來的 data,我們要測試這個組件
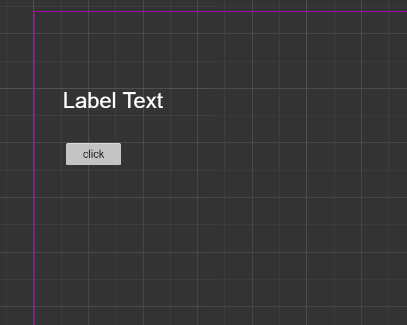
程式碼在 github/cocos_creator
之前有人問了有沒有 typescript 版本的範例, 這邊記錄一下差異,詳細的專案也放到 github 上了
// 1. 安裝 typescript, ts-jest
npm i typescript ts-jest

// 2. 安裝 bable 轉換 plugin
npm i @babel/preset-typescript -D

// 3. 初始化 jsconfig 設定
npx ts-jest config:init
// 與 js 版本差異就在於需要透過 preset-typescript 對 ts 做一次轉換
module.exports = {
preset: 'ts-jest',
collectCoverageFrom: ['<rootDir>/assets/**/*.ts'],
setupFiles: [
'jest-canvas-mock', // npm 套件只需要名稱
'<rootDir>/test/utils/cocos2d-js-for-preview.js',
],
testEnvironment: 'jsdom',
transformIgnorePatterns: [
'cocos2d-js-for-preview.js',
],
};
jest.config.js
module.exports = {
    // plugins: ['./babel_plugin/babel-cc-class.js'],
    presets: [
        [
            '@babel/preset-env',
            {
                targets: {
                    node: 'current',
                },
            },
            '@babel/preset-typescript',
        ],
    ],
    ignore: [
        '**/cocos2d-js-for-preview.js',
    ],
};
babel.config.js
這邊要注意的是 typescirpt 的 creator 專案
component 都會加上 export, 所以就不需要我們之前做的 babel plugin 了
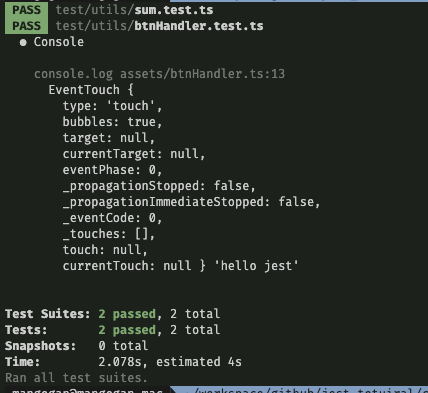
最終結果
END
範例程式碼都可以在 github 找到