GL 3 Basic Attitude Instrument Flight

Rev 01/2025
Disclaimer
Students should use their textbooks, syllabus, and Airman Certification Standards (ACS) as their primary sources of information. EcFlight is an online training tool designed to simplify and enhance your ground school learning experience. However, it is not a substitute for FAA- or school-approved study materials. Before using these slides for study, always refer to your officially approved resources, such as the Jeppesen physical or electronic book and other FAA-approved materials.
Reference Books
- Instrument Flying Handbook faa-h-8083-15B. (2012). Oklahoma City, OK: United States Department of Transportation, Federal Aviation Administration, Airman Testing Standards Branch.
- Instrument Pilot Syllabus (10001785-003). (2015). Englewood, CO: Jeppesen.
- Rod Machados Instrument Survival Manual Third Edition Ebook - ISBN 978-9823560-2-9
Reference Multimedia
- https://aviation.stackexchange.com/questions/16464/why-are-most-cockpits-gray
- https://fineartamerica.com/featured/cockpit-of-an-old-plane-5-micah-may.html
- https://www.zipscanners.com/resources/aviation-scanner-guide/
- https://aviationweek.com/business-aviation/checklists-and-callouts-keep-it-simple-avoid-distraction-prevent-ineptitudemage by Eric Long, National Air and Space Museum, Smithsonian Institution
- https://www.aopa.org/news-and-media/all-news/2018/august/pilot/technique-learn-to-turn
- https://simvim.com/svp_cessna172.html
- https://airfactsjournal.com/2013/10/11-keys-to-safer-instrument-flights/
- https://www.telegraph.co.uk/travel/lists/how-to-land-a-plane-weird-facts-lessons/
- https://www.onemedical.com/blog/live-well/prevent-jet-lag/
- https://www.thebalancecareers.com/basic-flight-instruments-the-airspeed-indicator-282607
- https://www.sportys.com/pilotshop/cessna-molded-pitot-cover-3-4-d KCAjwmNzoBRBOEiwAr2V27dDrrUr3hJvTe0J_CWWD9ylIlmTd5sV8M1m6UQBf0pN2DufnUaNNwE
- https://www.ainonline.com/aviation-news/2012-10-31/cae/aps-upset-prevention-and-recovery-training-push-continues
Index

Fundamental Skills
The fundamental skills include the following skills:
- Instrument Cross Check
- Instrument Interpretation
- Aircraft Control
Instrument Cross Check
- Cross Checking is the continuous and logical observation of instruments for attitude and performance information.
- Although no specific method of cross-checking is recommended, those instruments that give the best information for controlling the aircraft in any given manuever should be used.
- Primary instruments are those that display the needed information to accomplish the intended manuever.
Radial Cross Check
- Radial scan means to begin the scan at the attitude indicator, then move to the appropriate primary instrument, extract information from it, and return to the attitude indicator, and make corrections if necessary.
Radial Scan
Inverted V - Cross Check
- In the inverted V cross-check, the pilot scans from the attitude indicator down to the turns coordinator, up to the attitude indicator, down to the VSI, and back up to the attitude indicator.
Inverted V
Rectangular Scan
Rectangular Scan
- In the rectangular cross-check, the pilot scans across the top three instruments and then drops down to scan the bottom three instruments. This scan follows a rectangular path (clockwise or counterclockwise rotation is a personal choice).
Common Cross Check Errors
- Fixation: Staring at a single instrument often leads to poor results.
- Omission: Omitting to cross-check an instrument during significant attitude changes.
- Emphasis: Putting too much attention to a single instrument instead of relying on the combination of instruments necessary for attitude information.
Instrument Interpretation
- As the performance capabilities of the aircraft are learned a pilot interprets the instrument indications appropriately in terms of the attitude of the aircraft.
- If the pitch attitude is to be determined, the airspeed indicator, the altimeter, VSI, and attitude indicator provide the necessary information.
- If the bank attitude is to be determined, the heading indicator, turn coordinator, and attitude indicator must be interpreted.
Aircraft Control
- For each, maneuver, learn what performance to expect and the combination of instruments to be interpreted in order to control aircraft attitude during the maneuver.
Attitude Instrument Flying Methods
Control and Performance Method
Control and Performance Method
" Power and Attitude equal perfomance"
- An aircraft is flown in instrument flight by controlling the attitude and power, as necessary, to produce both controlled and stabilized flight without reference to a visible horizon.
-
This overall process is known as the control and performance method of attitude instrument flying.
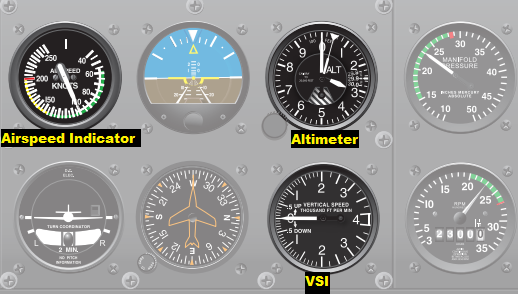
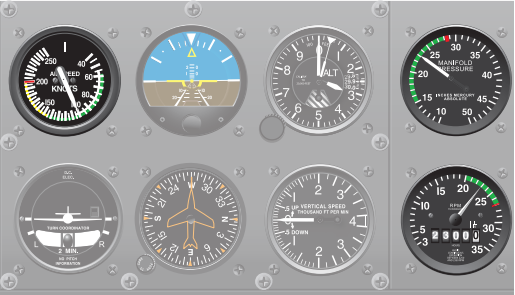
Control Instruments
- The control instruments display an immediate attitude and power indications and are calibrated to permit those respective adjustments in precise increments.
-
Control is determined by reference to the attitude and power indicators.
Control Instruments
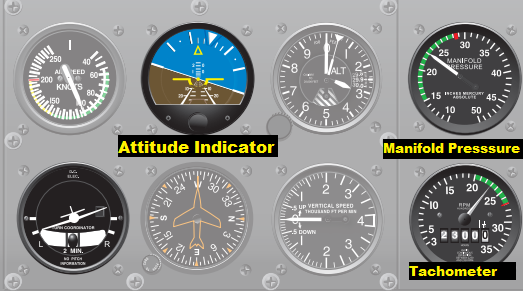
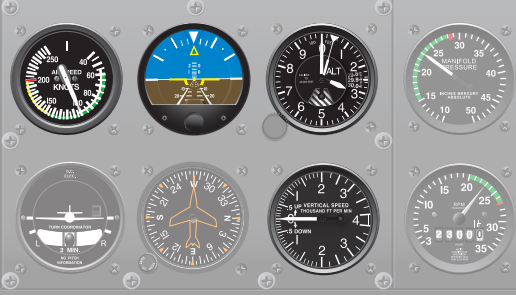
Perfomance Instruments
- The performance instruments indicate the aircraft’s actual
performance. - Performance is determined by reference to
the altimeter, airspeed, or vertical speed indicator (VSI).
Performance Instruments
Navigation Instruments
Navigation Instruments
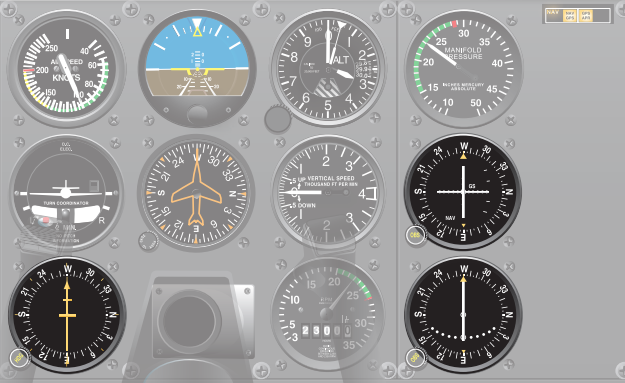
The navigation instruments indicate the position of the aircraft in relation to a selected navigation facility or fix. This group of instruments includes various types of course indicators, range indicators, glideslope indicators, and bearing pointers.
Steps in Using Control and Performance
1. Establish an attitude and power setting on the control instruments that result in the desired performance.
- Known attitude changes and approximated power settings should be used.
2. Trim until control pressures are neutralized.
- Trimming for hands-off flight is essential for smooth, precise aircraft control.
3. Cross Check the performance instruments to determine if the established attitude or power setting is providing the desired performance.
4. Adjust the attitude and/or power setting on the control instruments as necessary.
Primary And Supporting Method
- The primary and supporting method of attitude instrument flying divides the instrument panel into three groups:
- For each maneuver, there are a set of primary instruments that will help you obtain the desired performance. Instruments that help you maintain the desired indication on a primary instrument are referred to as supporting instruments.
1) Pitch Instruments
2) Power Instruments
3) Bank Instrument
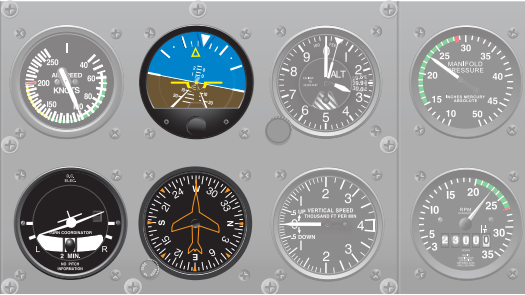
Pitch Instruments
Bank Instruments
Power
Basic Flight Maneuvers
Straight and Level Flight
Pitch Control
- The altimeter is the primary pitch instrument during straight and level flight.
- Monitor the attitude indicator from deviations from the desired pitch attitude.
- Maintain a constant scan of the Altimeter and VSI to make sure the selected attitude is correct.
-
Make half-bar-width corrections on the attitude indicator when 100 feet or less from your desired altitude.
Bank Control
- The Heading Indicator is the primary bank instrument during straight and level flight because it immediately tells you which way to correct your bank to maintain the desired heading.
- Once a zero bank on the attitude indicator has been established and verified with the heading indicator, use the turn coordinator to support both instruments indications.
- When you notice a deviation make corrections stablishing an
angle of bank equal to the degrees of deviation from the heading.
Power Control
- The airspeed indicator is the primary power instrument during straight and level flight.
- Make a small correction on the tachometer to adjust the speed to the desired value. Learn to listen to engine noise to make subtle corrections on the power instruments.
Straight and Level Flight Demonstration
Standard Rate Turns
Pitch Control
- It is easy to lose altitude during a turn due to the loss of vertical lift.
- After rolling into a turn it is always a good idea to cross-check the altimeter (primary pitch instrument) while monitoring the attitude indicator to make adjustments as necessary.
Bank Control
-
The turn coordinator is the primary instrument for bank once established in the turn because it is the only instrument that can tell you whether the angle of the bank you have established is
maintaining the desired rate of turn.
- The attitude indicator is a supporting bank instrument; use it to correct any deviations identified on the turn coordinator.
-
The bank angle required for a standard rate of turn by dividing the true airspeed by 10 and adding 5.
Power Control
- During a turn, the increase of induced drag will cause an airspeed decrease.
- Crosscheck the airspeed indicator to make adjustments using the tachometer as necessary.
Standard Rate Turn Demonstration
Steep Turns
Pitch Control
- During a steep turn since the airplane is maintaining straight and level flight the primary pitch instrument would be the altimeter. And you should verify any trends of going up or doing by supporting your crosscheck with the VSI.
Bank Control
- The bank angle used for a steep turn will exceed the one required for a standard rate of turn, the turn coordinator can't be used as a primary instrument for bank.
- The instrument that will provide a direct indication of a bank will be the attitude indicator.
- Cross check the heading indicator as a supporting instrument and anticipate the rollout within 20 to 25 degrees.
Power Control
- A steep turn includes a significant increase in drag.
- It is important to crosscheck the airspeed indicator (primary power instrument) to verify if a change in power its required.
Steep Turn Demonstration
Constant Airspeed Climbs/Descends
- When performing a climb at full power,
- smoothly push the throttle while simultaneously increasing pitch attitude until obtaining the desired climb speed (generally VX or VY).
- Since a constant power is being maintained, disregarding the climb rate, the primary pitch instrument will be the airspeed indicator, supported by the attitude indicator. The primary bank instrument on a wings-level climb will be the heading indicator.
- When performing a constant airspeed descent, use the attitude indicator to select a shallow pitch angle that will give you a descent rate between 500 and 1000 feet/min. With the use of the tachometer, regulate the airspeed at which you wish to descend.
Constant Airspeed Climb Demonstration
Constant Rate Climbs/Descents
- During a descent or climb at a constant rate, the goal is to maintain a constant rate and airspeed. Our primary pitch instrument will be the VSI, and our primary power instrument will be the airspeed indicator.
Constant Rate of Descent Demonstration
Constant Rate of Climb Demonstration
- An ILS approach is a perfect example of descent at a constant rate and airspeed in which we will select an attitude that will give us the required descent rate, and we will adjust our tachometer to maintain a constant airspeed.
Level Off From Climbs And Descends
- Level off when you are 10 percent of the vertical speed used for climbs and descents. For example, if descending at 500 ft/min, start the level off when you are 50 feet from the desired altitude.
- The attitude indicator becomes the primary pitch instrument from the transition, and the tachometer is the primary power instrument to select the desired airspeed after level off.
Descend Level Off Demonstration
Climb Level Off Demonstartion
Climbing and Descending Turns
- Climbing and Descending Turns is just a combination of a straight climb and descent procedures with turns.
- Anticipate the rollout of the turn and use the attitude indicator to align the primary instruments.
Demonstration
Common Errors
| Problem | Solution |
|---|---|
| Chasing Needles | Use the attitude indicator to establish a proper pitch attitude and cross-check the primary pitch instruments. |
| Overcontrol of the aircraft | Make half bar widths of corrections and small power changes when performing instrument maneuvers. |
Partial-Panel Flying
Triangules of Agreement
- When the flight instruments don't respond consistently to the way the flight controls move, it becomes challenging to identify which instruments malfunctioned.
- When in doubt about which instrument has failed, keep in mind that the majority wins. If two out of three instruments show the same indication, it is most likely that the third instrument in the triangle of agreement is the one providing erroneous information.
Turn Triangle of Agreement
- The turn triangle of agreement consists of the attitude indicator, the turn coordinator, and the magnetic compass. All of these instruments work with different power sources.
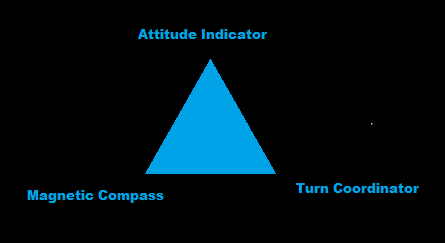
- When the pilot suspects an instrument malfunction, consult the turn triangle of agreement to figure out which set of instruments are the ones giving erroneous information.
- If two out of three of these instruments show a bank to the left then the one not backing up this information is most likely the one to blame.
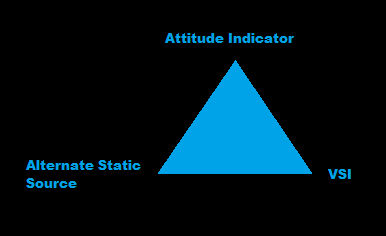
Pitch Triangle of Agreement
- The pitch triangle of agreement consists of the attitude indicator, the VSI (the most sensitive pitch instrument), and the alternate static source.
- Both instruments work with different power sources, and by pulling the alternate static source out, you can confirm when the static source has been affected.
Gyroscopic Instrument Failure
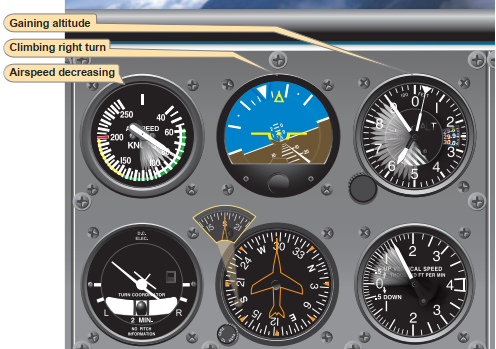
Climbs and Straight And Level Flight
- In the event of an attitude instrument failure, keep using the altimeter as the primary pitch instrument, and use the airspeed indicator and the VSI as support.
- Make gentle adjustments to the instruments and keep in mind that they all have a lag; it takes a few seconds for the needles of all these pitch instruments to stabilize.
- If the heading indicator fails, use the compass and the turn coordinator for banking.
- Keep in mind that even small defections of the turn coordinator can result in significant deviations in the compass.
Turns
Demonstration
Compass Turns
Accelerate
North
Decelerate
South
"Refer to GL 3 for more info"
Undershoot
North
Overshoot
South
Compass Turns Demonstrations
North Demonstration
South Demonstration
East Demonstration
Timed Turns
- When performing times turns with the magnetic compass, remember that if the standard rate turn is maintained during the turn. The airplane will turn at a rate of 10 degrees every 3 seconds.
Demonstration
Pitot - Static Instrument Failures
- In the event of a static port or pitot tube blockage, the affected instruments will be the altimeter, VSI, and airspeed indicator. Consult the pitch triangle of the agreement for verification.
- When the airplane is under control using the attitude indicator, make small adjustments of power and use the remaining pitch instruments available to establish smooth descent rates until reaching a safe destination.
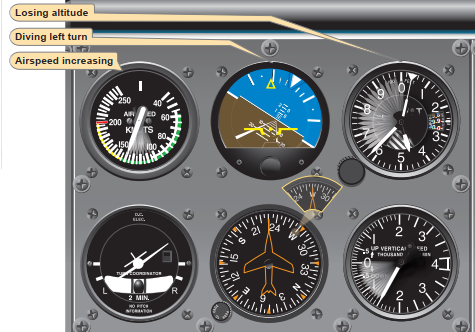
Unusual Attitude Recovery
- In the event of an unusual attitude due to the effect of vestibular or visual illusions, immediately cross-check the airspeed indicator to apply the necessary recovery correction.
- Watch for the complete reversal of the VSI and Altimeter Needles for recovery and return to a wings level flight using the turn coordinator and heading indicator.
- Most likely, the attitude indicator is unreliable due to its tumbling limitations.
Nose High
Nose Low
Nose High Unusual Attitude
1. FULL POWER
2.PITCH DOWN
3.WINGS LEVEL
"In the event of a dangerously decreasing airspeed while flying IMC, the first step is to stop an eventual stall by adding full power, reducing the angle of attack, and finally returning to a wings-level flight."
Nose Low Unusual Attitude
1. POWER TO IDLE
2.WINGS LEVEL
3.PITCH UP
"In the event of a dangerously increasing airspeed while flying IMC, the first step is to prevent the airplane from reaching VNE (Never Exceed Speed) by reducing the power to idle. Second, we need to avoid an increase in load factor by keeping our wings level, and lastly, bringing our pitch up to level flight."