Docker Training
Abdullah Fathi

Download Presentation Slide
Have you ever heard the famous phrase
"It works on my machine"?

By using Docker it is not an excuse anymore. Docker allows you to locally run the same (or almost the same) environment which will be used in production
- Docker is a tool that allows developers, sys-admins etc. to automate deployment of an application as a lightweight container so that the application can work efficiently in different environments.
- The key benefit of Docker is that it allows users to package an application with all of its dependencies (code, framework, libraries, etc.) into a standardized unit for software development
- By taking advantage of Docker’s methodologies for shipping, testing, and deploying code quickly, you can significantly reduce the delay between writing code and running it in production.
What is Docker?
- Standardized packaging for software and dependencies
- Isolate apps from each other
- Share the same OS Kernel
- Works with all major Linux and Windows Server
What is Docker?


This is what Docker is trying to solve
Why Docker ?
- Fast, consistent delivery of your applications: Great for continuous integration and continuous delivery (CI/CD) workflows
- Responsive deployment and scaling: Easy to dynamically manage workloads, scaling up or tearing down applications and services as business needs dictate, in near real time
- Running more workloads on the same hardware: Docker is lightweight and fast. It provides a viable, cost-effective alternative to hypervisor-based virtual machines, so you can use more of your server capacity to achieve your business goals
Why Docker ?
- Dev mind shift
- Agility through workflows
- Build, ship deploy evolution
- Infrastructure freedom
- Convention over configuration
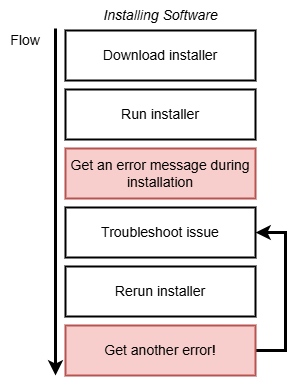
Docker makes it really easy to install and run software without worrying about setup or dependencies
Docker makes it really easy to install and run software without worrying about setup or dependencies
Windows 10 & 11 users will be able to install Docker Desktop if their computer supports the Windows Subsystem for Linux (WSL).
-
Register for a DockerHub account
Visit the link below to register for a DockerHub account (this is free)
-
Download and install all pending Windows OS updates
-
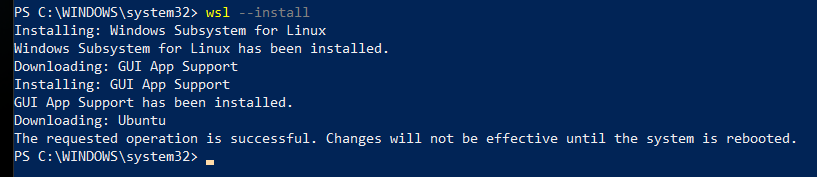
Run the WSL install script
Note - If you have previously enabled WSL and installed a distribution you may skip to step #7
Open PowerShell as Administrator and run:
wsl --install
This will enable and install all required features as well as install Ubuntu.Official documentation:
https://docs.microsoft.com/en-us/windows/wsl/install#install-wsl-command
-
Reboot your computer
-
Set a Username and Password in Ubuntu
After the reboot, Windows will auto-launch your new Ubuntu OS and prompt you to set a username and password.
-
Manually Installing a Distribution
If for some reason Windows did not prompt you to create a distribution or you simply would like to create a new one, you can do so by running the following command:
wsl --install -d Ubuntu -
Install Docker Desktop
Navigate to the Docker Desktop installation page and click the Docker Desktop for Windows button:
-
Double-click the Docker Desktop Installer from your Downloads folder
-
Click "Install anyway" if warned the app isn't Microsoft-verified
-
Click "OK" to Add a shortcut to the Desktop
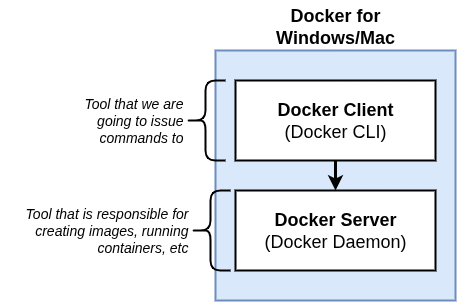
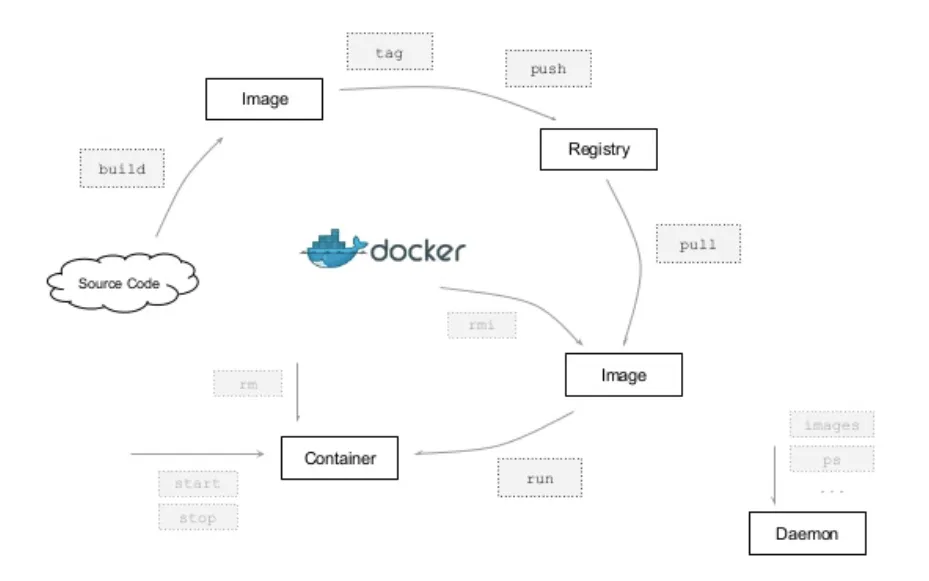
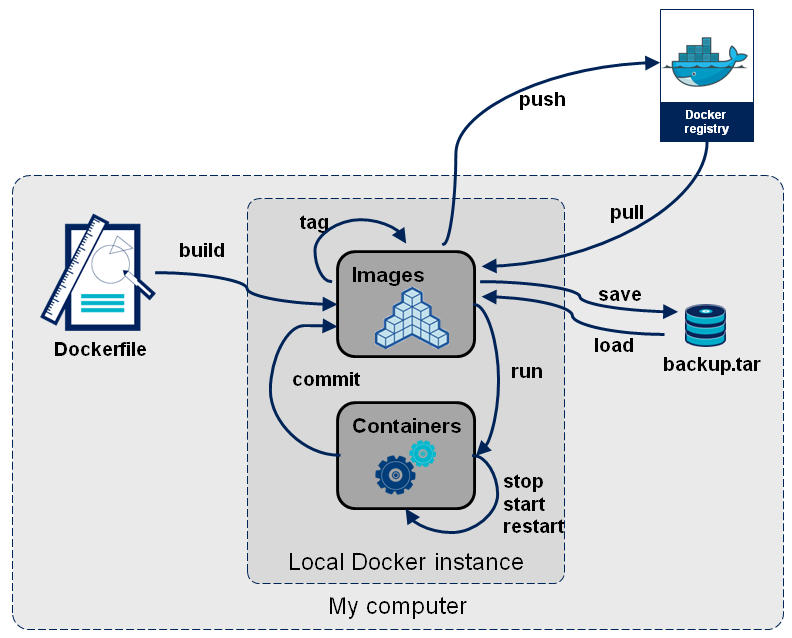
Docker Architecture
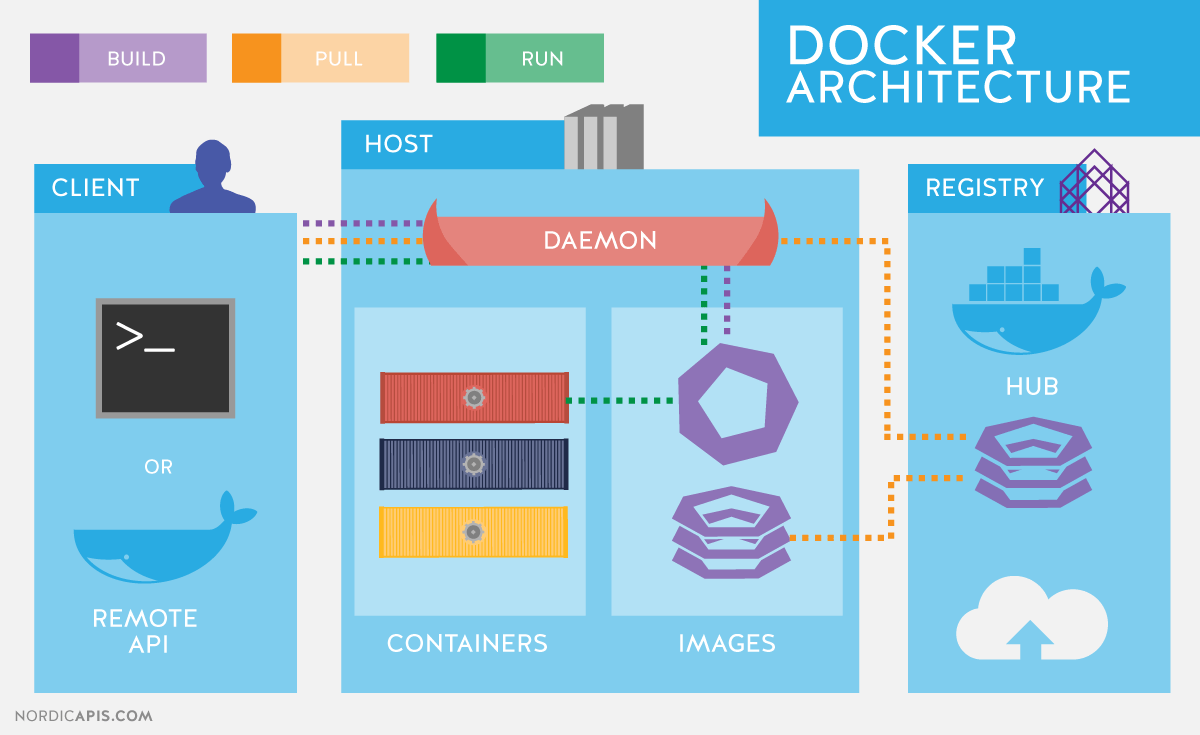
What is Docker Daemon?
The Docker daemon (dockerd) listens for Docker API requests and manages Docker objects such as images, containers, networks, and volumes
What is Docker Client?
The Docker client (docker) is the primary way that many Docker users interact with Docker
What is Docker Registry?
A Docker registry stores Docker images. Docker Hub is a public registry that anyone can use, and Docker is configured to look for images on Docker Hub by default
What is Docker Image?
-
An image is a read-only template with instructions for creating a Docker container. Often, an image is based on another image, with some additional customization.
-
You might create your own images or you might only use those created by others and published in a registry. To build your own image, you create a Dockerfile with a simple syntax for defining the steps needed to create the image and run it. Each instruction in a Dockerfile creates a layer in the image. When you change the Dockerfile and rebuild the image, only those layers which have changed are rebuilt. This is part of what makes images so lightweight, small, and fast, when compared to other virtualization technologies.
What is Docker Image?
-
Read-only templates used to build containers. Images contain the application code, libraries, tools, dependencies, and other files needed to run applications. Often, an image is based on another image, with some additional customization.
-
You might create your own images or you might only use those created by others and published in a registry. To build your own image, you create a Dockerfile with a simple syntax for defining the steps needed to create the image and run it. Each instruction in a Dockerfile creates a layer in the image. When you change the Dockerfile and rebuild the image, only those layers which have changed are rebuilt. This is part of what makes images so lightweight, small, and fast, when compared to other virtualization technologies.
What is Docker Container?
- A container is a runnable instance of an image. You can create, start, stop, move, or delete a container using the Docker API or CLI. You can connect a container to one or more networks, attach storage to it, or even create a new image based on its current state.
- By default, a container is relatively well isolated from other containers and its host machine. You can control how isolated a container’s network, storage, or other underlying subsystems are from other containers or from the host machine.
- When a container is removed, any changes to its state that are not stored in persistent storage disappear.
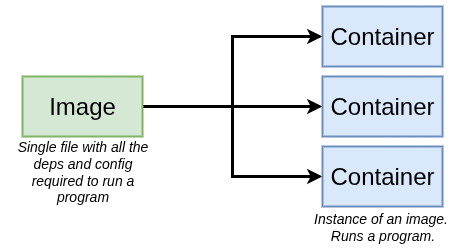
Docker Image
- It is a file, comprised of multiple layers, used to execute code in a Docker container.
- They are a set of instructions used to create docker containers.
Docker Container
- It is a runtime instance of an image.
- Allows developers to package applications with all parts needed such as libraries and other dependencies.
-
CONTAINER is a running environment for IMAGE
-
virtual file system
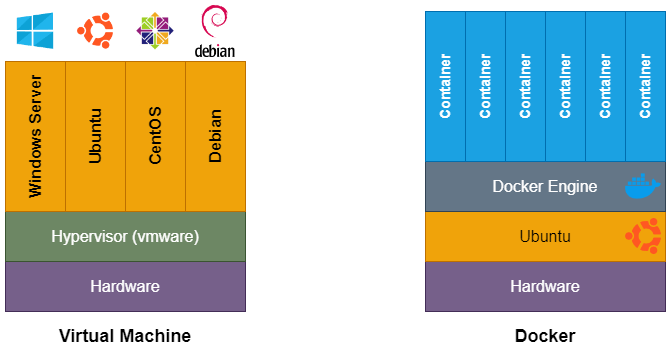
Docker Container
vs
Virtual Machine

Docker
Virtual Machine


Applications
OS Kernel
Hardware
Applications
OS Kernel
Hardware
Docker Container
VM
- Docker Containers contain binaries, libraries, and configuration files along with the application itself
- Containers share resources with other containers in the same host OS and provide OS-level process isolation
- Virtual Machines (VMs) run on Hypervisors, which allow multiple Virtual Machines to run on a single machine along with its own operating system
- Provide Hardware-level process isolation and are slow to boot
Size: Docker image much smaller
Speed: Docker containers start and run much fast
Compatibility: VM of any OS can run on any OS host

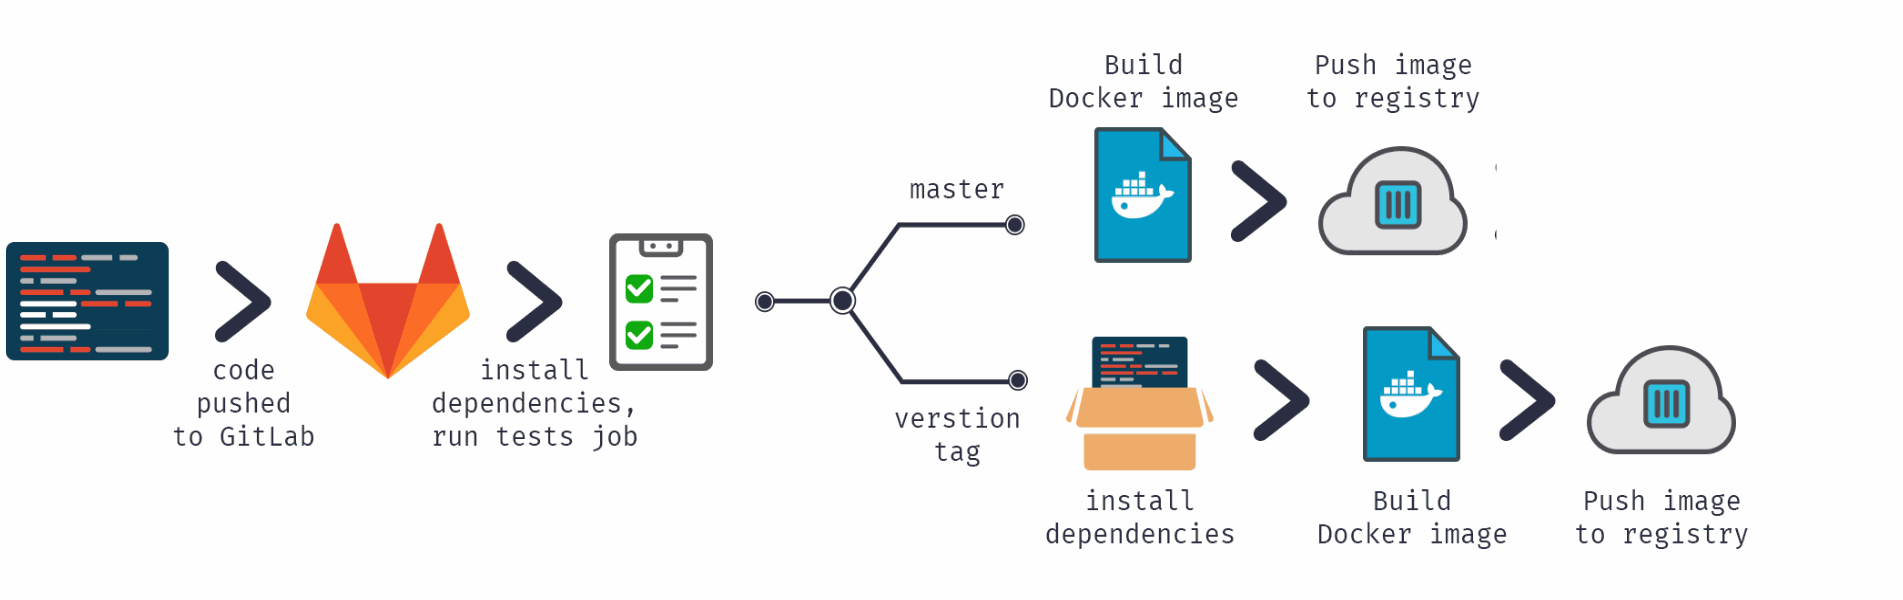
Docker CI/CD
Docker CI/CD
Docker Container Lifecycle
Basic Commands
# Pull Image from Docker Hub
docker pull nginx

# Check Existing Images
docker images

# Tags
docker pull nginx:1.24-alpine

# Run Image
# Start image in a container
docker run nginx

# Status running container
docker ps

# Run container in detached mode
docker run -d nginx

# Restart container
docker stop <container id>
docker start <container id>

# Show all container lists (running/not running)
docker ps -a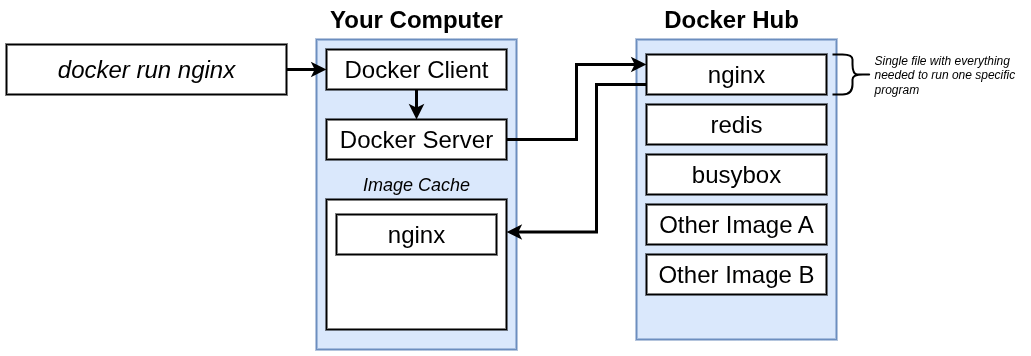
HOST Port vs CONTAINER Port
- Multiple containers can run on your host machine
- Your laptop has only certain ports available
- Conflict when same port on host machine
Container
Port 5000
Container
Port 5000
Container
Port 5000
Container
Port 3000
Container
Port 5000
Container
Port 3000
Port 5000
Port 3000
Port 3001
Host
# Docker Port Binding Between Host and Container
docker run -d -p<host port>:<container port> <image>
#docker run -d -p6000:6379 redis
docker run -d -p80:80 nginx
Debugging Container
# Debugging Container
docker logs <container id/container name>
# Display last part of Log
docker logs <container id/container name> | tail
# Stream the logs
docker logs <container id/container name> -f

# Assign container name
docker run -d -p6001:6379 --name redis-older redis:4.0

# Get to Terminal of Running Container (Interactive Terminal)
docker exec -it <container id/container name> /bin/bash
Docker Network
(Bridge)
# View auto generated docker network
docker network ls

# Create docker network
docker network create <network name>
docker network create mongo-network
It allows containers to communicate with each other on the same host through IP addresses/container name (custom bridge)
Docker Network
(Host)
Containers share the network namespace with the host and use the host's networking directly.
# HOST network is already created by default
# We can directly use it as below
docker run -dit --rm --network host --name myws nginx
Docker Compose
- Compose is a tool for defining and running multi-container Docker applications.
- With Compose, you use a YAML file to configure your application’s services. Then, with a single command, you create and start all the services from your configuration
docker run -d \

-p 27017:27017 \

-e MONGO_INITDB_ROOT_USERNAME=admin \

-e MONGO_INITDB_ROOT_PASSWORD=password \

--name mongodb \

--net mongo-network \

mongo
# https://docs.docker.com/compose/compose-file/04-version-and-name/
services:
mongodb:
image: mongo
container_name: mongo
ports:
- 27017:27017 #HOST:CONTAINER
environtment:
- MONGO_INITDB_ROOT_USERNAME=admin
- MONGO_INITDB_ROOT_PASSWORD=passwordDocker Compose takes care of creating a common Network
Docker Run Command
docker-compose.yaml
# Start container using docker-compose file
docker-compose -f mongo.yaml up -d
# Stop the containers and network using docker compose
docker-compose -f mongo.yaml down
Dockerfile
Build your own Docker Image
A Dockerfile is simply a text file with instructions that Docker will interpret to make an image. It is relatively short most of the time and primarily consists of individual lines that build on one another.
Dockerfile: Blueprint for creating docker images
#First line of every
# Start by basing it on another image
# Generates a layer based on Nodejs + Alpine.
FROM node:13-alpine

# Optionally define environment variables
# Previously we define it in docker compose which is recommended,
# So we didnt have to rebuild the image if the environment variables changes
ENV MONGO_DB_USERNAME=admin \
	MONGO_DB_PWD=password

# RUN: execute any LINUX command / Constructs your container
# The directory is created INSIDE the container
RUN mkdir -p /home/app

# COPY: executes on the HOST machine
COPY . /home/app

# Executes an entrypoint LINUX command
# Specifies which command should be executed within the container
CMD ["node", "server.js"]

# Differences between RUN and CMD:
# CMD=entrypoint command
# you can have multiple RUN commands
# Mark dockerfile that this is the command we want to execute as entrypoint
#
#
install node 13

#
#
#
set MONGO_DB_USERNAME=admin
set MONGO_DB_PWD=password

#
#
create /home/app folder

#
copy current folder files to /home/app

#
Start the app with: "node server.js"
Image Environment Blueprint
Dockerfile
Dockerfile Teardown
FROM
COPY
CMD
node:14-alpine
. /home/app
["node", "server.js"]
Instruction telling Docker what to do
Argument to the instruction
FROM node

COPY package*.json ./

RUN npm install

COPY . .

CMD ["node", "index.js"]FROM: Link to Base Image
COPY: Copy files to target path
RUN: Runs command(s) in build step
CMD: Command that gets run on container start-up
Dockerfile
| COMMAND | DESC |
|---|---|
| FROM image|scratch | base image for the build |
| MAINTAINER email | name of the maintainer (metadata) |
| COPY path dst | copy path from the context into the container at location dst |
| ADD src dst | same as COPY but able to untar archives and accepts http urls |
| RUN args... | run an arbitrary command inside the container |
| USER name | set the default username |
| WORKDIR path | set the default working directory |
| CMD args... | set the default command |
| ENV name value | set an environment variable |
Docker Build Image
docker build -t my-app:1.0 .

# Rebuild Image
# 1) Delete container
docker rm <container id>
# 2) Delete Docker Image
docker rmi <image id>
# 3) Build New Image
docker build -t my-app:1.1 .
Docker Build Buildkit
Buildkit will hide away much of its progress which is something the legacy builder did not do
To see this output, you will want to pass the progress flag to the build command:
docker build --progress=plain .
Additionally, you can pass the no-cache flag to disable any caching:
docker build --no-cache --progress=plain .
Disable Buildkit
To disable Buildkit, you can just pass the following variable to the build command:
DOCKER_BUILDKIT=0 docker build .
Docker Multi-Stage
Reduce the size of Docker Image
When to use
Docker Multi-stage Build?
- When there is a need to create an artifact/binary (ex: .jar/.war file) where building such require a lot of dependencies. However, once the binary is built, the dependencies is not needed anymore
- When there is a need to separate the build and runtime environment
Why Docker Multi-stage ?
- Smaller generated images - image only include what the application needs to run
- More secure container - Reduce potential source of vulnerability for attackers to exploit because the final image includes only what it needs to run the application
- Faster deployment - Less time to transfer or quicker ci/cd builds, faster deployment time and improved performance
# Use node:16-alpine image as a parent image
FROM node:16-alpine

# Create app directory
WORKDIR /usr/src/app

# Copy package.json files to the working directory
COPY package*.json ./

# Install app dependencies
RUN npm install

# Copy the source files
COPY . .

# Build the React app for production
RUN npm run build

# Expose port 3000 for serving the app
EXPOSE 3000

# Command to run the app
CMD ["npm", "start"]
# Stage 1 - Building the application
FROM node:16-alpine AS build
# Create app directory
WORKDIR /usr/src/app
# Copy package.json files to the working directory
COPY package*.json ./
# Install app dependencies
RUN npm install
# Copy the source files
COPY . .
# Build the React app for production
RUN npm run build
# Stage 2 - Serve the application
FROM nginx:alpine
# Copy build files to Nginx
COPY --from=build /usr/src/app/build /usr/share/nginx/html
EXPOSE 80
CMD ["nginx", "-g", "daemon off;"]Previous
After
525MB
43.8MB
FROM node:12.7-alpine AS build
WORKDIR /usr/src/app
COPY package.json package-lock.json ./
RUN npm install -g @angular/cli@7.1.4
RUN npm install
COPY . .

EXPOSE 4200
CMD ["ng", "serve", "--host", "0.0.0.0"]
### STAGE 1: Build ###
FROM node:12.7-alpine AS build
WORKDIR /usr/src/app
COPY package.json package-lock.json ./
RUN npm install
COPY . .
RUN npm run build
### STAGE 2: Run ###
FROM nginx:1.17.1-alpine
COPY nginx.conf /etc/nginx/nginx.conf
COPY --from=build /usr/src/app/dist/aston-villa-app /usr/share/nginx/html
Previous
After
506MB
43.8MB
Push Image to Registry
# The server needs to login to pull from PRIVATE repository
docker login -u <username>
# private registry
# docker login https://hub.fotia.com.my -u <HARBOR_USER> -p <HARBOR_TOKEN>

# Push image to private container registry
docker push hub.osdec.gov.my/<project-name>:<image tag>

# Pull image from private container registry
docker pull hub.osdec.gov.my/<project-name>:1.0
Image Naming in Docker registries
registryDomain/imageName:tag
In DockerHub:
- docker pull mongo:4.2
- equivalent to: docker pull docker.io/library/mongo:4.2
In Harbor (Private Registry):
- docker pull hub.osdec.gov.my/<project-name>:1.0
Docker Volumes
Data Persistence
What is Docker Volume?
- Folder in physical host file system is mounted into the virtual file system of Docker
- Data gets automatically replicated
3 Type of Docker Volumes
-
Bind Mount/Host Volumes
- docker run -v /home/mount/data:/var/lib/mysql/data
- Container accesses files directly from the host’s file system
-
Anonymous Volumes
- docker run -v /var/lib/mysql/data
- Directory automatically created by Docker
-
Named Volumes
- docker run -v name:/var/lib/mysql/data
- Recommended
| Feature | Bind Mount/ Host Volume |
Named Volumes |
|---|---|---|
| Path Specification | Absolute path on the host file system | Docker-managed location |
| Management | Managed manually via the host OS | Managed via Docker CLI and API |
| Data Persistence | Depends on the host directory/file | Designed for persistent storage |
| Isolation | Less isolation (direct access to host FS) | More isolation (abstracted from host FS) |
| Performance | Varies based on host and container FS | Generally consistent, managed by Docker |
| Use Case Suitability | Development, direct host FS access | Production, data persistence, databases |
version: '3'
services:
	mongodb:
    	image: mongo
        ports:
        	- 27017:27017
        environment:
        	- MONGO_INITDB_ROOT_USERNAME=admin
         	- MONGO_INITDB_ROOT_PASSWORD=password
         #Volumes
         volumes:
         	- mongo-data:/data/db
	mongo-express:
    	image: mongo-express
        ports:
        	- 8080:8081
        environment:
        	- ME_CONFIG_MONGODB_ADMINUSERNAME=admin
            - ME_CONFIG_MONGODB_ADMINPASSWORD=password
            - ME_CONFIG_MONGODB_SERVER=mongodb
volumes:
	mongo-data:
    	driver: local
Example in docker-compose
Docker Volume Locations
Windows - \\wsl$\docker-desktop\mnt\docker-desktop-disk\data\docker\volumes
Linux - /var/lib/docker/volumes
MacOS - /var/lib/docker/volumes
Your feedback matters