Alan King, Senior Software Developer
Martin Flores, Software Developer
iRODS Consortium
Advanced Training:
Getting Started

May 28-31, 2024
iRODS User Group Meeting 2024
Amsterdam, Netherlands


Little Slips of Paper & Dependencies
curl -LO https://github.com/irods/irods_training/raw/ugm2024/training.pem
chmod 600 training.pem
ssh -i training.pem ubuntu@#.#.#.#
Log into your VM.
Install iRODS Build Requirements.
sudo apt-get update

sudo apt-get -y install git g++ make python3-dev help2man unixodbc libfuse-dev libcurl4-gnutls-dev libbz2-dev zlib1g-dev libpam0g-dev libssl-dev libxml2-dev libkrb5-dev unixodbc-dev libjson-perl python3-psutil python3-jsonschema super python3-exif odbc-postgresql unzip jq wget curl less gnupg2 lsb-release

Disable the needrestart prompts.
echo "\$nrconf{restart} = 'a';" |
  sudo tee /etc/needrestart/conf.d/no-prompt.conf > /dev/null
Acquire the Prerequisites
Clone the training repository.
git clone https://github.com/irods/irods_training
Install and configure PostgreSQL
DEBIAN_FRONTEND=noninteractive sudo -E apt-get -y install postgresql
sudo pg_ctlcluster --skip-systemctl-redirect 14/main start
sudo sed -i 's/CommLog=1/CommLog=0/' /etc/odbcinst.ini
sudo su - postgres
As the ubuntu user, install and start the database.
postgres $ psql
CREATE DATABASE "ICAT";
CREATE USER irods WITH PASSWORD 'testpassword';
GRANT ALL PRIVILEGES ON DATABASE "ICAT" to irods;
\q
postgres $ exit
As the postgres user, prepare the database for iRODS use.
Install and configure Rsyslog
sudo apt-get -y install rsyslog
As the ubuntu user ...
$FileCreateMode 0644
$DirCreateMode 0755
$Umask 0000
$template irods_format,"%msg%\n"
:programname,startswith,"irodsServer" /var/log/irods/irods.log;irods_format & stop
:programname,startswith,"irodsDelayServer" /var/log/irods/irods.log;irods_format & stop
Edit /etc/rsyslog.d/00-irods.conf (requires sudo).
Install rsyslog.
Restart rsyslog.
sudo systemctl restart rsyslog
Configure the Repository, Install, Run setup
wget -qO - https://packages.irods.org/irods-signing-key.asc | sudo apt-key add -
echo "deb [arch=amd64] https://packages.irods.org/apt/ $(lsb_release -sc) main" | \
  sudo tee /etc/apt/sources.list.d/renci-irods.list
sudo apt-get update
sudo apt-get -y install irods-server irods-database-plugin-postgres
Install public key and add repository.
Install from repository.
Read more: https://packages.irods.org
sudo python3 /var/lib/irods/scripts/setup_irods.py < \
  /var/lib/irods/packaging/localhost_setup_postgres.input
Run setup with provided input file.
Confirm iRODS setup is successful
sudo su - irods -c "~/irodsctl -v start && ils"
sudo su - irods -c "iadmin set_delay_server $(hostname)"
ps aux | grep irodsDelayServer
Start iRODS server and confirm it is running. Set delay server host and confirm it is running.
sudo fallocate -l 3G /swapfile
sudo chmod 600 /swapfile
sudo mkswap /swapfile
sudo swapon /swapfile
sudo swapon --show
Add swap space to the VM for some heavy stuff later ...
The server log will be located at /var/log/irods/irods.log.
Setup iRODS for Auditing
Before we continue with the training, we are going to set up some auditing in iRODS so that we can report on all of the activities in our iRODS instance.
At the end of today's training, we will revisit this and visualize what has happened in iRODS throughout the day.
The first action is to install the auditing plugin ...
sudo apt-get -y install irods-rule-engine-plugin-audit-amqp
Setup the iRODS Audit Plugin
Edit /etc/irods/server_config.json.
Add a new stanza to the rule_engines array, after the irods_rule_language plugin.
"rule_engines": [
{
"instance_name": "irods_rule_engine_plugin-irods_rule_language-instance",
...
...
"shared_memory_instance": "irods_rule_language_rule_engine"
},
{
"instance_name": "irods_rule_engine_plugin-audit_amqp-instance",
"plugin_name": "irods_rule_engine_plugin-audit_amqp",
"plugin_specific_configuration" : {
"amqp_location" : "ANONYMOUS@localhost:5672",
"amqp_topic" : "audit_messages",
"pep_regex_to_match" : "pep_(api|resource)_.*"
}
},
{
"instance_name": "irods_rule_engine_plugin-cpp_default_policy-instance",
...
Setup Monitoring
curl -fsSL https://download.docker.com/linux/ubuntu/gpg | sudo apt-key add -
sudo add-apt-repository "deb [arch=amd64] https://download.docker.com/linux/ubuntu $(lsb_release -cs) stable"
sudo apt-get update
sudo apt-get install -y docker-ce
sudo usermod -aG docker ${USER}
The iRODS audit plugin produces AMQP 1.0 messages for each dynamic policy enforcement point.
We will now setup a docker container which will accept these messages, store them in an Elastic database, and provide a visualization web tool.
First we need to install Docker.
Log out of your virtual machine and log back in to make sure your group list is updated.
Setup Monitoring
docker run -d -p 8080:15672 -p 5672:5672 -p 80:5601 -p 9201:9200 irods/irods_audit_elk_stack
From within your virtual machine, run this pre-built ELK stack docker image.
You now have a docker container instance running within your virtual machine.
This instance is running the following:
-
RabbitMQ - Message broker that stores the AMQP messages
-
Elasticsearch - Database that stores the AMQP messages
-
not-logstash - Reads messages from RabbitMQ and writes them to Elasticsearch
-
Kibana - A data visualization dashboarding tool for ElasticSearch
docker ps
Confirm that the container is running.
Confirm the Visualization
Port 80 on your VM is now mapped to the Kibana web tool.
It may take a minute or so to start up.
-
In a web browser, navigate to http://#.#.#.#/ to open the Kibana dashboard.
-
Click on hamburger menu (top left) -> Analytics -> Dashboards.
-
Select iRODS Dashboard.
-
In the upper right corner, select "Last 15 minutes".
-
Also, set the Refresh time to "15 seconds".
Configure the Visualization
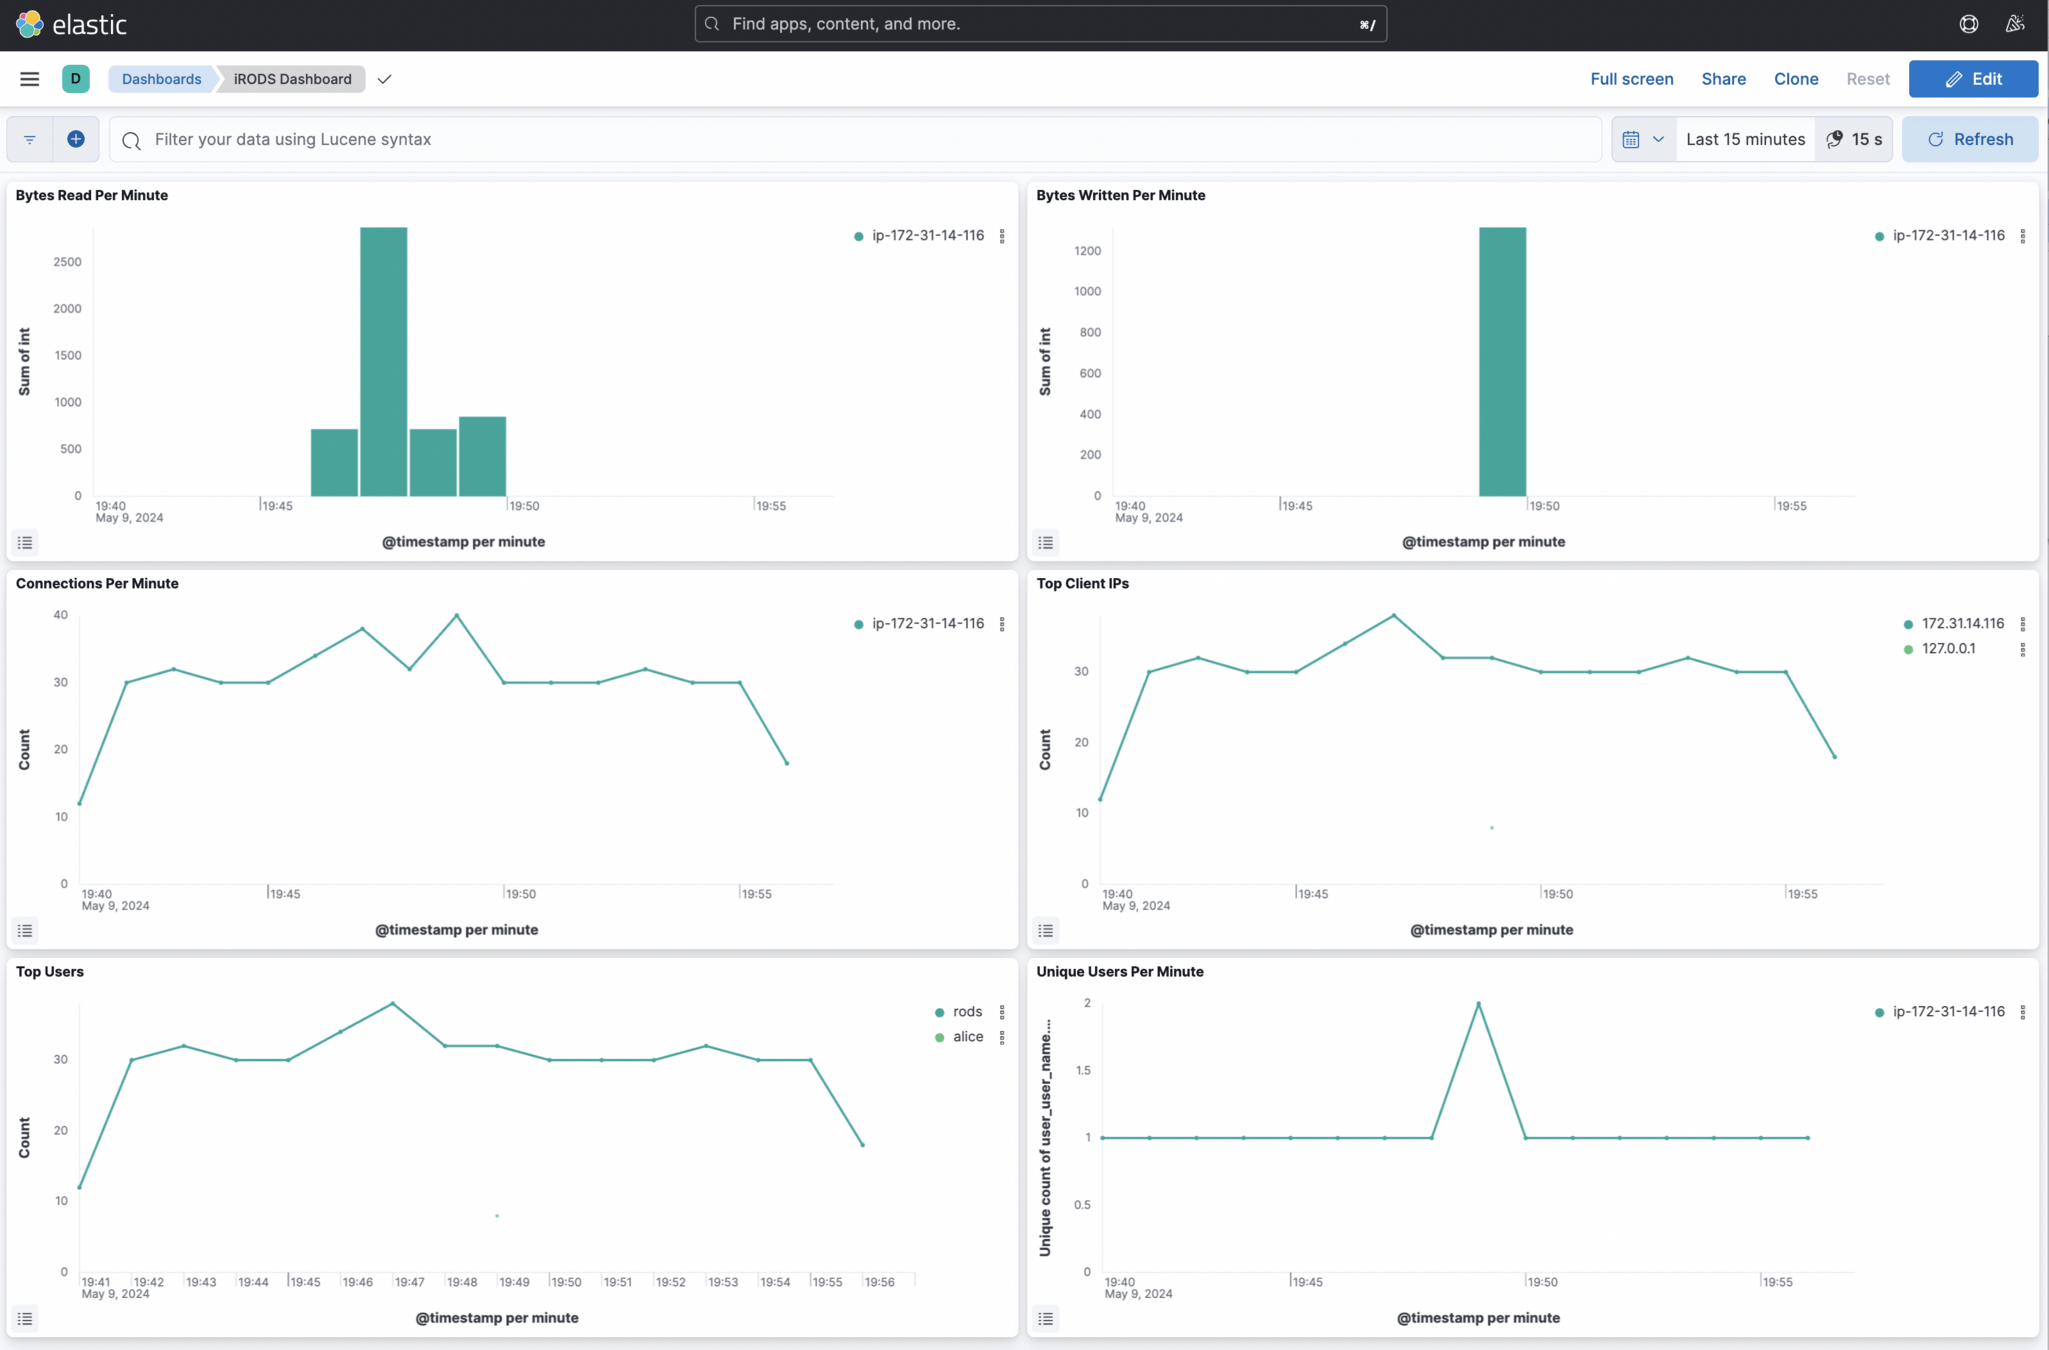
You should see a dashboard that looks similar to the screenshot below.
If you have not executed an iput or iget yet...
the Bytes Read Per Minute and Bytes Written Per Minute will report no data.
What to Consider in an iRODS Deployment
Things to consider
-
Number of users and expected simultaneous connections
-
Expected ingest rate
-
Sizes of files
-
Many small files (more overhead per connection)
-
-
Partial read / write vs whole file usage
-
Replication for durability
-
Replication for locality of reference
-
Load balancing vs High Availability
iRODS will run on a laptop or a rack of servers.
Upgrading Large Installations
Things to consider
-
Database Snapshots
-
Maintenance Window
-
Attempt a graceful grid-wide shutdown ahead of time
-
Test Zones - do not upgrade blindly
-
Conformance Tests - try your edge cases
-
Federated Zones - how mixed is your deployment
Questions?
Anatomy of an iRODS installation
/etc/irods/core.* - iRODS Rule Language
/etc/irods/server_config.json - primary server configuration
/etc/irods/service_account.config - service account information
/usr/bin/* - iCommands
/usr/sbin/irodsAgent
/usr/sbin/irodsPamAuthCheck
/usr/sbin/irodsDelayServer
/usr/sbin/irodsServer
/var/lib/irods - service account home directory
/var/log/irods - log files
/usr/lib/irods/plugins - plugins location
Introduction to iCommands
iRODS command line equivalent to standard Unix operations
-
ils
-
icd
-
ipwd
-
iput
-
iget
-
irepl
use -h to get help with any particular iCommand
ihelp will show all available iCommands
Questions?