KAI
Roof Window & Flashing Installation
45 Slides
1. Roof Window Installation
2. Spare Parts
3. TRF/DRF Flashing Installation
4. PTRF Flashing Installation
5. SRF Flashing Installation
Contents
Roof Window Installation
Keylite Accredited Installer Academy
Roof Window Installation
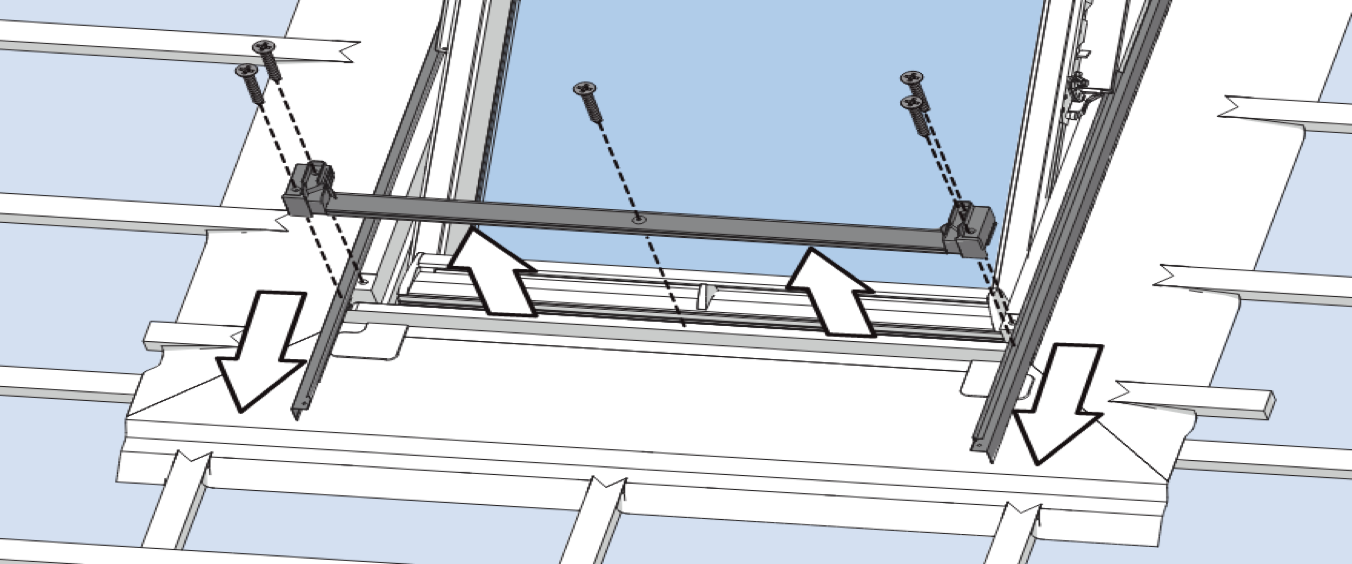
Structural
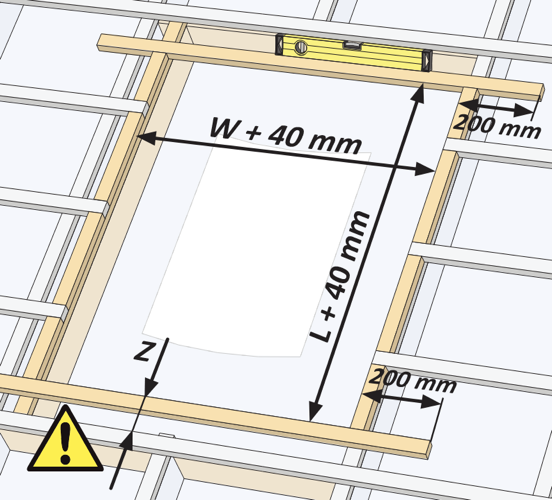
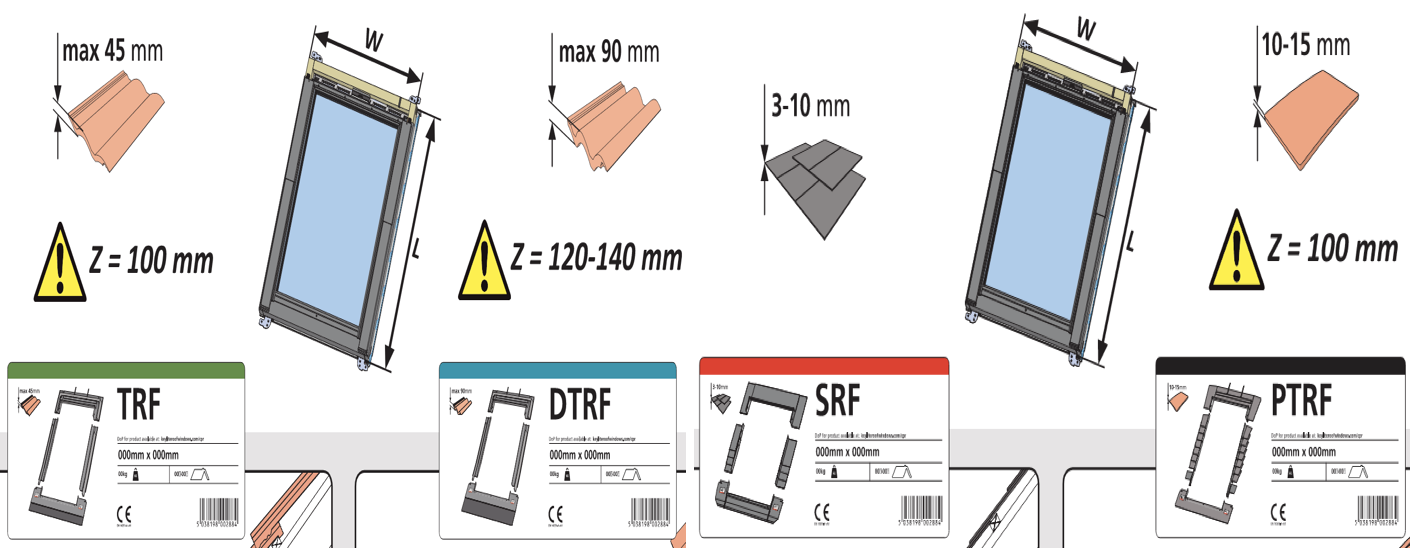
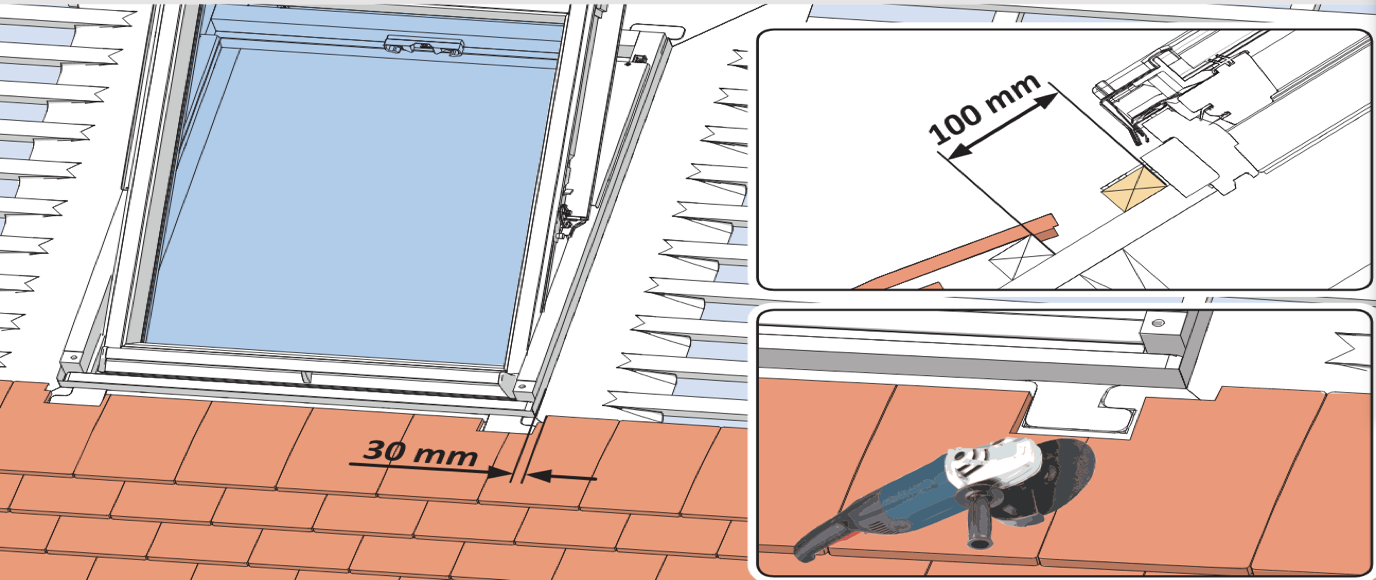
Opening Size
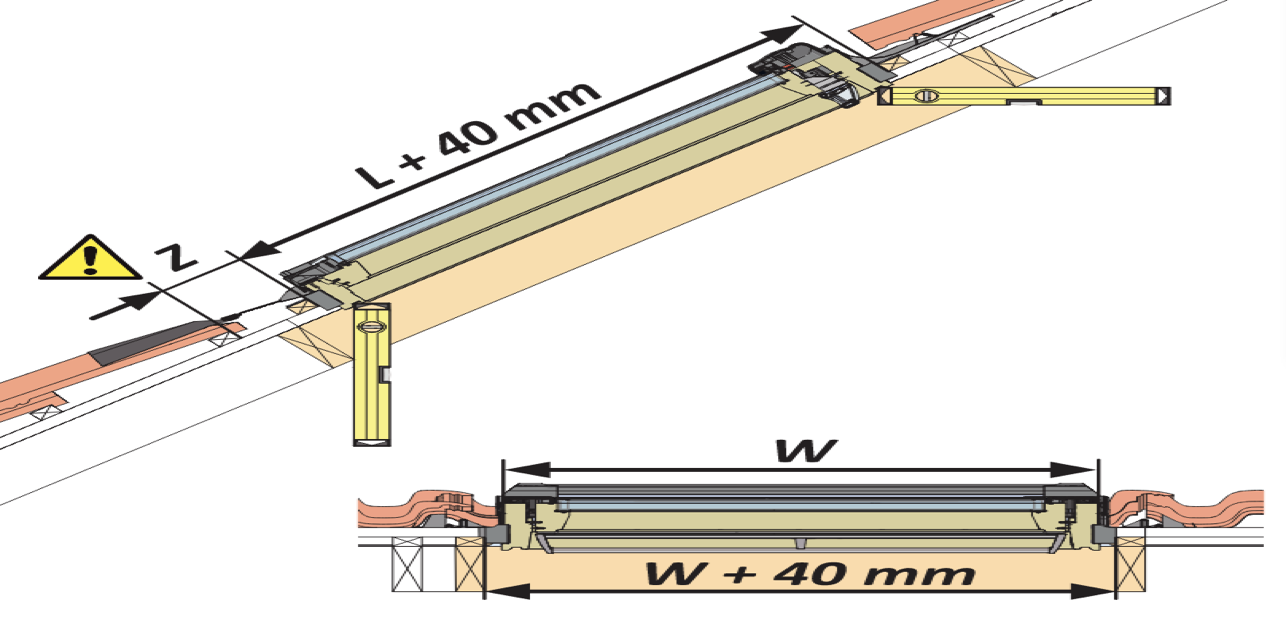
The Z-dimension is the distance the top of the from the lower roof window batten to the top of the first tile / slate batten beneath the roof window.
The dimension ensures that the flashing kit sits flush to the roof resulting in a streamlined finish.
Failure to set the z-dimension correctly can lead to a number of the following issues. Water ingress, Open / Close issues and tiles kicking up.
Keylite Accredited Installer Academy
Roof Window Installation
What is a Z-dimension?
Keylite Accredited Installer Academy
Roof Window Installation
Z-dimensions for flashing kits
Keylite Accredited Installer Academy
Roof Window Installation
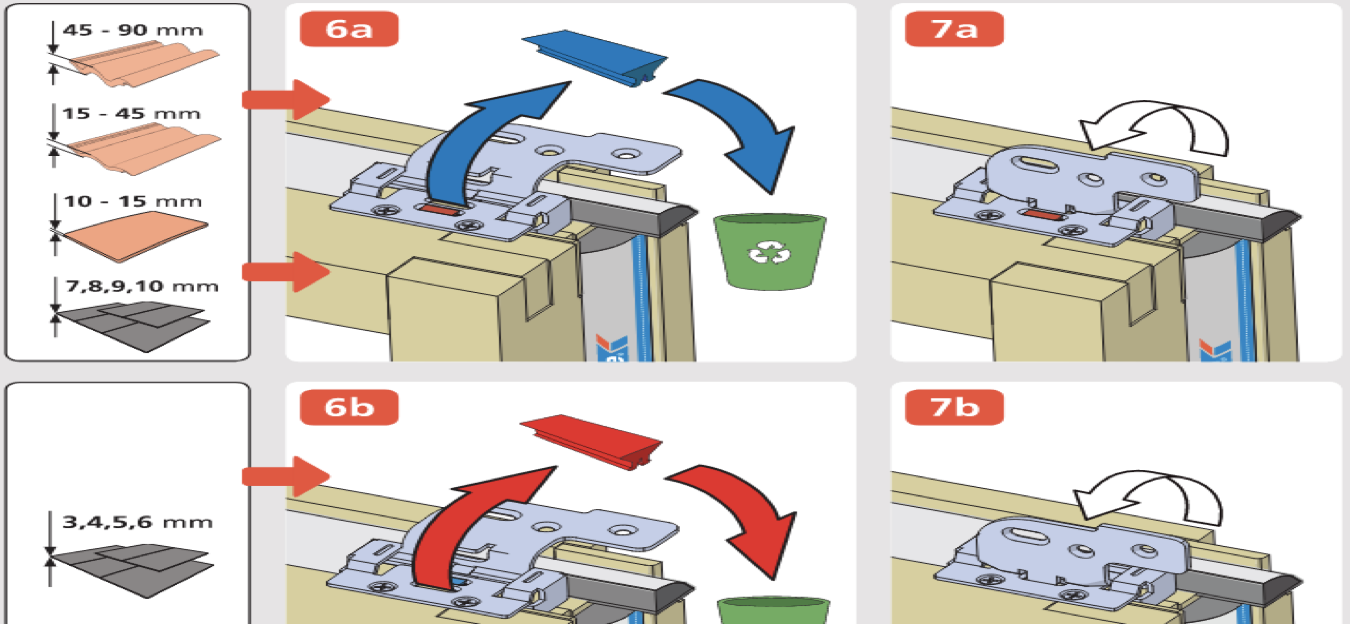
Flick Fit Bracket - Which colour tab to remove depending on roof material.
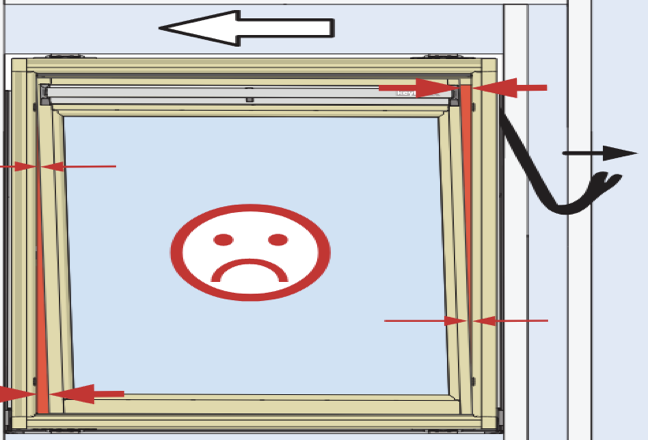
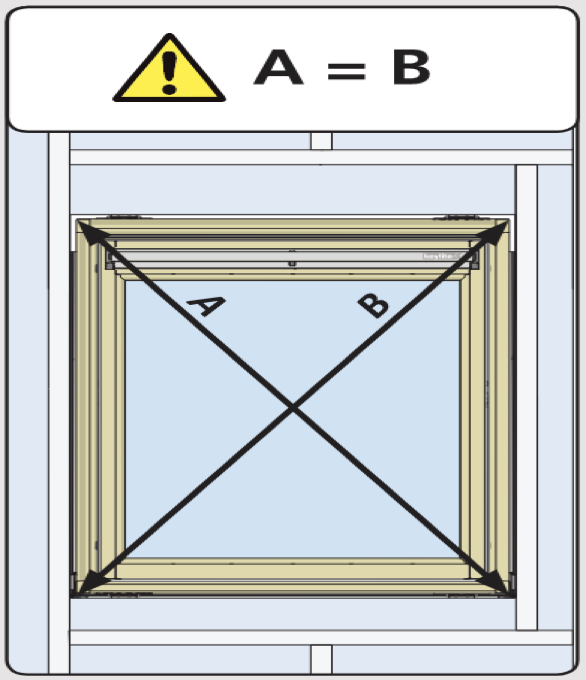
An off square frame can lead to the following issues. Water ingress, draughts and open / close issues.
Keylite Accredited Installer Academy
Roof Window Installation
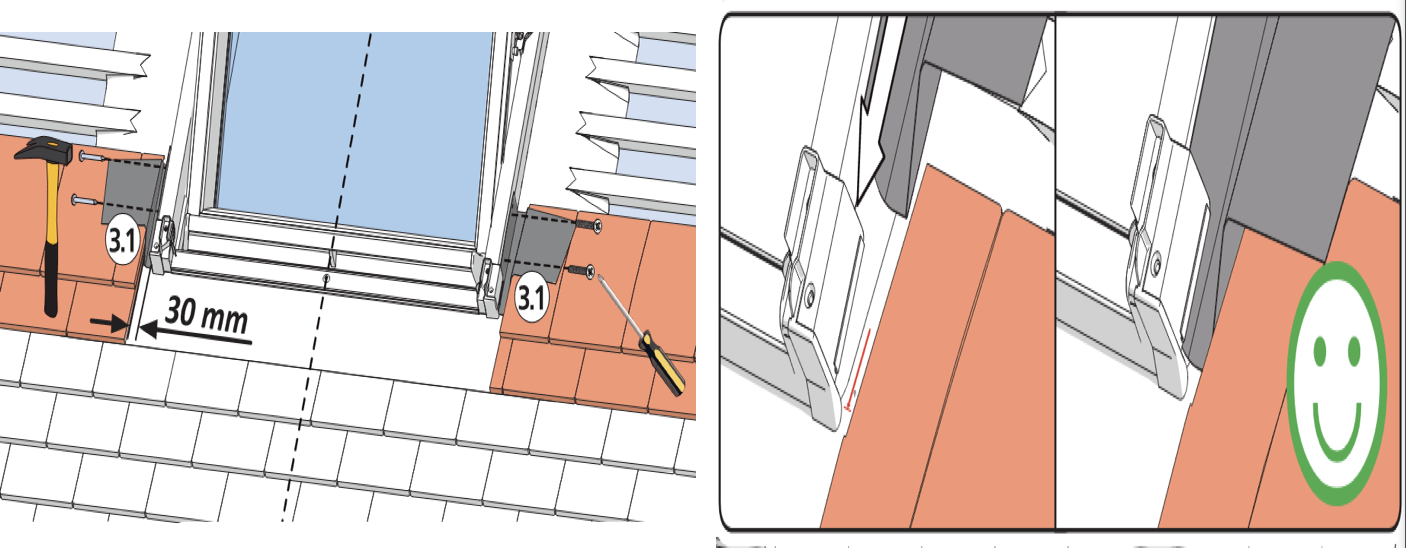
Ensure the window frame is square!
Keylite Accredited Installer Academy
Roof Window Installation
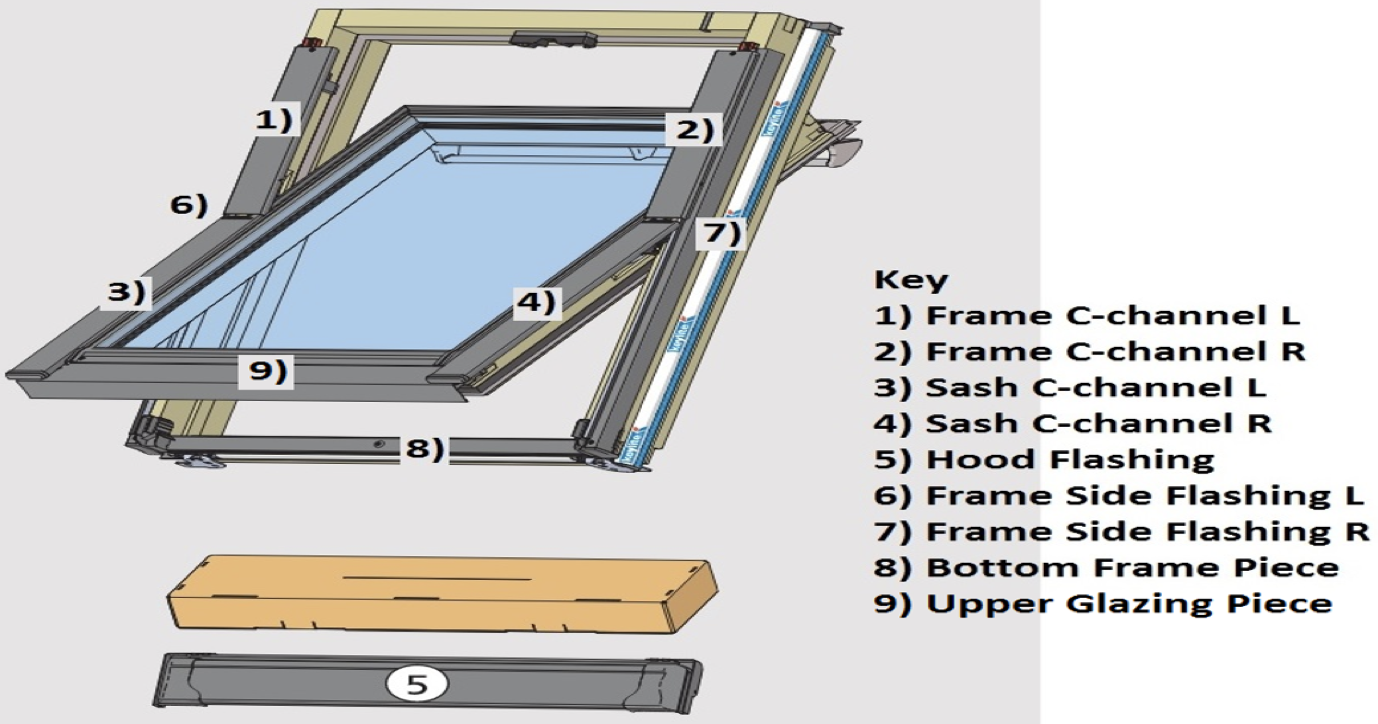
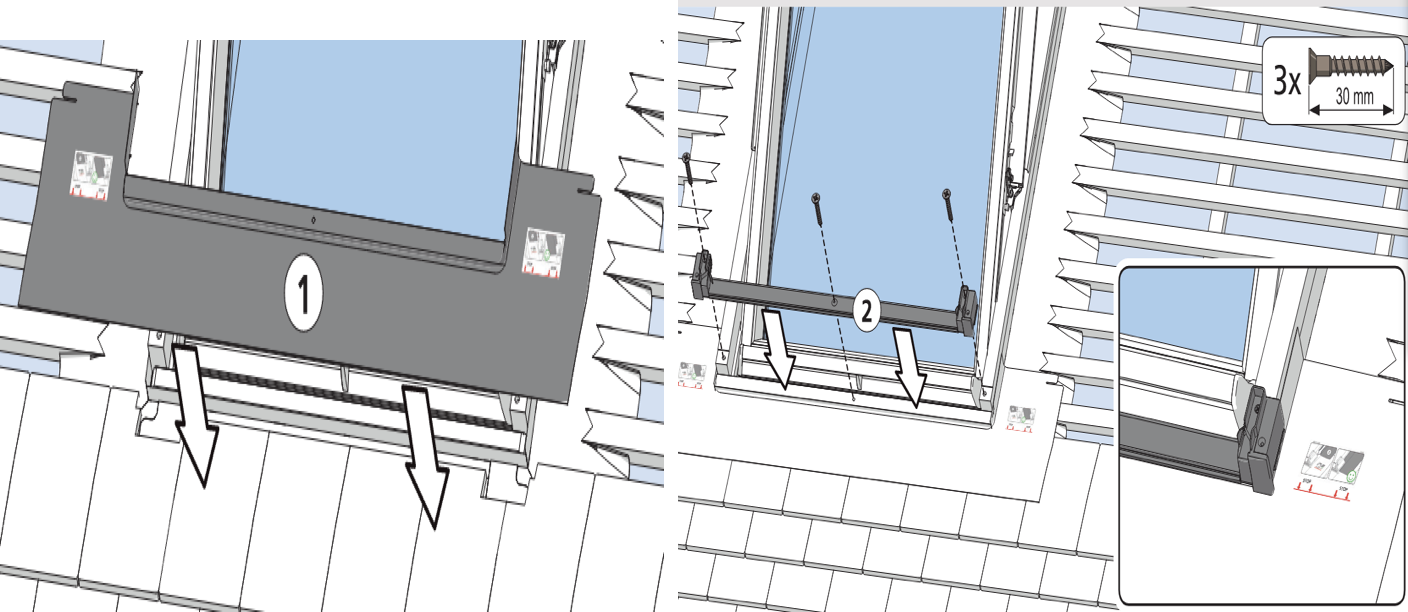
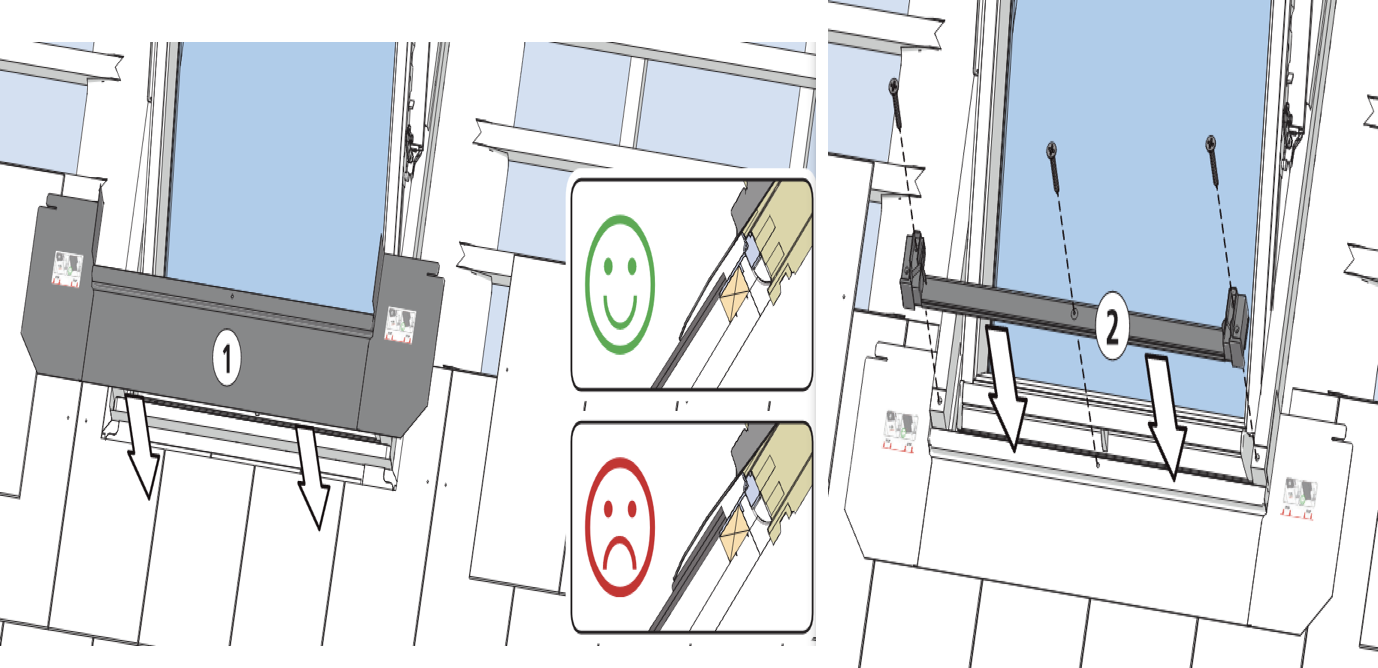
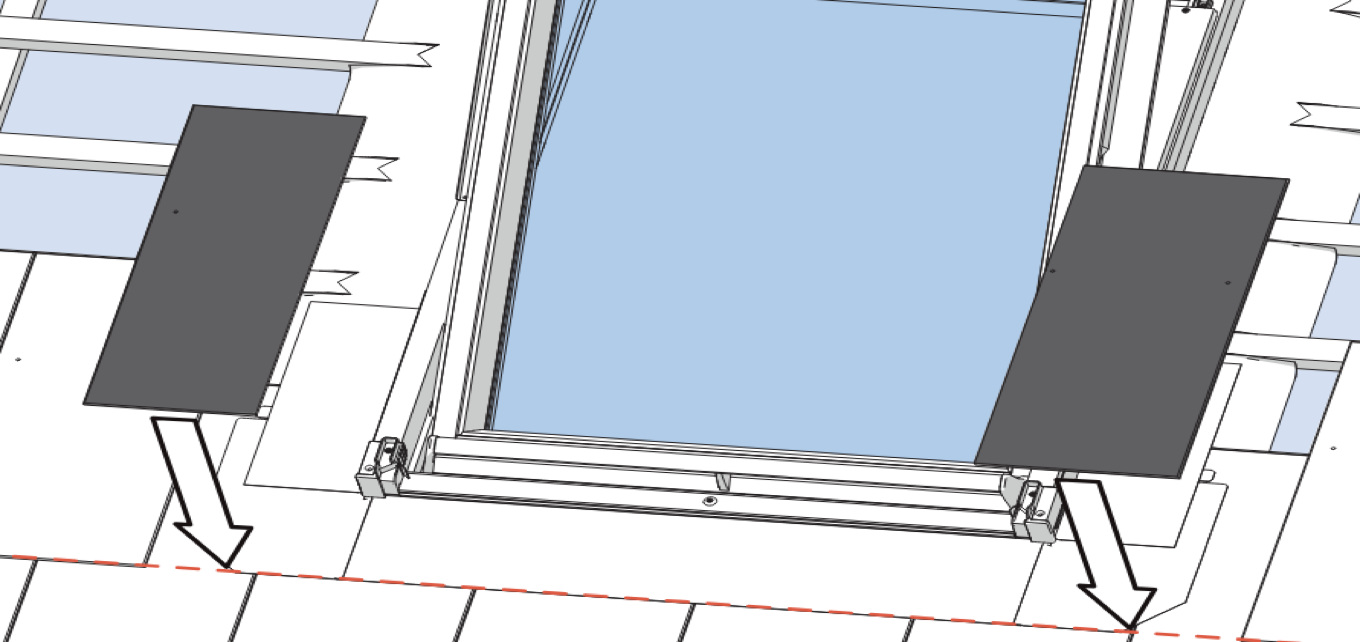
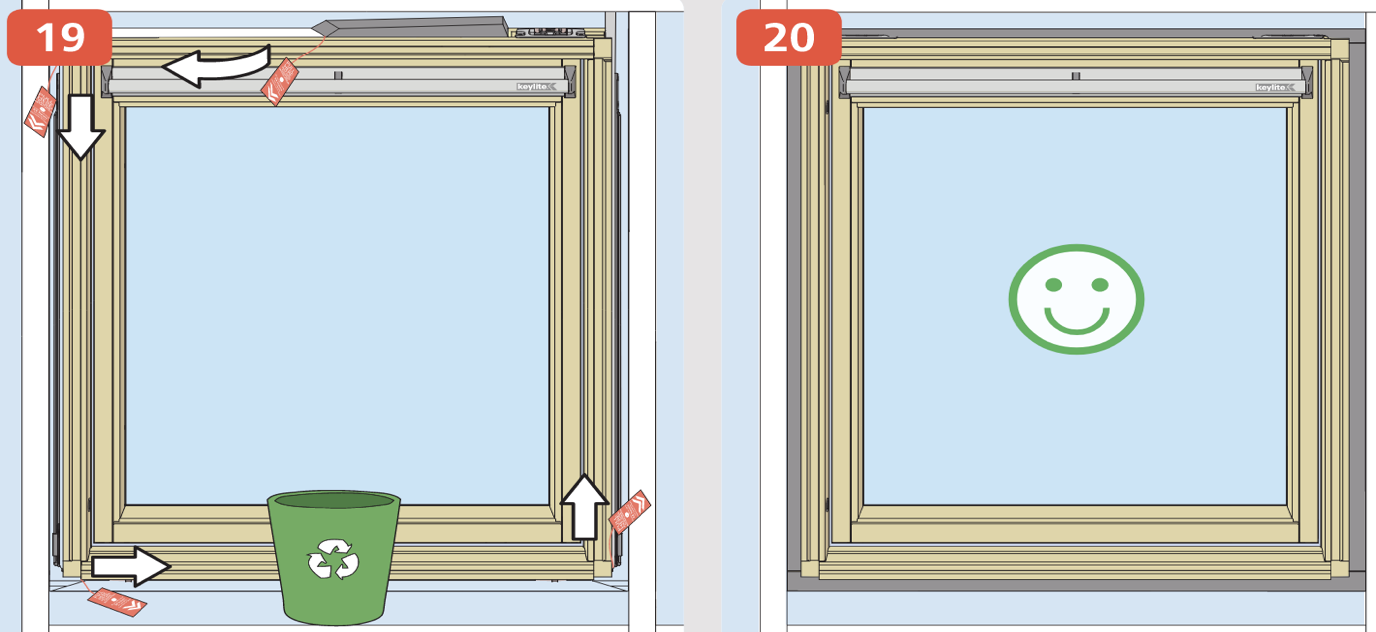
Remove frame side flashings and bottom frame piece from the window to prepare the window for roof flashing installation.
Spare Parts
Keylite Accredited Installer Academy
Spare Parts
TRF / DTRF Flashing Installation
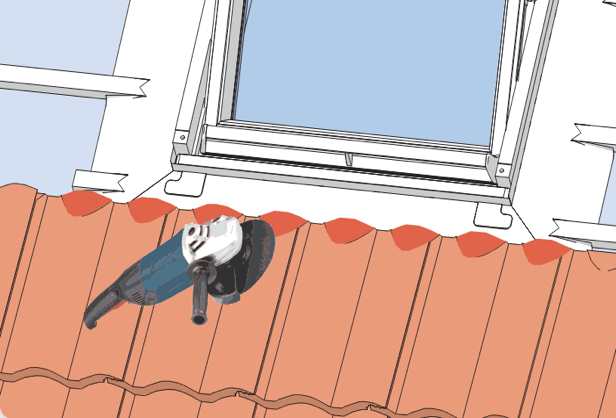
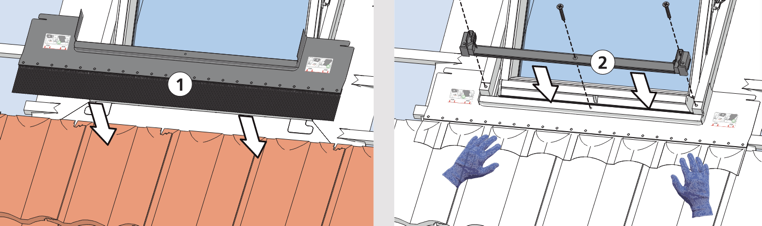
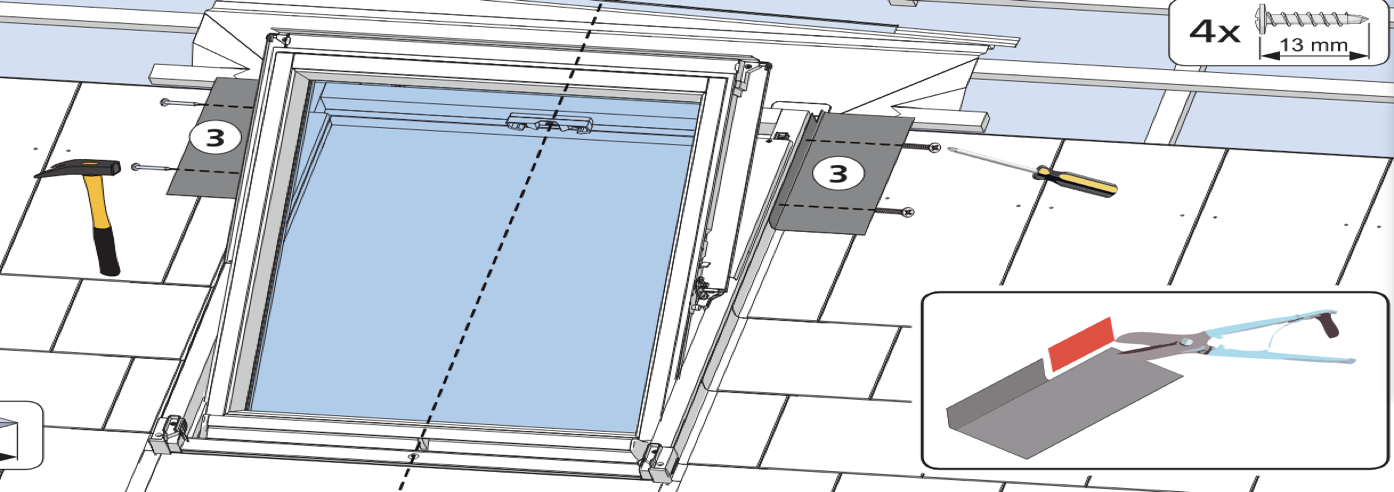
Cut the top profile of the tiles. This reduces the chances of flashings and tiles kicking up, but also make the finished result look professional and sleek.
Keylite Accredited Installer Academy
TRF/DTRF Flashing Installation
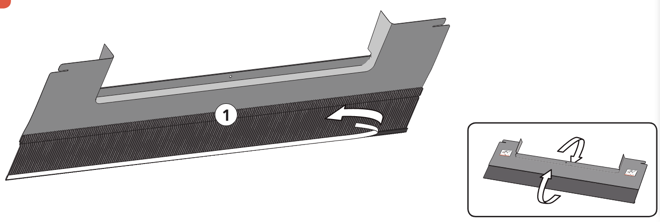
Remove plastic tabs to activate mastic adhesive beneath the lead of the bottom apron
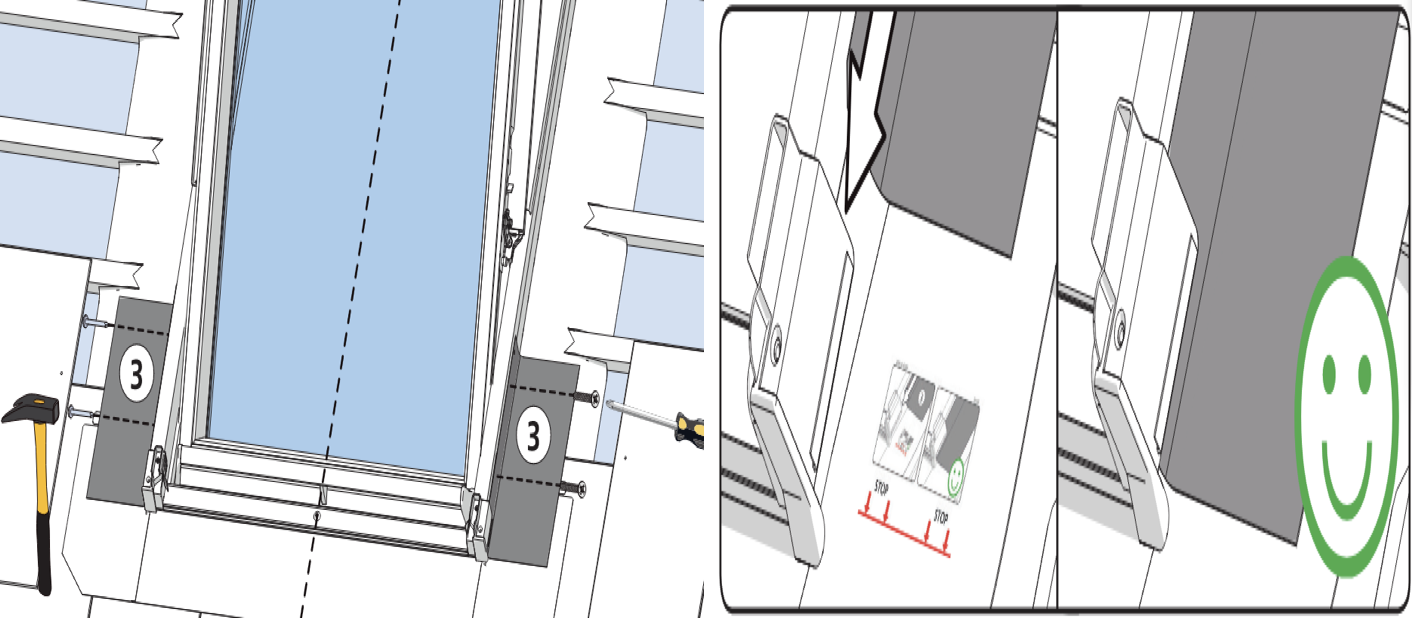
Place bottom apron over the bottom of the window frame and install the bottom frame piece to hold into place. Dress lead apron into tile profile.
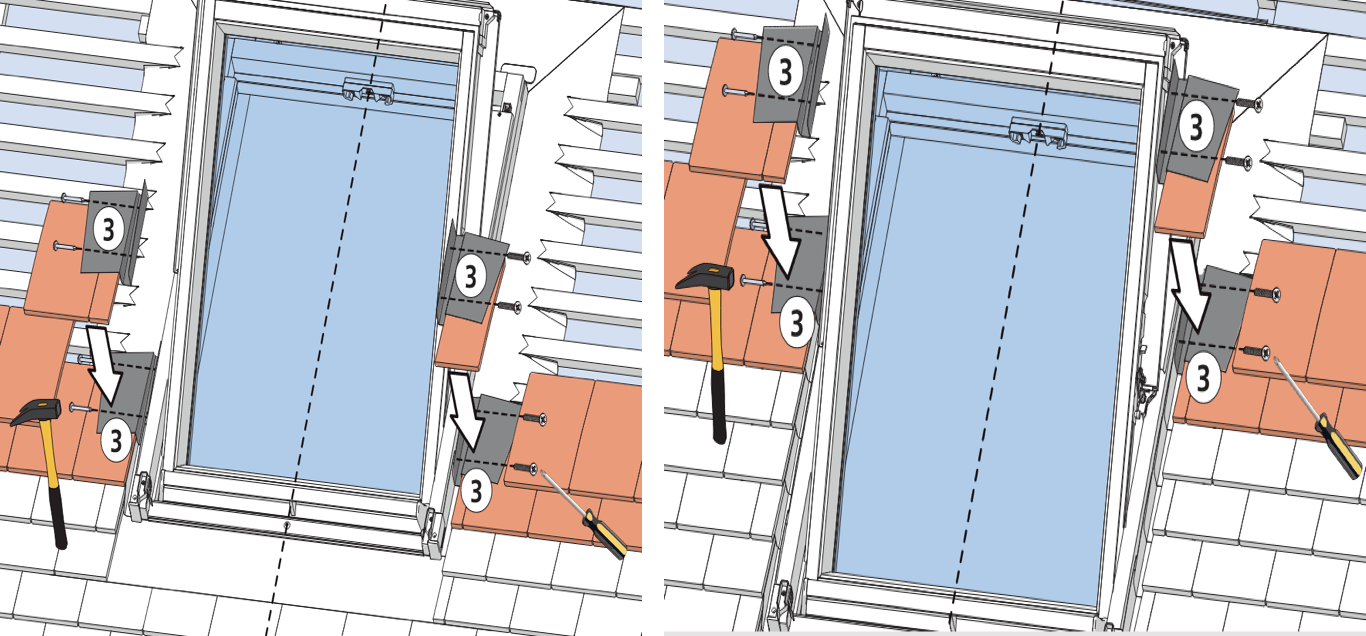
Install side installations ensuring they are the correct way around and that they are slid underneath the plastic frame end cap.
Keylite Accredited Installer Academy
TRF/DTRF Flashing Installation
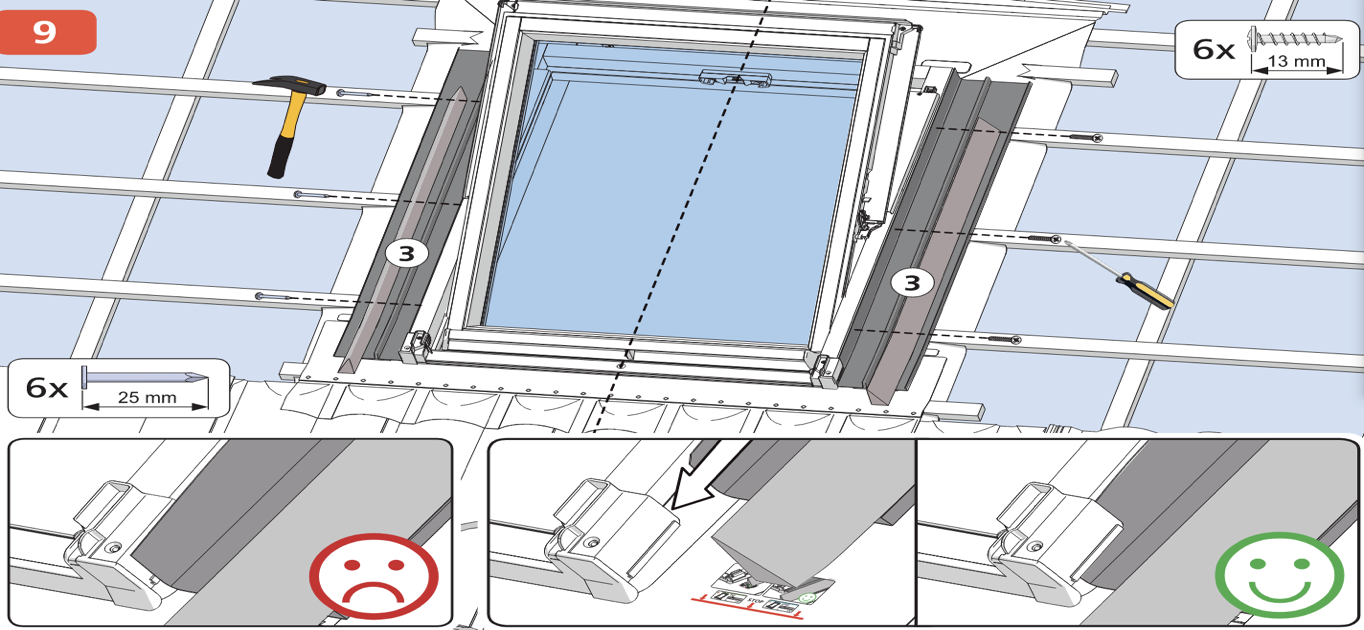
Fold the side of the bottom apron over the side installations. This will stop any pooling water or wind driven rain fall from running into the roof space. Ensure that the apron is fold over to the top of the tile beneath the apron.
Keylite Accredited Installer Academy
TRF/DTRF Flashing Installation
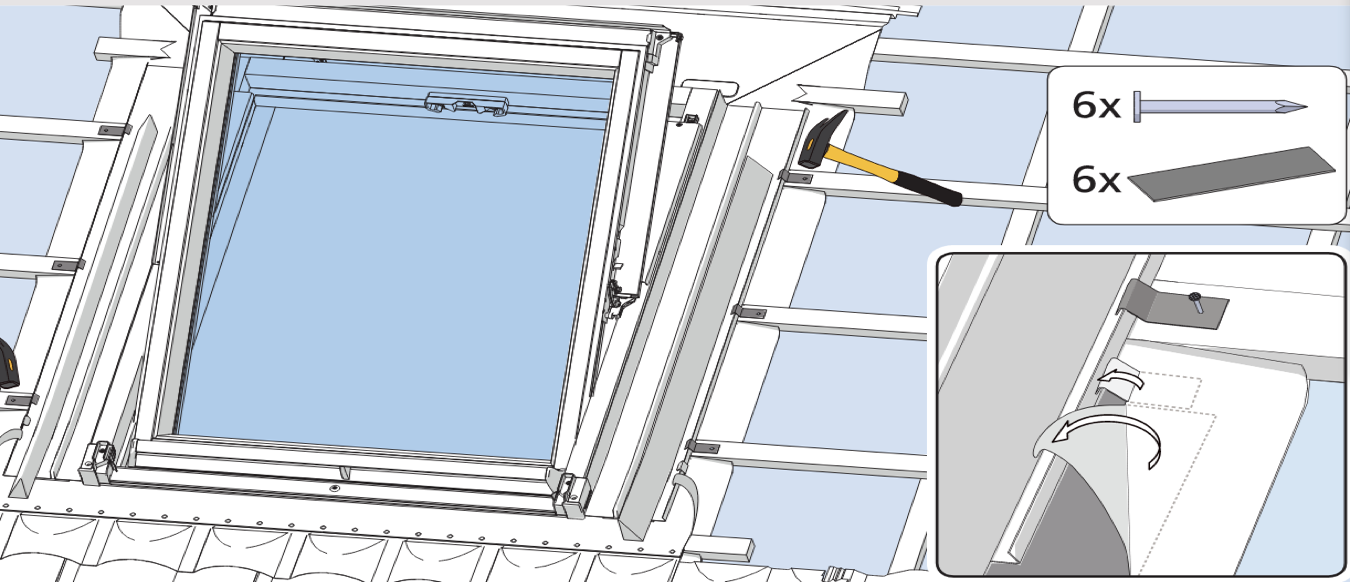
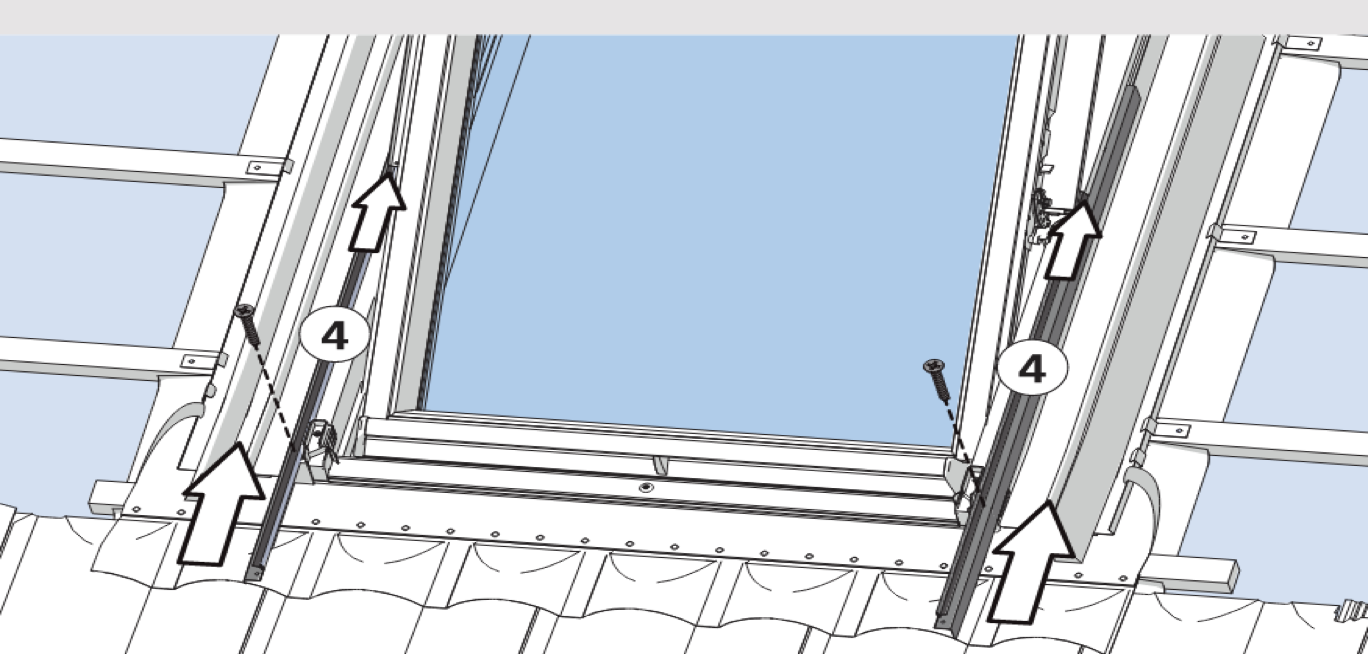
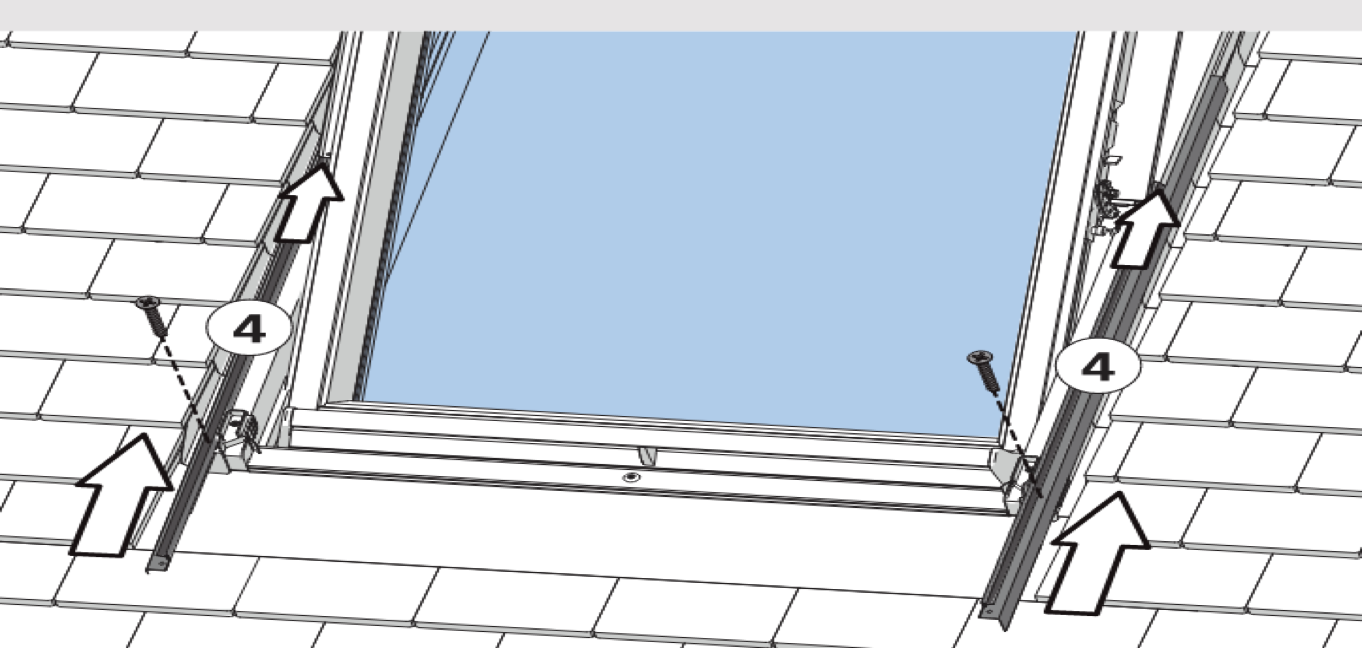
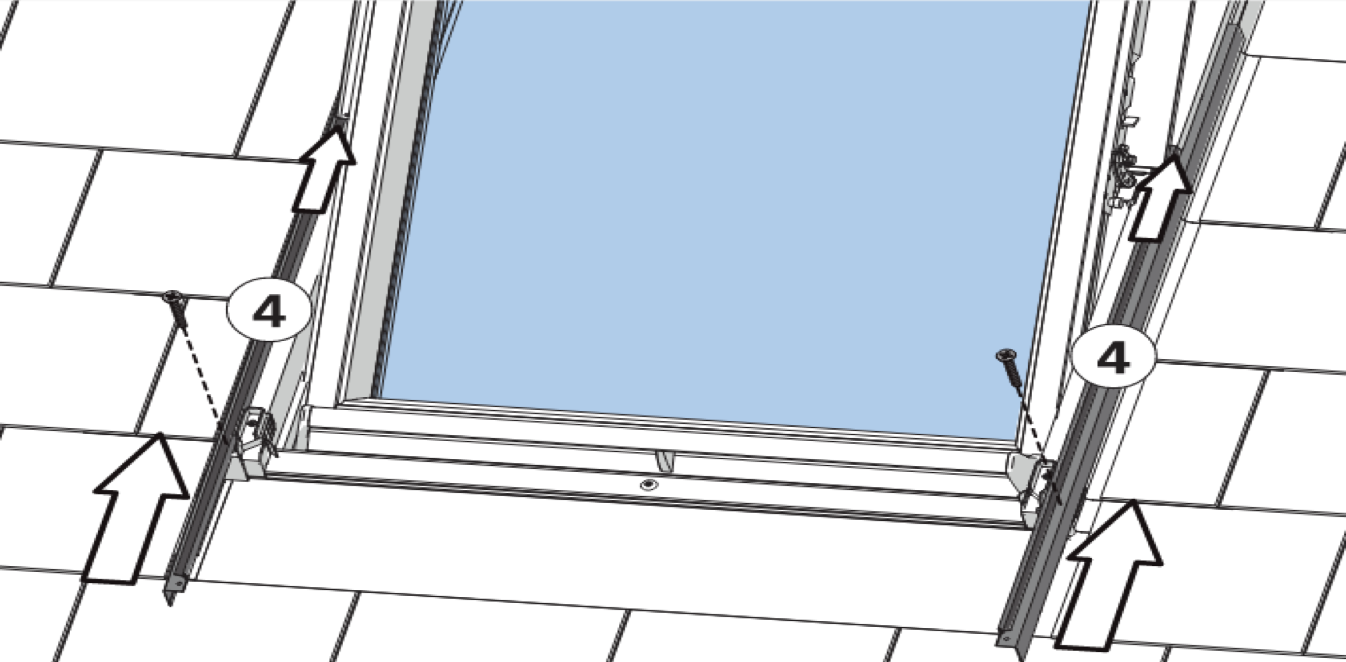
Install the frame side flashings by sliding the up and under the frame c-channels.
Keylite Accredited Installer Academy
TRF/DTRF Flashing Installation
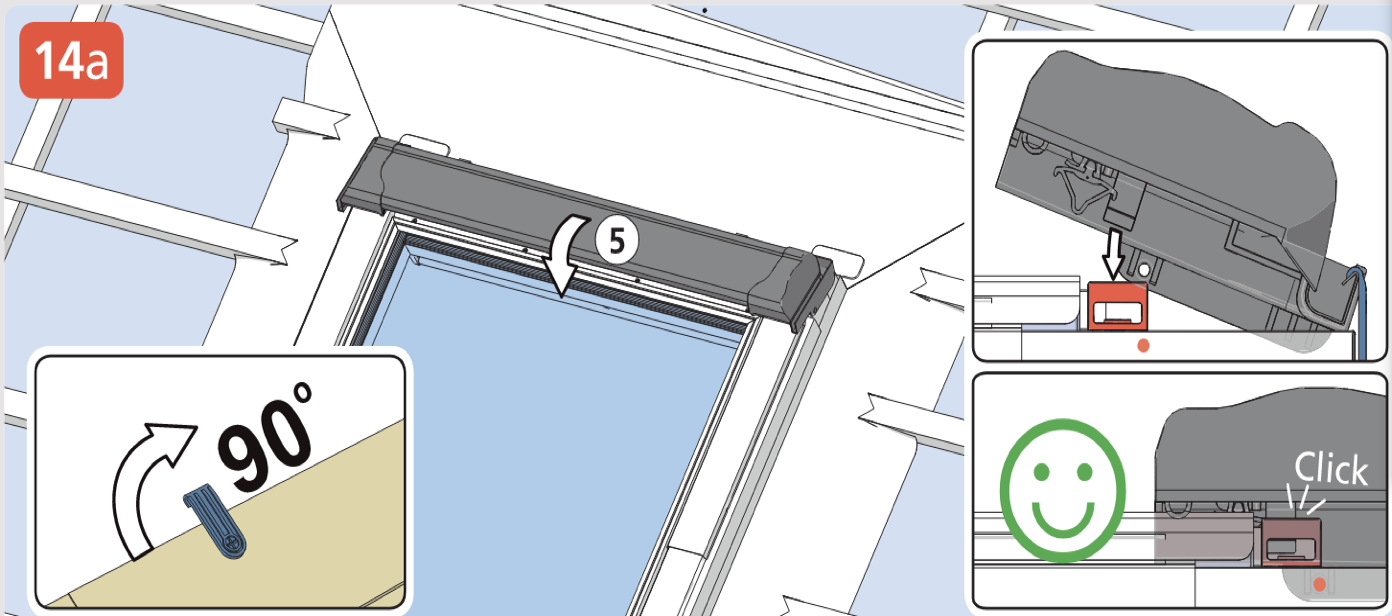
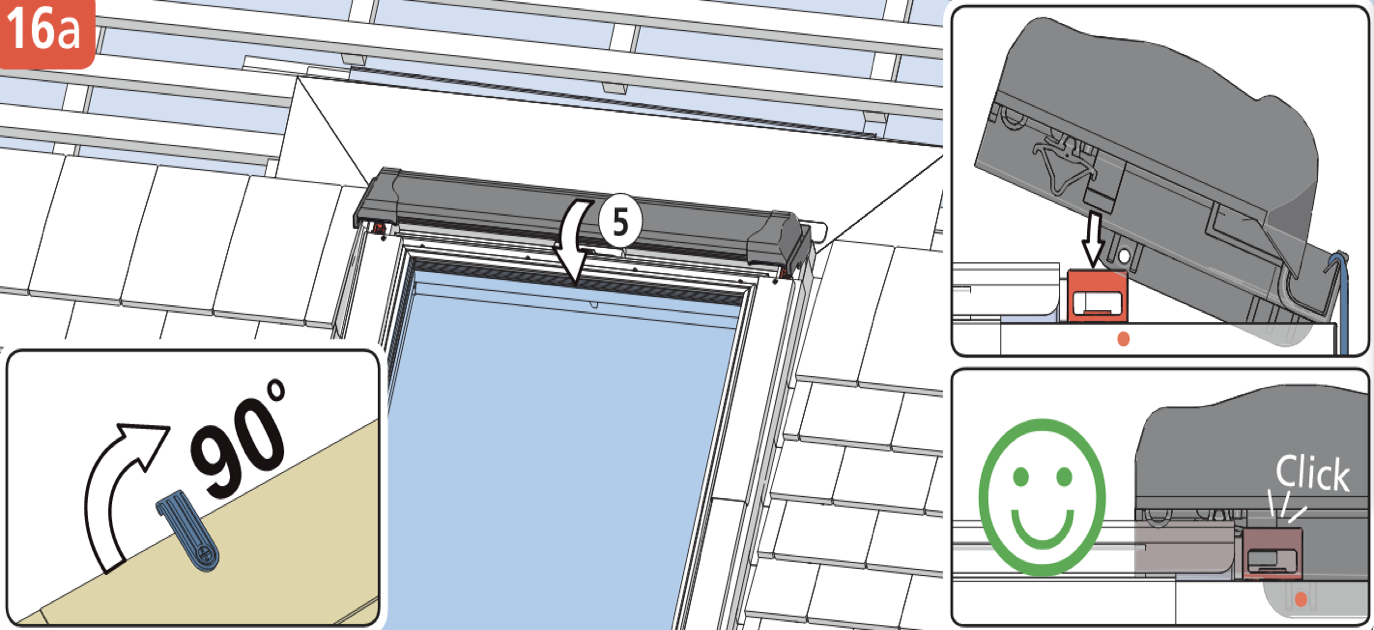
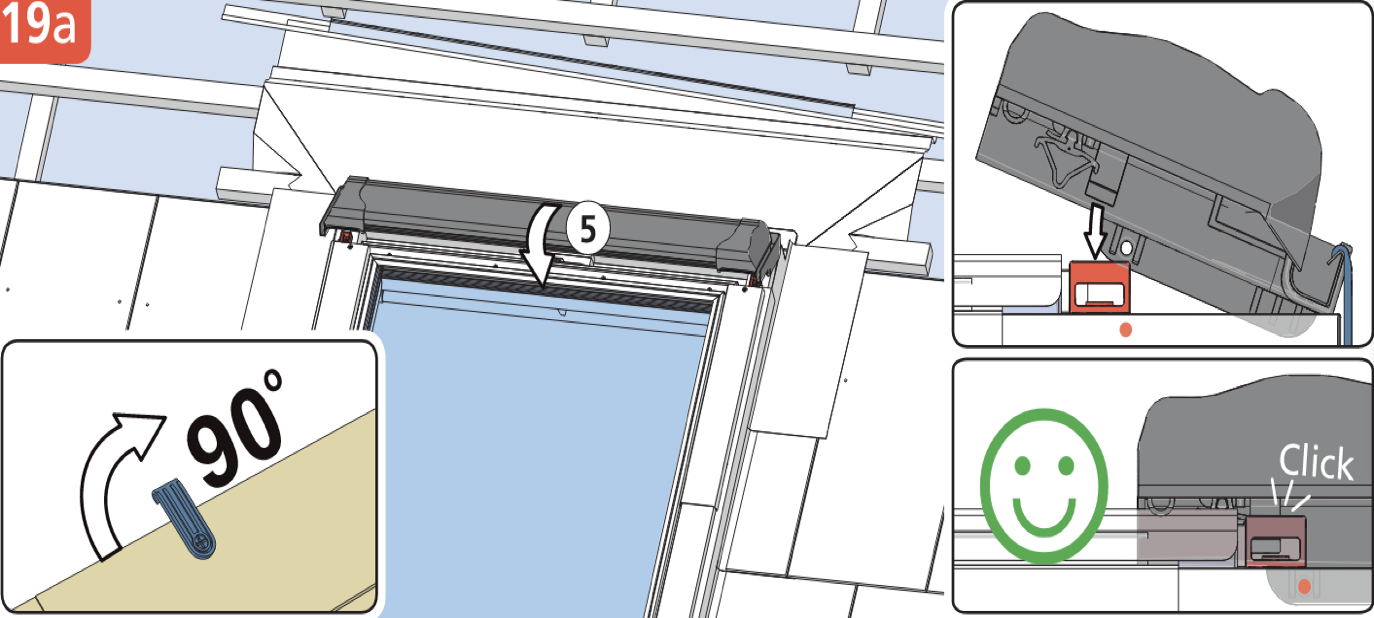
Fold out the blue guide at the top of the frame. Place the top lip of the hood flashing into the lip of these guides and click the hood flashing into place.
Keylite Accredited Installer Academy
TRF/DTRF Flashing Installation
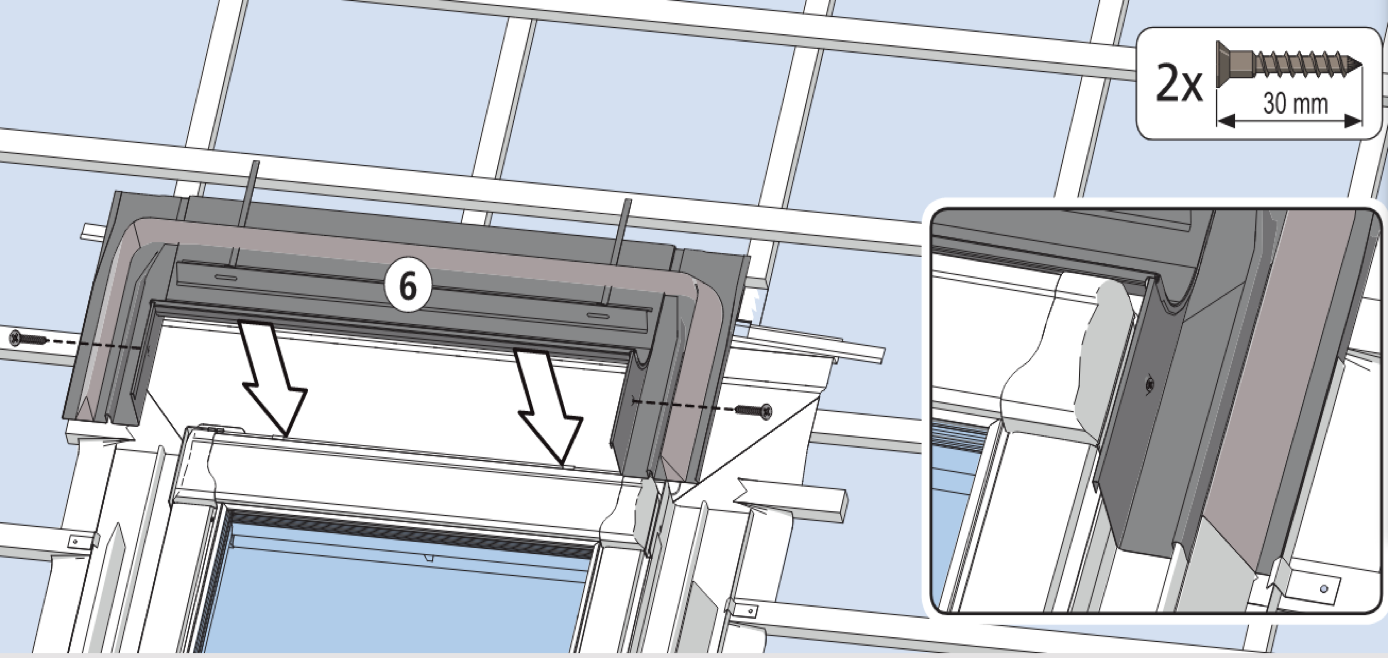
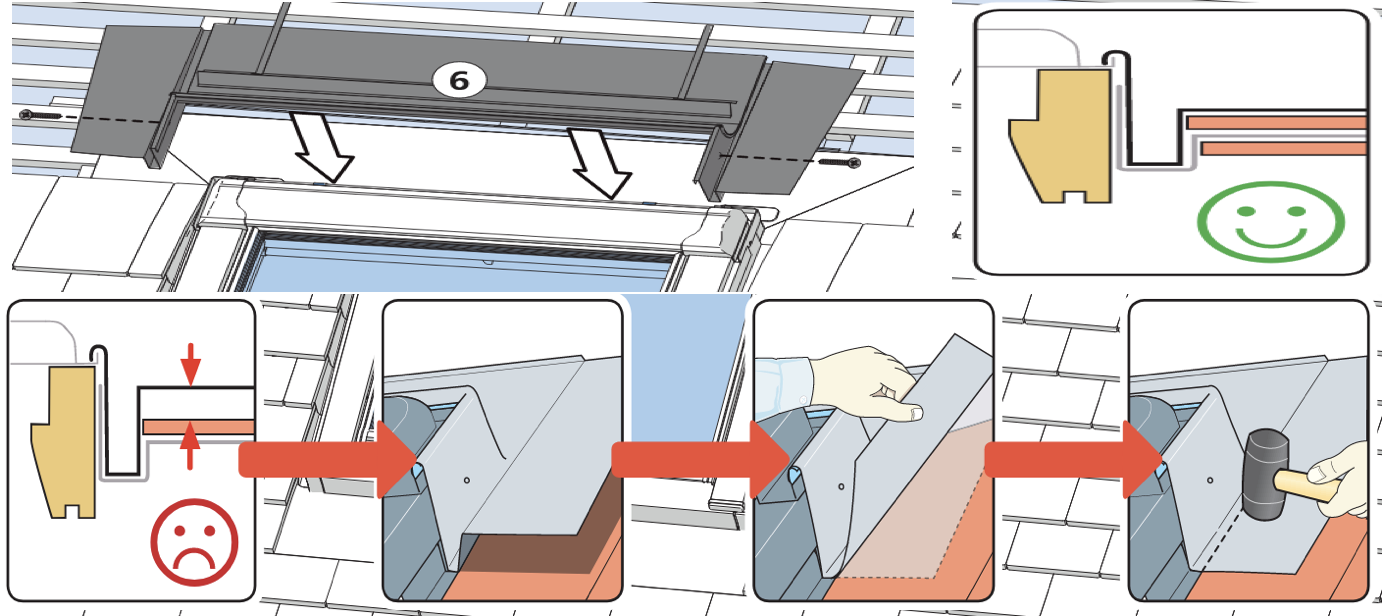
Install the top apron and fix into place using the two powder coated screws to the sides.
Keylite Accredited Installer Academy
TRF/DTRF Flashing Installation
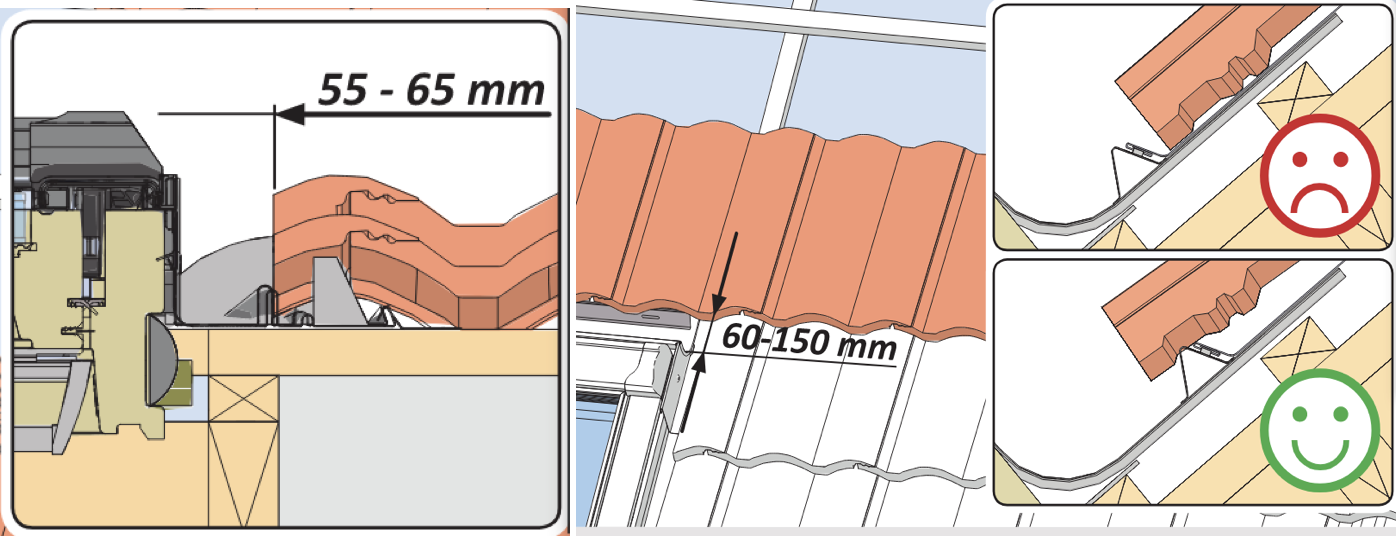
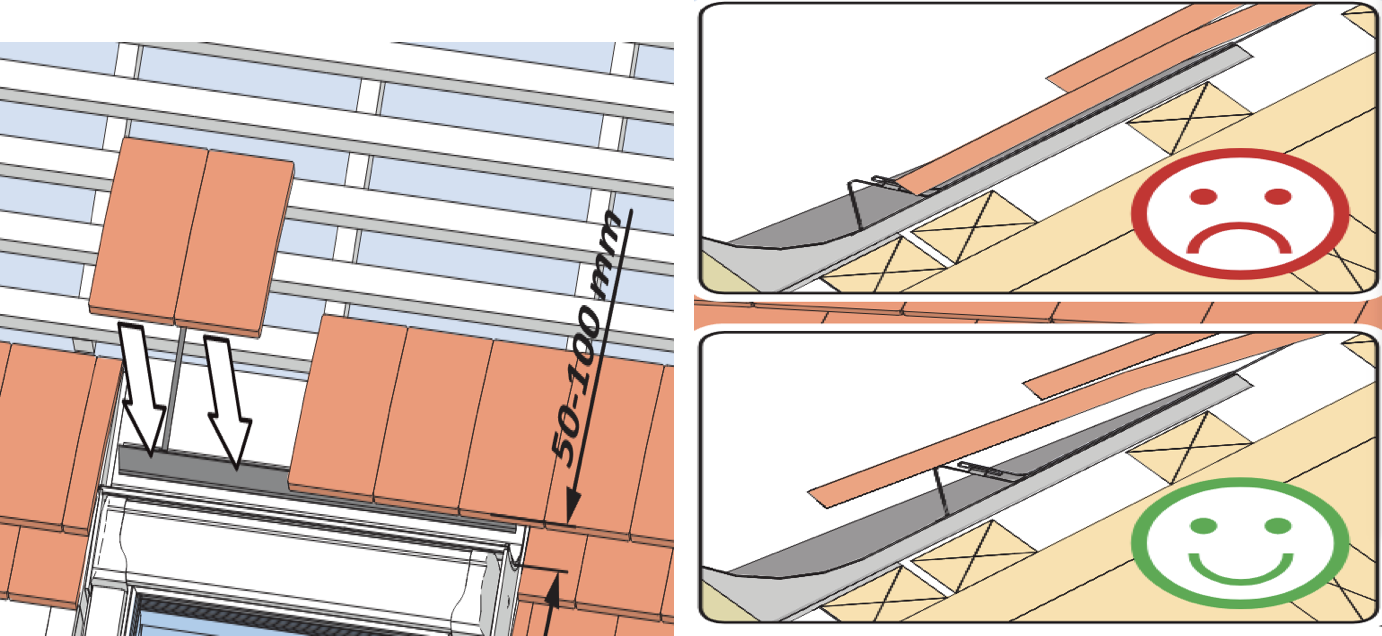
Install tiles to the sides and above the roof window, overlapping the flashing kit. The tiles to the sides of the window must be 55-65mm away from the window frame. The tiles to the top of the window must be 60-150mm away from the window frame. Failure to abide to these dimensions may result in water ingress.
Keylite Accredited Installer Academy
TRF/DTRF Flashing Installation
Now the flashing kit is installed, activate the thermal integral collar on the outer perimeter of the window frame.
Keylite Accredited Installer Academy
TRF/DTRF Flashing Installation

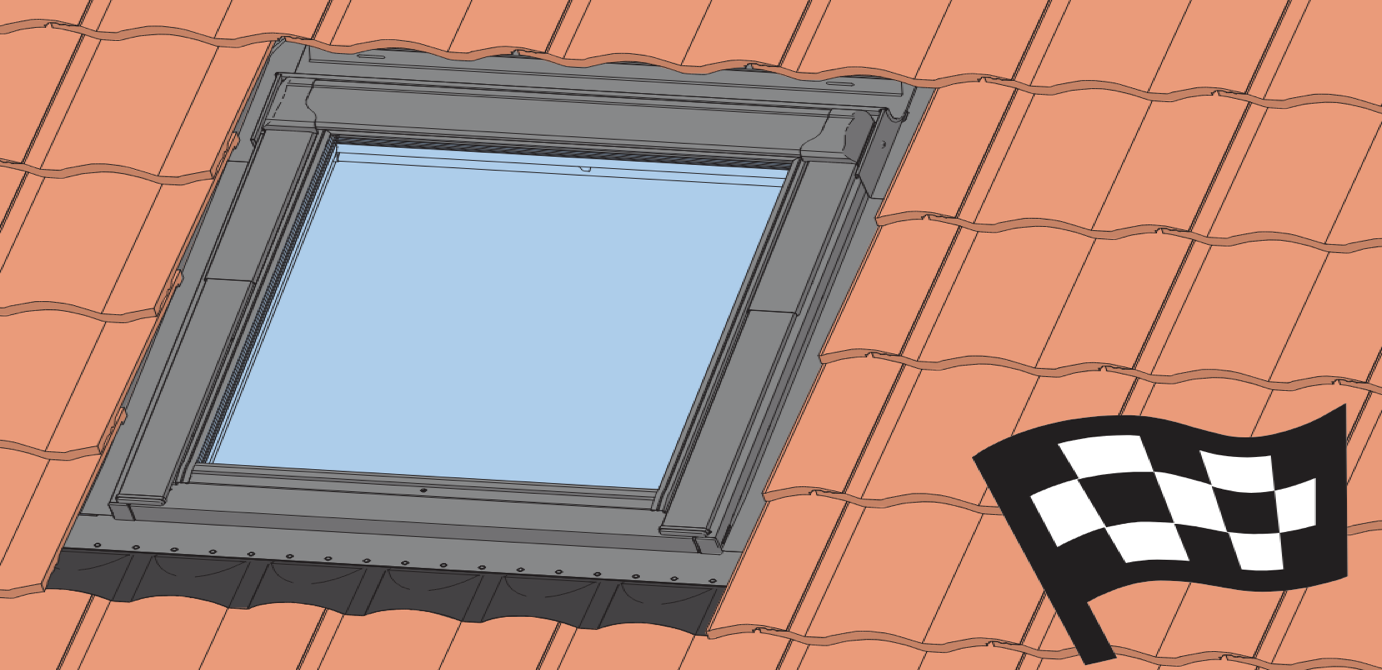
TRF/DTRF flashing installation completed.
Keylite Accredited Installer Academy
TRF/DTRF Flashing Installation
PTRF Flashing Installation
First row of tiles beneath the window may need to be eaves tiles. The tiles overlapping the window bracket may also kick up, as a result the tiles may need to be cut to avoid this.
Keylite Accredited Installer Academy
PTRF Flashing Installation
Install the bottom apron over the timber frame of the window and install the bottom frame piece to secure the bottom apron into place. Ensure the bottom frame piece is flush and not raised up.
Keylite Accredited Installer Academy
PTRF Flashing Installation
Two tiles must be installed above the bottom apron to the sides of the window before the first side soaker is installed. The first side soaker is different in appearance to all other soakers as it has a cut out to the lower section of it. Ensure the side soaker is slid under the plastic frame end cap.
Keylite Accredited Installer Academy
PTRF Flashing Installation
Install a side soaker with every tile from then on as per below.
Keylite Accredited Installer Academy
PTRF Flashing Installation
Side soakers must cover the full length of the frame. When the last side soaker has been installed covering the very top of the frame, install the last tile above it.
Keylite Accredited Installer Academy
PTRF Flashing Installation

Install the frame side flashing sliding them up beneath the frame c-channels.
Keylite Accredited Installer Academy
PTRF Flashing Installation
Fold out the blue guide at the top of the frame. Place the top lip of the hood flashing into the lip of these guides and click the hood flashing into place.
Keylite Accredited Installer Academy
PTRF Flashing Installation
Install the top apron and fix into place using the two powder-coated screws to the sides. The sides of the apron must be refolded on site to suit the height of the tile beneath it.
Keylite Accredited Installer Academy
PTRF Flashing Installation
Install the top row of tiles above the roof window overlapping the top apron and tile hanger. The top row of tiles must be installed 50-100mm away from the to of the window frame.
Keylite Accredited Installer Academy
PTRF Flashing Installation
Now the flashing kit is installed, activate the thermal integral collar on the outer perimeter of the window frame.
Keylite Accredited Installer Academy
PTRF Flashing Installation

PTRF flashing installation completed.
Keylite Accredited Installer Academy
PTRF Flashing Installation
SRF Flashing Installation
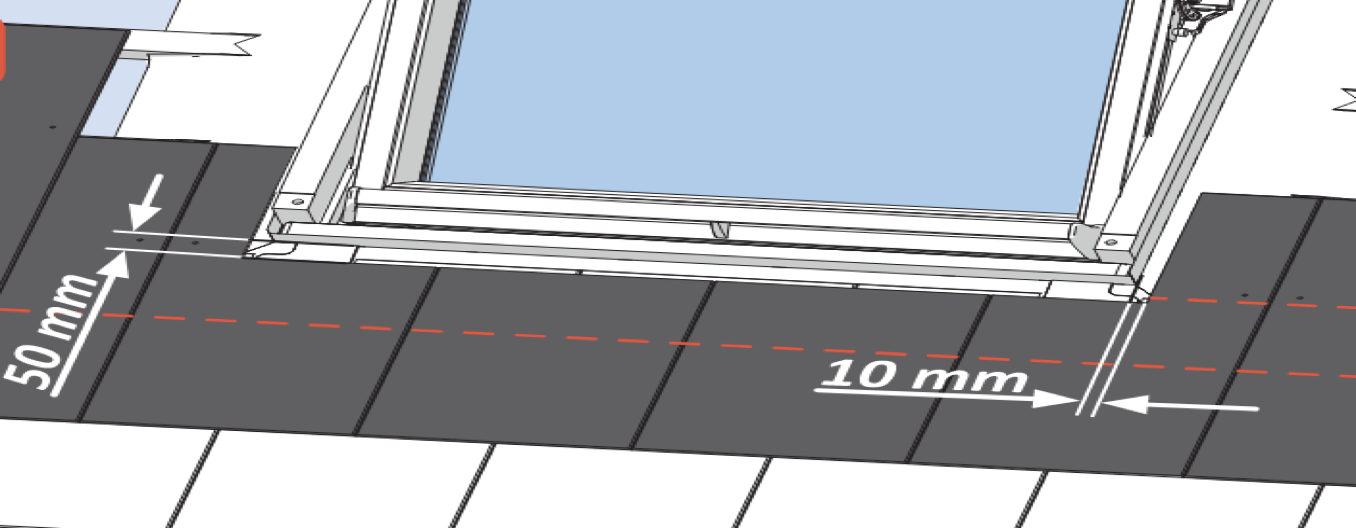
Install the slates to the bottom of the roof window. Ensure to leave a 10mm gap to the sides of the window and a 50mm gap to the bottom of the window. This is to ensure that the bottom apron sits flush using these gaps. Failure to abide by this rule may lead to water ingress, open/closing window issues and slates to sit up high.
Keylite Accredited Installer Academy
Roof Window Installation
Install the bottom apron of the SRF and install the bottom frame piece to secure this into place.
Keylite Accredited Installer Academy
Roof Window Installation
Install the first side soaker directly over the aluminium of the bottom apron without any slates in between. Ensure the soaker is slid down beneath the plastic frame end cap.
Keylite Accredited Installer Academy
Roof Window Installation
Install the slates over the overlapping side soaker and bottom aprons.
Keylite Accredited Installer Academy
Roof Window Installation
Continue to install side soakers with the slates up the side of the window frame. The last side soaker you may find runs up higher than the top of the frame itself. This is correct to provider a sufficient head lap. When this does happen, cut the side soaker 90 degree fin off from the point at the top of the frame upwards. This cut ensures the top apron can be installed with the fin hindering this.
Keylite Accredited Installer Academy
Roof Window Installation
Install the frame side flashings by sliding them upwards underneath the frame c-channels.
Keylite Accredited Installer Academy
Roof Window Installation
Fold out the blue guide at the top of the frame. Place the top lip of the hood flashing into the lip of these guides and click the hood flashing into place.
Keylite Accredited Installer Academy
Roof Window Installation
Install the top apron directly over the side soakers ensuring no slates are installed in between.
Keylite Accredited Installer Academy
Roof Window Installation

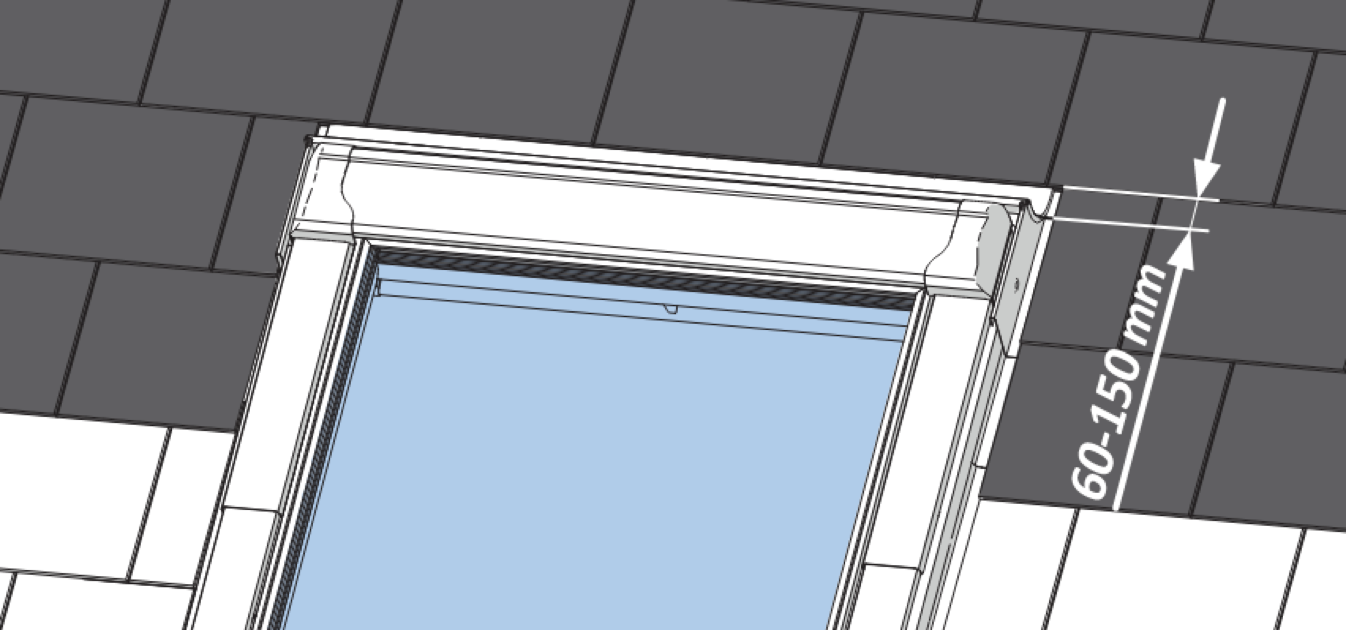
Install slates above the roof window overlapping the flashing kit ensuring that the slates are installed 60-150mm away from the window frame.
Keylite Accredited Installer Academy
Roof Window Installation
Now the flashing kit is installed, activate the thermal integral collar on the outer perimeter of the window frame.
Keylite Accredited Installer Academy
Roof Window Installation
PTRF flashing installation completed.
Keylite Accredited Installer Academy
Roof Window Installation