Angular Tutorial
第七課 Promise/Observable與Firebase資料庫
Outline
- Promise與RxJS Observable
- Firebase資料庫: Cloud Firestore
非同步執行:Promise
- 什麼是Promise?
什麼是Promise? (1/3)
父母「承諾」將來進大學後買手機給妳
Promise
進大學後真的拿到了
狀況一
進大學後沒拿到!
狀況二
resolved
rejected
pending
從承諾當天開始
直到resolved或rejected
什麼是Promise? (2/3)
interface PhoneInterface {
  brand: string;
  color: string;
  type: string;
}

var isMomHappy: boolean = false;
// 建立承諾 new Promise(resolve, reject)
var willIGetNewPhone = new Promise((resolve, reject) => {
  if (isMomHappy === true) {    // case1: 會拿到手機的情況
    var phone: PhoneInterface = {  /* 建立手機物件 */
      brand: 'Apple',
      color: 'black',
      type: 'iPhone 11'
    }

    resolve(phone)  /* 成立時呼叫 resolve, 回傳手機 */
  } else {                      // case2: 不會拿到手機的情況
    var reason = new Error('Mom is unhappy'); /* 設定理由 */
    reject(reason)  /* 不成立時,回傳理由 */
  }
什麼是Promise? (3/3)
promise函式(參數1, 參數2...).then().catch();
promise變數.then().catch();
.then( (回傳結果) => 敘述式 )
或是
.then( (回傳結果) => { 多行敘述 以分號分隔 } ).then( (result) => console.log(result) )
.then( (result) => {
    console.log(result);
    this.user = result;
})
.then()為promise成功回傳的回呼函式
.catch()為promise失敗的回呼函式
willIGetNewPhone   /* 非同步變數, 等待執行 */
.then(   /* resolve 呼叫的回呼函式 */
    (/*參數*/) => { /* 函式主體 */}
)
.catch(  /* reject 呼叫的回呼函式 */
    (/*參數*/) => { /* 函式主體 */}
);
RxJS Observable
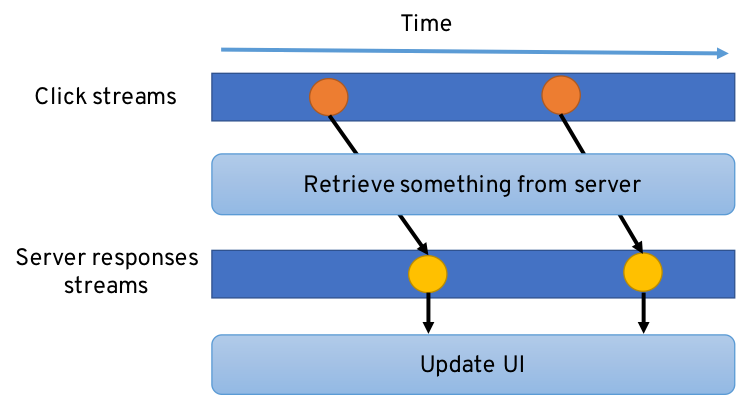
- 處理「非同步資料流」
出版-訂閱 設計模式 Publisher-Subscriber Design Pattern
https://developers.redhat.com/blog/wp-content/uploads/2017/06/reactive-programming.png
時間軸
隨時間出版事件
Emitter: 通知訂閱者
更新畫面
出版-訂閱設計模式
事件1
事件2
訂閱者: 訂閱後等待通知
出版者
滑鼠點擊
資料庫查詢
網頁資料讀取
讀取檔案內容
訂閱者
輸入介面
商品展示畫面
Observable
通
知
訂
閱
出
版
出版-訂閱設計模式
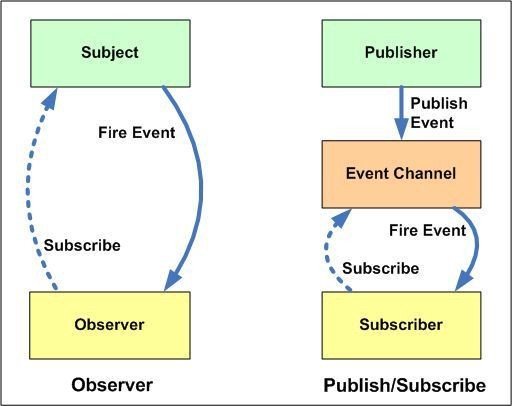
❷ 訂閱
❸ 資料陸續產生publish
❹通知
❶ Observable
➦
➦
訂閱-出版設計模式
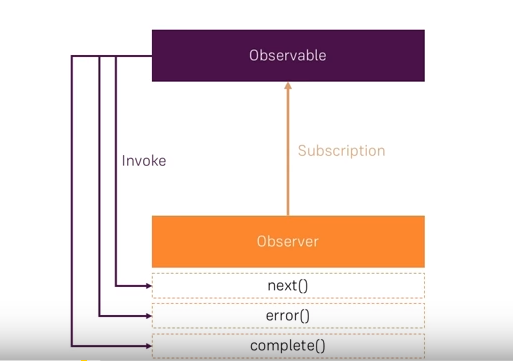
❷ Observer訂閱
❸ 資料陸續產生
❹ 通知
❶ Observable建立起來
下一筆資料
發生錯誤
結束
Observer
Firebase資料庫
- 使用Firebase資料庫:Cloud Firestore
SQL CRUD
Create (新增)
Read (查詢)
Update (修改)
Delete (刪除)
NoSQL ?
Push / Add (新增)
List / Object (查詢)
Update / Set (修改)
Remove (刪除)
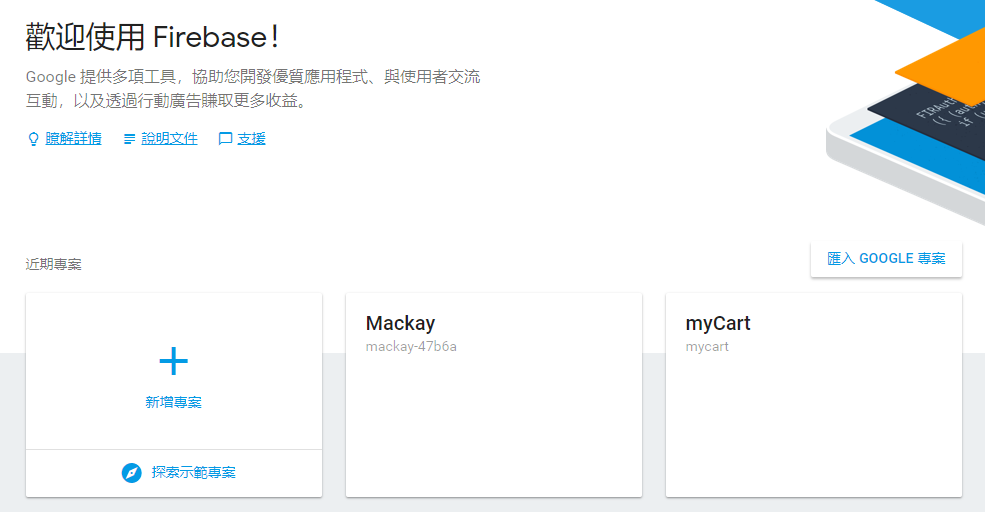
使用Firebase資料庫 前置工作(1/8)
-
安裝firebase, @angular/fire套件
npm install firebase @angular/firefirebase: v. 8.1.2
@angular/fire: v. 6.1.4
2020/12/10
有時會有與Angular版本不相容的問題
安裝時需留意版本序號
ng add @angular/fire或
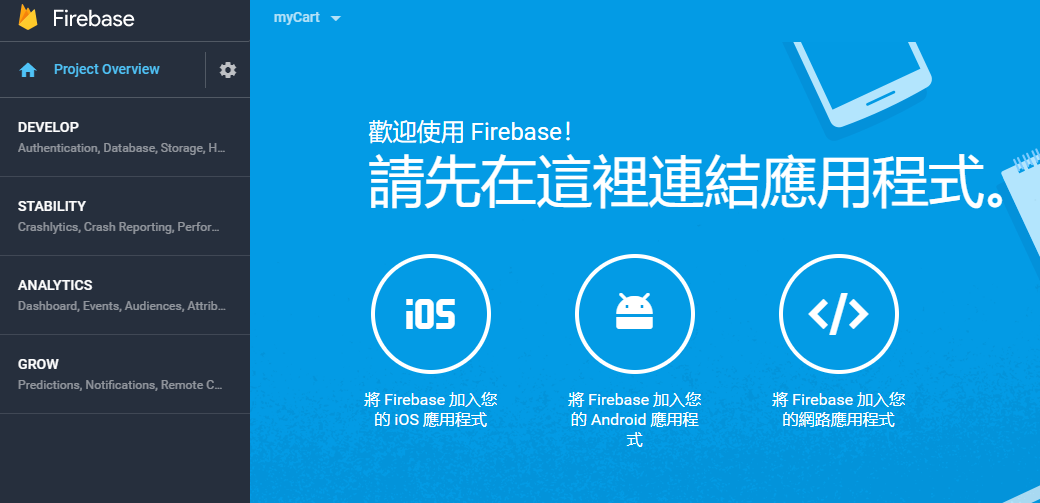
使用Firebase資料庫 前置工作(2/8)
使用Firebase資料庫 前置工作(3/8)
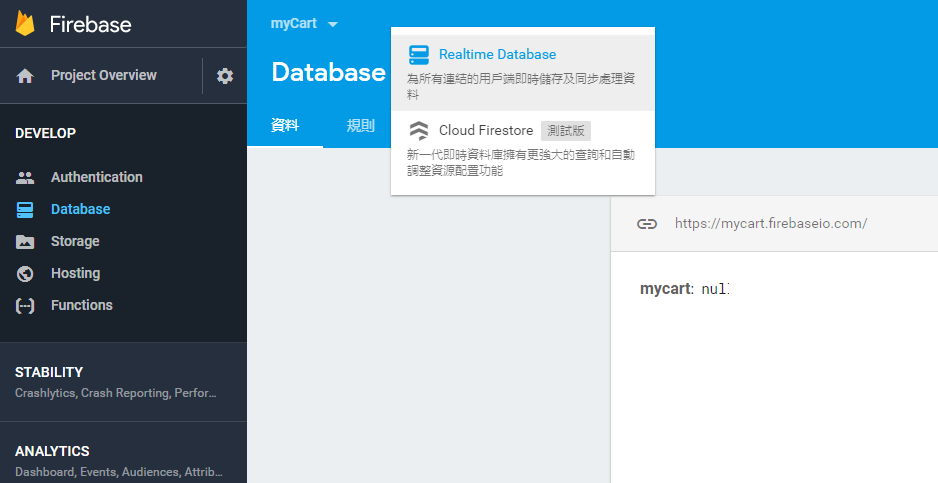
選擇 Cloud Firestore
使用Firebase資料庫 前置工作(4/8)

留意安全性規則設定
使用Firebase資料庫 前置工作(5/8)
以鎖定模式啟動
service cloud.firestore {
  match /databases/{database}/documents {
    match /{document=**} {
      allow read, write;
    }
  }
}
service cloud.firestore {
match /databases/{database}/documents {
match /{document=**} {
allow read, write: if false;
}
}
}
以測試模式啟動
任何人都不能讀寫!
任何人都能讀寫!
修改安全性規則
做好資料庫權限控管
測試期採用
使用Firebase資料庫 前置工作(6/8)
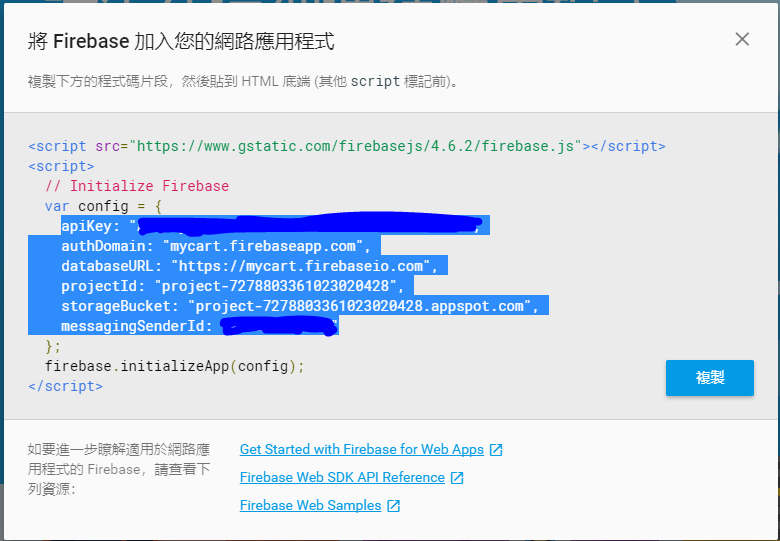
複製反白區域
使用Firebase資料庫 前置工作(7/8)
export const environment = {
  production: false,
  firebaseConfig: {
    apiKey: 'XXXXXXXXXXXXXXXXXXXXXXXXXXXXXXXXXXXXX',
    authDomain: '專案id.firebaseapp.com',
    databaseURL: 'https://專案id.firebaseio.com',
    projectId: '專案id',
    storageBucket: '專案id.appspot.com',
    messagingSenderId: 'XXXXXXXXXXXX'
  }
};
修改environments/environment.ts
將上頁複製內容貼上
使用Firebase資料庫 前置工作(8/8)
import { NgModule } from '@angular/core';

import { AngularFireModule } from '@angular/fire';
import { AngularFirestoreModule } from '@angular/fire/firestore';
import { environment } from '../environments/environment';

...略...

@NgModule({

...略...

  imports: [
    BrowserModule,
    AngularFireModule.initializeApp(environment.firebaseConfig),
    AngularFirestoreModule
  ],
  ...略...
})
修改app.module.ts
Firestore 資料模型
- NoSQL
- 集合(Collection)
- 集合內可含多個文件(Document)
- 每一文件內可含多個欄位

2個集合

prodcuts集合內含6個文件
此文件有4個欄位
Firestore 資料模型設計原則

1. Root Collections
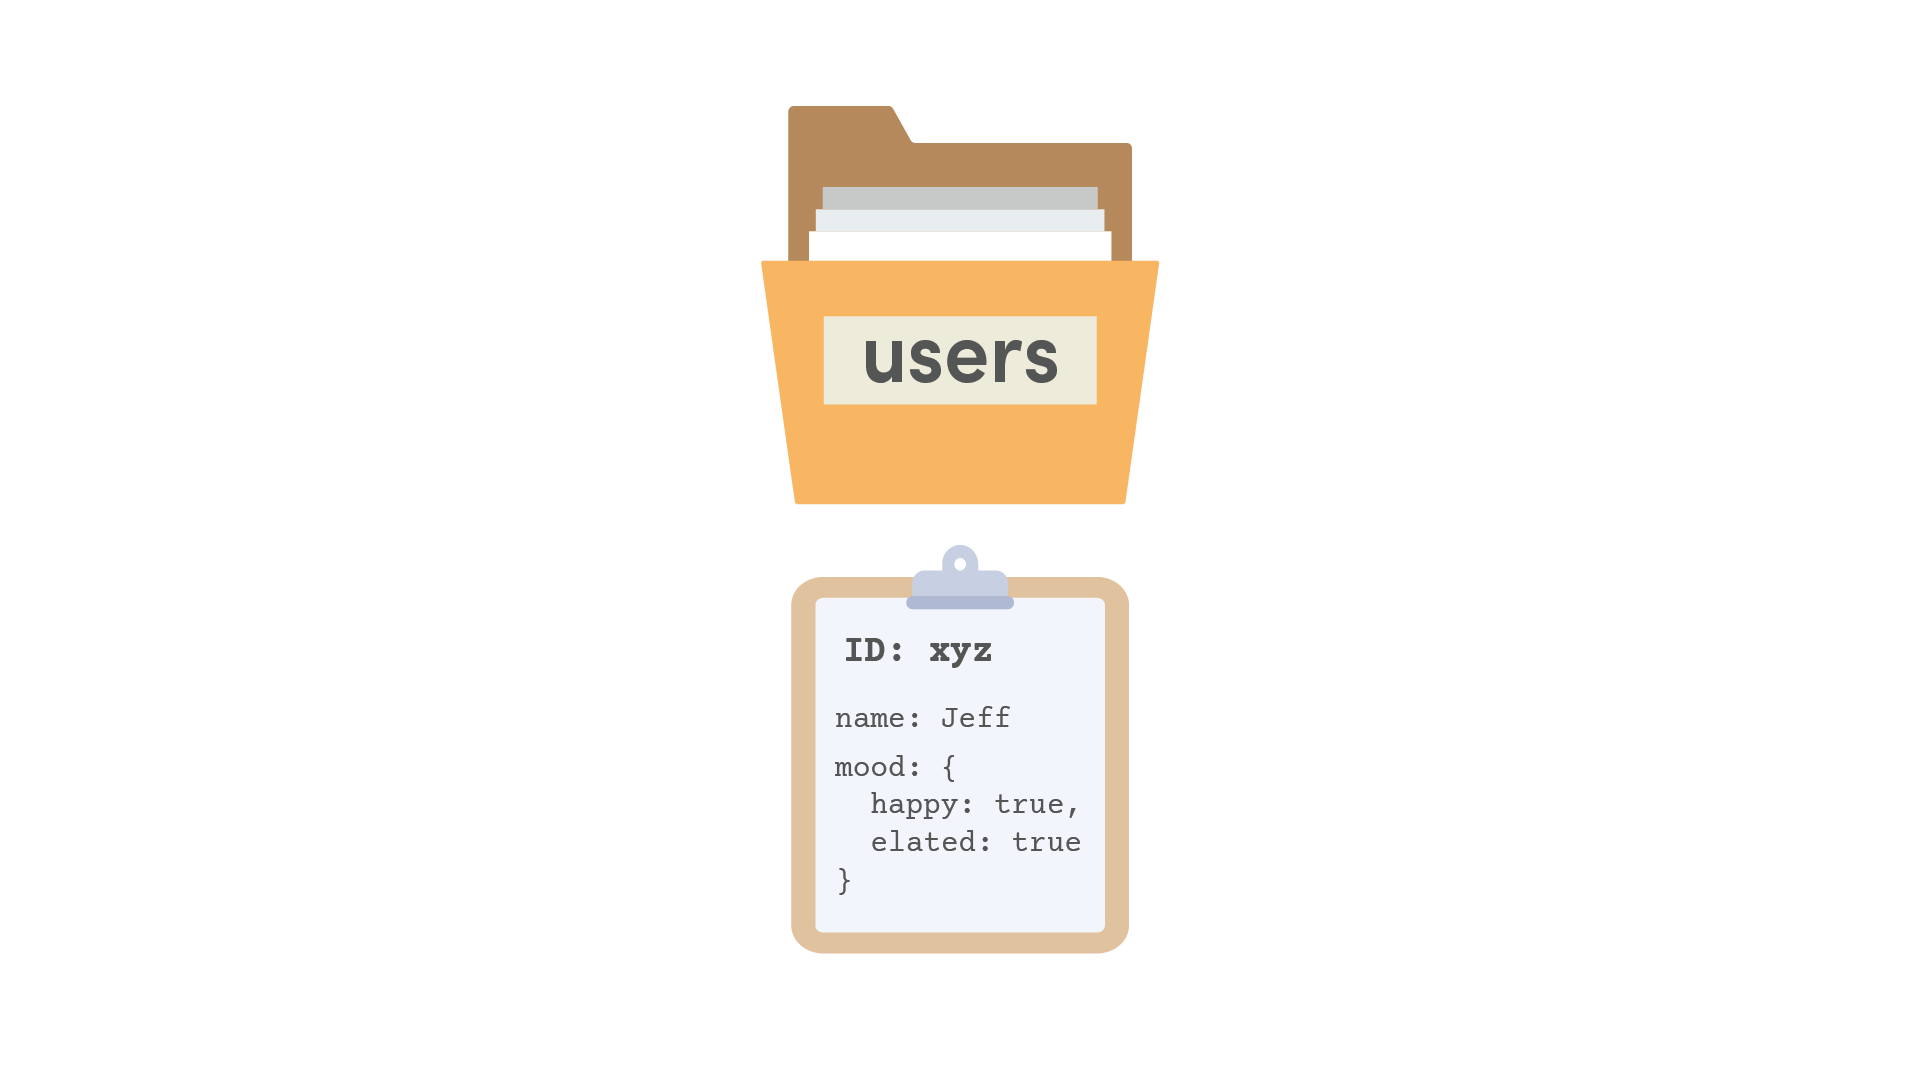
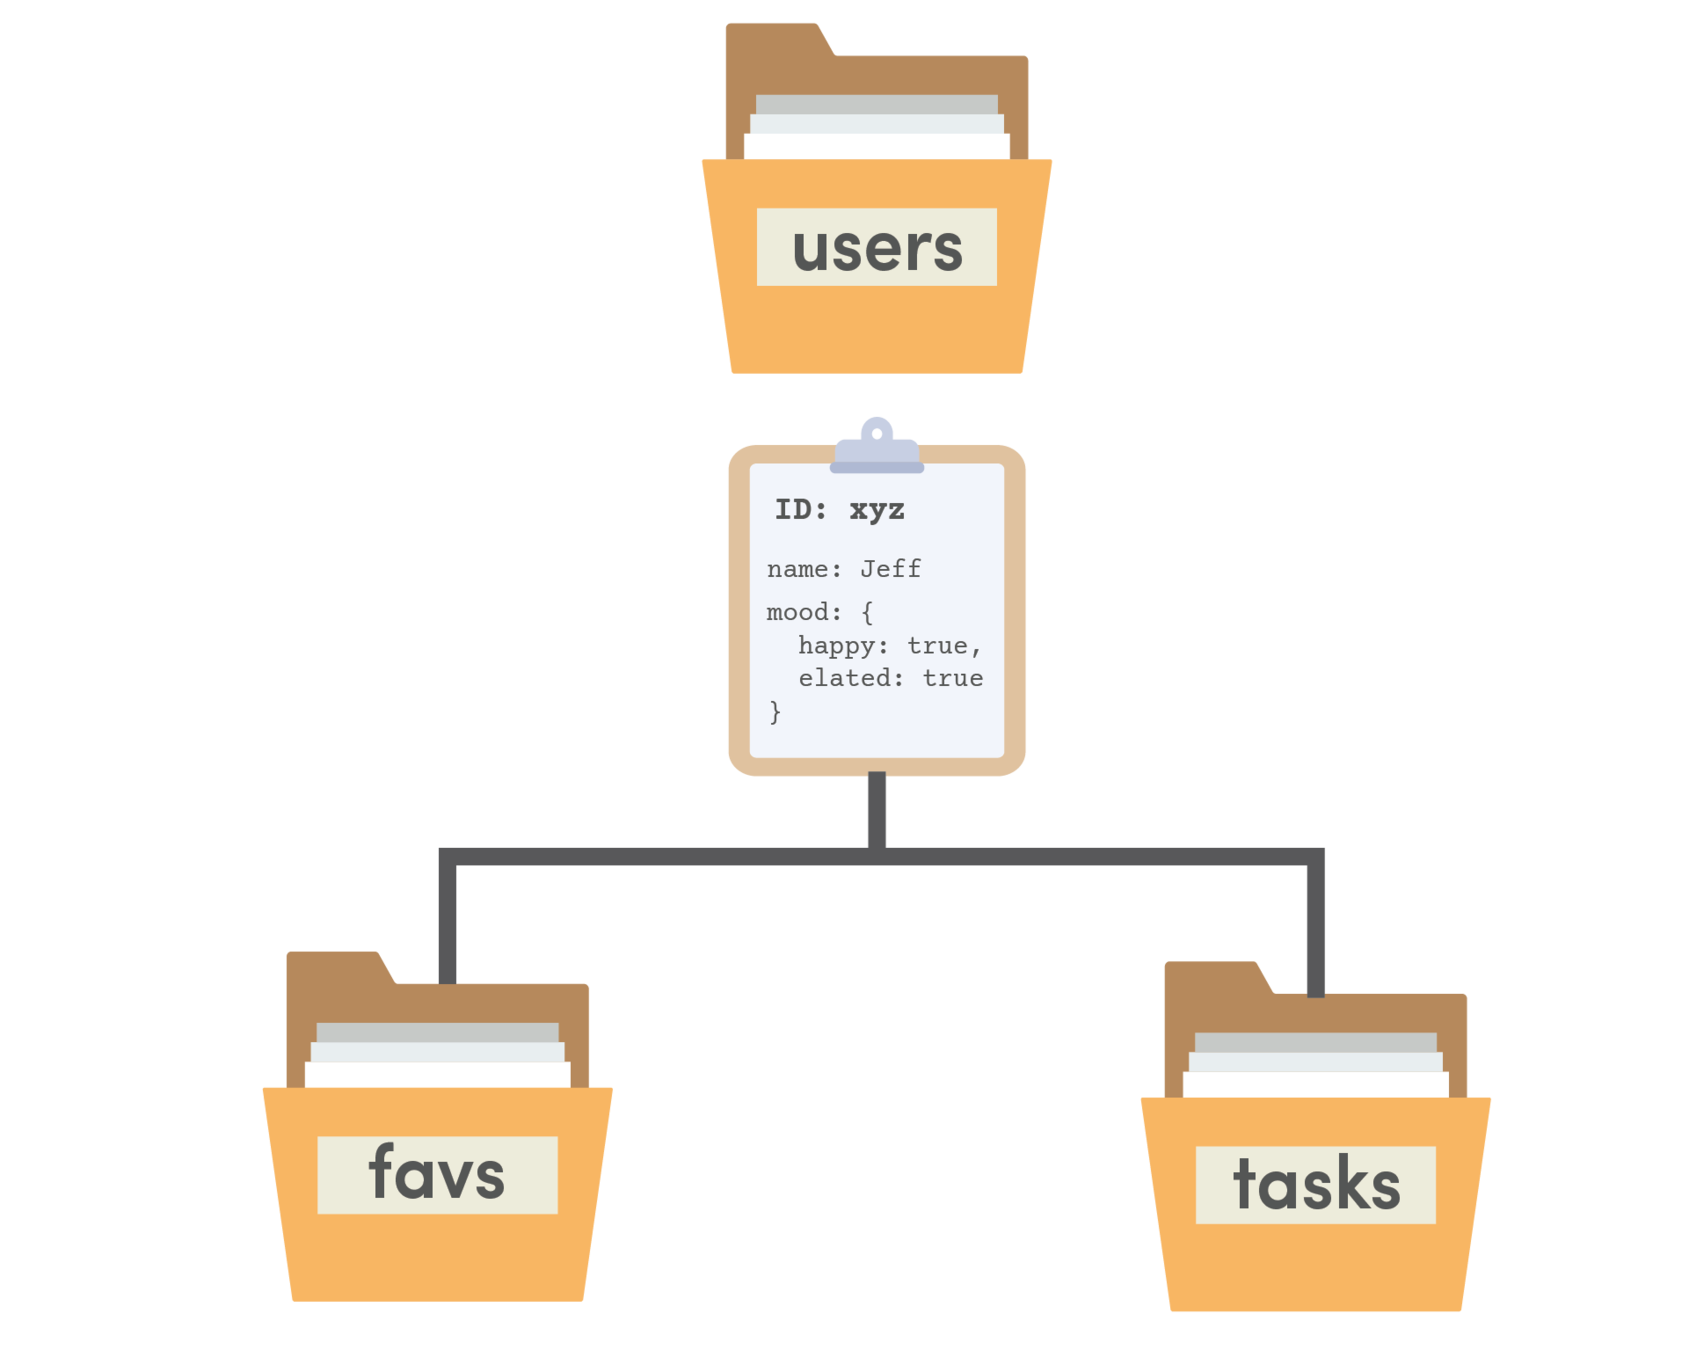
2. Embedded Data
mood欄位值為
兩個欄位的文件
3. Subcollections
除欄位外,文件內也可包含子集合
Firestore 資料模型設計原則
關聯式資料庫之relationships
1個員工分配1台電腦
1個部門負責很多個專案
每台電腦只屬於某個員工
適用 Embedded Data
每個專案只屬於1個部門
1個員工負責很多個專案
每個專案隸屬於多個員工
可用 Root Collections
Subcollections
或 Embedded Data
經常查詢某部門專案 也
經常條件式查詢所有專案
專案查詢功能不涉及跨部門
Firestore資料模型設計方式
專案資料量少又欄位簡單
或 Root Collections
資料量少又欄位簡單
資料量大
額外加上第三個Collection
包含employeeId, projectId
在各自Collection內加入Embedded Data
在每個員工下重複儲存專案資料
在每個專案下重複儲存員工資料
Subcollections
將上述embedded data改成subcollections
客戶管理範例
- 範例1: 客戶資料表「查詢」
- 範例2: 客戶資料表「新增/查詢」
- 範例3: 客戶資料表「修改/刪除」
客戶管理範例資料庫需求
銷售代表資料表
客戶資料表
1對多
1對多
工作項目資料表
1對多
練習: 客戶管理
ng g interface _models/customer
ng g service _services/customer

ng g component customer/customer-list
ng g component customer/customer-detail

ng g component customer/customer-form
ng new MyCRM
cd MyCRM
npm install firebase @angular/fire
ng g component dashboard建立專案
firebase資料庫
資料庫存取服務
資料欄位定義
客戶清單
單一客戶資料
客戶資料維護表單(modal)
首頁
首頁: dashboard
會員管理: customer-list
新增客戶: customer-form
Modal視窗
Firebase資料庫前置動作
❶前往Firebase控制台,建立新資料庫
❷修改environmentss/environment.ts,加入firebase連線參數
❸修改app.module.ts加入相關模組/元件
(參考 p.14~p.21)
Ⓐ準備工作
客戶管理bootstrap設定
npm install @ng-bootstrap/ng-bootstrap
<!doctype html>
<html lang="en">
<head>
   <!--...略--->
  <link rel="stylesheet" href="https://stackpath.bootstrapcdn.com/bootstrap/4.1.1/css/bootstrap.min.css" integrity="sha384-WskhaSGFgHYWDcbwN70/dfYBj47jz9qbsMId/iRN3ewGhXQFZCSftd1LZCfmhktB"
    crossorigin="anonymous">
</head>
<body>
  <app-root></app-root>
  <script src="https://code.jquery.com/jquery-3.3.1.slim.min.js" integrity="sha384-q8i/X+965DzO0rT7abK41JStQIAqVgRVzpbzo5smXKp4YfRvH+8abtTE1Pi6jizo"
    crossorigin="anonymous"></script>
  <script src="https://cdnjs.cloudflare.com/ajax/libs/popper.js/1.14.3/umd/popper.min.js" integrity="sha384-ZMP7rVo3mIykV+2+9J3UJ46jBk0WLaUAdn689aCwoqbBJiSnjAK/l8WvCWPIPm49"
    crossorigin="anonymous"></script>
  <script src="https://stackpath.bootstrapcdn.com/bootstrap/4.1.1/js/bootstrap.min.js" integrity="sha384-smHYKdLADwkXOn1EmN1qk/HfnUcbVRZyYmZ4qpPea6sjB/pTJ0euyQp0Mk8ck+5T"
    crossorigin="anonymous"></script>
</body>
</html>
❶ 安裝ng-bootstrap
❷ 加入bootstrap 4 相關css檔, js檔(index.html)
Ⓐ準備工作
index.html
import { BrowserModule } from '@angular/platform-browser';
import { NgModule } from '@angular/core';

import { NgbModule } from '@ng-bootstrap/ng-bootstrap';
import { FormsModule } from '@angular/forms';
// ...[略]...

@NgModule({
  // ...[略]...
  imports: [
    BrowserModule,
    AppRoutingModule,
    NgbModule,
    FormsModule
  ],
  entryComponents: [ CustomerFormComponent ],
  providers: [],
  bootstrap: [AppComponent]
})
export class AppModule { }
❸ 加入外部元件: FormsModule, NgbModule (app.module.ts)
Ⓐ準備工作
app.module.ts
⓵ 引入模組名稱
⓶ 注入模組
客戶管理appModule設定
客戶管理路徑設定
import { CustomerDetailComponent } from './customer/customer-detail/customer-detail.component';
import { CustomerListComponent } from './customer/customer-list/customer-list.component';
import { DashboardComponent } from './dashboard/dashboard.component';
import { NgModule } from '@angular/core';
import { Routes, RouterModule } from '@angular/router';

const routes: Routes = [
  { path: '', redirectTo: '/dashboard', pathMatch: 'full' },
  { path: 'dashboard', component: DashboardComponent },
  { path: 'customer', component: CustomerListComponent },
  { path: 'customer/:cid', component: CustomerDetailComponent }
];

@NgModule({
  imports: [RouterModule.forRoot(routes)],
  exports: [RouterModule]
})
export class AppRoutingModule { }
❹ 在app-routing.module.ts設定兩個路徑
Ⓐ準備工作
app-routing.module.ts
⓶ 三個路徑
⓵ 首頁
⓷ 引入元件名稱
<router-outlet></router-outlet>❺ 在app.component.html使用router-outlet
app.component.html
刪除其他內容
或是加入導覽列Navbar, 頁尾Jumbotrum
客戶管理Font Awesome CSS連結
❻ 加入Font Awesome 圖案css連結
Ⓐ準備工作
<!doctype html>
<html lang="en">
<head>
   <!--...略--->
   <link rel="stylesheet" href="https://use.fontawesome.com/releases/v5.6.1/css/all.css" integrity="sha384-gfdkjb5BdAXd+lj+gudLWI+BXq4IuLW5IT+brZEZsLFm++aCMlF1V92rMkPaX4PP" crossorigin="anonymous">
</head>
<body>
    <!--...略--->
</body>
</html>
index.html
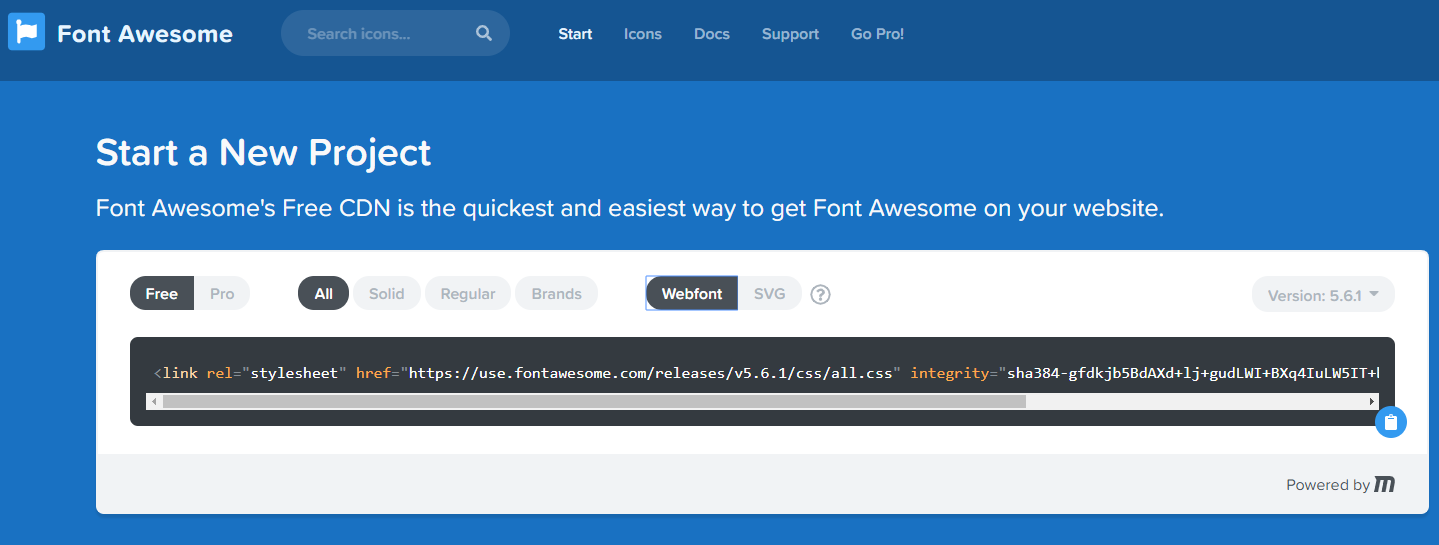
css 連結
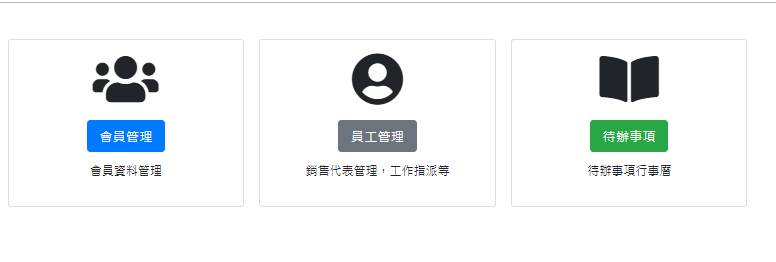
首頁 dashboard
首頁dashboard
<div class="container">
  <div class="card-columns text-center my-5">
    <div class="card p-3">
      <i class="fas fa-users fa-5x"></i>
      <div class="card-body">
        <h4 class="card-title">
          <a class="btn btn-lg btn-primary text-light" [routerLink]="['/customer']">會員管理</a>
        </h4>
        <p class="card-text">會員資料管理</p>
      </div>
    </div>
    <div class="card p-3">
      <i class="fas fa-user-circle fa-5x"></i>
      <div class="card-body">
        <h4 class="card-title">
            <a class="btn btn-lg btn-secondary text-light">員工管理</a>
        </h4>
        <p class="card-text">銷售代表管理,工作指派等</p>
      </div>
    </div>
    <div class="card p-3">
      <i class="fas fa-book-open fa-5x"></i>
      <div class="card-body">
        <h4 class="card-title">
            <a class="btn btn-lg btn-success text-light">待辦事項</a>
        </h4>
        <p class="card-text">待辦事項行事曆</p>
      </div>
    </div>
  </div>
</div> <a class="btn btn-lg btn-primary" [routerLink]="['/customer']">
會員管理
</a>dashboard.component.html
資料存取設計模式
簡化版
客戶資料欄位設定
import { NgbDate } from '@ng-bootstrap/ng-bootstrap/datepicker/ngb-date';

export interface Customer {
    name: string;       // 姓名
    date_init_contact: NgbDate;    // 初次接觸日期
    cell_phone: string; // 手機
    background_info?: string;   // 背景資訊
    customer_id: string;   // 客戶編號
}

// 增加firestore特有的"亂數id"欄位
export interface CustomerId extends Customer { id: string; }
Ⓑ資料存取
_models/customer.ts
⓶ 日期格式
⓵ 5個欄位
⓷ Firestore特有欄位
❶ 建立資料模型檔
客戶資料表: 5個欄位
第6個id欄位:外加Firestore欄位
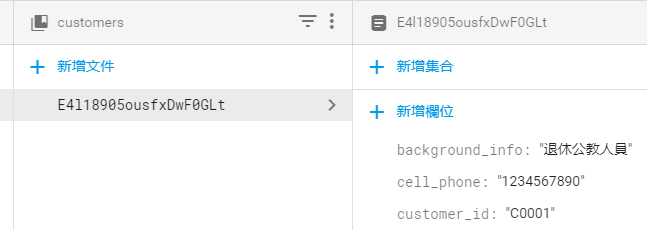
Firestore管理平台
id: 用來建立資料
客戶資料資料庫存取服務
Ⓑ資料存取
...[略]...
export class CustomerService {
  customerRef: AngularFirestoreCollection<Customer> ; // 資料庫集合參照點
  customers: Observable<CustomerId[]>;    // 所有客戶的動態資料流(供訂閱)

  constructor(private db: AngularFirestore) {
    // 設定資料庫集合參照點
    this.customerRef = this.db.collection<Customer>('customers');
  }
  // 新增一筆會員資料
  addCustomer(customer: Customer): Promise<any> {
  }
  // 刪除一筆會員資料
  removeCustomer(id: string): Promise<any> {
  }
  // 修改一筆會員資料
  updateCustomer(id: string, data: Customer): Promise<any> {
  }
  // 取得所有會員資料
  getCustomers(): Observable<CustomerId[]> {
  }
}
⓵ 2個屬性
⓶ 建構子: 設定「資料集合」連結
⓷ 預計有4個方法
customer.service.ts預計功能
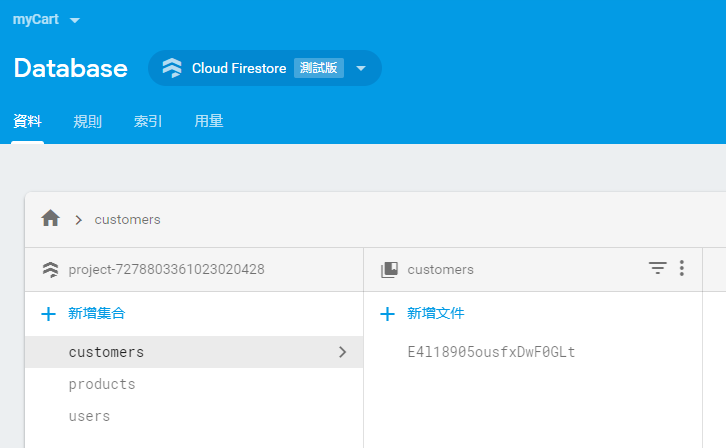
Firebase控制台:資料庫區域
customers集合
products集合
users集合
集合(collection):相當於「資料表」, 需手動建立
集合內每一筆資料:一份文件
客戶資料資料庫存取服務
Ⓑ資料存取
import { Customer, CustomerId } from './../_models/customer';
import { Injectable } from '@angular/core';
import { AngularFirestoreCollection, AngularFirestore, AngularFirestoreDocument } from '@angular/fire/firestore';
import { Observable } from 'rxjs';
import { map } from 'rxjs/operators';

...[略]...
export class CustomerService {
  customerRef: AngularFirestoreCollection<Customer> ; // 資料庫集合參照點
  customers: Observable<CustomerId[]>;
...[略]...
所有import
customer.service.ts
AngularFirestoreCollection : 資料集合的參考點
AngularFirestore : 資料庫服務
AngularFirestoreDocument : 資料文件的參考點
新增資料
customer.service.ts加入「新增功能」
customer-list.component.html:新增按鈕
customer-form:輸入表單
客戶資料新增資料
export class CustomerService {
  ...
  // 新增一筆會員資料
  addCustomer(customer: Customer): Promise<any> {
    customer.customer_id = 'C' + ('0000' + this.fake_cid).slice(-4);
    this.fake_cid ++; // 遞增
    return this.customerRef.add(customer);
  }
  ...
}Ⓒ新增資料
customer.service.ts
  constructor(private db: AngularFirestore) {
    // 設定資料庫集合參照點
    this.customerRef = this.db.collection<Customer>('customers');
}客戶資料新增資料customer-list(html檔)
Ⓒ新增資料
<div class="container">
  <div class="row my-5">
    <!-- 列1:按鈕列 -->
    <div class="col">
      <button class="btn btn-lg btn-danger mr-4" (click)="openModal()">
        新增客戶
      </button>
      <button class="btn btn-lg btn-success" [routerLink]="['/dashboard']">
        返回首頁
      </button>
    </div>
  </div>

  <!--略-->

</div>
customer-list.component.html
客戶資料新增資料customer-list(ts檔)
Ⓒ新增資料
...[略]...
export class CustomerListComponent implements OnInit {
  subscription: any;

  constructor(private cs: CustomerService,
    private modal: NgbModal
    ) { }
  // 開啟客戶視窗
  openModal() {
    const ref = this.modal.open(CustomerFormComponent, {
      size: 'lg'
    });
    this.subscription = ref.componentInstance.result.subscribe(
      result => {
        console.log('表單輸入資料為:', result);
        this.cs.addCustomer(result);
      }
    );
  }
...[略]...
}
customer-list.component.ts
...
import { CustomerFormComponent } from './customer/customer-form/customer-form.component';

@NgModule({
  declarations: [
    AppComponent,
    DashboardComponent,
    CustomerListComponent,
    CustomerDetailComponent,
    CustomerFormComponent
  ],
  entryComponents: [ CustomerFormComponent ],
  ...
  providers: [],
  bootstrap: [AppComponent]
})
export class AppModule { }
修改app.module.ts
Ⓒ新增資料
客戶資料加入entryComponents陣列
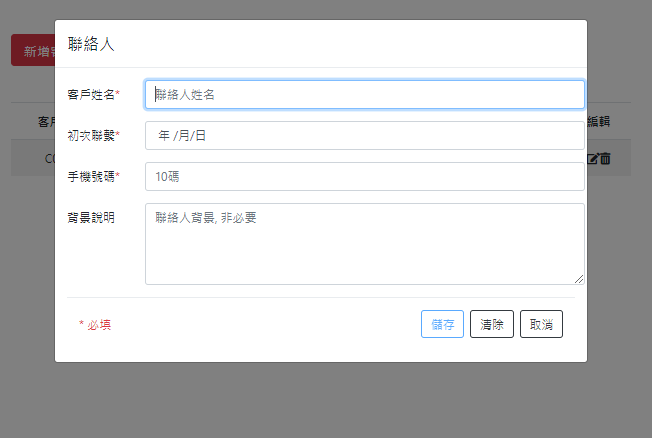
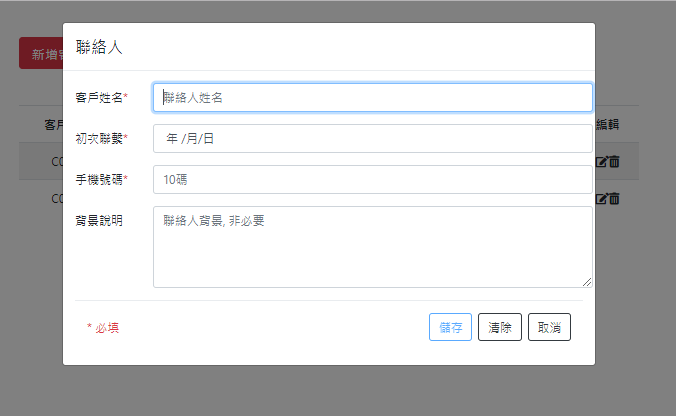
新增客戶資料 新增
import { Component, OnInit, Output, EventEmitter } from '@angular/core';
import { Customer } from 'src/app/_models/customer';
import { NgbActiveModal } from '@ng-bootstrap/ng-bootstrap';

@Component({
  selector: 'app-customer-form',
  templateUrl: './customer-form.component.html',
  styleUrls: ['./customer-form.component.css']
})
export class CustomerFormComponent implements OnInit {
  @Output() result: EventEmitter<Customer> = new EventEmitter<Customer>();

  customer: Customer = {
    name: '',
    date_init_contact: null,
    cell_phone: '',
    background_info: '',
    customer_id: ''
  };

  constructor(public activeModal: NgbActiveModal) { }

  ngOnInit() {
  }

  save() {
    this.result.emit(this.customer);
    this.activeModal.close('儲存');
  }

}
customer-form.component.ts
Ⓒ新增資料
<div class="modal-header">
    <h4 class="modal-title">聯絡人</h4>
  </div>
  <div class="modal-body">
    <form #cform="ngForm">
      <div class="form-group">
        <div class="row">
          <label for="name" class="col-2 col-form-label">客戶姓名<span class="text-danger">*</span></label>
          <input type="text" class="col-10 form-control" [(ngModel)]="customer.name" name="name" #name="ngModel" placeholder="聯絡人姓名" required>
        </div>
        <div *ngIf="name.dirty">
          <span *ngIf="name.errors; then errors"></span>
        </div>
      </div>

      <div class="form-group">
        <div class="row">
          <label for="date" class="col-2 col-form-label">初次聯繫<span class="text-danger">*</span></label>
          <input type="date" class="col-10 form-control" [(ngModel)]="customer.date_init_contact" name="date" #date="ngModel" ngbDatepicker #d="ngbDatepicker"
            required>
        </div>
        <div *ngIf="date.dirty">
            <span *ngIf="date.errors; then errors"></span>
        </div>
      </div>

      <div class="form-group">
        <div class="row">
          <label for="cell_phone" class="col-2 col-form-label">手機號碼<span class="text-danger">*</span></label>
          <input type="text" class="col-10 form-control" [(ngModel)]="customer.cell_phone" name="phone" #phone="ngModel" placeholder="10碼" required minlength="10"
          maxlength="10">
        </div>
        <div *ngIf="phone.dirty">
            <span *ngIf="phone.errors; then phone_errors"></span>
        </div>
      </div>

      <div class="form-group row">
        <label for="background" class="col-2 col-form-label">背景說明</label>
        <textarea type="text" class="col-10 form-control" [(ngModel)]="customer.background_info" name="background"
        placeholder="聯絡人背景, 非必要" rows="4">
            </textarea>
      </div>

      <div class="modal-footer">
        <small class="text-danger mr-auto">* 必填</small>
        <button type="submit" class="btn btn-outline-primary" (click)="save()" [disabled]="!cform.form.valid">儲存</button>
        <button type="reset" class="btn btn-outline-dark">清除</button>
        <button type="button" class="btn btn-outline-dark" (click)="activeModal.dismiss('cancel')">取消</button>
      </div>
    </form>
  </div>

  <ng-template #errors>
      <p class="text-danger">欄位未填!</p>
  </ng-template>
  <ng-template #phone_errors>
      <p class="text-danger">手機號碼需10碼!</p>
  </ng-template>
customer-form.component.html
新增客戶資料 新增
Ⓒ新增資料
查詢所有資料
customer.service.ts加入「查詢全部功能」
customer-list.component:客戶列表
客戶資料查詢資料
export class CustomerService {
  ...
  // 取得所有會員資料
  getCustomers(): Observable<CustomerId[]> {
    return this.customers = this.customerRef.snapshotChanges()
    .pipe<CustomerId[]>(
      map( actions => {
        return actions.map( a => {
          const data = a.payload.doc.data();
          const customer: CustomerId = {
            id: a.payload.doc.id,
            name: data.name,
            date_init_contact: data.date_init_contact,
            cell_phone: data.cell_phone,
            background_info: data.background_info ? data.background_info : '',
            customer_id: data.customer_id
          };
          return customer;
        });
      })
    );
  }
}
Ⓓ查詢資料
查詢所有資料
a.payload.doc.data(): 單一文件資料
a.payload.doc.id: 單一文件id
map運算子: 類似for迴圈的效果
客戶資料清單查詢 所有資料
import { CustomerId } from './../../_models/customer';
import { CustomerService } from './../../_services/customer.service';
import { Component, OnInit } from '@angular/core';
import { NgbModal } from '@ng-bootstrap/ng-bootstrap';
import { CustomerFormComponent } from '../customer-form/customer-form.component';
import { Observable } from 'rxjs';
import { ConfirmModalComponent } from 'src/app/_modal/confirm-modal/confirm-modal.component';

@Component({
  selector: 'app-customer-list',
  templateUrl: './customer-list.component.html',
  styleUrls: ['./customer-list.component.css']
})
export class CustomerListComponent implements OnInit {
  customers: Observable<CustomerId[]>;
  subscription: any;
  edit: boolean;

  constructor(private cs: CustomerService,
    private modal: NgbModal
  ) { }

  ngOnInit() {
    this.customers = this.cs.getCustomers();
  }
  // 開啟客戶視窗
  openModal(cdoc?: CustomerId) {
    const ref = this.modal.open(CustomerFormComponent, {
      size: 'lg'
    });
    // 傳資料進來,代表是[編輯]功能, 而非新增
    if (cdoc) {
      ref.componentInstance.cdoc = cdoc;
      this.edit = true;   // 編輯
    } else {
      this.edit = false;  // 新增
    }
    this.subscription = ref.componentInstance.result.subscribe(
      result => {
        console.log('表單輸入資料為:', result);
        if (this.edit) {
          this.cs.updateCustomer(cdoc.id, result);
        } else {
          this.cs.addCustomer(result);
        }
      }
    );
  }

  editCustomer(c: CustomerId) {
    this.openModal(c);
  }

  deleteCustomer(c: CustomerId) {
    const cmref = this.modal.open(ConfirmModalComponent, {
      size: 'lg'
    });
    cmref.componentInstance.data = c;
    cmref.result
      .then(
        (result) => {
          this.cs.removeCustomer(c.id);
        }
      )
      .catch(
        (reason) => {
          console.log('Cancel原因', reason);
        });

  }

}
customer-list.component.ts
Ⓓ查詢資料
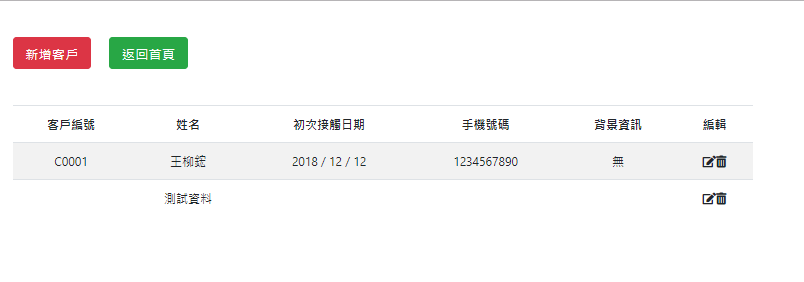
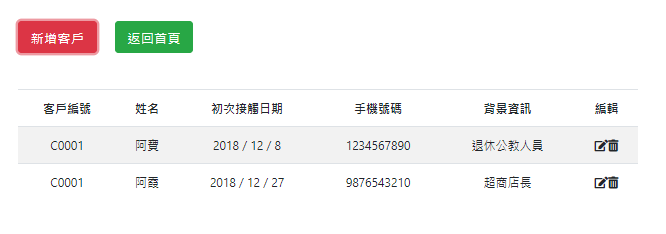
客戶資料清單查詢 所有資料
<div class="container">
  <div class="row my-5">
    <!-- 列1:按鈕列 -->
    <div class="col">
      <button class="btn btn-lg btn-danger mr-4" (click)="openModal()">新增客戶</button>
      <button class="btn btn-lg btn-success" [routerLink]="['/dashboard']">返回首頁</button>
    </div>
  </div>
  <!-- 列2:資料列-->
  <div class="row">
    <div class="col">
      <table class="table table-striped table-inverse">
        <thead class="thead-inverse text-center">
          <tr>
            <th>客戶編號</th>
            <th>姓名</th>
            <th>初次接觸日期</th>
            <th>手機號碼</th>
            <th>背景資訊</th>
            <th>編輯</th>
          </tr>
        </thead>
        <tbody class="text-center">
          <tr *ngFor="let c of customers | async">
            <td>{{ c.customer_id }}</td>
            <td>{{ c.name }}</td>
            <td>{{ c.date_init_contact.year }} / {{ c.date_init_contact.month }} / {{ c.date_init_contact.day }}</td>
            <td>{{ c.cell_phone }}</td>
            <td>{{ c.background_info }}</td>
            <td>
              <i class="fas fa-edit" (click)="editCustomer(c)"></i>
              <i class="fas fa-trash-alt" (click)="deleteCustomer(c)"></i>
            </td>
          </tr>
        </tbody>
      </table>
    </div>
  </div>

  <div class="row">
    <!-- 列3:分頁(pagination)-->

  </div>

</div>
customer-list.component.html
Ⓓ查詢資料
修改資料
customer.service.ts加入「修改一筆資料」
customer-form:修改資料視窗
傳入編輯的資料
修改資料完成修改資料功能
export class CustomerService {
  ...
  // 修改一筆會員資料
  updateCustomer(id: string, data: Customer): Promise<any> {
    const docRef: AngularFirestoreDocument
        = this.db.doc<Customer>(`customers/${id}`);
    return docRef.set(data, {merge: true});
  }
}Ⓔ修改資料
修改一筆資料
需傳入id
文件id
${id} 在ts檔的作用相當於 用於html檔的 {{ id }}
docRef.set():設定文字為新值
{merge: true}:只更新修改的欄位
修改資料修改資料表單
import { Component, OnInit, Output, EventEmitter, Input } from '@angular/core';
import { Customer, CustomerId } from 'src/app/_models/customer';
import { NgbActiveModal } from '@ng-bootstrap/ng-bootstrap';

@Component({
  selector: 'app-customer-form',
  templateUrl: './customer-form.component.html',
  styleUrls: ['./customer-form.component.css']
})
export class CustomerFormComponent implements OnInit {
  @Input() cdoc: CustomerId;
  @Output() result: EventEmitter<Customer> = new EventEmitter<Customer>();

  customer: Customer = {
    name: '',
    date_init_contact: null,
    cell_phone: '',
    background_info: '',
    customer_id: ''
  };

  constructor(public activeModal: NgbActiveModal) { }

  ngOnInit() {
    if (this.cdoc) {
      this.customer = {
        name: this.cdoc.name,
        date_init_contact: this.cdoc.date_init_contact,
        cell_phone: this.cdoc.cell_phone,
        background_info: this.cdoc.background_info,
        customer_id: this.cdoc.customer_id
      };
    }
  }

  save() {
    this.result.emit(this.customer);
    this.activeModal.close('儲存');
  }

}
customer-form.component.ts
Ⓔ修改資料
<div class="modal-header">
    <h4 class="modal-title">聯絡人</h4>
  </div>
  <div class="modal-body">
    <form #cform="ngForm">
      <div class="form-group">
        <div class="row">
          <label for="name" class="col-2 col-form-label">客戶姓名<span class="text-danger">*</span></label>
          <input type="text" class="col-10 form-control" [(ngModel)]="customer.name" name="name" #name="ngModel" placeholder="聯絡人姓名" required>
        </div>
        <div *ngIf="name.dirty">
          <span *ngIf="name.errors; then errors"></span>
        </div>
      </div>

      <div class="form-group">
        <div class="row">
          <label for="date" class="col-2 col-form-label">初次聯繫<span class="text-danger">*</span></label>
          <input type="date" class="col-10 form-control" [(ngModel)]="customer.date_init_contact" name="date" #date="ngModel" ngbDatepicker #d="ngbDatepicker"
            required>
        </div>
        <div *ngIf="date.dirty">
            <span *ngIf="date.errors; then errors"></span>
        </div>
      </div>

      <div class="form-group">
        <div class="row">
          <label for="cell_phone" class="col-2 col-form-label">手機號碼<span class="text-danger">*</span></label>
          <input type="text" class="col-10 form-control" [(ngModel)]="customer.cell_phone" name="phone" #phone="ngModel" placeholder="10碼" required minlength="10"
          maxlength="10">
        </div>
        <div *ngIf="phone.dirty">
            <span *ngIf="phone.errors; then phone_errors"></span>
        </div>
      </div>

      <div class="form-group row">
        <label for="background" class="col-2 col-form-label">背景說明</label>
        <textarea type="text" class="col-10 form-control" [(ngModel)]="customer.background_info" name="background"
        placeholder="聯絡人背景, 非必要" rows="4">
            </textarea>
      </div>

      <div class="modal-footer">
        <small class="text-danger mr-auto">* 必填</small>
        <button type="submit" class="btn btn-outline-primary" (click)="save()" [disabled]="!cform.form.valid">儲存</button>
        <button type="reset" class="btn btn-outline-dark">清除</button>
        <button type="button" class="btn btn-outline-dark" (click)="activeModal.dismiss('cancel')">取消</button>
      </div>
    </form>
  </div>

  <ng-template #errors>
      <p class="text-danger">欄位未填!</p>
  </ng-template>
  <ng-template #phone_errors>
      <p class="text-danger">手機號碼需10碼!</p>
  </ng-template>
customer-form.component.html
修改資料修改資料表單
Ⓔ修改資料
刪除資料
ng g c _modal/confirm-modal
customer.service.ts加入「刪除一筆資料」
confirm-modal:刪除確認視窗
confirm-list:呼叫刪除資料功能
刪除資料完成刪除資料功能
export class CustomerService {
  ...
  // 刪除一筆會員資料
  removeCustomer(id: string): Promise<any> {
    const docRef: AngularFirestoreDocument = this.db.doc<Customer>(`customers/${id}`);
    return docRef.delete();
  }
}Ⓕ刪除資料
刪除一筆資料
需傳入id
文件id
${id} 在ts檔的作用相當於 用於html檔的 {{ id }}
docRef.delete():永久刪除該筆資料
...
import { ConfirmModalComponent } from './_modal/confirm-modal/confirm-modal.component';

@NgModule({
  declarations: [
    AppComponent,
    DashboardComponent,
    CustomerListComponent,
    CustomerDetailComponent,
    CustomerFormComponent,
    ConfirmModalComponent
  ],
  entryComponents: [ CustomerFormComponent, ConfirmModalComponent ],
  ...
  providers: [],
  bootstrap: [AppComponent]
})
export class AppModule { }
修改app.module.ts
刪除資料加入entryComponents陣列
Ⓕ刪除資料
刪除資料執行刪除資料
// ...略...
export class CustomerListComponent implements OnInit {
// ...略...
  deleteCustomer(c: CustomerId) {
    const cmref = this.modal.open(ConfirmModalComponent, {
      size: 'lg'
    });
    cmref.componentInstance.data = c;
    cmref.result
      .then(
        (result) => {
          this.cs.removeCustomer(c.id);
        }
      )
      .catch(
        (reason) => {
          console.log('Cancel原因', reason);
        });
  }
}
customer-list.component.ts
Ⓕ刪除資料
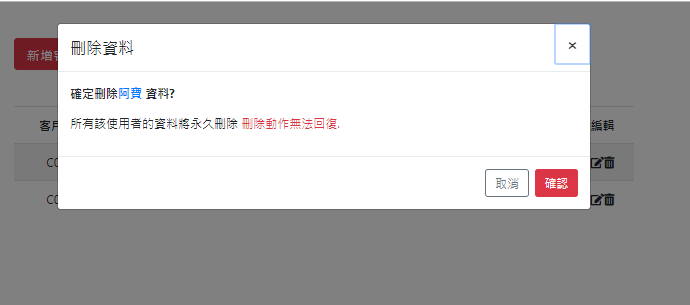
刪除資料確認表單
import { CustomerId } from './../../_models/customer';
import { Component, OnInit, Input } from '@angular/core';
import { NgbActiveModal } from '@ng-bootstrap/ng-bootstrap';

@Component({
  selector: 'app-confirm-modal',
  templateUrl: './confirm-modal.component.html',
  styleUrls: ['./confirm-modal.component.css']
})
export class ConfirmModalComponent implements OnInit {
  @Input() data: CustomerId;

  constructor(public activeModal: NgbActiveModal) { }

  ngOnInit() {
  }

}
confirm-modal.component.ts
Ⓕ刪除資料
刪除資料確認表單
<div class="modal-header">
<h4 class="modal-title" id="modal-title">刪除資料</h4>
<button type="button" class="close" aria-describedby="modal-title" (click)="activeModal.dismiss('Cross')">
<span aria-hidden="true">×</span>
</button>
</div>
<div class="modal-body">
<p><strong>確定刪除<span class="text-primary">{{ data.name }}</span> 資料?</strong></p>
<p>所有該使用者的資料將永久刪除
<span class="text-danger">刪除動作無法回復.</span>
</p>
</div>
<div class="modal-footer">
<button type="button" class="btn btn-outline-secondary" (click)="activeModal.dismiss('Cancel')">取消</button>
<button type="button" class="btn btn-danger" (click)="activeModal.close('DELETE')">確認</button>
</div>confirm-modal.component.html
Ⓕ刪除資料
關於期末考
- 時間:17週/18週
- 請先決定你要實作的「資料表」欄位(至少4個欄位)
- 以firebase為資料庫
- 完成「新增/刪除/查詢/修改」功能
- 首頁為列表頁面(如customer-list)
- 名稱為「學號-list」
例如: AA123456-list
新增元件 ng g c AA123456-list
- 名稱為「學號-list」
- 其餘新增/修改/刪除功能參考本投影片範例