Java 3 - 2025
Week 1
Course Objectives
- Explain how standard documentation and diagrams apply to Java web application.
- Write Java applications that use database technologies and consumes web services.
- Display an understanding of the role of security in modern software development.
- Show awareness of human behavior as it applies to software interaction.
What You'll Learn
- Deploy web apps to Microsoft Azure and Heroku
- Page loading indicators
- Custom error pages
- Sending e-mail
- Database tables, schemas and stored procedures
- JDBC Database connection
- CallableStatement and ResultSet
- Plain Old Java Objects (POJOs), Data Access Objects (DAOs), Java Servlets, and Java Server Pages (JSP)
- Website themes
- Including JSP fragments, header and footer
- Sign up a user
- 2-Factor Authentication
- Session configuration
- Session cookies
- Login/logout
What You'll Learn
- User permissions - what users can create, read ,update, and delete data
- Login Attempts
- Forgot password
- Update and delete users
- External authentication with GitHub
- Cross-Site Scripting (XSS) attacks and other vulnerabilities
- Internationalization
- Custom JSTL tags
- Send Text and Voice messages
- APIs
- Web sockets, multi-user applications
- Credit Card processing
Microsoft Azure Setup
- Go to https://portal.azure.com/ and log in.
- View Education credits by visiting this URL or by clicking the menu icon, choosing "Cost Managment + Billing", clicking Overview > Summary, and scrolling down to the bottom of the page.
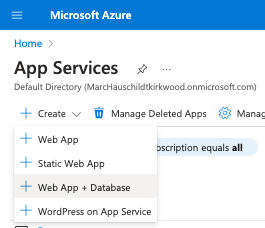
- Back on the home page, click to create an "App Service" and click the "+ Create" button. Select "Web App + Database".
Microsoft Azure Setup
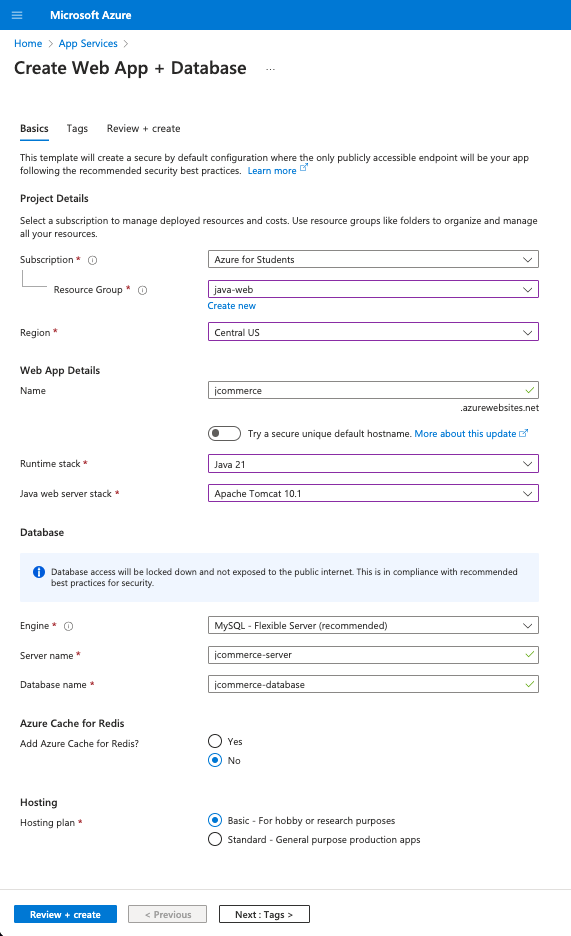
- Choose the "Azure for Students" subscription.
- Select an existing Resource Group, or create a new one named something like "java-web".
- Select your desired region. Note that some US regions don't support free student accounts.
- Give your web app a unique short name, like "yourname-java".
- Uncheck the "Try a secure unique default hostname".
- Select "Java 21" as the runtime stack.
- Change the "Java web server stack" to Apache Tomcat 10.1.
- Select MySQL as your database, and give the server and database a unique name.
- Select "Basic" for the hosting plan - See pricing
Microsoft Azure Setup
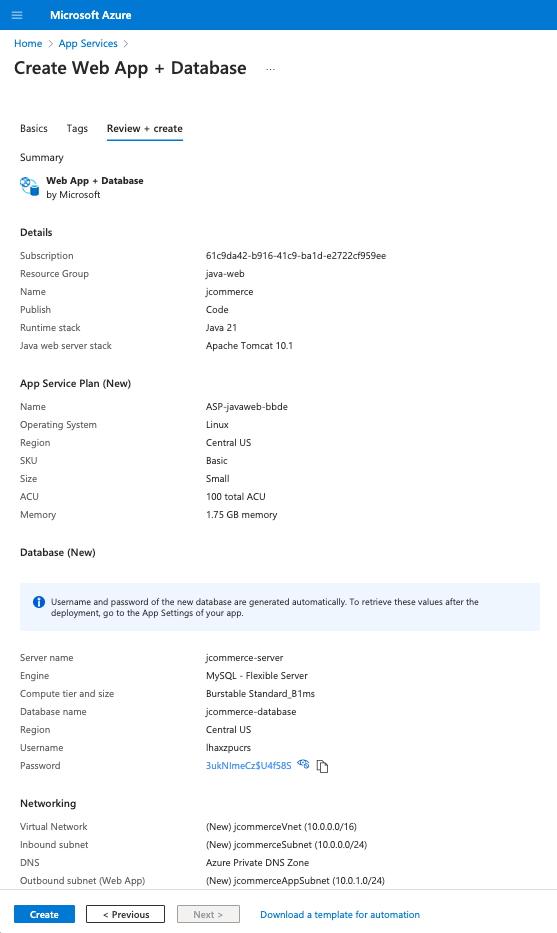
- Click the Review + Create button.
- Before clicking the Create button, confirm the settings. Copy the database name, username and password.
- Note that deploying a MySQL database will "meet expectations" for the project. However, deploying a SQLAzure, Postgres, or Cosmos DB database will qualify as "exceeding expectations".
- If you are familiar with SQL Server and T-SQL, consider selecting SQLAzure.
- Click the Create button and wait for the app and database to deploy.
- Create a new IntelliJ project and set up a GitHub repository while this deploys.
Other Cloud Service Setup
IntelliJ Setup
- Open IntelliJ Ultimate. Close any open project.
- Create a new project.
- Select Jakarta EE in the left column.
- Title the project something like "java3-project". Save it in your preferred location.
- Check the "Create Git repository" box.
- Select Web Application from the template menu.
- Select your Tomcat 10.1 installation for the Application Server.
- Mac users: You may have to manually navigate to "/Users/path/to/tomcat".
- Select Java and Maven for the Language and Build System.
- Change the Group to "edu.kirkwood".
- Select your JDK 21 installation.
- Click Next.
IntelliJ Setup
- Select Jakarta EE 10 as the version.
- In the Dependencies section, open the Specifications toggle and select "Full Platform".
- Click Create. Wait for the project to load.
- Close the JetBrains AI service box, the Tip of the Day box, and any other popup alerts.
- From the Main menu, click Run > Edit Configurations.
- Tomcat 10.1.X should be set as your Application Server.
- On the Deployment tab, a "war exploded" artifact should be set.
- On the server tab, the URL should be something like http://localhost:8080/java3_project_war_exploded/
- Set the On Update action to "Restart server".
- Set the On frame deactivation to "Update classes and resources".
- Click OK.
IntelliJ Setup
- Run Tomcat. Your default web browser should open, showing the contents of src/main/webapp/index.jsp.
- Clicking the hyperlink will display the contents of the HelloServlet
- Press your browser's back button.
- In IntelliJ, modify the contents of index.jsp. Go back to the web browser and refresh to display the changes.
- Modify the contents of HelloServlet.java.
- Go back to the browser. Notice that refreshing will not display the changes.
- Go back to IntelliJ and restart Tomcat to see the changes.
- Close the open file tabs (pom.xml, HelloServlet.java, index.jsp).
- Click the "Terminal" tab at the bottom left.
- Windows users, PowerShell will open by default.
- Click the arrow next to the plus sign and click Settings.
- Change the Application Settings > Shell path input to Git Bash
- Close and reopen the Terminal tab.
AI Code Assistants
You may use these tools during project development
-
JetBrains AI Assistant
- Pricing: $10/mo, free for 7 days
- JetBrains Plugin
- JetBrains AI integrates various large language models (LLMs) from providers like OpenAI, Google, and Meta.
- GitHub Copilot
- Amazon Q Developer
- Google AI for Developers
- Tabnine
Git Setup
- Open the Terminal Tab. Enter this command:
git status - If a message says the project is not initialized, enter this command:
git init -b main - If the terminal says "On branch master", run this command:
git checkout -b main - Open .gitignore and add this line.
.env - Click the Commit tab. Select all files that you want to commit, including Unversioned Files.
- Click the gear icon in the bottom-right corner of the Commit box. Uncheck the "Analyze Code" and "Check TODO" boxes.
- Write a short commit message describing your recent work.
Initial commit - Click "Commit". Don't click "Commit and Push".
GitHub Setup
- Create a new private repository on GitHub. Title the repository "java3-project". Copy the URL.
- In IntelliJ's Terminal, enter this command:
git remote add origin https://github.com/YOUR-USERNAME/java3-project.git - Click the Git menu and select "Push".
- Verify that your main branch is being pushed to the origin's (GitHub's) main branch. Verify the files that are being pushed.
- Click Push.
- The first time you do this you will need to sign into GitHub.
- Windows Users: Click Log In via GitHub password.
- Mac Users: Click "Use Token". See the next slide for more directions.
- Refresh your GitHub repository page to see the changes.
GitHub Setup
- Mac Users:
- Click "Generate".
- Log in to your GitHub account.
- You will be on a screen to generate a new personal access token.
- The note should be pre-filled with "IntelliJ IDEA GitHub integration plugin".
- Set the expiration date to be after the semester ends (or No expiration).
- Select the Repo check box if its not pre-checked.
- Click Generate Token
- Copy the token that is generated.
- Paste the token in the IntelliJ GitHub popup. Click Log In.
- In the Terminal, enter this command so you only have to enter the token once.
git config --global credential.helper cache
GitHub Setup
- Student To-do:
- Click the "Settings" tab
- Choose Access > Collaborators, and click "Add people".
- Type "mlhaus" and select the instructor's profile. The instructor will grade all assignments via GitHub.
- Instructor To-do:
- Click the "Settings" tab, then set the visibility to public so students can access it.
- Copy and paste a link to the course content so students always have access to the demo code.
Azure Web App
- The web app and database should be deployed by now.
- Go back to the Azure portal. If it says "Your deployment is complete", click the blue "Go to resource" button.
- Wait for the web app's status to load and click the "Browse" button. The web page should say "Hey, Java developers! Your app service is up and running.".
- Click the Deployment tab in the left navigation and select "Deployment Slots".
- If you were on a paid plan, creating a staging slot to test your app before deploying to production is recommended.
Azure Web App
- Click the Deployment tab in the left navigation and select "Deployment Center".
- Change the Source to GitHub.
- Select your username as the organization.
- Select your new repository.
- Select the main branch.
- Click "Preview file".
- Click the Close button.
- Scroll up and click the Save button.
- Refresh your GitHub repo. A new file will be created at this path:
.github/workflows/main_jcommerce.yml - Click the Actions tab to see the failed Workflow run.
- An error message says "The string 'java21' is not valid SemVer notation for a Java version."
Azure Web App
- Go to IntelliJ and pull the changes by clicking the Git menu, choosing "Update Project", and clicking OK.
- The .github/ folder should appear in your project files.
- Open the "main_java3_project.yml" file.
- For the java-version, change 'java21' to '21'
- Commit and push those changes to GitHub.
- If you get a "Line Separators Warning" popup, click "Fix and commit".
- Click "Push".
- Go back to your GitHub repo and click the Actions tab.
- Wait for the action to finish.
- A green checkmark means the project built and deployed successfully.
- Refresh your live web app. Be patient if changes don't display right away. You may have to do a hard refresh (Ctrl + Shift + R)
End Day 1
Start Day 2
Azure Database
-
View your Azure Database for MySQL flexible server on the Azure portal.
- If you selected something other than MySQL, please find it.
- Click the database name.
- Click Settings in the left navigation, then click Networking.
- Click the "Move to private link" button. Click Yes.
- Check the box labeled "Allow public access..."
- Wait for the Detach VNet progress to finish.
- Skip to slide 6-5 while you wait for this to complete.
- Do not add private endpoints. Go back to the database.
- Click Settings in the left navigation, then click Networking.
- Check the box labeled "Allow public access from any Azure service within Azure to this server"
- Click the "Add 0.0.0.0 to 255.255.255.255" button.
- Click the Save button.
About Allowed IP Addresses
- For our class, I want you to allow connections from any IP Address in case you need help troubleshooting database issues.
- Note, this will give anyone access to your database from any location. This is not safe in a real-life app, but okay for our class.
- For a real production app, you only want to allow connections from specific IP addresses, like your home or work.
- Click the "+ Add current client IP address" link wherever you need to make a connection.
- Consider renaming each firewall rule so you know what each represents, like "Home" or "Kirkwood".
- IP addresses at Kirkwood will change depending on your location. Add the following firewall rules to include access anywhere on campus.
- Start IP: 207.165.224.70, End IP: 207.165.224.100
- Start IP: 207.165.225.70, End IP: 207.165.225.100
Azure Database
- If you selected something other than MySQL, and change your mind, delete your database and create a new Azure Database for MySQL flexible server.
- Select the Resource Group you previously set up.
- Enter a server name related to your project name.
- Select (US) Central US for the Region.
- Create an admin username and password. Assign them to your environment variables.
- Check "Add firewall rule for current IP Address".
- Click "Review + Create", then "Create".
- After the database is deployed, click Settings in the left navigation, then click Networking.
- Check the box labeled "Allow public access from any Azure service within Azure to this server"
- Click the "Add 0.0.0.0 to 255.255.255.255" button.
- Click the Save button.
Environment Variables
- Open your Web App in the Azure Portal.
- In the left navigation, find the Settings section and click the "Environment Variables" link.
- A "AZURE_MYSQL_CONNECTIONSTRING" setting should be there.
- If not, click the add button. Set the value to:
jdbc:mysql://<your-server-name>.mysql.

	database.azure.com:3306/<your-database-name>?serverTimezone=UTC&sslmode=required&

user=<your-user-name>&password=<your-password>- If the password contains $, % or other symbols, you may need to remove them, especially on Mac devices.
- Remove any spaces added. Uncheck "Deployment slot setting" and click Apply. Confirm to save it.
- If you altered your password, go to the MySQL database and reset the password.
Environment Variables
- Once saved, open your web app in the browser. Add ".scm" before ".azurewebsites.net".
https://<your-app-name>.scm.azurewebsites.net/ - Click "App Settings". Your "AZURE_MYSQL_CONNECTIONSTRING" key should be displayed in the JSON object.
Azure Toolkit for IntelliJ Plugin
-
Close your current project in IntelliJ. Install the Azure Toolkit for IntelliJ plugin and restart IntelliJ.
-
Re-open your class project.
-
To sign in to your Azure account, navigate to the left-hand Azure Explorer sidebar, and then click the Azure Sign In icon. Alternatively, you can navigate to Tools, expand Azure, and then click Sign in.
-
In the Azure Sign In window, select Azure CLI or OAuth 2.0, and then click Sign in.
-
In the browser, sign in with your account and then go back to IntelliJ.
-
In the Select Subscriptions dialog box, click on the subscription that you want to use, then click Select.
Azure Toolkit for IntelliJ Plugin
-
Open the Azure option. Open the Azure Database for MySQL, Resource Groups, and Web Apps options to see the items you created last class.
-
Right-click the web app and open in the browser.
-
You can even use this area to create new resource groups, web apps, and databases.
-
Right-click the database that has public access and choose "Open with Database Tools". The Azure database info should be populated. Enter your username and password.
-
If you need to reset your password, go to the web portal, and click the "Reset password" button.
-
Select Forever in the Save input.
-
Download any missing drivers.
-
Click Test Connection. A "Succeeded" message should display.
IntelliJ/DataGrip
- Add a new database source. Select MySQL.
- Download any necessary drivers.
- Your full connection URL will be this:
jdbc:mysql://<your-server-name>.mysql.

	database.azure.com:3306/<your-database-name>?serverTimezone=UTC&sslmode=required&

user=<your-user-name>&password=<your-password> - Remove any spaces added.
- Click Test Connection. A green "Succeeded" message should display. Click OK.
- If a red "Failed to Connect" message displays, check that you did slides 6-2 to 6-4 correctly.
- You may skip to the next slide if you are still waiting for the Detach VNet progress to finish.
- The general form of the connection URL is
jdbc:[driver]://[serverName[.hostName][:portNumber]]/[schema][?property=value[&property=value]] -
A Connection String uses a set of properties to establish a connection to a database server. It consists of:
-
Driver (jdbc:)
-
Connection protocol (mysql://, postgresql://, mariadb://, etc.)
-
IP Address: a universal resource locator (URL) that identifies a specific host machine.
-
A port number - a positive integer that identifies a specific server software running on a host machine.
-
A database resource name
-
Any other vendor specific properties
-
-
You will need to create a connection string for each database schema you need to connect to.
.env
- Create a .env file in the src/main/resources/ folder.
- Add a database environment variable with the full URL from the previous slide.
- The quotation marks are optional.
AZURE_MYSQL_CONNECTIONSTRING="XXXX"Other Dependencies
- Add the dotenv, Jakarta Standard Tag Library (JSTL) API, JSTL Implementation, and Azure Communication Email dependencies to the pom.xml file.
- Reload the Maven project to download the needed jar files.
Database Dependencies
- Add dependencies to your pom.xml file for any database you plan to use.
- The Azure Database for MySQL flexible server Overview page will say what version of MySQL is being used.
- Note, you can upgrade from 8.0 to 8.4 only on paid plans.
MySQL_Connect Class
- Create a MySQL_Connect class in a shared package, add this code
import io.github.cdimascio.dotenv.Dotenv;
import io.github.cdimascio.dotenv.DotenvException;

import java.sql.Connection;
import java.sql.DriverManager;
import java.sql.SQLException;

public class MySQL_Connect {
    public static Connection getConnection() throws SQLException {
        try {
            Class.forName("com.mysql.cj.jdbc.Driver");
        } catch (ClassNotFoundException e) {
            throw new SQLException("MySQL driver not found");
        }

        Dotenv dotenv = null;
        try {
            dotenv = Dotenv.load();
        } catch(DotenvException e) {
            throw new SQLException("Could not find .env file");
        }
        String connectionString = dotenv.get("AZURE_MYSQL_CONNECTIONSTRING");
        if(connectionString == null) {
            throw new SQLException("Connection string not found");
        }

        try {
        	Connection connection = DriverManager.getConnection(connectionString);
            if (connection.isValid(2)) {
                return connection;
            }
        } catch (SQLException e) {
            throw new SQLException(e.getMessage());
        }
        return null;
    }

    public static void main(String[] args) {
        try {
            if(getConnection() != null) {
                System.out.println("Connection successful");
            }
        } catch (SQLException e) {
            System.out.println(e.getMessage());
        }
    }
}- Driver is a vendor's implementation of JDBC
- DriverManager is a class used to get an instance of a Connection object by using the JDBC driver named in the connectionString.
- Connection: represents a communication session with a relational database server.
- To test if the connection is valid we can call the isValid() method.
- Run the main method to verify we have a successful connection.
Database Vocabulary
-
Connection - An interface for classes representing a communication session with a database server.
-
Connection String - A string containing the information needed to establish a connection to a database server. The string typically includes:
- connection protocol
- hostname or IP address
- port number
- database name
- any required parameters such as user name and password
-
DriverManager - The DriverManager class provides functionality for managing JDBC drivers. Use the DriverMananger to get a Connection object with the getConnection() method.
-
Port - A port is a positive integer that identifies a specific server software running on a host machine.
User Table
- Create a user database table by running the following SQL command.
- I am setting all fields to NOT NULL, meaning that they are required.
- If the user doesn't enter a first name, last name, or phone number, I would prefer to enter them as empty strings rather than null because null values can be difficult to deal with.
CREATE TABLE user (
    user_id INT AUTO_INCREMENT PRIMARY KEY,
    first_name VARCHAR(255) NOT NULL DEFAULT '',
    last_name VARCHAR(255) NOT NULL DEFAULT '',
    email VARCHAR(255) NOT NULL UNIQUE,
    phone VARCHAR(255) NOT NULL DEFAULT '',
    password VARCHAR(255) NOT NULL DEFAULT '',
    language VARCHAR(255) NOT NULL DEFAULT 'en-US',
    status enum('inactive', 'active', 'locked') NOT NULL,
    privileges enum('subscriber', 'user', 'premium', 'admin') NOT NULL,
    timezone VARCHAR(50) NOT NULL DEFAULT 'America/Chicago',
    created_at DATETIME NOT NULL DEFAULT CURRENT_TIMESTAMP,
    updated_at DATETIME NOT NULL DEFAULT CURRENT_TIMESTAMP ON UPDATE CURRENT_TIMESTAMP
);- 2025
- after week 1 I added the last_updated field, but I have not updated the rest of my presentations
Add User
CREATE PROCEDURE sp_add_user(
    IN p_email VARCHAR(255),
    IN p_password VARCHAR(255),
    IN p_status VARCHAR(10),
    IN p_privileges VARCHAR(10)
)
BEGIN
    INSERT INTO user (email, password, status, privileges)
    VALUES (p_email,p_password,p_status,p_privileges);
END;- Step 1: Create/Update a stored procedure
- Create two users by running these queries
CALL sp_add_user('delete-me@example.com', 'badpassword1', 'inactive', 'subscriber');
CALL sp_add_user('delete-me2@example.com', 'badpassword2', 'inactive', 'subscriber');- View the new users
SELECT * FROM user;Get All Users
CREATE PROCEDURE sp_get_all_users()
BEGIN
    SELECT user_id, first_name, last_name, email, phone, password, language, status, privileges, created_at, timezone
    FROM user;
END;- Step 1: Create/Update a stored procedure
User POJO
- Step 2: Create/Update a POJO.
- Create an User POJO class in a "model" package.
-
Generate a default and parameterized constructor, getter and setter methods, a toString method (id, firstName, lastName, email), and equals method.
import java.time.Instant;

public class User {
    private int userId;
    private String firstName;
    private String lastName;
    private String email;
    private String phone;
    private char[] password;
    private String language;
    private String status;
    private String privileges;
    private Instant createdAt;
    private String timezone;
}- Implement the Comparable Interface. Add a compareTo method.
@Override
public int compareTo(User o) {
    int result = this.lastName.compareToIgnoreCase(o.lastName);
    if(result == 0) {
        result = this.firstName.compareToIgnoreCase(o.firstName);
    }
    return result;
}
User POJO
- The
getPassword()method returns achar[]and not a String, because String is an immutable data type. That means String objects cannot be changed after a value has been created on the "String Pool". The String pool will eventually be removed by the "Java Garbage Collection Process". Until then, this value will continue to exist on the "Heap". -
Therefore, the char[] is used to store the password to help with security. This is because the character array can be cleared as an empty array immediately after using it. It will not be stored in the heap so no unauthorized user can access the heap and retrieve the entered password.
Get All Users
import edu.kirkwood.jcommerce.model.User;

import java.sql.Connection;
import java.sql.SQLException;
import java.util.ArrayList;
import java.util.List;

import static edu.kirkwood.shared.MySQL_Connect.getConnection;

public class UserDAO {
    public static List<User> getAll() {
        List<User> list = new ArrayList<>();
        try (Connection connection = getConnection()) {

        } catch (SQLException e) {
            throw new RuntimeException(e);
        }
        return list;
    }
}- Step 3: Create/Update a Data Access Object (DAO)
- Create an UserDAO class in a "data_access" package.
- Create a static getAll method that returns a list of users.
- It's important that you always close a database connection. Since the Connection class implements the AutoClosable interface, closing the connection can be done using a try-with-resources block.
Get All Users
public class UserDAO {
  public static List<User> getAll() {
      List<User> list = new ArrayList<>();
      try (Connection connection = getConnection()) {
      	try (CallableStatement statement = connection.prepareCall("{CALL sp_get_all_users()}")) {

  		}
      } catch (SQLException e) {
          throw new RuntimeException(e)
      }
      return list;
  }
}- After making a database connection we need a Statement object to encapsulate a SQL query.
- A CallableStatement allows non-SQL statements (such as stored procedures) to be executed against the database.
-
The Connection object has a prepareCall() method that allows us to create a CallableStatement object.
Get All Users
public class UserDAO {
  public static List<User> getAll() {
      List<User> list = new ArrayList<>();
      try (Connection connection = getConnection()) {
      	try (CallableStatement statement = connection.prepareCall("{CALL sp_get_all_users()}")) {
        	try (ResultSet resultSet = statement.executeQuery()) {

            }
  		}
      } catch (SQLException e) {
          throw new RuntimeException(e)
      }
      return list;
  }
}- Then we use the CallableStatement's executeQuery() method to send the stored procedure to the database to execute the query.
-
The ResultSet object represents the database response - the actual data returned by the SQL command.
-
Using a try-with-resources statement will automatically close each Autocloseable object.
Get All Users
public class UserDAO {
  public static List<User> getAll() {
      List<User> list = new ArrayList<>();
      try (Connection connection = getConnection()) {
      	try (CallableStatement statement = connection.prepareCall("{CALL sp_get_all_users()}")) {
        	try (ResultSet resultSet = statement.executeQuery()) {
            	while (resultSet.next()) {
                	int userId = resultSet.getInt("user_id");
                  	String firstName = resultSet.getString("first_name");
                  	String lastName = resultSet.getString("last_name");
                  	String email = resultSet.getString("email");
                  	String phone = resultSet.getString("phone");
                  	char[] password = resultSet.getString("password").toCharArray();
                  	String language = resultSet.getString("language");
                  	String status = resultSet.getString("status");
                  	String privileges = resultSet.getString("privileges");
                  	Instant createdAt = resultSet.getTimestamp("created_at").toInstant();
                    String timezone = resultSet.getString("timezone");
                  	User user = new User(userId, firstName, lastName, email, phone, password, language, status, privileges, created_at, timezone);
                  	list.add(user);
              	}
            }
  		}
      } catch (SQLException e) {
          throw new RuntimeException(e)
      }
      return list;
  }
}- Inside that try-with-resources statement, loop through all of the results, obtaining the data and instantiating an object.
- Before closing the resultSet and statement, we add a while loop to iterate over each element in the resultSet.
Get All Users
-
ResultSet behaves like a Java Collections iterator in that it allows you to review the contents of each record returned by the query, one record at a time.
-
The .next() method of the ResultSet class will place a pointer at the first row of the result sets returned by the SQL query.
- The method returns true if there is a record a the pointer location, false if no records are remaining.
-
Since we don't know how many records the query will return, this statement is best used as the condition of a while loop.
Get All Users
-
JDBC does not auto-generate Objects for each row and is ignorant of the data types in each row. The developer must tell the program which fields and data types you want to extract from each row.
- The .getString() method can be used with a column name as its argument to return the value as a String.
- The .getInt() and .getDouble() methods do the same thing but return specified numeric values.
- The .getDate() method can be used to return a Date object, which will need to be converted to a LocalDate or LocalDateTime object.
- The .getTimestamp() method can be used to return Timestamp object. Call the .toLocalDateTime() method.
Get All Users
-
Add a main method to the UserDAO class to test the getAll method. Run the method and it should print the users you have in your database table.
public static void main(String[] args) {
	getAll().forEach(System.out::println);
}
Understanding the JDBC API
-
java.sql.Connection: A connection that represents the session between your Java application and the database
Connection connection = DriverManager.getConnection(url, username, password); -
java.sql.Statement: An object used to execute a static SQL statement and return the result.
Statement statement = connection.createStatement();To execute SQL queries with JDBC, you must create a SQL query wrapper object, an instance of the Statement object.
-
java.sql.ResultSet: An object representing a database result set.
String query = "SELECT * FROM User";

	ResultSet resultSet = statement.executeQuery(query);
Use the Statement instance to execute a SQL query.
Statement execute methods
-
A ResultSet object represents the database query response in a table-like structure that holds records returned - the actual data returned by the SQL command. The next() method returns true or false. If true, the resultSet object points to the first row of data.
| Method | Returns | Used for |
|---|---|---|
| executeQuery(sqlString) | ResultSet | SELECT statement |
| executeUpdate(sqlString) | int (rows affected) | INSERT, UPDATE, DELETE, or a DDL (DROP, CREATE, ALTER) |
| execute(sqlString) | boolean (true if there was a ResultSet) | Any SQL command or commands |
Using CallableStatement
-
A CallableStatement allows non-SQL statements (such as stored procedures) to be executed against the database.
- The CallableStatement object encapsulates and execute a stored procedure. The Connection object has a prepareCall() method that allows us to create a CallableStatement object.
- Then we use the PreparedStatement's executeQuery() method to send the stored procedure to the database to execute the query.
- Again, the ResultSet object represents the database response - the actual data returned by the SQL command.
Get All Users
- Step 4: Create/Update a Servlet
- Create an AdminUsers servlet in a "controller" package.
- Set the URL pattern to "/users". Forward get requests to a JSP.
import jakarta.servlet.ServletException;
import jakarta.servlet.annotation.WebServlet;
import jakarta.servlet.http.HttpServlet;
import jakarta.servlet.http.HttpServletRequest;
import jakarta.servlet.http.HttpServletResponse;

import java.io.IOException;
import java.util.List;

@WebServlet("/users")
public class AdminUsers extends HttpServlet {
    @Override
    protected void doGet(HttpServletRequest req, HttpServletResponse resp) throws ServletException, IOException {
        List<User> users = UserDAO.getAll();
        req.setAttribute("users", users);
        req.setAttribute("pageTitle", "All Users");
        req.getRequestDispatcher("WEB-INF/ecommerce/admin-users.jsp").forward(req, resp);
    }
}
Get All Users
-
Step 5: Create/Update a JSP
-
Create a JSP in the "WEB-INF" folder called admin-users.jsp.
-
Add this HTML.
<%@ page contentType="text/html;charset=UTF-8" language="java" %>
<%@ taglib prefix="c" uri="jakarta.tags.core" %>
<%@ taglib prefix="fmt" uri="jakarta.tags.fmt" %>
<fmt:setLocale value="en-US" />
<!doctype html>
<html lang="en">
<head>
    <meta charset="utf-8">
    <meta name="viewport" content="width=device-width, initial-scale=1">
    <title>${pageTitle}</title>
    <link href="https://cdn.jsdelivr.net/npm/bootstrap@5.3.3/dist/css/bootstrap.min.css" rel="stylesheet"
          integrity="sha384-QWTKZyjpPEjISv5WaRU9OFeRpok6YctnYmDr5pNlyT2bRjXh0JMhjY6hW+ALEwIH" crossorigin="anonymous">
</head>
<body>
<div class="container py-4">
    <div class="row">
        <!-- Main content START -->
        <div class="col-xl-12">
            <!-- Title -->
            <h1>All Users</h1>
            <p class="lead">
                <c:choose>
                    <c:when test="${users.size() == 1}">There is 1 user</c:when>
                    <c:otherwise>There are ${users.size()} users</c:otherwise>
                </c:choose>
            </p>
            <c:if test="${users.size() > 0}">
                <div class="table-responsive">
                    <table class="table table-bordered">
                        <thead>
                        <tr>
                            <th scope="col"></th>
                            <th scope="col">First name</th>
                            <th scope="col">Last name</th>
                            <th scope="col">Email</th>
                            <th scope="col">Phone</th>
                            <th scope="col">Language</th>
                            <th scope="col">Status</th>
                            <th scope="col">Privileges</th>
                            <th scope="col">Created At</th>
                            <th scope="col">Timezone</th>
                        </tr>
                        </thead>
                        <tbody>
                        <c:forEach items="${users}" var="user">
                        <tr>
                            <td>
                                <a href="edit-user?user_id=${user.userId}" class="btn btn-sm btn-outline-primary">Edit</a>
                                <a href="delete-user?user_id=${user.userId}" class="btn btn-sm btn-outline-danger">Delete</a>
                            </td>
                            <td>${user.firstName}</td>
                            <td>${user.lastName}</td>
                            <td>${user.email}</td>
                            <td>${user.phone}</td>
                            <td>${user.language}</td>
                            <td>${user.status}</td>
                            <td>${user.privileges}</td>
                            <td>${user.createdAt}</td>
                            <td>${user.timezone}</td>
                            </c:forEach>
                        </tbody>
                    </table>
                </div>
            </c:if>
        </div> <%-- Col END --%>
    </div> <%-- Row END --%>
</div> <%-- Container END --%>

<script src="https://cdn.jsdelivr.net/npm/bootstrap@5.3.3/dist/js/bootstrap.bundle.min.js"
        integrity="sha384-YvpcrYf0tY3lHB60NNkmXc5s9fDVZLESaAA55NDzOxhy9GkcIdslK1eN7N6jIeHz"
        crossorigin="anonymous"></script>
</body>
</html>-
Run Tomcat. Visit "/users". A table with two users should display.
End Day 2
Delete Users
-
Run this query to delete one of the users.
DELETE FROM user WHERE user_id = 2;-
Refresh the local version of the website. It should display "There is 1 user".
-
Delete the last user.
-
Refresh the local version of the website. It should display "There are 0 users".
Deploy to Azure
-
Commit/push changes to GitHub.
-
Visit "/users" on your live site. A 500 server error will occur.
-
Go to Azure and click your web app. In the left navigation, click Monitoring > App Service Logs.
-
Turn on File System Application logging.
-
Type 7 in the retention period field. Click Save.
-
Click Log Stream to find the .env file not found error.
-
If you don't see the error, click the Reconnect button.
-
-
Last semester, we built the war file from IntelliJ and deployed it to Azure through the Azure Toolbox plugin. This worked because IntelliJ has access to the .env file.
-
This semester, the GitHub Action builds the war file and deploys to Azure using continuous integration and continuous delivery/deployment (CI/CD). GitHub does not have access to the .env file because we ignored it in the .gitignore file.
Deployment Descriptor
-
In IntelliJ, open the src/main/webapp/WEB-INF/web.xml file.
-
This file is called the deployment descriptor. Its purpose is to provide instructions to the Jakarta EE web application server for deploying and running the web application.
-
Add this code between the <web-app> tags.
<jsp-config>
    <jsp-property-group>
        <url-pattern>*.jsp</url-pattern>
        <page-encoding>UTF-8</page-encoding>
        <include-prelude>/WEB-INF/top.jspf</include-prelude>
        <trim-directive-whitespaces>true</trim-directive-whitespaces>
        <default-content-type>text/html</default-content-type>
    </jsp-property-group>
    <jsp-property-group>
        <url-pattern>*.jsp</url-pattern>
        <page-encoding>UTF-8</page-encoding>
        <include-coda>/WEB-INF/bottom.jspf</include-coda>
        <trim-directive-whitespaces>true</trim-directive-whitespaces>
        <default-content-type>text/html</default-content-type>
    </jsp-property-group>
</jsp-config>-
The
<jsp-config>element can contain 1 or more<jsp-property-group>elements. -
Each group must define distinct
<url-pattern>tags. In this example, we are telling Tomcat to apply the base.jspf file to the beginning of all files ending in .jsp anywhere in the application.
Deployment Descriptor
-
<page-encoding>indicates page encoding information. UTF-8 is the preferred encoding for e-mail and web pages.-
UTF is backwards compatible with ASCII, results in fewer internationalization issues, has been implemented in all modern operating systems, and has been implemented in standards such as JSON.
-
-
<trim-directive-whitespaces>controls whether template text containing only white spaces must be removed from the response output. Without this, there will be a couple empty lines at the top of our HTML source code. -
<default-content-type>Specifies the default content type. If the page directive does not include a contentType attribute, it specifies the default response content type.
Context Parameters
-
Context Parameters can be added to the web.xml file to set global variables for the entire application.
-
Use environment variables for variables that need to be accessed by servlets, like passwords and API keys.
-
Use the web.xml file for variables that need to be accessed by JSPs.
-
<context-param>
    <param-name>appURLLocal</param-name>
    <param-value>http://localhost:8080/your_project_name_war_exploded</param-value>
</context-param>
<context-param>
    <param-name>appURLCloud</param-name>
    <param-value>https://your-app-name.azurewebsites.net</param-value>
</context-param>-
Substitute the param-value tags with your URLs.
-
I would like you to remove the last "/" at the end of both URLs.
top.jspf
-
Create the top.jspf file in the WEB-INF folder.
-
jspf stands for Java Server Page Fragment
-
-
Add this code to include page and taglib directives, to set an "appURL" variable based on whether you are running the app locally or on Microsoft Azure, and to set doctype, html, head, meta, title, Bootstrap link and script, jQuery script, and body tags.
<%@ page contentType="text/html;charset=UTF-8" language="java" %>
<%@ taglib prefix="c" uri="jakarta.tags.core" %>
<%@ taglib prefix="fmt" uri="jakarta.tags.fmt" %>
<fmt:setLocale value="en-US" />
<c:choose>
    <c:when test="${pageContext.request.serverName eq 'localhost' }">
        <c:set var="appURL" value="${initParam['appURLLocal']}"></c:set>
    </c:when>
    <c:otherwise>
        <c:set var="appURL" value="${initParam['appURLCloud']}"></c:set>
    </c:otherwise>
</c:choose>
<!doctype html>
<html lang="en">
<head>
    <meta charset="utf-8">
    <meta name="viewport" content="width=device-width, initial-scale=1">
    <title>${pageTitle}</title>
    <link href="https://cdn.jsdelivr.net/npm/bootstrap@5.3.3/dist/css/bootstrap.min.css" rel="stylesheet"
          integrity="sha384-QWTKZyjpPEjISv5WaRU9OFeRpok6YctnYmDr5pNlyT2bRjXh0JMhjY6hW+ALEwIH" crossorigin="anonymous">

  	<script defer src="https://cdn.jsdelivr.net/npm/bootstrap@5.3.3/dist/js/bootstrap.bundle.min.js"
            integrity="sha384-YvpcrYf0tY3lHB60NNkmXc5s9fDVZLESaAA55NDzOxhy9GkcIdslK1eN7N6jIeHz"
            crossorigin="anonymous"></script>
    <script defer src="https://code.jquery.com/jquery-3.7.1.min.js"
            integrity="sha256-/JqT3SQfawRcv/BIHPThkBvs0OEvtFFmqPF/lYI/Cxo="
            crossorigin="anonymous"></script>
</head>
<body>
bottom.jspf
-
Create the bottom.jspf file in the WEB-INF folder
-
Add this code to close the body and html tags.
</body>
</html>-
Remove the related code from admin-users.jsp. The deployment descriptor will now include it via base.jspf.
-
Remove the related code from admin-users.jsp. The deployment descriptor will now include it via base.jspf.
-
Temporarily add this to admin-user.jsp to see the value set.
<h1>${appURL}</h1> -
Run the app and view the users page.
-
Note that the page title requires it to be set as a servlet request attribute.
Custom Error Pages
-
By default, Java web applications display detailed error messages that disclose the server version and detailed stack trace information that can, in some situations, display snippets of Java code. This information is a boon to hackers looking for as much information about their victims as possible.
-
Fortunately, it's very easy to configure web.xml to display custom error pages.
-
An error page will be displayed using the following configuration whenever the application responds with an HTTP 500 error.
-
You can add additional entries for other HTTP status codes.
-
405 errors will occur when Azure fails to send emails.
-
<error-page>
    <error-code>404</error-code>
    <location>/fileNotFound</location>
</error-page>
<error-page>
    <exception-type>java.lang.Throwable</exception-type>
    <location>/errorHandler</location>
</error-page>
ErrorHandler
-
In the "shared" package, create a new class called "ErrorHandler". Add this code.
import jakarta.servlet.ServletException;
import jakarta.servlet.annotation.WebServlet;
import jakarta.servlet.http.HttpServlet;
import jakarta.servlet.http.HttpServletRequest;
import jakarta.servlet.http.HttpServletResponse;
import static jakarta.servlet.RequestDispatcher.*;
import java.io.IOException;

@WebServlet("/errorHandler")
public class ErrorHandler extends HttpServlet {

    @Override
    protected void doGet(HttpServletRequest req, HttpServletResponse resp) throws ServletException, IOException {

        req.setAttribute("pageTitle", "Error");
        req.getRequestDispatcher("WEB-INF/error.jsp").forward(req, resp);
    }
}
FileNotFound
-
In the "shared" package, create a new class called "FileNotFound". Add this code.
import jakarta.servlet.ServletException;
import jakarta.servlet.annotation.WebServlet;
import jakarta.servlet.http.HttpServlet;
import jakarta.servlet.http.HttpServletRequest;
import jakarta.servlet.http.HttpServletResponse;
import static jakarta.servlet.RequestDispatcher.*;
import java.io.IOException;

@WebServlet("/fileNotFound")
public class FileNotFound extends HttpServlet {

    @Override
    protected void doGet(HttpServletRequest req, HttpServletResponse resp) throws ServletException, IOException {

        req.setAttribute("pageTitle", "File Not Found");
        req.getRequestDispatcher("WEB-INF/fileNotFound.jsp").forward(req, resp);
    }
}
ErrorHandler
-
In the "WEB-INF" folder, create a file called "error.jsp". Add this code.
<main>
    <div class="container pt-5">
        <div class="row">
            <div class="col-12 text-center">
                <h2>Oh no!</h2>
                <p class="mb-4">Something went wrong. We are sorry for the inconvenience.</p>
                <a href="${appURL}" class="btn btn-primary">Take me to the Homepage</a>
            </div>
        </div>
    </div>
</main>-
In the "WEB-INF" folder, create a file called "fileNotFound.jsp". Add this code.
<main>
    <div class="container pt-5">
        <div class="row">
            <div class="col-12 text-center">
                <h1>404</h1>
                <h2>Page Not Found</h2>
                <p class="mb-4">The page you are looking for does not exist.</p>
                <a href="${appURL}" class="btn btn-primary">Take me to the Homepage</a>
            </div>
        </div>
    </div>
</main>
Test the Error Handlers
-
Add this code to the doGet method of the AdminUsers servlet to cause a server error.
String query = req.getParameter("q");
query.toString();-
Run Tomcat locally. Visit "/users" to see the custom error page. Visit "/users2" to see the custom file not found page.
-
Remove the two lines of code from the doGet method that is causing the server error.
-
Commit and push the work to GitHub. Wait for the app to deploy and test the live website.
-
Test the "Take me to the Homepage" buttons. Note they should go to localhost when running Tomcat locally and they should go to your azurewebsites.net URL when running on the live server.
ErrorHandler
-
Check out the available static error fields from the RequestDispatcher interface.
-
In the ErrorHandler, before setting the pageTitle attribute, get some of those fields and assign them to String variables.
-
Format the error message output.
String errorMsg = "<strong>Error code:</strong> " + req.getAttribute(RequestDispatcher.ERROR_STATUS_CODE) + "<br>";
errorMsg += "<strong>Exception:</strong> " + req.getAttribute(RequestDispatcher.ERROR_EXCEPTION_TYPE) + "<br>";
errorMsg += "<strong>Message:</strong> " + req.getAttribute(RequestDispatcher.ERROR_MESSAGE); // Some Exceptions may not have messages
req.setAttribute("errorMsg", errorMsg);-
In web.xml, set a context-param for debugging.
<context-param>
    <param-name>debugging</param-name>
    <param-value>true</param-value>
</context-param>
ErrorHandler
-
Update error.jsp to conditionally display error messages based on the value of the debugging setting.
<c:choose>
    <c:when test="${initParam['debugging'] eq 'true'}">
        <p>${errorMsg}</p>
    </c:when>
    <c:otherwise>
        <h2>Oh no!</h2>
        <p class="mb-4">Something went wrong. We are sorry for the inconvenience.</p>
        <a href="${appURL}" class="btn btn-primary">Take me to the Homepage</a>
    </c:otherwise>
</c:choose>-
Add this code to the doGet method of the AdminUsers servlet to cause a server error.
String query = req.getParameter("q");
query.toString();
ErrorHandler
-
Run Tomcat locally. Visit "/users" to see the custom error page.
-
Remove the two lines of code from the doGet method that is causing the server error.
-
Commit and push the work to GitHub. Wait for the app to deploy and test the live website.
-
Visit "/users" to see the custom error page.
-
Set the debugging context-param to anything but true if you do not want users to see error messages on your live site.
Config Class
-
In the shared package, create a class called Config. Add this code I got from ChatGPT to retrieve system environment variables.
import java.util.Optional;

public class Config {
    public static String getEnv(String key) {
        return Optional.ofNullable(System.getenv(key))
                .orElseThrow(() -> new IllegalStateException("Environment variable " + key + " is not set"));
    }
}-
Windows Users: Create an AZURE_MYSQL_CONNECTIONSTRING environment variable the same way you created a JAVA_HOME, MAVEN_HOME, and CATALINA_HOME environment variable. Restart your computer.
Environment Variables
Mac Environment Variables
-
Mac Users: The ChatGPT thread on the previous page contains directions on how to set system environment variables.
- Open "Users/your-username/" in the Finder app. Press Command + Shift + period to display hidden files.
- I created a file called ".zshrc" and opened it in VS Code.
- I typed this text with my full connection string and saved the file:
export AZURE_MYSQL_CONNECTIONSTRING='jdbc:mysql..'- I had issues when my database password contained $ and % characters. Please remove those and reset the password.
- I opened the terminal and typed
printenvto display a list of currently set environment variables. - Restart your computer.
MySQL_Connect Class
-
Update the MySQL_Connect class to use the Config class instead of the Dotenv class.
String connectionString = "";
try {
    connectionString = Config.getEnv("AZURE_MYSQL_CONNECTIONSTRING");
} catch (IllegalStateException e) {
    throw new SQLException(e.getMessage());
}-
Run Tomcat. Go to "/users". The program should work without errors.
-
Commit and push the work to GitHub. Wait for the app to deploy and test the live website.
-
Visit "/users" to see the list of users, not an error page.