Technology Empowerment Team
Form 3 ~ 6 Potential Course
2023-2024
Floor 4 - Computer Room
Mr. Peter
Outline

1
2
Connect to the server
Development and practice
1.1.
RGBA Controller
1.2.
Binary to Decimal
1.3.
Classical Encryption
Server
1.
2.
3.
4.
5.
6.
7.
8.
9.
10.
11.
12.
13.
14.
Ex09 - RGBA Controller
Tasks:
Develop the layout with title and input
1.
Get the RGBA input from user
2.
Add input event listener to listen input from user
3.
Display the result by changing the color of the rectangle
4.
Ex09 - RGBA Controller
Setup before coding
Create a folder called under your own folder.
1.
Create a file called under the ex02 folder
2.
Save and check your web page
3.
Ex09 - RGBA Controller


PeterChan
ex01
ex02
ex03
ex04
ex05
ex06
ex07
ex08
ex09
Ex09 - RGBA Controller
Generate HTML structure
Input in the index.html file
1.
Press key to generate the code
2.
Change the page title to
3.
Save and check your web page
4.
<meta name="viewport" content="width=device-width, initial-scale=1">
Ex09 - RGBA Controller
Generate title h1 tag
Input in the index.html file
1.
Press key to generate the code
2.
Change the content to
3.
Save and check your web page
4.
Ex09 - RGBA Controller
Generate label tag for input text
Input in the index.html file
1.
Press key to generate the code
2.
Change the content to
3.
Save and check your web page
4.
Ex09 - RGBA Controller
Generate input for user input
Input in the index.html file
1.
Press key to generate the code
2.
Change the properties of input
3.
Save and check your web page
4.
Type: range
-
ID: red
-
Min: 0
-
Max: 255
-
Default Value: 255
-
Ex09 - RGBA Controller
Duplicate the label and input
Ex09 - RGBA Controller
Add a rectangle result using div tag
Display the content as "rgba(255, 255, 255, 1)"
Ex09 - RGBA Controller
Define the style of the interface
1.
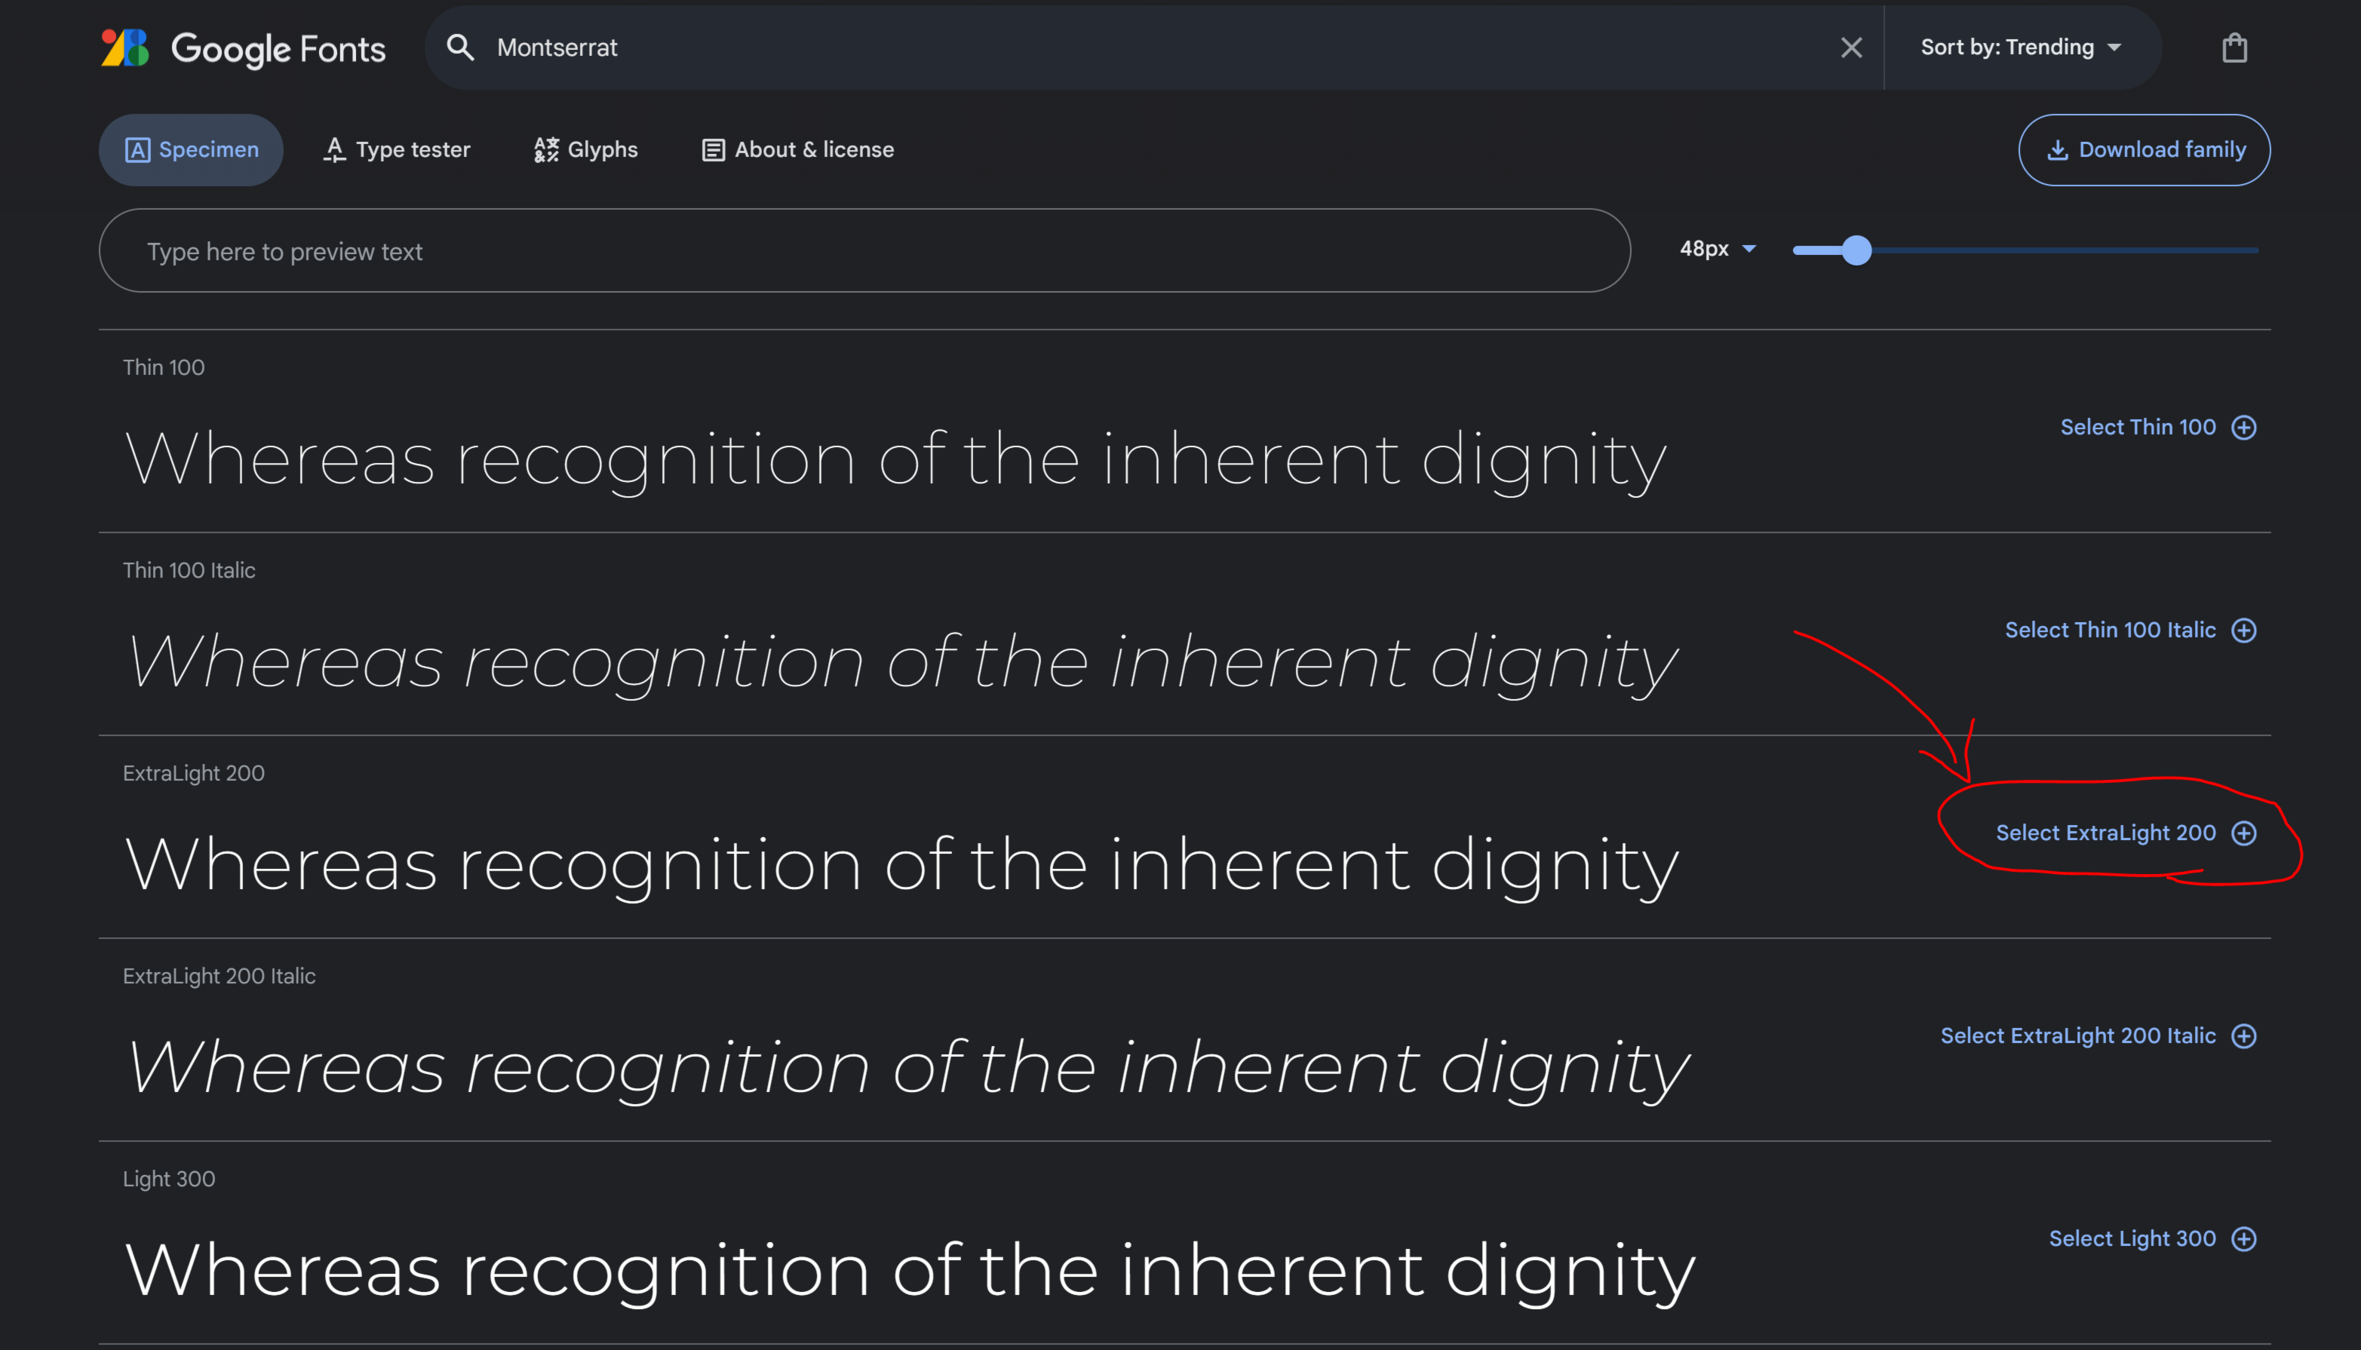
Select the font
2.
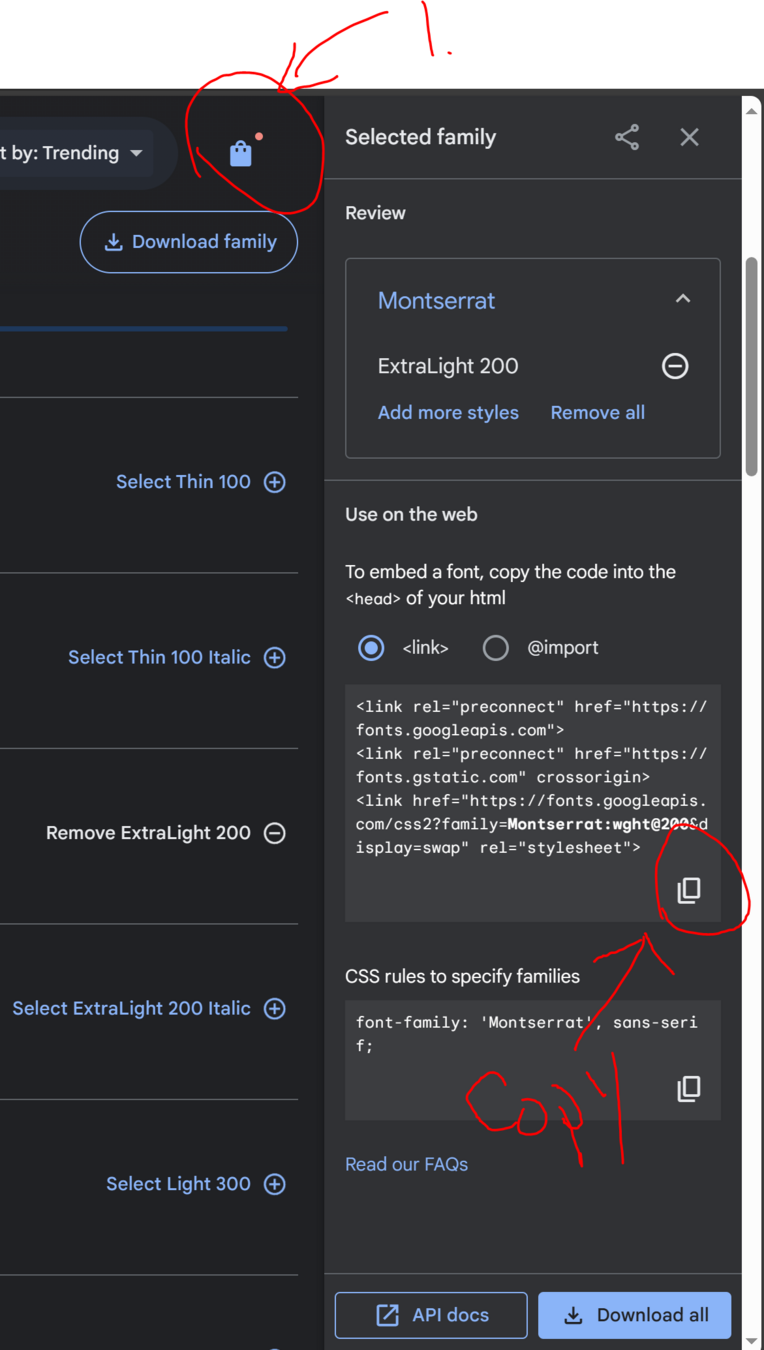
Copy the code from the Google Font website
3.
Import the font into your website by pasting the code
4.
How?
How?
How?
Ex09 - RGBA Controller
Generate style tag for web interface styling
Ex09 - RGBA Controller
Define the CSS style
Copy the code from google font
1.
Use * to represent every elements that need to apply the font
2.
How?

Ex09 - RGBA Controller
Define the CSS style
Add a padding for the body element
1.
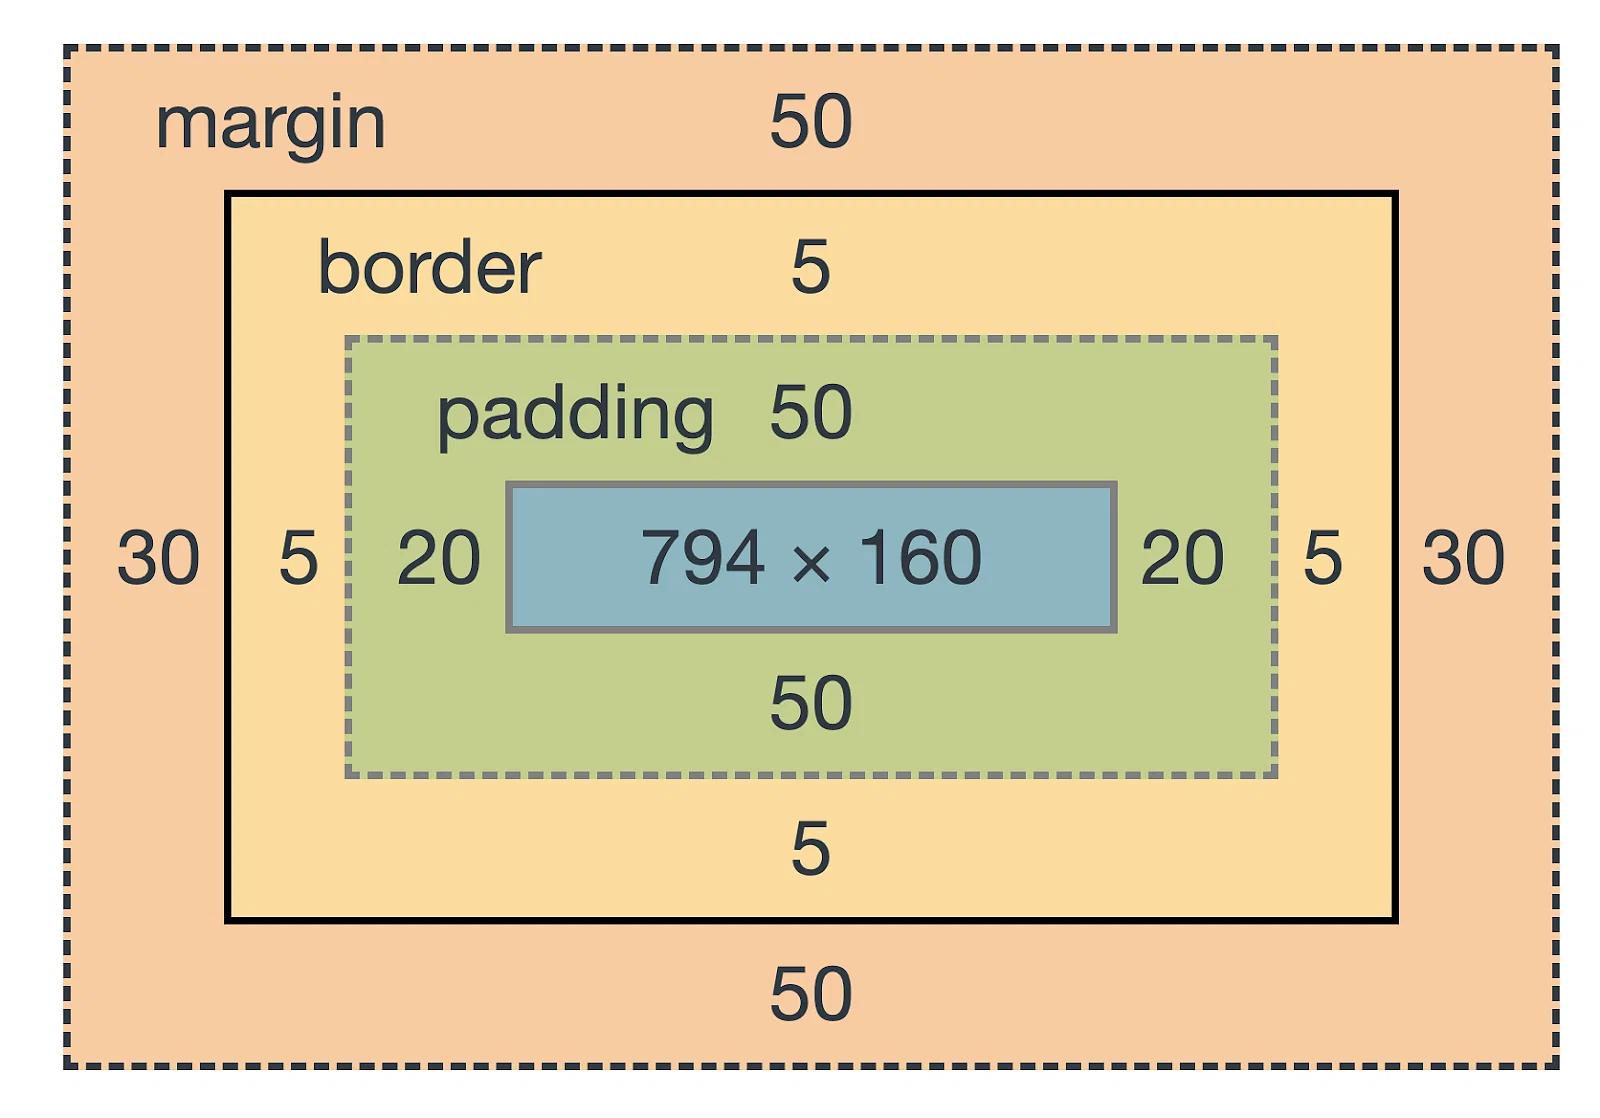
What is padding?
Ex09 - RGBA Controller
Define the CSS style
Align the text in h1 to be center
1.
Ex09 - RGBA Controller
Define the CSS style
Set the input scroll bar to fit the screen width
1.
Ex09 - RGBA Controller
Define the CSS style
Define the button margin top, width and height.
1.
Margin top size is the distance between previous element and the button
So, what is margin?
Ex09 - RGBA Controller
Define the CSS style
Define the rectangle style with border and background color
1.
margin-top: 16px;
width: 100%;
height: 200px;
background-color: rgba(255, 255, 255, 1);
border: 1px solid #ccc;
I need code
Ex09 - RGBA Controller
Define the CSS style
Center-align text in the result rectangle vertically and horizontally
1.
display: flex;
justify-content: center;
align-items: center;
I need code
Ex09 - RGBA Controller
Define the interaction using JavaScript
Generate script tag for writing JavaScript
1.
Import jQuery
<script src="https://cdnjs.cloudflare.com/ajax/libs/jquery/3.7.1/jquery.min.js"></script>
<script>

</script>
Ex09 - RGBA Controller
Define the interaction using JavaScript
Create a function called whenInput( )
1.
Ex09 - RGBA Controller
Define the interaction using JavaScript
Add a event listener to listen if the three inputs are scrolling, then execute whenInput function.
1.
Ex09 - RGBA Controller
Define the interaction using JavaScript
Declare four variables to get the input values
1.
Ex09 - RGBA Controller
Define the interaction using JavaScript
Change the rectangle background color in CSS
1.
Ex09 - RGBA Controller
Define the interaction using JavaScript
Change the text in rectangle
1.
Ex09 - RGBA Controller
Test your app in your mobile
1. Open your web page in browser
2. Add inqrcode.com/ in front of your link
i.e. peterchan.srleng.com => inqrcode.com/peterchan.srleng.com
3. Turn on your mobile and scan the Qrcode
Ex10 - Binary to Decimal
Logic and procedures in JavaScript:
Get the binary input from users
1.
Ex10 - Binary to Decimal
Add click event listener to the button
2.
Show the decimal result
3.
4.
Setup before coding
Create a folder called under your own folder.
1.
Create a file called under the ex02 folder
2.
Save and check your web page
3.
PeterChan
ex01
ex02
ex03
ex04
ex05
ex06
ex07
ex08
ex10
Ex10 - Binary to Decimal
ex09
Define the HTML elements
H1 title: Binary to Decimal
1.
div: Decimal number:
4.
Ex10 - Binary to Decimal
Label: Binary Number
2.
Input: number type, set id to binary
3.
Save and check your web page
6.
button: Convert
5.
div: Decimal number:
4.
Define the CSS styling
Body with padding
1.
Ex10 - Binary to Decimal
body {
	padding: 16px;
}
Title align center
2.
h1 {
	text-align: center;
}
Setup the input element
3.
input {
  width: 100%;
  margin-top: 10px;
  padding: 6px 10px;
  font-size: 16px;
  outline: none;
}
Setup the button element
4.
button {
  margin-top: 16px;
  width: 100px;
  height: 30px;
}
Setup the display result element
5.
.result {
	margin-top: 16px;
}
* {
box-sizing: border-box;
}Import jQuery
1.
Ex10 - Binary to Decimal
<script src="https://cdnjs.cloudflare.com/ajax/libs/jquery/3.7.1/jquery.min.js"></script>Create function
2.
function whenClick() {

}
Add click event listener
3.
$('button').on( 'click', whenClick );Get the value from input element
4.
let binary = $( 'input' ).val();Iterate each letter from the binary value
5.
let i = 0;
while ( i <= binary.length - 1 ) {
	let letter = binary.charAt(i);
	i++;
}
Check if letter is 1, then add to decimal
6.
if ( letter == 1 ) {
	decimal += Math.pow( 2, binary.length - 1 - i )
}
let decimal = 0;Display the result
6.
$('.result').text( `Decimal number: ${decimal}` );Define the interaction using JavaScript
Ex11 - Classical Encryption
Logic and procedures in JavaScript:
Ex11 - Classical Encryption
Get the message input from users
1.
Add click event listener to the button
2.
Show the encrypted result
3.
4.
Setup before coding
Create a folder called under your own folder.
1.
Create a file called under the ex02 folder
2.
Save and check your web page
3.
PeterChan
ex01
ex02
ex03
ex04
ex05
ex06
ex07
ex08
ex11
ex09
ex10
Ex11 - Classical Encryption
Define the HTML elements
H1 title: Classic Encryption
1.
Label: Decrypted message:
2.
textarea: set the id to decrypted
3.
Save and check your web page
8.
button: Encrypt and set the class to be e-btn
4.
Ex11 - Classical Encryption
Label: Encrypted message:
5.
textarea: set the id to encrypted
6.
button: Decrypt and set the class to be d-btn
7.
Define the CSS styling
Body with padding
1.
body {
	padding: 16px;
}
Title align center
2.
h1 {
	text-align: center;
}
Setup the input element
3.
textarea {
  width: 100%;
  margin-top: 10px;
  padding: 6px 10px;
  font-size: 16px;
  outline: none;
}
Setup the button element
4.
button {
  margin-top: 16px;
  width: 100px;
  height: 30px;
}
Ex11 - Classical Encryption
Import jQuery
1.
<script src="https://cdnjs.cloudflare.com/ajax/libs/jquery/3.7.1/jquery.min.js"></script>Create functions
2.
function whenEncryptClick() {

}

function whenDecryptClick() {

}
Ex11 - Classical Encryption
Define the interaction using JavaScript
Create click listeners
3.
$('.e-btn').on( 'click', whenEncryptClick );
$('.d-btn').on( 'click', whenDecryptClick );
Get value from user input
4.
let message = $( '#decrypted' ).val();
let encrypted_message = '';
Encryption
6.
for( let i = 0; i < message.length; i++ ) {
	encrypted_message += String.fromCharCode(message.charCodeAt(i) + 10000);
}
Display encrypt result
6.
$('#encrypted').val( encrypted_message );
$( '#decrypted' ).val('');