First Aid & CPR
Emergency Care Online Course


Objectives
Recognize when cardiopulmonary resuscitation (CPR) and use an automated external defibrillator (AED)
Acting in an emergency is important and can make a difference to a victim of injury or illness.
Let's Get Started

First Aid
First aid refers to the emergency or immediate care you should provide when a person is injured or ill until full medical treatment is available. For minor conditions, first aid care may be enough. For serious problems, first aid care should be continued until more advanced care becomes available.
The decision to act appropriately with first aid can mean the difference between life and death. Begin by introducing yourself to the injured or ill person. Explain that you are a first aid provider and are willing to help. The person must give you permission to help them; do not touch them until they agree to be helped. If you encounter a confused person or someone who is critically injured or ill, you can assume that they would want you to help them. This is known as “implied consent.
The Good Samaritan Law protects individuals who assist those who are injured, ill, or in peril.

As long as someone is acting voluntary and without expectation of reimbursement or compensation while performing such aid on-site, they will have legal protection. When performing CPR, every second counts, so unless unique circumstances apply, don’t hesitate to call 911 and perform CPR immediately.
Understanding Duty to Act
Duty to act is the duty requiring a person to take necessary action in order to prevent harm to another person or to the general public. Whether you are required to follow through depends on the situation and the relationship between the parties. In some cases, breach of duty may put a party at liability for damages.
For laypersons, duty to act requires that you provide care if you have a legal duty. If you do not have a legal duty to provide care, you are not required to provide it.
Fear of providing care
There are a number of factors to weigh up when considering providing care. COVID-19 is an important concern, but the risk of contracting diseases can be reduced by wearing personal protective devices like masks, gloves, and gowns that limit exposure.
If you feel fear of providing care due to possible legal issues, know that rescuers who provide care without a legal duty and act in good faith are protected by Good Samaritan laws.
If the situation is actively unsafe, do not attempt care. If you or the victim are at risk, it is best to call EMS and wait for support to arrive
Fear of providing care
In some cases, you may be unable to save a victim. Rescuers should still attempt to provide the best care they are able to. A victim’s chances of survival can be improved by even basic efforts at life support. In accidents, victims who are clinically dead may still be helped when given care. Rescue efforts will not worsen their condition.
Following a traumatic situation in which you provided care, you may experience overwhelming emotions. If you continue to feel symptoms like depression, be sure to seek help from a professional source.
SCENE SAFETY
Assessing the safety of the surroundings is critical when approaching any scene. You do not want to become another person who is injured or ill, so look for any potential dangers.
Remove the person from any dangers, such as the presence of water at the scene. Be especially alert to avoid danger from automobile traffic.
Checking the Scene
Key Questions to ask:
- Is it safe for me to help?
- What happened?
- How many patients are there?
- Am I going to need assistance from
- EMS?
- Do I have my personal protective equipment ready to use?
Check the Patient
Tap and shout. Is there any response?
-
While checking for responsiveness, look for normal breathing by looking at the person’s chest and face. Is the patient breathing normally?
-
Agonal respirations are not normal breathing. They would be characterized as occasional gasps. The chest does not rise.
Activate EMS – Call 911
Send someone to call and tell them to come back. The caller should give dispatch the patient’s location, what happened, how many people are injured, and what is being done.
If you are alone and no one is available:
-
PHONE FIRST for adults and get the AED. Return to start CPR and use the AED for all ages.
-
CARE FIRST for children and infants by providing about 5 cycles or 2 minutes of CPR before activating the emergency response number.
CARE FIRST for all age patients of hypoxic (asphyxial) arrest (ei., drowning, injury, drug overdose).
Personal Protective Equipment
Putting On Gloves
Use disposable gloves when providing first aid care. If you have a latex allergy, use a latex alternative such as nitrile or vinyl. Before providing care, make sure the gloves are not ripped or damaged.
Removing Gloves
Remember to use skin to skin and glove to glove. Pinch the outside wrist of the other gloved hand. Pull the glove off turning the glove inside-out as you remove it. Hold it in the gloved hand. Use the bare hand to reach inside the other glove at the wrist to turn it inside out trapping the other glove inside. Dispose of gloves properly.
HANDWASHING AND PERSONAL PROTECTIVE GEAR
Handwashing is essential in the prevention of disease and illness. Wash your hands after each episode of care and after taking off gloves. When a sink is not available, use hand sanitizers. (Most hand sanitizers are alcohol-based and are a substitute for handwashing when needed.)
Proper handwashing technique is fairly simple:
- Completely wet your hands and generously apply soap.
- Rub vigorously for at least 20 seconds (Figure1).
- Rinse your hands with plenty of running water.
- Dry your hands with a towel or air dryer.
Cardiovascular Disease
Cardiovascular disease is the number one killer in the United States. The Center for Disease Control reports that in the United States over 650,000 people die each year from cardiovascular disease.
Cardiovascular disease causes damage to the heart and blood vessels. Cardiovascular disease often leads to heart attack or stroke. The best way to survive a heart attack or stroke is to never have one. The key for cardiovascular disease is to focus on prevention.
Heart Attack
Signs and Symptoms may include
- Chest discomfort-pressure, tightness, that may radiate to jaw and arms.
- Nausea
- Sweating
- Shortness of breath
- Denial
- Feeling of weakness
Women present more with shortness of breath, extreme fatigue, or flu-like symptoms About a third of women experience no chest pain.
Treatment:
Recognize the signs and symptoms of a heart attack, activate EMS, have patient remain in a position of comfort, offer 1 adult dose aspirin, and keep the patient calm and quiet.
Stroke
Stroke is the 3rd leading cause of death in the United States. Strokes can be one of two types: ischemic– a clot in a blood vessel that restricts or obstructs blood flow to the brain; hemorrhagic- a blood vessel that ruptures and prevents blood flow to the brain. In either case, the brain is deprived of oxygen and tissue starts to die.
Signs and Symptoms may include
- Numbness or weakness of the face, arm or leg, especially on one side of the body. The acronym FAST helps in assessing a stroke: F– facial droop, A– Arm drift, S– Speech, T– Time
- Confusion, trouble speaking or understanding
- Trouble seeing in one or both eyes
- Trouble walking, dizziness, loss of balance or coordination
- Severe headache with no known cause
Treatment:
Recognize the signs and symptoms of a stroke, activate EMS, give nothing to drink or eat, and keep the patient calm and quiet. Monitor patient and be prepared to start CPR if necessary.
Bleeding Control
Capillary bleeding is usually not serious and is characterized by oozing blood that is easily stopped. Venous bleeding steadily gushes larger amounts of blood, but can usually be stopped with direct pressure. Arterial bleeding is usually spurting and is the most serious because a large amount of blood can be lost quickly.
-
Inspect the wound. Look for the area were the bleeding is coming from. Apply gloves.
-
Use direct pressure on the wound using an absorbent pad or gauze. Add more gauze or padding if necessary.
-
Make a pressure bandage by wrapping a roller gauze or elastic bandage around the wound to maintain bleeding control.
-
If severe bleeding is not controlled, consider using a tourniquet.
-
Activate EMS if severe bleeding is present, use direct pressure and apply pressure bandage. If wound is minor, wash and apply an antibiotic ointment, then bandage as needed.

Nose Bleeds (Epistaxis)
Treatment: Pinch nose, tilt the head forward, and apply a cold pack to bridge of nose.
Amputation
Treatment: Activate EMS, control bleeding with direct pressure with bulky dressing. If amputated part can be found wrap in clean or sterile dressing and place in plastic bag.
Put bag in container of ice and water. Care for shock, check and correct ABC. Do not soak amputated part in water or allow it to freeze by putting it directly on ice.

Dental Emergencies
Treatment: For bleeding, apply a moistened piece of gauze with direct pressure to the area. Be careful not to block the airway or cause a choking hazard. If teeth are knocked out, avoid handling by the root end, store in coconut water or milk. Apply a cold compress to the outside of the mouth, cheek, or lip near the injury to keep any swelling down and relieve pain. If life threatening conditions exist, call 911 and provide appropriate care
Shock
Shock is the body’s inability to circulate oxygen to the vital organs.
Signs and symptoms of shock include:
- restlessness
- dizziness
- confusion
- cool, moist skin
- anxiety
- delayed capillary refill time
- weakness
Treatment: Recognize, Activate EMS, keep calm, give nothing to eat or drink, maintain body heat, raise the legs if no spinal injury or fracture of the legs.
Head, Neck, and Back Injuries
Common causes include:
-
Motor vehicle accidents
-
Pedestrian-vehicle collisions
-
Falls
-
Blunt trauma
-
Diving accidents
-
Any trauma leaving the patient unresponsive
Signs and symptoms include:
-
Bruising around the eyes and behind the ears
-
Irregular or abnormal breathing patterns
-
Altered mental status
-
Unconsciousness
-
Headache
-
Pain, pressure, stiffness in the back or neck area
-
Inability to move the arms or legs
-
Numbness or tingling in the extremities
Treatment: Activate EMS, do not move the patient unless life threatening danger arises, minimize movement, check and correct ABC.
Concussion
Signs and Symptoms include:
- Dizziness
- Inability to track movement with eyes
- Blurred vision
- Loss of balance
- Confusion
- Acute memory loss
- Dazed look
- Nausea
Treatment: Activate EMS, let patient sit in position of comfort, monitor patient for life threatening issues, check and correct ABC.
Concussion in sports: If a player shows signs of having a concussion, the player is not allowed to go back to play until cleared by a physician.
Musculoskeletal Injuries
Sprains and strains:
A sprain is an overextended ligament. A strain is an overextended muscle. In either case, a minor sprain or strain is usually not serious. A more serious strain or sprain may show the same signs as a fracture and require medical attention. Sprain or strain signs include:
-
Pain upon movement
-
Tenderness
-
Minor swelling or bruising
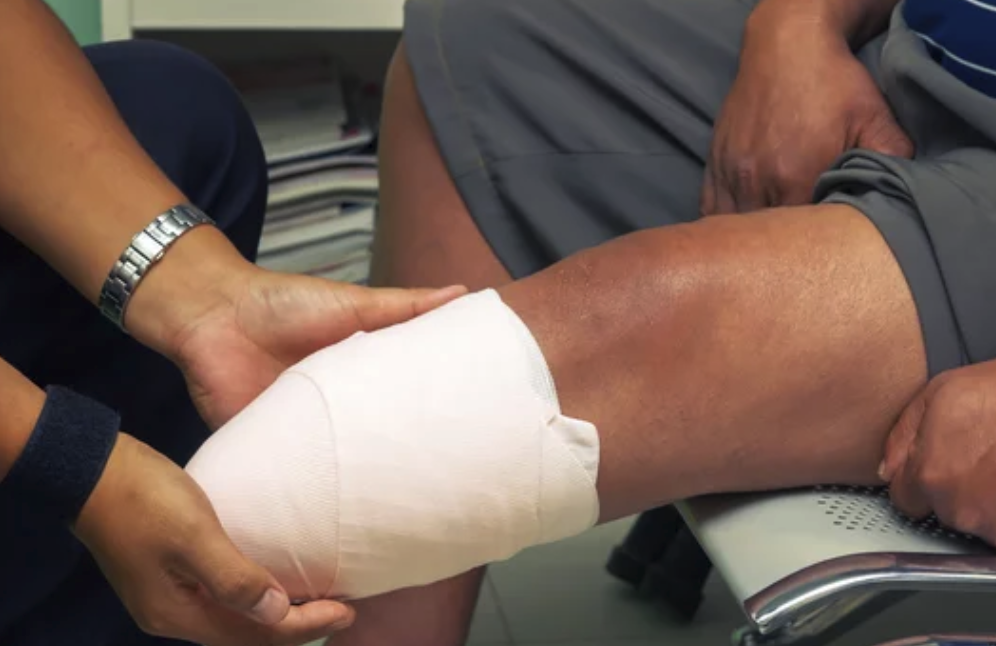
Treatment: RICE- Rest the injured area, Ice for 10-15 minutes every hour, Compress by wrapping with an ACE or elastic bandage, Elevate the injured area above the person’s heart level.
Musculoskeletal Injuries
Fractures:
-
If patient is not to able to move the body part, treat as a fracture.
-
Consider the mechanism that caused the injury.
-
Look for deformity, open wounds, tenderness, significant swelling, discoloration, bruising, crepitus (a grating sensation), and loss of movement.
-
Cover any open wounds with dry clean dressings, but do not apply pressure over possible fracture.
-
General splinting is not recommended. Stabilize fractures in the position found. Splinting may be appropriate if there will be an extended time for EMS response, EMS is not available, or an individual will be transport- ing the patient to a hospital.
Treatment: Activate EMS if necessary, manually stabilize the affected body part, do not attempt to straighten, use ice to minimize swelling.
First Degree
- Pain
- Red Skin
- Swelling
Third Degree
- Both numbness is burned area and severe pain in surrounding area
- Multicolored skin, black, white, gray, and red
- Severe body fluid loss
Burns
Treatment: Stop the burning. Cool burn with water, cover with dry sterile dressing (for chemical burns, flush with water for 15-20 minutes). For 1st and 2nd degree burns, activate EMS if severe conditions exist. For 3rd degree burns, electrical burns, and chemical burns activate EMS immediately. For electrical burns, look for entrance and exit burns. Care for shock, check and correct ABC.
Second Degree
- Pain
- Blistering
- White or Red Skin
- Body fluids leaking from the burn site
Eye Injuries
- Burns – stop the burning, bandage both eyes
- Chemical – flush with warm water for 15-20 minutes and bandage both eyes
-
Penetrating Trauma – Do not remove. Bandage the object into place, place a cup over object, and cover both eyes.
Treatment: Activate EMS if severe conditions exist. Seek professional medical treatment for all forms of eye injuries.
Diabetic Emergencies
Signs & Symptoms
- Altered level of consciousness
- Personality changes
- Irritability
- Weakness
- Dizziness
- Difficulty breathing
- Cool, clammy skin
Treatment: Give sugar if conscious. If unconscious or condition does not improve, activate EMS, check and correct ABC.
Poison Control
The most important point for poisoning is to prevent it from happening. Store poisons, like cleaning products and medications, out of reach of children. Use cabinet and drawer safety locks.
Treatment: Activate EMS and call Poison Control Services, 1-800-222-1222. Follow their directions.
Signs & Symptoms
- Open bottles of medication or cleaning products near the victim
- Altered level of consciousness
- Hallucinations
- Burning sensation in the chest and throat
- Headache
- Excessive sweating
- Burns, stains, or blue tint around the mouth
- Difficulty breathing
- Nausea and vomiting
- Severe abdominal cramping
Allergic Reactions
Allergic reaction can happen because of food, drugs, poisons, plants, inhalation or insect stings.
- Altered level of consciousness
- Burning sensation in the chest and throat
- Difficulty breathing
- Nausea and vomiting
- Severe abdominal cramping
-
Rashes/Hives
Treatment: Activate EMS, place in position of comfort. Look for obvious bites and stings. If the patient has a prescribed Epipen, assist patient to utilize the device.
Asthma
Signs & Symptoms
- Shortness of breath or wheezing
- Leaning forward to breath
- Unable to make noise or speak
- Blue lips and fingernails
- Moist skin
-
Rapid, shallow breathing
Treatment: Activate EMS and keep patient calm. Place in position of comfort. Ask about allergies, asthma, COPD or other medical conditions. If the patient has a prescribed inhaler, assist patient to utilize the device. Check and correct ABC.
Seizures
Signs & Symptoms
- Altered level of consciousness
- Uncontrollable shaking
-
Stiffness
Treatment: Activate EMS if the reason for the seizure is unknown or it lasts for more than 5 minutes. Protect patient from further harm, place nothing in the mouth, and do not try to restrain the patient. After seizure ends, open the airway, check and correct ABC, and consider moving patient into the recovery position if patient is unconscious and breathing.
Heat Related Emergencies
Heat Cramps
- Faintness, dizziness
- Exhaustion
- Possible nausea and vomiting
- Normal mental status
-
Severe muscle cramps/pain
Treatment: Get patient out of the hot environment, cool the patient, remove tight clothing, and give water if tolerated.
Heat Related Emergencies
Heat Exhaustion
- Moist and clammy skin
- Pale
- Weak, dizzy or faint
- Headache
-
Nausea and vomiting
Treatment: Get patient out of the hot environment, remove clothing as necessary, gently cool the patient, give water if tolerated. Full body immersion in cool water is also acceptable if it can be done safely. If patient does not improve or becomes unconscious, activate EMS, check and correct ABC.
Heat Related Emergencies
Heat Stroke
- Unconscious or nearly unconscious
- Dry or wet skin, usually red
-
Very high body temperature
Treatment: Activate EMS immediately, get patient out of the hot environment, check and correct ABC, remove clothing as necessary, gently cool the patient, give nothing to drink or eat. Full body immersion in cool water is also acceptable if it can be done safely.
Cold Related Emergencies
Hypothermia
Hypothermia tends to progress in stages starting from mild signs to severe. The earlier signs are recognized and treated, the better the outcome.
- Shivering
- Feeling of numbness
- Slow breathing
- Slow pulse
- Slurred speech
- Decreased levels of consciousness
- Hard, cold, painless body parts
- Death
Treatment: Get patient out of cold environment. Gently rewarm by removing wet clothing and covering patient with a dry blanket. If patient does not improve, shows decreased level of consciousness or becomes unconscious, activate EMS.
Cold Related Emergencies
Frost-Bite
- Waxy looking, discolored, numb, swollen extremities (usually fingers and toes) after prolonged exposure to cold.
-
Blisters may occur in severe cases.
Treatment: Seek immediate professional medical help. Do not rub the affected area. Do not rewarm area if chance of refreezing exists. Rewarm with warm water, not hot.
Special Considerations for Hypothermia
If the victim is unresponsive with no breathing or no normal breathing, and suspected to be in hypothermia, healthcare providers would follow the normal steps for CPR and take a few extra steps.
- Check for a pulse for no more than 10 seconds.
- If no pulse, begin CPR without delay
- AED should be used as normal
- Do not wait to check the victim’s temperature
- Do not wait until the victim is rewarmed to start CPR
- Wet clothes should be removed from the victim to prevent further heat loss
- Shield the victim from wind or cold
- Avoid rough movement and handle person gently
- Passive warming, such as warm blankets and heat packs, can be used until active warming is available with advanced medical care
Conscious Choking
Ask, “Are you choking?
If a person is unable to cough, breath or speak, activate EMS
Adult and Child
- Stand behind the victim with one foot in-between the victims feet and your other foot behind you.
- Place the flat side of your fist just above the patients belly button. Grab the back of your fist with your other hand.
- Administer abdominal thrusts, pulling inward and upward, until the object comes out or the patient becomes unconscious.
Infant Choking
- Support the infant’s face and place body on your forearm.
- Keep the infant’s head lower than the feet.
- Administer 5 back blows between the shoulder blades with the palm of your hand.
- Support the infant’s head. Turn the baby over onto your other forearm. Give 5 chest thrusts.
- Continue back blows and chest thrusts until object comes out or infant becomes unconscious.
Special Circumstances for Choking:
- If the patient is pregnant or too large to reach around, give chest thrusts instead.
- If you are giving someone abdominal thrusts and the person goes unconscious, lower the patient safely to the ground
- Activate EMS, send someone to call 911
Unconscious Choking
-
Give 30 chest compressions
-
Open the airway and check the mouth for a foreign body. If something is seen sweep it out with a finger. Use the pinky finger for an infant.
-
Attempt rescue breaths. If breaths do not make the chest rise, reposition head and reattempt rescue breaths.
-
Give 30 more chest compressions
-
Open the airway again and check the mouth for a foreign body. If something is seen sweep it out with a finger. Use the pinky finger for an infant.
-
Give 2 more breaths.
-
If breaths do not make the chest rise, reposition head and reattempt rescue breaths. Continue compressions, foreign body check, breathing attempts.
-
If victim is still unresponsive and not breathing normally, continue CPR with cycles of 30 compressions to 2 breaths.
Opiates and opioids are central nervous system (CNS) depressants
Common Opiates and Opioids
- Heroin
- Morphine
- Codeine
- Methadone
- Hydrocodone (also known as Vicodin or Lortab)
- Oxycodone (also known as Percocet)
A Naloxone dose of two milligrams is recommended and typically takes three to five minutes for the full effect. Patients must be closely monitored for re-occurrence of problems requiring additional doses.
What are some signs of an Opioid Overdose?
- Unconsciousness
- Very small pupils
- Slow or shallow breathing
- Vomiting
- An inability to speak
- Faint heartbeat
- Limp arms and legs
- Pale skin
- Purple lips and fingernails
How to Administer Naloxone
-
Assemble the nasal atomizer.
-
Tilt the head back and briskly spray half of the Naloxone up one side of the nose with 1 cc.
-
Spray half up the other side of the nose with 1 cc.
Rescue breathing or CPR should continue while waiting for the Naloxone to take effect. If there’s no change in three to five minutes, administer another dose of Naloxone and continue CPR or rescue breathing. If the second dose of Naloxone doesn’t revive them, something else is wrong. Either there are no opioids in their system, or the opioids are unusually strong and require more Naloxone.
CPR & AED
Section
Out-of-Hospital Chain of Survival
This is the idea that every step in the out-of-hospital chain of survival is critical to a successful outcome, just as every link in a real chain is critical to its integrity. Additionally, a weak link in the out-of-hospital chain of survival also includes any delays in moving from one step to the next.
The earlier these steps take place in an emergency, the better the chance of a patient’s survival.
- Recognition and Activation of EMS
- High-Quality CPR
- Defibrillation
- Advanced Care
- Post Cardiac Arrest Care
- Recovery
Compressions
If the victim is unconscious with no normal breathing, begin chest compressions.
Give 30 chest compressions at a rate of 100-120 compressions per minute for all ages.
Hand placement for compressions:
-
Adult – Place heel of hand of the dominant hand on the center of the chest between the nipples. The second hand should be placed on top. Compress 2-2.4 inches deep.
-
Child – Hand placement is the same as adult. You may choose to use only one hand in the center of the chest between the nipples for a very small child. Compress at least 1/3 the depth of the chest.
-
Infant – Place two fingers on the center of the chest between the nipples. Compress at least 1/3 the depth of the chest.
Airway
Open Airway using head tilt chin lift. Look in the mouth to make sure the air- way is clear. If you see any foreign object, sweep it out right away.
Breathing
Give 2 breaths lasting 1 second each. Watch for chest rise and fall.
Note: If not using a rescue mask, make sure you make a seal over the mouth on an adult or child and pinch the nose closed each time you give a breath. On an infant, make sure to cover the mouth and nose with your mouth.
Continue cycles of 30 compressions to 2 breaths until an AED arrives, advanced medical personnel take over, the patient shows signs of life, the scene becomes unsafe, or you are too exhausted to continue.
CPR Summary
- Check the Scene for Safety
- Check the person for responsiveness and normal breathing
- Call 911
- Give 30 Chest Compressions
- (Adult rate of 100-120 per minute, 2-2.4 inches deep)
- (Child or infant rate of 100-120 per minute, 1/3 depth of chest)
- Open the Airway
- Give 2 Breaths
- Continue cycles of 30 compressions to 2 breaths.
AEDs
AEDs are designed to shock the heart, in order for the heart to restart under a normal rhythm. The AED analyzes the heart’s rhythm, states whether a shock is advised and then powers up, the operator then pushes a button that will deliver the shock.
Each minute that defibrillation is delayed the chance of survival is reduced by 10 percent. After 10 minutes few people are resuscitated. Early defibrillation increases survival rates to greater than 50%. Rescuers should begin chest compressions as soon as possible, and use the AED as soon as it is available and ready.
If you are giving CPR to a child or infant and the available AED does not have child pads or a way to deliver a smaller dose, it is still recommended to use the AED even with adult pads. With adult pads for a small child or infant, you would place one pad on the center of the chest and the other on the center of the back between the shoulder blades.
AED Considerations
-
Remove a patient from standing water, such as in a puddle, before AED use. Rain, snow, or a damp surface is not a concern.
-
Patient should be removed from a metal surface if possible.
-
Slightly adjust pad placement so as not to directly cover the area if the patient has an obvious bump or scar for a pacemaker.
-
Remove medication patches found on the patient’s chest with a gloved hand.
-
Never remove the pads from the patient or turn the machine off.
How to Use an AED
-
Turn the AED on and bare the chest. Dry the chest if it is wet. If there is excessive hair you may need to shave it off
-
Place the pads. Place one pad on the patient’s upper right chest above the nipple. Place the other pad on the patients lower left ribs below the armpit. **Follow the directions shown on the pads for the AED pad placement.
-
Quickly check the pads. Make sure pads are pressed down firmly.
-
Follow AED prompts.
-
Stand Clear. Do not touch the patient while the AED analyzes
-
If the AED says, “Shock advised, charging…,” shout, “Clear” and make sure no one is touching the patient. Push the shock button when the AED tells you to.
-
If no shock is advised give CPR if the patient is not moving and not breathing.
-
After the Shock, begin CPR.
-
The AED will reanalyze every 2 minutes and prompt for a shock if needed.
Child and Infant AED Pad Placement
For children 8 years old and younger and infants, an AED with pediatric pads is preferred. If only a standard AED with adult pads is available, it should still be used for children and infants in cardiac arrest. When placing the pads on a child, the pads should not touch.
For a small child or infant, the pads should be placed one in the center of the chest and one in the center of the back between the shoulder blades.

Congratulations
You have completed the coursework. You can now continue to the exam by selecting the button below.