Smart Blind Opener And LEarning tool
ENGR-4960
Fall 2020
Neil Koul
Features
- Must be able to use IoT
- ESP 8266 with a low power mode
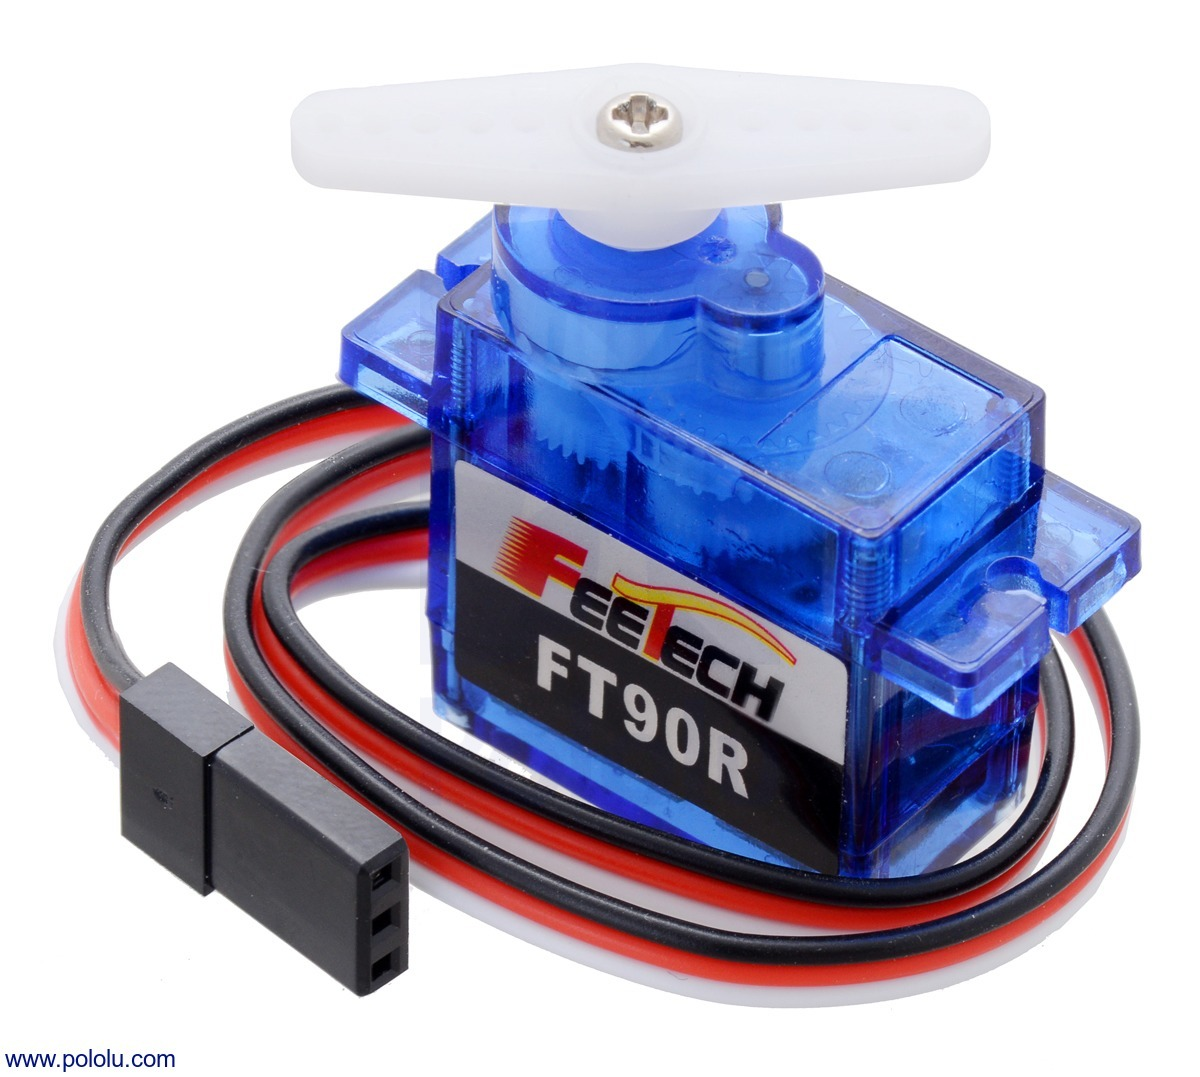
- Uses a cheap servo motor
Goals
- 3-D printable parts to keep cost low
- Be able to control it through Google Home
- Design a PCB to be expandable to learning platform
Implementation
Design
- Breadboard design, esp8266 and a servo
- Draw up Schematic in EDA software
- Order PCB
- Integrate with Automation
BreadBoard
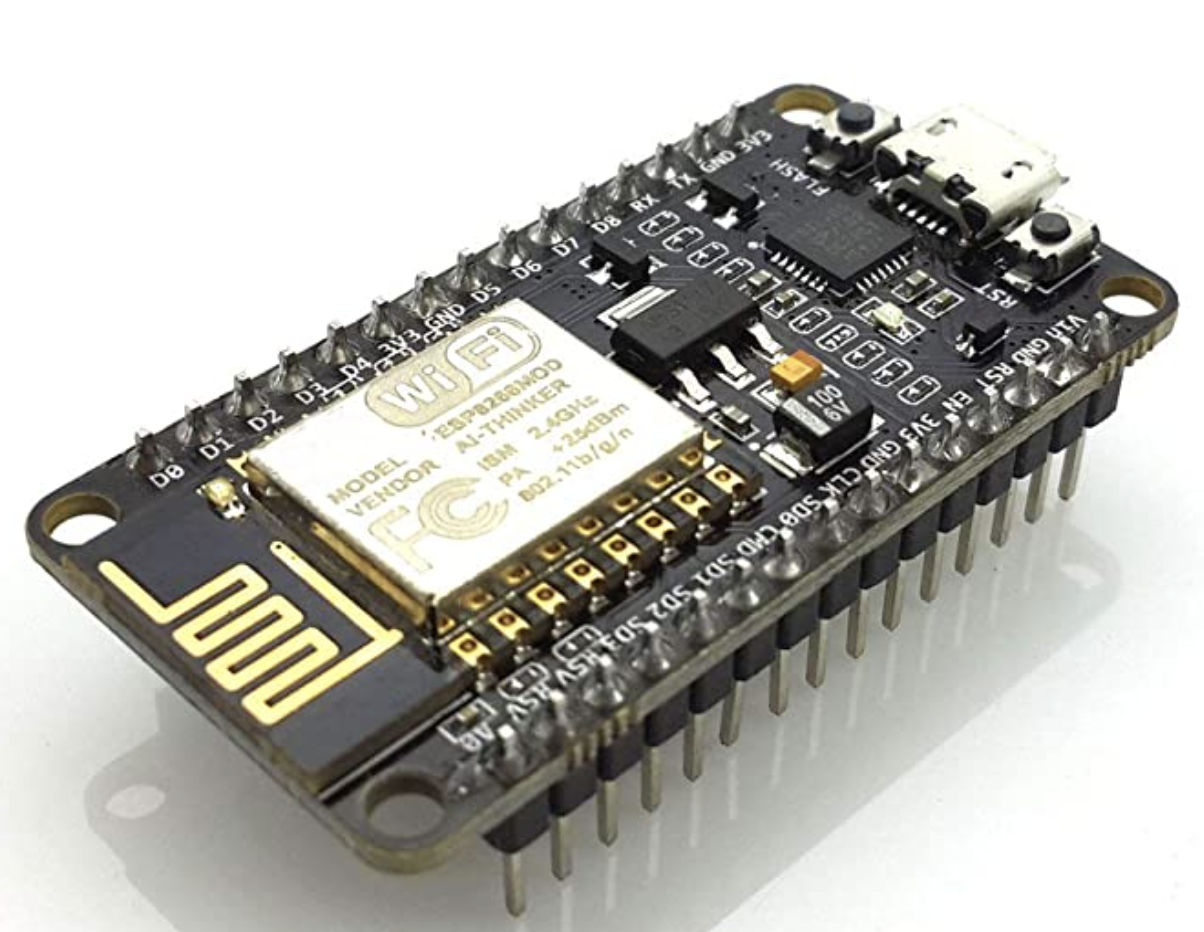
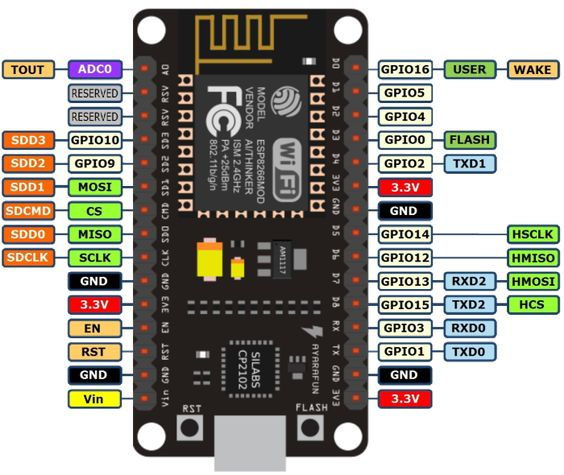
ESP8266 DevBoard
Servo with Continuous rotation
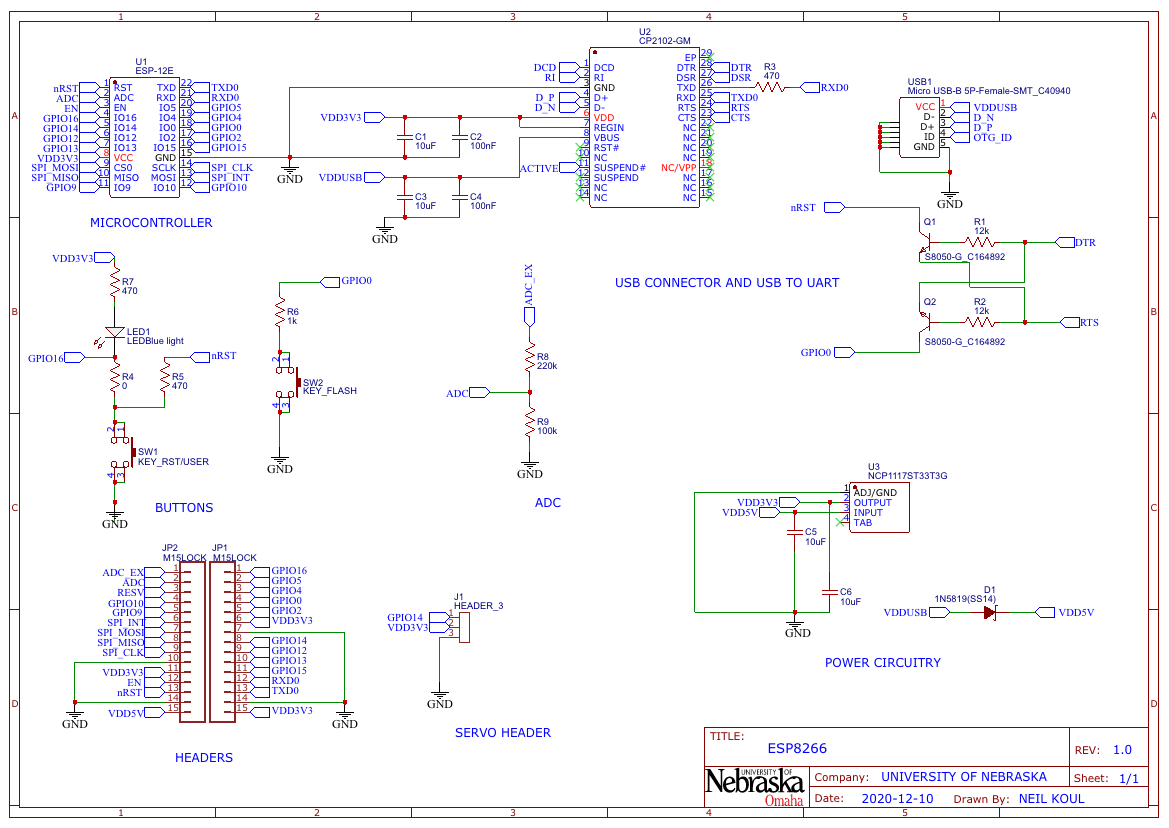
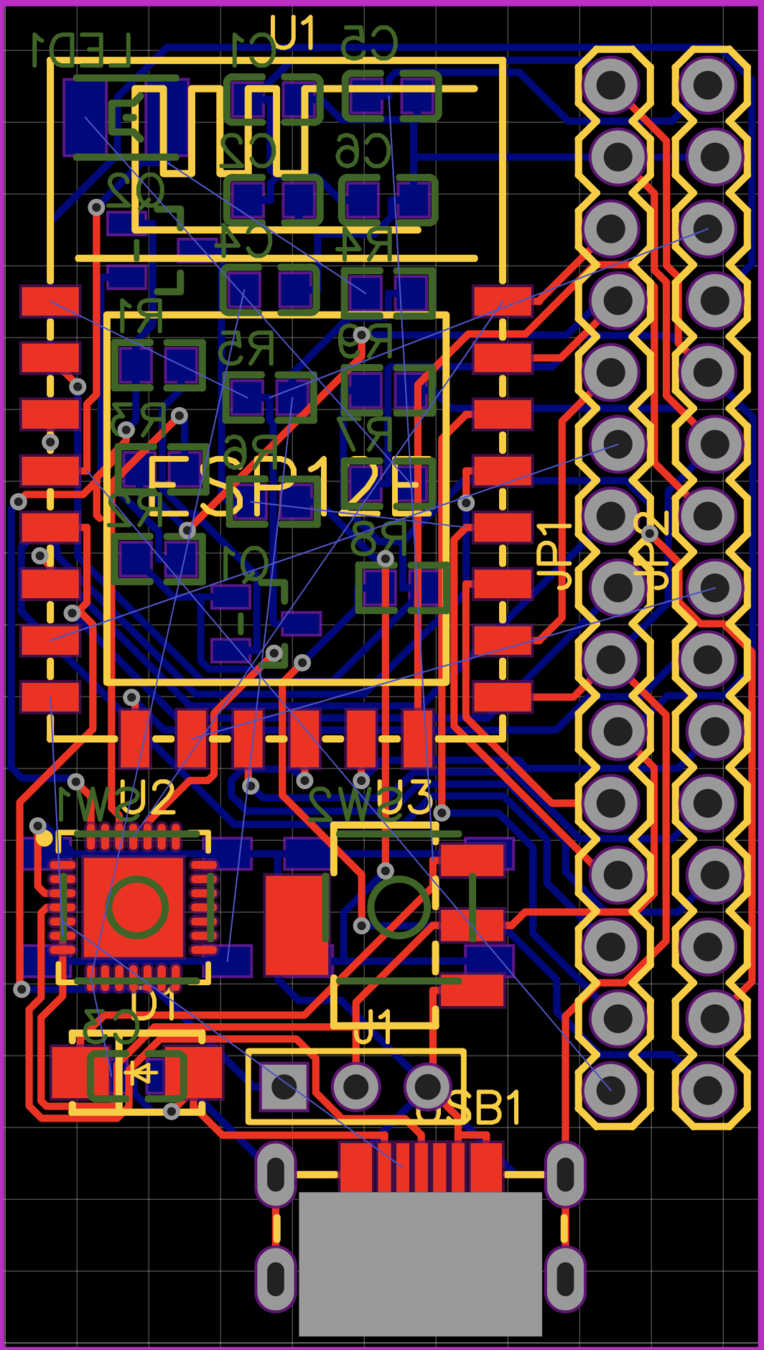
Schematic
PCB
BRacket Design
INtegration
There are a few steps to get the device added
Adafruit.io
- Adafruit.io is a free IoT service
- Easily accessible Library for a multitude of devices
- Easy to program with as well
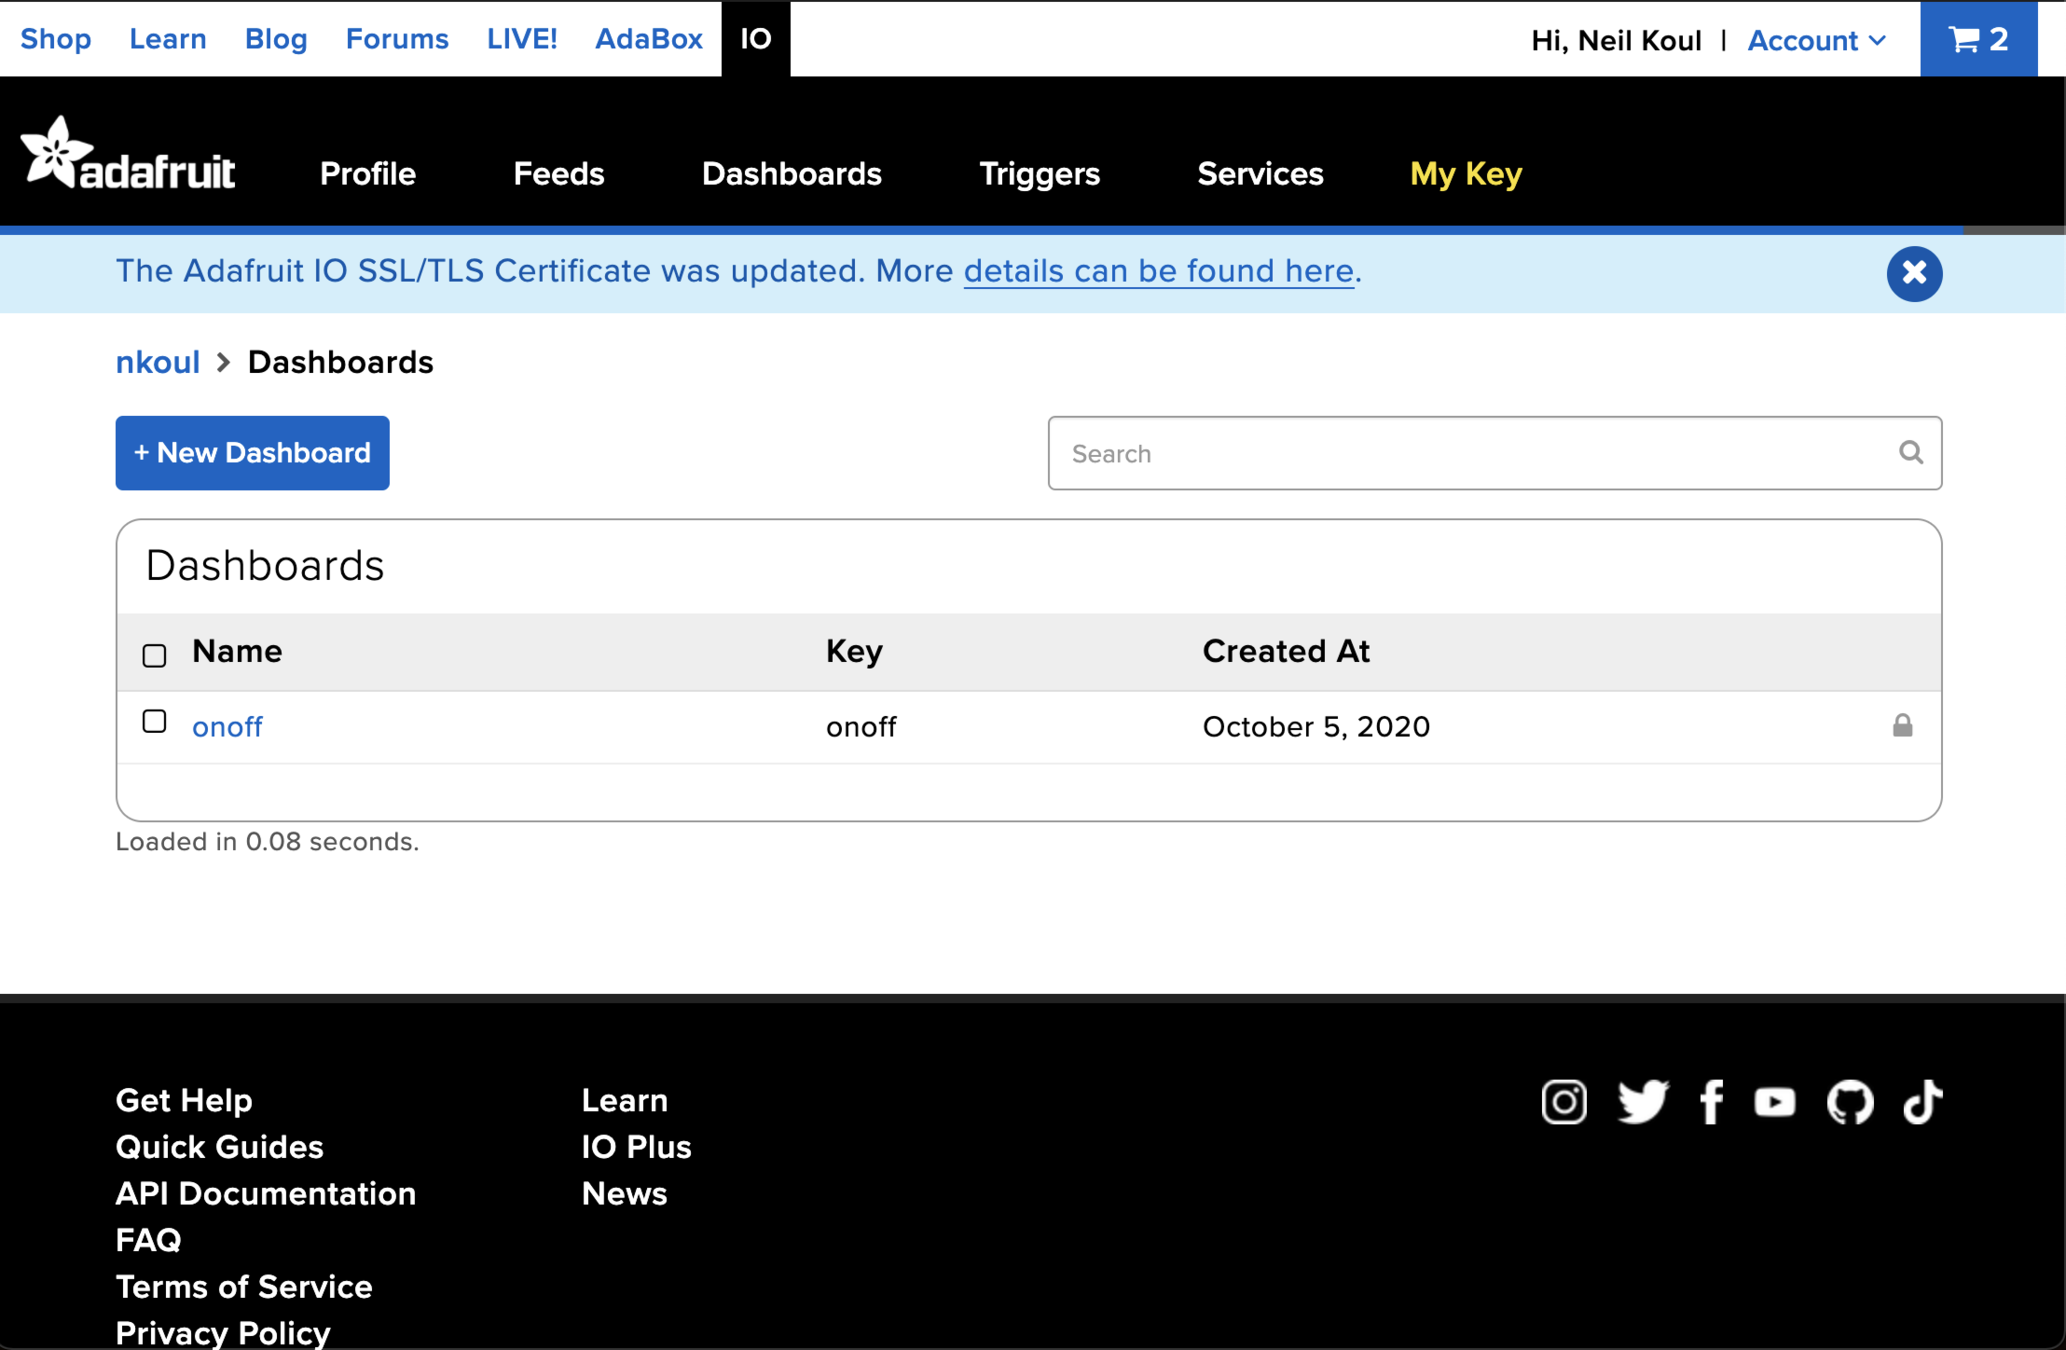
Programming
- Get Adafruit IO Key
- Add to program
- Program device to trigger serve rotation
CODE
#include <ESP8266WiFi.h>
#include <Servo.h>
#include "Adafruit_MQTT.h"
#include "Adafruit_MQTT_Client.h"
#define WIFI_SSID "Wifi"
#define WIFI_PASS "superStrongPassword"
#define MQTT_SERV "io.adafruit.com"
#define MQTT_PORT 1883
#define MQTT_NAME "nkoul"
#define MQTT_PASS "1337_hack3r"
Servo servo;
WiFiClient client;
Adafruit_MQTT_Client mqtt(&client, MQTT_SERV, MQTT_PORT, MQTT_NAME, MQTT_PASS);
Adafruit_MQTT_Subscribe onoff = Adafruit_MQTT_Subscribe(&mqtt, MQTT_NAME "/f/onoff");
void setup() {
// put your setup code here, to run once:
Serial.begin(9600);
//Connect to WiFi
Serial.print("\n\nConnecting Wifi... ");
WiFi.begin(WIFI_SSID, WIFI_PASS);
while (WiFi.status() != WL_CONNECTED)
{
delay(500);
}
Serial.println("OK!");
//Subscribe to the onoff topic
mqtt.subscribe(&onoff);
pinMode(LED_BUILTIN, OUTPUT);
}
void loop() {
//Connect/Reconnect to MQTT
MQTT_connect();
//Read from our subscription queue until we run out, or
//wait up to 5 seconds for subscription to update
Adafruit_MQTT_Subscribe * subscription;
while ((subscription = mqtt.readSubscription(5000)))
{
//If we're in here, a subscription updated...
if (subscription == &onoff)
{
//Print the new value to the serial monitor
Serial.print("onoff: ");
Serial.println((char*) onoff.lastread);
//If the new value is "ON", turn the light on.
//Otherwise, turn it off.
if (!strcmp((char*) onoff.lastread, "ON"))
{
//active low logic
digitalWrite(LED_BUILTIN, LOW);
servo.attach(2);
servo.write(90);
servo.detach();
}
else
{
digitalWrite(LED_BUILTIN, HIGH);
servo.attach(2);
servo.write(90);
servo.detach();
}
}
}
}
void MQTT_connect()
{
int8_t ret;
// Stop if already connected
if (mqtt.connected())
{
return;
}
Serial.print("Connecting to MQTT... ");
uint8_t retries = 3;
while ((ret = mqtt.connect()) != 0) // connect will return 0 for connected
{
Serial.println(mqtt.connectErrorString(ret));
Serial.println("Retrying MQTT connection in 5 seconds...");
mqtt.disconnect();
delay(5000); // wait 5 seconds
retries--;
if (retries == 0)
{
// basically die and wait for WDT to reset me
while (1);
}
}
Serial.println("MQTT Connected!");
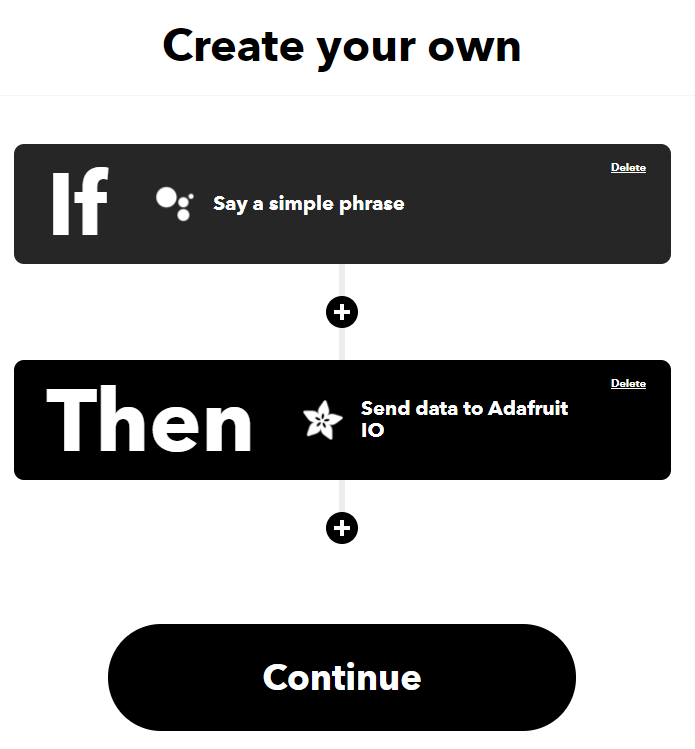
}ifttt
- IFTTT is a free service that you can create custom automations on
- Able to connect multiple different services together
Expansion
This is just one of the many projects that can be done with an ESP8266
Education
The ESP8266 makes a great and cheap platform for teaching IoT to students
POssible Projects
- IoT Temperature sensor
- IoT Servo
- IoT Sensors
- IoT Relays
- IoT Lights
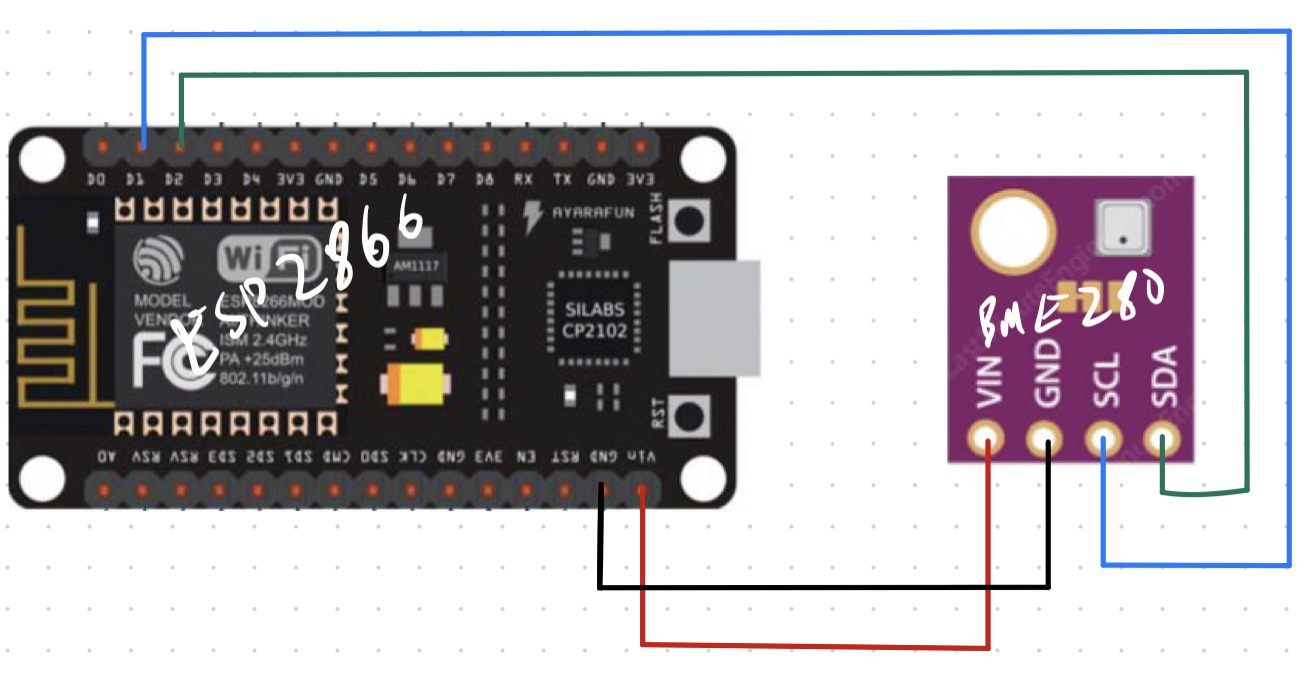
IOT Temperature sensor
Cost: $3 for senor, $4 for ESP8266, Total $7
#include <ESP8266WebServer.h>
#include <Wire.h>
#include <Adafruit_Sensor.h>
#include <Adafruit_BME280.h>
#define SEALEVELPRESSURE_HPA (1013.25)
Adafruit_BME280 bme;
float temperature, humidity, pressure, altitude;
/*Put your SSID & Password*/
const char* ssid = "YourNetworkName";
const char* password = "YourPassword";
ESP8266WebServer server(80);
void setup() {
Serial.begin(115200);
delay(100);
bme.begin(0x76);
Serial.println("Connecting to ");
Serial.println(ssid);
//connect to your local wi-fi network
WiFi.begin(ssid, password);
//check wi-fi is connected to wi-fi network
while (WiFi.status() != WL_CONNECTED) {
delay(1000);
Serial.print(".");
}
Serial.println("");
Serial.println("WiFi connected..!");
Serial.print("Got IP: "); Serial.println(WiFi.localIP());
server.on("/", handle_OnConnect);
server.onNotFound(handle_NotFound);
server.begin();
Serial.println("HTTP server started");
}
void loop() {
server.handleClient();
}
void handle_OnConnect() {
temperature = bme.readTemperature();
humidity = bme.readHumidity();
pressure = bme.readPressure() / 100.0F;
altitude = bme.readAltitude(SEALEVELPRESSURE_HPA);
server.send(200, "text/html", SendHTML(temperature,humidity,pressure,altitude));
}
void handle_NotFound(){
server.send(404, "text/plain", "Not found");
}
String SendHTML(float temperature,float humidity,float pressure,float altitude){
String ptr = "<!DOCTYPE html> <html>\n";
ptr +="<head><meta name=\"viewport\" content=\"width=device-width, initial-scale=1.0, user-scalable=no\">\n";
ptr +="<title>ESP8266 Weather Station</title>\n";
ptr +="<style>html { font-family: Helvetica; display: inline-block; margin: 0px auto; text-align: center;}\n";
ptr +="body{margin-top: 50px;} h1 {color: #444444;margin: 50px auto 30px;}\n";
ptr +="p {font-size: 24px;color: #444444;margin-bottom: 10px;}\n";
ptr +="</style>\n";
ptr +="</head>\n";
ptr +="<body>\n";
ptr +="<div id=\"webpage\">\n";
ptr +="<h1>ESP8266 Weather Station</h1>\n";
ptr +="<p>Temperature: ";
ptr +=temperature;
ptr +="°C</p>";
ptr +="<p>Humidity: ";
ptr +=humidity;
ptr +="%</p>";
ptr +="<p>Pressure: ";
ptr +=pressure;
ptr +="hPa</p>";
ptr +="<p>Altitude: ";
ptr +=altitude;
ptr +="m</p>";
ptr +="</div>\n";
ptr +="</body>\n";
ptr +="</html>\n";
return ptr;
}