Sup?
about:me
Nap Joseph N. Calub
Web Developer at Ingenuity Tech
Part-time instructor at AdDU
Open source enthusiast
ʕ ∗ •́ ڡ •̀ ∗ ʔ
Polymer
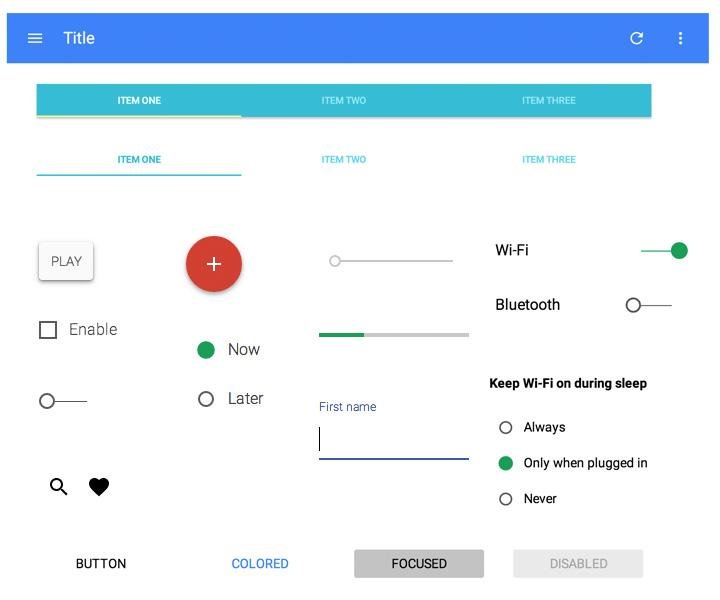
Material Design
a specification for a unified system of visual, motion, and interaction design that adapts across different devices.
It's modeled after tactile materials like paper and ink with fluid animation and lighting.
What is Polymer?
Polymer is the embodiment of material design for the web.
So (Polymer == Bootstrap) ?
False
It is a library utilizing web components for building elements and applications.
Web Components?
╰| ⁰ □ ⁰ |╯
"In a nutshell, they allow us to bundle markup and styles into custom HTML elements."
The Shadow DOM
<body>
  <video src="./foo.webm" controls></video>
</body>
Shadow DOM


Normal HTML
Web-component-ified
<div id="slider">
  <input checked="" type="radio" name="slider" id="slide1" selected="false">
  <input type="radio" name="slider" id="slide2" selected="false">
  <input type="radio" name="slider" id="slide3" selected="false">
  <input type="radio" name="slider" id="slide4" selected="false">
  <div id="slides">
    <div id="overflow">
      <div class="inner">
        <img src="images//rock.jpg">
        <img src="images/grooves.jpg">
        <img src="images/arch.jpg">
        <img src="images/sunset.jpg">
      </div>
    </div>
  </div>
  <label for="slide1"></label>
  <label for="slide2"></label>
  <label for="slide3"></label>
  <label for="slide4"></label>
</div>
<img-slider>
<img src="images/sunset.jpg" alt="a dramatic sunset">
<img src="images/arch.jpg" alt="a rock arch">
<img src="images/grooves.jpg" alt="some neat grooves">
<img src="images/rock.jpg" alt="an interesting rock">
</img-slider>So (Polymer == AngularJS) ?
False
Angular is a complete framework for building webapps, whereas Polymer is a library for creating Web Components.
Those components, however, can then be used to build a webapp.
<!-- Polyfill Web Components support for older browsers -->
<script src="components/webcomponentsjs/webcomponents.js"></script>

<!-- Import element -->
<link rel="import" href="google-map.html">

<!-- Use element -->
<google-map lat="37.790" long="-122.390"></google-map>
Use Elements
<!-- Define element -->
<polymer-element name="my-counter" attributes="counter">
  <template>
    <style> /*...*/ </style>
    <div id="label"><content></content></div>
    Value: <span id="counterVal">{{counter}}</span><br>
    <button on-tap="{{increment}}">Increment</button>
  </template>
  <script>
    Polymer({
      counter: 0, // Default value
      counterChanged: function() {
        this.$.counterVal.classList.add('highlight');
      },
      increment: function() {
        this.counter++;
      }
    });
  </script>
</polymer-element>

<!-- Use element -->
<my-counter counter="10">Points</my-counter>
Create Elements
moar samples plz?
ʕ ⊃・ ◡ ・ ʔ⊃

Let's create a basic Polymer app!
Getting Started
Project structure
step-1/
step-2/
step-3/
finished/
components/
...
starter/
index.html
post-card.html
post-list.html
Test
Python 2.x
python -m SimpleHTTPServer
Python 3.x
python -m
http.server
Creating the app structure
Import the elements
<link rel="import"
  href="../components/font-roboto/roboto.html">

<link rel="import"
  href="../components/core-header-panel/core-header-panel.html">
<link rel="import"
  href="../components/core-toolbar/core-toolbar.html">
<link rel="import"
  href="../components/paper-tabs/paper-tabs.html">
index.html
Add the toolbar
<body unresolved>

  <core-header-panel>

    <core-toolbar>
    </core-toolbar>

    <!-- main page content will go here -->

  </core-header-panel>

</body>
index.html
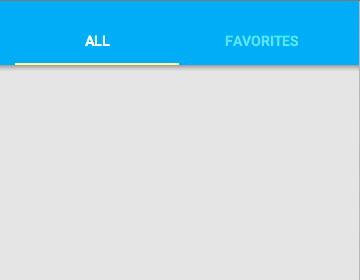
Add the tabs
...
<core-toolbar>

  <paper-tabs id="tabs" selected="all" self-end>
    <paper-tab name="all">All</paper-tab>
    <paper-tab name="favorites">Favorites</paper-tab>
  </paper-tabs>

</core-toolbar>
...
index.html
Add the styles
html,body {
  height: 100%;
  margin: 0;
  background-color: #E5E5E5;
  font-family: 'RobotoDraft', sans-serif;
}

core-header-panel {
  height: 100%;
  overflow: auto;
  -webkit-overflow-scrolling: touch;
}
core-toolbar {
  background: #03a9f4;
  color: white;
}
#tabs {
  width: 100%;
  margin: 0;
  -webkit-user-select: none;
  -moz-user-select: none;
  -ms-user-select: none;
  user-select: none;
  text-transform: uppercase;
}
index.html
Handle tab switching
  <script>
    var tabs = document.querySelector('paper-tabs');

    tabs.addEventListener('core-select', function() {
      console.log("Selected: " + tabs.selected);
    });
  </script>
</body>
index.html
Creating your own element
Don't Repeat Yourself
Import the required elements
<link rel="import"
  href="../components/polymer/polymer.html">
<link rel="import"
  href="../components/core-icon-button/core-icon-button.html">
...
post-card.html
Element definition
<polymer-element name="post-card">
  <template>
    <style>
    :host {
      display: block;
      position: relative;
      background-color: white;
      padding: 20px;
      width: 100%;
      font-size: 1.2rem;
      font-weight: 300;
    }
    .card-header {
      margin-bottom: 10px;
    }
    </style>

    <!-- CARD CONTENTS GO HERE -->
  </template>

  <script>
    Polymer({});
  </script>
</polymer-element>
post-card.html
Create the card structure
...

  <!-- CARD CONTENTS GO HERE -->

  <div class="card-header" layout horizontal center>
  <content select="img"></content>
  <content select="h2"></content>
</div>
<content></content>

...
post-card.html
Add some styles
...

.card-header {
  margin-bottom: 10px;
}

polyfill-next-selector { content: '.card-header h2'; }
.card-header ::content h2 {
  margin: 0;
  font-size: 1.8rem;
  font-weight: 300;
}
polyfill-next-selector { content: '.card-header img'; }
.card-header ::content img {
  width: 70px;
  border-radius: 50%;
  margin: 10px;
}

</style>

...
post-card.html
Import your new element
...

<link rel="import"
  href="../components/paper-tabs/paper-tabs.html">
<link rel="import" href="post-card.html">

...
index.html
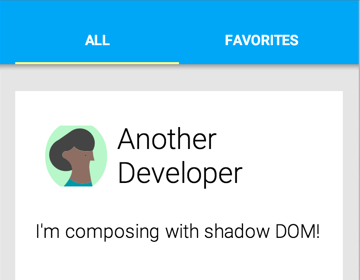
Create a new <post-card>
...

<core-toolbar>


  <div class="container" layout vertical center>
    <post-card>
      <img width="70" height="70"
           src="../images/avatar-07.svg">
      <h2>Another Developer</h2>
      <p>Hooray for shadow DOM!</p>
    </post-card>
  </div>

...
index.html
Using data binding
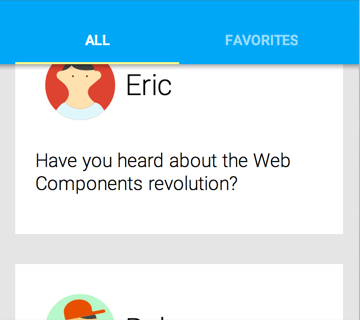
Fetching post data
...

  {
    "uid": 1,
    "text" : "Have you heard about the Web Components revolution?",
    "username" : "Eric",
    "avatar" : "../images/avatar-01.svg",
    "favorite": false
  },
  {
    "uid": 2,
    "text" : "Loving this Polymer thing.",
    "username" : "Rob",
    "avatar" : "../images/avatar-02.svg",
    "favorite": false
  },

...
api/posts.json
Adding an element in an element
...

  <post-service id="service" posts="{{posts}}">
  </post-service>

</template>
...
post-list.html
Render a list of cards
...
<post-service id="service" posts="{{posts}}">
</post-service>

<div layout vertical center>
  <template repeat="{{post in posts}}">
    <post-card>
      <img src="{{post.avatar}}" width="70" height="70">
      <h2>{{post.username}}</h2>
      <p>{{post.text}}</p>
    </post-card>
  </template>
</div>

...
post-list.html
Import <post-list>
...
<link rel="import" href="../components/paper-tabs/paper-tabs.html">

<link rel="import" href="post-list.html">

<style>
...
index.html
Change <post-card> to <post-list>
...
<div class="container" layout vertical center>

  <post-list show="all"></post-list>

</div>
...
index.html
Finishing touches
Add an icon-button to the card
<div class="card-header" layout horizontal center>
  <content select="img"></content>
  <content select="h2"></content>
</div>


<core-icon-button
  id="favicon"
  icon="favorite"
  on-tap="{{favoriteTapped}}">
</core-icon-button>


<content></content>
post-card.html
Add a method and a property
<script>
Polymer({
  publish: {
    favorite: {
      value: false,
      reflect: true
    }
  },
  favoriteTapped: function(event, detail, sender) {
    this.favorite = !this.favorite;
    this.fire('favorite-tap');
  }
});
</script>
post-card.html
Add some styles
...

core-icon-button {
  position: absolute;
  top: 3px;
  right: 3px;
  color: #636363;
}
:host([favorite]) core-icon-button {
  color: #da4336;
}

</style>
...
post-card.html
Add a new event listener
<script>
var tabs = document.querySelector('paper-tabs');

var list = document.querySelector('post-list');
tabs.addEventListener('core-select', function() {
  list.show = tabs.selected;
});

</script>
index.html
Add a favorites handler
...
  <template repeat="{{post in posts}}">

    <post-card
      favorite="{{post.favorite}}"
      on-favorite-tap="{{handleFavorite}}"
      hidden?="{{show == 'favorites' && !post.favorite}}">

      <img src="{{post.avatar}}" width="70" height="70">
      <h2>{{post.username}}</h2>
      <p>{{post.text}}</p>
    </post-card>
  </template>
...
post-list.html
Create the favorite-tap event
...
<script>

Polymer({
  handleFavorite: function(event, detail, sender) {
    var post = sender.templateInstance.model.post;
    this.$.service.setFavorite(post.uid, post.favorite);
  }
});

</script>
...
post-list.html
- Blog
- Documentation
- Frequently Asked Questions
- Sample applications
- and Tutorials!
That's it, pansit!
</slides>
about:me
Nap Joseph N. Calub
Web Developer at Ingenuity Tech
Part-time instructor at AdDU
Open source enthusiast
ʕ ∗ •́ ڡ •̀ ∗ ʔ