React i Redux
(listopad 2022)
React with Next.js Day 2
Trener
Marcin Kieruzel
Jestem programistą z 15-letnim doświadczeniem. Programuję głównie w środowisku JS w tym w (Node, Nest.js, React, React Native).
Prowadzę firmę No Input Signal. Pracujemy między innymi dla Polskiego Radia, Polskiej Rady Biznesu, PKP Infomatyka, Orange Polska.

Plan
- React.js wprowadzenie
- Wprowadzenie do JSX
- Listy i klucze
- Komponenty
- Stan i Hooks
- Obsługa zdarzeń
- Warunkowe renderowanie
- Formularze
- React i dane asynchroniczne
Część 1
React wprowadzenie
Czym jest React.js?
React jest JavaScriptową biblioteką
stworzoną przez Facebooka.
Służy do tworzenia frontendowych interfejsów użytkownika.
Dlaczego React?
Duże, aktywne środowisko – łatwo znaleźć wsparcie
Ma wsparcie dużej firmy Facebook
Pozwala na dzielenie większej aplikacji na mniejsze fragmenty, dzięki własnym komponentom.
Dzięki takim rozwiązaniom jak np. wirtualny DOM,
jest bardzo wydajną biblioteką.


"In the essence framework is solving structural and architectural problems on the code level."
"React does not solve any structural or architectural problems on the app level. It provides us with a set of methods for better handling of front-end."
Trochę historii
-
Pomysł na React: Marcel Laverdet w 2009
-
Pierwsza wersja: Jordan Walke w 2013
- Aktualna wersja: 18.2.0 (Czerwiec 2022)
Główne założenia
-
Wirtualny DOM
https://reactjs.org/docs/faq-internals.html
-
JSX
https://reactjs.org/docs/glossary.html#jsx
-
Jednostronne powiązania:
One Way Data Biding
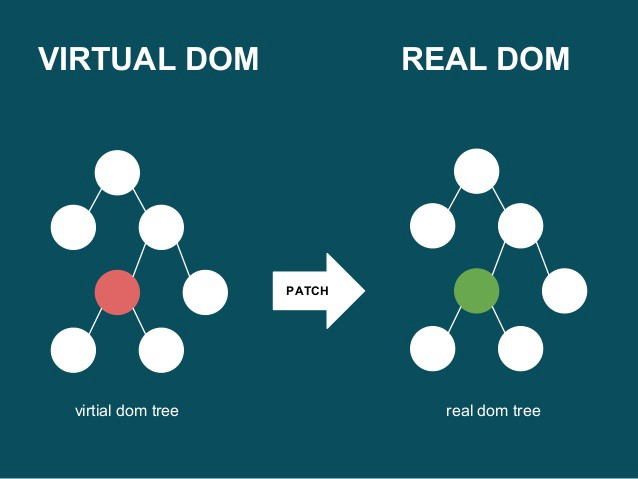
DOM vs. Wirtualny DOM
Manipulacja elementami DOM za pomocą JS jest bardzo wolna i nie wydajna. Jednym z głównych powodów jest fakt, że aktualizujemy DOM w zakresie o wiele większym, niż niezbędny.
Wirtualny DOM (VDOM) to reprezentacja drzewa DOM przechowywana w pamięci i synchronizowana z nim za pomocą biblioteki ReactDOM. Proces ten nosi nazwę reconciliation.
UWAGA: Shadow DOM to nie to samo co Virtual DOM
DOM vs. Wirtualny DOM
porozmawiamy o tym szerzej trochę później ;)
JSX
To rozszerzenie języka JavaScript o tagi podobne do tych, które stosujemy w HTML
const element = <h1>Hello, world!</h1>;Za chwilę porozmawiamy o tym szerzej :)
Przykład:
Jednostronne powiązanie

Narzędzia
1. Edytor: https://www.jetbrains.com/webstorm/
2. Node: https://nodejs.org/en/
3. Chrome: https://www.google.pl/chrome/browser/desktop/index.html
4. Terminal/Git bash: https://gitforwindows.org/
Może jakaś wtyczka? - VScode
https://marketplace.visualstudio.com/items?itemName=jawandarajbir.react-vscode-extension-pack
React Dev Tools
-
Instalujemy - dla Chrome
https://chrome.google.com/webstore/detail/react-developer-tools/fmkadmapgofadopljbjfkapdkoienihi
- Może się zdarzyć, że nie pojawi Ci się ta zakładka w przeglądarce. W tym celu wejdź w Chrome do:chrome://extensions/ i zaznacz opcję „Zezwalaj na dostęp do adresów URL plików”
Pierwsza aplikacja
https://create-react-app.dev/docs/getting-started
- Pełna konfiguracja
- Zawsze najnowsze wersje
- Proste w instalacji
- Szybko działa
- Dobra dokumentacja
npm init react-app my-app
// lub
yarn create react-app my-app
ReactDOM.render()
ReactDOM.render()
Główne 2 metody, dostarczane przez moduł react-dom to:
const root = ReactDOM.createRoot(element do
której będziemy wstrzykiwać aplikację);

root.render(element, który wstrzykujemy)
Renderujemy (wstawiamy do rzeczywistego drzewa DOM) elementy, które chcemy wyświetlić.
JSX
JSX - zasady
- Tagi zawsze zamknięte, nawet pojedyncze np.
<br /> lub <image src="src/logo.png" />- Wartości atrybutów zawsze w cudzysłowie lub w apostrofach lub w nawiasach {} np.
<div style={{color: 'red' }}/>
<div height="0"/>- Nie ma class jest className, reszta bez zmian
Jak generowany jest JSX?
JSX
<p id="logo">Hello, World</p>JS
React.createElement(
    "p",
    {id: "logo"},
    "Hello, World"
);
Wyrażenia JSX
Wyrażeniem JSX jest dowolny kod JavaScript, który coś zwraca np.:
<div>{ 4 + 3 }</div>const name = 'Jan';
const count = name.length;
<div>Twoje imię ma { count } znaków</div>JSX jako Element
const name = 'Jan';
const str = <p>Hello,{ name }</p>
<div>{ str }</div>
JSX jako komponent
const name = 'Jan';
const cmp = <Hello>Hello,{ name }</Hello>
<div>{ cmp }</div>
Jeszcze nie wiemy co to komponenty, ale wkrótce się wszystko wyjaśni.
Atrybuty
- W atrybutach mogą występować wyrażenia np.
<div contentEditable={ true }>Sample<∕div>- Jeśli korzystamy ze styli inline to pamiętamy, że przekazywany jest obiekt czyli :
const style = {
  color: 'blue',
  backgroundColor: 'green'
};
<div style={style}><∕div>
JSX - zagnieżdżanie
-
W starszej wersji React (15.x) każdy komponent oraz funkcja ReactDom.render musiały zwracać zawsze jeden element.
- W wersji React od17.x można zwracać listę elementów lub tzw. Fragments
JSX - zagnieżdżanie
return <ul>
  <li key="1">Element 1</li>
  <li key="1">Element 2</li>
  <li key="3">Element 3</li>
</ul>;
return [
  <li key="1">Element 1</li>,
  <li key="1">Element 2</li>,
  <li key="3">Element 3</li>,
];
React 15.x - element główny
React 18.x - tablica elementów
JSX - zagnieżdżanie
return <React.Fragment>
  <li key="1">Element 1</li>,
  <li key="1">Element 2</li>,
  <li key="3">Element 3</li>,
</React.Fragment>;
return <>
  <li key="1">Element 1</li>,
  <li key="1">Element 2</li>,
  <li key="3">Element 3</li>,
</>;
React 18.x - Fragment
React 18.x - Fragment-
skrócona wersja
JSX - zagnieżdżanie
const tab = [1,2,3];

return <ul>
{
  tab.map((el, i) => <li key={i}>{el+2}</li>)
}
</ul>;
//  <li key="1">3</li>,
//  <li key="1">4</li>,
//  <li key="3">5</li>,
Elementy JSX możemy wyrenderować z tablicy poprawnych elementów JSX lub komponentów.
Kiedy zwracamy kolekcję musimy każdemu elementowi nadawać unikalny klucz (key). React wykorzystuje klucze w celach optymalizacyjnych.
Listy i klucze
Listy i klucze
-
Jak pamiętamy zmiany w React są automatycznie porównywane w komponentach i elementach, a w rzeczywistym DOMie są dokonywane wyłącznie niezbędne zmiany.
- Algorytmy Reacta zredukowały złożoność obliczeń podczas porównywania węzłów w drzewie DOM z O(n^3) do O(n) - jeśli węzłów w DOM jest 1000 to przy O(n^3) należy wykonać 1000^3 = miliard porównań, a przy O(n) tylko 1000!!!
Listy i klucze
Wydajność algorytmów Reacta wynika z "wiedzy" w jaki sposób najczęściej postępują programiści (algorytmy heurystyczne)
Poznajmy kilka zasad zgodnie z którymi React dokonuje zmian w DOM.
Listy i klucze - zasada 1
Powinniśmy wskazywać, które elementy są stabilne pomiędzy zmianami za pomocą kluczy.
<ul>
    <li> Jan </li>
    <li> Ala </li>
</ul>
//Dodajemy element na koniec
//Nie ma problemu
<ul>
    <li> Jan </li>
    <li> Ala </li>
    <li> Ela </li>
</ul>
Dlaczego?
Listy i klucze - zasada 1
<ul>
    <li> Jan </li>
    <li> Ala </li>
</ul>
//Dodajemy element na początek
//Jest problem
<ul>
    <li> Ola </li>
    <li> Jan </li>
    <li> Ala </li>
</ul>
Listy i klucze - zasada 1
<ul>
    <li key="89237284"> Jan </li>
    <li key="81928284"> Ala </li>
</ul>
//Dodajemy element na początek
//Jest problem
<ul>
    <li key="77284737"> Ola </li>
    <li key="89237284"> Jan </li>
    <li key="81928284"> Ala </li>
</ul>
Klucze pomagają Reactowi zidentyfikować, które elementy uległy zmianie, zostały dodane lub usunięte.
Listy i klucze - zasada 1
const App = () =>  {
    const animals = ["dog", "cat", "horse"];
    const liElements = animals.map( el => {
        return <li> {el} </li>
    })
  return liElements;
}
Jeśli generujemy elementy w tablicy, React ostrzega nas w konsoli o problemie.

Listy i klucze - zasada 1
const App = () =>  {
    const animals = ["dog", "cat", "horse"];
    const liElements = animals.map( (el,i) => {
        return <li key={i}> {el} </li>
    })
  return <ul>{liElements}</ul>
}
musimy dodać klucze do każdego elementu listy .
Moglibyśmy wykorzystać index np.:
ale ...
React odradza używania zwykłych indeksów jako kluczy.
Jeśli klucz jest indeksem, zmiana kolejności elementu zmienia ten indeks - co powoduje, że nie jest on stabilny/tożsamy z danym elementem!
Może to powodować problemy podczas działania aplikacji np. usuwanie nie tego elementu co trzeba.
Najlepiej skorzystać z id danego elementu.
Listy i klucze - zasada 1
Listy i klucze - zasada 2
<div>
    <h1> Hello </h1>
    <Counter />
</div>
//Jeżeli zmienimy element główny to
//wszystko jest montowane od nowa
<section>
     <h1> Hello </h1>
    <Counter />
</section>
Jeżeli zmieni się element główny to jego dzieci również się zmieniają
Podsumowanie
Możemy wskazać, które elementy są stabilne pomiędzy zmianami dzięki atrybutowi key w listach.
Czas na zadania
Zrób zadania z sekcji JSX -> Zagnieżdżanie
Komponenty
Czym jest komponent?
Komponent to pojedynczy element interfejsu użytkownika, odpowiedzialny za konkretną część aplikacji. Składa się z elementów i/lub innych komponentów.
Komponent jest funkcją.
Komponenty funkcyjne
const Hello = () => {
    return <h1>Hello World </h1>
}

//Wywołujemy
<Hello />
Komponenty klasowe
class Hello extends React.Component {
  render() {
    return <h1> Hello </h1>
  }
}

//Wywołujemy
<Hello />
Czas na zadania
Zrób zadania z sekcji Komponenty -> Podstawy
Czym są props?
props to sposób na przekazywanie informacji komponentom tak samo jak atrybuty przekazują je elementom.
props - przykład
<Hi name="Zygmunt" />

//Zapis funkcyjny
const Hi = (props) => <h1>Hi, {props.name}</h1>

//Zapis klasowy
class Hi extends React.Component {
  render() {
    return <h1>Hi, {this.props.name}</h1>;
  }
}
props - przykład 2
<Hi numbers={[1,2,3]} />

//Zapis funkcyjny
const Hi = (props) => <div> Hi,
    {props.numbers.map( e => <span> {e} </span> )}
</div>

//Zapis klasowy
class Hi extends React.Component {
  render() {
    return <div> Hi,
        {this.props.numbers.map( e => <span> {e} </span> )}
    </div>
  }
}
Czas na zadania
Zrób zadania z sekcji Komponenty -> props
Kompozycja kontra dziedziczenie

Komponent jako pure function
const pureFunc = (a, b) => {
    return a + b;
}

pureFunc(2,2) // 4;
pureFunc(2,3) // 5

const dirtyFunc = () => {
    return Math.random();
}

dirtyFunc() //0.5211613377746926
dirtyFunc() //0.4766865051280922
Czym jest pure function?
Komponent jako pure function
W kontekście Reacta i Reduxa wszelkie komponenty i funkcje powinny być "pure".
Komponent nie powinien modyfikować danych, które otrzymuje.
Komponenty - kompozycja
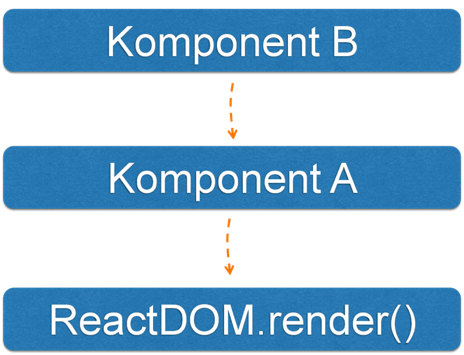
Przepływ props
class KomponentB extends React.Component {
    render() {
        return <div> {this.props.name} </div>
    }
}

class KomponentA extends React.Component {
    render() {
        return <KomponentB name={this.props.name} />
    }
}
ReactDOM.render(
    <KomponentA name="Ala"/>,
    document.getElementById("root")
)
Komponenty klasowe
Przepływ props
const KomponentB = ({name}) => <div> {name} </div>
const KomponentA = ({name}) => <KomponentB name={name} />

ReactDOM.render(
    <KomponentA name="Ala"/>,
    document.getElementById("root")
)
Komponenty funkcyjne
props.children
Niektóre komponenty nie muszą wiedzieć niczego o
swoich dzieciach. Wystarczy, że je tylko wyrenderują
const CrazyBg = (props) => {
  return (
    <div style={ {backgroundColor: props.color}}>
      {props.children}
    </div>
  );
}

const NotLogged = () => {
  return (
    <CrazyBg color="green">
      <a href="#">Zaloguj</a>
    </CrazyBg>
  );
}

const Logged = (props) => {
  return (
    <CrazyBg color="red">
      <h3>
        Witaj {props.name}
      </h3>
      <a href="#">Wyloguj</a>
    </CrazyBg>
  );
}

const App = () => {
  return <>
    <Logged name="Agata"/>
    <NotLogged />
  </>
}
state
state
State (z ang. "stan") jest obiektem przechowującym aktualny, wewnętrzny stan danego komponentu.
Stan możemy zmieniać, ale musimy poznać metody Cyklu Życia Komponentu
state w komponentach
klasowych
state
class Counter extends React.Component {
  constructor(props) {
    super(props);
    this.state = {
    	counter: 0
    }
  }
  render() {
    return <h1>
      {this.state.counter}
    </h1>
  }
}
state - aktualizacja
Jedną z metod cyklu życia komponentu jeste metoda render(). Odpowiada ona za wyrenderowanie w drzewie DOM odpowiedniego elementu JSX.
Aby móc zarządzać elementami drzewa DOM potrzebujemy mieć pewność, że zostały już "zamontowane". Do tego użyjemy componentDidMount() i to tutaj m.in. będziemy aktualizować DOM.
state - aktualizacja
// Źle
componentDidMount () {
	this.state.counter += 1;
}
Nie aktualizujemy state w ten sposób!!!!
state - aktualizacja
Korzystamy z setState()
//Dobrze
componentDidMount () {
  this.setState({
      counter: this.state.counter + 1
  })
}
UWAGA: Funkcja setState() nie zmienia stanu od razu tzn. działa asynchronicznie. React grupuje kilka wywołań setState w jedno wywołanie zwiększając tym samym wydajność aplikacji.
class Counter extends React.Component {
  constructor(props) {
    super(props);
    this.state = {
    	counter: 0
    }
  }
  componentDidMount() {
    this.id = setInterval( () => {
      this.setState({
      	counter: this.state.counter + 1
      })
    })
  }

  render() {
    return <h1>
      {this.state.counter}
     </h1>
   }
}
class Counter extends React.Component {
constructor(props) {
super(props);
this.state = {
counter: 0
}
}
componentDidMount() {
this.id = setInterval( () => {
this.setState({
counter: this.state.counter + 1
})
})
}
componentWillUnmount() {
clearInterval(this.id);
}
render() {
return <h1>
{this.state.counter}
</h1>
}
}Dodajemy sprzątanie
Inne Metody
Montowanie - kiedy komponent jest tworzony i wstrzykiwany do DOM
- constructor()
- render()
- componentDidMount()
Inne Metody
Aktualizacja - kiedy komponent jest przerenderowywany
- shouldComponentUpdate()
- render()
- componentDidUpdate()
Inne Metody
Odmontowywanie - kiedy komponent jest usuwany z DOM.
- componentWillUnmount()
state w komponentach funkcyjnych
(Hooks)
Wprowadzenie
Hooki to dodatek do Reacta 16.8. Wcześniej nie istniała taka funkcjonalność. Zamiast tego korzystaliśmy z klas
(Dzięki Hooks możemy używać state i metod cyklu życia komponentu bez użycia klas.)
Hook to funkcja, dzięki której możemy "zahaczyć" ją w wewnętrzne mechanizmy Reacta.
import React, { useState } from 'react';

const Counter2 => () {
    const [counter, setCounter] = useState(0);

    return (
        <div>
            Hook {counter}
        </div>
    )
}
useState - hook stanu.
Jako parametr przyjmuje wartość początkową dla zmiennej counter. Zwraca parę: aktualną wartość stanu oraz funkcje, którą będzie go aktualizować.
import React, { useState } from 'react';

const Counter2 => () {
  const [counter, setCounter] = useState(0);
  const [name, setName] = useState("Ala");
  const [animal, setAnimal] = useState("Dog");

  return (
        <div>
            Hook {counter}
            <h1>{name} {animal} </h1>
        </div>
    )
}
useState
Kilka wartości naraz
//Zwraca parę
const [animal, setAnimal] = useState('Reksio');

//Inaczej
var animalState = useState('Reksio'); // Zwraca parę
var animal = animalState[0]; // Pierwszy element pary
var setAnimal = animalState[1]; // Drugi element pary
useState - destrukturyzacja tablicy
useEffect
Dzięki useEffect komponent może wykonać jakiś efekt uboczny np:
- zapytania do API
- Timery (setTimeout i setInterval)
- aktualizacje DOM
- nasłuchiwanie zdarzeń
- ...
useEffect to połączenie: componentDidMount, componentDidUpdate i componentWillUnmount
useEffect - componentDidUpdate
import React, { useState, useEffect } from 'react';

const Counter2 = () => {

  useEffect(() => {
      const id = setInterval(() => {
           setCounter(counter => counter+1)
        }, 1000)
    })

    return (
        <div>
            Hook {counter}
        </div>
    )
}
Tutaj useEffect jest wywoływane za każdym razem gdy zmieni się komponent.
useEffect - componentDidMount
import React, { useState, useEffect } from 'react';

const Counter2 = () => {
  const [counter, setCounter] = useState(0);

  useEffect(() => {
       const id = setInterval(() => {
           setCounter(counter => counter+1)
        }, 1000)
    }, [])

    return (
        <div>
            Hook {counter}
        </div>
    )
}
Teraz useEffect jest wywołane tylko raz, na początku.
Do useEffect przekazujemy drugi argument w postaci pustej tablicy
useEffect
useEffect(() => {
  const id = setInterval(() => {
    console.log(counter) // zawsze 0
  	setCounter(counter => counter+1)
  }, 1000)
}, [])
Jeśli chcemy mieć dostęp do poprzedniej wartości stanu musimy skorzystać z funkcji callback przekazanej do setCounter. Powód?
Mamy dostęp do zmiennej counter tylko w pierwszym renderowaniu, ponieważ useEffect nie jest wywoływany po raz drugi. Counter jest zawsze równy 0 przy wywoływaniu setInterval.
useEffect - componentWillUnmount
useEffect(() => {
  const id = setInterval(() => {
  	setCounter(counter => counter+1)
  }, 1000)

  return () => clearInterval(id);

}, [])
A jeśli chcielibyśmy zaktualizować komponent tylko wtedy, gdy zmieni się jakaś konkretna wartość?
useEffect - componentDidUpdate
import React, { useState, useEffect } from 'react';

const App = () => {
  const [title, setTitle] = useState("Empty")

  useEffect(() => {
    document.title = title
  }, [title])

  return <input
        type="text"
        onChange={e => setTitle(e.target.value)}
   />
}
Korzystamy z tablicy przekazanej jako drugi argument.
Uruchamiamy ponownie efekt, gdy zmieni się wartość title
Czas na zadania
Zrób zadania z sekcji State
useRef()
useRef()
Jeśli chcielibyśmy stworzyć zmienną, która będzie widoczna w całym komponencie i będzie niezależna od cyklu życia komponentu możemy skorzystać z hooka useRef()
useRef() zwraca nam mutowalny obiekt (referencję) z polem current. Pole to możemy podczas tworzenia obiektu zainicjalizować.
const ref = useRef(initialValue);

useEffect(() => {
  ref.current = newValue
})
useRef()
Do zapamiętania:
- wartość referencji stworzonej za pomocą useRef() jest stała pomiędzy kolejnymi renderowaniami komponentu
- Aktualizacja referencji nie powoduje ponownego renderowania komponentu
useRef() - przykład
const App = () => {
    const [counter, setCounter] = useState(0)
    const timer = useRef();

    useEffect(()=> {
       timer.current = setInterval(()=>{
            setCounter(counter => {
                if(counter >=5 )
                  clearInterval(timer.current)
                return counter + 1
            })
        }, 1000)

        return () => clearInterval(timer.current)
    }, [])

    return <div>  Counter: {counter} </div>
}
A co gdybyśmy chcieli użyć zwykłego obiektu zamiast useRef() ?
useRef() - przykład
const App = () => {
    const [counter, setCounter] = useState(0)
    const timer = {current: null} // za kazdym razem nowy obiekt
    console.log("ja się renderuje!")

    useEffect(()=> {
       timer.current = setInterval(()=>{
            setCounter(counter => {
                if(counter >=5 )
                  clearInterval(timer.current)
                return counter + 1
            })
        }, 1000)

        return () => clearInterval(timer.current)
    }, [])

    return <div> Counter: {counter} </div>
}
A po co ten current?
useRef() - przykład
// ...
let timer = useRef();

useEffect(()=> {
 //tak też nie. Wyrzucamy całą referencję
 //zastepując ją zwykła zmienną
  timer = setInterval(()=>{
     setCounter(counter => {
       if(counter >=5 )  clearInterval(timer)
           return counter + 1
      })
  }, 1000)

  return () => clearInterval(timer)
}, [])

// ...
useRef() - podsumujmy
// timer jest obiektem, który jest
// przechowywany przez mechanizmy Reacta
const timer = useRef();

// Tutaj aktualizuje tylko
// własność tego obiektu.
timer.current = 1234;
useMemo
useMemo pozwala nam zapamiętać niektóre operacje po to aby nie multiplikować obliczeń przy każdym renderowaniu komponentu.
const memoizedValue = useMemo(() => computeExpensiveValue(a, b), [a, b]);Powyższe obliczenie wykona się tylko wtedy gdy zmienią się wartości w tablicy zależności.
React.memo()
When it comes to memoization, there is one more method worth mentioning. When parent components render all, its children render accordingly even if nothing changes actually inside it. To cache the component and prevent rendering, whenever parent component renders, we may memoize it.
const MyComponent = React.memo(function MyComponent(props) {
  /* render using props */
} /* optional comaparison function (prevProps, nextProps) => { ... } */);
In react memo, it will render only if any of its props changes. The comparison is shallow in this case so we might need a second parameter to compare props.
React.memo()
Do not overuse React.memo – it might me tempting to use it everywhere but comparing props is a procedure that consumes resources as well. Consider if memoization is worth this expense. In numerous cases, memoization would harm your performance not increase it.
useCallback
useCallback is one of the toughest to understand. In fact, on the Internet there are plenty of misleading information about it.
Function is just an object (like everything in JavaScript under the hood). So, while comparing props (for example in React.memo process) any callback sent to the children components would be a different prop and would cause rerendering.
{} === {} // FalsyuseCallback
Thanks to useCallback the callback function will not be recreated on each render. The same as with useMemo it takes the second parameter with the list of dependencies. When those dependencies changes the function is recreated accordingly.
...
const memoizedCallback = useCallback(
  () => {
    doSomething(a, b);
  },
  [a, b],
);

return <Child callback={memoizedCallback} />
...

function Child = React.memo(({callback}) => {
...
})
forwardRef
There is an infrequent occurrence when we might need to access the ref of a child component from the parent perspective. It happens with animations and when it comes to small reusable components like button.
const FancyButton = React.forwardRef((props, ref) => (
  <button ref={ref} className="FancyButton">
    {props.children}
  </button>
));

// You can now get a ref directly to the DOM button:
const ref = React.createRef();
// you may now access the ref of a button from parent perspective
// for example ref.current.focus()
<FancyButton ref={ref}>Click me!</FancyButton>;
useReducer
Another pretty useful hook is useReducer. Not that popular but definitely worth mentioning. Basically, it's the same as useState but it allows us to deal with complicated and nested states. It also allows us to carry out complicated mutations of the state.
const [state, dispatch] = useReducer(reducer, initialArg, init);- reducer – a function with two arguments a state and an action.
- initial state
- optional function - is to initiate state in a lazy manner.
useReducer
The most important part is the reducer function. We may conduct complicated mutations of the state there.
An action must have its type and optionally a set of data attached to the action. It's conventionally named payload. In reducer we check the type either with a switch statement or with an if statement and we mutate it accordingly.
function reducer(state, action) {
  switch (action.type) {
    case 'increment':
      return {count: state.count + action.payload};
    case 'decrement':
      return {count: state.count - action.payload};
    case 'reset':
      return init(action.payload);
    default:
      throw new Error();
  }
}
The concept of reducer function is widely used in Redux as well.
useLayoutEffect
useLayoutEffect to hook identyczny z useEffect za wyjątkiem jednej funkcjonalności. Jest on synhroniczny w odróżnieniu od useEffect. Użyjemy go w sytuacji, kiedy potrzebujemy bezpośrednio manipulować DOM.
Przykłady użycia:
https://greensock.com/react/
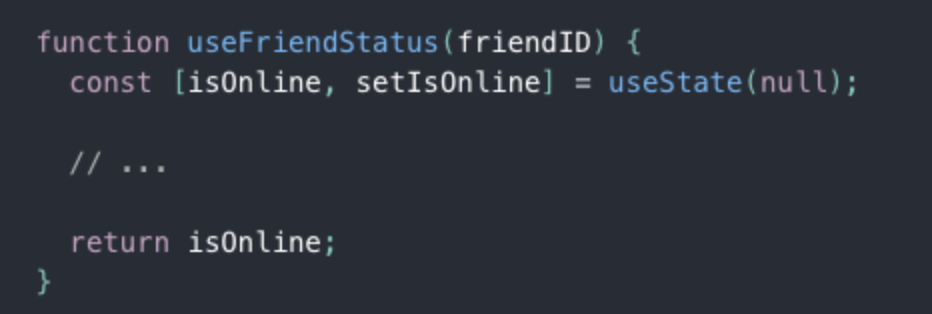
Custom Hooks
A custom Hook doesn’t need to have a specific signature. We can decide what it takes as arguments, and what, if anything, it should return. In other words, it’s just like a normal function. Its name should always start with use so that you can tell at a glance that the rules of Hooks apply to it.
source: Read ⬇️ https://reactjs.org/docs/hooks-custom.html
Example:
The purpose of our useFriendStatus Hook is to subscribe us to a friend’s status. This is why it takes friendID as an argument, and returns whether this friend is online:
Zdarzenia
Zdarzenia - przykłady
Nazwy zdarzeń w React są takie same jak w JavaScript z jedną małą różnicą, że na początku dodajemy słówko "on"
| onClick | onChange | onMouseEnter |
|---|---|---|
| onMouseLeave | onKeyPress | onKeyDown |
| onFocus | onBlur | onSubmit |
Przykładowe:
https://reactjs.org/docs/events.html
Zdarzenia - przykłady
const ClickTest = () => {
    const [counter, setCounter] = useState(0);
    const handleClick = () => {
        setCounter(counter + 1)
    }
    return (
        <div>
            <h1>{counter}</h1>
            <button onClick={handleClick}>
            	Kliknij mnie
            </button>
        </div>
    )
}
onClick
Przekazywanie parametrów
const ClickTest = () => {
    const [counter, setCounter] = useState(0);
    const handleClick = (e, name) => {
        console.log(e, name)
        setCounter(counter + 1)
    }
    return (
        <div>
            <h1>{counter}</h1>
            <button onClick={ e => handleClick(e, "Jan")}>
            	Kliknij mnie
            </button>
        </div>
    )
}
Czas na zadania
Zrób zadania z sekcji Zdarzenia -> Podstawy
Przekazywanie zdarzeń
Przekazywanie zdarzeń
-
Komunikacja rodzic -> dzieci
-
Komunikacja dzieci -> rodzic
-
Komunikacja rodzeństwo
Komunikacja rodzic - dzieci
const Hello = (props) => {
  return <div>
    Hello {props.name}
  </div>
}

const Counter = (props) => {
  return <div>
   {props.num}
  </div>
}

const App = () => (
  <div>
    <Hello name="Jan"/>
    <Hello name="Giorgio" />
    <Counter num="1" />
  </div>
);
Komunikacja dzieci-rodzic
App
Hello
Counter
?
Komunikacja dzieci-rodzic
const Hello = (props) => {
    return <div>
      Hello {props.name}
    </div>
  }

  const Counter = (props) => {
    const handleClick = () => {
      props.add();
    }
    return <div> {props.num}
     <button onClick={handleClick}> Add </button>
    </div>
  }

 const App = () => {
    const [counter, setCounter] = useState(0);
    const addNum = () => {
      setCounter(counter + 1)
    }
    return <div>
        <Hello name="Jan" />
        <Hello name="Giorgio" />
        <Counter num={counter}
                 add={addNum}
        />
    </div>
  }
Czas na zadania
Zrób zadania z sekcji Przekazywanie zdarzeń
Warunkowe renderowanie i blokowanie
Warunkowe renderowanie i blokowanie
- if
- Operator trójargumentowy
- logiczny operator &&
Warunkowe renderowanie
const App = () => {
  const [isLogged, setIsLogged] = useState(false);

  if(isLogged) {
    return <h1> Witaj </h1>
  } else {
    return <span>Zaloguj</span>
  }
}
Warunkowe renderowanie
const App = () => {
  const [isLogged, setIsLogged] = useState(false);
  const el = isLogged ?
            <h1>Witaj</h1> :
            <span>Zaloguj</span>

  return el;
}
operator trójargumentowy
Warunkowe renderowanie
const App = () => {
  const [msgs, setMsgs] = useState([]);

  return msgs.length > 0 &&
        <h1>Masz {msgs.length}
        nieprzeczytanych wiadomości
        </h1>
}
operator logiczny &&
Blokowanie wyświetlania
const App = () => {
    return null;
}
Jeśli nie chcemy wyświetlić komponentu możemy zwrócić null lub po prostu false
Czas na zadania
Zrób zadania z sekcji renderowanie i blokowanie
Formularze
Formularze - form, input
-
Formularze w React działają nieco inaczej niż znane nam formularze HTML.
- Różnica polega na tym, że elementy formularza HTML trzymają same swój stan i same go kontrolują, a elementy formularza stworzone w React powinny być kontrolowane poprzez state co powoduje, że state jest jedynym źródłem prawdy (z ang. "single source of truth").
Komponenty kontrolowane
const App = () => {
  const [value, setValue] = useState("");

  const handleChange = (event) => {
    setValue(event.target.value)
  }

  return <form>
  <label>
    Email:
    <input type="text"
           value={value}
           onChange={handleChange}/>
  </label>
  </form>
}
textarea
const App = () => {
  const [value, setValue] = useState("");

  const handleChange = (event) => {
    setValue(event.target.value)
  }

  const handleSubmit = () => {
    //walidacja, wysyłanie
  }

  return <form onSubmit={handleSubmit}>
  <label>
    Wiadomość:
    <textarea type="text"
           value={value}
           onChange={handleChange}/>
  </label>
  <input type="submit" value="wyślij" />
  </form>
}
select
<form onSubmit={handleSubmit}>
    <label>
      Wybierz ulubionego zwierzaka:
      <select value={value}
              onChange={handleChange}>
          <option value="dog">Dog</option>
          <option value="cat">Cat</option>
          <option value="shrimp">Shrimp</option>
          <option value="goose">Goose</option>
      </select>
  </label>
  <input type="submit" value="Wybierz" />
</form>
Jedna funkcja wiele elementów
const App = () => {
  //.....

  return <form>
    <label>
      Email:
      <input type="text"
            value={values.email}
            name="email"
            onChange={handleChange}/>
    </label>
    <label>
      Password:
      <input type="password"
            value={values.password}
            name="password"
            onChange={handleChange}/>
    </label>
  </form>
}
Ustawiamy właściwość name
Jedna funkcja wiele elementów
const App = () => {
  const [values, setValues] = useState({email: "", password: ""});

  const handleChange = (event) => {
    const name = event.target.name;
    setValues({
      ...values,
      [name]: event.target.value
    })
  }

  return //...
}
Komponenty niekontrolowane
useRef()
Używamy zazwyczaj do przechowywania odniesień do elementów DOM lub do przechowywania prostych typów i obiektów.
const myRef = useRef(null); <input type="text"
ref={myRef}
onChange={handleChange}/>Komponenty niekontrolowane
useRef()
Pamiętaj, że odwołujemy się do elementów DOM HTML, a nie do komponentów React.
Aby dostać się do referencji wskazującej na element korzystamy z pola "current"
console.log(myRef.current)Komponenty niekontrolowane
useRef()
const App = () => {
const myRef = useRef(null);
const handleChange = (event) => {
console.log(myRef.current.value)
}
return <form>
<label>
Email:
 <input type="text"
        ref={myRef}
        onChange={handleChange}/>
</label>
</form>
}Czas na zadania
Zrób zadania z sekcji Formularze
Fetch
Fetch API
Fetch API to narzędzie do komunikowania się z różnymi źródłami danych. Różnica między nim a XMLHttpRequest polega nam tym, że Fetch korzysta z Promises, dzięki temu możemy uniknąć tzw. callback hell.
fetch('https://api.kanye.rest/');Promise - Fetch API
fetch() zwraca obiekt typu Promise. Aby odebrać dane możemy użyć metody Promise.then().
fetch('https://api.kanye.rest/')
.then( resp => {
  console.log( resp );
});
Promise - Fetch API
Aby uzyskać z niego odpowiedź w formacie json musimy użyć: Response. json()
Metoda ta zwróci kolejny obiekt typu Promise, który tym razem przy spełnieniu zwróci nam dane w wersji jsona.
fetch('https://api.kanye.rest/')
.then( resp => resp.json())
.then( data => {
 console.log(data)
})
Fetch - obsługa błędów
fetch('https://api.kanye.rest/')
.then( resp => resp.json() )
.then( data => {
    console.log(data)
})
.catch( error => {
    console.log(error)
})
fetch - nagłówki
fetch(url, {
  headers : {
    'X-My-Header' : 'test'
  }
});
Jeżeli musimy przesłać nagłówek to:
fetch - metody HTTP
fetch(url, {
  method : 'POST'
});
fetch - przesyłanie danych
const user = {
  name: "Aga"
};

fetch(url, {
  method : 'POST',
  body: JSON.stringify( user )
});
fetch - React
  useEffect(() => {
      fetch('https://api.kanye.rest/')
      .then(r=>r.json())
      .then(response => {
        setData(response)
      })
  }, [])
fetch używamy w komponentach klasowych w funkcji componentDidMount natomiast w funkcyjnych w useEffect.
Po otrzymaniu danych zmieniamy state.
Async / Await
Async/ Await zapewnia nam przyjemniejszą składnię w przypadku zagmatwanych scenariuszy. Dzięki Async/ Await kod wygląda na synchroniczny.
Aync / Await - React
 const url = 'https://api.kanye.rest/';
 useEffect(() => {
    (async () => {
        const response = await fetch(url);
        const json = await response.json();
        setData(json);
    })();
  }, []);
Czas na zadania
Zrób zadania z sekcji Fetch