Grav CMS for Educators

Flipping the LMS with an
Open + Collaborative Web Platform
EDUCATOR AND EXPERIENCE DESIGN CONSULTANT
Paul D Hibbitts
Workshop resources: bit.ly/1PDs3N8
Hello, Grav
(Workshop I)
What is a Modern
Flat-file CMS?
What makes a CMS “Modern”?
-
Modern PHP code (i.e. reliability, speed, extensibility, etc.)
-
Use of current standards (i.e. Markdown, Twig, YAML, etc.)
-
Modular/customizable content chunks (i.e. reuse of content)
-
Further separation of content (i.e. files) from presentation
What makes a CMS “Flat-file”?
No database means less (or no) IT involvement needed
Content stored in text files rather than in a database
Takes full advantage of the collaborative ecosystem now available (i.e. GitHub)
Increased portability, as moving a site now only requires simply copying files to another location
All template and content files are 100% version controllable
Getting Grav
Up and Running
Requirements
- A Webserver (Apache, Nginx, LiteSpeed, etc.)
- PHP 5.5.9 or higher (7.0 recommended, 2X faster!)
Installation (Server only)
- Download Grav Workshop Demo Site (bit.ly/1ZZjstZ)
- Unzip the package onto your desktop
- Copy the entire Grav folder to your Web server
- Point your browser at the Web server folder
- Create your site administrator account
- And you're done!
Installation (Local Desktop)
- Download and install MAMP (mamp.info)
- Download/unzip Grav Workshop Demo Site (bit.ly/1ZZjstZ)
- Unzip the downloaded Grav package onto your desktop
- Copy the entire Grav folder into the MAMP 'htdocs' folder
- Launch MAMP and press the MAMP 'Start Servers' button
- Enter 'localhost:8888' in Web Browser and choose Grav folder
- Create your site administrator account
- And you're done!
The Basics of Grav
Admin Panel
Admin Panel Overview
The 'Admin Panel' provides the ability to easily manage your site, modify content, and perform updates
The Basics of Grav
Working with Files
(instead of Admin Panel)
Your Content and Grav
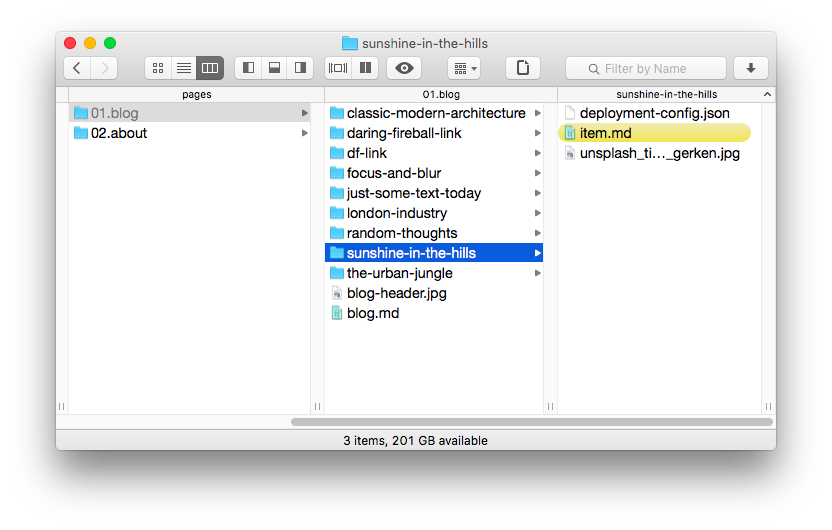
All of your site content is stored in the 'user/pages' folder
Pages
Each page within Grav is stored as a folder, and within each folder the text and other elements of a page are stored
Page Folders
The numeric prefixes of a page folder name (i.e. '01') are used to determine the position of that page within a site navigation bar
Page Folders
To prevent a page from being included within the site navigation bar do not prefix the folder name with a number (i.e. 'sidebar)
The Basics of Grav
Page Content
Page Editing
Within a page folder a text file with the suffix '.md' (markdown) contains the content for that page
Recommended Text Editors
- Adobe Brackets (shown in these slides)
- Atom (my preferred text/markdown editor)
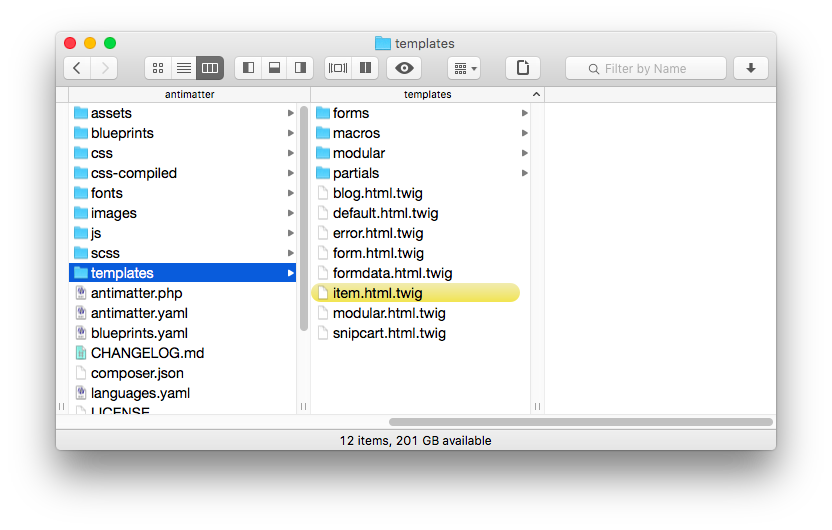
Page Names
The name of the file within a page folder determines the template used to display it (i.e. page 'item.md' would use the template 'item')
Page Content
Headers
Page Headers
Each page within Grav contains two main parts; a header
(starting and ending with three dashes ('---'),
with the content of the page below
Page Content
Markdown
Markdown
Markdown is a syntax to format the display of content stored as plain text - similar but simpler than HTML formating
Markdown Examples
| H1 | # Your Header Text Here |
| H2 | ## Your Header Text Here |
| H3 | ### Your Header Text Here |
| Italics | _your italic text here_ |
| bold | **your bold text here** |
| unordered list item | * your item here |
| ordered list item | 1. your item here |
| link | [link title](www.google.com) |
Tip: To ensure a new paragraph after text in markdown,
put two spaces after the end of the line
Page Content
Linking Pages
Linking Pages
To included a link to one of your site's Grav pages you would generally use the following format: '[your link text](../path/page)'
Note: '../' indicates moving up the file directory
Page Content
Embeding Media
Embedding Media
To embed an image you would use the following format:
''
Note: the above assumes media is stored within folder of page
Things to Explore Next...
- Learn about more Page Header options
- Review a Markdown tutorial
- Try out some open source Grav themes and plugins
- Use the built-in media manipulation functionality
Thank you! Questions?
-
Contact Info
- Blog: hibbittsdesign.org
- Email: paul@paulhibbitts.com
- Twitter: @hibbittsdesign
- LinkedIn: linkedin.com/in/paulhibbitts
-
Grav Resources
- Website: getgrav.org
- Twitter: @getgrav
- Documentation: learn.getgrav.org (built with Grav itself)
Flip Your LMS with Grav (Workshop II)
Flipping your LMS
What is a Flipped LMS?
“A flipped LMS approach is where an open platform,
in the control of course participants,
serves as an alternative front-end to the institutional LMS.
”
Why “Flip” the LMS?
- To support pedagogical goals unmet by the current LMS
- To deliver a better student (and facilitator) experience
- To increase capability of access, sharing and collaboration
Experience Design Goals
-
For Students
-
Engaging
-
Organized
-
Relevant
-
Convenient
-
Enjoyable
-
-
For Facilitator(s)
-
Controllable (i.e. manageable)
-
Pliable (i.e. flexible)
-
Efficient
- Enjoyable (hey, instructors are people too...)
-
Why Grav?
- The best modern flat-file CMS currently available (to me)
- Due to it's flat-file nature, Grav also fully supports...
An Open
+ Collaborative Workflow
Recommended Toolset
- MAMP
- Git service (e.g. GitHub, GitLab Gogs, etc.)
- GitHub Desktop
- Automatic deployment service (e.g. Deploy or Buddy)
What Skills are Required?
-
Basic User Skills, Level I (Web-server Only)
-
Text file editing
-
Copying/pasting/editing URLs
-
Markdown or simple HTML formatting
-
Web server access (i.e. FTP)
-
-
Basic User Skills, Level II (supports an open and collaborative workflow, which is also very efficient!)
-
Setting up a GitHub account
-
Configuring GitHub Desktop app
-
Setting up a GitHub to FTP server service (e.g. Deploy)
-
So, what does that workflow
look like?
How long would that
update take?
~ 30 Seconds
(your mileage may vary)
Setting up An Open and Collaborative Workflow - Part I
- Download/unzip Grav Course Hub Skeleton (bit.ly/1QQsJ7z)
- Create a folder 'MAMP Websites' in your 'Documents' folder
- Copy the entire Grav folder into the 'MAMP Websites' folder
- Download, install, and launch MAMP
- Launch MAMP
- Change the 'Document Root' MAMP preferences setting to the 'MAMP Websites' folder (within 'Documents')
- Press the MAMP 'Start Servers' button
- Enter 'localhost:8888' as the URL in your Web Browser
- Choose the displayed Grav folder name
- Create your site administrator account
Want more details? Running Grav Locally with MAMP
Setting up An Open and Collaborative Workflow - Part II
- Setup a GitHub account
- Download and configure GitHub Desktop
- Using GitHub Desktop, create a new repository of your locally running Grav installation
- Commit your entire site to your repository
- Setup an automatic deployment service (can be done later)
Want more details? Using Grav with GitHub Desktop
Course Hub
Skeleton Package
Course Hub Highlights
- A complete ready-to-run Grav Skeleton Package (open source)
- Blog-format, with 'featured' (sticky) posts
- Important reminders & class preparations areas
- Additional site pages can be easily added
- Image header area above site navbar
- Sidebar is a simple markdown file, which can also contain HTML
- URL flag to only display page content (for display within LMS )
- External links are automatically opened in a new Tab/Window
- Built-in support for entire site to be maintained on GitHub
- Since everything is built with Grav it can be entirely customized
Want more information? github.com/hibbitts-design
Explore the online demo at demo.hibbittsdesign.org
Download the Course Hub skeleton at bit.ly/1QQsJ7z
Things to Explore Next...
- Font awesome icons (included)
- Modular content using Page Inject plugin (included)
-
Gravstrap Shortcodes plugin
(included with Course Hub Bootstrap - Additional theme customizations
Thank you! Questions?
-
Contact Info
- Blog: hibbittsdesign.org
- Email: paul@paulhibbitts.com
- Twitter: @hibbittsdesign
- LinkedIn: linkedin.com/in/paulhibbitts
-
Grav Resources
- Website: getgrav.org
- Twitter: @getgrav
- Documentation: learn.getgrav.org (built with Grav itself)
- Course Hub
- Grav Course Hub Getting Started Guide:
http://hibbittsdesign.org/blog/getting-started - EDUCAUSE Next Gen LMS paper (“NGDLE”):
http://net.educause.edu/ir/library/pdf/eli3035.pdf
- Grav Course Hub Getting Started Guide: