DOM Manipulation
Tim Carlson
Winter 2024
View of the Day
-
Q&A
-
DOM Manipulation Methods (code together!)
-
Adding Interactivity (code together!)
JavaScript Q&A
The DOM

The DOM
(Document Object Model)
A
structural model of information represented by HTML.
The model is
a tree of element nodes.
The DOM provides functions that allows computer programs (e.g., JavaScript) to access and manipulate it.
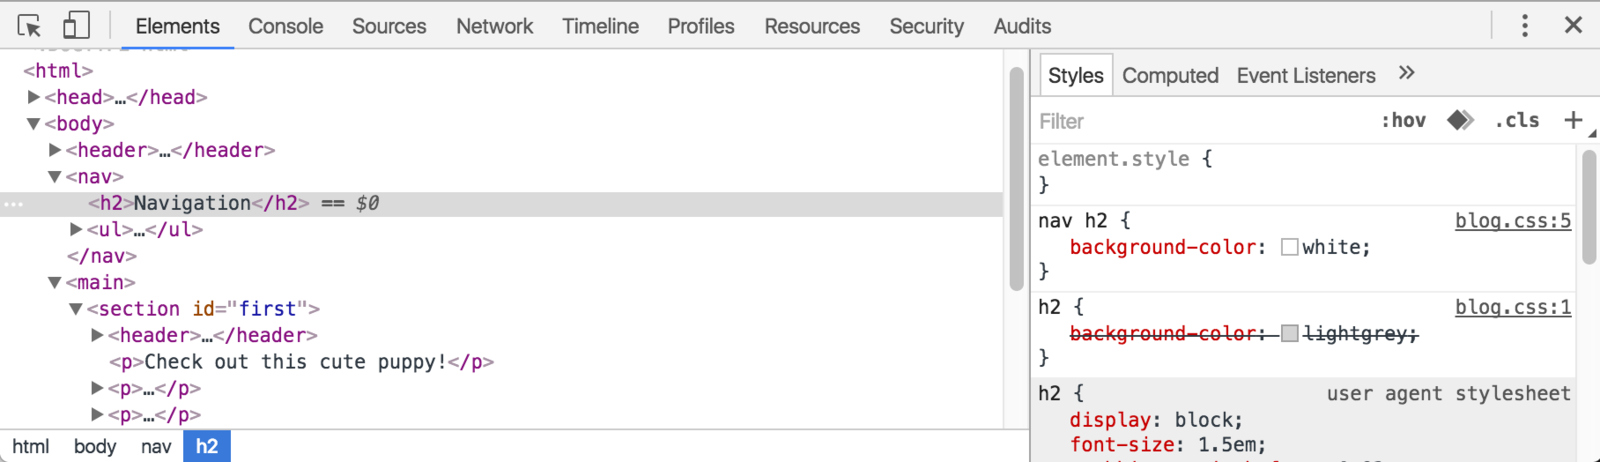
The DOM
Interaction with the DOM
- Change content
- Change an attribute
- Change a style
- Create an element
- Use Javascript to add item to DOM
- Use Javascript to add items repeatedly
- Register an Event Listener
- Keep State as events occur
- Design pattern:
- function - create and return element
- function - iterate and render elements
Reading Review
Which should we use, html.onclick(), or element.addEventListener()?
Try and keep your interaction in your jscript file rather than in the html file.
- Use addeventlistener()
- You can add/remove the listener
- You can add more than one listener to the same element
- You will keep interaction code in one place
DOM DEMO
Referencing Elements
Use the document.querySelector() function to get a reference to DOM (HTML) elements, which you can assign to a variable.
The function's argument is a string (in quotes!) of a CSS selector for those elements.
//select the <h1> element
//returned value is an HTML Element
const headingElement = document.querySelector('h1');

/* can use any valid CSS selector */
//selects the first element with `class="alert"`
const alertElement = document.querySelector('.alert');

/* querySelectorAll() will select multiple elements */
/* returns a NodeSet, which is like an array */
//select all hyperlinks <a> within the <nav>
const buttonElementsSet = document.querySelectorAll('nav a');
Document Object Model
The DOM has an API which can interact with elements of the DOM
To manipulate DOM elements, a variable is needed to refer to element
//paragraph element with id="foo"
let pElem = document.getElementById('foo');

//elements with class="row"
let rowElems = document.getElementsByClassName('row'); //note the plural!

//<li> elements
let liElems = document.getElementsByTagName('li'); //note the plural!

/*easiest to select by reusing CSS selectors! */
let cssSelector = 'header p, .title > p';  //a string of a CSS selector

//selects FIRST element that matches css selector
let p2elem = document.querySelector(cssSelector);

//matches ALL elements that match css selector
let elems = document.querySelectorAll(cssSelector);
Document Object Model
// Example:

let elem = document.querySelector('p');

console.log (elem); // will log the first 'p' element


let text = elem.textContent;  //the text content of elem

elem.textContent = "This is different content!"; //change content


let html = elem.innerHTML; //content including HTML
document.querySelector(cssSelector) is recommended method
- The "cssSelector" argument is the same syntax as you used for CSS selectors. (example: id, class or element selector)
- Once you have the element you can call methods to get or set properties
Changing Elements
const paragraph = document.querySelector('p');
const image = document.querySelector('img');
const input = document.querySelector('input');

//change the paragraph's content.
paragraph.textContent = "This is new content!";

//change the content (including HTML)
paragraph.innerHTML = "This is <em>new</em> content!";

//change element attributes
image.src = 'path/to/different_picture.png'; //change src

//access element properties
const inputttedValue = input.value;

//change element class(es)
paragraph.classList.add('bg-dark'); //give it the `bg-dark` class
paragraph.classList.toggle('bg-dark'); //remove if there, add if not

//add specific CSS property (but better to use a class!)
//note that property names are camelCase
paragraph.style.fontSize = '2rem'; //change font-size
Access element properties to modify the element.
Example 1 - Change Element
//Slide 13 - change h1 element and add additional highlighted text
// aquire the h1 element

let theH1 = document.querySelector('h1');
console.log(theH1)

let puppyImg = document.querySelector('#puppySection img')
console.log(puppyImg);

// querySelectorAll will select multiple elements rather than just the 1st element
// that matches the selector

//change content of an element
let subtitle = document.querySelector('main h2');

subtitle.innerHTML = subtitle.textContent + " <em>(Husky)</em>";
Change an Attribute
// Change an Attribute

const h1Elem = document.querySelector('h1');

h1Elem.textContent = "DOM Demo";


const dogImg = document.querySelector('#puppySection img')

dogImg.src = 'img/husky.jpg';
dogImg.alt = 'a husky';
Change Style (ClassList)
// Change a style. Notice you use "classList.add" to
// add an additional style to the existing list of applied styles

//show the current style list (classList) for the header element
console.log(document.querySelector('header').classList);

//make the padding really big
document.querySelector('header').classList.add('py-5')

const theImg = document.querySelector('img');

theImg.classList.add('anim') //adds a new style

// In the console type: "theImg.classList.toggle('scale-out');"
Creating Elements
Create new elements using document.createElement()
New elements need to be added to the existing DOM tree with e.g., appendChild()
//create an element
const newParagraphElem = document.createElement('p');

//give it content/etc
newParagraphElement.textContent = "new content";

//get refefrence to element already on the page
const mainElem = document.querySelector('main');

//append the new element as last child
mainElem.appendChild(newParagraphElem);
<main>
  <p>old content</p>
</main>
<main>
<p>old content</p>
<p>new content</p>
</main>Ceate element with sub-element
//create the new element
let newLi = document.createElement('li');

//set the html using .innerHTML method
newLi.innerHTML = '<a href="https://www.youtube.com/watch?v=BHOevX4DlGk">
The Police - Spirits In The Material World</a>';

//add to the appropriate place in DOM
const songListElem = document.querySelector('#dataSection ol');
songListElem.appendChild(newLi);
//create the new elements
const newLi = document.createElement('li');
const newAnchor = document.createElement('a');

//fill out the attributes for the anchor
newAnchor.href = "https://www.youtube.com/watch?v=BHOevX4DlGk";
newAnchor.textContent = "The Police - Spirits In The Material World";

newLi.appendChild(newAnchor);

//add to the appropriate place in DOM
const songListElem = document.querySelector('#dataSection ol');
songListElem.appendChild(newLi);
Example A. Using innerHTML
Example B. Build up Anchor tag and append to 'li'
//Take in a song object and return a formatted <li> object
function createSongListItem(songObj) {
  //make this into a url
  const aElem = document.createElement('a');
  aElem.textContent = songObj.artist + " - " + songObj.title;
  aElem.href = songObj.youtubeUrl;

  // create the newLi and make
  const newLi = document.createElement('li');
  newLi.append(aElem);
  return newLi;
}

function renderSongList(aSongArray) {
  const songListElem = document.querySelector('#dataSection ol');
  for (const songObj of aSongArray) {
    const songLiElem = createSongListItem(songObj);
    songListElem.appendChild(songLiElem);
  }

}

renderSongList(songArray);
Pattern: Use function to generate elements
"Render" Functions
Best practice is to define functions (e.g., named create____ or render____) that will create and return elements.
function createLinkItem(text, url) {
  const aElem = document.createElement('a');
  aElem.textContent = text;
  aElem.src = url;
  return aElem; //returns an element!
}

const linkArray= [{url: 'https://info340.github.io/', title: 'Course Textbook'},
                  {url: 'https://ischool.uw.edu/', title: 'iSchool'},
                  {url: 'https://www.google.com/search?q=puppies&tbm=isch', title: 'Puppies'}];

function createLinkList(linkObjList) {
  const ulElem = document.createElement('ul');
  for(const linkObj of linkObjList) {
    //call the render function to create the child element
    const linkELem = createLinkItem(linkObj.title, linkObj.url);

    const liElem = document.createElement('li');
    liElem.appendChild(linkElem); //include the rendered element
    ulElem.appendChild(liElem);
  }
  return ulElem; //returns an element!
}
document.querySelector('nav').appendChild(createLinkList(linkArray));
But how do we make it interactive?
Event Handling
We add interactivity by listening for and responding to "events" created by the computer.
Register a Listener
Use the addEventListener() function to register a "listener". The function takes 2 arguments: the type of event to listen for (a string), and a callback function to run when the event occurs.
the event that occurred
const button = document.querySelector('button');

button.addEventListener('click', function(event) {

  //what to do when button is pressed!
  console.log("you clicked on", event.target);

});
which element
cause the event
Registering Event Listener
Registering an Event Listener (example 1)
const hideButton = document.querySelector('#puppySection button');

function whatToDoWhenClicked(event){
  console.log("you clicked me!");
  console.log(event); //the event object
  console.log(event.target); //tells you which element got clicked
}

hideButton.addEventListener('click', whatToDoWhenClicked )
const hideButton = document.querySelector('#puppySection button');
function whatToDoWhenClicked(){
console.log("you clicked me!");
}
hideButton.addEventListener('click', whatToDoWhenClicked )Event listener with literal function that hides the section
Use State to see if showing
//STATE (should be at top of file)
let puppyShown = true;

function renderPuppy() {
  const imgElement = document.createElement('img');
  imgElement.src = 'img/puppy.jpg';
  imgElement.alt = 'a cute puppy';

  if (!puppyShown) {
    imgElement.classList.add('d-none')
  }

  document.querySelector('#puppySection div').appendChild(imgElement);

}
renderPuppy();

const hideButton = document.querySelector('#puppySection button');

hideButton.addEventListener('click', function (event) {
  //change the state
  puppyShown = !puppyShown;
  //rerender
  renderPuppy();
});
Part (2) - toggle puppy
//STATE (should be at top of file)
let puppyShown = true;

const hideButton = document.querySelector('#puppySection button');

function renderPuppy() {
  //clear out the previous content befor rendering
  const puppyContainer = document.querySelector('#puppySection div');
  puppyContainer.innerHTML = '';

  if (puppyShown) {
    const imgElement = document.createElement('img');
    imgElement.src = 'img/puppy.jpg';
    imgElement.alt = 'a cute puppy';
    puppyContainer.appendChild(imgElement);
    document.querySelector('#puppySection button').textContent = 'Hide';
  }
  else { //not shown
    document.querySelector('#puppySection button').textContent = 'Show';
  }
}

renderPuppy();

hideButton.addEventListener('click', function (event) {
  //change the state
  puppyShown = !puppyShown;
  //rerender
  renderPuppy();
});
JS Web App Structure
To develop a web app, think about your page as "displaying dynamic content", not "responding to user actions".
- Define the data (state) that your app will be displaying
- ex: the list of tasks, the current recipe, the user's history
- ex: the list of tasks, the current recipe, the user's history
- Define how to render (display) that data using functions
- ex: renderTaskItem(), renderRecipe()
- ex: renderTaskItem(), renderRecipe()
- Define responses to user action. When the user does something:
- Update the state data
- "re-render" the (now-changed) data!
JS Web App Structure
//define data
const state = {
  data: [ {}, {}, {} ],
  ...
}

//define presentation - lots of these kinds of functions
function renderData() {
  //render all the data
  for(let datum of state.data){
    //call helper functions to break things up!
    const dataCardElement = renderDataCard(datum);
    document.querySelector('#main').appendChild(dataCardElement);
  }
}

//define user interaction
button.addEventListener('click', function(event) {
  state.data[i] = ...; //MODIFY THE STATE
  document.querySelector('#main').innerHTML = ''; //CLEAR OLD VIEW
  renderData(); //RE-RENDER CONTENT
})

renderData() //show initial content!
Handing Form Data
In order to respond to a form submission, you will need to "stop" the normal HTTP request being sent by calling preventDefault() on the event.
const formElement = document.querySelector('#myForm');

//listen for submit events
formElement.addEventListener('submit', function(event) {
  //stop normal behavior (going to a new site)
  event.preventDefault();

  //access what value the user typed in
  const inputElement = document.querySelector('#name-input')
  const userValue = inputElement.value;

  //... do something with that value!
});
Action Items!
Action Items!
-
Review Chapter 1-12
-
Read Ch 14: ES6+ Features (we skip Ch13)
-
Problem Set 05 due Friday
-
Problem Set 06 is larger; due week from Friday
-
Do not put this off!
-
Next time: ES6 syntax