Building WhatsApp in a Day with React Native
Software architect & consultant
Web / Mobile / VR / AR / IoT / AI
author, engineer, enterpreneur
CTO & Co-founder
creating a robust, performant, and feature-rich online conferencing experience
Assumptions
- You are familiar with JavaScript and Web development
- You are familiar with basics of React
- You are interested in React Native
You did initial setup sent over by email and have Hello World app running
Why React native?
- Amazing DX close to Web development
- Shared codebase
- NPM/Yarn, bundlers, modern JS/Typescript, State management
The idea
React Native combines the best parts of native development with React. You can use React Native today in your existing Android and iOS projects or you can create a whole new app from scratch.
- Written in JavaScript—rendered with native code
- Easy to write native code and integrate in React Native app
- Get updates instantly with Fast refresh
Motivation
- Code reuse between platforms
- Smaller dev team is able to handle multiple platforms (Android/iOS/Web)
- Shared logic and ecosystem
- Declarative and more functional programming style
- Styling using modern CSS techniques in mobile apps
Architecture
React
JavaScript
JSC
Bridge
Shadow tree
JSON
Native Modules
Native
Threading model
-
UIManager Thread - Responsible for the native side.
- The main thread where app is running.
- Has access to UI
- JS Thread - Run all bundled main.bundle.js file
- Shadow Thread - Does the whole recalculation
- Native modules thread - platform apis
Execution flow
Start
Main Thread
load .js bundles and send to JS thread
React
Reconciler generates new VDOM layout
JS Thread
layout calculations
using Yoga

UI
updates
Shadow thread
Native modules
React Native re-architecture

How to get started
npx react-native init WhatsappProject
Debugging
Errors and warnings


Errors and warnings
Yellow and Red boxes are disabled in production
To disable them in development:

Application layout
/android - folder that stores Android native code
/ios - folder that stores Android native code
app.json - simulates Expo like config. Basically is imported by index.js
index.js - Entry point of application

AppRegistry registers app with native modules
React Native components
Excercise 1
Create Screens
Clone the repo:
Follow the instructions for Excercise 1 in the Readme.md
Styling in React Native
Style names and values usually match how CSS works (except transforms) except instead of kebab-case using camelCase.


Flexbox
container: {
flex: 1,
},
box1: {
flex: 1,
backgroundColor: 'red',
},
<View style={styles.container}>
<View style={styles.box1} />
</View>
container: {
flex: 1,
},
box1: {
flex: 1,
backgroundColor: 'red',
},
box2: {
flex: 1,
backgroundColor: 'orange',
},
<View style={styles.container}>
<View style={styles.box1} />
<View style={styles.box2} />
</View>

container: {
flex: 1,
},
box1: {
flex: 1,
backgroundColor: 'red',
},
box2: {
flex: 2,
backgroundColor: 'orange',
},
<View style={styles.container}>
<View style={styles.box1} />
<View style={styles.box2} />
</View>


Flexbox
container: {
flex: 1,
},
box1: {
flex: 1,
backgroundColor: 'red',
},
box2: {
flex: 2,
backgroundColor: 'orange',
},
<View style={styles.container}>
<View style={styles.box1} />
<View style={styles.box2} />
</View>


flex-direction establishes the main axis
In React Native default flex-direction is column
Excercise 2
Style screen Layout
Continue from Excercise 1 solution
Clone step1 branch in the same repo
Follow the instructions for Excercise 2 in the Readme.md
or
Images

Static resources can be auto sized
Dynamic resources need to have size provided
Image resize modes
<Image
style={{
width: 51,
height: 51,
resizeMode: Image.resizeMode.contain,
}}
source={{
uri:'data:image/png;base64,iVBORw0KGg...',
}}
/>
cover - will take max value of either width or height and scale uniformly (maintain aspect ratio)
contain - will take min value of either width or height and scale uniformly (maintain aspect ratio)
Image resize modes
stretch - scale width and height independently without conforming to aspect ratio
repeat - repeat the image to cover the frame of the view. image will keep size and aspect ratio
Icons - Android
react-native-vector-icons
rm -rf android/app/build
<Icon
name="chat"
color="#fff"
size={23}
style={{ padding: 5 }}
/>
Icons - iOS
react-native-vector-icons
rm -rf android/ios/buildadd to Info.plist
	<key>UIAppFonts</key>
	<array>
	<string>AntDesign.ttf</string>
	<string>Entypo.ttf</string>
	<string>EvilIcons.ttf</string>
	<string>Feather.ttf</string>
	<string>FontAwesome.ttf</string>
	<string>FontAwesome5_Brands.ttf</string>
	<string>FontAwesome5_Regular.ttf</string>
	<string>FontAwesome5_Solid.ttf</string>
	<string>Foundation.ttf</string>
	<string>Ionicons.ttf</string>
	<string>MaterialIcons.ttf</string>
	<string>MaterialCommunityIcons.ttf</string>
	<string>SimpleLineIcons.ttf</string>
	<string>Octicons.ttf</string>
	<string>Zocial.ttf</string>
	</array>
</dict><Icon
name="chat"
color="#fff"
size={23}
style={{ padding: 5 }}
/>
Dimensions
Lists


Exercise 3
Continue styling
Continue from Excercise 2 solution
Clone step2 branch in the same repo
Follow the instructions for Excercise 3 in the Readme.md
or
Networking

Input and Keyboard

Exercise 4
API and Input
Continue from Excercise 3 solution
Clone step3 branch in the same repo
Follow the instructions for Exercise 4 in the Readme.md
or
Navigation setup
npm install @react-navigation/nativenpm install react-native-reanimated react-native-gesture-handler react-native-screens react-native-safe-area-context @react-native-community/masked-viewnpx pod-install iosStack Navigator
npm install @react-navigation/stack


Instead specifying component you can use render callback
Navigating

Passing params

Second argument passed to navigate will be accessible on route.params inside screen component
You can also pass initialParams to a screen
Screen can update its params by using
navigation.setParamsMore on params: https://reactnavigation.org/docs/params
Navigation Headers
Configuring headers: https://reactnavigation.org/docs/headers
Changing Header buttons:

Exercise 5
Navigation
Continue from Excercise 4 solution
Clone step4 branch in the same repo
Follow the instructions for Exercise 5 in the Readme.md
or
Animations

Create animated value
Create custom Animated component or use Animated.View
Animations
Add animated value as style
Trigger animation

Interpolate on value if needed
Exercise 6
Animations
Continue from Excercise 5 solution
Clone step5 branch in the same repo
Follow the instructions for Exercise 6 in the Readme.md
or
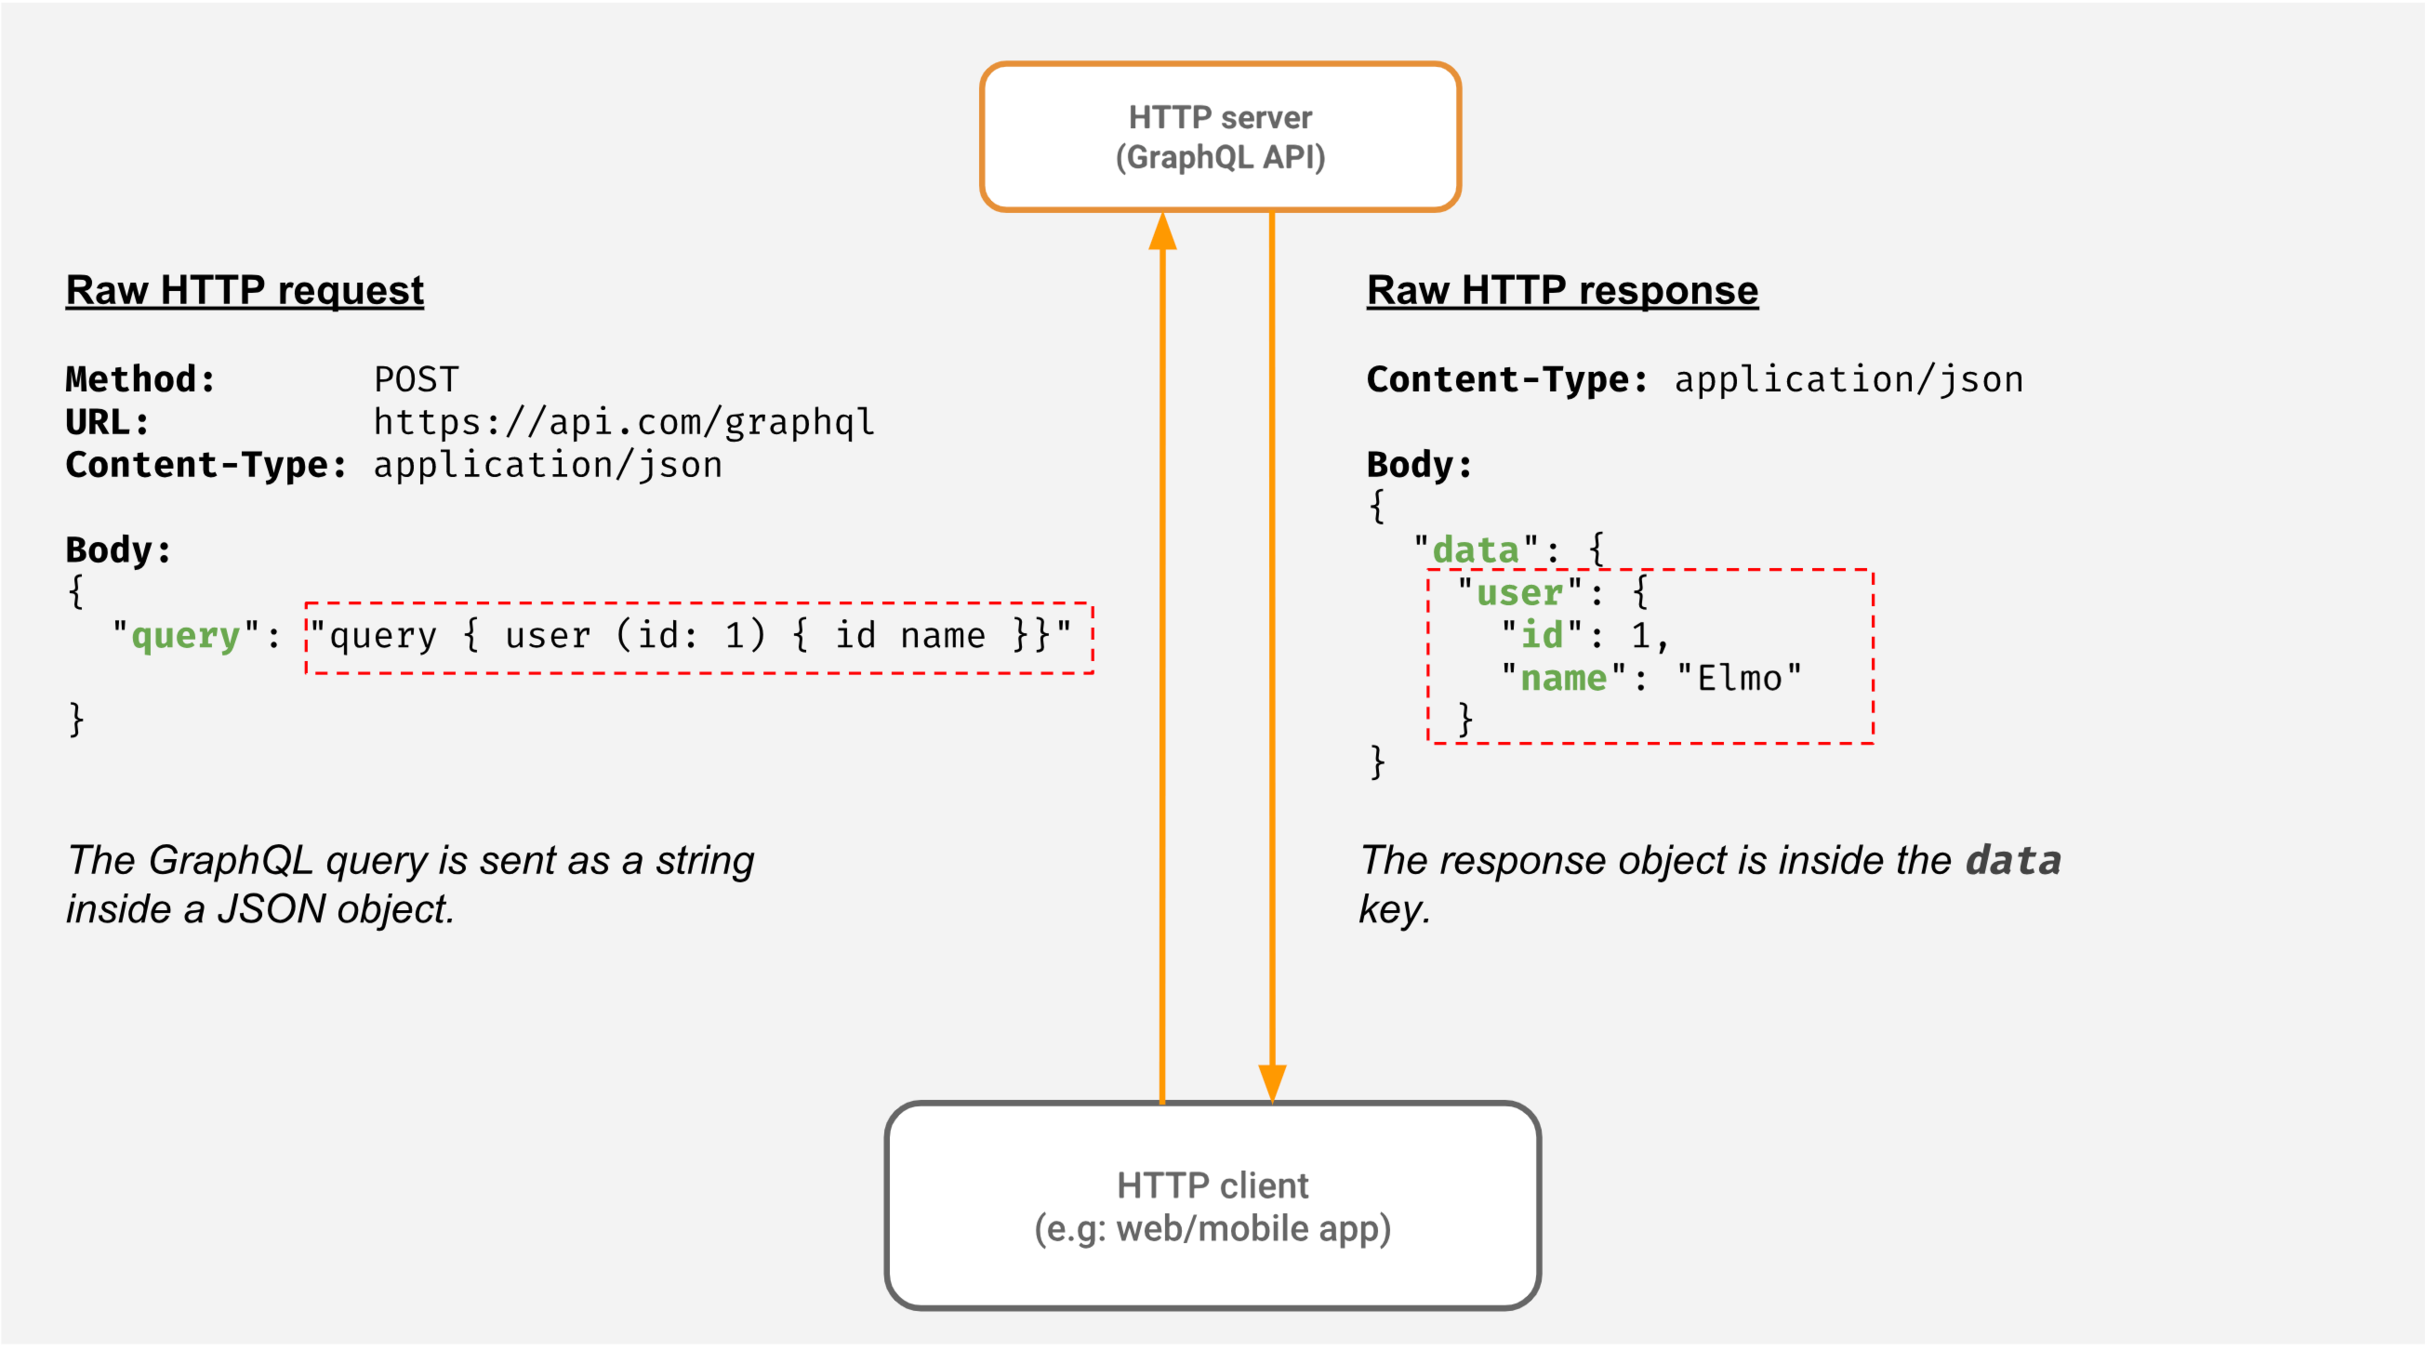
GraphQL
A query language for your API

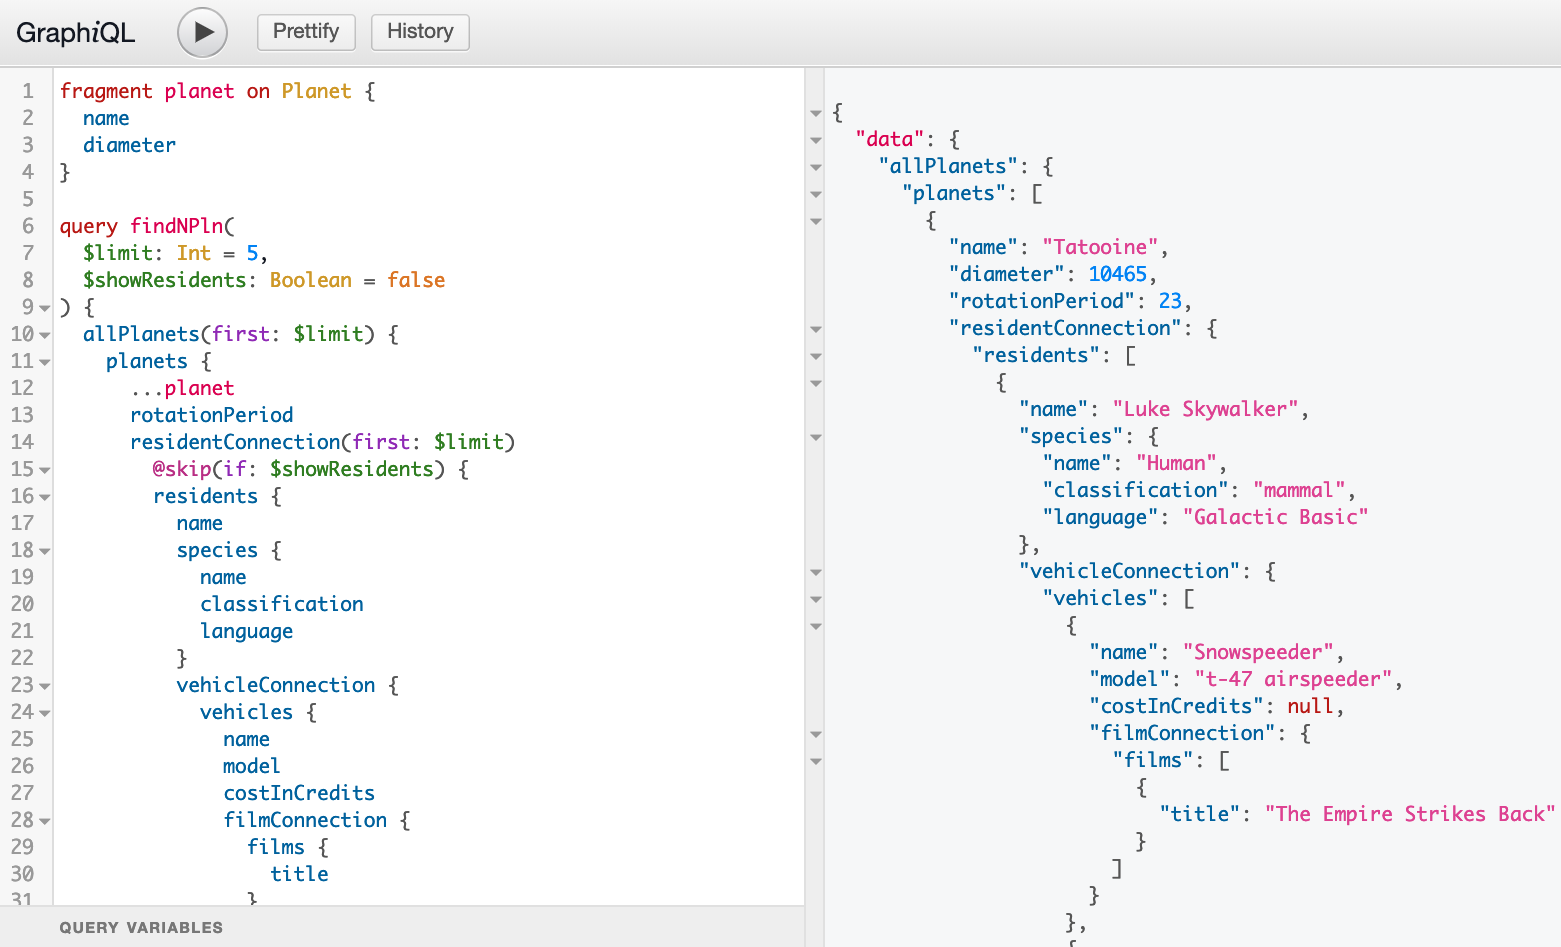
How does it look like
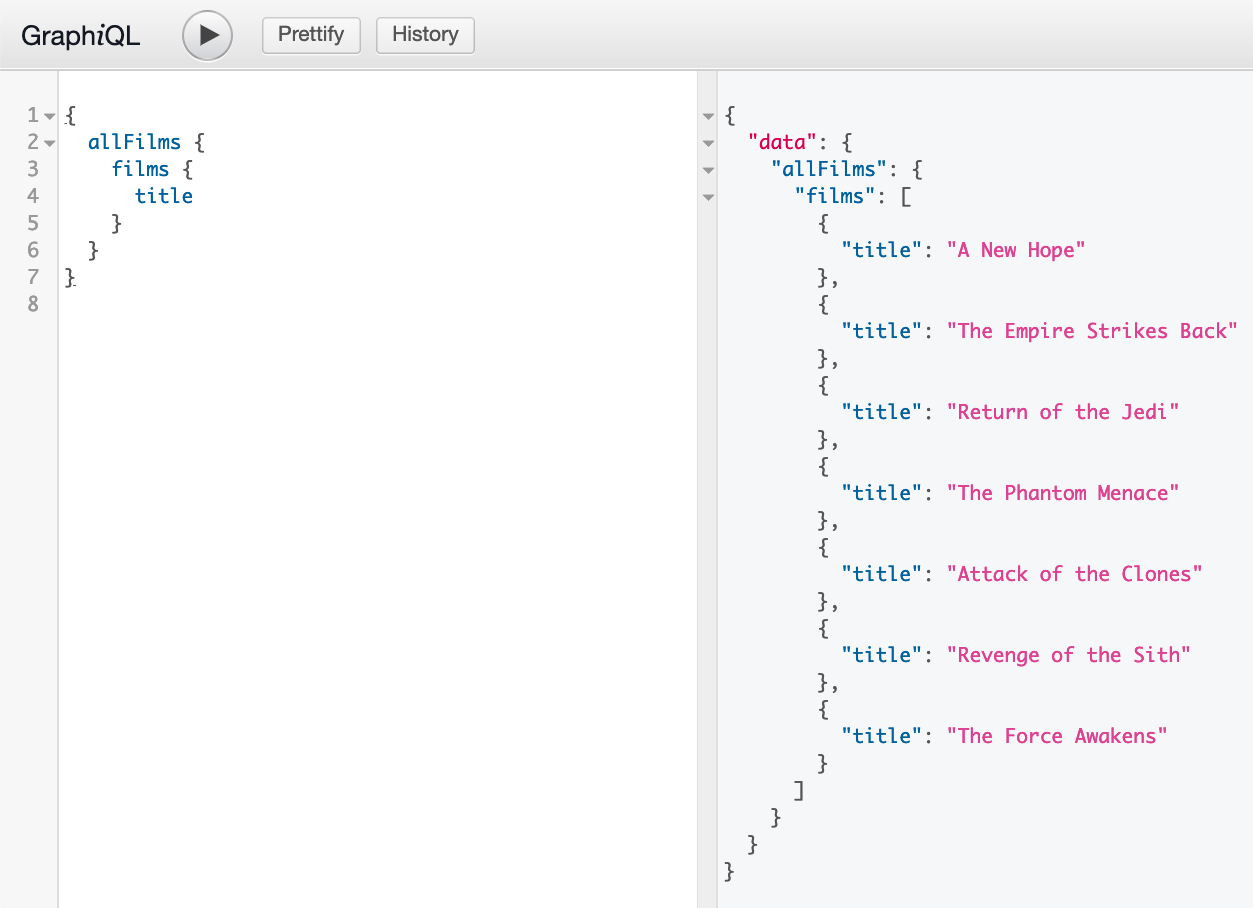
How does it look like
GraphQL SDL
type Post {
title: String!
content: String!
user: User!
}
type Person {
name: String!
address: String
posts: [Post!]!
}
GraphQL SDL
type Post {
title: String!
content: String!
user: User!
}
type Person {
name: String!
address: String
posts: [Post!]!
}
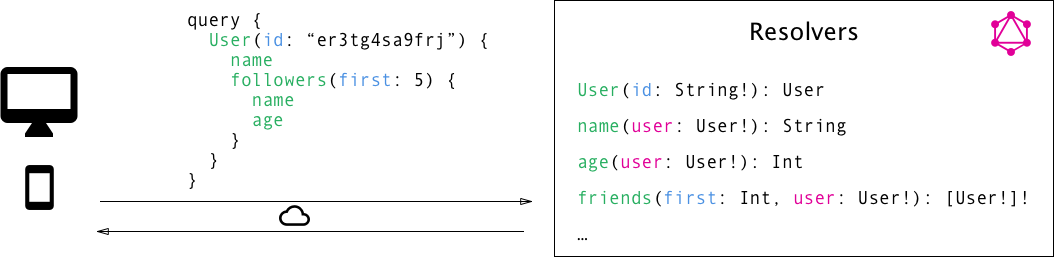
GraphQL Resolvers
What about GraphQL client?
import {ApolloClient, InMemoryCache, split, HttpLink} from '@apollo/client';
import {getMainDefinition} from '@apollo/client/utilities';
import {WebSocketLink} from '@apollo/client/link/ws';

// Create an http link:
const httpLink = new HttpLink({
  uri: 'endpoint url',
});

// Create a WebSocket link:
const wsLink = new WebSocketLink({
  uri: 'endpoint url',
  options: {
    reconnect: true,
  },
});

// The split function takes three parameters:
//
// * A function that's called for each operation to execute
// * The Link to use for an operation if the function returns a "truthy" value
// * The Link to use for an operation if the function returns a "falsy" value
const splitLink = split(
  ({query}) => {
    const definition = getMainDefinition(query);
    return (
      definition.kind === 'OperationDefinition' &&
      definition.operation === 'subscription'
    );
  },
  wsLink,
  httpLink,
);

const cache = new InMemoryCache();
const client = new ApolloClient({
  // Provide required constructor fields
  cache: cache,
  link: splitLink,
});

export default client;
Executing subscriptions and mutations
import {useSubscription, gql, useMutation} from '@apollo/client';

const GET_MESSAGES_BY_ID = gql`
  subscription getMessagesById($conversationId: uuid) {
    messages(where: {conversation_id: {_eq: $conversationId}}) {
      id
      message
      userId: user_id
    }
  }
`;

const POST_MESSAGE = gql`
  mutation postMessageForUserId(
    $userId: uuid
    $conversationId: uuid
    $message: String!
  ) {
    insert_messages(
      objects: {
        user_id: $userId
        conversation_id: $conversationId
        message: $message
      }
    ) {
      returning {
        message
      }
    }
  }
`;


///
//
export const ChatViewScreen = ({navigation}) => {
  const {id: conversationId} = route.params;
  const {loading, data, error} = useSubscription(GET_MESSAGES_BY_ID, {
    variables: {conversationId},
  });

  const [postMessage, {data: mutationData}] = useMutation(POST_MESSAGE);


  <Compose
  submit={(message) =>
  postMessage({
    variables: {
      userId: MY_USER,
      conversationId,
      message,
    },
  })
}
/>
Exercise 7
GraphQL and realtime
Continue from Excercise 6 solution
Clone step6 branch in the same repo
Follow the instructions for Exercise 7 in the Readme.md
or
Thank you
@VladimirNovick