ReactJS & Express 를 이용한
웹 어플리케이션 개발하기
public.velopert@gmail.com
https://velopert.com/
Minjun Kim
http://bit.ly/ReactCodelab
https://goo.gl/tBzDB6
SLACK 초대
https://bit.ly/reactworkspace
작업환경 설정
슬라이드 링크 (LIVE)
오늘의 목표
오늘 배우게 될 것
React Fundamentals
Redux
Express
MongoDB
mongoose
Webpack
ES6
오늘 만들 프로젝트들
전화번호부
카운터 (Redux)
무한 스크롤형 메모패드
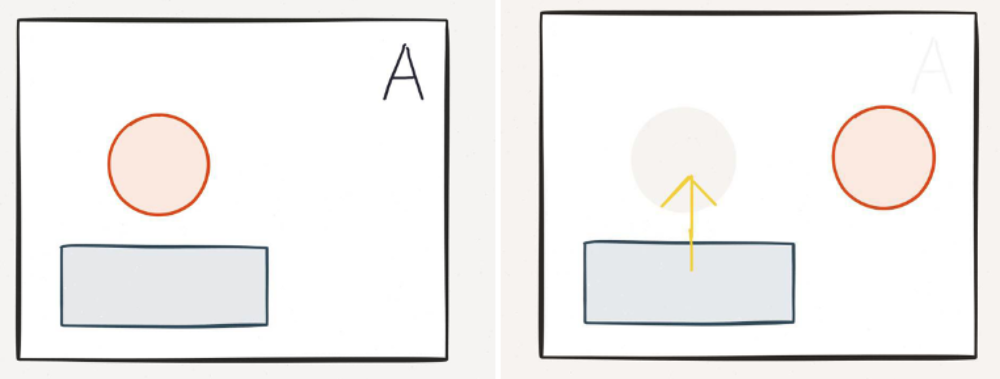
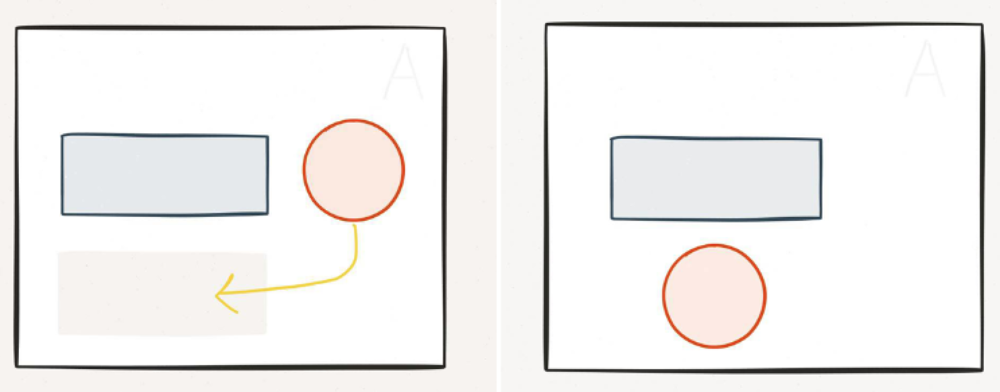
JavaScript 어플리케이션을 어떻게 구조화 할까?
agility.js · angularjs · aria temmplates
backbone.js · batman.js · bolt · canjs · chaplin + brunch
closure · cujo.js · dart · derby · dermis · dijon · dojo · due
ember.js · epitome · ext.js · funnyface.js · gwt · kendo ui
knockback.js · knockoutjs · maria · marionette · meteor
montage · olives · plastronjs · puremvc · rappid.js
sammy.js · serenade.js · socketstream;soma.js · spine
stapes, yui ...
또 다른 프레임워크를 배워야하나!
프레임워크가 아닌 라이브러리
frame; 틀
"A Javascript Library for Building User Interfaces"
Angular를 대체 할 수 있을까?
Virtual DOM
// JQUERY
$("#content").html("whatever");

// JAVASCRIPT
document.getElementById("content").innerHTML = "whatever";
{
name: "velopert",
point: 100,
eyeColor: black,
nation: "ROK"
}React 의 장점?
배우기 간단하다
controller
directive
template
global event listener
model
view model

뛰어난
Garbage Collection
메모리 관리
성능
서버 & 클라이언트 렌더링
초기 구동 딜레이 & SEO (검색엔진최적화)
매우 간편한 UI 수정 및 재사용
페이스북이 밀어준다

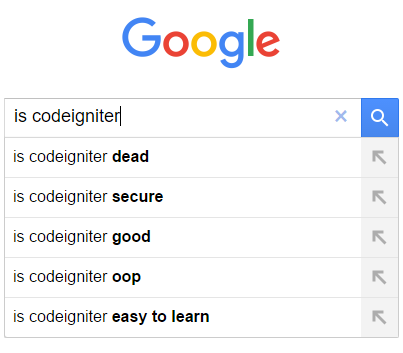
CodeIgniter의 몰락
다른 프레임워크나
라이브러리와 혼용가능
React 의 단점!
VIEW ONLY
IE8 이하 지원 X
Let's Code!

설정과정 생략 - 링크: bit.ly/ReactCodePen
JSX
JSX
XML-like syntax 를 native JavaScript 로 변경해줍니다.
" " 로 감싸지 않습니다.
( ) 를 사용하지 않아도 오류는 발생 하지 않지만 가독성을 위하여 사용합시다.
var a = (
    <div>
        Welcome to <b>React CodeLab</b>
    </div>
);
"use strict";
var a = React.createElement(
"div",
null,
"Welcome to ",
React.createElement(
"b",
null,
"React.js CodeLab"
)
);class Codelab extends React.Component {
render() {
return (
<div>
<h1>Hello React</h1>
</div>
)
}
}
class App extends React.Component {
render() {
return (
<Codelab/>
);
}
};
ReactDOM.render(
<App></App>,
document.getElementById("root")
);<div id="root"></div>JSX
1. Nested Element
/* 에러 발생 코드 */

render() {
    return (
        <h1>Hi</h1>
        <h2>I am Error</h2>
    )
}

/* 컴포넌트에서 여러 Element를 렌더링 할 때
      꼭 container element 안에 포함시켜주세요 */

render() {
    return (
        <div>
            <h1>Hi</h1>
            <h2>Yay! Error is gone.</h2>
        </div>
    )
}
JSX
2. JavaScript Expression
/* JSX 안에서 JavaScript를 표현하는 방법은 간단합니다.
    그냥 { } 로 wrapping 하면 됩니다. */


render() {
    let text = "Hello React!";
    return (
        <div>{text}</div>
    );
}

/* If Else 문은 JSX에서 사용불가
    이에 대한 대안은 tenary expression
        condition ? true : false */

render() {
    return (
        <p>{ 1==1 ? 'True' : ' False' }</p>
    );
}JSX
3. Inline Style
/* JSX 안에서 style 을 설정 할때는, string 형식을 사용하지 않고
    key 가 camelCase 인 객체가 사용됩니다. */

render() {
    let style = {
        color: 'aqua',
        backgroundColor: 'black'
    };

    return (
        <div style={style}>React CodeLab</div>
    );
}

/* JSX 안에서 class 를 설정 할 때는 class= 가 아닌 className= 을 사용하세요. */
render() {
    return (
        <div className="box">React CodeLab</div>
    );
}
JSX
4. Comments
/* JSX 안에서 주석을 작성 할 때는
       {  /* ... */  }
    형식으로 작성하세요.

    주의 하실점은 이 역시 Nested Element 부분에 설명했던것과 같이
    container element 안에 주석이 작성되어야 합니다. */

render() {
    return (
        <div>
            { /* This is How You Comment */ }
            { /* Multi-line
                    Testing */ }
                React CodeLab
        </div>
    );
}
props & state
props
-
컴포넌트 내부의 Immutable Data
-
JSX 내부에 { this.props.propsName }
-
컴포넌트를 사용 할 때, < > 괄호 안에 propsName="value"
-
this.props.children 은 기본적으로 갖고있는 props로서, <Cpnt>여기에 있는 값이 들어간다.</Cpnt>
class Codelab extends React.Component {
  render() {
    return (
      <div>
        <h1> Hello {this.props.name}</h1>
        <div>{this.props.children}</div>
       </div>
    );
  }
}

class App extends React.Component {
  render() {
   return (
     <Codelab name={this.props.name}>
      {this.props.children}
     </Codelab>
   );
  }
}

ReactDOM.render(
  <App name="velopert">Hi!!!!</App>,
  document.getElementById('root')
);
기본 값 설정
class App extends React.Component {
    render() {
        return (
            <div>{this.props.value}</div>
        );
    }
};

App.defaultProps = {
    value: 0
};
Component.defaultProps = { ... }
Type 검증
class App extends React.Component {
    render() {
        return (
            <div>
                 {this.props.value}
                 {this.props.secondValue}
                 {this.props.thirdValue}
            </div>
        );
    }
};

App.propTypes = {
    value: React.PropTypes.string,
    secondValue: React.PropType.number,
    thirdValue: React.PropTypes.any.isRequired
};Component.propTypes = { ... }
적용하기
class Codelab extends React.Component {
    render() {
        return (
            <div>
                <h1>Hello {this.props.name}</h1>
                <h2>{this.props.number}</h2>
                <div>{this.props.children}</div>
            </div>
        )
    }
}

Codelab.defaultProps = {
    name: "Unknown"
};

Codelab.propTypes = {
    number: React.PropTypes.number.isRequired
}

class App extends React.Component {
    render() {
        return (
            <Codelab name={this.props.name}></Codelab>
        );
    }
}

ReactDOM.render(
    <App/>,
    document.getElementById("root")
);state
-
유동적인 데이터
-
JSX 내부에 { this.state.stateName }
-
초기값 설정이 필수, 생성자(constructor) 에서
this.state = { } 으로 설정 -
값을 수정 할 때에는 this.setState({ val: 'new_val' }), 렌더링 된 다음엔 this.state = 절대 사용하지 말것
class Counter extends React.Component {
  constructor(props) {
    super(props);
    this.state = { value: 0 }
    this.handleClick= this.handleClick.bind(this);
  }

  handleClick() {
    this.setState({value: this.state.value+1})
  }

  render() {
    return(
      <div>
        <h4>Value: {this.state.value}</h4>
        <button onClick={this.handleClick}>TICK</button>
      </div>
      );
  }
}

class App extends React.Component {
  render() {
    return (
      <Counter/>
    );
  }
};

ReactDOM.render(
  <App></App>,
  document.getElementById("root")
);<div ng-controller="repeatController">
I have {{friends.length}} friends. They are:
<input type="search" ng-model="q" placeholder="filter friends..."
aria-label="filter friends" />
<ul class="example-animate-container">
<li class="animate-repeat" ng-repeat="friend in friends | filter:q as results">
[{{$index + 1}}] {{friend.name}} who is {{friend.age}} years old.
</li>
<li class="animate-repeat" ng-if="results.length == 0">
<strong>No results found...</strong>
</li>
</ul>
</div>In Angular..
JavaScript - Map
"map() 메소드는 파라미터로 전달 된 함수를 통하여 배열 내의 각 요소를 처리해서 그 결과로 새로운 배열을 생성합니다."
arr.map(callback, [thisArg])callback 새로운 배열의 요소를 생성하는 함수로서, 다음 세가지 인수를 가집니다.
currentValue 현재 처리되고 있는 요소
index 현재 처리되고 있는 요소의 index 값
array 메소드가 불려진 배열
thisArg (선택항목) callback 함수 내부에서 사용 할 this 값을 설정
var numbers = [1, 2, 3, 4, 5];

var processed = numbers.map(function(num){
    return num*num;
});
결과: [1, 4, 9, 16, 25]
/* ES6 Syntax */

let numbers = [1, 2, 3, 4, 5];

let result = numbers.map((num) => {
    return num*num;
});
arrow function ( ... ) => { ... }
컴포넌트 매핑
Contact 컴포넌트
class Contact extends React.Component {
    render() {
        return (
            /* 하드 코딩 */
            <div>
              <h1>Contacts</h1>
              <div>
                <div>Abet 010-0000-0001</div> /* 반복되는 부분 */
                <div>Betty 010-0000-0002</div>
                <div>Charlie 010-0000-0003</div>
                <div>David 010-0000-0004</div>
              </div>
            </div>
        );
    }
}
ContactInfo 컴포넌트
class ContactInfo extends React.Component {
    render() {
        return (
            <div>
                {this.props.contact.name} {this.props.contact.phone}
            </div>
        )
    }
};
Contact 컴포넌트
class Contact extends React.Component {
    constructor(props) {
        super(props);
        this.state = {
            contactData: [{
                name: 'Abet',
                phone: '010-0000-0001'
            }, {
                name: 'Betty',
                phone: '010-0000-0002'
            }, {
                name: 'Charlie',
                phone: '010-0000-0003'
            }, {
                name: 'David',
                phone: '010-0000-0004'
            }]
        };
    }

/*....생략....*/
state 만들기
Contact 컴포넌트
/*...생략...*/

    render() {
        const mapToComponents = (data) => {
            return data.map((contact, i) => {
                return (<ContactInfo contact={contact} key={i}/>);
            })
        }

/*...생략...*/
rendering 내부에 메소드 생성
Contact 컴포넌트
/*...생략...*/

        return (
            <div>
                <h1>Contacts</h1>
                <div>{mapToComponents(this.state.contactData)}</div>
                </div>
            )
        }

/*...생략...*/
메소드 사용하기
class ContactInfo extends React.Component {
    render() {
        return (
            <div>{this.props.contact.name} {this.props.contact.phone}</div>
        )
    }
};

class Contact extends React.Component {
    constructor(props) {
        super(props);
        this.state = {
            contactData: [{
                name: 'Abet',
                phone: '010-0000-0001'
            }, {
                name: 'Betty',
                phone: '010-0000-0002'
            }, {
                name: 'Charlie',
                phone: '010-0000-0003'
            }, {
                name: 'David',
                phone: '010-0000-0004'
            }]
        };
    }

    render() {
        const mapToComponents = (data) => {
            return data.map((contact, i) => {
                return (<ContactInfo contact={contact} key={i}/>);
            })
        }

        return (
            <div>
                <h1>Contacts</h1>
                <div>{mapToComponents(this.state.contactData)}</div>
                </div>
            )
        }
    };

}
class App extends React.Component {
    render() {
        return (
            <Contact/>
        );
    }
};

ReactDOM.render(
    <App></App>,
        document.getElementById("root")
);Goodbye, Codepen.
Global Dependency 설치
- webpack: 브라우저 위에서 import(require) 를 할 수 있게 해주고 자바스크립트 파일들을 하나로 합쳐줍니다
- webpack-dev-server: 별도의 서버를 구축하지 않고도 static 파일을 다루는 웹서버를 열 수 있으며 hot-loader 를 통하여 코드가 수정 될 때마다 자동으로 리로드 되게 할 수 있습니다.
$ sudo npm install -g webpack webpack-dev-server프로젝트 생성
$ mkdir react-fundamentals
$ cd react-fundamentals
$ npm init
Dependency 및 Plugin 설치
React 설치
npm install --save react react-dom개발 의존 모듈 설치
npm install --save-dev react-hot-loader webpack webpack-dev-server
npm install --save-dev babel-core babel-loader babel-preset-es2015 babel-preset-react
wget https://github.com/velopert/react-codelab-fundamentals/releases/download/1.0/node_modules.zip
unzip node_modules.zip -d node_modules너무 오래 걸린다면..
{
"name": "codelab",
"version": "1.0.0",
"main": "index.js",
"scripts": {
"dev-server": "webpack-dev-server"
},
"author": "",
"license": "ISC",
"description": "",
"dependencies": {
"react": "^15.2.1",
"react-dom": "^15.2.1"
},
"devDependencies": {
"babel-core": "^6.9.1",
"babel-loader": "^6.2.4",
"babel-preset-es2015": "^6.9.0",
"babel-preset-react": "^6.5.0",
"react-hot-loader": "^1.3.0",
"webpack": "^1.13.1",
"webpack-dev-server": "^1.14.1"
}
}package.json
webpack 설정하기
var webpack = require('webpack');
module.exports = {
entry: './src/index.js',
output: {
path: __dirname + '/public/',
filename: 'bundle.js'
},
devServer: {
hot: true,
inline: true,
host: '0.0.0.0',
port: 4000,
contentBase: __dirname + '/public/',
},
module: {
loaders: [
{
test: /\.js$/,
loader: 'babel',
exclude: /node_modules/,
query: {
cacheDirectory: true,
presets: ['es2015', 'react']
}
}
]
},
plugins: [
new webpack.HotModuleReplacementPlugin()
]
}
/webpack.config.js
HTML 및 JS 작성
<!DOCTYPE html>
<html>
<head>
<meta charset="UTF-8">
<title>React App</title>
</head>
<body>
<div id="root"></div>
<script src="bundle.js"></script>
</body>
</html>/public/index.html
HTML 및 JS 작성
import React from 'react';
class App extends React.Component {
render(){
return (
<h1>Hello React Skeleton</h1>
);
}
}
export default App;/src/components/App.js
HTML 및 JS 작성
import React from 'react';
import ReactDOM from 'react-dom';
import App from './components/App';
const rootElement = document.getElementById('root');
ReactDOM.render(<App />, rootElement);/src/index.js 작성
개발서버 실행 스크립트
/* .. 생략 .. */
"scripts": {
"dev-server": "webpack-dev-server"
},
/* .. 생략 .. *//package.json
npm run dev-serverwebpack 설정파일 수정
module: {
loaders: [
{
test: /\.js$/,
loaders: ['react-hot', 'babel?' + JSON.stringify({
cacheDirectory: true,
presets: ['es2015', 'react']
})],
exclude: /node_modules/,
}
]
},
/* PREVIOUS STATE
module: {
loaders: [
{
test: /\.js$/,
loader: 'babel',
exclude: /node_modules/,
query: {
cacheDirectory: true,
presets: ['es2015', 'react']
}
}
]
},
*//webpack.config.js
git clone https://github.com/velopert/react-codelab-fundamentals.git
cd react-codelab-fundamentals
npm install # 혹은 이전 디렉토리에서 node_modules 디렉토리 이동Time to Code, Again.
src/components/ContactInfo.js
import React from 'react';
export default class ContactInfo extends React.Component {
render() {
return (
<div>{this.props.contact.name} {this.props.contact.phone}</div>
);
}
}
src/components/Contact.js
import React from 'react';
import ContactInfo from './ContactInfo';
export default class Contact extends React.Component {
constructor(props) {
super(props);
this.state = {
contactData: [{
name: 'Abet',
phone: '010-0000-0001'
}, {
name: 'Betty',
phone: '010-0000-0002'
}, {
name: 'Charlie',
phone: '010-0000-0003'
}, {
name: 'David',
phone: '010-0000-0004'
}]
};
}
render() {
const mapToComponents = (data) => {
return data.map((contact, i) => {
return (<ContactInfo contact={contact} key={i}/>);
});
};
return (
<div>
<h1>Contacts</h1>
<div>{mapToComponents(this.state.contactData)}</div>
</div>
);
}
}
src/components/App.js
import React from 'react';
import Contact from './Contact';
class App extends React.Component {
render(){
return (
<Contact/>
);
}
}
export default App;
CHECKPOINT
# 에러를 겪었을경우 새 branch를 만든다
git checkout -b error01
git add .
git commit -m"some errors need to be fixed"
# 이렇게 만든 branch는 나중에 git checkout error01 로 돌아와서 수정할수있다. 일단 그건 나중으로 미루자!
# 지금 강좌에서 진행되고 있는 체크포인트로 체크아웃하자! 일단 오류는 해결하고 강좌를 따라오자.
git checkout contact01
검색 기능
src/components/Contact.js
constructor(props) {
super(props);
this.state = {
keyword: "",
/* 코드생략 */
};
this.handleChange = this.handleChange.bind(this); // 메소드 바인딩
}
handleChange(e) {
this.setState({
keyword: e.target.value
});
}handleChange 메소드 작성
input 렌더링
<h1>Contacts</h1>
<input name="keyword" placeholder="Search"
value={this.state.keyword} onChange={this.handleChange}/>JavaScript Array Functions
const mapToComponents = (data) => {
data.sort();
data = data.filter(
(contact) => {
return contact.name.toLowerCase()
.indexOf(this.state.keyword.toLowerCase()) > -1;
}
);
return data.map((contact, i) => {
return (<ContactInfo contact={contact} key={i}/>);
});
};Contact.js - render()
CHECKPOINT
# 에러를 겪었을경우 새 branch를 만든다
git checkout -b error02
git add .
git commit -m"some errors need to be fixed"
# 이렇게 만든 branch는 나중에 git checkout error02 로 돌아와서 수정할수있다. 일단 그건 나중으로 미루자!
# 지금 강좌에서 진행되고 있는 체크포인트로 체크아웃하자! 일단 오류는 해결하고 강좌를 따라오자.
git checkout contact02
선택 기능
ContactInfo.js
name 만 보여주자
render() {
return (
<div>{this.props.contact.name}</div>
);
}Contact.js
handleClick 메소드
constructor(props) {
....
this.state = {
selectedKey: -1,
....
}
this.handleChange =this.handleChange.bind(this);
this.handleClick = this.handleClick.bind(this);
}
handleChange(e) { ... }
handleClick(key) {
this.setState({
selectedKey: key
});
console.log(key, 'is selected');
}Contact.js
컴포넌트 매핑 부분 수정
return data.map((contact, i) => {
return (<ContactInfo
contact={contact}
key={i}
onClick={ () => { this.handleClick(i) } }
/>);
});ContactInfo.js
전달받은 onClick 사용하게 하기
render() {
return (
<div onClick={this.props.onClick}>{this.props.contact.name}</div>
);
}src/components/ContactDetails.js
컴포넌트 파일 생성
import React from 'react';
export default class ContactDetails extends React.Component {
render() {
// 선택되었을 때 보여질 부분
const details = (
<div>
<p>{ this.props.contact.name }</p>
<p>{ this.props.contact.phone }</p>
</div>
);
// 아무것도 선택되지 않았을 때 보여질 부분
const blank = (
<div> Nothing is Selected </div>
);
return(
<div>
<h2>Details</h2>
{ /* isSelected props 값에 따라 어떤걸 보여줄지 정한다
ternary expression condition ? true : false */ }
{ this.props.isSelected ? details : blank }
</div>
);
}
}
ContactDetails.defaultProps = {
contact: {
name: "",
phone: ""
}
}Contact.js
ComponentDetails 컴포넌트 import / render
import React from 'react';
import ContactInfo from './ContactInfo';
import ContactDetails from './ContactDetails';
/* .. */
render() {
/*...*/
return (
<div>
<h1>Contacts</h1>
<input name="keyword" placeholder="Search"
value={this.state.keyword} onChange={this.handleChange}/>
<div>{mapToComponents(this.state.contactData)}</div>
<ContactDetails
contact={this.state.contactData[this.state.selectedKey]}
isSelected={this.state.selectedKey!=-1}/>
</div>
);
/*...*/Contact.js
ComponentDetails 컴포넌트 import / render
import React from 'react';
import ContactInfo from './ContactInfo';
import ContactDetails from './ContactDetails';
/* .. */
render() {
/*...*/
return (
<div>
<h1>Contacts</h1>
<input name="keyword" placeholder="Search"
value={this.state.keyword} onChange={this.handleChange}/>
<div>{mapToComponents(this.state.contactData)}</div>
<ContactDetails
contact={this.state.contactData[this.state.selectedKey]}
isSelected={this.state.selectedKey!=-1}/>
</div>
);
/*...*/CHECKPOINT
# 에러를 겪었을경우 새 branch를 만든다
git checkout -b error03
git add .
git commit -m"some errors need to be fixed"
# 이렇게 만든 branch는 나중에 git checkout error03 로 돌아와서 수정할수있다. 일단 그건 나중으로 미루자!
# 지금 강좌에서 진행되고 있는 체크포인트로 체크아웃하자! 일단 오류는 해결하고 강좌를 따라오자.
git checkout contact03State 내부 배열 처리..
this.setState({
list: this.state.list.concat(newObj)
})npm install --save react-addons-updateimport update from 'react-addons-update'원소 추가
this.setState({
list: update(
this.state.list,
{
$push: [newObj, newObj2]
}
});원소 제거
this.setState({
list: update(
this.state.list,
{
$splice: [[index, 1]]
}
});원소 수정
this.setState({
list: update(
this.state.list,
{
[index]: {
field: { $set: "value" },
field2: { $set: "value2" }
}
}
});데이터 추가 기능
src/components/Contact.js
데이터 추가/삭제/수정 메소드 만들기
import React from 'react';
import ContactInfo from './ContactInfo';
import ContactDetails from './ContactDetails';
import update from 'react-addons-update';
export default class Contact extends React.Component {
constructor(props) {
/* ... */
this.handleChange = this.handleChange.bind(this);
this.handleClick = this.handleClick.bind(this);
this.handleCreate = this.handleCreate.bind(this);
this.handleRemove = this.handleRemove.bind(this);
this.handleEdit = this.handleEdit.bind(this);
}
/* ... */
handleCreate(contact) {
this.setState({
contactData: update(
this.state.contactData,
{ $push: [contact] }
)
});
}
handleRemove() {
this.setState({
contactData: update(
this.state.contactData,
{ $splice: [[this.state.selectedKey, 1]] }
)
});
}
handleEdit(name, phone) {
this.setState({
contactData: update(
this.state.contactData,
{
[this.state.selectedKey]: {
name: { $set: name },
phone: { $set: phone }
}
}
)
});
}
/* ... */src/components/ContactCreate.js
컴포넌트 파일 생성
import React from 'react';
export default class ContactCreate extends React.Component {
constructor(props) {
super(props);
}
render() {
return (
<div>
<h2>Create Contact</h2>
<p>
<input type="text" name="name" placeholder="name"/>
<input type="text" name="phone" placeholder="phone"/>
</p>
<button>Create</button>
</div>
)
}
}ContactCreate.js
input 박스 state 값 설정
import React from 'react';
export default class ContactCreate extends React.Component {
constructor(props) {
super(props);
this.state = {
name: '',
phone: ''
}
this.handleChange = this.handleChange.bind(this);
}
handleChange(e) {
let nextState = {};
nextState[e.target.name] = e.target.value;
this.setState(nextState);
}
render() {
return (
<div>
<h2>Create Contact</h2>
<p>
<input type="text" name="name" placeholder="name"
value={this.state.name} onChange={this.handleChange}/>
<input type="text" name="phone" placeholder="phone"
value={this.state.phone} onChange={this.handleChange}/>
</p>
<button>Create</button>
</div>
)
}
}ContactCreate.js
버튼 클릭
/*...*/
constructor(props) {
/*...*/
this.handleClick = this.handleClick.bind(this);
}
handleChange(e) { /*...*/ }
handleClick() {
const contact = {
name: this.state.name,
phone: this.state.phone
};
this.props.onCreate(contact);
this.setState({
name: '',
phone: ''
});
}
render() {
return (
<div>
<h2>Create Contact</h2>
<p>
<input type="text" name="name" placeholder="name"
value={this.state.name} onChange={this.handleChange}/>
<input type="text" name="phone" placeholder="phone"
value={this.state.phone} onChange={this.handleChange}/>
</p>
<button onClick={this.handleClick}>Create</button>
</div>
)
}
}Contact.js
ContactCreate 컴포넌트 import / render
import React from 'react';
import ContactInfo from './ContactInfo';
import ContactDetails from './ContactDetails';
import ContactCreate from './ContactCreate';
import update from 'react-addons-update';
/*...*/
render() {
/* ... */
return (
<div>
<h1>Contacts</h1>
<input name="keyword" placeholder="Search"
value={this.state.keyword} onChange={this.handleChange}/>
<div>{mapToComponents(this.state.contactData)}</div>
<ContactDetails
contact={this.state.contactData[this.state.selectedKey]}
isSelected={this.state.selectedKey!=-1}/>
<ContactCreate onCreate={this.handleCreate}/>
</div>
);
}
}
CHECKPOINT
# 에러를 겪었을경우 새 branch를 만든다
git checkout -b error04
git add .
git commit -m"some errors need to be fixed"
# 이렇게 만든 branch는 나중에 git checkout error04 로 돌아와서 수정할수있다. 일단 그건 나중으로 미루자!
# 지금 강좌에서 진행되고 있는 체크포인트로 체크아웃하자! 일단 오류는 해결하고 강좌를 따라오자.
git checkout contact04데이터 제거 기능
ContactDetails.js
버튼 생성 및 onClick 설정
import React from 'react';
export default class ContactDetails extends React.Component {
render() {
const details = (
<div>
<p>{ this.props.contact.name }</p>
<p>{ this.props.contact.phone }</p>
<p>
<button>Remove</button>
</p>
</div>
);
/*...*/Contact
ContactDetails 렌더링 부분 수정
<ContactDetails
contact={this.state.contactData[this.state.selectedKey]}
isSelected={this.state.selectedKey!=-1}
onRemove={this.handleRemove}/> handleRemove() {
this.setState({
contactData: update(
this.state.contactData,
{ $splice: [[this.state.selectedKey, 1]] }
),
selectedKey: -1 // 현재 선택중인걸 무효화
});
}handleRemove 버그 고치기
CHECKPOINT
# 에러를 겪었을경우 새 branch를 만든다
git checkout -b error05
git add .
git commit -m"some errors need to be fixed"
# 이렇게 만든 branch는 나중에 git checkout error05 로 돌아와서 수정할수있다. 일단 그건 나중으로 미루자!
# 지금 강좌에서 진행되고 있는 체크포인트로 체크아웃하자! 일단 오류는 해결하고 강좌를 따라오자.
git checkout contact05데이터 수정 기능
ContactDetails.js
Edit 버튼 렌더링
const details = (
<div>
<p>{ this.props.contact.name }</p>
<p>{ this.props.contact.phone }</p>
<p>
<button>Edit</button>
<button onClick={this.props.onRemove}>Remove</button>
</p>
</div>
);state.isEdit 추가, handleToggle 메소드 작성
constructor(props){
super(props);
this.state = {
isEdit: false
};
this.handleToggle = this.handleToggle.bind(this);
}
handleToggle() {
this.setState({
isEdit: !this.state.isEdit
});
}ContactDetails.js
버튼 누르면 handleToggle 호출, isEdit 값에 따라 텍스트 변경
<button onClick={this.handleToggle}>{this.state.isEdit ? 'Ok' : 'Edit'}</button>기존의 정보 나타내는 부분을 read 로 분리,
edit 라는 상수를 임시로 설정
isEdit 값에 따라 read 보여줄지 edit 보여줄지 결정
render() {
const read = (
<div>
<p>{ this.props.contact.name }</p>
<p>{ this.props.contact.phone }</p>
</div>
);
const edit = (
<div>
EDIT
</div>
);
const details = (
<div>
{ this.state.isEdit ? edit : read }
/* ... */ContactDetails.js
state.name state.phone 추가, handleChange 추가
constructor(props){
super(props);
this.state = {
isEdit: false,
name: '',
phone: ''
};
this.handleToggle = this.handleToggle.bind(this);
this.handleChange = this.handleChange.bind(this);
}
handleChange(e) {
let nextState = {};
nextState[e.target.name] = e.target.value;
this.setState(nextState);
}ContactDetails.js
edit 상수 수정
const edit = (
<div>
<p>
<input
type="text"
name="name"
placeholder="name"
value={this.state.name}
onChange={this.handleChange}
/>
</p>
<p>
<input
type="text"
name="phone"
placeholder="phone"
value={this.state.phone}
onChange={this.handleChange}
/>
</p>
</div>
);ContactDetails.js
Edit 모드로 전환 될 때 state 를 props 값으로 설정
handleToggle() {
if(!this.state.isEdit) {
this.setState({
name: this.props.contact.name,
phone: this.props.contact.phone
});
}
this.setState({
isEdit: !this.state.isEdit
});
}ContactDetails.js
Read 모드로 전환 될 때 props.onEdit 사용
handleToggle() {
if(!this.state.isEdit) {
this.setState({
name: this.props.contact.name,
phone: this.props.contact.phone
});
} else {
this.props.onEdit(this.state.name, this.state.phone);
}
this.setState({
isEdit: !this.state.isEdit
});
}Contact.js
ContactDetails 컴포넌트에 handleEdit 전달
return (
<div>
<h1>Contacts</h1>
<input
name="keyword"
placeholder="Search"
value={this.state.keyword}
onChange={this.handleChange}/>
<div>{mapToComponents(this.state.contactData)}</div>
<ContactDetails
contact={this.state.contactData[this.state.selectedKey]}
isSelected={this.state.selectedKey!=-1}
onRemove={this.handleRemove}
onEdit={this.handleEdit}
/>
<ContactCreate onCreate={this.handleCreate}/>
</div>
);CHECKPOINT
# 에러를 겪었을경우 새 branch를 만든다
git checkout -b error06
git add .
git commit -m"some errors need to be fixed"
# 이렇게 만든 branch는 나중에 git checkout error06 로 돌아와서 수정할수있다. 일단 그건 나중으로 미루자!
# 지금 강좌에서 진행되고 있는 체크포인트로 체크아웃하자! 일단 오류는 해결하고 강좌를 따라오자.
git checkout contact06엔터 입력시 Create / Edit
ContactCreate.js
constructor(props) {
/* .. */
this.handleKeyPress = this.handleKeyPress.bind(this);
}
handleKeyPress(e) {
if(e.charCode==13) {
this.handleClick();
}
}
render() {
return (
<div>
<h2>Create Contact</h2>
<p>
<input type="text" name="name" placeholder="name"
value={this.state.name} onChange={this.handleChange}/>
<input type="text" name="phone" placeholder="phone"
value={this.state.phone} onChange={this.handleChange}
onKeyPress={this.handleKeyPress}/>
</p>
<button onClick={this.handleClick}>Create</button>
</div>
);
}ContactDetails.js
constructor(props) {
/* .. */
this.handleKeyPress = this.handleKeyPress.bind(this);
}
handleKeyPress(e) {
if(e.charCode==13) {
this.handleToggle();
}
}
const edit = (
<div>
<p><input type="text" name="name" placeholder="name"
value={this.state.name} onChange={this.handleChange}
onKeyPress={this.handleKeyPress}/></p>
<p><input type="text" name="phone" placeholder="phone"
value={this.state.phone} onChange={this.handleChange}
onKeyPress={this.handleKeyPress}/></p>
</div>
);CHECKPOINT
# 에러를 겪었을경우 새 branch를 만든다
git checkout -b error07
git add .
git commit -m"some errors need to be fixed"
# 이렇게 만든 branch는 나중에 git checkout error07 로 돌아와서 수정할수있다. 일단 그건 나중으로 미루자!
# 지금 강좌에서 진행되고 있는 체크포인트로 체크아웃하자! 일단 오류는 해결하고 강좌를 따라오자.
git checkout contact07Create 후 name input 포커스주기
document.getElementById(id).focus();ref
outdated usage
class Hello extends React.Component {
render() {
return (
<div>
<input ref="myInput">
</input>
</div>
)
}
componentDidMount() {
this.refs.myInput.value = "Hi, I used ref to do this";
}
}
ReactDOM.render(
<Hello/>,
document.getElementById('app')
);CURRENT
use callback function
class Hello extends React.Component {
render() {
return (
<div>
<input ref={(ref) => { this.input = ref} }>
</input>
</div>
)
}
componentDidMount() {
this.input.value = "I used ref to do this";
}
}
ReactDOM.render(
<Hello/>,
document.getElementById('app')
);ContactCreate.js
handleClick() {
let contact = {
name: this.state.name,
phone: this.state.phone
};
this.props.onCreate(contact);
this.setState({
name: '',
phone: ''
});
this.nameInput.focus();
}
render() {
return (
<div>
<h2>Create Contact</h2>
<p>
<input type="text" name="name" placeholder="name"
value={this.state.name} onChange={this.handleChange}
ref={ (ref) => { this.nameInput = ref } }/>
<input type="text" name="phone" placeholder="phone"
value={this.state.phone} onChange={this.handleChange}
onKeyPress={this.handleKeyPress}/>
</p>
<button onClick={this.handleClick}>Create</button>
</div>
)
}CHECKPOINT
# 에러를 겪었을경우 새 branch를 만든다
git checkout -b error08
git add .
git commit -m"some errors need to be fixed"
# 이렇게 만든 branch는 나중에 git checkout error08 로 돌아와서 수정할수있다. 일단 그건 나중으로 미루자!
# 지금 강좌에서 진행되고 있는 체크포인트로 체크아웃하자! 일단 오류는 해결하고 강좌를 따라오자.
git checkout contact08Component LifeCycle API
- componentWillMount
- componentDidMount
- componentWillReceiveProps
- shouldComponentUpdate
- componentWillUpdate
- componentDidUpdate
- componentWillUnmount

constructor
constructor(props){
super(props);
console.log("constructor");
}컴포넌트가 처음 만들어질 때 실행 된다
기본 state 를 설정 할 수 있다
componentWillMount
componentWillMount(){
console.log("componentWillMount");
}컴포넌트가 DOM 위에 만들어지기 전에 실행된다
componentDidMount
componentDidMount(){
console.log("componentDidMount");
}첫 렌더링 마치고 실행된다
이 안에서 다른 자바스크립트 프레임워크 연동 및
setTimeout, setInterval 및 AJAX 사용
componentWillReceiveProps
componentWillReceiveProps(nextProps){
console.log("componentWillReceiveProps: " + JSON.stringify(nextProps));
}props를 받을 때 실행된다
props 에 따라 state 를 업데이트 할 때 사용하면 유용하다
이 안에서 setState를 해도 괜찮다
shouldComponentUpdate
shouldComponentUpdate(nextProps, nextState){
console.log("shouldComponentUpdate: " + JSON.stringify(nextProps) + " " + JSON.stringify(nextState));
return true;
}props/state 가 변경되었을 때 리렌더링을 할지말지 정한다
실제로 사용 할 때 는 필요한 비교를 하고 값을 반환해야 한다
예: return nextProps.id !== this.props.id
JSON.stringify 를 사용하여 여러 field 를 편하게 비교
componentWillUpdate
componentWillUpdate(nextProps, nextState){
console.log("componentWillUpdate: " + JSON.stringify(nextProps) + " " + JSON.stringify(nextState));
}컴포넌트 업데이트 전 실행된다
여기서 setState 절대 사용하지 말 것
componentDidUpdate
componentDidUpdate(prevProps, prevState){
console.log("componentDidUpdate: " + JSON.stringify(prevProps) + " " + JSON.stringify(prevState));
}컴포넌트가 리렌더링을 마친 후 실행된다
여기서도 setState 사용 하지 말 것
componentWillUnmount
componentWillUnmount(){
console.log("componentWillUnmount");
}컴포넌트가 DOM 에서 사라진 후 실행된다
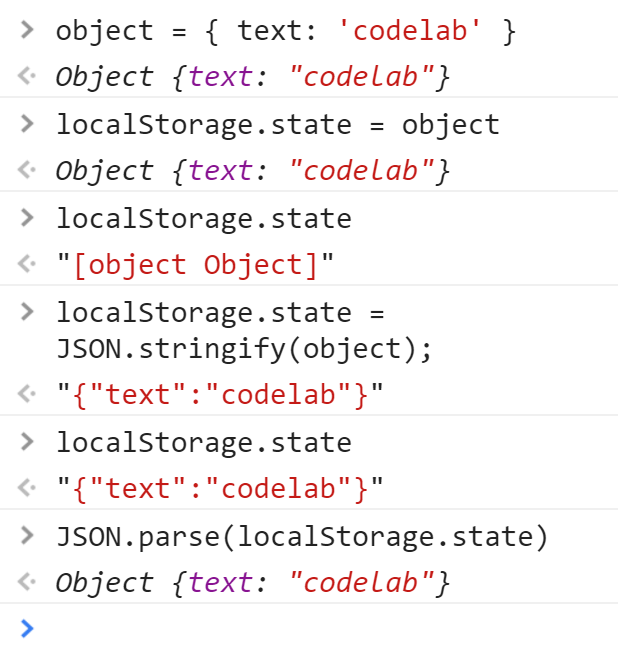
componentWillMount() {
// 컴포넌트를 가장 처음 그리기 전, contactData 의 값이 존재한다면
// setState 를 통하여 저장되있던 값을 불러온다
let contactData = localStorage.contactData;
if(contactData) {
this.setState({
contactData: JSON.parse(contactData)
});
}
}
componentDidUpdate(prevProps, prevState) {
// state 가 변경 될 때 마다, 만약에 state 가 새롭다면
// localStorage 에 현 contactData 의 데이터를 저장한다
if(JSON.stringify(prevState.contactData) != JSON.stringify(this.state.contactData)) {
localStorage.contactData = JSON.stringify(this.state.contactData);
}
}Contact.js
contactData 를 localStorage 에 담고 사용하기
CHECKPOINT
# 에러를 겪었을경우 새 branch를 만든다
git checkout -b error09
git add .
git commit -m"some errors need to be fixed"
# 이렇게 만든 branch는 나중에 git checkout error09 로 돌아와서 수정할수있다. 일단 그건 나중으로 미루자!
# 지금 강좌에서 진행되고 있는 체크포인트로 체크아웃하자! 일단 오류는 해결하고 강좌를 따라오자.
git checkout contact09
점심 휴식
12:30 ~ 13:30
Redux
그래서 Redux가 뭔데?
Flux?
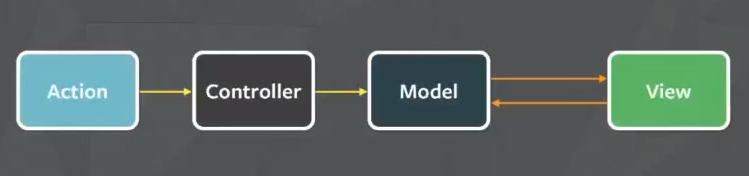
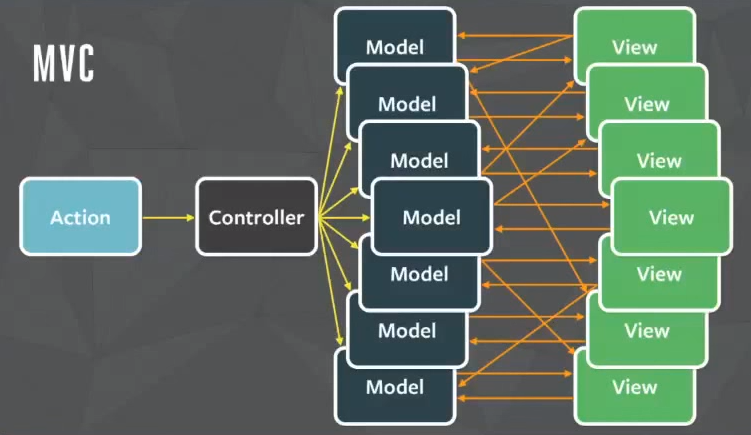
MVC


FLUX
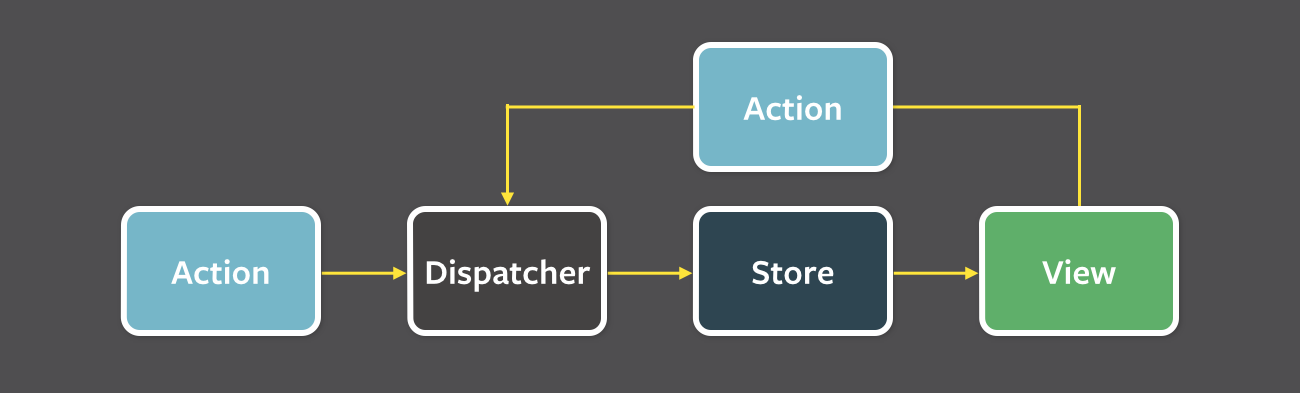
FLUX
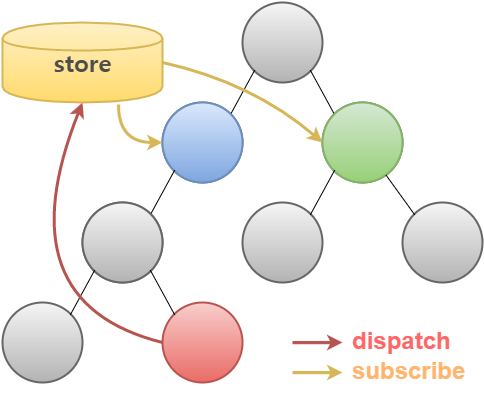
Redux
3 가지 원칙
하나, Single Source of Truth
어플리케이션의 state 를 위해 단 한개의 store 를 사용합니다.
Flux 와의 주요 차이입니다;
Flux 에서는 여러개의 store 를 사용합니다
둘, State is Read-only
어플리케이션에서 store 의 state 를 직접 변경할 수 없습니다
state 를 변경하기 위해선 무조건 action 이 dispatch 되어야 합니다
셋, Changes are made with pure Functions
action 객체를 처리하는 함수를 reducer 라고 부릅니다
reducer 는 정보를 받아서 상태를 어떻게 업데이트 할 지 정의합니다
reducer 는 '순수 함수' 로 작성되어야 합니다.
즉, 네트워크 및 데이터베이스 접근 X, 인수 변경 X
같은 인수로 실행된 함수는 언제나 같은 결과를 반환
' 순수하지 않은' API 사용 불가 (Date.now(), Math.random() 등)
Redux 를 사용한 카운터 만들기
checkout
# 아까 작업하던 디렉토리에서..
git checkout counter00
# 아까 프로젝트에서 한번도 안막히신분들은? 다시 Clone 하세요 :D
git clone https://github.com/velopert/react-codelab-fundamentals.git react-codelab-redux
cd react-cdelab-redux
git checkout counter00
npm install
의존 모듈 설치
npm install --save redux react-reduxnpm install --save-dev babel-preset-stage-0webpack: resolve-root기능 사용하기
var path = require('path');
module.exports = {
/*
Webpack Codes..
*/
module: {
/*.. */
presets: ['es2015', 'stage-0', 'react']
/*.. */
},
resolve: {
root: path.resolve('./src')
}
}webpack.config.js
import App from './components/App';
import App from 'components/App';
만들 컴포넌트
Counter
Controls
중간 꿀팁
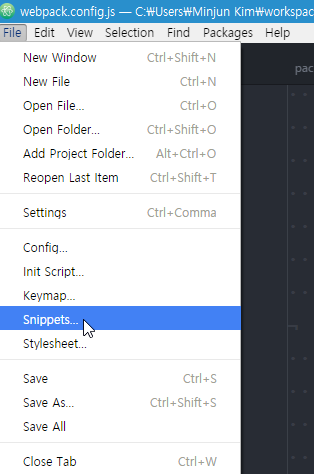
'.source.js':
'React Component':
'prefix': 'rc'
'body': '''
import React, { Component, PropTypes } from 'react';
const propTypes = {
};
const defaultProps = {
};
class ${1:MyComponent} extends React.Component {
constructor(props) {
super(props);
}
render() {
return(
<div>${1:MyComponent}</div>
);
}
}
${1:MyComponent}.propTypes = propTypes;
${1:MyComponent}.defaultProps = defaultProps;
export default ${1:MyComponent};
'''
'Import Component':
'prefix': 'impc'
'body': '''
import ${1:MyComponent} from './${1:MyComponent}';
'''열린 파일에 위 코드를 COPY&PASTE
새 파일을 만들고 거기서 rc 라고만 입력하고
엔터를 누르면 컴포넌트 기본 코드가 생성됩니다.
초기 VIEW 설정
Codes: https://git.io/voQ1J
CHECKPOINT
# 에러를 겪었을경우 새 branch를 만든다
# error__은 이미 아까 했을수도 있으니까 rd_error__로 합시다
git checkout -b rd_error01
git add .
git commit -m"some errors need to be fixed"
# 이렇게 만든 branch는 나중에 git checkout rd_error__ 을 해서 돌아와서 수정할수있다.
# 일단 그건 나중으로 미루자!
# 지금 강좌에서 진행되고 있는 체크포인트로 체크아웃하자! 일단 오류는 해결하고 강좌를 따라오자.
git checkout counter011. Action 만들기
2. Reducer 만들기
3. Redux 초기설정 하기
4. 컴포넌트에 연결하기
개발 순서
ACTION
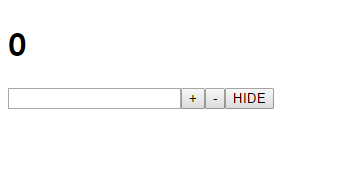
1. Control 컴포넌트 HIDE 토글
2. 버튼이 클릭 될 때 증가/감소 할 값 설정
3. + 버튼이 클릭 될 때 증가
4. - 버튼이 클릭 될 때 감소
ACTION
1. TOGGLE_CTRL_VISIBILITY
2. SET_DIFF
3. INCREASE
4. DECREASE
ACTION 설정하기
파일 두개:
- src/actions/ActionTypes.js
- src/actions/index.js
ACTION 설정하기
actions/ActionTypes.js
export const TOGGLE_CONTROL_VISIBILITY = 'TOGGLE_CONTROL_VISIBILITY';
export const SET_DIFF = 'SET_DIFF';
export const INCREASE = 'INCREASE';
export const DECREASE = 'DECREASE';ACTION 설정하기
actions/index.js
import * as types from 'actions/ActionTypes';
export function toggleControlVisibility() {
return {
type: types.TOGGLE_CONTROL_VISIBILITY
};
}
export function setDiff(value) {
return {
type: types.SET_DIFF,
diff: value
};
}
export function increase() {
return {
type: types.INCREASE
};
}
export function decrease() {
return {
type: types.DECREASE
};
}Reducer 설정하기
src/reducers/index.js
import * as types from 'actions/ActionTypes';
const initialState = {
uistate: {
visibility: true
},
counter: {
value: 0,
diff: 1
}
};
export function reducer(state, action) {
if(typeof state === 'undefined') {
state = initialState;
}
}Reducer 설정하기
src/reducers/index.js
/* jshint ignore: start */
import * as types from 'actions/ActionTypes';
const initialState = {
uistate: {
visibility: true
},
counter: {
value: 0,
diff: 1
}
};
export default function reducer(state, action) {
if(typeof state === 'undefined') {
return initialState;
}
switch(action.type) {
case types.TOGGLE_CONTROL_VISIBILITY:
return {
...state,
uistate: {
visibility: !state.uistate.visibility
}
};
case types.SET_DIFF:
return {
...state,
counter: {
...state.counter,
diff: action.diff
}
};
case types.INCREASE:
return {
...state,
counter: {
...state.counter,
value: state.counter.value + state.counter.diff
}
};
case types.DECREASE:
return {
...state,
counter: {
...state.counter,
value: state.counter.value - state.counter.diff
}
}
default:
return state;
}
}
Redux 초기설정
src/index.js
import React from 'react';
import ReactDOM from 'react-dom';
import App from 'components/App';
import { createStore } from 'redux';
import { Provider } from 'react-redux';
import reducers from 'reducers';
let store = createStore(counterApp);
const rootElement = document.getElementById('root');
ReactDOM.render(
<Provider store={store}>
<App/>
</Provider>,
rootElement);
CHECKPOINT
# 에러를 겪었을경우 새 branch를 만든다
# error__은 이미 아까 했을수도 있으니까 rd_error__로 합시다
git checkout -b rd_error02
git add .
git commit -m"some errors need to be fixed"
# 이렇게 만든 branch는 나중에 git checkout rd_error__ 을 해서 돌아와서 수정할수있다.
# 일단 그건 나중으로 미루자!
# 지금 강좌에서 진행되고 있는 체크포인트로 체크아웃하자! 일단 오류는 해결하고 강좌를 따라오자.
git checkout counter02react-redux
connect API
connect([mapStateToProps], [mapDispatchToProps], [mergeProps], [options])
App.js
mapStateToProps 작성
import React from 'react';
import Counter from './Counter';
import Controls from './Controls';
import { connect } from 'react-redux';
class App extends React.Component {
/* .... */
}
const mapStateToProps = (state) => {
return {
value: state.counter.value,
config: {
diff: state.counter.diff,
visibility: state.uistate.visibility
}
};
};
export default connect(mapStateToProps)(App);
App.js
mapDispatchToProps 작성
/* ... */
import * as actions from 'actions';
/* ... */
const mapStateToProps = (state) => {
/* ... */
};
const mapDispatchToProps = (dispatch) => {
return {
onSetDiff: (value) => dispatch(actions.setDiff(value)),
onIncrease: () => dispatch(actions.increase()),
onDecrease: () => dispatch(actions.decrease()),
onToggleVisibility: () => dispatch(actions.toggleControlVisibility())
};
};
export default connect(mapStateToProps, mapDispatchToProps)(App);
CHECKPOINT
# 에러를 겪었을경우 새 branch를 만든다
# error__은 이미 아까 했을수도 있으니까 rd_error__로 합시다
git checkout -b rd_error03
git add .
git commit -m"some errors need to be fixed"
# 이렇게 만든 branch는 나중에 git checkout rd_error__ 을 해서 돌아와서 수정할수있다.
# 일단 그건 나중으로 미루자!
# 지금 강좌에서 진행되고 있는 체크포인트로 체크아웃하자! 일단 오류는 해결하고 강좌를 따라오자.
git checkout counter03App.js
하위 컴포넌트에 매핑된 state/dispatch 함수 전달
class App extends React.Component {
render(){
return (
<div>
<Counter value={this.props.value}/>
<Controls
config={this.props.config}
onSetDiff={this.props.onSetDiff}
onIncrease={this.props.onIncrease}
onDecrease={this.props.onDecrease}
onToggleVisibility={this.props.onToggleVisibility}
/>
</div>
);
}
}
Controls.js
defaultProps / propTypes 설정
import React, { Component, PropTypes } from 'react';
const propTypes = {
config: PropTypes.object,
onSetDiff: PropTypes.func,
onIncrease: PropTypes.func,
onDecrease: PropTypes.func,
onToggleVisibility: PropTypes.func
};
const defaultProps = {
config: null,
onSetDiff: () => console.error('onSetDiff not defined'),
onIncrease: () => console.error('onIncrease not defined'),
onDecrease: () => console.error('onDecrease not defined'),
onToggleVisibility: () => console.error('oonToggleVisibility not defined')
};
class Controls extends React.Component {
/* ... */
}
Controls.propTypes = propTypes;
Controls.defaultProps = defaultProps;
export default Controls;
Controls.js
props 사용하기 - i
class Controls extends React.Component {
constructor(props) {
super(props);
this.state = {
tempDiff: 1
};
this.handleChange = this.handleChange.bind(this);
}
handleChange(e) {
if(isNaN(e.target.value)) // only accepts numbers and ''
return;
this.setState({
tempDiff: e.target.value
});
// parse Integer from the string, set to 0 if empty.
const value = (e.target.value === '') ? 0 : parseInt(e.target.value);
this.props.onSetDiff(value);
}
render() {
return(
<div>
<input type="text"
onChange={this.handleChange}
value={this.state.tempDiff}/>
<button onClick={this.props.onIncrease}>+</button>
<button onClick={this.props.onDecrease}>-</button>
<button onClick={this.props.onToggleVisibility}>HIDE</button>
</div>
);
}
}
Controls.js
props 사용하기 - ii
render() {
const options = (
<span>
<input type="text"
onChange={this.handleChange}
value={this.state.tempDiff}/>
<button onClick={this.props.onIncrease}>+</button>
<button onClick={this.props.onDecrease}>-</button>
</span>
);
return(
<div>
{this.props.config.visibility ? options : undefined }
<button onClick={this.props.onToggleVisibility}>HIDE</button>
</div>
);
}CHECKPOINT
# 에러를 겪었을경우 새 branch를 만든다
# error__은 이미 아까 했을수도 있으니까 rd_error__로 합시다
git checkout -b rd_error04
git add .
git commit -m"some errors need to be fixed"
# 이렇게 만든 branch는 나중에 git checkout rd_error__ 을 해서 돌아와서 수정할수있다.
# 일단 그건 나중으로 미루자!
# 지금 강좌에서 진행되고 있는 체크포인트로 체크아웃하자! 일단 오류는 해결하고 강좌를 따라오자.
git checkout counter04reducer 분리하기
import { TOGGLE_CONTROL_VISIBILITY } from 'actions/ActionTypes';
const initialState = {
visibility: true
};
export default function uistate(state, action) {
if(typeof state === 'undefined') {
state = initialState;
}
switch(action.type) {
case TOGGLE_CONTROL_VISIBILITY:
return {
visibility: !state.visibility
};
default:
return state;
}
}
reducers/uistate.js
reducer 분리하기
/* jshint ignore: start */
import * as types from 'actions/ActionTypes';
const initialState = {
value: 0,
diff: 1
};
export default function counter(state = initialState, action) {
switch(action.type) {
case types.SET_DIFF:
return {
...state,
diff: action.diff
};
case types.INCREASE:
return {
...state,
value: state.value + state.diff
};
case types.DECREASE:
return {
...state,
value: state.value - state.diff
};
default:
return state;
}
}
reducers/counter.js
reducer 분리하기
import { combineReducers } from 'redux';
import counter from 'reducers/counter';
import uistate from 'reducers/uistate';
export default combineReducers({
counter,
uistate
});
reducers/index.js
CHECKPOINT
# 에러를 겪었을경우 새 branch를 만든다
# error__은 이미 아까 했을수도 있으니까 rd_error__로 합시다
git checkout -b rd_error05
git add .
git commit -m"some errors need to be fixed"
# 이렇게 만든 branch는 나중에 git checkout rd_error__ 을 해서 돌아와서 수정할수있다.
# 일단 그건 나중으로 미루자!
# 지금 강좌에서 진행되고 있는 체크포인트로 체크아웃하자! 일단 오류는 해결하고 강좌를 따라오자.
git checkout counter05"Don’t use Redux until you have problems with vanilla React."
Express.js
Node.js
Express.js
$ mkdir express-tutorial
$ cd express-tutorial
$ npm init
$ npm install --save expressvar express = require('express');
var app = express();
app.get('/', function(req, res) {
res.send('Welcome to Codelab');
});
app.listen(3000, function() {
console.log('Example App listening on port 3000');
});
main.js
첫 Express 서버 만들기
node main.jsapp.METHOD(PATH, HANDLER)app.js
기본 라우팅
app.js
기본 라우팅 - 예제
app.get('/user/:id', function(req, res) {
res.send('Received a GET request, param:' + req.params.id);
});
app.post('/user', function(req, res) {
res.send('Received a POST request');
});
app.put('/user', function(req, res) {
res.send('Received a PUT request');
});
app.delete('/user', function(req, res) {
res.send('Received a DELETE request');
});
REST API 테스팅 도구

morgan 미들웨어
express 에서 받은 요청들을 콘솔에 기록
npm install --save-dev morganvar express = require('express');
var morgan = require('morgan');
var app = express();
app.use(morgan('dev'));
/* Express Codes.. */body-parser 미들웨어
npm install --save body-parservar express = require('express');
var bodyParser = require('body-parser');
var app = express();
app.use(bodyParser.json());
app.post('/user', function(req, res) {
console.log(req.body);
console.log(req.body.username);
res.json({ success: true });
});
/* Express Codes.. */JSON 형태 데이터 파싱
Node 개발 툴 - nodemon
npm install -g nodemonnodemon main.js파일이 수정 될 때마다 자동으로 재시작
router 모듈화
router/user.js
var router = require('express').Router();
router.get('/:id', function(req, res) {
res.send('Received a GET request, param:' + req.params.id);
});
router.post('/', function(req, res) {
console.log(req.body);
console.log(req.body.username);
res.json({ success: true });
});
router.put('/', function(req, res) {
res.send('Received a PUT request');
});
router.delete('/', function(req, res) {
res.send('Received a DELETE request');
});
module.exports = router;
router 모듈화
main.js
var user = require('./router/user');
app.use('/user', user);
// public 디렉토리에 있는 정적파일 제공
app.use('/', express.static('public')); app.js
정적 (static) 파일 제공
Codes
Express.js & React.js
우선 React 초기 프로젝트를 git clone 합시다..
git clone git@github.com:velopert/react-codelab-fundamentals.git react-with-express
cd react-with-express
npm install
# npm install 과정이 오래 걸린다면, 다음과 같이 node_modules.zip 을 다운로드 받아서 압축을 해제하세요:
wget https://github.com/velopert/react-codelab-fundamentals/releases/download/1.0/node_modules.zip
unzip node_modules.zip -d node_modulesGlobal Dependency 설치
npm install -g babel-clibabel-cli: 콘솔환경에서 babel 을 사용 할 수 있게 해줍니다.
Local Dependency 설치
npm install --save pathpath: 상대 경로를 절대 경로로 변경해줍니다.
Express 코드 작성
server/main.js
import express from 'express';
import path from 'path';

const app = express();
const port = 3000;

app.use('/', express.static(path.join(__dirname, './../public')));

app.get('/hello', (req, res) => {
    return res.send('Hello CodeLab');
});

app.listen(port, () => {
    console.log('Express is listening on port', port);
});
NPM 스크립트 수정
package.json
  "scripts": {
    "clean": "rm -rf build public/bundle.js",
    "build": "babel server --out-dir build --presets=es2015 && webpack",
    "start": "NODE_ENV=production node ./build/main.js",
    // WINDOWS: "NODE_ENV=production&node ./build/main.js"
    "development": "NODE_ENV=development nodemon babel-node --presets=2015 ./server/main.js --watch server"
    // WINDOWS: "set NODE_ENV=development&nodemon babel-node --presets=2015 ./server/main.js --watch server"
  },
webpack 개발서버용 설정파일 생성
webpack.dev.config.js
var webpack = require('webpack');

module.exports = {

    entry: [
        './src/index.js',
        'webpack-dev-server/client?http://0.0.0.0:4000',
        'webpack/hot/only-dev-server'
    ],

    output: {
        path: '/',
        filename: 'bundle.js'
    },

    devServer: {
        hot: true,
        filename: 'bundle.js',
        publicPath: '/',
        historyApiFallback: true,
        contentBase: './public',
        proxy: {
            "**": "http://localhost:3000"
        },
        stats: {
          // Config for minimal console.log mess.
          assets: false,
          colors: true,
          version: false,
          hash: false,
          timings: false,
          chunks: false,
          chunkModules: false
        }
    },


    plugins: [
        new webpack.optimize.OccurenceOrderPlugin(),
        new webpack.HotModuleReplacementPlugin(),
        new webpack.NoErrorsPlugin()
    ],

    module: {
        loaders: [
            {
                test: /\.js$/,
                loaders: ['react-hot', 'babel?' + JSON.stringify({
                    cacheDirectory: true,
                    presets: ['es2015', 'react']
                })],
                exclude: /node_modules/,
            }
        ]
    }


};
webpack 설정파일 수정
webpack.config.js
module.exports = {
    entry: './src/index.js',

    output: {
        path: __dirname + '/public/',
        filename: 'bundle.js'
    },

    module: {
        loaders: [
            {
                test: /\.js$/,
                loaders: ['babel?' + JSON.stringify({
                    cacheDirectory: true,
                    presets: ['es2015', 'react']
                })],
                exclude: /node_modules/,
            }
        ]
    }
};
server 메인파일 수정
server/main.js
import WebpackDevServer from 'webpack-dev-server';
import webpack from 'webpack';

const devPort = 4000;

/*
    Express Codes
*/


if(process.env.NODE_ENV == 'development') {
    console.log('Server is running on development mode');
    const config = require('../webpack.dev.config');
    const compiler = webpack(config);
    const devServer = new WebpackDevServer(compiler, config.devServer);
    devServer.listen(
        devPort, () => {
            console.log('webpack-dev-server is listening on port', devPort);
        }
    );
}

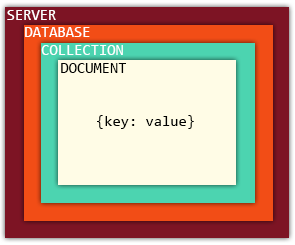
mongoDB 호스팅, mLab
OR
NoSQL
| user_id | name | gender | age |
|---|---|---|---|
| 1 | Abet | m | 20 |
| 2 | Betty | f | 21 |
| user_id | name | gender | age |
|---|---|---|---|
| 1 | Abet | m | 20 |
| 2 | Betty | f | 21 |
| user_id | phone |
|---|---|
| 1 | 01000000000 |
{
        "_id" : ObjectId("5773de2b5ff1e156ee497cb1"),
        "name" : "abet",
        "gender" : "m",
        "age" : "20",
        "phone" : "01000000000"
}

{
        "_id" : ObjectId("5773de2b5ff1e156ee497cb2"),
        "name" : "betty",
        "gender" : "f",
        "age" : "20"
}
$ mongo
MongoDB shell version: 3.2.1
connecting to: test
> use codelab
switched to db codelab
>
use database_name
> show dbs
local             0.000GB
show dbs
데이터베이스 사용 / 생성
데이터베이스 목록
> db.createCollection("books")
{ "ok" : 1 }
db.createCollection(name, [options])
> show collections
books
show collections
> db.books.drop();
true
db.name.drop();
컬렉션 생성
컬렉션 생성
컬렉션 제거
db.name.insert(data)
> db.books.insert({
... name: "reactjs guide",
... author: "velopert"
... })
WriteResult({ "nInserted" : 1 })
> db.books.insert([
... { name: "nodejs guide", author: "mjkim" },
... { name: "mongodb guide", author: "velopert" }
... ])
BulkWriteResult({
"writeErrors" : [ ],
"writeConcernErrors" : [ ],
"nInserted" : 2,
"nUpserted" : 0,
"nMatched" : 0,
"nModified" : 0,
"nRemoved" : 0,
"upserted" : [ ]
})
다큐먼트 생성
다큐먼트 여러개 생성
db.name.find()
db.books.find()
{ "_id" : ObjectId("5773eb4dbb35c36beff8fd78"), "name" : "reactjs guide", "author" : "velopert" }
{ "_id" : ObjectId("5773eb55bb35c36beff8fd79"), "name" : "nodejs guide", "author" : "mjkim" }
{ "_id" : ObjectId("5773eb55bb35c36beff8fd7a"), "name" : "mongodb guide", "author" : "velopert" }
> db.books.find().pretty()
{
        "_id" : ObjectId("5773eb4dbb35c36beff8fd78"),
        "name" : "reactjs guide",
        "author" : "velopert"
}
{
        "_id" : ObjectId("5773eb55bb35c36beff8fd79"),
        "name" : "nodejs guide",
        "author" : "mjkim"
}
{
        "_id" : ObjectId("5773eb55bb35c36beff8fd7a"),
        "name" : "mongodb guide",
        "author" : "velopert"
}
db.name.remove(criteria, justOne)
> db.books.remove({name: "nodejs guide"})
WriteResult({ "nRemoved" : 1 })
> db.books.remove({author: "velopert"}, true)
WriteResult({ "nRemoved" : 1 })
다큐먼트 제거
db.name.find([query], [projection])
> db.books.find({name: "mongodb guide"}).pretty()
{
        "_id" : ObjectId("5773eb55bb35c36beff8fd7a"),
        "name" : "mongodb guide",
        "author" : "velopert"
}
> db.books.find({name: "mongodb guide"}, { name: true })
{ "_id" : ObjectId("5773eb55bb35c36beff8fd7a"), "name" : "mongodb guide" }
> db.books.find({name: "mongodb guide"}, { _id: false, name: true })
{ "name" : "mongodb guide" }
Back To
Express.js & React.js
복습용...
React 커뮤니티
추가 공부 자료
끝.
reactCodelab
By Minjun Kim
reactCodelab
React Codelab 2016


