AngularJS 2
Álvaro José Agámez Licha
@CodeMaxter
Velocity Partners Colombia
Medellín, Colombia - 2016-06-07
Agenda
-
Introduction to AngularJS 2
-
TypeScript
-
Change Detection in AngularJS 2
-
The difference between Annotations and Decorators
-
AngularJS 2 - Binding
-
AngularJS 2 Template Syntax
-
Routing in AngularJS 2
-
Shadow DOM Strategies in AngularJS 2
-
AngularJS 2 Server Rendering
-
Code time
Introduction to AngularJS 2
Why Angular 2?
There are many front-end JavaScript frameworks to choose from today, each with its own set of trade-offs. Many people were happy with the functionality that Angular 1.x afforded them. Angular 2 improved on that functionality and made it faster, more scalable and more modern. Organizations that found value in Angular 1.x will find more value in Angular 2.
Angular 2's Advantages
The first release of Angular provided programmers with the tools to develop and architect large scale JavaScript applications, but its age has revealed a number of flaws and sharp edges. Angular 2 was built on five years of community feedback.
Angular 2 Is Easier
The new AngularJS 2 codebase is more modern, more capable and easier for new programmers to learn than Angular 1.x, while also being easier for project veterans to work with.
With AngularJS 1.x, programmers had to understand the differences between Controllers, Services, Factories, Providers and other concepts that could be confusing, especially for new programmers.
Familiarity
Despite being a complete rewrite, Angular 2 has retained many of its core concepts and conventions with Angular 1.x, e.g. a streamlined, "native JS" implementation of dependency injection. This means that programmers who are already proficient with Angular will have an easier time migrating to Angular 2 than another library like React or framework like Ember.
Performance and Mobile
Angular 2 was designed for mobile from the ground up. Aside from limited processing power, mobile devices have other features and limitations that separate them from traditional computers. Touch interfaces, limited screen real estate and mobile hardware have all been considered in Angular 2.
AngularJS 2, like React and other modern frameworks, can leverage performance gains by rendering HTML on the server or even in a web worker. Depending on application/site design this isomorphic rendering can make a user's experience feel even more instantaneous.
Project Architecture and Maintenance
AngularJS 1 provided web programmers with a highly flexible framework for developing applications, but, it became evident that it was often too flexible. Over time, best practices evolved, and a community-driven structure was endorsed, John Papa's Style guide for example.
AngularJS 2 makes use of the upcoming ES2015 module system. Modules are far less coupled to the "Angular way", and it's easier to write more generic JavaScript and plug it into Angular. The removal of minification workarounds and the addition of rigid prescriptions make maintaining existing applications simpler. The new module system also makes it easier to develop effective tooling that can reason better about larger projects.
New Features
Some of the other interesting features in AngularJS 2 are:
-
Form Builder
-
Change Detection
-
Templating
-
Routing
-
Annotations
-
Observables
-
Shadow DOM
Differences Between AngularJS 1 & 2
| Old School Angular 1.x | Angular 1.x Best Practices | Transitional Architecture | Angular 2 | |
|---|---|---|---|---|
| Nested scopes ("$scope", watches) | Used heavily | Avoided | Avoided | Gone |
| Directives vs controllers | Use as alternatives | Used together | Directives as components | Component directives |
| Controller and service implementation | Functions | Functions | ES6 classes | ES6 classes |
| Module system | Angular's modules | Angular's modules | ES6 modules | ES6 modules |
| Transpiler required | No | No | TypeScript | TypeScript |
Note that "Transitional Architecture" refers to a style of Angular 1 application written in a way that mimics Angular 2's component style, but with controllers and directives instead of TypeScript classes.
<label>Name:</label>
    <!-- data-bind to the input element; store value in yourName -->
<input type="text" [(ngModel)]="yourName" placeholder="Enter a name here">
<hr>
<!-- conditionally display `yourName` -->
<h1 [hidden]="!yourName">Hello {{yourName}}!</h1>
import {Component} from 'angular/core';
@Component({
// Declare the tag name in index.html to where the component attaches
selector: 'hello-world',
// Location of the template for this component
templateUrl: 'app/hello-world.component.html'
})
export class HelloWorld {
// Declaring the variable for binding with initial value
yourName: string = '';
}import { bootstrap } from '@angular/platform-browser-dynamic';
import { HelloWorld } from './hello-world.component';
bootstrap(HelloWorld);<body>
<hello-world>Loading...</hello-world>
</body>TypeScript
TypeScript is a superset of ES6, which means all ES6 features are part of TypeScript, but not all TypeScript features are part of ES6. Consequently, TypeScript must be transpiled into ES5 to run in most browsers.
One of TypeScript's primary features is the addition of type information, hence the name. This type information can help make JavaScript programs more predictable and easier to reason about.
Types let developers write more explicit "contracts". In other words, things like function signatures are more explicit.
function add(a, b) {
  return a + b;
}

add(1, 3);   // 4
add(1, '3'); // '13'
function add(a: number, b: number) {
return a + b;
}
add(1, 3); // 4
// compiler error before JS is even produced
add(1, '3'); // '13'Without TypeScript:
With TypeScript:
Please, do yourself a favor (and to who go to keep your code), uses TypeScript.
Still don't believe me?

JavaScript vs TypeScript
(function(app) {
  app.AppComponent =
    ng.core.Component({
      selector: 'my-app',
      template: '<h1>My First Angular 2 App</h1>'
    })
    .Class({
      constructor: function() {}
    });
})(window.app || (window.app = {}));
import { Component } from '@angular/core';
@Component({
selector: 'my-app',
template: '<h1>My First Angular 2 App</h1>'
})
export class AppComponent { }Change Detection in AngularJS 2
What’s Change Detection anyways?
The basic task of change detection is to take the internal state of a program and make it somehow visible to the user interface. This state can be any kind of objects, arrays, primitives, … just any kind of JavaScript data structures.
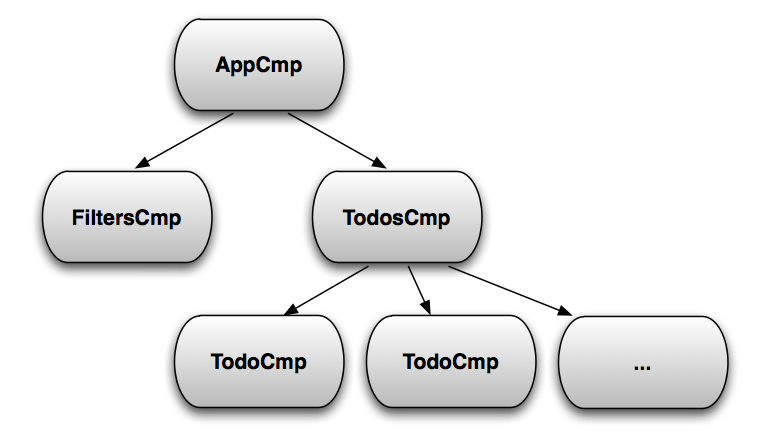
An Angular 2 application is a tree of components.
An Angular 2 application is a reactive system, with change detection being the core of it.
Every component gets a change detector responsible for checking the bindings defined in its template. Examples of bindings:{{todo.text}} and [todo]=”t”. Change detectors propagate bindings from the root to leaves in the depth first order.
What causes change?
Now that we know what change detection is all about, we might wonder, when exactly can such a change happen? When does Angular know that it has to update the view? Well, let’s take a look at the following code:
@Component({
  template: `
    <h1>{{firstname}} {{lastname}}</h1>
    <button (click)="changeName()">Change name</button>
  `
})
class MyApp {

  firstname:string = 'Pascal';
  lastname:string = 'Precht';

  changeName() {
    this.firstname = 'Brad';
    this.lastname = 'Green';
  }
}
Here’s another one:
@Component()
class ContactsApp implements OnInit{

  contacts:Contact[] = [];

  constructor(private http: Http) {}

  ngOnInit() {
    this.http.get('/contacts')
      .map(res => res.json())
      .subscribe(contacts => this.contacts = contacts);
  }
}
Basically application state change can be caused by three things:
-
Events - click, submit, …
-
XHR - Fetching data from a remote server
-
Timers - setTimeout(), setInterval()
They are all asynchronous. Which brings us to the conclusion that, basically whenever some asynchronous operation has been performed, our application state might have changed. This is when someone needs to tell Angular to update the view.
IMMUTABLE OBJECTS
If a component depends only on its input properties, and they are immutable, then this component can change if and only if one of its input properties changes. Therefore, we can skip the component’s subtree in the change detection tree until such an event occurs. When it happens, we can check the subtree once, and then disable it until the next change
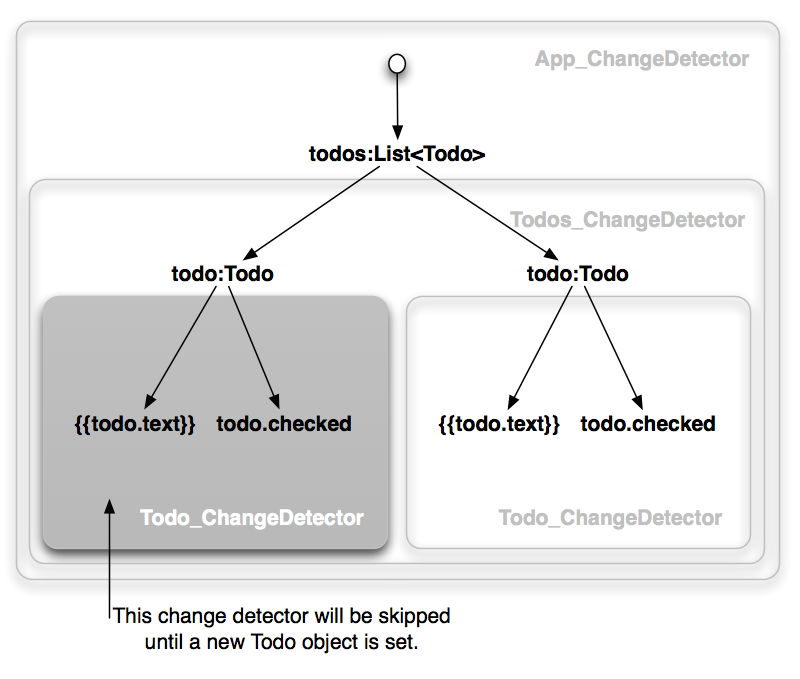
Gray boxes indicate disabled change detectors
If we are aggressive about using immutable objects, a big chunk of the change detection tree will be disabled most of the time.
@Component({changeDetection:ChangeDetectionStrategy.OnPush})
class ImmutableTodoCmp {
  todo:Todo;
}
Implementing this is trivial. Just set the change detection strategy to OnPush.
OBSERVABLE OBJECTS
If a component depends only on its input properties, and they are observable, then this component can change if and only if one of its input properties emits an event. Therefore, we can skip the component’s subtree in the change detection tree until such an event occurs. When it happens, we can check the subtree once, and then disable it until the next change.
Although it may sound similar to the Immutable Objects case, it is quite different. If you have a tree of components with immutable bindings, a change has to go through all the components starting from the root. This is not the case when dealing with observables.
type ObservableTodo = Observable<todo>;
type ObservableTodos = Observable<array>;

@Component({selector:'todos'})
class ObservableTodosCmp {
  todos: ObservableTodos;
  //...
}
Let see a small example demonstrating the issue.
The template of ObservableTodosCmp:
<todo *ngFor="let t of todos" todo="t"></todo>@Component({selector:'todo'})
class ObservableTodoCmp {
todo:ObservableTodo;
//...
}Finally, ObservableTodoCmp:
As you can see, here the Todos component has only a reference to an observable of an array of todos. So it cannot see the changes in individual todos.
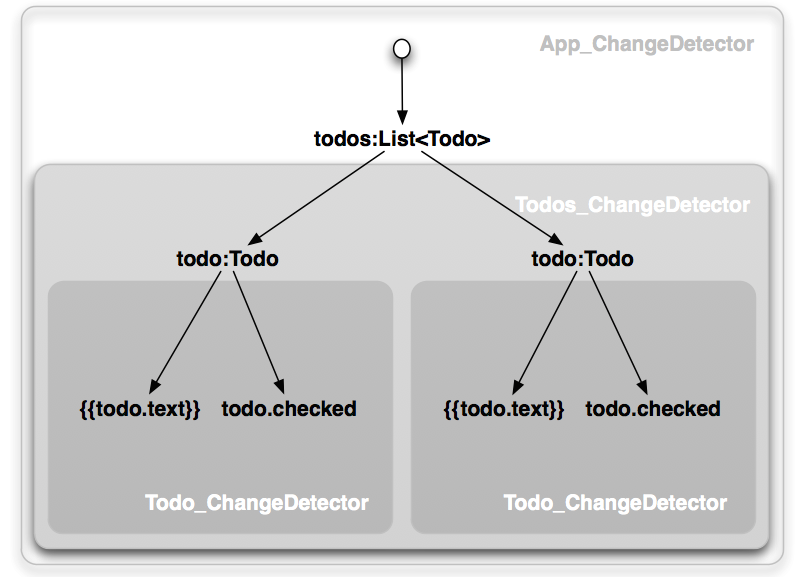
The way to handle it is to check the path from the root to the changed Todo component when its todo observable fires an event. The change detection system will make sure this happens.
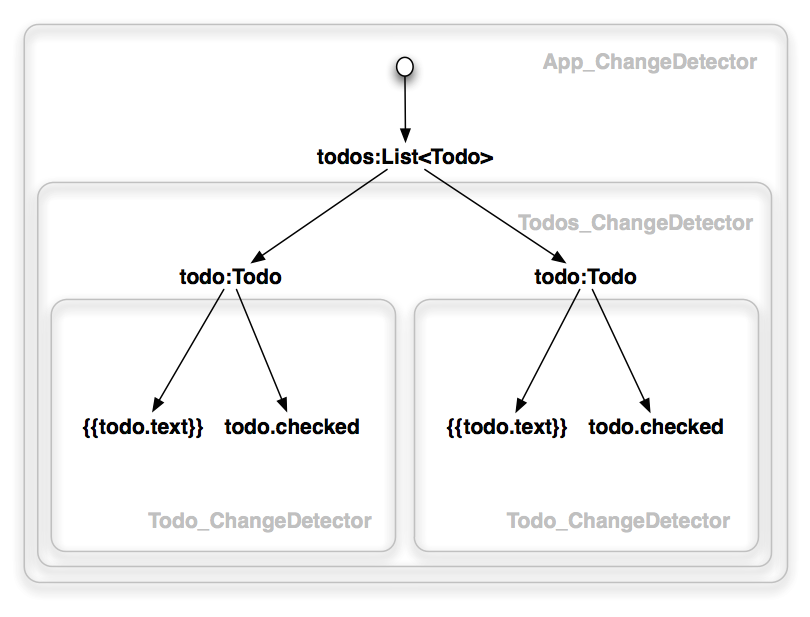
Say our application uses only observable objects. When it boots, Angular will check all the objects.
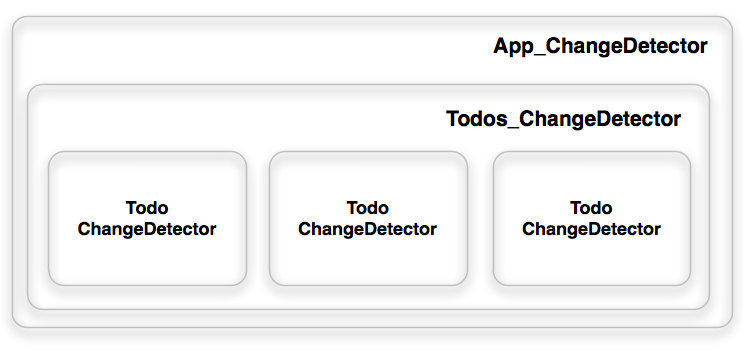
So the state after the first pass will look as follows.
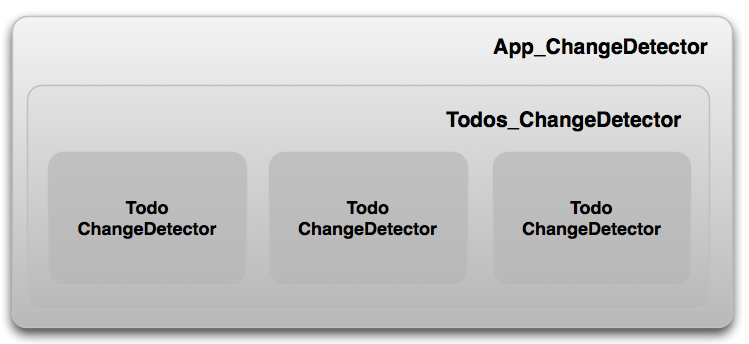
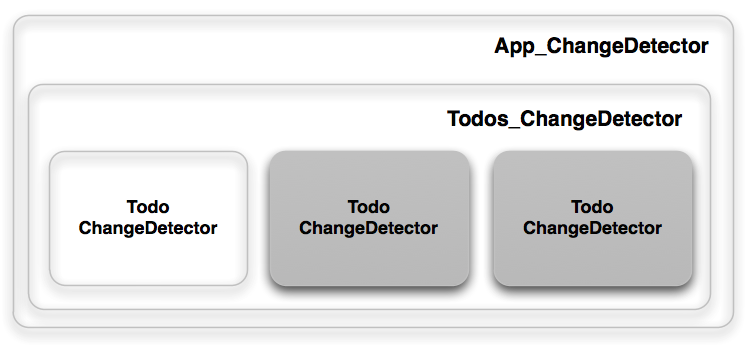
Let’s say the first todo observable fires an event. The system will switch to the following state:
And after checking App_ChangeDetector, Todos_ChangeDetector, and the first Todo_ChangeDetector, it will go back to this state.
The difference between Annotations and Decorators
Let's shed some light on this subject, which is quite critical in the development of our AngularJS 2 applications.
Annotations
Annotations are a type of feature that AngularJS team added to the framework at the beginning, when they created the ECMAScript language extension AtScript and basically, they are a declarative way to add metadata to code.
The AngularJS team changed their AtScript in function of TypeScript, and the Annotation concept changed to the decorator concept, so, forget the annotation concept by the way.
@Component({
  selector: 'tabs',
  template: `
    <ul>
      <li>Tab 1</li>
      <li>Tab 2</li>
    </ul>
  `
})
export class Tabs {

}
Let’s take a look at the following Angular 2 component to get an idea of what metadata annotations can look like:
We have a class Tabs that is basically empty. The class has one annotation @Component. If we’d remove all annotations, what would be left is just an empty class that doesn’t have any special meaning right? So it seems that @Component add some metadata to the class in order to give it a specific meaning. This is what annotations are all about. They are a declarative way to add metadata to code.
@Component is an annotation that tells Angular, that the class, which the annotation is attached to, is a component.
Decorators
Decorators are a proposed standard for ECMAScript 2016 by Yehuda Katz, to annotate and modify classes and properties at design time. This sounds pretty much like what annotations do right? Well… sort of. Let’s take a look at what a decorator looks like:
// A simple decorator
@decoratorExpression
class MyClass { }
Wait. This looks exactly like an AtScript annotation! That’s right. But it isn’t. From a consumer perspective, a decorator indeed looks like the thing that we know as “AtScript Annotation”. There is a significant difference though. We are in charge of what our decorator does to our code. Taking the code above, a corresponding decorator implementation for @decoratorExpression could look like this:
function decoratorExpression(target) {
   // Add a property on target
   target.annotated = true;
}
Right. A decorator is just a function that gives you access to the target that needs to be decorated. Get the idea? Instead of having a transpiler that decides where your annotations go, we are in charge of defining what a specific decoration/annotation does.
AngularJS 2 - Binding
When developing data entry forms, we often want to both display a data property and update that property when the user makes changes.
The [(ngModel)] two-way data binding syntax makes that easy. Here's an example:
<input [(ngModel)]="currentHero.firstName">[()] = BANANA IN A BOX
To remember that the parentheses go inside the brackets, visualize a banana in a box.
Inside [(ngModel)]
We could have achieved the same result with separate bindings to the <input> element's valueproperty and input event.
<input [value]="currentHero.firstName"
       (input)="currentHero.firstName=$event.target.value" >
That’s cumbersome. Who can remember which element property to set and what event reports user changes? How do we extract the currently displayed text from the input box so we can update the data property? Who wants to look that up each time?
That ngModel directive hides these onerous details behind its own ngModel input andngModelChange output properties.
<input
  [ngModel]="currentHero.firstName"
  (ngModelChange)="currentHero.firstName=$event">
Let's try something silly like forcing the input value to uppercase:
<input
  [ngModel]="currentHero.firstName"
(ngModelChange)="setUpperCaseFirstName($event)">AngularJS 2 Template Syntax
The template syntax in ANgularJS 2 is quite similar to AngularJS 1, but we need to learn some new constructions for repeat statement or bindings.
| Binding type | Target | Examples |
|---|---|---|
| Property | Element property Component property Directive property |
<img [src] = "heroImageUrl"> <hero-detail [hero]="currentHero"></hero-detail> <div [ngClass] = "{selected: isSelected}"></div> |
| Event | Element event Component event Directive event |
<button (click) = "onSave()">Save</button> <hero-detail (deleteRequest)="deleteHero()"></hero-detail> <div (myClick)="clicked=$event">click me</div> |
| Two-way | Event and property | <input [(ngModel)]="heroName"> |
| Attribute | Attribute (the exception) | <button [attr.aria-label]="help">help</button> |
| Class | class property | <div [class.special]="isSpecial">Special</div> |
| Style | style property | <button [style.color] = "isSpecial ? 'red' : 'green'"> |
<div *ngFor="let hero of heroes; trackBy:trackByHeroes">({{hero.id}}) {{hero.fullName}}</div>

<hero-detail *ngFor="let hero of heroes" [hero]="hero"></hero-detail>

<div *ngFor="let hero of heroes; let i=index">{{i + 1}} - {{hero.fullName}}</div>

trackByHeroes(index: number, hero: Hero) { return hero.id; }

<div *ngFor="let hero of heroes; trackBy:trackByHeroes">({{hero.id}}) {{hero.fullName}}</div>
*ngFor
<hero-detail *ngIf="currentHero" [hero]="currentHero"></hero-detail>

<template [ngIf]="currentHero">
  <hero-detail [hero]="currentHero"></hero-detail>
</template>
*ngIf
*ngSwitch
<span [ngSwitch]="toeChoice">

  <!-- with *NgSwitch -->
  <span *ngSwitchCase="'Eenie'">Eenie</span>
  <span *ngSwitchCase="'Meanie'">Meanie</span>
  <span *ngSwitchCase="'Miney'">Miney</span>
  <span *ngSwitchCase="'Moe'">Moe</span>
  <span *ngSwitchDefault>other</span>

  <!-- with <template> -->
  <template [ngSwitchCase]="'Eenie'"><span>Eenie</span></template>
  <template [ngSwitchCase]="'Meanie'"><span>Meanie</span></template>
  <template [ngSwitchCase]="'Miney'"><span>Miney</span></template>
  <template [ngSwitchCase]="'Moe'"><span>Moe</span></template>
  <template ngSwitchDefault><span>other</span></template>

</span>
Routing in AngularJS 2
Routing allows us to express some aspects of the app's state in the URL. Unlike with server-side front-end solutions, this is optional - we can build the full app without ever changing the URL. Adding routing, however, allows the user to go straight into certain aspects of the app. This is very convenient as it can keep your application linkable and bookmarkable and allow users to share links with others.
- Maintain the state of the application.
- Implement modular applications.
- Implement the application based on the roles (certain roles have access to certain URLs)
Routing in Angular 2
The Angular 2 team reworked routing from the ground up. The new component router allows you to configure routes using annotation on the main app component and map each route to the corresponding component. There are three main components used to configure routing:
- RouteConfig - Annotation similar to View and Component used to define the routes in the main app
- RouterOutlet - Placeholder directive similar to ng-view that renders the content of each route
- RouterLink - Used to define links to the different routes within the application.
@RouteConfig([
  { path: "/", redirectTo: "/ComponentOne" },
  { path: "/component-one",    as: "ComponentOne",    component: ComponentOne },
  { path: "/component-two",   as: "ComponentOne",   component: ComponentTwo }
])
export default class Main {

}
The @RouteConfig decorator is used to define the routing for the component. This is where we can set up the expected paths, the components we want to use and what we want our application to understand them as. To use @RouteConfig, you decorate a class with it and provide an array containing a Route Definition Object.
Below is the sample RouteConfig defined in the main application component:
RouteConfig is a decorator defined in Angular 2 which takes the array of RouteDefinition to define routes within the application. Each RouteDefinition could have different attributes; some of the common attributes are:
- path - URL to be shown in the browser when application is on the specific route
- component - Component to be rendered when the application is on the specific route
- redirectTo - Redirect route if needed; each route can have either component or redirect attribute defined in the route
- name or as - Unique identifier for the route to be used within the application, must be CamelCase
- useAsDefault - Boolean variable which, if set to true, forces the corresponding child route to navigate to it by default
- data - Optional property of any type representing arbitrary route metadata for the given route
- loader - Function that returns a promise that resolves to a component.
Defining the Router Outlet
@Component({
    selector: 'simple-routing',
    directives: [ROUTER_DIRECTIVES]
    template: `<div>
        Basic Routing
        <ul>
          <li><a [routerLink]="['/ComponentOne']">Component One</a></li>
          <li><a [routerLink]="['/ComponentTwo']">Component Two</a></li>
        </ul>
        <div style="border: 1px solid black">
          <router-outlet></router-outlet>
        </div>

    `
})
@RouteConfig([
  {path: '/componentOne', as: 'ComponentOne', useAsDefault: true, component: ComponentOne},
  {path: '/componentTwo', as: 'ComponentTwo', useAsDefault: false, component: ComponentTwo}
])
export class SimpleRouting {

}
Defining Links Between Routes
After declaring routes and adding the outlet, we must tell Angular how to navigate between the routes. There are two ways to do this. One way is to use href links in the templates as shown below.
<nav>
    <a href="/componentOne">Component One</a>
    <a href="/componentTwo">Component Two</a>
</nav>
While this does work, it is not always recommended, because if you change your @RouteConfig definition you will have to manually update all of your templates to reflect the new URL. There is also an issue where this can result in a full-page reload, which is usually something we do not want in our single page applications.
The preferred way is to define them using the RouterLink. The RouterLink directive lets you link to specific parts of your app. The values in the array will map to the name or as that was given to the component in the @RouteConfig. The following example shows how to define routes using RouterLink
<ul>
    <li><a [routerLink]="['/ComponentOne']">Component One</a></li>
    <li><a [routerLink]="['/ComponentTwo']">Component Two</a></li>
</ul>
<ul>
<li><a [routerLink]="['/ComponentOne']">Component One</a></li>
<li><a [routerLink]="['/ComponentTwo']">Component Two</a></li>
<li><a [routerLink]="['/ComponentThree',{message: 'Param'}]">Component Three with Param</a></li>
</ul>If we want to define routes with parameters, we must pass the specific parameter value after each route in the routerLink array as shown below:
Shadow DOM Strategies in AngularJS 2
In one sentence, Shadow DOM is part of the Web Components standard and enables DOM tree and style encapsulation. DOM tree and style encapsulation? What does that even mean? Well, it basically means that Shadow DOM allows us to hide DOM logic behind other elements. Addition to that, it enables us to apply scoped styles to elements without them bleeding out to the outer world.
Whenever we create a component, Angular puts it’s template into a shadowRoot, which is the Shadow DOM of that particular component. Doing that, we get DOM tree and style encapsulation for free, right? But what if we don’t have Shadow DOM in the browser? Does that mean we can’t use Angular 2 in those environments? We can. In fact, Angular 2 doesn’t use native Shadow DOM by default, it uses an emulation. To be technically correct, it also doesn’t create a shadowRoot for our components in case no native Shadow DOM is used.
View Encapsulation Types
Angular 2 comes with view encapsulation built in, which enables us to use Shadow DOM or even emulate it. There are three view encapsulation types:
- ViewEncapsulation.None - No Shadow DOM at all. Therefore, also no style encapsulation.
- ViewEncapsulation.Emulated - No Shadow DOM but style encapsulation emulation.
- ViewEncapsulation.Native - Native Shadow DOM with all it’s goodness.
ViewEncapsulation.None
Angular doesn’t use Shadow DOM at all. Styles applied to our component are written to the document head. We talked about that in a more detail in styling Angular 2 components, but to make a quick recap, having a zippy component with styles like this (note that we set the encapsulation property in our @Component decorator):
import {ViewEncapsulation} from '@angular/core';

@Component({
  selector: 'zippy',
  templateUrl: 'zippy.html',
  styles: [`
    .zippy {
      background: green;
    }
  `],
  encapsulation: ViewEncapsulation.None
})
class Zippy {
  @Input() title: string;
}
And a template like this:
<div class="zippy">
  <div (click)="toggle()" class="zippy__title">

  </div>
  <div [hidden]="!visible" class="zippy__content">
    <ng-content></ng-content>
  </div>
</div>
ViewEncapsulation.Emulated
This view encapsulation is used by default. ViewEncapsulation.Emulated emulates style encapsulation, even if no Shadow DOM is available. This is a very powerful feature in case you want to use a third-party component that comes with styles that might affect your application. Here’s what the head looks like with the exact same component but different strategy:
<head>
  <style>
    .zippy[_ngcontent-1] {
      background: green;
    }
  </style>
</head>
Looks like styles are still written to the document head. But wait, what’s that? Instead of the simple .zippy selector that we used, Angular creates a .zippy[_ngcontent-1] selector. So it seems like Angular rewrote our component’s styles. Let’s see what the component’s template looks like:
<zippy title="Details" _ngcontent-0 _nghost-1>
  <div class="zippy" _ngcontent-1>
    <div (click)="toggle()" class="zippy__title" _ngcontent-1>
      ▾ Details
    </div>
    <div [hidden]="!visible" class="zippy__content" _ngcontent-1>
      <script type="ng/contentStart" class="ng-binding"></script>
        ...
      <script type="ng/contentEnd"></script>
    </div>
  </div>
</zippy>
ViewEncapsulation.Native
Last but not least, we have the native Shadow DOM view encapsulation. This one is super simple to understand since it basically just makes Angular using native Shadow DOM. We can activate it the same way we did with the other types. Here’s what that looks like:
@Comoponent({
  templateUrl: 'zippy.html',
  styles: [`
    .zippy {
      background: green;
    }
  `],
  encapsulation: ViewEncapsulation.Native
})
...
Okay that was easy. If we run our code in the browser, we see that no styles are written to the document head anymore. However, styles do now end up in the component’s template inside the shadow root. Here’s what that looks like:
<zippy title="Details">
  #shadow-root
  | <style>
  |   .zippy {
  |     background: green;
  |   }
  | </style>
  | <div class="zippy">
  |   <div (click)="toggle()" class="zippy__title">
  |     ▾ Details
  |   </div>
  |   <div [hidden]="!visible" class="zippy__content">
  |     <content></content>
  |   </div>
  | </div>
  "This is some content"
</zippy>
AngularJS 2 Server Rendering

Code Time