Nginx
&
Docker
吳亞倫
為什麼要講?
- 之後要開放部上 server 給大家用
- 練習部署
上機測驗 0
先來準備接下來要用的
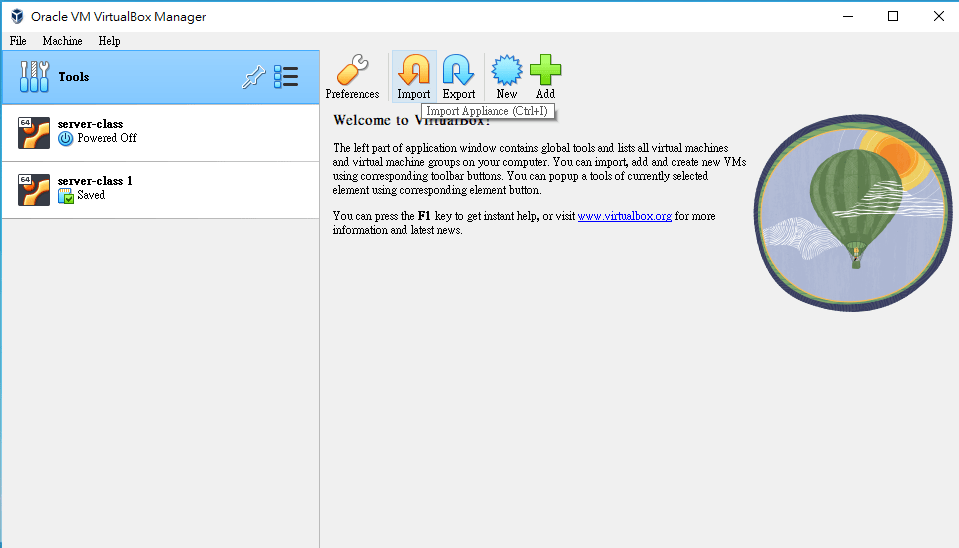
- 安裝好 virtual box
- 複製完 USB / 雲端內的虛擬機 OVA 檔案
- 匯入到 virtual box 當中
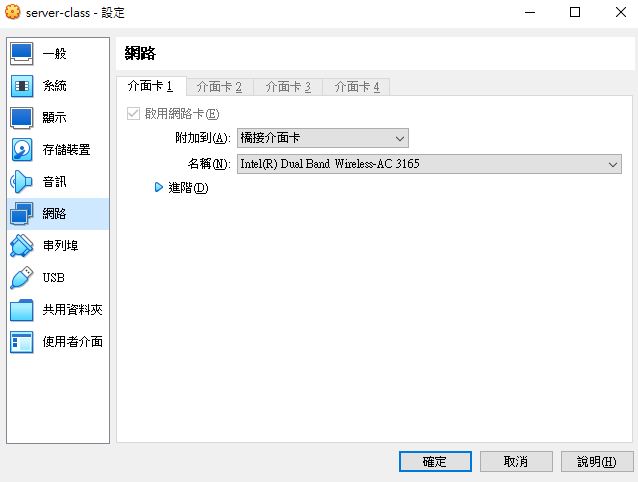
- 進入虛擬機設定,將網路改成橋接
- 開機
- 帳號:user
密碼:12131415
4.
4.
3.
沒有 virtualbox 的可憐 Mac 人們
來用沒 GUI 的虛擬機吧
1. 安裝 Multipass
2. 用以下指令啟動一台假的 vm
# 啟動
multipass launch --name server-class 22.04 --cpus 2 --memory 3G --disk 20G
# CPU、記憶體、硬碟要多少你們可以自己調整

# 進入虛擬機
multipass shell server-class先來準備接下來要用的
開機後
sudo apt update && sudo apt upgrade- 安裝必要包(我應該都裝好ㄌ,以防萬一)
- 啟動 ufw 防火墻(非必要)
sudo ufw enable
sudo ufw allow http
sudo ufw allow https
sudo ufw allow ssh
sudo ufw status
sudo apt update
sudo apt upgrade
sudo apt install build-essential gcc git vim npm nodejs apache2 nginx docker docker-compose neofetch ufw網路協定
TCP/IP 五層協定套組
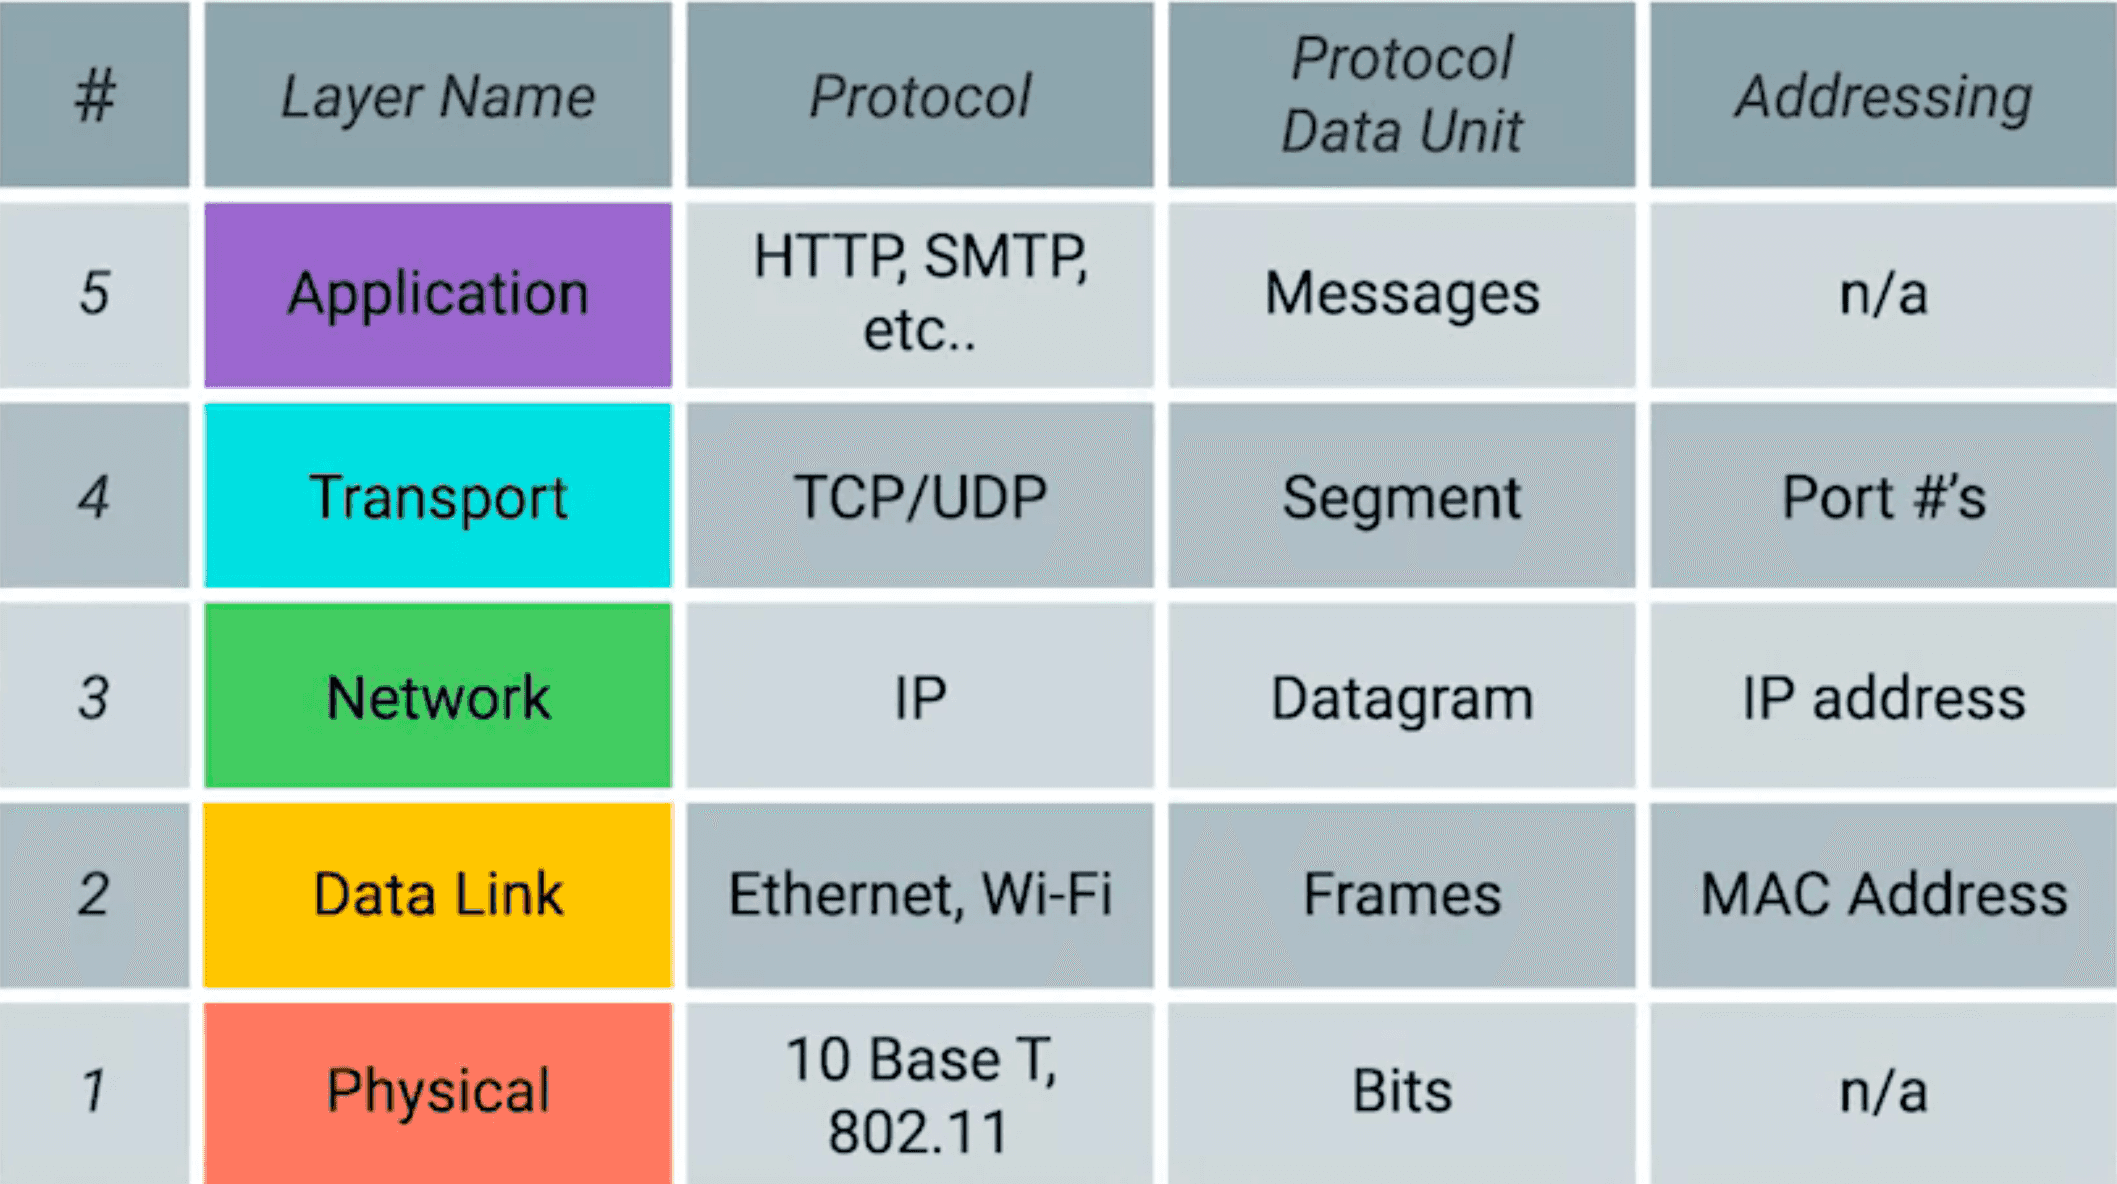
Physical
- 負責網路當中物理上的實體連接,為資料端裝置提供傳送資料的通路,並將數據轉換為電信號或無線電波進行傳輸。
- 範例:網路線、無線電波、光纖等。
Link
- 定義了在區域網路連結範圍內的設備之間的直接連線的通信方法,會將資料分 成 Frame 進行傳輸。
- Ethernet、Wi-Fi
- Mac address
- 交換機
Internet
負責跨網路的數據傳輸
IP
- IPv4:使用 32 位地址(如 192.168.1.1)。
- IPv6:使用 128 位地址(如 2001:0db8:85a3:0000:0000:8a2e:0370:7334)。
Transport
TCP/UDP
- TCP 是一種可靠的傳輸方法、會固定傳輸的順序,依靠多次握手來確保資料傳輸順利,但速度比較慢
- UDP 是一種不可靠的傳輸方法,可能會造成部分資料的丟失,但速度比較快。
Application
HTTP(Port:80)/HTTPS(Port:443) - 網頁瀏覽
客戶端(如瀏覽器)發送一個 HTTP 請求到服務器
然後伺服器便會回傳一個 HTTP response 給客戶端
HTTPS 是加密版本的 HTTP
DNS - 域名系統
它的主要作用是將人類易於記憶的域名轉換成電腦能夠了解的 IP 位址
使用域名時,電腦便會發送一個 DNS 請求,並返回該域名對應的 IP 位址
伺服器軟體
Nginx & Apache
什麼是伺服器軟體?
伺服器硬體
伺服器軟體
電腦設備
網路設備
機房
作業系統
各種應用程式:
負責讓伺服器發揮它的功能
網頁伺服器軟體
web server 包含了一連串控制網路用戶如何訪問託管檔案 。HTTP 伺服器是其中一個部份,它理解 URLs 與 HTTP(瀏覽器用來觀察網頁的協議)。它能透過域名(domain name)訪問託管的網站,並將其內容遞送到終端用戶的設備上。
看不懂?
就是判斷使用者輸入的網址,
給出相應的網頁內容!
(或是丟出 404)
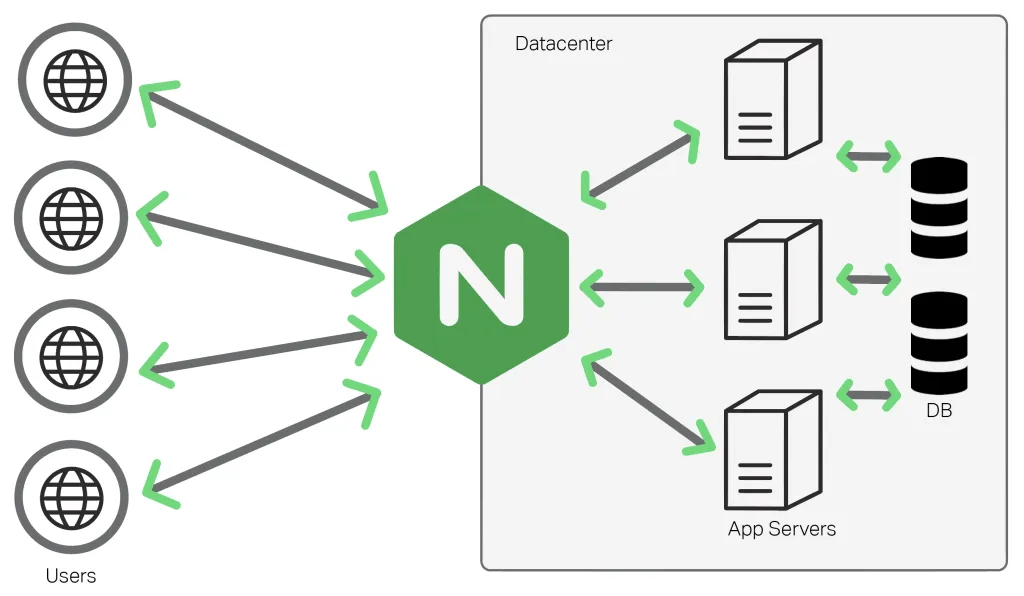
其他用途:反向代理、Http Cache、負載平衡器
常見的網頁伺服器軟體
1. Apache HTTP Server
-
由 Tim Berners Lee 開發並於 1995 年發布
-
由 Apache 基金會維護。
-
為全球約 46% 的網站提供支持
2. NGINX
-
發音為“Engine X”
-
由 Igor Sysoev 於 2004 年發布
3. Microsoft IIS

常見的網頁伺服器軟體
1. Apache HTTP Server
2. NGINX
3. Microsoft IIS
我們今天要交的是 Nginx
Why?
Nginx 的基本使用
安裝 Nginx
sudo apt update
apt install nginx
Nginx 的基本使用
配置 Nginx
Nginx 的設定文件都位於 /etc/nginx 目錄下

主要設定檔:nginx.conf
其他設定檔:/conf.d/*.conf
例如:iscoj 的文件放在 /conf.d/iscoj.fg.tp.edu.tw.conf 裡
主要設定檔:nginx.conf
user www-data; ##設定 Nginx 使用 www-data 用戶執行。
worker_processes auto; ##自動調整工作進程的數量
pid /run/nginx.pid;
include /etc/nginx/modules-enabled/*.conf; ##包含額外的模塊配置文件

events {
	worker_connections 768;
	# multi_accept on;
}

http {

	##
	# Basic Settings
	##

	sendfile on;
	tcp_nopush on;
	types_hash_max_size 2048;
	# server_tokens off;

	# server_names_hash_bucket_size 64;
	# server_name_in_redirect off;

	include /etc/nginx/mime.types;
	default_type application/octet-stream;

	##
	# SSL Settings
	##

	ssl_protocols TLSv1 TLSv1.1 TLSv1.2 TLSv1.3; # Dropping SSLv3, ref: POODLE
	ssl_prefer_server_ciphers on;

	##
	# Logging Settings
	##

	access_log /var/log/nginx/access.log;
	error_log /var/log/nginx/error.log;

	##
	# Gzip Settings
	##

	gzip on;

	# gzip_vary on;
	# gzip_proxied any;
	# gzip_comp_level 6;
	# gzip_buffers 16 8k;
	# gzip_http_version 1.1;
	# gzip_types text/plain text/css application/json application/javascript text/xml application/xml application/xml+rss text/javascript;

	##
	# Virtual Host Configs
	##

	include /etc/nginx/conf.d/*.conf;
	include /etc/nginx/sites-enabled/*;
}


#mail {
#	# See sample authentication script at:
#	# http://wiki.nginx.org/ImapAuthenticateWithApachePhpScript
#
#	# auth_http localhost/auth.php;
#	# pop3_capabilities "TOP" "USER";
#	# imap_capabilities "IMAP4rev1" "UIDPLUS";
#
#	server {
#		listen     localhost:110;
#		protocol   pop3;
#		proxy      on;
#	}
#
#	server {
#		listen     localhost:143;
#		protocol   imap;
#		proxy      on;
#	}
#}
預設文件:
次要設定檔:
virtual host: 一機多站
差在哪?
/conf.d/*.conf
/sites-available/*
/sites-enable/*
- 新作法
- 所有放在目錄下的 vhost config 都會啟動
- 官方推薦的
- 舊作法
-
sites-available 存放所有 vhost config
-
link 要啟動的 config 到 sites-enable
-
Apache 的管理方式
vhost config 寫法
先來看看 default 檔案
##
# You should look at the following URL's in order to grasp a solid understanding
# of Nginx configuration files in order to fully unleash the power of Nginx.
# https://www.nginx.com/resources/wiki/start/
# https://www.nginx.com/resources/wiki/start/topics/tutorials/config_pitfalls/
# https://wiki.debian.org/Nginx/DirectoryStructure
#
# In most cases, administrators will remove this file from sites-enabled/ and
# leave it as reference inside of sites-available where it will continue to be
# updated by the nginx packaging team.
#
# This file will automatically load configuration files provided by other
# applications, such as Drupal or Wordpress. These applications will be made
# available underneath a path with that package name, such as /drupal8.
#
# Please see /usr/share/doc/nginx-doc/examples/ for more detailed examples.
##

# Default server configuration
#
server {
	listen 80 default_server;
	listen [::]:80 default_server;

	# SSL configuration
	#
	# listen 443 ssl default_server;
	# listen [::]:443 ssl default_server;
	#
	# Note: You should disable gzip for SSL traffic.
	# See: https://bugs.debian.org/773332
	#
	# Read up on ssl_ciphers to ensure a secure configuration.
	# See: https://bugs.debian.org/765782
	#
	# Self signed certs generated by the ssl-cert package
	# Don't use them in a production server!
	#
	# include snippets/snakeoil.conf;

	root /var/www/html;

	# Add index.php to the list if you are using PHP
	index index.html index.htm index.nginx-debian.html;

	server_name _;

	location / {
		# First attempt to serve request as file, then
		# as directory, then fall back to displaying a 404.
		try_files $uri $uri/ =404;
	}

	# pass PHP scripts to FastCGI server
	#
	#location ~ \.php$ {
	#	include snippets/fastcgi-php.conf;
	#
	#	# With php-fpm (or other unix sockets):
	#	fastcgi_pass unix:/run/php/php7.4-fpm.sock;
	#	# With php-cgi (or other tcp sockets):
	#	fastcgi_pass 127.0.0.1:9000;
	#}

	# deny access to .htaccess files, if Apache's document root
	# concurs with nginx's one
	#
	#location ~ /\.ht {
	#	deny all;
	#}
}


# Virtual Host configuration for example.com
#
# You can move that to a different file under sites-available/ and symlink that
# to sites-enabled/ to enable it.
#
#server {
#	listen 80;
#	listen [::]:80;
#
#	server_name example.com;
#
#	root /var/www/example.com;
#	index index.html;
#
#	location / {
#		try_files $uri $uri/ =404;
#	}
#}
vhost config 寫法
解析一下他的常見基本架構
upstream api {
    server localhost:5000;
}

server {
    listen 80;
    listen [::]:80;
    server_name dian.cjtsai.com;
    root /var/www/html;
    index index.html index.htm index.nginx-debian.html;


    proxy_set_header Host $http_host;
    proxy_set_header X-Real-IP $remote_addr;
    proxy_set_header X-Forwarded-For $proxy_add_x_forwarded_for;

    location / {
            proxy_pass http://api/;
    }
}
定義了要將 request proxy 過去的應用
主區段
監聽 80 port (http)
靜態網頁的根目錄
靜態網頁的要拿啥當 root page
路由設定(其實這裡跟第10行衝突)
非常重要,是反向代理的主要設定區
不懂?來看看 iscoj 的反向代理設定
##
# You should look at the following URL's in order to grasp a solid understanding
# of Nginx configuration files in order to fully unleash the power of Nginx.
# https://www.nginx.com/resources/wiki/start/
# https://www.nginx.com/resources/wiki/start/topics/tutorials/config_pitfalls/
# https://wiki.debian.org/Nginx/DirectoryStructure
#
# In most cases, administrators will remove this file from sites-enabled/ and
# leave it as reference inside of sites-available where it will continue to be
# updated by the nginx packaging team.
#
# This file will automatically load configuration files provided by other
# applications, such as Drupal or Wordpress. These applications will be made
# available underneath a path with that package name, such as /drupal8.
#
# Please see /usr/share/doc/nginx-doc/examples/ for more detailed examples.
##

# Default server configuration
#

#	passenger_enabled on;


map $http_upgrade $connection_upgrade {
    default upgrade;
    ''      close;
}


upstream vscode{
	server 0.0.0.0:8443;
	keepalive 16;
}
upstream websocket{
	server 0.0.0.0:3000;
	keepalive 16;
}
upstream tioj {
	server 0.0.0.0:4000;
	keepalive 16;
}

upstream qduoj {
	server 0.0.0.0:1443;
	keepalive 16;
}

upstream cms {
	server 0.0.0.0:8890;
	keepalive 8;
}

upstream cms-admin {
	server 0.0.0.0:8891;
	keepalive 8;
}

upstream cms-rank {
	server 0.0.0.0:8892;
	keepalive 8;
}


# fgiscoj -> qduoj
server {
	listen 443 ssl;
  	listen [::]:443 ssl;

  	# 憑證與金鑰的路徑
    ssl_certificate /etc/letsencrypt/live/iscoj.fg.tp.edu.tw/fullchain.pem; # managed by Certbot
    ssl_certificate_key /etc/letsencrypt/live/iscoj.fg.tp.edu.tw/privkey.pem; # managed by Certbot

	root /var/www/html;
	server_name fgiscoj.fg.tp.edu.tw;

	location /{
		proxy_pass https://qduoj/;
		# 把 IP、Protocol 等 header 都一起送給反向代理的 server
		proxy_set_header X-Real-IP $remote_addr;
      	proxy_set_header X-Forwarded-For $proxy_add_x_forwarded_for;
      	proxy_set_header X-Forwarded-Proto https;
      	proxy_set_header X-Forwarded-Server $host;
      	proxy_set_header Host $http_host;
      	proxy_redirect off;
	}
}


server {

	# SSL configuration
	#
	listen 443 ssl default_server;
	listen [::]:443 ssl default_server;

  	# 憑證與金鑰的路徑
    ssl_certificate /etc/letsencrypt/live/iscoj.fg.tp.edu.tw/fullchain.pem; # managed by Certbot
    ssl_certificate_key /etc/letsencrypt/live/iscoj.fg.tp.edu.tw/privkey.pem; # managed by Certbot
	# Note: You should disable gzip for SSL traffic.
	# See: https://bugs.debian.org/773332
	#
	# Read up on ssl_ciphers to ensure a secure configuration.
	# See: https://bugs.debian.org/765782
	#
	# Self signed certs generated by the ssl-cert package
	# Don't use them in a production server!
	#
	# include snippets/snakeoil.conf;

	root /var/www/html;

	# Add index.php to the list if you are using PHP
	# index index.html index.htm index.nginx-debian.html;

	server_name iscoj.fg.tp.edu.tw iscoj.ckefgisc.org;
	location /{
		proxy_pass http://tioj/;

		# 把 IP、Protocol 等 header 都一起送給反向代理的 server
		proxy_set_header X-Real-IP $remote_addr;
      	proxy_set_header X-Forwarded-For $proxy_add_x_forwarded_for;
      	proxy_set_header X-Forwarded-Proto https;
      	proxy_set_header X-Forwarded-Server $host;
      	proxy_set_header Host $http_host;
      	proxy_redirect off;


        # 舊網址 to 新網址格式 (with s)
		rewrite "^/problem/(.*)$" /problems/$1 permanent;
	}

#iscoj auto refresh and external judge server connection

    location /cable {
        proxy_pass http://localhost:4000/cable;
        proxy_http_version 1.1;
        proxy_set_header Upgrade $http_upgrade;
        proxy_set_header Connection $connection_upgrade;
        proxy_set_header Host $host;
        proxy_set_header X-Real-IP $remote_addr;
        proxy_set_header X-Forwarded-For $proxy_add_x_forwarded_for;
        proxy_set_header X-Forwarded-Proto $scheme;
        proxy_read_timeout 86400; # 1 day
    }

	location = /problem {
		return 302 /problem/;
	}

	location = /vscode {
		return 302 /vscode/;
	}
	location /vscode/ {
		proxy_pass http://127.0.0.1:8443/;
		proxy_set_header X-Real-IP $remote_addr;
		proxy_set_header X-Forwarded-For $proxy_add_x_forwarded_for;
		proxy_set_header Host $http_host;
		proxy_set_header X-NginX-Proxy true;
		proxy_http_version 1.1;
		proxy_set_header Upgrade $http_upgrade;
		proxy_set_header Connection "upgrade";
		proxy_redirect off;
	}

	location = /cms {
		return 302 /cms/;
	}
	location /cms/ {
		proxy_pass http://cms/;
	}

	location = /cms/admin {
		return 302 /cms/admin/;
	}
	location /cms/admin/ {
		proxy_pass http://cms-admin/;
	}

	location = /cms/ranking {
		return 302 /cms/ranking/;
	}
	location /cms/ranking/ {
		proxy_pass http://cms-rank/;
		proxy_buffering off;
	}

	location /cms/<ANS> {
		return 302 https://hackmd.io/_uploads/rJMJQzcNn.png;
	}
	location /cms/96 {
		return 302 https://hackmd.io/@QYi6gllvSum0RZrW3jaysg/Sy75nf9Vn;
	}
	location /cms/96/ {
		return 302 https://hackmd.io/@QYi6gllvSum0RZrW3jaysg/Sy75nf9Vn;
	}
	location /cms/2000000080{
		return 302 https://hackmd.io/@ckefgisc-izcc/BkZzbzPQ0;
	}
	location /cms/2000000080/{
		return 302 https://hackmd.io/@ckefgisc-izcc/BkZzbzPQ0;
	}

}


server {
    if ($host = iscoj.fg.tp.edu.tw) {
        return 301 https://$host$request_uri;
    } # managed by Certbot

	if ($host = fgiscoj.fg.tp.edu.tw) {
	    return 301 https://$host$request_uri;
	} # managed by Certbot

	if ($host = iscoj.ckefgisc.org) {
	    return 301 https://$host$request_uri;
	} # managed by Certbot


	listen 80 default_server;
	listen [::]:80 default_server;
	server_name iscoj.fg.tp.edu.tw fgiscoj.fg.tp.edu.tw iscoj.ckefgisc.org;
    return 404; # managed by Certbot

}
如何啟動 nginx ?
# 啟用
sudo systemctl enable nginx

# 啟動
sudo systemctl start nginx

# 重啟
sudo systemctl restart nginx

# 更新設定檔後 reload
sudo systemctl reload nginx

# 關閉
sudo systemctl stop nginx
nginx 更多指令
# 如果你沒有systemctl 可以使用nginx -s下達各種指令
nginx -s start/stop/reload

# 檢查conf檔案是否可用
nginx -t

# 自訂義conf檔案路徑
nginx -c [conf_file]
上機測驗 1
目標:將社網部署到伺服器上
要求:
- 設定完成 ufw 防火牆
- 使用 Nginx 部署
- 可以查資料
- 盡量不用 GPT 或其他 AI
- 限時 40 min
- 不可以抄作業,只能跟同組討論
提示:
1. 社網在這裡(為啥 27th? 因為 react 太麻煩)
2. 如何遠端複製檔案到 server? 用 scp
3. 可以 google:nginx static site 試試看
4. 如果你要 https ,可以用看看 certbot,但今天沒網址給你試
5. 如何檢視電腦 ip?用 hostname -I 看
Docker
什麼是 Docker ?
- 一個類似於虛擬機的東東
- 可以十分輕量化的建立一個服務
- 確保系統、環境到哪裡都一樣
- 設定好安裝指令,可以簡易的部署到任意地方
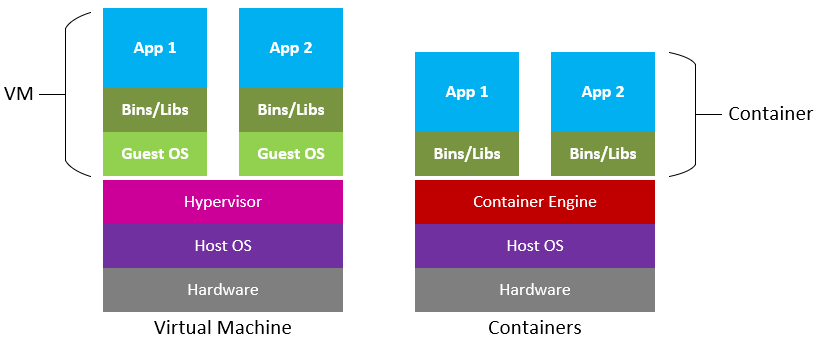
三個基本概念
- 映像檔(Image)
- 容器(Container)
- 倉庫(Repository)
三個基本概念
- 映像檔(Image)
- 就是一個唯讀的模板
- 例如:一個映像檔可以包含一個完整的 ubuntu 作業系統環境,裡面僅安裝了 Apache 或使用者需要的其它應用程式。
- 映像檔可以從倉庫抓取,或是利用 Dockerfile 建立
- 映像檔可以用來建立 Container
- 容器(Container)
- 倉庫(Repository)
三個基本概念
- 映像檔(Image)
- 容器(Container)
- 容器是一個運作的實體
- 可以啟動、開始、停止、刪除
- 每個容器都是相互隔離的
- 可以把它看作一個小 VM ,跑著特定的 linux
- 倉庫(Repository)

三個基本概念
- 映像檔(Image)
- 容器(Container)
- 倉庫(Repository)
- 倉庫是集中存放映像檔檔案的場所
- 最大的公開倉庫是 Docker Hub
Installation
Docker Desktop
Docker Engine
-
Docker 新推薦的
-
個人覺得很麻煩,會需要一直啟動 deamon 之類的
-
適合 windows / mac / 有 GUI 的電腦
- https://docs.docker.com/get-started/get-docker/
- 包含 docker 核心的部分
- 傳統、好用
- 適合伺服器、WSL
- https://docs.docker.com/engine/install/
來建立一個基本的 Docker
拉取 ubuntu image
docker image pull ubuntu查看 image list
docker image list成立一個 container 並且執行指令
# 產生一個 ubuntu 並且輸出 Hello world
sudo docker run ubuntu /bin/echo 'Hello world'

# 產生一個 ubuntu 並且進入 bash
sudo docker run --name test ubuntu "/bin/bash"

# 查看現有的 container
docker ps -a這樣感覺很雞肋
對,沒錯
所以來介紹另一種建立 image 的方式 --- Dockerfile
實務上我們會從 Docker Hub 下載官方的 Docker Image 使用,但官方的 image 功能可能過於陽春,我們可能想根據自己的需求,再安裝其他的 app,最後再打包成自己的 Docker image
Dockerfile
好懶得做簡報喔
Dockerfile
來看看例子
FROM ubuntu:latest

# Install Linux library dependency
RUN apt-get update
RUN apt-get install -y wget apt-transport-https gpg

# Install microsoft.gpg
RUN wget -qO- https://packages.microsoft.com/keys/microsoft.asc | gpg --dearmor > microsoft.asc.gpg
RUN mv microsoft.asc.gpg /etc/apt/trusted.gpg.d/
RUN wget -q https://packages.microsoft.com/config/ubuntu/18.04/prod.list
RUN mv prod.list /etc/apt/sources.list.d/microsoft-prod.list
RUN chown root:root /etc/apt/trusted.gpg.d/microsoft.asc.gpg
RUN chown root:root /etc/apt/sources.list.d/microsoft-prod.list

# Install .NET Core SDK
RUN apt-get update
RUN apt-get install -y dotnet-sdk-2.1

# Display Greeting
CMD [ "echo", "Ubuntu 18.04 LTS with .NET Core 2.1"]
Dockerfile
來看看例子
CMS Dockerfile by 成大某位電神
FROM ubuntu:20.04

RUN apt-get update && apt-get upgrade -y
RUN apt-get install -y \
    build-essential \
    cgroup-lite \
    cppreference-doc-en-html \
    fp-compiler \
    git \
    haskell-platform \
    libcap-dev \
    libcups2-dev \
    libffi-dev \
    libpq-dev \
    libyaml-dev \
    mono-mcs \
    openjdk-8-jdk-headless \
    php7.4-cli \
    postgresql-client \
    python3-pip \
    python3.8 \
    python3.8-dev \
    rustc \
    sudo \
    wait-for-it \
    zip \
    vim

# Create cmsuser user with sudo privileges
RUN useradd -ms /bin/bash cmsuser && \
    usermod -aG sudo cmsuser
# Disable sudo password
RUN echo '%sudo ALL=(ALL) NOPASSWD:ALL' >> /etc/sudoers
# Set cmsuser as default user
USER cmsuser

COPY --chown=cmsuser:cmsuser . /home/cmsuser/cms

WORKDIR /home/cmsuser/cms
EXPOSE 8888-8890

RUN sudo pip3 install -r requirements.txt
RUN sudo pip3 install -r dev-requirements.txt
RUN sudo python3 setup.py install

RUN sudo python3 prerequisites.py --yes --cmsuser=cmsuser install

RUN sudo sed 's/cmsuser:0000@localhost/postgres@db/' ./config/cms.conf.sample \
    | sudo tee /usr/local/etc/cms.conf

ENV LANG C.UTF-8

CMD [""]
基本上 RUN 開頭的東西都是 CMS doc 裡面的安裝指令
可是,有些時候,一個 Container 沒辦法完成所有事情
Docker-compose
一個指令,自動根據規則
完成 build image、啟動多個 container
並且操控多個 container
docker-compose.yml 就是 container 的管理文件,只是採用 code 形式描述
基本概念
- 服務 (Service): 一個應用的容器,定義在
docker-compose.yml文件中。 - 網絡 (Network): 服務之間的通信方式,默認會為每個 Compose 應用創建一個網絡。
- 卷 (Volume): 持久化數據存儲,服務可以共享和持久化數據。
看看例子
version: '3'
services:
  web:
    image: my-web-app:latest
    ports:
      - "5000:5000"
    depends_on:
      - redis
  redis:
    image: redis:alpine
-
總共有兩個 container
-
一個 Web 服務和一個 Redis 服務
-
image: 從哪裡抓 image
-
volumes: 映射資料夾進去容器
-
environment: 傳送變數
-
ports: 映射通訊阜口
看看例子
version: "3.7"

x-logging:
  &default-logging
  driver: "json-file"
  options:
    max-size: "100m"
    max-file: "2"

services:
  web:
    build:
      context: ./
      args:
        MYSQL_ROOT_PASSWORD: $MYSQL_ROOT_PASSWORD
        TIOJ_KEY: $FETCH_KEY
    environment:
      - RAILS_ENV=production
      - SMTP_USERNAME
      - SMTP_PASSWORD
      - SMTP_PORT
      - SMTP_ADDRESS
      - MAIL_HOSTNAME
      - MAIL_SENDER
    volumes:
      - /srv/tioj/web-td:/tioj/td
      - /srv/tioj/web-log:/tioj/log
      - /srv/tioj/public:/tioj/public
    depends_on:
      - db
    networks:
      - app
    ports:
      - "4000:4000"
    logging: *default-logging
  db:
    image: mysql:8.0
    volumes:
      - /srv/tioj/db:/var/lib/mysql
    environment:
      - MYSQL_ROOT_PASSWORD=$MYSQL_ROOT_PASSWORD
      - MYSQL_DATABASE=tioj_production
    networks:
      - app
    logging: *default-logging
  judge:
    build: https://github.com/TIOJ-INFOR-Online-Judge/tioj-judge.git#ddb2f430eb7b6a4561ed23c1ef2ad94fcafc5b22
    environment:
      TIOJ_URL: "http://localhost:4000"
      TIOJ_KEY: $FETCH_KEY
    volumes:
      - /srv/tioj/judge-td-pool:/var/lib/tioj-judge/td-pool
      - /srv/tioj/judge-testdata:/var/lib/tioj-judge/testdata
    tmpfs:
      - /tmp:exec
    privileged: true
    network_mode: host
    pid: host
    logging: *default-logging

networks:
app:-
總共有三個 container
-
image: 從哪裡抓 image
-
web: 直接編譯 dockerfile
-
db: 從 docker hub 抓 image
-
judge: 從另一個github repo 的 dockerfile 編譯
-
-
volumes: 映射資料夾進去容器
-
environment: 傳送變數
-
ports: 映射通訊阜口
看看例子
version: "3"
services:

  oj-redis:
    image: redis:4.0-alpine
    container_name: oj-redis
    restart: always
    volumes:
      - ./data/redis:/data

  oj-postgres:
    image: postgres:10-alpine
    container_name: oj-postgres
    restart: always
    volumes:
      - ./data/postgres:/var/lib/postgresql/data
    environment:
      - POSTGRES_DB=onlinejudge
      - POSTGRES_USER=onlinejudge
      - POSTGRES_PASSWORD=onlinejudge

  judge-server:
    image: registry.cn-hangzhou.aliyuncs.com/onlinejudge/judge_server
    container_name: judge-server
    restart: always
    read_only: true
    cap_drop:
      - SETPCAP
      - MKNOD
      - NET_BIND_SERVICE
      - SYS_CHROOT
      - SETFCAP
      - FSETID
    tmpfs:
      - /tmp
    volumes:
      - ./data/backend/test_case:/test_case:ro
      - ./data/judge_server/log:/log
      - ./data/judge_server/run:/judger
    environment:
      - SERVICE_URL=http://judge-server:8080
      - BACKEND_URL=http://oj-backend:8000/api/judge_server_heartbeat/
      - TOKEN=CHANGE_THIS
      # - judger_debug=1

  oj-backend:
    image: registry.cn-hangzhou.aliyuncs.com/onlinejudge/oj_backend
    container_name: oj-backend
    restart: always
    depends_on:
      - oj-redis
      - oj-postgres
      - judge-server
    volumes:
      - ./data/backend:/data
    environment:
      - POSTGRES_DB=onlinejudge
      - POSTGRES_USER=onlinejudge
      - POSTGRES_PASSWORD=onlinejudge
      - JUDGE_SERVER_TOKEN=CHANGE_THIS
      - FORCE_HTTPS=1
      # - STATIC_CDN_HOST=cdn.oj.com
    ports:
      - "0.0.0.0:8000:8000"
      - "0.0.0.0:1443:1443"
- 總共有四個 container
oj-redis、oj-postgres
judge-server、oj-backend - image: 從哪裡抓 image
- volumes: 映射資料夾進去容器
- environment: 傳送變數
- ports: 映射通訊阜口
# 啟動服務
docker compose up

# 在背景執行
docker compose up -d

# 停止服務
docker compose down

# 指定檔案名稱
docker compose up -f customname.yml
上機測驗 2
使用 docker-compose 部署社網
要求:
- 使用 docker-compose + nginx
- 目標:完成一個資料夾,裡面放三個東西
- data 資料夾裡面放社網原始碼
- nginx.conf 放 nginx 配置
- docker-compose.yml:
- 抓取 nginx:alpine image
- 映射 80 和 443 port
- 映射 data 到容器內
- 映射 nginx.conf 到 conf.d 資料夾中
- 不准看簡報答案
提示關鍵字:
docker nginx static
docker compose nginx static