Gatsby & WordPress
Look into how we can build a blog with WordPress, Gatsby and Wpgraphql
Use ACF with the WPGraphQl plugin
Style it with styled components
Wordpress demo URL:
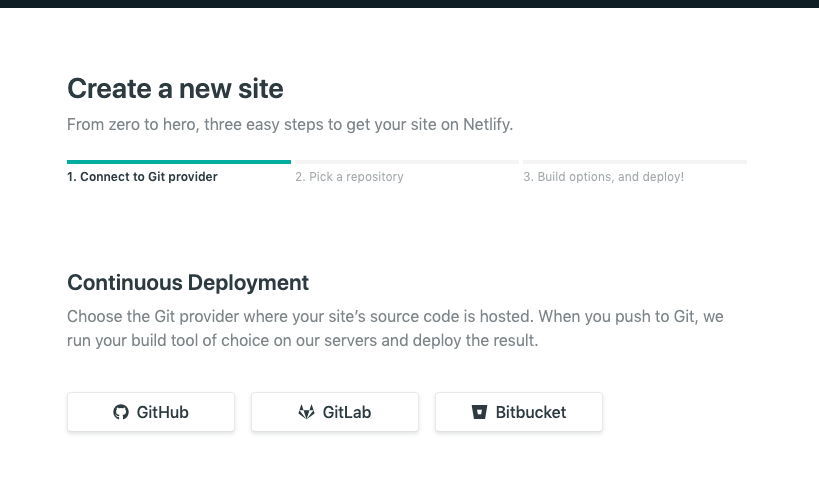
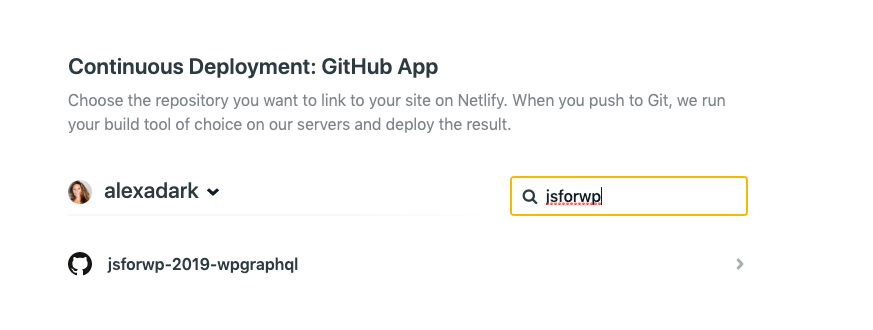
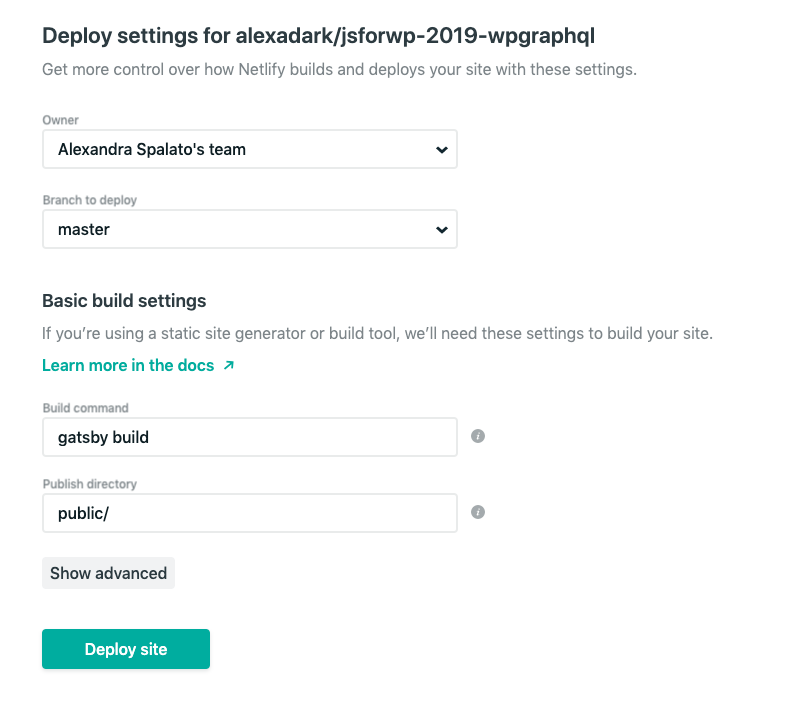
Deploy it on netlify
Gatsby demo URL:
Github repo: Each branch is a different step, if you want to follow
WHY WPgraphql
The gatsby-source-wordpress plugin is only a wrapper around the REST API
WPGraphQl brings the power of GraphQL to WordPress
Easily expose both default and custom data in WordPress
A lot FASTER compared to the REST API.
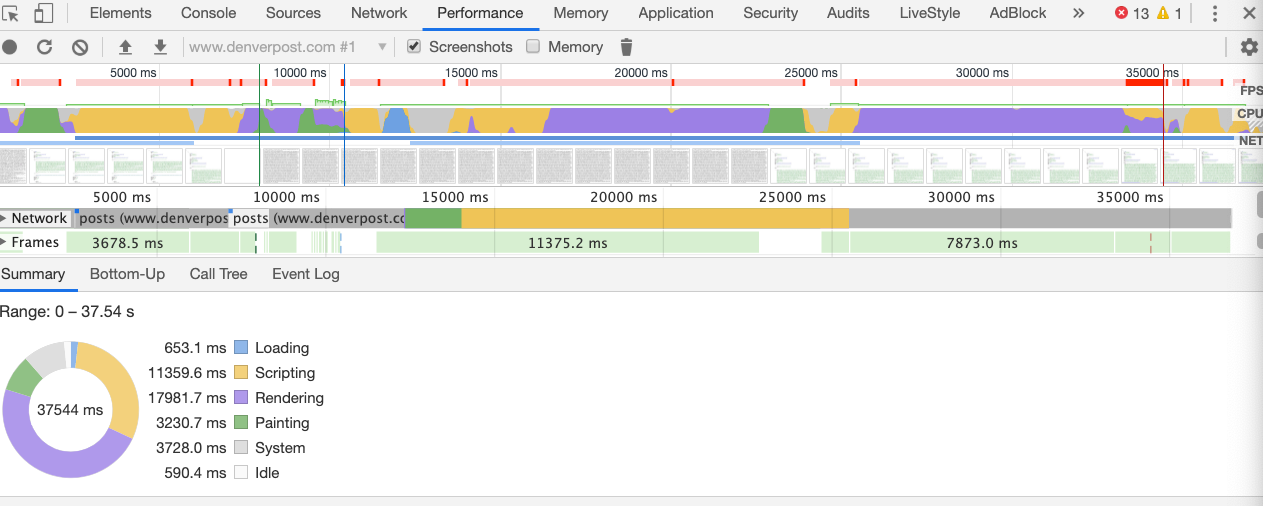
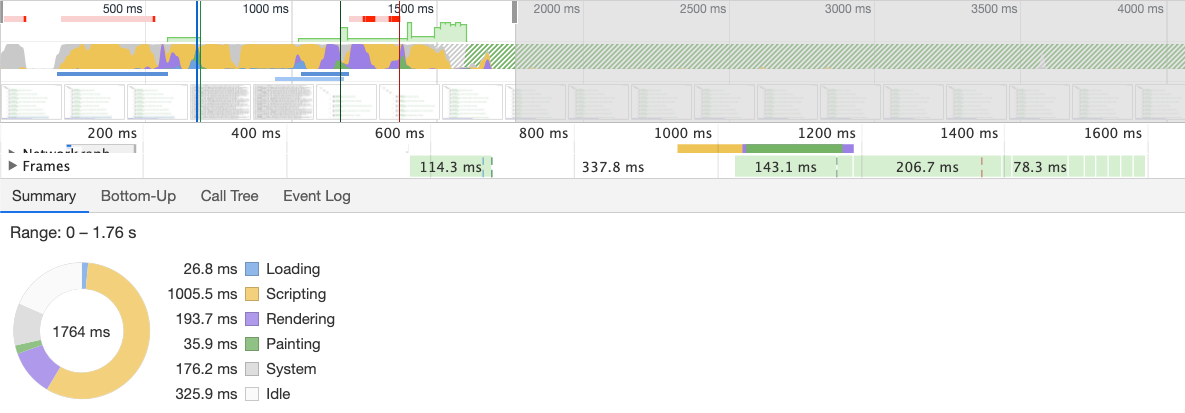
Look at how quickly the data loads with WPGraphQL here
and now look at the difference in load time when it's done with the REST API here
LET'S LOOK INTO THE POWER OF GRAPHQL
GraphQl gives you the ability to dictate exactly what you need from the server and receive the data in a predictable way.
For e.g: Let's say you want to get the author's name for a blog post.
If you had a REST API, you would typically receive the entire User object back in your response.
This leads to overfetching and can result in performance issues.
With GraphQL, you only receive the data you explicitly request. Here's what the query would look like:
author {
  name
}
And here's what our response would look like:
{
  "author": {
    "name": "John Doe"
  }
}
are you ready?
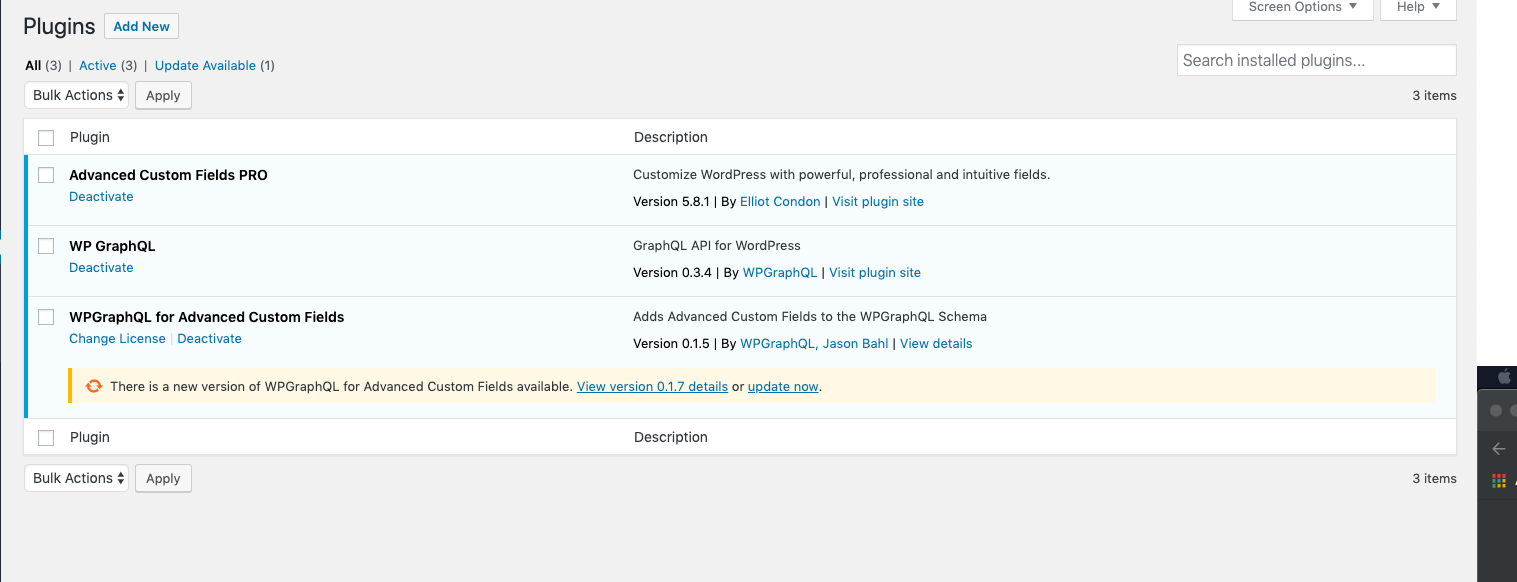
install and config
Install Gatsby Hello World Starter
$ gatsby new myNewBlog gatsbyjs/gatsby-starter-hello-worldInstall and activate the WPGraphQl plugin by downloading or cloning through Github. More info at https://www.wpgraphql.com/
gatsby-config.js
It is the file where Site configurations options are placed for a Gatsby site
Among other things this is where we will have:
- SiteMetadata
-Plugins config
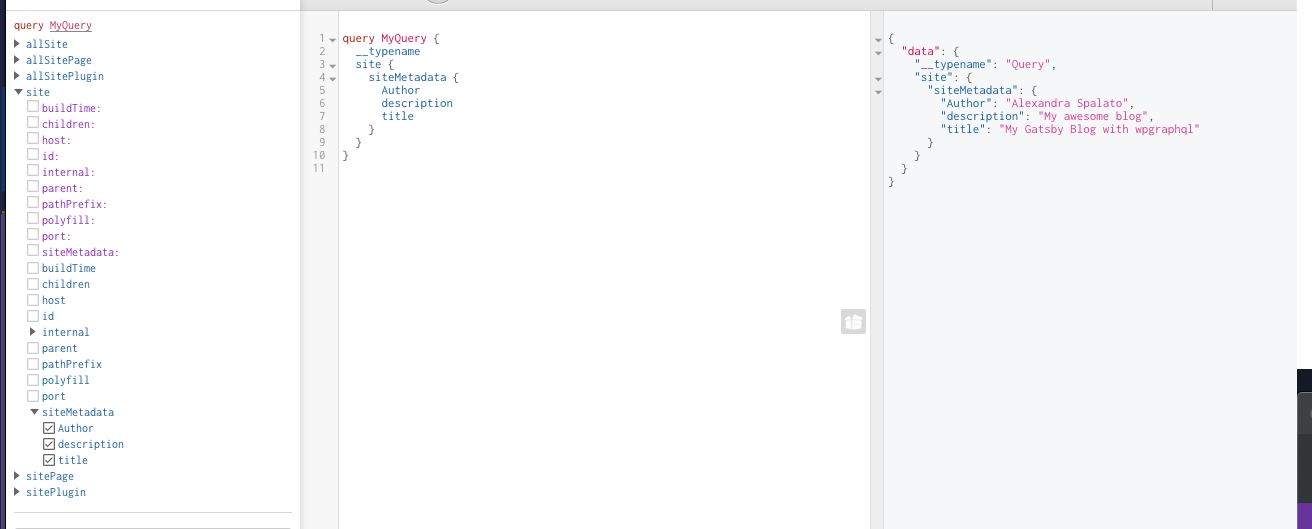
Sitemetadata
module.exports = {
  siteMetadata: {
    title: `My Gatsby Blog with wpgraphql`,
    description: `My awesome blog`,
    Author: `Alexandra Spalato`,
  },
}
Add siteMetadata object to gatsby-config.js
Adding metadata to pages, such as page title and description, helps search engines understand your content and when to show your pages in search results.
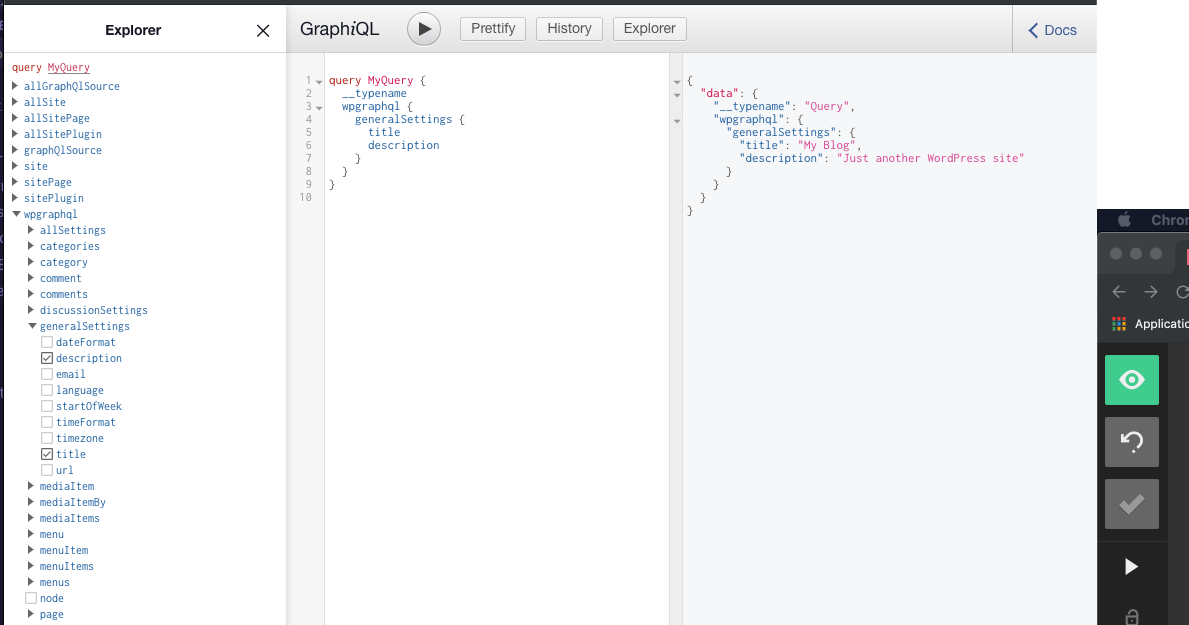
let's take a look at graphiql explorer
create a config file
This where we will place the wordpress URL
/**
 * @type {{wordPressUrl: string}}
 */
const config = {
  wordPressUrl: `http://alexandraspalato.com/jsforwp`,
}

module.exports = config
Install gatsby-source-graphql
$ yarn add gatsby-source-graphqlconst config = require("./config")
module.exports = {
siteMetadata: {
title: `My Gatsby Blog with wpgraphql`,
description: `My awesome blog`,
Author: `Alexandra Spalato`,
},
plugins: [
{
resolve: `gatsby-source-graphql`,
options: {
// This type will contain remote schema Query type
typeName: `WPGraphQL`,
// This is field under which it's accessible
fieldName: `wpgraphql`,
// Url to query from
url: `${config.wordPressUrl}/graphql`,
},
},
],
}
Create Basic Components
HEADER
useStaticQuery is a new Gatsby feature that provides the ability to use a React Hook to query with GraphQL at build time.
Just like the StaticQuery component, it allows your React components to retrieve data via a GraphQL query that will be parsed, evaluated, and injected into the component.
usestaticquery
import React from "react"
import { useStaticQuery, graphql, Link } from "gatsby"

const Header = () => {
  const data = useStaticQuery(graphql`
    query SiteTitleQuery {
      wpgraphql {
        generalSettings {
          description
          title
        }
      }
    }
  `)

  const { title, description } = data.wpgraphql.generalSettings

  return (
    <header id="masthead" className="site-header">
      <p className="site-title">
        <Link to="/" rel="home">
          {title}
        </Link>
      </p>

      <p className="site-description">{description}</p>
    </header>
  )
}

export default Header
footer
import React from "react"

const Footer = () => (
  <footer>
    © {new Date().getFullYear()} | Built with{` `}
    <a href="https://www.wpgraphql.com">WPGraphQL</a> and{` `}
    <a href="https://www.gatsbyjs.org">Gatsby</a>
  </footer>
)

export default Footer
layout
import React from "react"
import Header from "./Header.js"
import Footer from "./Footer.js"

const Layout = ({ children }) => (
  <>
    <Header />
    <div className="content">{children}</div>
    <Footer />
  </>
)

export default Layout
The layout component is like the master template containing the sections of your site that you want to share across multiple pages
wrap pages into layout
import React from "react"
import Layout from "../components/Layout"

export default () => <div>Hello world!</div>
export default () => (
  <Layout>
    <div>Hello world!</div>
  </Layout>
)
Since the content is now wrapped with Layout, the header and footer will now be shown
CREATE POSTS AND PAGES
GATSBY-NODE.JS
Gatsby gives plugins and site builders many APIs for controlling your site. You can implement any of these APIs trough the 'gatsby-node.js' file
const createPosts = require(`./create/createPosts`)
const createSitePages = require(`./create/createSitePages`)

exports.createPages = async ({ actions, graphql }) => {
  await createPosts({ actions, graphql })
  await createSitePages({ actions, graphql })
}
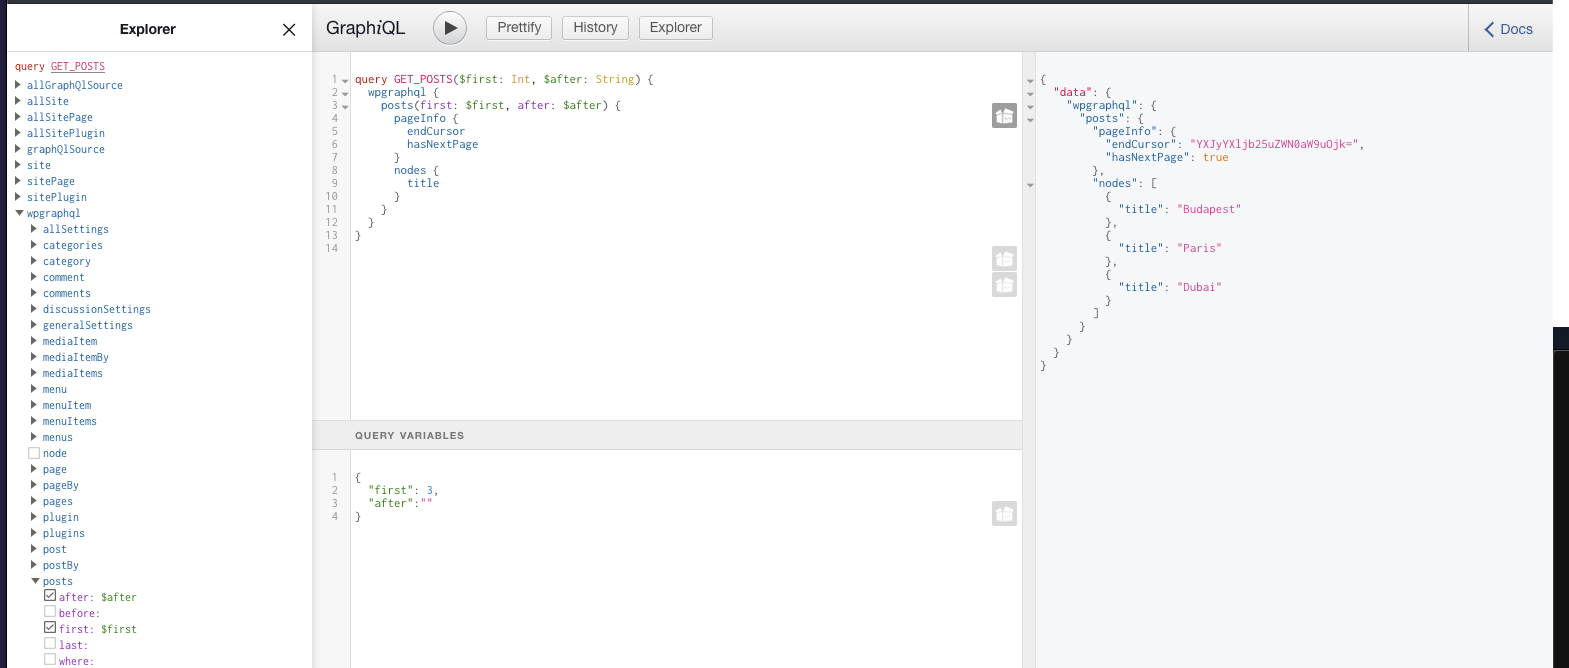
create/createPosts.js
const GET_POSTS = `
    query GET_POSTS($first:Int $after:String){
        wpgraphql {
          posts(
            first: $first
            after:$after
          ) {
            pageInfo {
              endCursor
              hasNextPage
            }
            nodes {
              id
              uri
              postId
              title
            }
          }
        }
      }
    `
const postTemplate = path.resolve(`./src/templates/post.js`)
allPosts.map(post => {
console.log(`create post: ${post.uri}`)
createPage({
path: `/blog/${post.uri}/`,
component: postTemplate,
context: post,
})
})templates/post.js
export const pageQuery = graphql`
  query GET_POST($id: ID!) {
    wpgraphql {
      post(id: $id) {
        title
        content
        featuredImage {
          sourceUrl
          altText
        }
      }
    }
  }
`
const {
content,
featuredImage,
title,
} = data.wpgraphql.post <Layout>
{featuredImage && (
<img src={featuredImage.sourceUrl} alt={featuredImage.altText} />
)}
<h1 className="page-title" dangerouslySetInnerHTML={{ __html: title }} />
<p className="content" dangerouslySetInnerHTML={{ __html: content }} />
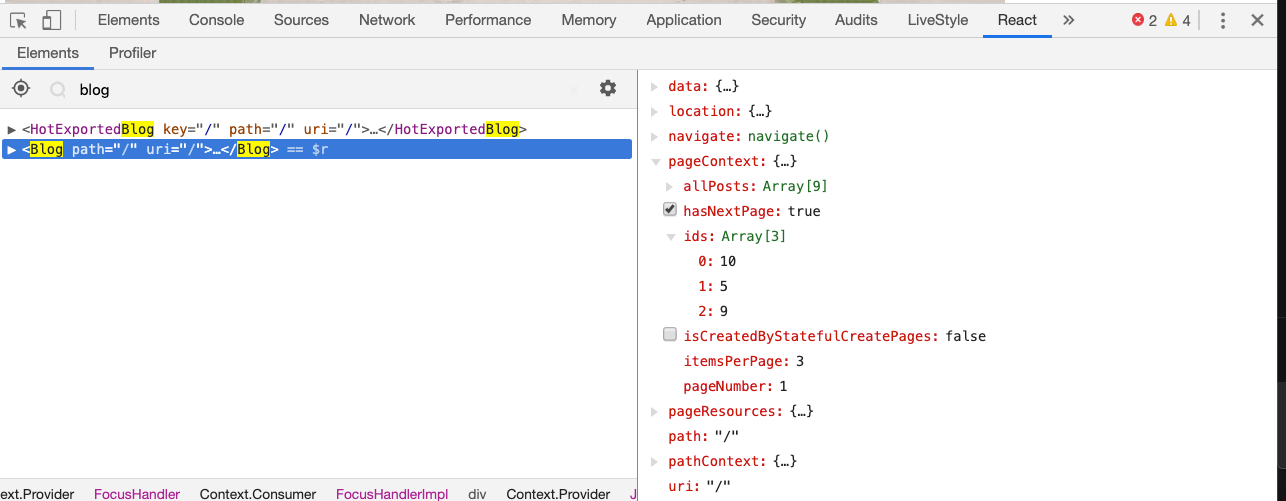
</Layout>pagination
react dev tools
import React from "react"
import { Link } from "gatsby"

const Pagination = ({ pageNumber, hasNextPage, allPosts, itemsPerPage }) => (
  <div className="pagination">
    {pageNumber > 1 && (
      <button>
        <Link to={pageNumber > 2 ? `/page/${pageNumber - 1}` : `/`}>
          Previous Posts
        </Link>
      </button>
    )}

    {Array.from({ length: allPosts.length / itemsPerPage }, (_, i) => (
      <Link
        key={`pagination-number${i + 1}`}
        to={i === 0 ? "/" : `/page/${i + 1}`}
      >
        {i + 1}
      </Link>
    ))}
    {hasNextPage && (
      <button>
        <Link to={`page/${pageNumber + 1}`}>Next Posts</Link>
      </button>
    )}
  </div>
)

export default Pagination
const Blog = ({ data, pageContext }) => {
  const posts = data.wpgraphql.posts.nodes
  const { pageNumber, hasNextPage, itemsPerPage, allPosts } = pageContext
  return (
    <Layout>
      {data &&
        data.wpgraphql &&
        posts.map(post => (
          <article key={post.id}>
            {post.featuredImage && (
              <img
                src={post.featuredImage.sourceUrl}
                alt={post.featuredImage.altText}
              />
            )}

            <h2>
              <Link
                to={`/blog/${post.uri}`}
                dangerouslySetInnerHTML={{ __html: post.title }}
              />
            </h2>
            <p
              className="content"
              dangerouslySetInnerHTML={{ __html: post.excerpt }}
            />
          </article>
        ))}
      <Pagination
        pageNumber={pageNumber}
        hasNextPage={hasNextPage}
        allPosts={allPosts}
        itemsPerPage={itemsPerPage}
      />
    </Layout>
  )
}
MENU
Always clean the cache if you have changed the WordPress theme
Otherwise it will show the wrong menu location in the explorer
rm -rf .cache/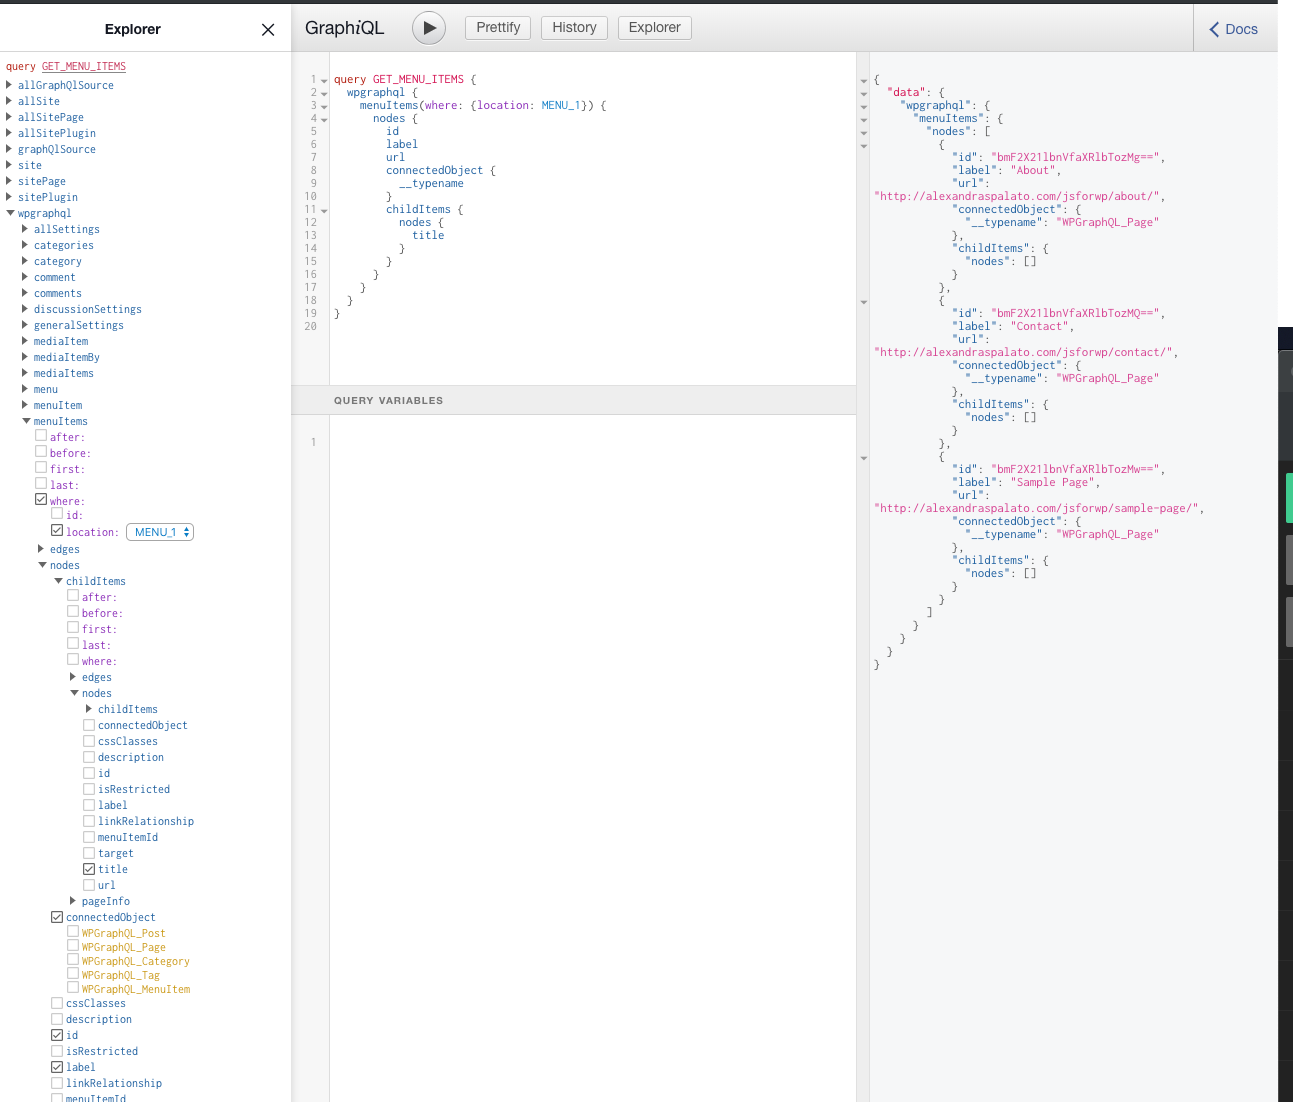
const MENU_QUERY = graphql`
fragment MenuFields on WPGraphQL_MenuItem {
id
label
url
target
connectedObject {
__typename
}
}
query GET_MENU_ITEMS {
wpgraphql {
menuItems(where: { location: MENU_1 }) {
nodes {
...MenuFields
childItems {
nodes {
...MenuFields
}
}
}
}
}
}
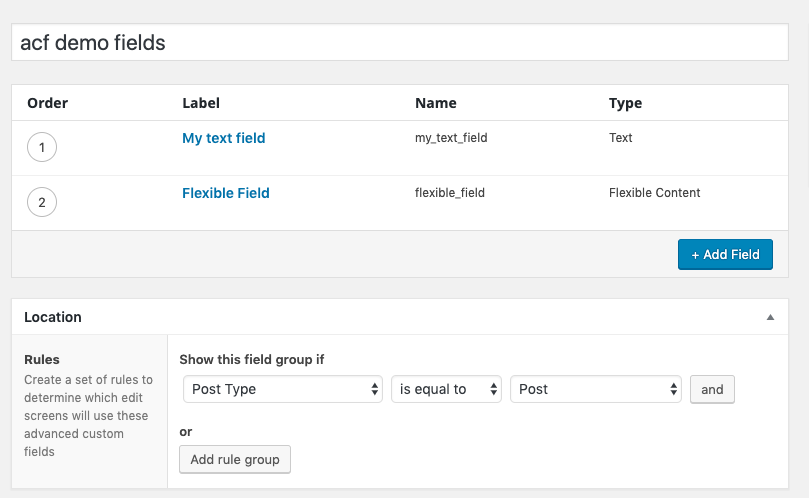
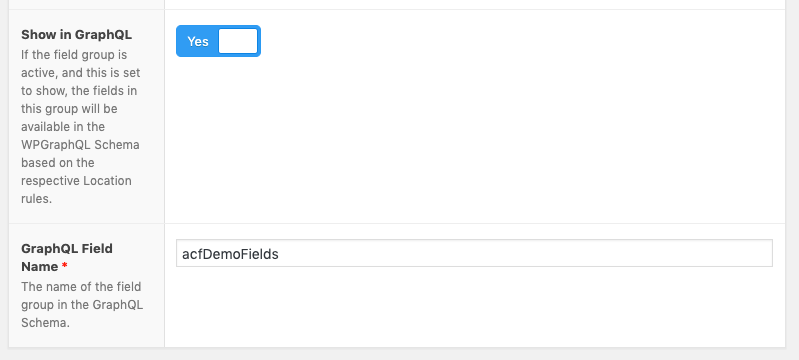
`wpgraphql acf
Install WPGraphQL for ACF plugin
Note: This is a paid plugin right now but well worth it.
create some fields
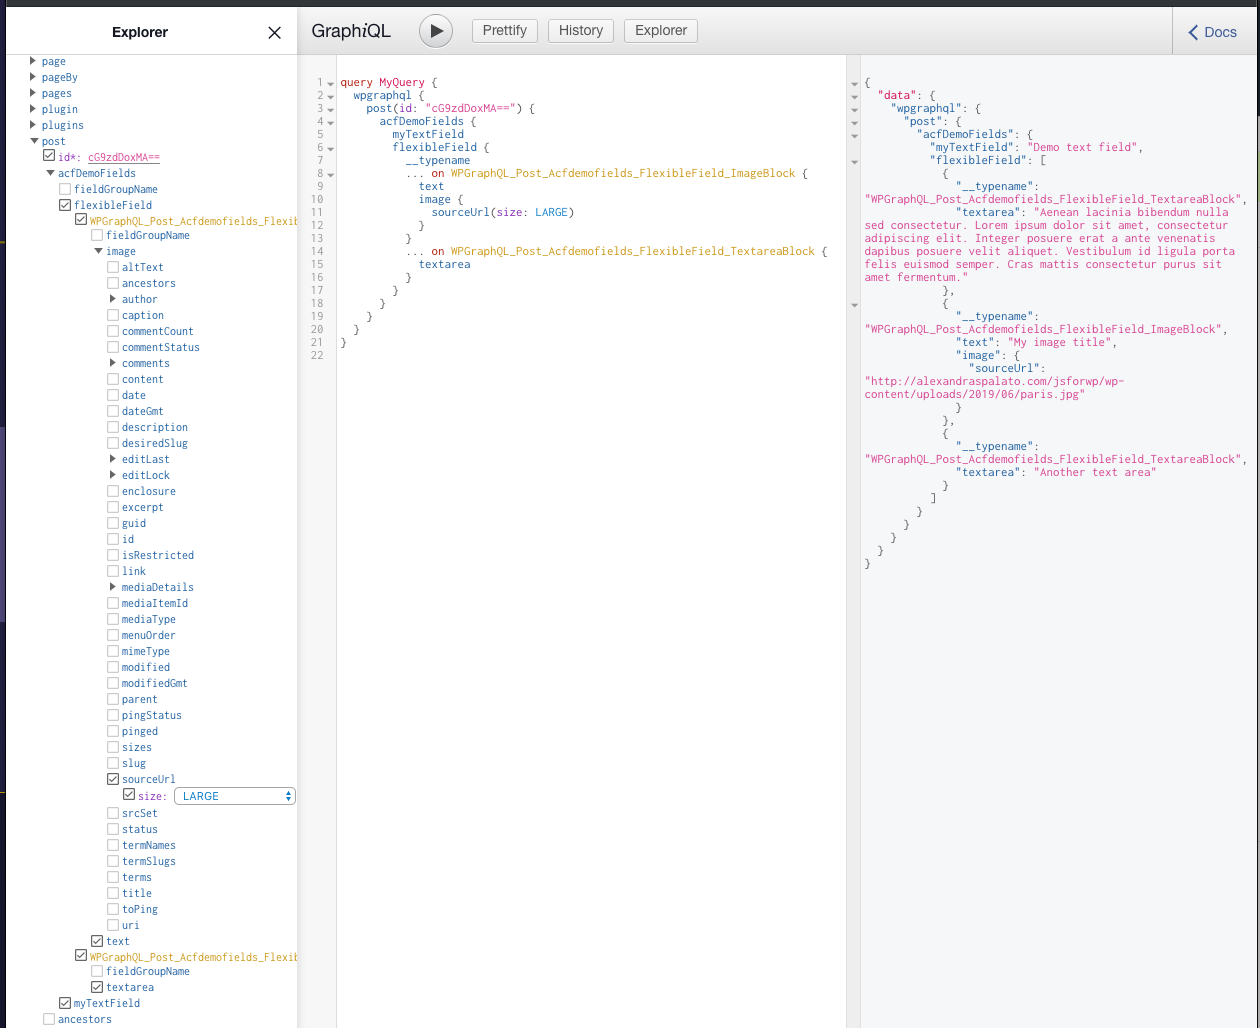
acfDemoFields {
          myTextField
          flexibleField {
            __typename
            ... on WPGraphQL_Post_Acfdemofields_FlexibleField_ImageBlock {
              text
              image {
                sourceUrl
              }
            }
            ... on WPGraphQL_Post_Acfdemofields_FlexibleField_TextareaBlock {
              textarea
            }
          }
        }
{flexibleField.length > 0 &&
flexibleField.map(layout => {
switch (layout.__typename) {
case "WPGraphQL_Post_Acfdemofields_FlexibleField_TextareaBlock":
return (
<>
<h3>Textarea</h3>
<p>{layout.textarea}</p>
</>
)
case "WPGraphQL_Post_Acfdemofields_FlexibleField_ImageBlock":
return (
<>
<h3>Text Image block</h3>
<img src={layout.image.sourceUrl} alt="" />
<h4>{layout.text}</h4>
</>
)
}
})}time to get stylish!
typography
Install the typography plugin
yarn add gatsby-plugin-typography react-typography typographyAdd config in gatsby-config.js
    {
      resolve: `gatsby-plugin-typography`,
      options: {
        pathToConfigModule: `src/utils/typography`,
      },
    },
utils/typography.js
import Typography from "typography"

const typography = new Typography({
  baseFontSize: "16px",
  baseLineHeight: 1.8,
  headerFontFamily: ["futura-pt", "sans-serif"],
  bodyFontFamily: ["proxima-nova", "sans-serif"],
  bodyColor: "#575757",
  bodyWeight: 100,
  headerColor: "#222",
  headerWeight: 100,
})

export default typography
The Gatsby typography plugin makes it easy to use the Typography library with minimal configuration.
styled components
Styled Components is a variant on " CSS-in-JS" which solves many problems with traditional css
Styled Components let you use actual CSS syntax inside your components
One of the most important problems they solve is selector name collisions. With traditional CSS, you have to be careful not to overwrite CSS selectors used elsewhere in a site because all CSS selectors live in the same global namespace
with Styled Components CSS selectors are scoped automatically to their component
All the power of JS to create variables, functions, make imports and use props
...And more...
Styled Components make the components much more semantic
Let's install it!
Install the plugin
yarn add gatsby-plugin-styled-components styled-components babel-plugin-styled-componentsConfig in gatsby-config.js
`gatsby-plugin-styled-components`,styles folder
Let's create a styles folder in src, where we will write the components that we will reuse among the site
Import them in an index.js to make them easier to use
export { GlobalStyles } from "./GlobalStyles"
export { Container } from "./LayoutElements"
export { PageTitle } from "./PageTitle"
And in the component
import { GlobalStyles, Container } from "../styles"Globalstyles.js
This is where you write all the common styles, like a css reset, here we have used sanitize.css
Bring this component on top of the Layout component
import { GlobalStyles, Container } from "../styles"

const Layout = ({ children }) => (
  <>
    <GlobalStyles />
    <Header />
    <Container>{children}</Container>
    <Footer />
  </>
)
How to write styled components
import styled from "styled-components"

export const PageTitle = styled.h1`
  margin: 10px 0 40px;
`
<PageTitle dangerouslySetInnerHTML={{ __html: title }} />
In the inspector
Use props in styled components
export const Container = styled.div`
  max-width: ${props => props.width || "1200px"};
  margin: 0 auto;
  padding: 0 30px;
`
By default the max-width will be 1200px, but now we can pass any value to the width props to modify the max-width to our needs
<Container width="960px">{children}</Container>For styles only used one time we can write them inside the component
const StyledFooter = styled.footer`
  @media (min-width: 768px) {
    padding: 80px 0;
  }
  padding: 40px 0;
`

const Footer = () => (
  <StyledFooter>
    <Container>
      © {new Date().getFullYear()}, Built with
      {` `}
      <a href="https://www.gatsbyjs.org">Gatsby</a>
    </Container>
  </StyledFooter>
)
...There is so much more about styled components! Including theming with the ThemeProvider
If you are interested you can dig in the doc https://www.styled-components.com/
And I highly recommend the levelUpTuts course by Scott Tolinski
https://www.leveluptutorials.com/tutorials/styled-components
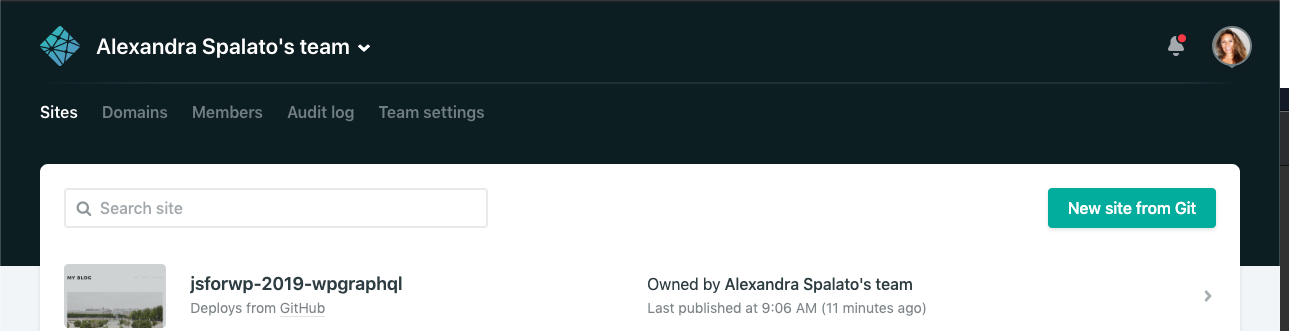
deploy on netlify
more about gatsby
Of course it was not possible to cover everything in this talk!
So I invite you to explore the Gatsby Doc about:
SEO: https://www.gatsbyjs.org/docs/seo/
PWA: https://www.gatsbyjs.org/docs/progressive-web-app/
...And more!
gatsby themes
Gatsby themes allow Gatsby site functionality to be packaged as a standalone product easily reusable
the configuration and functionality isn’t directly written into your project, but installed as a dependency.
Themes can be
- Updtated
- Composed: you can use several themes, write a gatsby-config that will be combined with other's themes gatsby-config
You can also pick components from the different themes and unify theme with a common styling
Component shadowing allows you to override specific components by creating a new file and exporting a component from that file
conclusion
WPGraphQl opens up a whole realm of possibilities for all of your WordPress data needs
Gatsby is an amazing open source framework for building blazing fast sites and apps
Pairing Gatsby and WordPress and connecting them through WPGraphQl is ground breaking as it brings all of the blazingly fast & optimized features of Gatsby and the easy &intuitive CMS capabilities of WordPress together.