iOS200
iOS Platform Development - Intermediate
Day 4
Todays Goals
- Learn about UIActivityViewController
- Learn about UIImagePickerController
- Learn about Gesture Recognizers
Lets Review!
"PuppyPicker"
Part 3
Download the code:
Implementing Protocol in PuppyListViewController

- In order for PuppyListViewController to respond to the NewPuppyViewControllerDelegate we must implement it's required protocol methods...
Assign the delegate
- In order for PuppyListViewController to respond to the NewPuppyViewControllerDelegate protocol, we must assign the class (self) as the delegate when we perform the modal segue

Run your app to see if your
PuppyListViewController view is now in control of the NewPuppyViewController
Saving New Puppy Data
- Switch back to NewPuppyViewController...
- When a user id finished entering information, we need to add a new Puppy object to the pups array so we can show it in the table view

Implement the new delegate method in PuppyListViewController

-
This adds the new Puppy object to the array of pups
-
Then inserts a new table cell at the bottom of the table
- We could have just done [self.tableView reloadData] but it looks nicer to insert the new row with an animation
- UITableViewRowAnimationAutomatic automatically picks the proper animation, depending on where you insert the new row.
UIImagePickerController
- Lets include a way for our users to select an image to go with the new puppy information when adding a puppy to the list.
- Add a Image View to the bottom of your table...

User Interaction Enabled

Must be set for gestures to work on a UIImageView
UIImageView IBOutlet
Add a new property to NewPuppyViewController in the form of an IBOutlet
@property (weak, nonatomic) IBOutlet UIImageView *imageView;Gesture Recognizers
- Add a tap gesture recognizer to the image view you just created
- This will allow us to create an IBAction when the cell is tapped

- Add a tap gesture recognizer to the image view you just created
- This will allow us to create an IBAction when the cell is tapped
Gesture Recognizers
- Right click and drag the gesture icon in the bottom bar into the PuppyListViewController class to create a new IBAction

Don't forget to implement the UIImagePickerControllerDelegate & UINavigationControllerDelegate protocols!
UIImagePickerControllerDelegate Methods

Save the image!
Update the done IBAction to assign the chosen image to the photo property in the Puppy model

Update PuppyDetailViewController

Now your selected image will display with your puppy details!
UIActivityViewController
- Lets us publish our new content to other services within our app!
 - (IBAction)Share:(id)sender
{
    NSArray *activityItems = @[[NSString stringWithFormat:@"Checkout my favorite puppy, %@!", self.puppyDetails.name], self.puppyDetails.photo];

    UIActivityViewController *activityController = [[UIActivityViewController alloc] initWithActivityItems:activityItems applicationActivities:nil];
    activityController.excludedActivityTypes =  @[UIActivityTypePostToWeibo];
    [activityController setValue:[NSString stringWithFormat:@"Checkout my favorite puppy, %@!", self.puppyDetails.name] forKey:@"subject"];

    [self presentViewController:activityController animated:YES completion:nil];
}- Don't forget to connect the Share IBAction to a navigation button bar item
Implementing Age & Popularity
- Tapping the Age & Popularity rows in the Add Puppy screen should open a new screen that lets the user pick an age or popularity from a list
- Drag a new Table View Controller into the storyboard
- Select the Age table view cell in the Add Puppy screen and ctrl-drag (or right click-drag) to the new Table View Controller to create a segue between them
- Make this a Push segue (under Selection Segue in the popup, not Accessory Action) and give it the identifier PickAge
- Follow the same steps for the popularity cell and give it a segue identifier of PickPopularity
Try it!
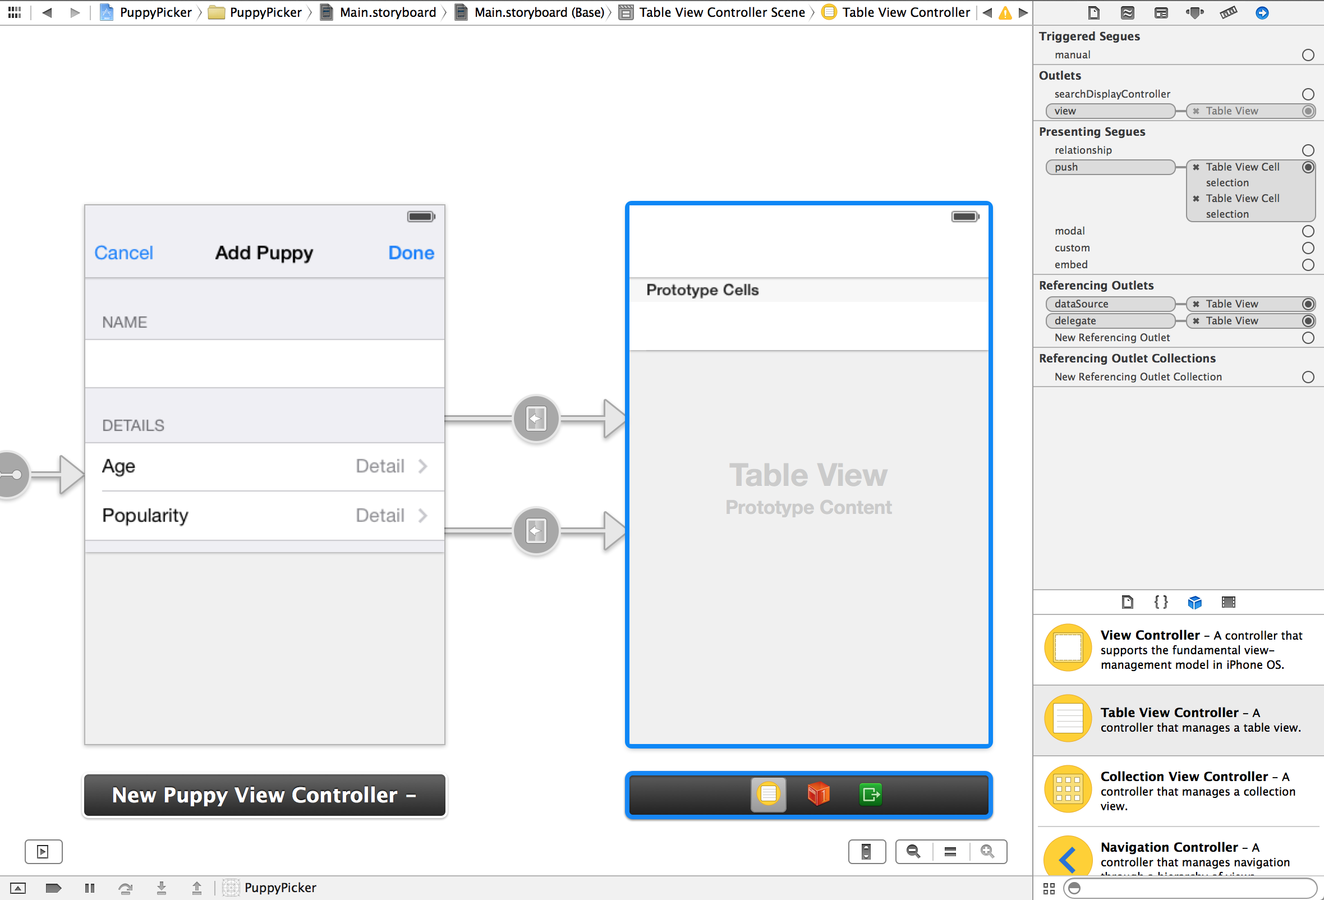
Customize TableView
- Set the new TableViews navigation title to "Choose Detail"
- Change the prototype cell style to "Basic"

NewPuppyDetailViewController
- Like always, we need to now add a new class for our new view...
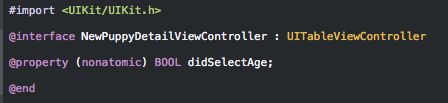
- Be sure to add a BOOL property that we can use in our class to know if the user selected to see the age options (didSelectAge) or selected to see the popularity options (!didSelectAge)
- Delete all of the pre populated methods in the .m file
Implement viewDidLoad

The options property is what will hold our list of options to display in the table view...
Implement UITableView Delegate Methods

Don't forget to set the reuse identifier for the cell in the storyboard!
This would also be a good time to make sure you set the view's custom class to "NewPuppyDetailViewController"
Don't forget to prepareForSegue!
In NewPuppyViewController...

Be sure to set didSelectAge if the user selected the Age
NewPuppyDetailViewControllerDelegate
Add the following protocol to NewPuppyDetailViewController

Add a delegate protocol with just one method, and a property that will hold the name of the currently selected option.
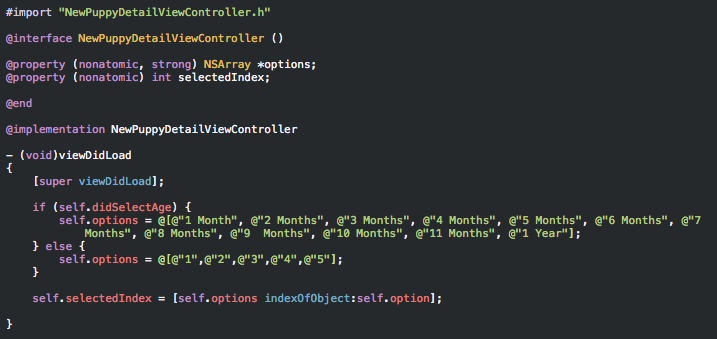
The name of the selected option will be set in self.option. Here you figure out what the index is for that option in the list of options. You’ll use that index to set a checkmark in the table view cell.
Update cellForRowAtIndexPath
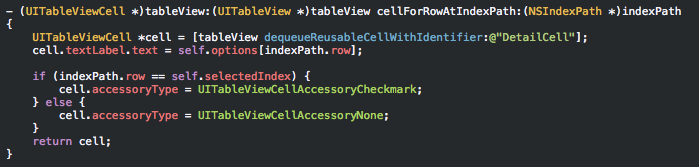
This sets a checkmark on the cell that contains the name of the currently selected option.
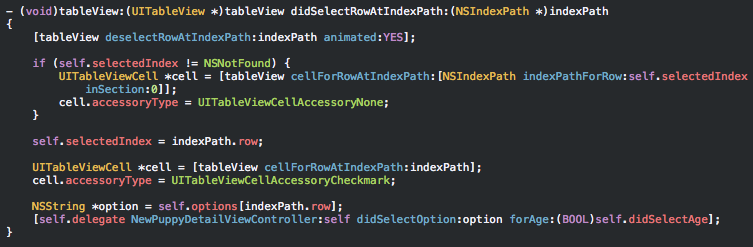
-
First this deselects the row after it was tapped.
-
Then it removes the checkmark from the cell that was previously selected, and puts it on the row that was just tapped.
-
Finally, the method returns the name of the chosen option to the delegate.
Update NewPuppyViewController
Create two new properties to store the users age and popularity options

Update viewDidLoad
Set default values for the age and popularity fields when the view loads

Don't forget to update prepareForSegue

We need to make sure we are passing right detail information to NewPuppyDetailViewController
Retrieve the selected options
Implement the NewPuppyDetailViewControllerDelegate method inside of NewPuppyViewController
Assign the selected values to their appropriate properties

Add the new Puppy to the model

Remember that newPuppyViewController: didAddPuppy is a delegate method of the NewPuppyViewControllerDelegate protocol