
About Dan M.
- Senior Software Engineer at the Organic Box
- My past: Infrastructure Engineering jobs and Network Engineering jobs.
- Went to school for Electrical Engineering (I don't do that anymore)
- I like kitties, badminton and development.


Installing Python

Tutorial 1:
Python Project

Tutorial 2:
- Installing Python
Recap
2. Setting up a Python project
Git

Tutorial 3:
- Installing Python
- Setting up a Python project
Recap
3. Working with others using Git
- Challenges working with others
- What is Git
Overview
- What is version control software?
- Why do we need it?
- Local Git workflow
- Remote Git workflow and repositories
- Branches: creating, merging, and pull requests.
What's this talk about?
Notes on the talk!
- You can ask questions! (although I might answer them after the talk in the interest of time)
- I don't have all the answers, but there's probably someone here who knows what you want to know.
- It's okay not to know or understand everything.
What is version control?
the task of keeping a software system consisting of many versions and configurations well organized.
Google's generic dictionary
That Looked like Russian!
- What is Version control software?
- Remember School Group projects before google docs?
- the file you send to you group:
- stupid_project-1.0-FINAL.docx
- the files (your bad group) they send you back:
- stupid_project-1.1-FINAL.docx
- stupid_project-1.1-FINAL.docx
- You have to fix this.... because your group sucks.
- the file you send to you group:
- Why do we need it?
Sure! How do we start?
- We're going to use a version control program called Git
- this is not specific to a programming language, used a lot by a lot of languages!
- Other Version control software:
- svn
- mercurial
- If you know more, just say it backwards right now.
How does this relate to Fortunato?
- Fortunato is your unicorn that is growing really quickly!
- We want a way to keep our code organized so that we can get that VC funding!
sudo apt update
sudo apt install git
How to install Git!
- If you want to install this on Windows or Mac please follow these instructions.
- If you're on Linux (your VM)
- Open a terminal (ctrl + alt + T)
- Write the following commands in your terminal!
Now I have Git!
How does one Git?
Is Dan a Git? (probably)
- Local Workflow
- Ideas and Concepts to understand
- commands: git init, git status, git add, git commit,
git log, git diff
- review and putting it together. - Remote Workflow
- setting up a remote repo with github.
- commands to learn: git remote add, git push, git fetch, git pull - Working with others with Branches
- ideas and concepts about branching (pictures!)
- commands to learn: git branch, git checkout
- merging and pull requests.
Git What we're covering
- terminology
- commands
- git init
- git status
- git add <file_name>
- git commit -m "<message>"
- git diff
- Review
Local Workflow
- Repository
- Everything in your project
- untracked files
- files that you haven't told git to track yet.
- Working directory
- where you'll do your programming!
- Staging area
- these are files you've told git that are "ready to be committed" (committed is like saving a file)
- Committed files:
- basically your save points!
Terminology
Git Init
You can think of this as "git initialize" this will make git start tracking your files in a directory (where you program is).
When do you use this?
What does this do?
Let's do it!
- Create a folder (mkdir ready-to-git) and go into it
(cd ready-to-git) - Initialize your repository (git init)
Git Status
This is your friend! Use it Constantly! If you are confused at all this is your "north star".
When do you use this?
What does this do?
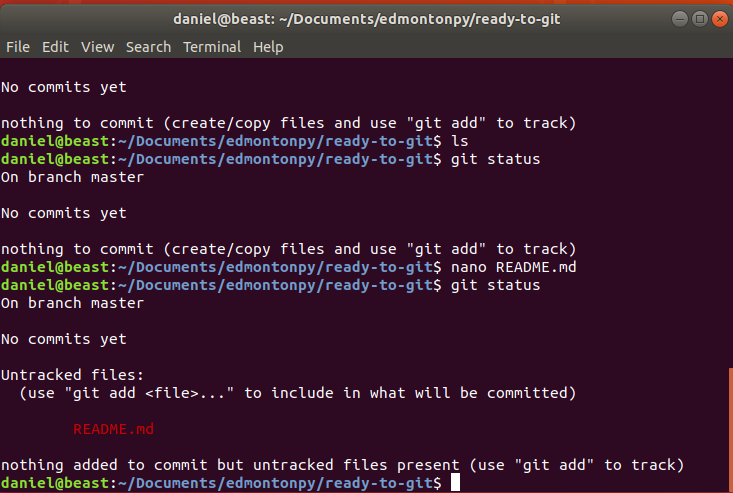
Let's do it!
- Let's make an EMPTY file named README.md
- what does git tell us? "git status"
Git status Example
Git Add <file_name>
Adding stuff to the staging (ready to be committed) area!
When do you use this?
What does this do?
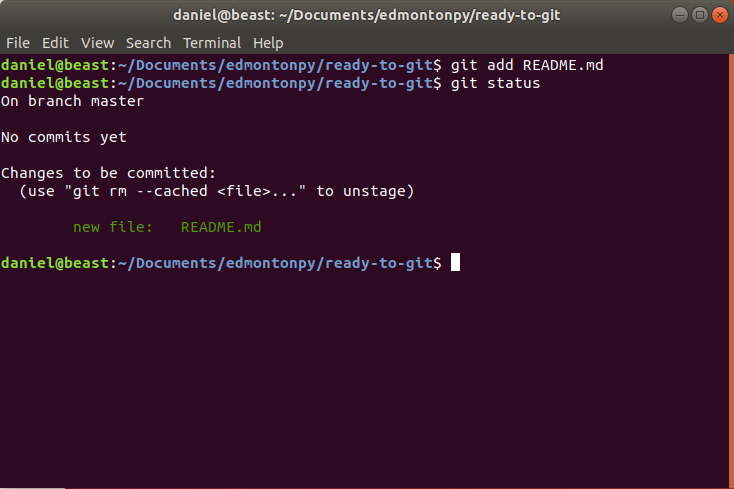
Let's do it!
- Add the file into the staging area! (git add README.md)
- what does git tell us? (git status)
Git add Example
Git Commit
Saves your staging area (ready to be committed) as a "checkpoint"
When do you use this?
What does this do?
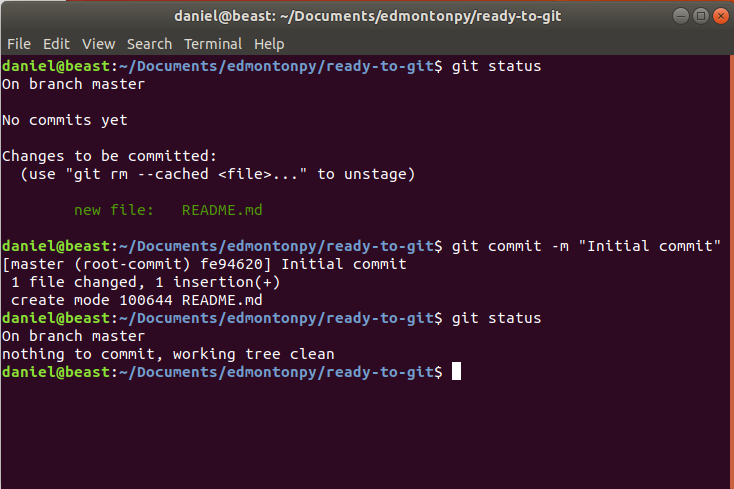
Let's do it!
-
you should see README.md in the "Changes to be committed" area! (git status)
-
Commit it! (git commit -m "Initial Commit")
-
check what's going on (git status)
Git status Example
Git Log
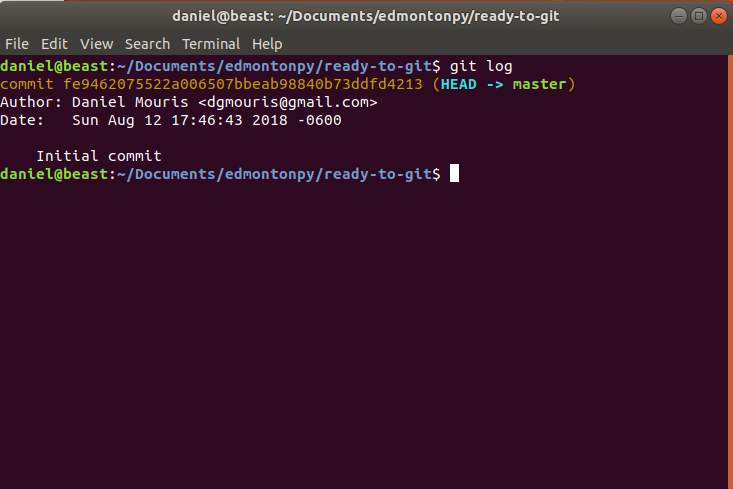
Shows your saved history!
When do you use this?
What does this do?
Let's do it!
- Let's see our history (git log)
Git log Example
Git diff <file_name?>
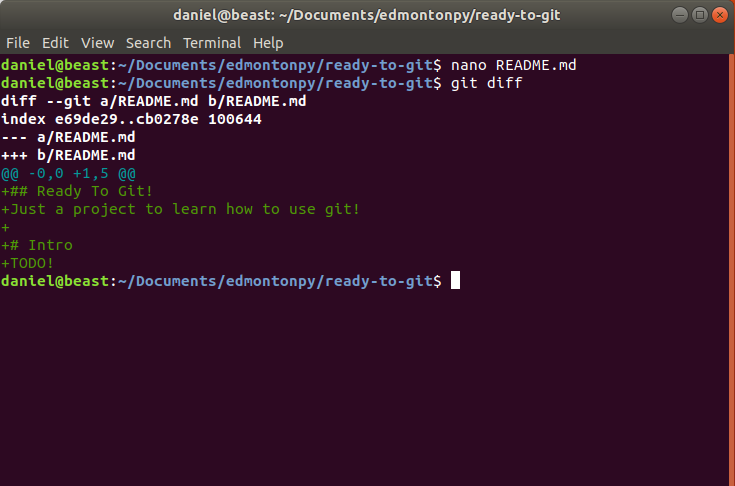
This shows the differences from what you've saved (or what's in your staging/ready to be committed area) and your working directory.
When do you use this?
What does this do?
Let's do it!
- open your README.md
- add the lines on the right and save.
- write git diff in the terminal.
- now you should see the changes!
## Ready To Git!

Just a project to learn how to use git!


# Intro

TODO!
Git diff
Local Workflow Review!
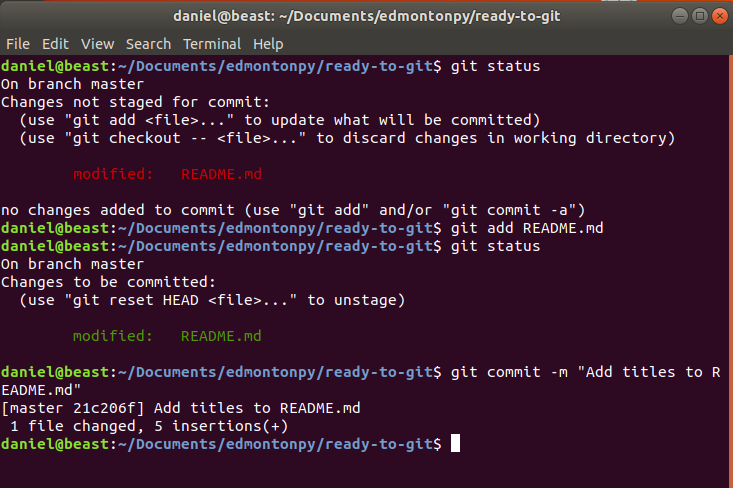
Let's save these changes with the process that we've defined!
- What's up with git?
git status - Let's add this to the staging (ready to be committed area).
git add README.md - Let's commit (save) it!
git commit -m "Add titles to README" - see your commit (save) log
git log
Local workflow review!
Remote Repo and Workflow
- Concepts
- Setting up a remote repo on Github.
- Commands
- git remote add <name of remote> <url to remote>
- git push <name of remote>
- git fetch
- git pull
Remote Repo Concepts
- They're not on our computer they're hosted elsewhere.
- Github, GitLab and Bitbucket are all awesome providers.
- if you want private repos use bitbucket.
- A lot of open source projects either use github or gitlab for hosting:)
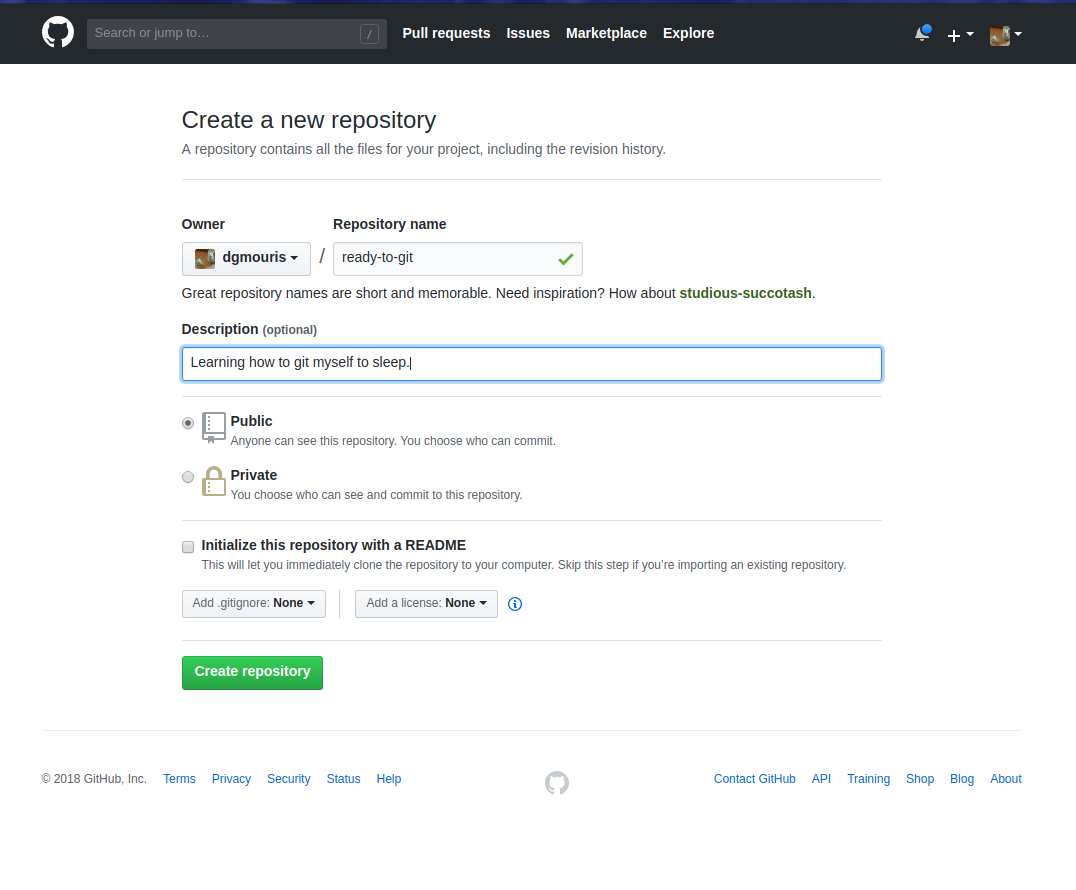
Setting up a repo on github
- Sign up for github (remember your password)
- Click Create new repo
- Enter the info (on the next slide).
- Then click "Create Repository"
- then copy that url somewhere (you'll need it.)
Setting up a repo on github
git remote add <remote> <url>
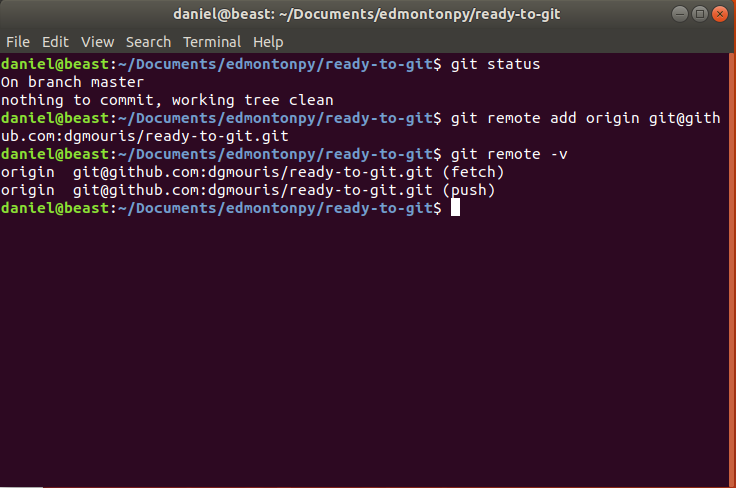
This allows us to "connect" our current repo which we've been working locally to our github.
When do you use this?
What does this do?
Let's do it!
- Let's connect it to our repo!
git remote add origin <url> - Let's see our remotes!
git remote -v
Git remote add Example
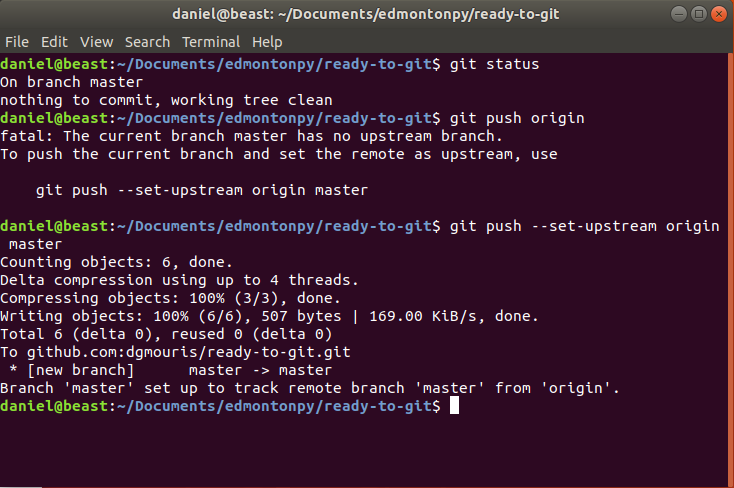
Git Push <name of remote>
Allows us to "upload our changes" to the remote repository.
When do you use this?
What does this do?
Let's do it!
-
git push (--set-upstream) origin master
-
Go to the repository on github and you should see your code there!
-
click on your repo name (mine is ready-to-git) Congrats! your code is on github!
Git push Example
Git fetch
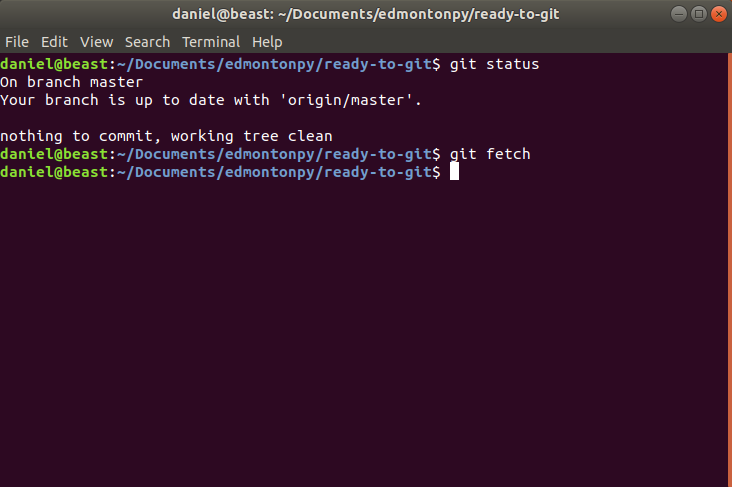
Allows us to "download" all of the changes that are on the remote repository.
When do you use this?
What does this do?
Let's do it!
-
git fetch
-
We're not going to see anything different. (we will later on)
Git fetch Example
Git Pull
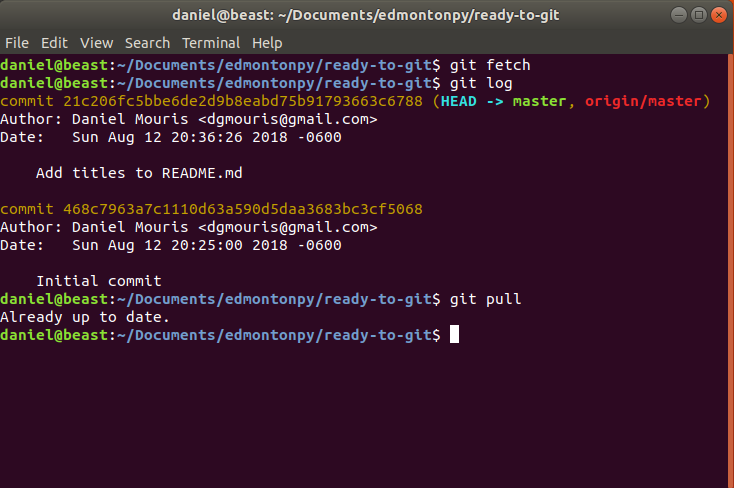
Git fetch doesn't do all the work you have to move your HEAD forward to the most recent commit!
When do you use this?
What does this do?
Let's do it!
-
git fetch (because you're downloading your stuff.)
-
git log (shows your commits)
-
git pull (moves it forward!)
Git pull Example
Congrats! Your code is on github!
Now that your code is on github we're going talk about working with others!
Working with others!
- Concepts
- Commands
- git branch <branch name>
- git checkout <branch name>
- the making a change workflow
- git merge and pull (merge) requests
- More Review!
- Random tidbits we didn't cover.
Concepts!
- Branch
- a branch allows you to save code (kind of like a save as) without effecting other code.
- The only difference is that you can merge it back into the "main line" all at once.
- PS. this is one of the more complex topics.
- Branches are good way to segment work.
- ie. hotfixes or features.
- Checking out a branch
Git Branch <branch-name>
You want your master "branch" to always be stable (normally production) so we're going to make a separate save line (or lane) for our fix
When do you use this?
What does this do?
Let's do it!
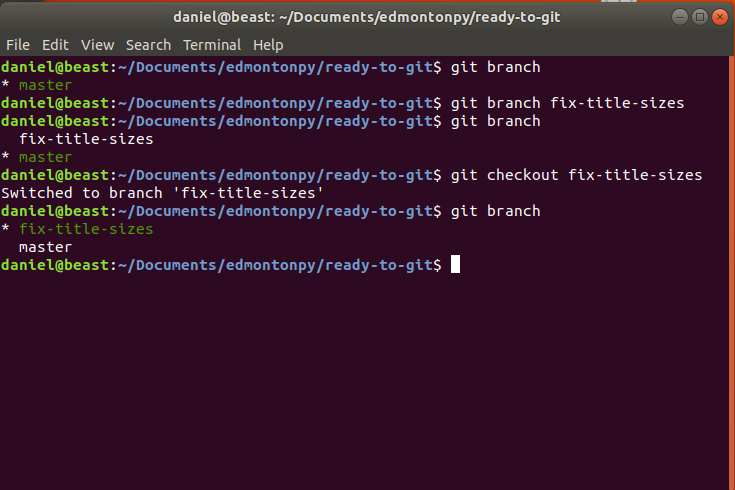
- show our branches (git branch)
- creates the branch (git branch fix-title-sizes)
- show our branches (git branch)
(example shown after git checkout)
Git checkout <branch>
this allows you to go into your new created lane!
When do you use this?
What does this do?
Let's do it!
-
go to the new branch (git checkout fix-title-sizes)
-
show the branches (git branch) itshows that you're on the new branch!
-
git log
shows that you have kept all of the changes from the previous branch because you have branched off from the last commit checkpoint!
Git checkout Example
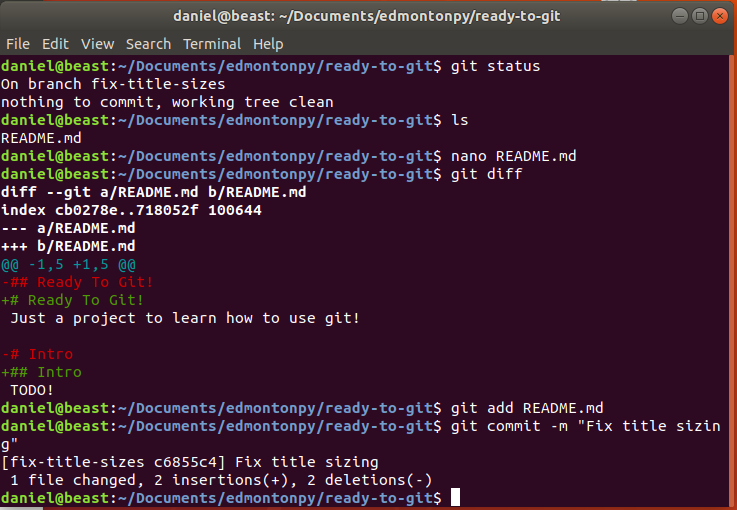
Let's Create the Change!
this is basically a review of everything except merging which we'll talk about next!
Let's do it!
-
make sure you're one the right branch! and you have nothing on it. (git status)
-
open your README.md and make the change
-
show your changes! (git diff)
-
add it to staging! (git add README.md)
-
Commit it! ( git commit -m "Fix title sizing")
-
take a look at your save log! (git log)
The Full process!
Git Merge / pull (merge) requests. part 1
this puts all of the commits that you did in your branch and puts them back into the mainline!
When do you use this?
What does this do?
Lets do it!
- push up your changes to github (git push --set-upstream origin fix-title-sizes)
Git Push up your changes!
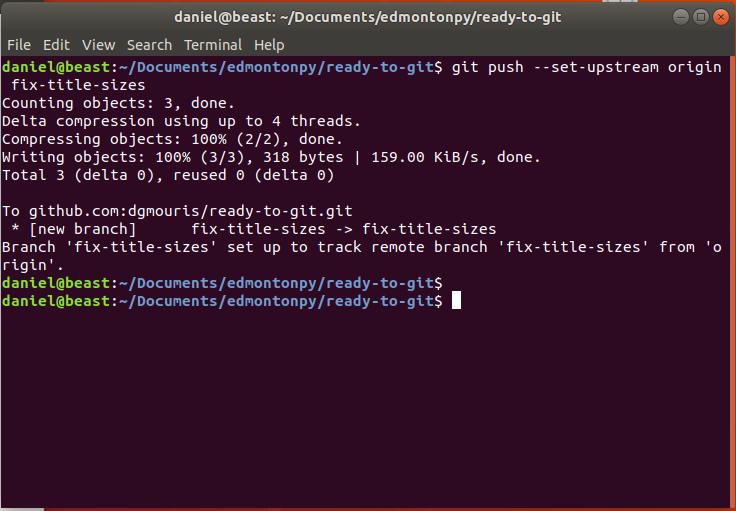
Git Merge / pull (merge) requests. part 2
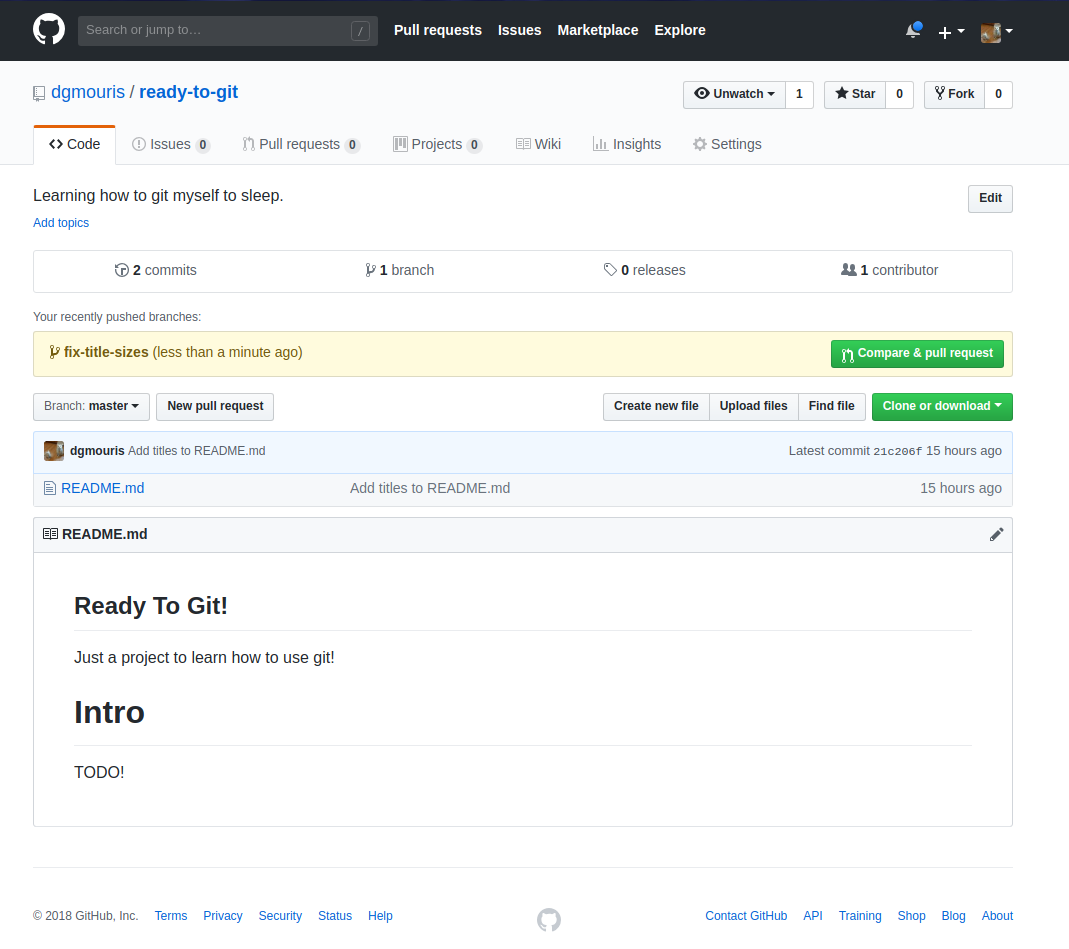
Let's do it!
- go to your github repo
- click on "Compare and Pull request"
Pull request part 1 Example
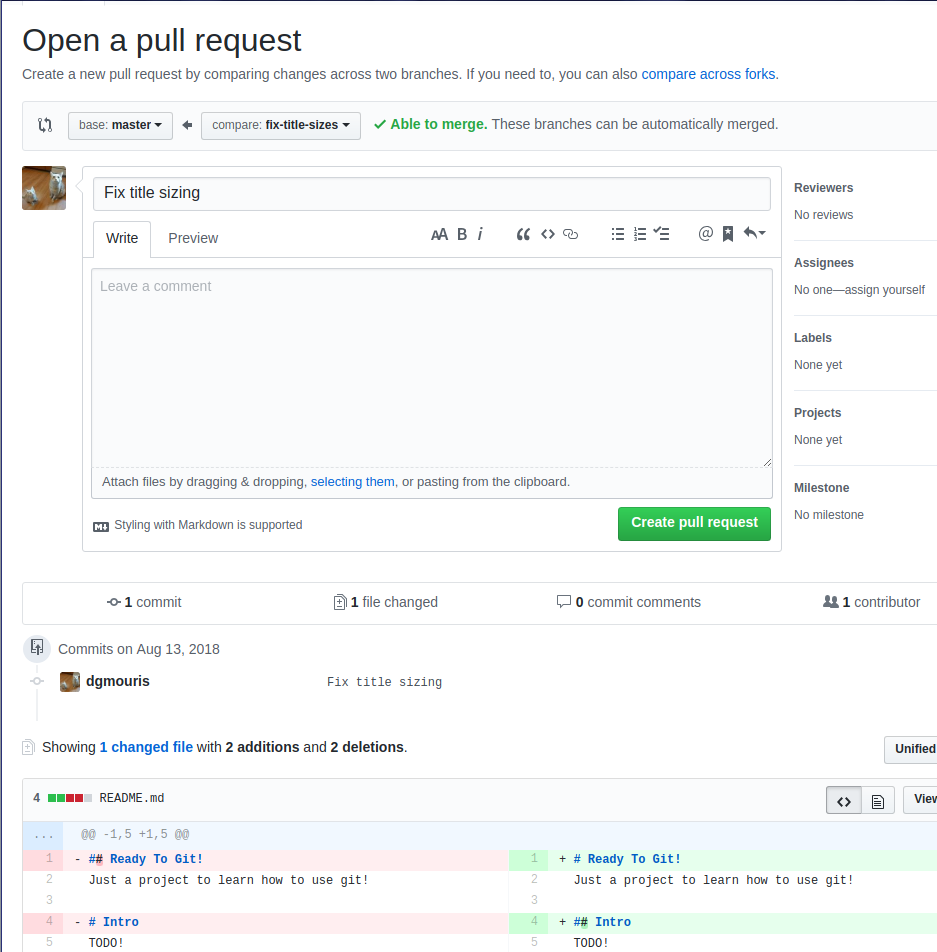
Git Merge / pull (merge) requests. part 3
Let's do it!
- Here you can see your changes and deletions
- You can do a lot of cool stuff here like:
- add reviewers
- assign people to look at it.
- add comments for you and others!
- Press Merge! this will put your changes from your branch to main.
Pull request part 2 Example
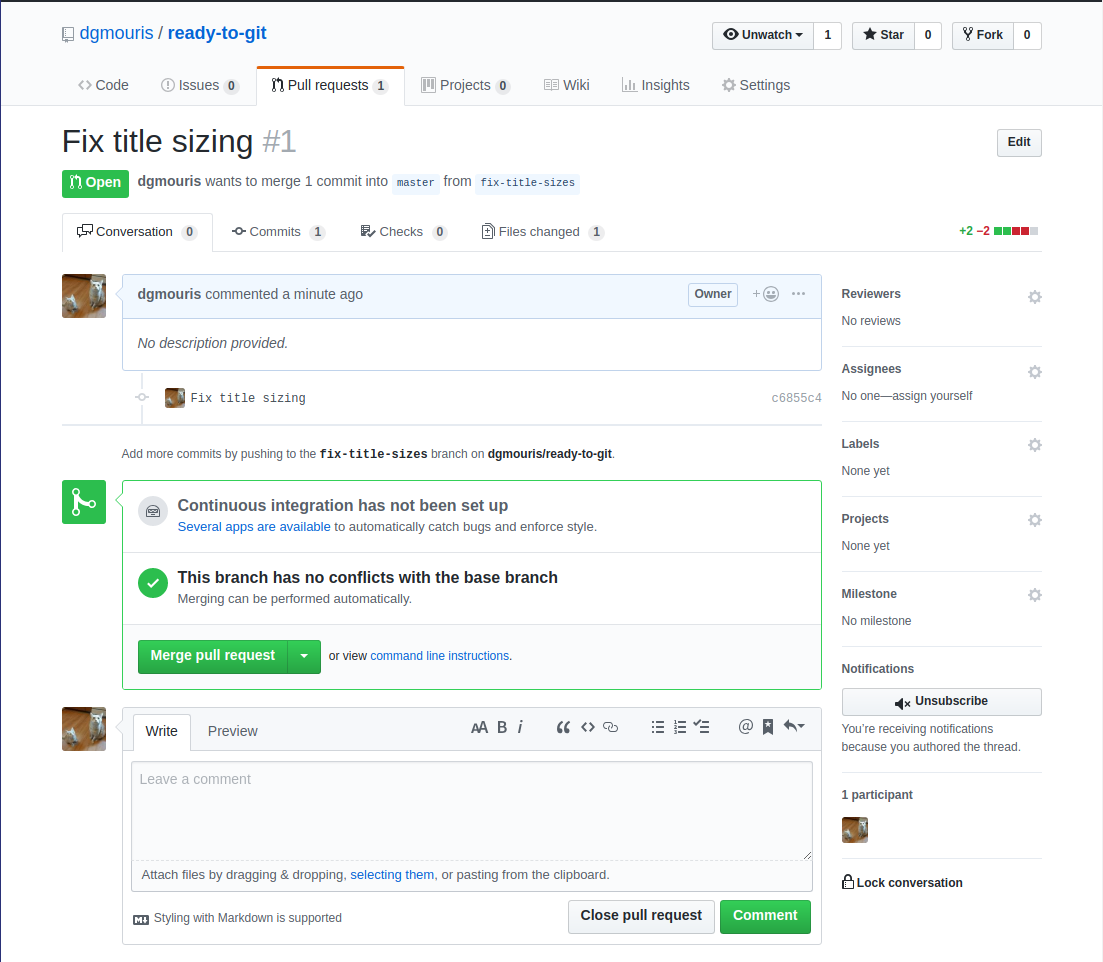
Pull request part 2 Example
One last time let's get our changes from github!
- git checkout master
- we don't have the most recent change (git log)
- download the changes (git fetch)
- we're behind the current change! our head is not on the most current commit! (git log)
- we'll pull our head to the most recent commit! (git pull)
- we're here! (git log)
Random tidbits
- Merge Conflicts
- hardest thing in git were' not covering it today.
- gitignore file
- does not track files that match patterns in this file
- git hooks
- are programs/scripts that are executed on a particular event normally: merge, commit, push.
- forks!
- this is a relatively harder topic that we're not going to cover today.
- git rebase
- fast forwarding branches on commits.
Thanks! Questions?
We've covered a lot, in the interest of time, please reach out to me afterwards as Andrew has another presentation! to help us with fortunato!
djangoproject.com
Django

Tutorial 4:
- Installing Python
- Setting up a Python project
- Working with others using Git
Recap
4. Creating a web application using Django
- Web applications
- Frameworks
- Django
- Making a simple sales page
Overview
What is a web application
Client-server computer program that is typicality accessed through the HTTP or HTTPS protocol.

git clone https://github.com/data-get/fortunato.git
Order of use
- Language
- Framework
- 3rd party libaries
- You
Framework
A Framework is a library that provides many different features and/or functions in order to accomplish a given task.
Django
Django is a high-level Python Web framework that encourages rapid development and clean, pragmatic design. Built by experienced developers, it takes care of much of the hassle of Web development, so you can focus on writing your app without needing to reinvent the wheel. It’s free and open source.
djangoproject.com
Installation:
pipenv install DjangoInstallation into a project setup.py:
pipenv update...
setup(
name='Fortunato',
version='0.1',
...
scripts=[
'bin/fortunato',
'manage.py',
],
install_requires=[
...
'django>=2.1.0',
...
],
...
)
Starting a Django app:
django-admin startproject fortunato ./fortunato/
__init__.py
settings.py
urls.py
wsgi.py
manage.pyFiles Django startproject creates
.gitignore
fortunato/
    __init__.py
    settings/
        __init__.py
        base.py
        integration_tests.py
        local_settings.py
    urls.py
    wsgi.py
manage.py
Improve Django Settings
from .base import * # noqa: F401,F403
settings/__init__.py
settings/base.py
...

try:
    from .local_settings import *  # noqa: F401,F403
except ImportError:
    pass
settings/integration_tests.py
RUN_INTEGRATION_TESTS = True
TEST_RUNNER = 'django.test.runner.DiscoverRunner'
settings/local_settings.py
DEBUG = True


LOGGING = {
    'version': 1,
    'disable_existing_loggers': False,
    'formatters': {
        'simple': {
            'format': '%(levelname)s %(message)s'
        },
    },
    'filters': {
        'require_debug_true': {
            '()': 'django.utils.log.RequireDebugTrue',
        },
    },
    'handlers': {
        'console': {
            'level': 'INFO',
            'filters': ['require_debug_true'],
            'class': 'logging.StreamHandler',
        }
    },
    'loggers': {
        'django': {
            'handlers': ['console'],
            'propagate': True,
        },
        'fortunato': {
            'level': 'INFO',
            'handlers': ['console'],
            'propagate': True,
        }
    }
}
Create a new app
cd fortunato
manage.py startapp www
Files startapp creates
www/
    migrations/
    __init__.py
    admin.py
    apps.py
    models.py
    tests.py
    views.py
settings/base.py
...

INSTALLED_APPS = [
    'django.contrib.admin',
    'django.contrib.auth',
    'django.contrib.contenttypes',
    'django.contrib.sessions',
    'django.contrib.messages',
    'django.contrib.staticfiles',
    'fortunato.www',
]

...
fortunato/urls.py
from django.conf.urls import include
from django.contrib import admin
from django.urls import path

urlpatterns = [
    path('', include('fortunato.www.urls')),
    path('admin/', admin.site.urls),
]
fortunato/www/urls.py
from django.conf.urls import url

from .views import IndexTemplateView

urlpatterns = [
    url(r'^', IndexTemplateView.as_view()),
]
fortunato/tests/test_views.py
import unittest

from unittest.mock import MagicMock

from ..person import Person
from ..views import IndexTemplateView


class TestIndexTemplateView(unittest.TestCase):
    def setUp(self):
        self.fortune = 'You like to test'
        self.person = MagicMock(spec=Person)
        self.person.get_fortune.return_value = self.fortune
        self.view = IndexTemplateView(person=self.person)
        self.request = MagicMock()
        self.request.method = 'GET'

    def test__init__(self):
        view = IndexTemplateView()
        self.assertIsInstance(view.person, Person)

    def test_get_context(self):
        context_data = self.view.get_context_data()
        self.assertEqual(context_data['fortune'], self.fortune)
fortunato/views.py
from .person import Person

from django.views.generic import TemplateView


class IndexTemplateView(TemplateView):
    template_name = 'index.html'

    def __init__(self, *args, person=None, **kwargs):
        if person is None:
            person = Person(None, None)
        self.person = person
        super().__init__(*args, **kwargs)

    def get_context_data(self, *args, **kwargs):
        context_data = super().get_context_data(*args, **kwargs)
        context_data['fortune'] = self.person.get_fortune()
        return context_data
Web
Deployment

Tutorial 5:
- Installing Python
- Setting up a Python project
- Working with others using Git
- Creating a web application using Django
Recap
5. Web Server Deployment
- What is a web server
- Deploying our application
- uWSGI
- Nginx
- Improvements
Overview
Virtual Box
Settings
Network
Bridged Adapter
Virtual Machine Settings

A web server is a program or system that serves files that make up websites to users in response to their requests.
What is a Web Server
We previously used Git to aid us in working with others.
Getting our Application onto the Server
We can use Git
Application Deployment
Install
# Configure ssh access or optionally use https access
cp rd_rsa ~/.ssh/id_rsa

# Git clone the project
cd /opt
git clone git@github.com:data-get/fortunato.git
git clone https://github.com/data-get/fortunato.git

# Install the project
cd /opt/fortunato/Tutorial\ 4/
export PIPENV_VENV_IN_PROJECT=true
pipenv sync

# Make the folder and files owned by user: group www-data
chown -R www-data:www-data /opt/fortunato
Application Settings
/opt/fortunato/Tutorial\ 4/fortunato/settings/local_settings.py
DEBUG = False

ALLOWED_HOSTS = ['*']

STATIC_ROOT = '/var/www/www.fortunato.com/static/'
mkdir -p www/www.fortunato.com/static
cd /opt/fortunato/Tutorial 4/fortunato
pipenv shell
./manage.py collectstatic
chown -R www-data:www-data /var/www/www.fortunato.com/static
Collecting Static
A versatile, performant, low-resource using, and reliable project aimed at building hosting services.
uWSGI
uWSGI
Install
sudo apt-get install libpcre3 libpcre3-dev
sudo apt install uwsgi
sudo apt-mark hold uwsgi

sudo pip3 install uwsgi
Disable apt uWSGI from starting
sudo systemctl disable uwsgiSetup log folders
sudo rm -rf /var/log/uwsgi
sudo mkdir /var/log/uwsgi
sudo chown www-data:www-data /var/log/uwsgi
uWSGI
Create the uWSGI system file
[Unit]
Description=uWSGI Emperor
After=syslog.target

[Service]
Group=www-data
ExecStart=/usr/local/bin/uwsgi --ini /etc/uwsgi/emperor.ini
RuntimeDirectory=uwsgi
RuntimeDirectoryMode=0775
StateDirectory=uwsgi
LogsDirectoryMode=0775
StateDirectory=uwsgi
LogsDirectoryMode=0775
Restart=always
KillSignal=SIGQUIT
Type=notify
NotifyAccess=all

[Install]
WantedBy=multi-user.target
/etc/systemd/system/emperor.uwsgi.service
uWSGI
Make uWSGI start on system boot
sudo systemctl daemon-reload
sudo systemctl enable emperor.uwsgi.service
uWSGI
Create the uWSGI emperor config file
[uwsgi]
uid=www-data
gid=www-data
emperor=/etc/uwsgi/apps-enabled
vassals-include=/etc/uwsgi/vassals-default.ini
logto=/var/log/uwsgi/emperor.log
log-date=true
logfile-chown=www-data
log-master=True
log-reopen=True
/etc/uwsgi/emperor.ini
Create the uWSGI default vassals config file
[uwsgi]
socket=/run/uwsgi/%(vassal_name).sock
uid=www-data
gid=www-data
chmod-socket=660
/etc/uwsgi/vassals-default.ini
uWSGI
/etc/uwsgi/apps-available/www.fortunato.com.ini
[uwsgi]
vassal_name=%n
master=True
processes=4
threads=2
venv=/opt/fortunato/Tutorial 4/.venv
module=fortunato.wsgi:application
wsgi-file=/opt/fortunato/Tutorial 4/fortunato/wsgi.py
chdir=/opt/fortunato/Tutorial 4
harakiri=60
env=ENV_KEY=value
Restart the web server
# Enable the application
sudo ln -s /etc/uwsgi/apps-available/www.fortunato.com.ini /etc/uwsgi/apps-enabled/

# Restart uwsgi
sudo systemctl restart emperor.uwsgi.service
sudo systemctl status emperor.uwsgi.service
Nginx is a web server which can also be used as a reverse proxy, load balancer, mail proxy and HTTP cache
Nginx
Nginx
Install keys
sudo wget https://nginx.org/keys/nginx_signing.key
sudo apt-key add nginx_signing.key
/etc/apt/sources.list.d/nginx_org_packages_ubuntu.list
deb [arch=amd64] https://nginx.org/packages/ubuntu/ bionic nginxInstall
sudo apt update
sudo apt install nginx
Add apt sources
Nginx
Configure Nginx
user www-data;
worker_processes auto;
pid /run/nginx.pid;

events {
	worker_connections 1024;
	multi_accept on;
}

http {
	##
	# Basic Settings
	##
	sendfile on;
	send_timeout 65s;
	tcp_nopush on;
	tcp_nodelay on;
	keepalive_timeout 65s;
	types_hash_max_size 2048;
	client_header_timeout 65s;
	server_tokens off;

	include /etc/nginx/mime.types;
	default_type application/octet-stream;

	##
	# Logging Settings
	##
	access_log /var/log/nginx/access.log;
	error_log /var/log/nginx/error.log;

	##
	# Gzip Settings
	##
	gzip on;
	gzip_disable "msie6";

	gzip_vary on;
	gzip_proxied any;
	gzip_comp_level 6;
	gzip_buffers 16 8k;
	gzip_http_version 1.1;
	gzip_types text/plain text/css application/json application/javascript text/xml application/xml application/xml+rss text/javascript;

	##
	# Virtual Host Configs
	##
	include /etc/nginx/conf.d/*.conf;
	include /etc/nginx/sites-enabled/*;
}
/etc/nginx/nginx.conf
Nginx
Remove the default.conf nginx file
sudo rm /etc/nginx/conf.d/default.confNginx
Configure Nginx for Fortunato
upstream fortunato {
    server unix:/run/uwsgi/www.fortunato.com.sock;
}

server {
    listen 80;
    server_name _;

    access_log /var/log/nginx/www.fortunato.com.access.log;
    error_log /var/log/nginx/www.fortunato.com.error.log;

    root /var/www/www.fortunato.com/;

    location /static {
    }

    location / {
        include /etc/nginx/uwsgi_params;
        proxy_redirect     off;
        proxy_set_header   Host              $host;
        proxy_set_header   X-Real-IP         $remote_addr;
        proxy_set_header   X-Forwarded-For   $proxy_add_x_forwarded_for;
        proxy_set_header   X-Forwarded-Proto $scheme;

        add_header X-Frame-Options SAMEORIGIN;

        uwsgi_pass  fortunato;
    }
}
/etc/nginx/sites-available/www.fortunato.com
Nginx
sudo systemctl restart nginxRestart Nginx to make your changes
Check it out
ip addrFind your IP address

192.168.0.24
Improvements
- Secure your site with HTTPS
- Setup Logging
- Setup Monitoring
- Performance tune your configuration
- Use a CDN for static files
- Setup a cache
Infrastructure
If something is hard, do it often.
If you do something often, automate it.