LXC/LXD
LinuX Container
The purpose of LXC is to create a Linux environment as close as possible to a standard Linux installation, without having a separate kernel.
LinuX Container
- Kernel namespaces
- Apparmor
- Seccomp policies
- Chroots
- Kernel capabilities
- CGroups
Uses the following system features
Namespaces
A namespace encapsulates global system resources, allowing to create instances and isolate their process.
There are 6 different namespaces implemented on linux:
- mnt (mount points, filesystems)
- pid (processes)
- net (network stack)
- ipc (inter-process communication)
- uts (hostname)
- user (user ids)
AppArmor
Allow to associate to each program a secure profile which restricts the capabilities on it :
- Mount
- Acces to files
- Restrict the communication inter-process
- …
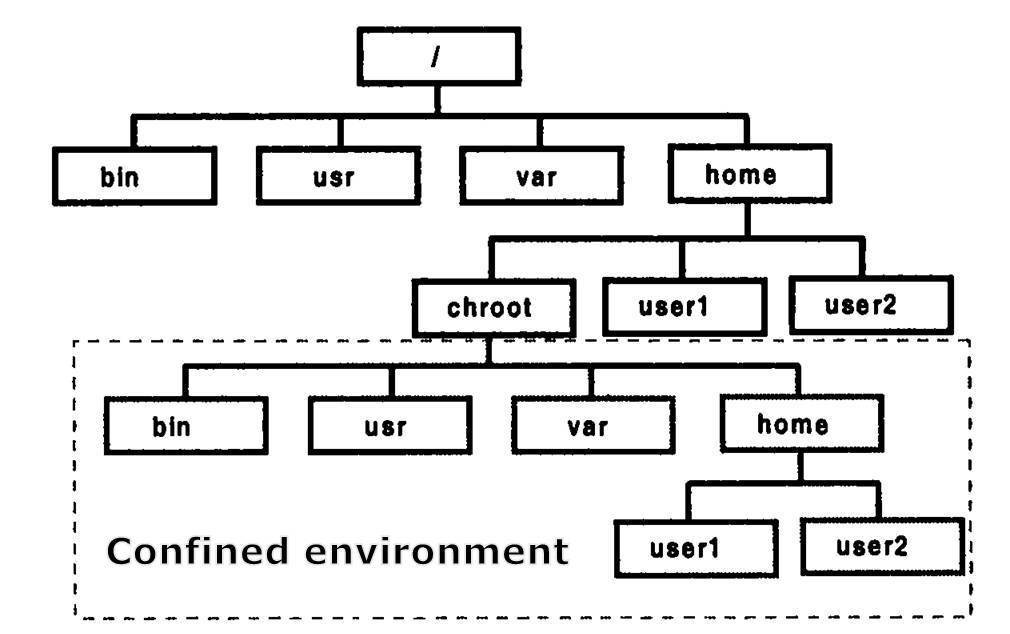
Chroot
Allow to change the root ( / ) to a new location.
Kernel capabilities
- Alow to restrict the system calls of each process.
- Secure state: just allow to exit(), sigreturn(), read() and write().
- It isolates each process from the system's ressources
Cgroups
Allow to allocate, to restrict and to monitor resources such as the time of CPU, the system memory, the network bandwidth...
LXD
Containers "hypervisor"
LXD is a new user experience with Linux Container. Specifically, it's made of three components :
- A server lxd (daemon) providing a API REST,
- A new command line client lxc (cli),
- And a plugin OpenStack (nova-compute-lxd).
LXD in Practice
- Installation
- Containers
- Images
- Remotes
- Snapshots
- Configuration
- Profiles
- Files

Installation
Ubuntu 16.04 LTS users can install LXD with:
apt-get -t trusty-backports install lxdUbuntu 14.04 LTS users can also install LXD using backports:
apt-get install lxdTo get the latest upstream release, a PPA is available:
add-apt-repository ppa:ubuntu-lxc/lxd-stable
apt-get update
apt-get dist-upgrade
apt-get install lxdContainers
Launch an Ubuntu 16.04 container :
lxc list
+--------------------------------+---------+---------------------+------+------------+-----------+
|              NAME              |  STATE  |        IPV4         | IPV6 |    TYPE    | SNAPSHOTS |
+--------------------------------+---------+---------------------+------+------------+-----------+
| first-container                | RUNNING | 192.168.57.1 (eth0) |      | PERSISTENT | 0         |
+--------------------------------+---------+---------------------+------+------------+-----------+
Lists the available containers :
lxc launch ubuntu:16.04 first-containerLaunch an Ubuntu 16.04 container :
lxc launch [remote:]<image> [remote:][<name>]Containers
Starting and stopping containers is just as easy with :
lxc stop <container>
lxc start <container>
In order to get access to the shell of a container run :
lxc exec <container> bashDelete container :
lxc delete <container>Images
All LXD containers come from an image.
Images are typically clean Linux distribution images similar to what you would use for a virtual machine.
To list the images:
lxc image list [remote:] [filtre]Images
Images are uniquely identified by their fingerprint sha256 hash or partial hash or Aliase.
lxc image list
+--------------------+--------------+--------+-------------------------------------------------+--------+----------+-------------------------------+
|       ALIAS        | FINGERPRINT  | PUBLIC |                   DESCRIPTION                   |  ARCH  |   SIZE   |          UPLOAD DATE          |
+--------------------+--------------+--------+-------------------------------------------------+--------+----------+-------------------------------+
| first_image        | 628c432840e1 | yes    | ubuntu 14.04 LTS amd64 (release) (20160714)     | x86_64 | 119.23MB | Jul 22, 2016 at 1:58pm (UTC)  |
+--------------------+--------------+--------+-------------------------------------------------+--------+----------+-------------------------------+
| ubuntu-xenial      | 20bc7c965bb7 | no     | testing image                                   | x86_64 | 47.34MB  | Jul 22, 2016 at 4:30pm (UTC)  |
+--------------------+--------------+--------+-------------------------------------------------+--------+----------+-------------------------------+Image Info
To get image informations :
lxc image info ubuntu-xenial-niji

Fingerprint: 20bc7c965bb76d8c9457d80ed8ffd093a66758eddb778f8511132166b766e5c2
Size: 47.34MB
Architecture: x86_64
Public: no
Timestamps:
    Created: 2015/02/18 18:36 UTC
    Uploaded: 2016/07/22 16:30 UTC
    Expires: never
Properties:
    os: Ubuntu
    release: xenial 16.04 niji
    architecture: x86_64
    description: Fucking image
Aliases:
    - ubuntu-xenial-niji
Auto update: disabled
lxc image info [remote:]<image>Importing Images
Copy remote image into your local image repository :
lxc image copy [remote:]<image> <remote>: [--alias=ALIAS] [--public]Copy the image of Ubuntu 14.04 and named it to “first_image” :
lxc image copy ubuntu:14.04 local: --alias first_imageEditing Images
Edit image, either by launching external editor or reading STDIN.
autoupdate: false
properties:
  aliases: "14.04,default,lts,t,trusty"
  architecture: "amd64"
  description: "ubuntu 14.04 LTS amd64 (release) (20160714)"
  label: "release"
  os: "ubuntu"
  release: "trusty"
  serial: "20160714"
  version: "14.04"
public: true
lxc image edit <image>
cat image.yml | lxc image edit <image>Creating images
Create an image from a container:
lxc publish <container> --alias <image-name>Create an image from a snapshot:
lxc publish <container>/<snapshot> --alias <image-name>Image
=
tar.gz(rootfs)
+
tar.gz(metadata.yml + template)
Creating images
Rootfs
Un root file system (rootfs) système de fichiers qui contient:
- les modules drivers chargés dynamiquement (/lib ...)
- les fichiers de configurations du système (/etc ...)
- les exécutables des outils standards (shell, réseau, ...)
- des applications (/opt /usr ...)
Create your own rootfs :
Metadata
Metadata files provide informations about the container at the creation, the copy and the starting of the container.
architecture: x86_64
creation_date: 1468420289
properties:
  description: "Ubuntu 14.04 LTS Intel 64bit"
  os: "ubuntu"
  release: "trusty"
You can simply create a metadata.yaml file like that:
Find your architecture with:
uname -aMetadata
The "when" key can be one or more of:
-
create (run at the time a new container is created from the image)
-
copy (run when a container is created from an existing one)
-
start (run every time the container is started)
The templates will always receive the following context:
-
trigger: name of the event which triggered the template (string)
-
path: path of the file being templated (string)
-
container: key/value map of container properties (name, architecture, privileged and ephemeral)
-
config: key/value map of the container's configuration
-
devices: key/value map of the devices assigned to this container
-
properties: key/value map of the template properties specified in metadata.yaml
Templates
A template is just a file.
But the template mechanism allows for some files in the container to be generated or re-generated at some point in the container lifecycle.
templates:
  /var/lib/cloud/seed/nocloud-net/meta-data
    when:
      - create
      - copy
    template: cloud-init-meta.tpl
Creating Image
1) Create your own rootfs tarballs or download it on:
.
|-- your-rootfs.tar.gz
|-- metadata.yaml
|-- templates
    |-- template1.tpl
    |-- ...
2) Write a new metadata.yaml file for your image, and templates if you want. You should have a tree like that:
Creating Image
3) Create a tarball containing that metadata.yaml files and the templates folder (if needed).
lxc image import <metadata tarball> <rootfs tarball> --alias some-nametar zcvf <file.tar.gz> <file>4) Import those two tarballs as a LXD image with:
Remotes
LXD is a networked daemon.
The command line client that comes with it can therefore talk to multiple remote LXD servers as well as image servers. For instance:
lxc launch ubuntu:14.04 <my-container>Lxc calls the Ubuntu’s remote server to launch the container with an Ubuntu image 14.04 with correct architecture.
Remotes
By default, our command line client comes with the following remotes defined:
-
local: (default remote, talks to the local LXD daemon over a unix socket)
-
ubuntu: (Ubuntu image server providing stable builds)
-
ubuntu-daily: (Ubuntu image server providing daily builds)
-
images: (images.linuxcontainers.org image server)
You can also add any number of remote LXD hosts that were configured to listen to the network. Either anonymously if they are a public image server or after going through authentication when managing remote containers.
Image/Remotes TP
You’ve two machines:
- one server foo
- one client your local LXD.
Make sure that « foo » is listening to the network :
lxc config set core.https_address [::]
lxc config set core.trust_password <secret-string>Add « foo » as remote server in local LXD :
lxc remote add foo <IP> (IP address or FQDN of foo)Image/Remotes TP
Enter the trust-password set by the server. Now, image can be used from the new remote server.
List your remotes with:
lxc remote listInteract with it ("test" an image from foo") :
lxc launch foo:test my_containerRemotes/Containers
Copying containers
Create a container « c2 » from a copy of the remote « c1 » :
lxc copy foo:c1 c2Stop the source container, and move it :
Moving containers
lxc stop foo:c1
lxc move foo:c1 local
Snapshots
Container snapshots are identical to containers except for the fact that they are immutable.
They can be renamed, destroyed or restored but cannot be modified in any way.
To delete a snapshot :
lxc snapshot <container> [<name>]lxc restore <container> <snapshot name>lxc delete <container>/<snapshot name>To restore a snapshot :
To create a snapshot :
Snapshots
Snapshot list accessible with :
lxc info <container>Name: illusory-nubia
Architecture: x86_64
Created: 2016/07/01 13:30 UTC
Status: Stopped
Type: persistent
Profiles: default
Snapshots:
first_snap (taken at 2016/07/01 14:05 UTC) (stateless)
save1 (taken at 2016/07/08 13:22 UTC) (stateless)
save2 (taken at 2016/07/13 08:53 UTC) (stateless)Some configurations
For things that are unique to a container, edit with:
lxc config edit <container>You can also modify individual keys:
lxc config set <container> <key> <value>Or add devices, for example;
lxc config device add my-container kvm unix-char path=/dev/kvmSome configurations
Mount the /home host directory to container :
lxc config device add <container> homedir disk source=/home/$USER \
path=/home/<name you want>
Limit the number of CPU :
lxc config set my-container limits.cpu <number>Find below all configuration paramaters :
Profiles
Profiles are a way to define container configuration and container devices in one place and then have it apply to any number of containers.
A container can have multiple profiles applied.
List them with:
lxc profile listLXD ships with two pre-configured profiles:
Default
Docker
Default/Docker
-
“default” is automatically applied to all containers unless an alternative list of profiles is provided by the user. This profile currently does just one thing, define a “eth0” network device for the container.
-
“docker” is a profile you can apply to a container which you want to allow to run Docker containers. It requests LXD load some required kernel modules, turns on container nesting and sets up a few device entries
Creating/Editing
To create a profile:
lxc profile create <profile>To show a profile:
lxc profile show <profile>To edit a profile:
lxc profile edit <profile>To delete a profile:
lxc profile delete <profile>Example
Editing of Docker profile:
The docker profile tells LXD to load a few required kernel modules and set up some mounts for the container. The docker profile also enables container nesting.
name: docker
config:
  linux.kernel_modules: overlay, nf_nat
  security.nesting: "true"
description: Profile supporting docker in containers
devices:
  aadisable:
    path: /sys/module/apparmor/parameters/enabled
    source: /dev/null
    type: disk
  fuse:
    path: /dev/fuse
    type: unix-char
Applying profile(s)
A container can have multiple profiles applied to it. When building the final container configuration, the profiles will be applied in the order they were defined in, overriding each other when the same configuration key or device is found.
To apply profile(s):
lxc profile apply <container> <profile1>,<profile2>,...Managing files
Because LXD has direct access to the container’s file system, it can directly read and write any file inside the container. This can be very useful to pull log files or exchange files with the container.
lxc file pull <container>/<path> <dest>Print it to standard output :
lxc file pull <container>/<path> -Get a file from the container :
Managing files
To push a file to the container:
lxc file push <source> <container>/<path>To edit a file directly in your container:
lxc file edit <container>/<path>Rest API
Everything that LXD does is done over its REST API. There is no other communication channel between the client and the daemon.
The REST API can be access over a local unix socket, only requiring group membership for authentication or over a HTTPs socket using a client certificate for authentication.
When a more complex communication mechanism is required, LXD will negotiate websockets and use those for the rest of the communication. This is used for interactive console session, container migration and for event notification.