Angular 2
Modular,testable, maintainable app
Для описания интерфейса используется декларативное программирование, а бизнес-логика отделена от кода интерфейса, что позволяет улучшить тестируемость и расширяемость приложений.Другой отличительной чертой фреймворка является двустороннее связывание, позволяющее динамически изменять данные в одном месте интерфейса при изменении данных модели в другом. Таким образом, AngularJS синхронизирует модель и представление.
Angular представляет собой opensource JavaScript-фреймворк, использующий шаблон MVC

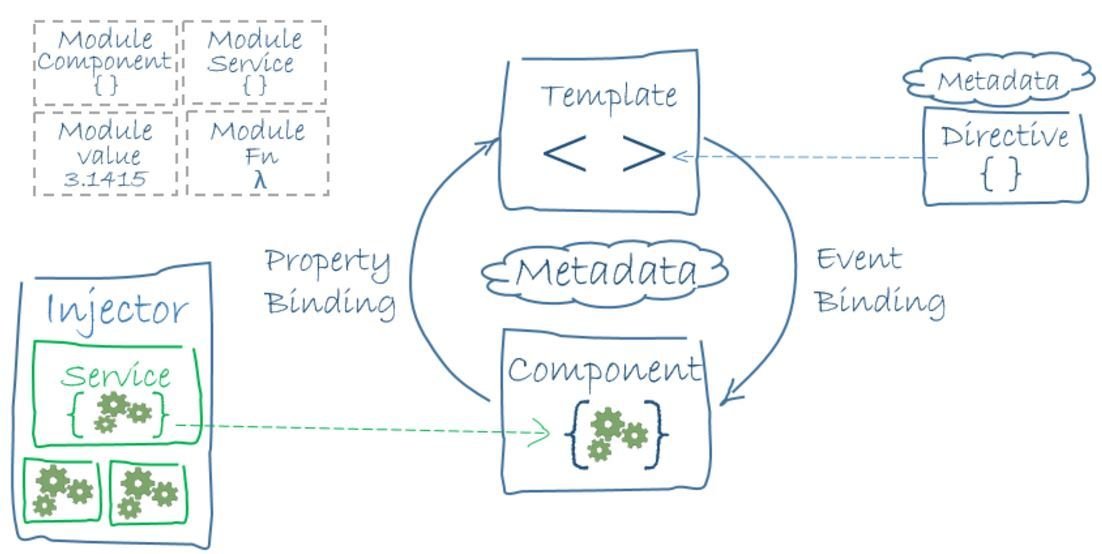
The basic building blocks of an Angular application are NgModules, which provide a compilation context for components. NgModules collect related code into functional sets; It can contain components, service providers, and other code files whose scope is defined by the containing NgModule. an Angular app is defined by a set of NgModules. An app always has at least a root module that enables bootstrapping, and typically has many more feature modules.
-
Components define views, which are sets of screen elements that Angular can choose among and modify according to your program logic and data. Every app has at least a root component.
-
Components use services, which provide specific functionality not directly related to views. Service providers can be injected into components as dependencies, making your code modular, reusable, and efficient.
Both components and services are simply classes, with decorators that mark their type and provide metadata that tells Angular how to use them.
-
The metadata for a component class associates it with a template that defines a view. A template combines ordinary HTML with Angular directives and binding markup that allow Angular to modify the HTML before rendering it for display.
-
The metadata for a service class provides the information Angular needs to make it available to components through Dependency Injection (DI).
import { NgModule }      from '@angular/core';
import { BrowserModule } from '@angular/platform-browser';
@NgModule({
  imports:      [ BrowserModule ],//Other modules whose exported classes are needed by component templates
  providers:    [ Logger ], //Creators of services that this NgModule contributes to the global collection of services; they become accessible in all parts of the app
  declarations: [ AppComponent ],//The components, directives, and pipes
  exports:      [ AppComponent ],//the subset of declarations that should be visible and usable in the component templates of other NgModules
  bootstrap:    [ AppComponent ] // root component
})
export class AppModule { }
Приложение Angular состоит из модулей. Модульная структура позволяет легко подгружать и задействовать только те модули, которые непосредственно необходимы.
Organizing your code into distinct functional modules helps in managing development of complex applications, and in designing for reusability. In addition, this technique lets you take advantage of lazy-loading—that is, loading modules on demand—in order to minimize the amount of code that needs to be loaded at startup.
Every Angular app has at least one NgModule class, the root module, which is conventionally named AppModule and resides in a file named app.module.ts. You launch your app by bootstrapping the root NgModule.
Каждый модуль должен определяться с декоратором @NgModule.
NgModule представляет функцию-декоратора, которая принимает объект, свойства которого описывают метаданные модуля. Наиболее важные свойства:
exports : A list of declarations—component, directive, and pipe classes—that an importing module can use.
entryComponents: A list of components that can be dynamically loaded into the view.
By default, an Angular app always has at least one entry component, the root component, AppComponent. Its purpose is to serve as a point of entry into the app, that is, you bootstrap it to launch the app.
Routed components are also entry components because they need to be loaded dynamically. The router creates them and drops them into the DOM near a <router-outlet>.
While the bootstrapped and routed components are entry components, you don't have to add them to a module's entryComponents list, as they are added implicitly.
Angular automatically adds components in the module's bootstrap and route definitions into the entryComponents list.
That leaves only components bootstrapped using one of the imperative techniques, such as ViewComponentRef.createComponent() as undiscoverable.
import { Component } from '@angular/core';

@Component({
  selector: 'my-app',
  template: `<h1>Hello {{name}}</h1>`,
  providers:  [ HeroService ]
})
export class AppComponent { name = 'Angular'; }
Angular applications are made up of components. A component is the combination of an HTML template and a component class that controls a portion of the screen
Every component begins with an @Component decorator function that takes a metadata object. The metadata object describes how the HTML template and component class work together.
selector property tells Angular to display the component inside a custom <my-app> tag in the index.html.
templateUrl: The module-relative address of this component's HTML template. Alternatively, you can provide the HTML template inline, .
providers: An array of dependency injection providers for services that the component requires.This is one way to tell Angular that the component's constructor requires a HeroService so it can get the list of heroes to display.
moduleId: sets the source of the base address (module.id) for module-relative URLs such as the templateUrl.
Компонент управляет отображением представления на экране.
A template combines ordinary HTML with Angular directives and binding markup that allow Angular to modify the HTML before rendering it for display.
Your templates can also use pipes to improve the user experience by transforming values for display.
Angular templates are dynamic. When Angular renders them, it transforms the DOM according to the instructions given by directives. A directive is a class with a @Directive decorator.
There are two kinds of directives besides components: structural (alter layout by adding, removing, and replacing elements in DOM : ngFor) and attribute directives (alter the appearance or behavior of an existing element :ngModel).
For data or logic that is not associated with a specific view, and that you want to share across components, you create a service class. A service class definition is immediately preceded by the @Injectable decorator. The decorator provides the metadata that allows your service to be injected into client components as a dependency.
Dependency injection (often called DI) is used everywhere to provide new components with the services or other things they need.
The injector maintains a container of dependency instances that it has already created, and reuses them if possible.
A provider is a recipe for creating a dependency. For a service, this is typically the service class itself. For any dependency you need in your app, you must register a provider with the app's injector, so that the injector can use it to create new instances.
When Angular creates a new instance of a component class, it determines which services or other dependencies that component needs by looking at the types of its constructor parameters.When Angular discovers that a component depends on a service, it first checks if the injector already has any existing instances of that service. If a requested service instance does not yet exist, the injector makes one using the registered provider, and adds it to the injector before returning the service to Angular.
You write Angular applications by composing HTML templates with Angularized markup, writing component classes to manage those templates, adding application logic in services, and boxing components and services in modules.
Then you launch the app by bootstrapping the root module. Angular takes over, presenting your application content in a browser and responding to user interactions according to the instructions you've provided.
Tamplate syntax
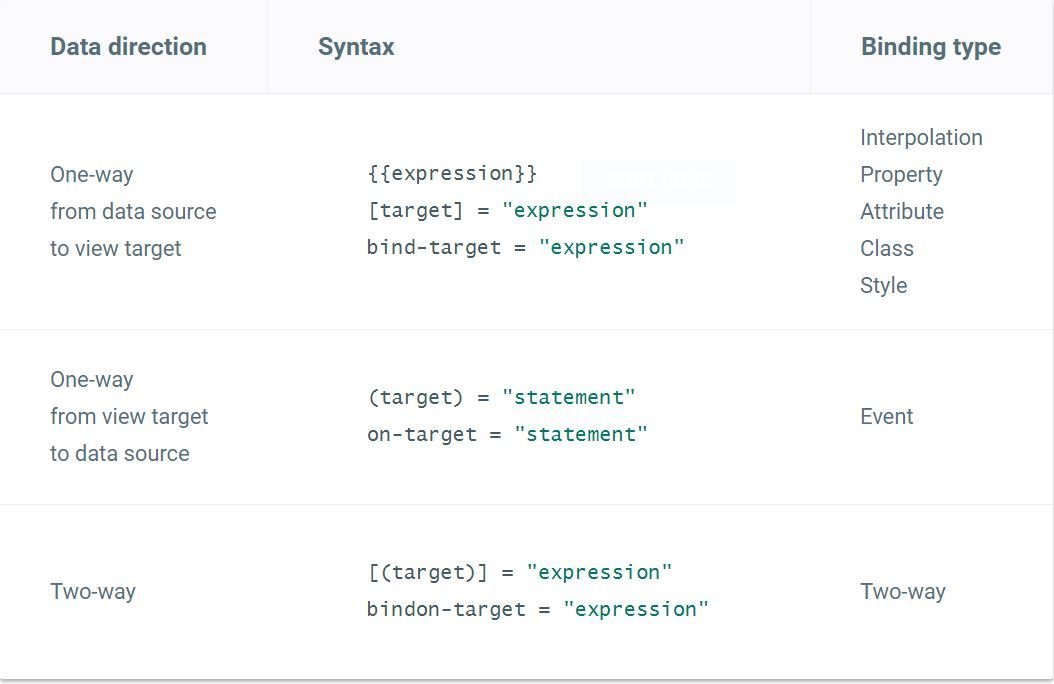
Angular supports data binding, a mechanism for coordinating parts of a template with parts of a component.
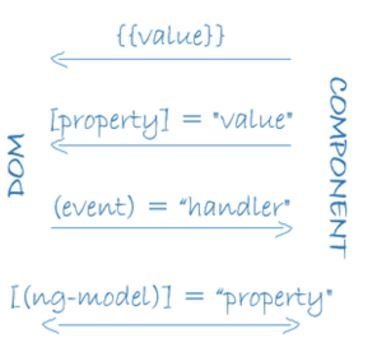
Two-way data binding is an important fourth form that combines property and event binding in a single notation, using the ngModel directive. In two-way binding, a data property value flows to the input box from the component as with property binding. The user's changes also flow back to the component, resetting the property to the latest value, as with event binding.
-
The {{hero.name}} interpolation displays the component's hero.name property value within the <li> element.
-
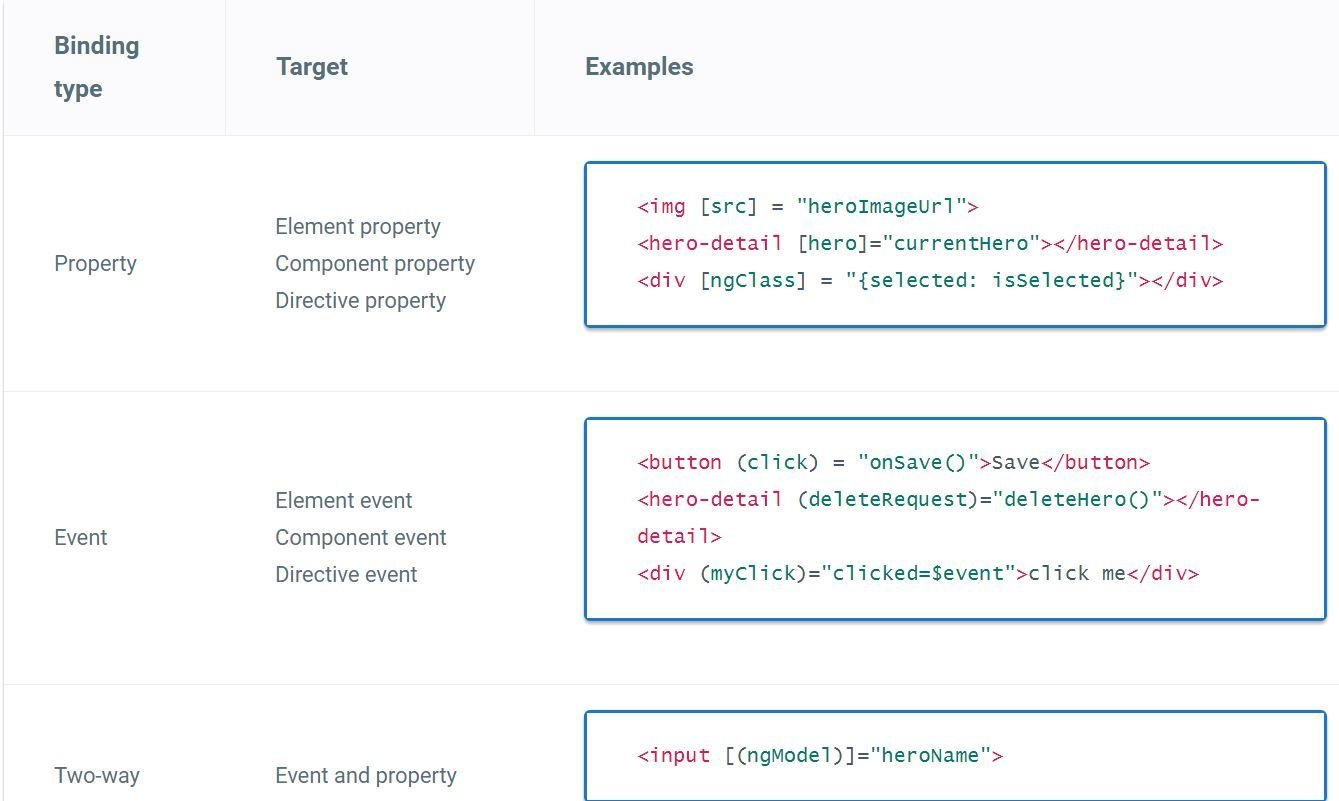
The [hero] property binding passes the value of selectedHero from the parent HeroListComponent to the heroproperty of the child HeroDetailComponent.
-
The (click) event binding calls the component's selectHero method when the user clicks a hero's name.
{{ and }} interpolation Angular replaces name of property with the string value of the corresponding component property
{{title}} title is a property of the data-bound component
Template binding works with properties and events, not attributes. Attributes initialize DOM properties and then they are done. Property values can change; attribute values can't. The HTML attribute value specifies the initial value; the DOM value property is the current value.
<p><img src="{{heroImageUrl}}"></p>
<p><img [src]="heroImageUrl"></p>

<p><span>"{{title}}" is </span></p>
<p>"<span [innerHTML]="title"></span>" is title.</p>
We must use attribute binding when there is no element property to bind.
The ngModel data property sets the element's value property and the ngModelChange event property listens for changes to the element's value. (for form elements)
it flows a value in one direction, from a component's data property into a target element property. Привязка свойства элемента html к значению компонента
Привязка метода компонента к событию в DOM (генерация события в DOM вызывает метод на компоненте)
Двусторонняя привязка, когда элемент DOM привязан к значению на компоненте, при этом изменения на одном конце привязки сразу приводят к изменениям на другом конце
The binding conveys information about the event, including data values, through an event object named $event.
The shape of the event object is determined by the target event. If the target event is a native DOM element event, then $event is a DOM event object, with properties such as target and target.value.
<input [value]="currentHero.name"
       (input)="currentHero.name=$event.target.value" >
Angular offers a special two-way data binding syntax for this purpose, [(x)]. The [(x)] syntax combines the brackets of property binding, [x], with the parentheses of event binding, (x).
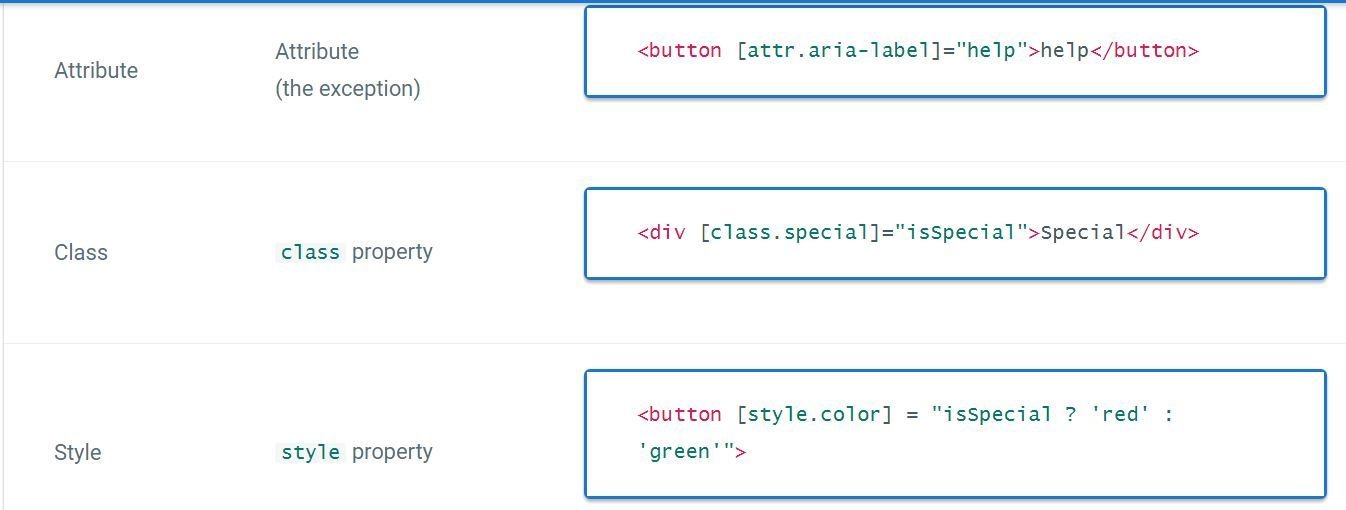
Attribute directives alter the appearance or behavior of an existing element. In templates they look like regular HTML attributes, hence the name.
Many Classes and styles
они изменяют поведение уже существующего элемента, к которому они применяются.
они изменяют структуру DOM с помощью добавления, изменения или удаления элементов hmtl
Add a method to the component that returns the value NgForOf should track. In this case, that value is the hero's id. Чтобы не удалять все
Structural alter layout by adding, removing, and replacing elements in DOM
Angular templates are dynamic. When Angular renders them, it transforms the DOM according to the instructions given by directives. A directive is a class with a @Directive decorator.
There are two kinds of directives besides components: structural and attribute directives.
You use the ElementRef in the directive's constructor to inject a reference to the host DOM element, the element to which you applied appHighlight.
ElementRef grants direct access to the host DOM element through its nativeElement property.
The @HostListener decorator lets you subscribe to events of the DOM element that hosts an attribute directive
import { Directive, ElementRef, HostListener, Input } from '@angular/core';

@Directive({
  selector: '[appHighlight]'
})
export class HighlightDirective {

  constructor(private el: ElementRef) { }

  @Input('appHighlight') highlightColor: string;

  @HostListener('mouseenter') onMouseEnter() {
    this.highlight(this.highlightColor || 'red');
  }

  @HostListener('mouseleave') onMouseLeave() {
    this.highlight(null);
  }

  private highlight(color: string) {
    this.el.nativeElement.style.backgroundColor = color;
  }
}
<p [appHighlight]="color">Highlight me!</p>The <ng-template> is an Angular element for rendering HTML. If there is no structural directive and you merely wrap some elements in a <ng-template>, those elements disappear.
The Angular <ng-container> is a grouping element that doesn't interfere with styles or layout because Angular doesn't put it in the DOM.
<p>
  I turned the corner
  <ng-container *ngIf="hero">
    and saw {{hero.name}}. I waved
  </ng-container>
  and continued on my way.
</p>
Template reference variables ( #var )
Use the hash symbol (#) to declare a reference variable.You can refer to a template reference variable anywhere in the template.
<input #phone placeholder="phone number">

<!-- lots of other elements -->

<!-- phone refers to the input element; pass its `value` to an event handler -->
<button (click)="callPhone(phone.value)">Call</button>
Input and Output properties
An Input property is a settable property annotated with an @Input decorator. Values flow into the property when it is data bound with a property binding
An Output property is an observable property annotated with an @Output decorator. The property almost always returns an Angular EventEmitter. Values flow out of the component as events bound with an event binding.
You can only bind to another component or directive through its Input and Output properties.
Input привязывает свойства дочернего компонента к свойствам из главного компонента. Ouput передает его родительскому компоненту
@Input decorator tells Angular that this property is public and available for binding by a parent component. Without @Input, Angular refuses to bind to the property.
<app-hero-detail [hero]="currentHero" (deleteRequest)="deleteHero($event)">
</app-hero-detail>
@Input() hero: Hero;
@Output() deleteRequest = new EventEmitter<Hero>();
delete() {
this.deleteRequest.emit(this.hero);
}Directives typically raise custom events with an Angular EventEmitter. The directive creates an EventEmitter and exposes it as a property. The directive calls EventEmitter.emit(payload) to fire an event, passing in a message payload, which can be anything. Parent directives listen for the event by binding to this property and accessing the payload through the $event object.
emit позволяет вызвать событие в главном компоненте, то есть при вызове метода
this.onChanged.emit(increased); генерируется событие onChanged. Так как главый компонент подписан на это событие, то у него вызывается метод
Your templates can also use pipes to improve the user experience by transforming values for display.
The Angular safe navigation operator (?.) is a fluent and convenient way to guard against null and undefined values in property paths. Here it is, protecting against a view render failure if the currentHero is null.
<div>Title through uppercase pipe: {{title | uppercase}}</div><!-- No hero, no problem! -->
The null hero's name is {{nullHero?.name}}import { Pipe, PipeTransform } from '@angular/core';
/*
* value | exponentialStrength:exponent
* Example:
* {{ 2 | exponentialStrength:10 }}
* formats to: 1024
*/
@Pipe({name: 'exponentialStrength'})
export class ExponentialStrengthPipe implements PipeTransform {
transform(value: number, exponent: string): number {
let exp = parseFloat(exponent);
return Math.pow(value, isNaN(exp) ? 1 : exp);
}
}A pipe takes in data as input and transforms it to a desired output.
Lifecycle Hooks (Жизненный цикл)
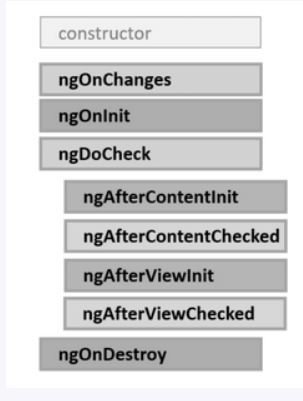
ngOnChanges: вызывается при начальной установке связанных input свойств, а также при любой их переустановке или изменении их значений. Данный метод в качестве параметра принимает объект класса SimpleChanges, который содержит предыдущие и текущие значения свойства.
Respond when Angular (re)sets data-bound input properties. Called before ngOnInit() and whenever one or more data-bound input properties change.
ngOnInit: вызывается один раз после установки свойств компонента, которые участвуют в привязке. Выполняет инициализацию компонента. Initialize the directive/component after Angular first displays the data-bound properties and sets the directive/component's input properties.
ngDoCheck: вызывается при каждой проверке изменений свойств компонента сразу после методов ngOnChanges и ngOnInit
ngAfterContentInit: вызывается один раз после метода ngDoCheck() после вставки содержимого в представление компонента кода html (view)
ngAfterContentChecked: вызывается фреймворком Angular при проверке изменений содержимого, которое добавляется в представление компонента. Вызывается после метода ngAfterContentInit() и и после каждого последующего вызова метода ngDoCheck().
ngOnDestroy: вызывается перед тем, как Angular удалит компонент. Cleanup just before Angular destroys the directive/component. Unsubscribe Observables and detach event handlers to avoid memory leaks.
ngAfterViewInit: вызывается фреймворком Angular после инициализации представления компонента, а также представлений дочерних компонентов. Вызывается только один раз сразу после первого вызова метода ngAfterContentChecked()
ngAfterViewChecked: вызывается фреймворком Angular после проверки на изменения в представлении компонента, а также проверки представлений дочерних компонентов. Вызывается после первого вызова метода ngAfterViewInit() и после каждого последующего вызова ngAfterContentChecked()
Angular calls after it creates a component's child views.
The following hooks take action based on changing values within the child view, which can only be reached by querying for the child view via the property decorated with @ViewChild.
export class AfterViewComponent implements  AfterViewChecked, AfterViewInit {
  private prevHero = '';

  // Query for a VIEW child of type `ChildViewComponent`
  @ViewChild(ChildViewComponent) viewChild: ChildViewComponent;

  ngAfterViewInit() {
    // viewChild is set after the view has been initialized
  }

  ngAfterViewChecked() {
    // viewChild is updated after the view has been checked
    if (this.prevHero === this.viewChild.hero) {
      this.logIt('AfterViewChecked (no change)');
    } else {
      this.prevHero = this.viewChild.hero;
    }
  }
  // ...
}
Стили
The styles specified in @Component metadata apply only within the template of that component.
Changes to styles elsewhere in the application don't affect the component's styles.
The :host selector is the only way to target the host element. Use the function form to apply host styles conditionally by including another selector inside parentheses after :host.
:host-context(селектор хозяина) выбирает элемент-хозяин, если какой-либо из его родителей удовлетворяет селектору, например:
:host-context(h1) p {
  /* селектор сработает для p, если хозяин находится внутри h1 */
}
:host выбирает элемент-хозяин, :host(селектор хозяина) выбирает элемент-хозяин, если он подходит под селектор
:host p {
  color: green;
}

:host(.important) p {
  color: red;
}
Здесь параграфы будут иметь color:green, но если у хозяина класс .important, то color:red.
There are several ways to add styles to a component:
- By setting styles or styleUrls metadata.
- Inline in the template HTML.
- With CSS imports.
Forms
User input
template: `
  <input (keyup)="onKey($event)">
  <p>{{values}}</p>
`
export class KeyUpComponent_v1 {
  values = '';

  onKey(event: any) { // without type info
    this.values += event.target.value + ' | ';
  }
}
Angular provides a corresponding DOM event object in the $event variable which this code passes as a parameter to the component's onKey() method.
  onKey(event: any) { // without type info
    this.values += event.target.value + ' | ';
  }
There's another way to get the user data: use Angular template reference variables.
These variables provide direct access to an element from within the template. To declare a template reference variable, precede an identifier with a hash (or pound) character (#).
@Component({
  selector: 'key-up2',
  template: `
    <input #box (keyup)="onKey(box.value)">
    <p>{{values}}</p>
  `
})
export class KeyUpComponent_v2 {
  values = '';
  onKey(value: string) {
    this.values += value + ' | ';
  }
}
A nice aspect of this approach is that the component gets clean data values from the view. It no longer requires knowledge of the $event and its structure.
keyup.enter pseudo-event and blur
@Component({
  selector: 'key-up4',
  template: `
    <input #box
      (keyup.enter)="update(box.value)"
      (blur)="update(box.value)">

    <p>{{value}}</p>
  `
})
export class KeyUpComponent_v4 {
  value = '';
  update(value: string) { this.value = value; }
}
Если же нам надо динамически при вводе каждого нового символа обрабатывать ввод, то в этом случае более удобным решением будет обработка события ngModelChange. Это событие не соотносится ни с каким стандартным событием элемента html. Функциональность ngModelChange привносится в элемент через применение к нему директивы NgModel. Например:
<input class="form-control" name="title"
    [(ngModel)]="phone.title" #phoneTitle="ngModel"
    (ngModelChange)="onTitleChange()" />
Each input element has a name property that is required by Angular forms to register the control with the form.
Defining a name attribute is a requirement when using [(ngModel)] in combination with a <form>
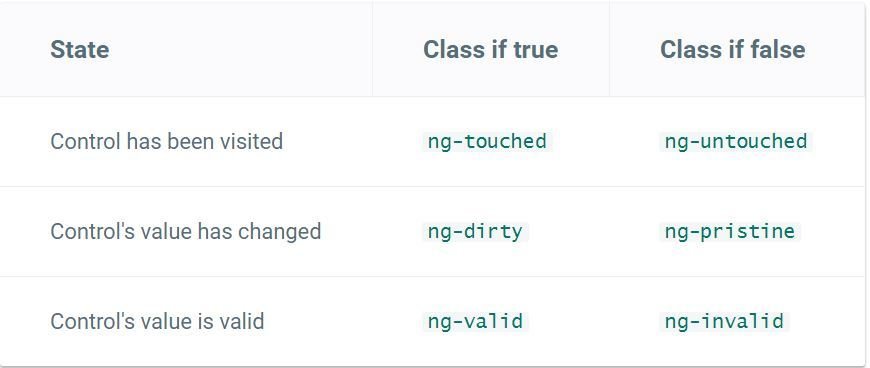
[(ngModel)]="model.name" name="name">The NgModel directive doesn't just track state; it updates the control with special Angular CSS classes that reflect the state.
При работе с формами ключевым моментом является использование директивы NgModel. Эта директива с помощью переданной модели создает объект FormControl и привязывает эту модель к созданному элементу формы. Объект FormControl отслеживает значение модели, а также отвечает за валидацию этого значения и взаимодействие с пользователем.
 <form (ngSubmit)="onSubmit()" #heroForm="ngForm">
      <div class="form-group">
        <label for="name">Name</label>
        <input type="text" class="form-control" id="name"
               required
               [(ngModel)]="model.name" name="name"
               #name="ngModel">
        <div [hidden]="name.valid || name.pristine"
             class="alert alert-danger">
          Name is required
        </div>
      </div>
<button type="submit" class="btn btn-success" [disabled]="!heroForm.form.valid">Submit</button>
      <button type="button" class="btn btn-default" (click)="newHero(); heroForm.reset()">New Hero</button>
The NgForm directive supplements the form element with additional features. It holds the controls we created for the elements with an ngModel directive and name attribute, and monitors their properties including their validity. It also has its own valid property which is true only if every contained control is valid.
Непосредственно в Angular для работы с формой определена специальная директива NgForm. Она создает объект FormGroup и привязывает его к форме, что позволяет отслеживать состояние формы, управлять ее валидацией.
У формы определена переменная #myForm. Причем она инициализирована значением "ngForm". То есть эта переменная myForm представляет директиву NgForm, и через эту переменную мы сможем ссылаться на всю форму.
В Angular существует 2 подхода к созданию форм:
Template-driven forms — подход, в котором ключевую роль играет шаблон компонента, и все описание производится в нем — этот подход является развитием работы с формами в AngularJS;
Reactive forms — новый подход для работы с формами в реактивном стиле. Описание формы происходит в компоненте в виде дерева объектов, после чего это дерево связывается с шаблоном. Все манипуляции (проверка валидности, подписка на изменение значения и прочее) производятся в компоненте, что делает работу более гибкой, удобной и предсказуемой.
- FormControl — элемент ввода, может быть связан с input, textarea, select и прочими html элементами форм.
- FormGroup— состоит из FormControl и FormGroup/FormArray, каждый элемент содержит строковый идентификатор. Может быть целой формой или же частью формы (вложенной формой).
- FormArray — похож на FormGroup, но действует как массив (вы можете использовать методы push, insert, или removeAt), используется для форм с динамическим набором элементов (например: список IP адресов, список контактных данных);
FormControl — это класс, который позволяет напрямую создавать отдельные элементы ввода и управлять ими. Конструктор new FormControl() принимает три необязательных параметра:
- изначальное значение данных
- массив валидаторов
- массив асинхронных валидаторов
Свяжем форму с шаблоном компонента через директивы formGroup и formControlName:
<form [formGroup]="myFirstReactiveForm">
  <label for="name">имя</label>
  <input type="text" id="name" formControlName="name" />
  <br/><br/>

  <label for="email">email</label>
  <input type="text" id="email" formControlName="email" />
  <br/><br/>

  <button type="submit">отправить</button>
</form>
export class AppComponent implements OnInit {
myFirstReactiveForm: FormGroup;
constructor(private fb: FormBuilder){}
ngOnInit(){
this.initForm();
}
/** Инициализация формы*/
initForm(){
this.myFirstReactiveForm = this.fb.group({
"userName": ["Tom", [Validators.required]],
"userEmail": ["", [ Validators.required, Validators.pattern("[a-zA-Z_]+@[a-zA-Z_]+?\.[a-zA-Z]{2,3}")]],
"phones": formBuilder.array([
["+7", Validators.required]
])
});
}
}При работе с большими и сложными формами реактивный подход удобнее по следующим причинам:
- Не нужно создавать для каждого контрола свойство. Все находится в дереве формы;
- Вся логика содержится в одном компоненте. Нет «размытия» по шаблону;
- Легче производить манипуляции с контролами за счет встроенных методов;
- Подписка на изменение контрола происходит не через обработчик превязанный к шаблону, а через подписку(subscribe);
- Легче тестировать.
export class AppComponent {

    myForm : FormGroup;
    constructor(private formBuilder: FormBuilder){

        this.myForm = formBuilder.group({

            "userName": ["Tom", [Validators.required]],
            "userEmail": ["", [ Validators.required, Validators.pattern("[a-zA-Z_]+@[a-zA-Z_]+?\.[a-zA-Z]{2,3}")]],
            "phones": formBuilder.array([
                ["+7", Validators.required]
            ])
        });
    }
    addPhone(){
        (<FormArray>this.myForm.controls["phones"]).push(new FormControl("+7", Validators.required));
    }
    submit(){
        console.log(this.myForm);
    }
}
Сервис представляет собой класс, выполняющие некоторые общие для всего приложения задачи. Чтобы сервис можно было внедрить, сперва нужно зарегистрировать его. Нам не нужно вручную создавать инжектор, ангуляр сам создаёт глобальный инжектор, когда вызывается функция bootstrap. Второй способ зарегистрировать сервис — добавить его в метаданные компонента в поле providers:
Чтобы указать, что сервис сам может использовать другие сервисы, к классу сервиса применяется декоратор Injectable. Если класс не будет иметь подобного декоратора, то встроенный механизм внедрения зависимостей не сможет создать объект этого класса и выдаст ошибку.
dependency injection is a coding pattern in which a class receives its dependencies from external sources rather than creating them itself.
Внедрение зависимостей в Angular 2 принципиально состоит из трех элементов:
- Инжектор – объект, предоставляющий нам различные API для создания экземпляров зависимостей.
- Провайдер – провайдер напоминает рецепт, описывающий инжектору, как создать экземпляр зависимости. У провайдера есть маркер, отображаемый им на фабричную функцию, создающую объект.
- Зависимость – зависимость это тип, к которому должен относиться создаваемый объект.
For data or logic that is not associated with a specific view, and that you want to share across components, you create a service class. A service class definition is immediately preceded by the @Injectable decorator. The decorator provides the metadata that allows your service to be injected into client components as a dependency.
Dependency injection (often called DI) is used everywhere to provide new components with the services or other things they need.
The injector maintains a container of dependency instances that it has already created, and reuses them if possible.
A provider is a recipe for creating a dependency. For a service, this is typically the service class itself. For any dependency you need in your app, you must register a provider with the app's injector, so that the injector can use it to create new instances.
When Angular creates a new instance of a component class, it determines which services or other dependencies that component needs by looking at the types of its constructor parameters.When Angular discovers that a component depends on a service, it first checks if the injector already has any existing instances of that service. If a requested service instance does not yet exist, the injector makes one using the registered provider, and adds it to the injector before returning the service to Angular.
Angular can tell which services a component needs by looking at the types of its constructor parameters. For example, the constructor of your HeroListComponent needs a HeroService:
constructor(private service: HeroService) { }When Angular creates a component, it first asks an injector for the services that the component requires.
- An injector maintains a container of service instances that it created.
- An injector can create a new service instance from a provider.
You can tell Angular to inject a dependency in the component's constructor by specifying a constructor parameter with the dependency type
dependency injection system creates and delivers dependent services "just-in-time".
For service we need Injectable function and applied that function as an @Injectable() decorator.
TypeScript sees the @Injectable() decorator and emits metadata about our service, metadata that Angular may need to inject other dependencies into this service.
Inject the HeroService
- We add a constructor that also defines a private property.
- We add to the component's providers metadata.
Внедрение зависимости (англ. Dependency injection, DI) — процесс предоставления внешней зависимости программному компоненту. Является специфичной формой «инверсии управления» (англ. Inversion of control, IoC), когда она применяется к управлению зависимостями. В полном соответствии с принципом единой обязанности объект отдаёт заботу о построении требуемых ему зависимостей внешнему, специально предназначенному для этого общему механизму[1].
Иногда нужно зарегистрировать провайдер динамически, используя информацию, недоступную с самого начала. Например, эта информация может быть получена из сессии и быть разной от раза к разу. Также предположим, что внедряемый сервис не имеет независимого доступа к этой информации.
В таких случаях используют провайдер-фабрику / фабричный провайдер.
Пускай у нас есть некий сервис BookService нуждается в информации из другого сервиса. Допустим, мы хотим проверить, авторизирован ли пользователь, используя данные из AuthService. Но, в отличие от EvenBetterLogger мы не можем внедрить напрямую сервис, т.е. в данном случае, BookService не имеет доступа к AuthService. Сервисы выглядят вот так:
@Injectable()
export class AuthService {
    isLoggedIn: boolean = false;
}

@Injectable()
export class BookService {
    books: any[]; // книги, доступные всем
    extraBooks: any[]; // книги, доступные только вошедшим пользователям

    constructor(private _logger: Logger, private _isLoggedIn: boolean) {}

    getBooks() {
        if (this._isLoggedIn) {
            this._logger.log('Дополнительные книги');
            return [...this.books, ...this.extraBooks];
        }
        this._logger.log('Основные книги');
        return this.books;
    }
}
Мы можем внедрить Logger, но не можем внедрить boolean-значение.
Так что мы используем функцию-фабрику при регистрации провайдера BookService, в которую внедрим нужный сервис:
Чтобы использовать фабрику, регистрируем провайдер, передав в поле useFactory наше фабрику, а в поле deps — зависимости этой фабрики:
let bookServiceFactory = (logger: Logger, authService: AuthService) => {
    return new BookService(logger, authService.isLoggedIn);
}
[provide(BookService, {useFactory: bookServiceFactory, deps: [Logger, AuthService]})
The Angular Router enables navigation from one view to the next as users perform application tasks. Routing is another name for navigation. The router is the mechanism for navigating from view to view.
The router is a combination of multiple provided services (RouterModule), multiple directives (RouterOutlet, RouterLink, RouterLinkActive), and a configuration (Routes).
Routes tell the router which views to display when a user clicks a link or pastes a URL into the browser address bar. The Routes are an array of route definitions.
We have to tell it where by adding a <router-outlet> element to the bottom of the template. RouterOutlet is one of the directives provided by the RouterModule. The router displays each component immediately below the <router-outlet>as we navigate through the application.
 <a routerLink="/heroes">Heroes</a>
   <router-outlet></router-outlet>
RouterModule.forRoot([
{
path: 'heroes',
component: HeroesComponent
}
])[routerLink]="['/detail', hero.id]" This time, we're binding to an expression containing a link parameters array. The array has two elements, the path of the destination route and a route parameter set to the value of the current hero's id.
Replace the template metadata with a templateUrl property that points to a new template file.
Set the moduleId property to module.id for module-relative loading of the templateUrl.
@Component({
  moduleId: module.id,
  selector: 'my-dashboard',
  templateUrl: 'dashboard.component.html',
})
С помощью нее можно просто реализовать паттерн Издатель-подписчик (publisher-subscriber, pub/sub) — это одна из реализаций паттерна Observable.
То есть у нас есть Наблюдаемый объект (издатель), об изменении которого мы хотели бы узнавать в разных частях программы. Поэтому мы на него подписываемся.
Каждый раз, когда наблюдаемый объект меняется, подписчики отлавливают это событие и получают новое значение.
Typescript
TypeScript является надмножеством JavaScript, а это значит, что любая программа на JS является программой на TypeScript.
TypeScript - это строго типизированный и компилируемый язык. Хотя на выходе компилятор создает все тот же JavaScript, который затем исполняется браузером. Однако строгая типизация уменьшает количество потенциальных ошибок, которые могли бы возникнуть при разработке на JavaScript.
TypeScript реализует многие концепции, которые свойственны объектно-ориентированным языкам, как, например, наследование, полиморфизм, инкапсуляция и модификаторы доступа и так далее.
В TypeScript имеются следующие базовые типы:
-
Boolean: логическое значение true или false
-
Number: числовое значение
-
String: строки
-
Array: массивы
-
Tuple: кортежи
-
Enum: перечисления
-
Any: произвольный тип
-
Null и undefined: соответствуют в javascript
-
Void: отсутствие конкретного типа
let x: number = 10;
let hello: string = "hello world";
let isValid: boolean = true;

let list: number[] = [10, 20, 30];
let colors: string[] = ["red", "green", "blue"];

// определение кортежа - кортеж состоит из двух элементов - строки и числа
let userInfo: [string, number];
// инициализация кортежа
userInfo = ["Tom", 28];

enum Season { Winter, Spring, Summer, Autumn };
let current: Season = Season.Summer;

let someVar: any = "hello";
console.log(someVar);   // сейчас someVar - это string
someVar = 20;
console.log(someVar);   // сейчас someVar - это number

var someArray: any[] = [ 24, "Tom", false];

let person = {name:"Tom", age:23};
Объединения или union не являются собственно типом данных, но они позволяют определить переменную, которая может хранить значение двух или более типов:
let names : string[] | string;names может представлять как тип string, а так и массив строк.
TypeScript позволяет определять псевдонимы типов с помощью ключевого слова type:
type stringOrNumberType = number | string;
let sum: stringOrNumberType = 36.6;
Type assertion представляет модель преобразования значения переменной к определенному типу. Обычно в некоторых ситуациях одна переменная может представлять какой-то широкий тип, например, any, который по факту допускает значения различных типов. Однако при этом нам надо использовать переменную как значение строго определенного типа. И в этом случае мы можем привести к этому типу
let someAnyValue: any = "hello world!";
let strLength: number = (<string>someAnyValue).length;
let strLength: number = (someAnyValue as string).length;
console.log(strLength); // 12
мы можем определить тип передаваемых параметров и тип возвращаемого значения
function add(a: number, b: number): number {
    return a + b;
}

function add(a: number, b: number): void {
    console.log(a + b);
}
Чтобы иметь возможность передавать различное число значений в функцию, в TS некоторые параметры можно объявить как необязательные. Они должны быть помечены вопросительным знаком ? и идти после обязательных
function getName(firstName: string="Иван", lastName?: string) {
    if (lastName)
        return firstName + " " + lastName;
    else
        return firstName;
}
Если же необходимо, чтобы функция принимала набор однотипных параметров, то используется знак многоточия, после которого идет массив:
function addNumbers(firstNumber: number, ...numberArray: number[]): number {

    var result = firstNumber;
    for (var i = 0; i < numberArray.length; i++) {
        result+= numberArray[i];
    }
    return result;
}
TypeScript поддерживает возможность перегрузки функций, т.е. мы можем определить несколько версий функции, которые будут иметь одно и то же имя, но разные типы параметров или разное количество параметров или разные возвращаемые типы результатов. Для перегрузки вначале определяем все версии функции, А потом определяем версию функции с общей сигнатурой, которая подходит под все ранее определенные варианты. И в этой общей версии уже определяем конкретную логику функции.
function getInfo(name: string): string;
function getInfo(age: number): string;
function getInfo(val: string|number): string {

    if (typeof val === "string")
        return "Имя = " + val;
    else if (typeof val === "number")
        return "Возраст = " + val;
    else
        return "undefined";
}
function add(x: string, y: string): string;
function add(x: number, y: number): number;
function add(x: any, y: any): any {
return x + y;
}Мы можем определить переменную как функцию некоторого типа.
let operation: (x: number, y: number) => number;
operation = function(x: number, y: number): number {
    return x + y;
};
operation = function (x: number, y: number): number {
    return x * y;
};
Здесь определена переменная operation, которая имеет тип (x: number, y: number) => number;, то есть фактически представляет некоторую функцию, которая принимает два параметра типа number и возвращает значение также типа number. Однако на момент определения переменной неизвестно, какую именно функцию она будет представлять. И далее происходит собственно установка функции:
Тип функции можно использовать как тип переменной, но он также может применяться для определения типа параметра другой функции:
function mathOp(x: number, y: number, operation: (a: number, b: number) => number): number{

    let result = operation(x, y);
    return result;
}
let operationFunc: (x: number, y: number) => number;
operationFunc = function (a: number, b: number): number {
    return a + b;
}
class User {
id: number;
name: string;
constructor(userId: number, userName: string) {
this.id = userId;
this.name = userName;
}
getInfo(): string {
return "id:" + this.id + " name:" + this.name;
}
}
let tom: User = new User(1, "Tom");class Operation {
static PI: number = 3.14;
static getSquare(radius: number): number {
return Operation.PI * radius * radius;
}
}Класс называется User, он представляет пользователя и имеет два свойства id и name и одну функцию getInfo()
Конструкторы выполняют начальную инициализацию объекта.
class User {

    name: string;
    constructor(userName: string) {

        this.name = userName;
    }
    getInfo(): void {
        console.log("Имя: " + this.name);
    }
    getClassName(): string {
        return "User";
    }
}

class Employee extends User {

    company: string;
    constructor(employeeCompany: string, userName: string) {

        super(userName);
        this.company = employeeCompany;
    }

    getInfo(): void {
        super.getInfo();
        console.log("Работает в компании: " + this.company);
    }
    getClassName(): string {
        return "Employee";
    }
}
let tom: User = new User("Tom");
tom.getInfo();
console.log(tom.getClassName());

let alice: User = new Employee("Microsoft", "Alice");
alice.getInfo();
console.log(alice.getClassName());
В TypeScript три модификатора доступпа: public, protected и private.
Если к свойствам и функциям классов не применяется модификатор, то такие свойства и функции расцениваются как будто они определены с модификатором public.
Если к свойствам и методам применяется модификатор private, то к ним нельзя будет обратиться извне при создании объекта данного класса.
class User {

    private _name: string;
    private _year: number;

    constructor(name: string, age: number) {

        this._name = name;
        this._year = this.setYear(age);
    }
    public displayYear(): void {
        console.log("Год рождения: " + this._year);
    }
}
Модификатор protected во многом аналогичен private - свойства и методы с данным модификатором не видны из вне, но к ним можно обратиться из классов-наследников:
class User {
    private name: string;
    protected age: number;
    constructor(name: string, age: number) {
        this.name = name;
        this.age = age;
    }
    public displayInfo(): void {

        console.log("name: " + this.name + "; age: " + this.age);
    }
}
Была предложена концепция методов доступа: для доступа к свойству определяется пара методов - get-метод для получения значения свойства и set-метод для установки значения.
class User {

    private _name: string;

    public get name(): string {
        return this._name;
    }

    public set name(n: string) {
        this._name = n;
    }
}

let tom = new User();
tom.name = "Tom";   // срабатывает set-метод
console.log(tom.name);  // срабатывает get-метод
Ключевое слово readonly позволяет определить свойства, которые доступны только для чтения:
class User {

    readonly id: number;
    name: string;
    constructor(userId: number, userName: string) {

        this.id = userId;
        this.name = userName;
    }
}

let tom: User = new User(2, "Tom");
console.log(tom.id, tom.name);
//tom.id=34;    // Ошибка - так как id - только для чтения
abstract class Figure {
abstract getArea(): void;
}
class Rectangle extends Figure{
constructor(public width: number, public height: number){
super();
}
getArea(): void{
let square = this.width * this.height;
console.log("area =", square);
}
}
let someFigure: Figure = new Rectangle(20, 30)
someFigure.getArea();Абстрактные классы представляют классы, определенные с ключевым словом abstract. Они во многом похожи на обычные классы за тем исключением, что мы не можем создать напрямую объект абстрактного класса, используя его конструктор.
Интерфейс определяет свойства и методы, которые объект должен реализовать. Другими словами, интерфейс - это определение кастомного типа данных, но без реализации.
interface IUser {
    id: number;
    name: string;
    getFullName(surname: string): string;
}

class User implements IUser{

    id: number;
    name: string;
    age: number;
    constructor(userId: number, userName: string, userAge: number) {

        this.id = userId;
        this.name = userName;
        this.age = userAge;
    }
    getFullName(surname: string): string {

        return this.name + " " + surname;
    }
}

let tom = new User(1, "Tom", 23);
console.log(tom.getFullName("Simpson"));
Класс User реализует интерфейс IUser. В этом случае класс User обязан определить все те же свойства и функции, которые есть в IUser.
Выражение <Тип> переменная позволяет преобразовать переменную к типу, который идет в угловых скобках.
Другой способ осуществить явное преобразование типов представляет применение оператора as:
let alice: User = new Employee("Microsoft", "Alice");

let aliceEmployee: Employee = <Employee>alice; // преобразование к типу Employee
let aliceEmployee: Employee = alice as Employee; // преобразование к типу Employee
С помощью выражения <T> мы указываем, что функция getId типизирована определенным типом T. При выполнении функции вместо Т будет подставляться конкретный тип. Причем на этапе компиляции конкретный тип не известен. И возвращать функция будет объект этого типа. Например:
function getId<T>(id: T): T {
    return id;
}

let result1 = getId<number>(5);
let result2 = getId<string>("abc");
Однако функциональность миксинов (mixins) частично позволяют унаследовать свойства и методы сразу двух и более классов.
Для наследования функционала классов в определении миксина-класса Horse применяется ключевое слово implements. Сам класс Horse при этому должен определить все те свойства и методы, которые определены в примененных классах. При этом вместо полного описания методов используется определение функции: feed: () => void;. Сама реализация будет браться из родительского класса.
class Animal {
    feed():void {
        console.log("кормим животное");
    }
}

class Transport {

    speed: number=0;
    move(): void {
        if (this.speed == 0) {
            console.log("Стоим на месте");
        }
        else if (this.speed > 0) {
            console.log("Перемещаемся со скоростью " + this.speed + " км/ч");
        }
    }
}
class Horse implements Animal, Transport {
    speed: number=0;
    feed: () => void;
    move: () => void;
}

function applyMixins(derivedCtor: any, baseCtors: any[]) {
    baseCtors.forEach(baseCtor => {
        Object.getOwnPropertyNames(baseCtor.prototype).forEach(name => {
            derivedCtor.prototype[name] = baseCtor.prototype[name];
        });
    });
}

applyMixins(Horse, [Animal, Transport]);