Best Practise Kubernetes
DevOpsDays Amsterdam 2018
Andy Repton, Mission Critical Engineer @ Schuberg Philis
@SethKarlo
arepton@schubergphilis.com
Overview
- Workshop 1: Installing Helm
- Workshop 2: HA with K8S: Creating a Wordpress Website
- Workshop 3: Readiness and Liveness Probes
- Workshop 4: Quotas and Limits
- Workshop 5: AuthZ RBAC Challenge
- Deep Dive Services quiz
- Questions/Wrap up
Thank you
They have very kindly let us use their AWS account
Please do not abuse it!!
Will this be a serious and sober workshop?

Getting setup
If you do not have kubectl or helm installed already, there is a how-to in the 1-Installing_Helm folder in the repo you just cloned

Link to the repository: https://bit.ly/2KiLT8d
(Please clone this locally)
Number time

Connecting
cd best-practise-kubernetes

./workshop.sh connect user22

mv ~/.kube/config my_kube_config_backup
mv user22.kubeconfig ~/.kube/config
There is a script we'll use called ./workshop.sh
If you feel more comfortable, you can directly download your kubeconfig from this link:
https://s3-eu-west-1.amazonaws.com/devopsdays-ams-public/${cluster_name}.kubeconfig
Connecting
$ kubectl get componentstatus
NAME                 STATUS    MESSAGE              ERROR
scheduler            Healthy   ok
controller-manager   Healthy   ok
etcd-1               Healthy   {"health": "true"}
etcd-0               Healthy   {"health": "true"}
Confirm you can connect to your cluster:
Put your hand up or call out if you cannot connect
Installing
helm init

kubectl create serviceaccount --namespace kube-system tiller

kubectl create clusterrolebinding tiller-cluster-rule\
    --clusterrole=cluster-admin --serviceaccount=kube-system:tiller

kubectl patch deploy --namespace kube-system tiller-deploy \
    -p '{"spec":{"template":{"spec":{"serviceAccount":"tiller"}}}}'
Helm is the Kubernetes Package manager
Confirm it's running:
 $ kubectl -n kube-system get pods | grep tiller
tiller-deploy-7ccf99cd64-89mvb                                        1/1       Running   0          13s
High Availability in Kubernetes
Making a WordPress site

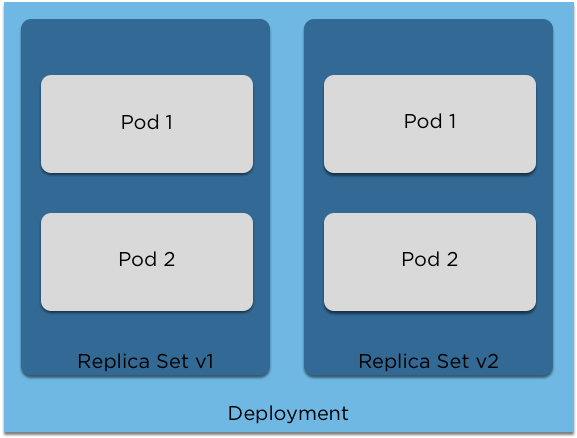
Deployments and Replica Sets
- Deployments contain Replica Sets
- Can have multiple versions (Editing the deployment will create a new version)
- The old replica set will be scaled down and the new one scaled up
Deploying our site
helm install --name first-wordpress --set wordpressBlogName="Andy's blog" \
    stable/wordpress
Wasn't that easy?
$ kubectl get svc first-wordpress-wordpress --namespace default -o wide
NAME                        TYPE           CLUSTER-IP       EXTERNAL-IP                                                               PORT(S)                      AGE       SELECTOR
first-wordpress-wordpress   LoadBalancer   100.70.163.174   a384579b1786911e895d60a0898d90d2-2143390945.eu-west-1.elb.amazonaws.com   80:32756/TCP,443:32656/TCP   1m        app=first-wordpress-wordpress
Grab this and let's open up our shiny new Wordpress website in your browser
Question: Is this HA?
Remember to change the name to your own!
Debugging outages
$ kubectl get eventsWe can use the 'get events' command to find out more
$ kubectl get events  --sort-by='.metadata.creationTimestamp'  -o 'go-template={{range .items}}{{.involvedObject.name}}{{"\t"}}{{.involvedObject.kind}}{{"\t"}}{{.message}}{{"\t"}}{{.reason}}{{"\t"}}{{.type}}{{"\t"}}{{.firstTimestamp}}{{"\n"}}{{end}}'

###
ip-172-20-63-237.eu-west-1.compute.internal	Node	Node ip-172-20-63-237.eu-west-1.compute.internal has been rebooted, boot id: 4bb677ca-c309-47b1-b5d3-0c1fec21d75a	Rebooted	Warning	2018-06-25T11:20:56Z
###
Or, sorted by timestamp:
We can see our pods got restarted, and our website went down.
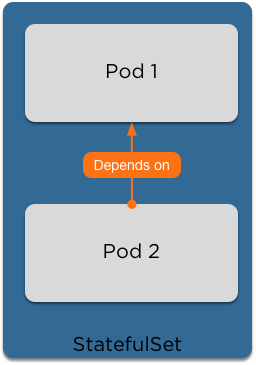
Stateful Sets

Some applications can't just be scaled up to multiple replicas
Stateful Sets guarantee ordering and scheduling of your pods
With a database this is important to ensure that replicas are created in a controlled manner.
Clean up our site
$ helm del --purge first-wordpress
MariaDB StatefulSet

$ helm install --name my-wordpress-db
    --set root.password=devopsdays,
    db.user=bn_wordpress,
    db.password=devopsdays,
    db.name=devopsdays,
    slave.replicas=2
  stable/mariadb
helm's --set option
We can use the --set option to overwrite variables in our helm charts on the fly. Here, we've adjusted the database name and the root password
HA WordPress

$ helm install --name my-wordpress
--set wordpressBlogName="Andy's blog",
  mariadb.enabled=false,
  externalDatabase.host=my-wordpress-db-mariadb,
  externalDatabase.password=devopsdays,
  externalDatabase.database=devopsdays,
  externalDatabase.port=3306,
  persistence.accessMode=ReadWriteMany
stable/wordpress- We want enough replicas to spread across our nodes.
- Wordpress is as simple as scaling up the replica set!
- We'll use a 'ReadWriteMany' disk to share the disk across the replicas. Once again, set your blog name!
$ kubectl get svc -o wideOnce again get the service and open in your browser
Debugging

Debugging
$ kubectl describe pod my-wordpress

Events:
 Type     Reason            Age                From               Message
 ----     ------            ----               ----               -------
 Warning  FailedScheduling  12s (x13 over 2m)  default-scheduler  PersistentVolumeClaim is not bound: "my-wordpress-wordpress" (repeated 3 times)
Using kubectl describe to debug:
Ok, something to do with the pvc:
$ kubectl describe pvc my-wordpress-wordpress

Events:
 Type     Reason              Age                From                         Message
 ----     ------              ----               ----                         -------
 Warning  ProvisioningFailed  11s (x15 over 3m)  persistentvolume-controller
Failed to provision volume with StorageClass "gp2": invalid AccessModes [ReadWriteMany]: only AccessModes [ReadWriteOnce] are supported
Third time's the charm

$ helm del --purge my-wordpressLet's clean up once again:
We'll add a basic NFS provisioner to our cluster:
$ helm install --name my-nfs stable/nfs-server-provisionerAnd now we can redeploy WordPress, now using NFS:
$ helm install --name my-wordpress
--set wordpressBlogName="Andy's blog",
  mariadb.enabled=false,
  externalDatabase.host=my-wordpress-db-mariadb,
  externalDatabase.password=devopsdays,
  externalDatabase.database=devopsdays,
  externalDatabase.port=3306,
  persistence.storageClass=nfs
stable/wordpress
Confirm our PVC is using NFS:
$ kubectl get pvc my-wordpress-wordpress
NAME                                    STATUS    VOLUME                                     CAPACITY   ACCESS MODES   STORAGECLASS   AGE
my-wordpress-wordpress                  Bound     pvc-f80012f7-732b-11e8-926e-0a33561ebb8c   10Gi       RWO            nfs            52s
Scale up!

Now that we have our website running again, let's increase the replica count
$ kubectl scale deployment my-wordpress-wordpress --replicas=3Confirm our replicas are on different nodes:
$ kubectl get pods -o wide
NAME                                      READY     STATUS    RESTARTS   AGE       IP            NODE
my-wordpress-wordpress-66b7d5b545-cvzqd   0/1       Running   0          31s       100.96.1.10   ip-172-20-43-243.eu-west-1.compute.internal
my-wordpress-wordpress-66b7d5b545-r7cpq   0/1       Running   0          31s       100.96.2.4    ip-172-20-40-196.eu-west-1.compute.internal
my-wordpress-wordpress-66b7d5b545-v6cg2   1/1       Running   0          2m        100.96.2.3    ip-172-20-40-196.eu-west-1.compute.internal
So, we're HA now. Right?

Some things to consider:
- Pod Anti Affinity to force pods away from each other
- What happens if the NFS provisioner dies?
Cleanup
Before we move on let's clean up ready for Workshop 3. The script will do this for you:
$ ./workshop.sh workshop2-cleanup
Cleaning up Workshop2, this will take a couple of minutes
deployment "my-wordpress-wordpress" scaled
release "my-wordpress" deleted
release "my-nfs" deleted
release "my-wordpress-db" deleted
persistentvolumeclaim "data-first-wordpress-mariadb-0" deleted
persistentvolumeclaim "data-my-wordpress-db-mariadb-master-0" deleted
persistentvolumeclaim "data-my-wordpress-db-mariadb-slave-0" deleted
persistentvolumeclaim "data-my-wordpress-db-mariadb-slave-1" deleted
persistentvolumeclaim "first-wordpress-wordpress" deleted
Readiness and Liveness probes

Running an image
Using kubectl run, we can quickly create a new deployment
$ kubectl run devopsdays --image sethkarlo/nginx:dod-firstEspecially for DevOpsDays, I've created a custom nginx image for us
Then use the very helpful port-forward to check our webpage
$ kubectl port-forward devopsdays-7f9bdcc9c5-nm7ch 8080:80Get the name of your pod:
$ kubectl get pods
NAME                          READY     STATUS    RESTARTS   AGE
devopsdays-7f9bdcc9c5-hwbnh   1/1       Running   0          2m
Readiness Probes

Once we've all opened the site and given it the proper admiration, let's upgrade
$ kubectl patch deployment devopsdays -p '{"spec":{"template":{"spec":{"containers":[{"name":"devopsdays","image":"sethkarlo/nginx:dod-second"}]}}}}'Patch is a very useful command to quickly update deployments.
Let's check our new image:
$ kubectl get pods
NAME                                      READY     STATUS        RESTARTS   AGE
devopsdays-86945768c-49pvf                1/1       Running       0          18s

$ kubectl port-forward devopsdays-86945768c-49pvf 8080:80
Forwarding from 127.0.0.1:8080 -> 80
Handling connection for 8080
Probes continued
$ kubectl logs devopsdays-86945768c-vr57m
I'm pretending to be a veeeeeery slow to start up Java app. Back in 5 minutes
This is what Readiness Probes are for
Let's find out what's going wrong
Probes continued
A readiness probe will stop a pod from being entered into Service until it's ready
Some examples include:
readinessProbe:
      exec:
        command:
        - grep 'alive'
        - /var/log/application.log
readinessProbe:
httpGet:
path: /healthz
port: 8080
httpHeaders:
- name: X-Custom-Header
value: DevOpsDaysreadinessProbe:
tcpSocket:
port: 8080
initialDelaySeconds: 15
periodSeconds: 20ports:
- name: liveness-port
containerPort: 8080
hostPort: 8080
livenessProbe:
httpGet:
path: /healthz
port: liveness-portProbes continued
$ kubectl apply -f readiness_patch.ymlWe can add a readiness probe using the yaml file located in the repo
$ kubectl get pods
NAME                                      READY     STATUS        RESTARTS   AGE
devopsdays-b5bd6ff4d-nxgrr                0/1       Running       0          40s
And we can now see that our pod remains 'unready', so it won't be added to services

Liveness Probes

$ kubectl apply -f liveness_patch.ymlUsed to restart a pod when it's 'dead'
$ kubectl get pods
NAME                                      READY     STATUS        RESTARTS   AGE
devopsdays-86945768c-49pvf                1/1       Running       0          40s

$ kubectl port-forward 8080:80
Forwarding from 127.0.0.1:8080 -> 80
Handling connection for 8080
Now we can port-forward once again and see our final image
For example:
- An application that crashes
- A dependency on a file or process

Quotas and Limits

Requests
(Canadian pods are very polite)
spec:
  containers:
    resources:
      requests:
        memory: "64Mi"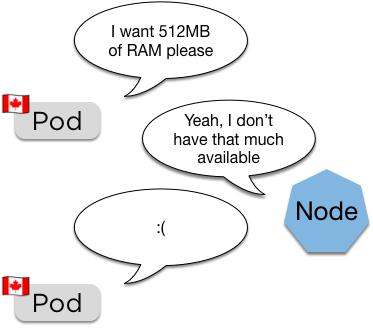
cpu: "250m"- Requests are the pod asking for a certain amount of RAM and CPU to be available
- The scheduler uses this to place the pod
Pod will remain pending until space becomes available (also how the cluster autoscaler works)
Limits
spec:
  containers:
    resources:
      limits:
        memory: "128Mi"
cpu: "500m"- Limits are a hard limit on the resources the pod is allowed
- These are passed directly to the container runtime, so usually this is docker
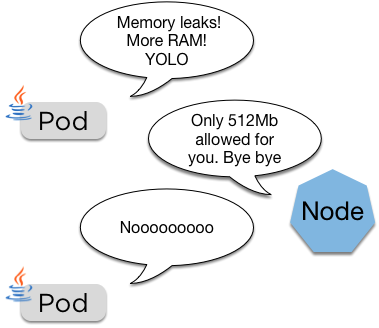
If the pod goes over its limit it'll be restarted
Quotas
apiVersion: v1
kind: ResourceQuota
metadata:
  name: devopsdays-demo
  namespace: devopsdays-demo
spec:
  hard:
    requests.cpu: "2"
    requests.memory: 2Gi
    limits.cpu: "2"
limits.memory: 2Gi- Quotas limit total resources allowed
- Quotas are assigned to namespaces


Developer:
Cluster Admin:
Using Quotas

$ kubectl create namespace devopsdays-demoLet's start with a namespace
We'll use the quota from above:
$ kubectl create -f quota.ymlAnd now let's try and roll out 100 replicas of nginx:
$ kubectl -n devopsdays-demo run nginx --image=nginx:stable --replicas=100And now we check if the quota worked

Quotas continued
$ kubectl -n devopsdays-demo get pods
No resources found.

$ kubectl -n devopsdays-demo get deployment
NAME      DESIRED   CURRENT   UP-TO-DATE   AVAILABLE   AGE
nginx     100       0         0            0           41s
First up, let's check for pods
This could be quite confusing if someone didn't know about the quota:
$ kubectl -n devopsdays-demo describe replicasets
Warning  FailedCreate  1m                replicaset-controller  Error creating: pods "nginx-7cc8949494-pm68x" is forbidden: failed quota: devopsdays-demo: must specify limits.cpu,limits.memory,requests.cpu,requests.memory
When a quota is active, all pods must have limits and requests set.
$ kubectl -n devopsdays-demo delete deployment nginxNow let's clean up and try something a bit more sensible
Adding Requests and Limits
We'll redo our kubectl run command and add the requests and limits in:
$ kubectl -n devopsdays-demo run nginx --image=nginx:stable --requests='cpu=100m,memory=256Mi' --limits='cpu=150m,memory=512Mi' --replicas=10
deployment "nginx" created
And now we can see the quota protected us:
$ kubectl -n devopsdays-demo get pods -o wide
NAME                     READY     STATUS    RESTARTS   AGE       IP             NODE
nginx-6c788db6bd-2qf8n   1/1       Running   0          3s        100.96.1.186   ip-172-20-57-78.eu-west-1.compute.internal
nginx-6c788db6bd-c6w46   1/1       Running   0          3s        100.96.2.161   ip-172-20-59-214.eu-west-1.compute.internal
nginx-6c788db6bd-dkksk   1/1       Running   0          3s        100.96.1.185   ip-172-20-57-78.eu-west-1.compute.internal
nginx-6c788db6bd-lxh2w   1/1       Running   0          3s        100.96.1.184   ip-172-20-57-78.eu-west-1.compute.internal
Let's check on the other 6 pods:
$ kubectl -n devopsdays-demo describe replicasets
Warning  FailedCreate      1m                replicaset-controller  Error creating: pods "nginx-6c788db6bd-cqt4r" is forbidden: exceeded quota: devopsdays-demo, requested: limits.memory=512Mi, used: limits.memory=2Gi, limited: limits.memory=2Gi
What now?
- With this we can limit namespaces effectively
- You can set default limits and requests for a namespace, so if it's not set it'll get the default
- Spending the time early on to get your limits and requests right will pay off in the long run
What's to stop users from simply creating more namespaces, or adjusting the quotas?

AuthZ and RBAC Challenge

What is RBAC?
Role Based Access Control is the successor to ABAC (Attribute Based Access control)
It comprises of Roles and Bindings
kind: Role
apiVersion: rbac.authorization.k8s.io/v1
metadata:
  namespace: default
  name: read-only-pods-deploy
rules:
- apiGroups: [""]
  resources: ["pods", "deployments"]
  verbs: ["get", "watch", "list"]
kind: RoleBinding
apiVersion: rbac.authorization.k8s.io/v1
metadata:
name: read-only-pods-deploy
namespace: default
subjects:
- kind: Group
name: managers
apiGroup: rbac.authorization.k8s.io
- kind: User
name: yvo
apiGroup: rbac.authorization.k8s.io
roleRef:
kind: Role
name: read-only-pods-deploy
apiGroup: rbac.authorization.k8s.ioRoles
kind: Role
apiVersion: rbac.authorization.k8s.io/v1
metadata:
namespace: default
name: read-only-pods-deploy
rules:
- apiGroups: [""]
resources: ["pods", "deployments"]
verbs: ["get", "watch", "list"]This is an example of a role that only allows read only access to pods and deployments in the default namespace
Role Bindings
kind: RoleBinding
apiVersion: rbac.authorization.k8s.io/v1
metadata:
  name: read-only-pods-deploy
  namespace: default
subjects:
- kind: Group
  name: managers
  apiGroup: rbac.authorization.k8s.io
- kind: User
  name: yvo
  apiGroup: rbac.authorization.k8s.io
roleRef:
  kind: Role
  name: read-only-pods-deploy
apiGroup: rbac.authorization.k8s.ioNow we can apply this role to the 'managers' group and the user Yvo, to ensure nothing gets broken
Role Bindings apply to a namespace, if you want it for the entire cluster you can use a 'ClusterRoleBinding'
RBAC Challenge

In each of your clusters there is an additional user, named 'devopsandy'. The challenge is:
- Using your namespace from Workshop 4 (devopsdays-demo), with the quota
- Allow the 'devopsandy' user full permissions to create, edit, view and delete anything inside the 'devopsdays-demo' namespace
- Not permit access to any other namespace or any cluster resources
Raise your hand or call out when you've done it and Andy will test from the stage
RBAC Challenge

Answers can be found here:
https://bit.ly/2KiLT8d
Kubernetes Services Deep Dive
Networking without overlay
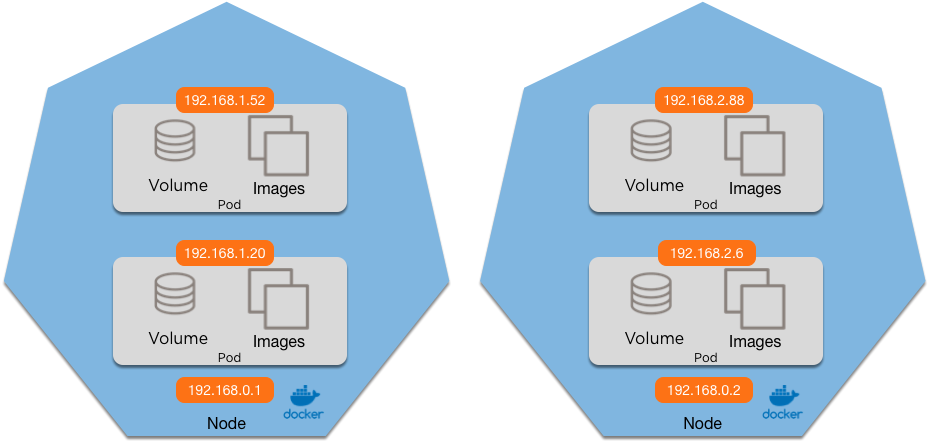
ip route add 192.168.2.0/24 via 192.168.0.2ip route add 192.168.1.0/24 via 192.168.0.1Networking
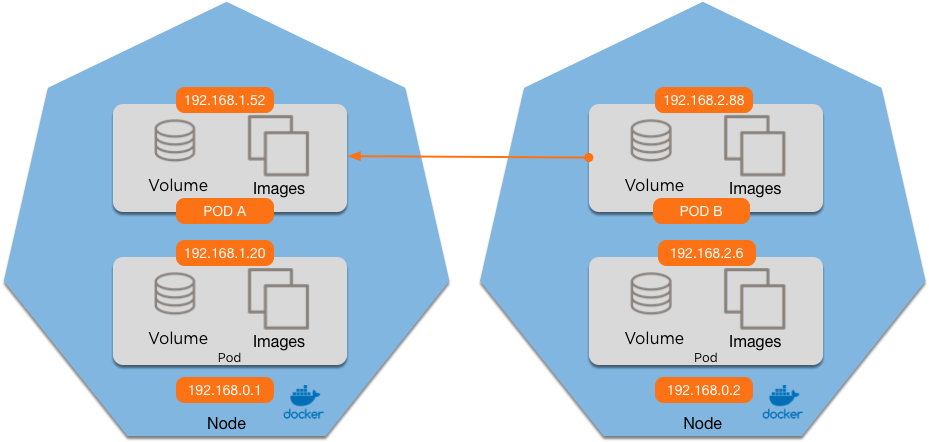
Does Pod A see the request from:
1. 192.168.0.2 (the node) 3. Either
2. 192.168.2.88 (Pod B) 4. Both
What if we add a Service?
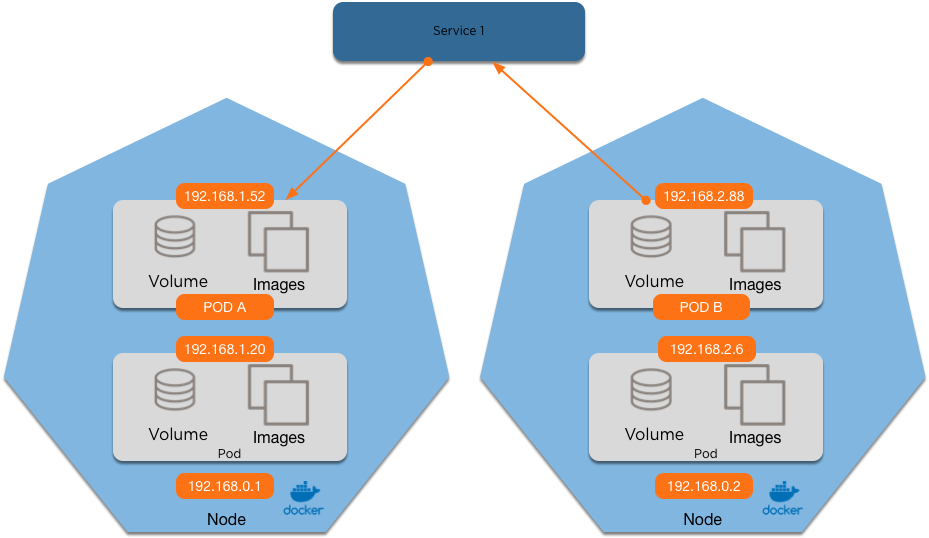
1. 192.168.0.2 (the node) 3. The Service IP
2. 192.168.2.88 (Pod B) 4. Either
What's going on under the hood?
Chain KUBE-SERVICES (2 references)
 pkts bytes target     prot opt in     out     source               destination
    0     0 KUBE-MARK-MASQ  tcp  --  *      *      !100.96.0.0/11        100.70.163.174       /* default/first-wordpress-wordpress:http cluster IP */ tcp dpt:80
    0     0 KUBE-SVC-F24E2VY7BZETU2MG  tcp  --  *      *       0.0.0.0/0            100.70.163.174       /* default/first-wordpress-wordpress:http cluster IP */ tcp dpt:80
Chain KUBE-SEP-KAC5IFIDSIOQVT7B (1 references)
pkts bytes target prot opt in out source destination
0 0 KUBE-MARK-MASQ all -- * * 100.96.5.8 0.0.0.0/0 /* default/first-wordpress-wordpress:http */
0 0 DNAT tcp -- * * 0.0.0.0/0 0.0.0.0/0 /* default/first-wordpress-wordpress:http */ tcp to:100.96.5.8:80Chain KUBE-SVC-F24E2VY7BZETU2MG (2 references)
pkts bytes target prot opt in out source destination
0 0 KUBE-SEP-KAC5IFIDSIOQVT7B all -- * * 0.0.0.0/0 0.0.0.0/0 /* default/first-wordpress-wordpress:http */IPtables is rewritten by the kube-proxy with the service IP
This goes to it's own chain, that has an entry per pod
Which in turn is redirected to the pod IP
Pod balancing
Chain KUBE-SVC-253L2MOZ6TC5FE7P (1 references)
 pkts bytes target     prot opt in     out     source               destination
    0     0 KUBE-SEP-AL7QVWV4IE7GZBWS  all  --  *      *       0.0.0.0/0            0.0.0.0/0            /* default/nginx1: */ statistic mode random probability 0.33332999982
    0     0 KUBE-SEP-WW7J6EVG3AA3MAGP  all  --  *      *       0.0.0.0/0            0.0.0.0/0            /* default/nginx1: */ statistic mode random probability 0.50000000000
    0     0 KUBE-SEP-AM4GYXY6DIGHHJA3  all  --  *      *       0.0.0.0/0            0.0.0.0/0            /* default/nginx1: */
For a service with 3 endpoints, this now load balances over each pod using statistic probability:
$ kubectl get pods -o wide | grep nginx
nginx1-649d8f4c6-7kcl8                       1/1       Running   0          3m        100.96.5.13   ip-172-20-63-237.eu-west-1.compute.internal
nginx1-649d8f4c6-89tnx                       1/1       Running   0          3m        100.96.4.11   ip-172-20-35-250.eu-west-1.compute.internal
nginx1-649d8f4c6-qdc4z                       1/1       Running   0          3m        100.96.5.14   ip-172-20-63-237.eu-west-1.compute.internal
Here's what those pods look like:
Questions?