R10 App Framework
Introduction
Business Need
- Shorter time to market
- Unified user-experience
- Operational efficiency
Objectives & Benefits
App Design & Low Code Development
-
Enhanced design process: WYSIWYG & Low Code canvas.
-
60 thin design components (atoms, molecules & organisms) and fat components (micro-app).
-
Introduce tools for API Integration through visual editor. Support Data Modeling and Data Transformation.
-
Micro-flows visual editor (based on BPMN) for defining app process with complex logic
-
Multi-theme support (e.g., WS10 , DCL).
Objectives & Benefits - Cont'd
Integration with 3rd party tools
e.g., Invision, StoryBook, Slack, Jira, Jenkins
App Lifecycle Management
e.g., App promotion to production, versioning, managing distribution & updates, etc.
Governance and Security
e.g., logging, monitoring, penetration testing, source code protection, etc.
Features

Logical Architecture
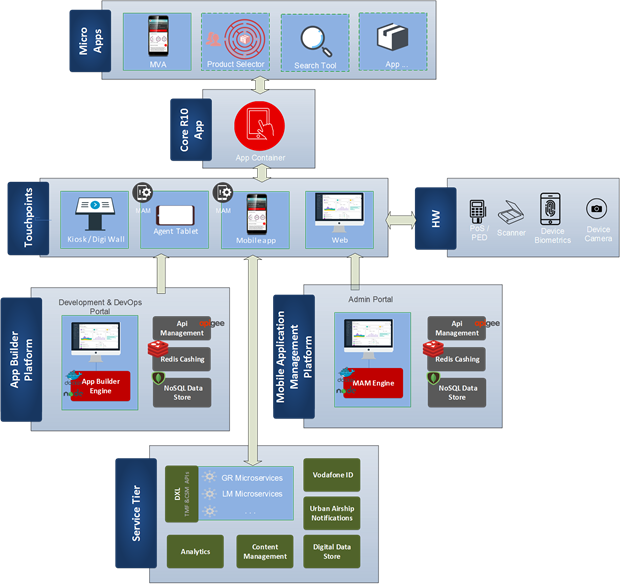
Logical Architecture
Logical Architecture
Logical Architecture
Demo
Solution Components Overview
- R10 Core App
- Mobile Application Management Platform (MAM)
- App Builder Platform
1. R10 Core App
Main components:
- Common library
- Micro-Applications
- Container Application
- Components communication
- Hardware access & permissions
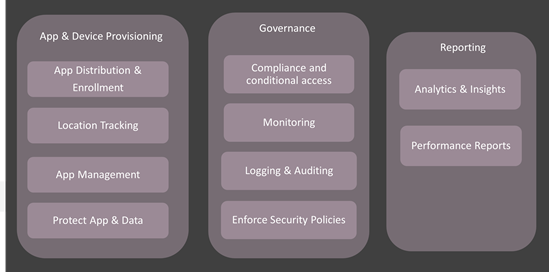
2. Mobile Application Management Platform (MAM)
3. App Builder Platform
-
App builder is a multi-tenant portal, where development and support teams can create and manage vertical applications.
-
Each tenant (LM) can manage only its own local vertical solutions.
-
Agent authentication and authorization happens using Azure Active Directory (AAD)
Vertical Solutions
- Mobile/Tablet application
- Web application
- Kiosk application
Main Components of App Builder Framework
- App Designer/ deployment
- Configurator
- Translator
1. App Designer
A. Create New App
B. Create Pages/Screens
C. Deploy app to various environments
A. Create New App
- In this step, you set app name, touch point (mobile, tablet, web or kiosk) and theme.
- On creation, an instance of the global PWA is created into the App Builder Database.
- The new PWA is the web container of the app where all the logical components (pages and components/widgets) are rendered.
- Based on the App Type and the Environment, the respective building/distribution process is linked with each app through the corresponding Jenkins Pipelines.
More Details
- When a user creates an app, a new entry is registered in the application registry in the MongoDB of the corresponding local market.
- There is a predefined app boilerplates for every app type (iOS, Android, Web, Kiosk).
-
The template app includes the following:
- components.json
- routing.json
Generated Artifacts
- The “dependencies” section of app package.json is combined with the component dependencies in components.json to form the cumulative dependencies of the application.
- A source file called router.js is generated from routing.json to form the routing table of the application, pointing to each page component.
- A page component is generated for each page in routing.json. The JSX template for the page is generated from the page template that is used, embedding a reference to each used component at the appropriate locations. Each component is wrapped in a HOC that links it to its owned slice of the Redux store.
- A source file is generated to initialize the Redux store, referencing all included component instances and their reducers, by giving them their own store key (slice).
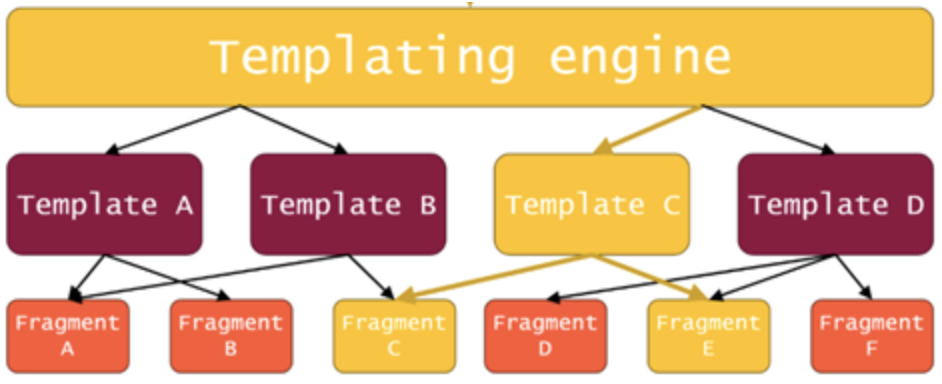
B.1. Create Pages/Screens
- Pages are the main blocks of the application construction.
- At least one page should exist and only one page could be the home page of the application.
- A template predefines the positions in which the widget can be rendered.
-
On selecting a template for a page:
- Page source file is updated with template implementation
- Page metadata file updated with template’s info
More Details
In this step, you:
- Select from a predefined template/layout or create from scratch
-
Through an interactive WYSIWYG
- Configure layout styles (e.g., margin, padding, etc.)
- Browse available components from Component Library
- Add components through drag-n-drop into a template slot.
More Details
- When a page is designed in the App Designer section and saved, the App Designer engine identifies the corresponding segments that are associated with the particular layout.
- Each segment corresponds to a DJSL segment template as follow:
More Details
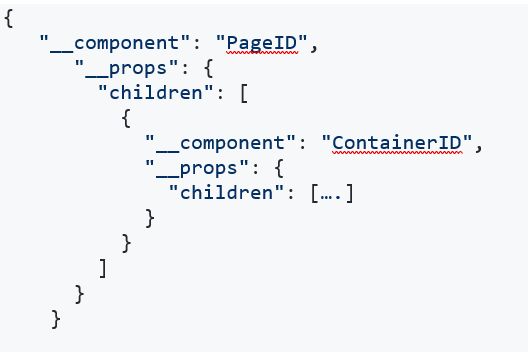
Upon Page Save the App Designer:
- Gathers each DJSL segment template that corresponds to the specific layout
- Introduces into the global.djs.json dynamically the segment.djs.json under the corresponding JSON structure
- Adds under this new JSON Structure the components, their props and its configuration that are inserted into the App Designer→Page Design
- Maps the Global State props into component props
- Updates the routes (where applicable)
- Validates the global.djs.json
-
The App along with its assets, files and updated global.djs.json is committed on the GitHub repo.
B.2. Adding Components/ Widgets
- Components/Widgets are the business main block of an application.
- A widget list is available for each local market and vertical. A widget is rendering in a template’s slot.
-
On adding a component in a slot:
- Run validation rules in order to identify if a widget is compatible for the specific slot (e.g. slot vs widget constraints)
-
Page source code is updated with widget code
-
Page metadata file is update with widget information.
How the components library work?
- Each LM development team create their own components as a repository under this GitHub account
- The App Builder periodically check for new packages/new versions and make it available in the Components Library section.
- In App Builder, the local market can only access its own created components, as well as global components shared by VF
Building New Commponents
- Any component would be a new GitHub repo containing branch "master".
- The repository will be initialized with skeleton code, or a template command will be provided (e.g. “npx create-vf-component”), TBD.
- If a Local Market wants to customize a Global component, the component repository will be forked off the repository of the global one.
Component and GIT Integration
Any components should have the following files:
-
package.json file with:
- "main" filed: refers to code entry point, e.g., build/index.js
- metadata fields: namely name, description, version & author fields in package.json in addition to appbuilder-preview directory.
- Jenkinsfile for managing Nexus publishing
- schema.json file if the component is configurable.
- A "translation" directory with json files named <language-code>.json if the component is localizable
NPM Registry & Jenkins Pipeline
- Jenkins pipeline is initiated through a hook on the "Release" branch, and on successful build, it publishes the component on Nexus.
- Jenkins pipeline also assigns a build version on every release.
API Integration & Data binding
- Through App Designer the users would be able to create/delete API Clients. This API client is linked with a specific app.
- The API Client will be generated by uploading an respective API Swagger file (JSON or YAML). This will “inform” the application of the presence of its API endpoints.
- In addition to being able to edit the props for components, there are other kinds of configuration one can do on components. One of them is the ability to configure API integrations. A number of API requests can be configured on a component.
-
An API request is defined by:
- A client
- A method (they will correspond to the endpoints)
- Its arguments
C. App Deployment
In this step, you:
- ....
2. Configurator
- Select specific environment, device type and app
-
Edit components config using either Form or a json editor
- Form is dynamically created from "schema.json" file available in component repo.
- Save and deploy config changes
- On saving, widget configuration will be saved in the configuration database and linked to the specific App instance
- During app build process, all components translations are gathered and generates a unified translation JSON file which will be persisted in the respective database.
3. Translator
- Select specific environment and app
- Edit components translations for various languages
- User can also add new languages
- Save and deploy translation changes
More Details
- i18n is used for localization.
- During app build process, all components translations are gathered and generates a unified translation JSON file which will be persisted in the respective database.
-
The Core app upon distribution is bundled with an initial/default language translation JSON file.
-
The core app provides the following functionality:
- Splitting translations into multiple files. Only load translations needed.
- languages detection for all touchpoints.
- Ability to cache languages.
- Options what to load and how to fallback.
- others.
- Find more details here