Let's start Python


What is Django?
What is a framework?
Django
開発・運用・意思決定を行う際に、その基礎となる規則・構造・アイデア・思想などの集合のこと。日本語では「枠組み」などと訳されることが多い。
framework
Django(ジャンゴ)は無料で
オープンソースとして公開されているPythonを使用したWebアプリケーションフレームワークです。
色々備わっています。
Webアプリ開発でよく使われる、「ユーザー認証」「管理画面」「サイトの案内ぺージ」
など、よく使われる機能はあらかじめ含まれています。
セキュリティが安心です。
ユーザー認証システムでは、ユーザーのアカウントとパスワードを安全に管理する方法が提供されています。
拡張性、柔軟性が高いです。
Djangoで扱う各ファイルは役割が決まっており、別々に切り分けて開発を行うことができます。
よって、それぞれ部品の独立性が高く、拡張することが容易になっています。
用途が広いんです。
Djangoは、会社や組織、そして政府にも利用されています。管理システム、ソーシャルネットワーク、科学技術計算など幅広い用途に対応しています。
Djangoの特徴
Djangoのメリット
Djangoのメリット
生産性が高く、信頼できる
オープンソースなので、世界中の開発者によって日々盛んに改良されており、どんどん使いやすくなっています。InstagramなどもDjangoで作られています。
実用性が高い
現在の開発方法に合致しており、非常に実用的です。Webアプリを新しく開発する際には、まずはじめに「開発にはどれぐらいの期間がかかりそうか」などの情報を得るために、模型を作って試験を行うことが多いです。
この模型を作って試験を行うことをプロトタイプといいます。Djangoはこのプロトタイプを作ることが簡単なので、開発期間を短くすることができるのです。
Djangoのデータ構造とDBへの連携
Installation of Django
step1 仮想環境を作ろう
Python
Pyramid
…
ProjectB
flask
…
ProjectB
Django
…
ProjectA
あなたのPC
Python を使って開発や実験を行うときは、用途に応じて専用の実行環境を作成し、切り替えて使用するのが一般的です。こういった、一時的に作成する実行環境を、「仮想環境」 と言います。
コンピュータの中に擬似的に再現した環境とも言えます。
Python3 の標準ライブラリである venv を紹介します。
仮想環境とは?


Mac
[アプリケーション]→[ユーティリティ]→[ターミナル]を選択しましょう。
もしくは、「コマンド + シフト」で検索を出して
terminal と入力してエンター
Windows
[スタート]→[Windowsシステムツール]→[コマンドプロンプト]を選択しましょうWindowsの古いバージョンの場合、[スタート] → [アクセサリ] → [コマンドプロンプト] です。
もしくは、「ウィンドウズキー + R」でファイル名を指定して実行を出して、
cmd と入力してエンター
本日のディレクトリを作成
cd elvdjango
mkdir でその後に記載した名称でディレクトリ作成
cd でそのディレクトリの中に移動
$ mkdir elvdjango本日のディレクトリを作成
作成したディレクトリの中に
仮想環境のディレクトリができています
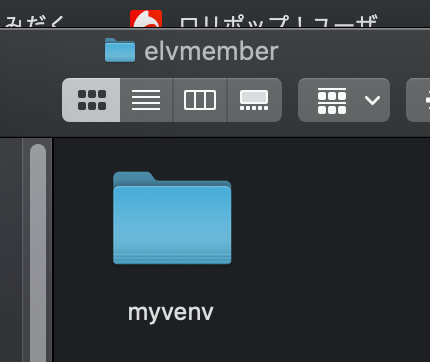
こんな感じで、頭に(仮想環境名)がつけばOK

Mac
Windows
Anaconda
conda create -n myvenv pythonmyvenv は仮想環境の名前です。
これは自分で好きな名前をつける事もできます。
source myvenv/bin/activatemyvenv¥Scripts¥Activate仮想環境を起動
python3 -m venv myvenvMac
Windows
python -m venv myvenv仮想環境を作成
# コマンドプロンプト  or ターミナル
python -m pip install --upgrade pip
Djangoをインストールするにあたり、
インストールに使うコマンドpipをupdateします。
step2 pip update
step3 pip update
Djangoをインストールします。
# コマンドプロンプト  or ターミナル
pip install django==3.0
# コマンドプロンプト or ターミナル
pip install djangoversion指定する場合
Django以外も入っていますが、
そういう仕様ですので、気にしない。
# コマンドプロンプト or ターミナル
pip freeze
step4 確認

Let's make a project
django-admin startproject mysiteStep1 Projectを作る
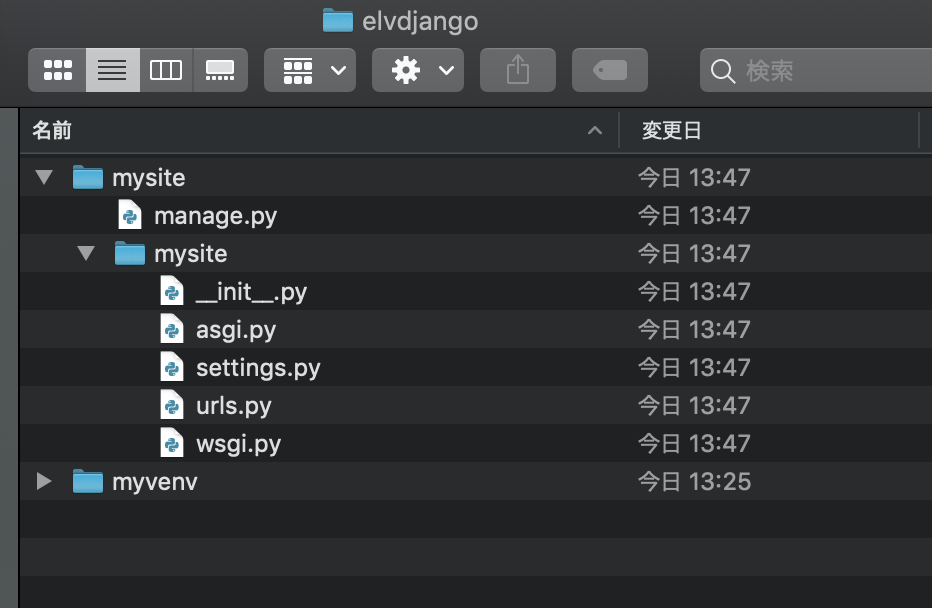
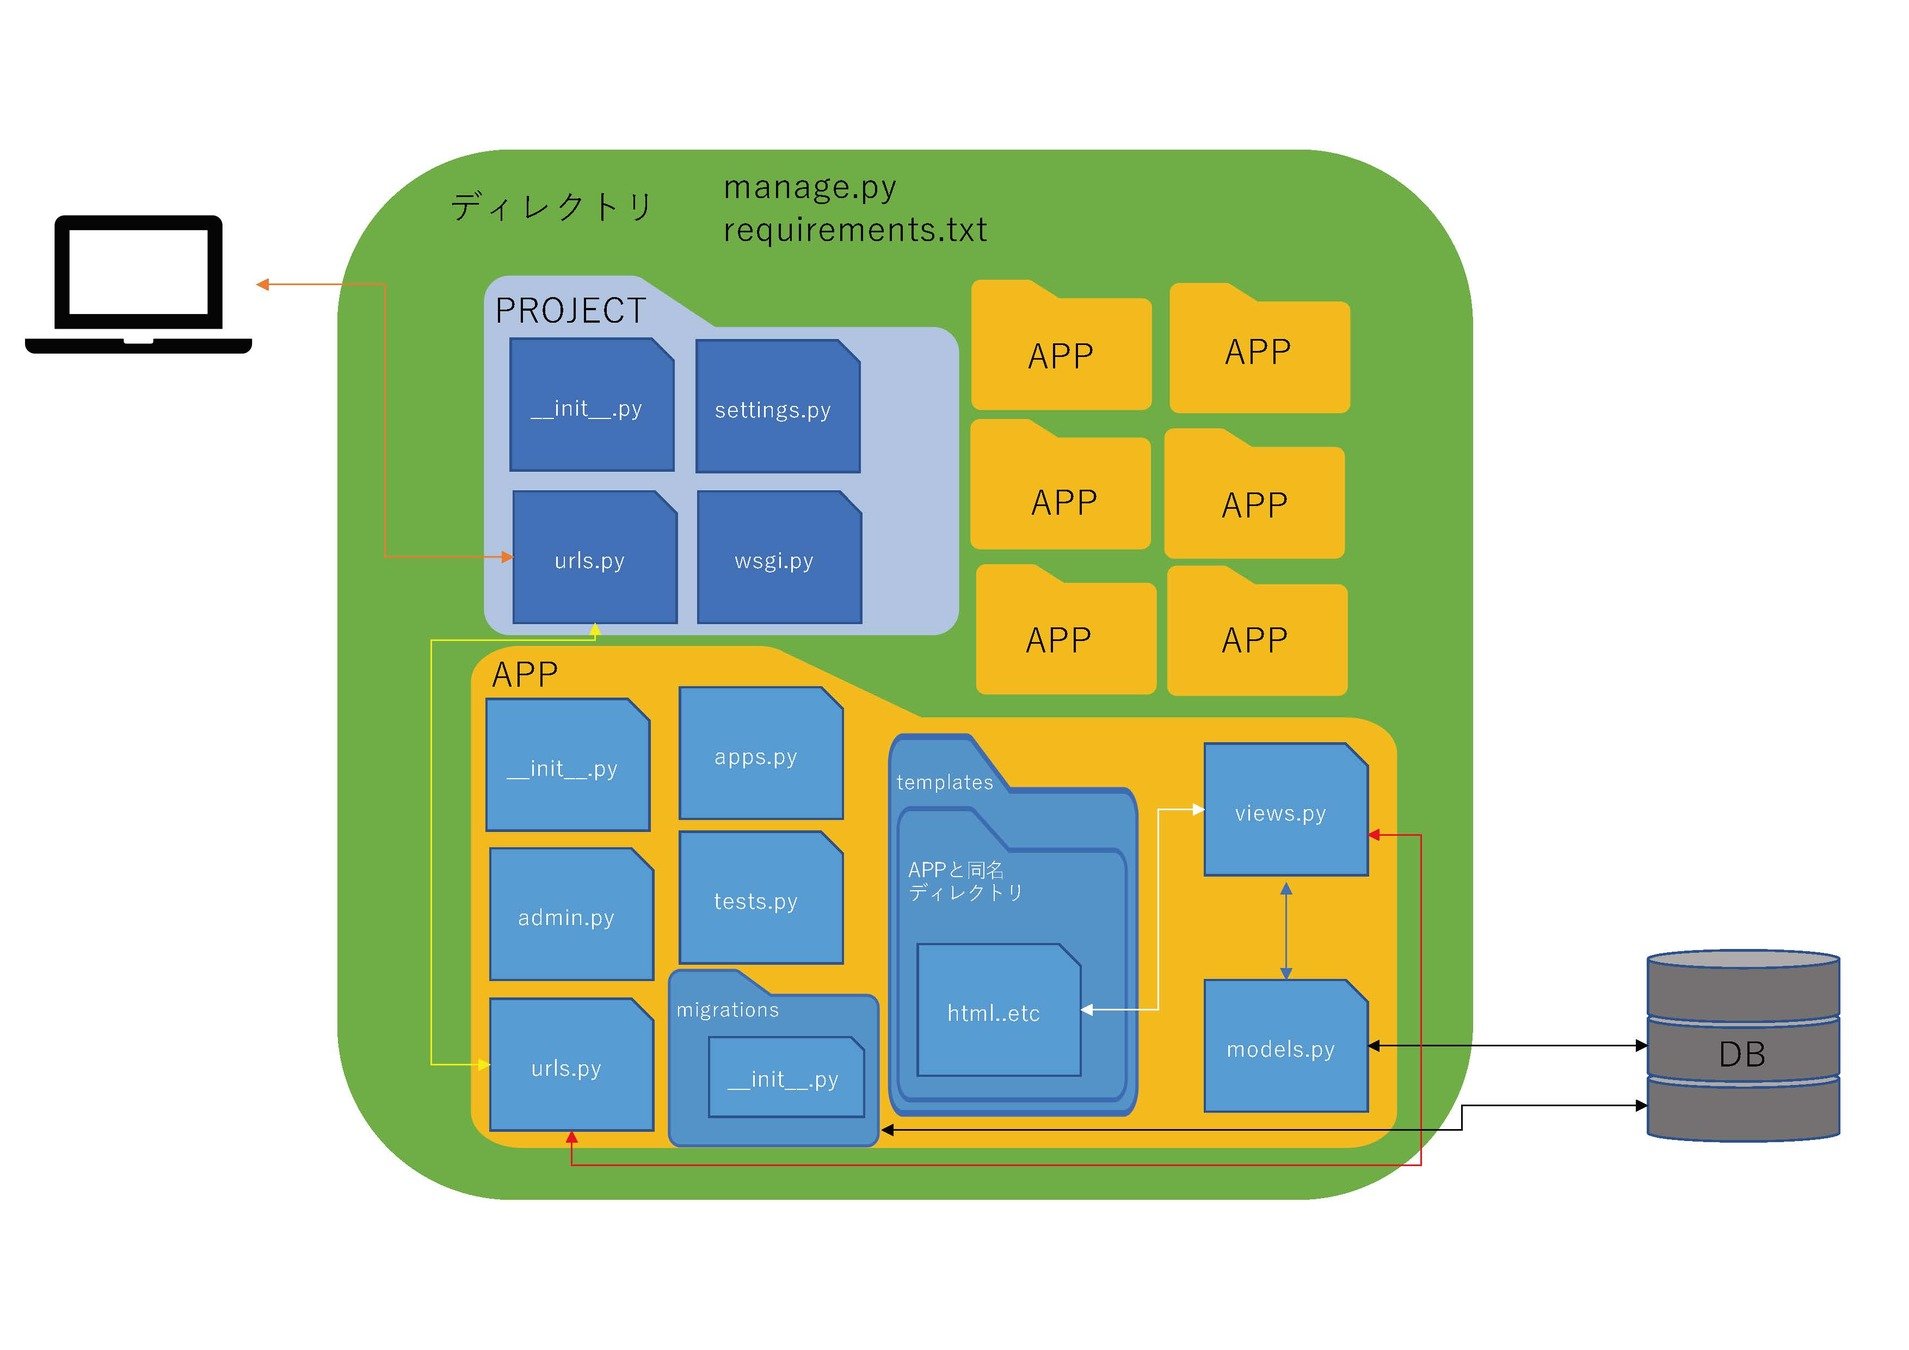
ファイルはそれぞれ以下のような役割を持っています:
- 外側のmysite /ルートディレクトリは、プロジェクトのコンテナです。 その名前はDjangoにとって重要ではありません。 好きな名前に変更できます。
- manage.py: Django プロジェクトに対する様々な操作を行うためのコマンドラインユーティリティです。詳しくは django-admin と manage.py を参照してください。
- 内側の mysite/ ディレクトリは、このプロジェクトの実際の Python パッケージです。この名前が Python パッケージの名前であり、 import の際に 使用する名前です (例えば import mysite.urls) 。
- mysite/__init__.py: このディレクトリが Python パッケージであることを Python に知らせるための空のファイルです。Python の初心者は、 Python の公式 ドキュメントの more about packages を読んで下さい。
- mysite/settings.py: Django プロジェクトの設定ファイルです。 設定の仕組みは Djangoの設定 を参照してください。
- mysite/urls.py: Django プロジェクトの URL 宣言、いうなれば Django サイトにおける「目次」に相当します。詳しくは URL ディスパッチャ を参照 してください。
- mysite/asgi.py: プロジェクトを提供するASGI互換Webサーバーのエントリポイント
- mysite/wsgi.py: プロジェクトをサーブするためのWSGI互換Webサーバーとのエントリーポイントです。詳細は WSGI とともにデプロイするには を参照してください。
開発用Server
#ターミナルorコマンドプロンプト
cd mysite
#ターミナルorコマンドプロンプト
python manage.py runserver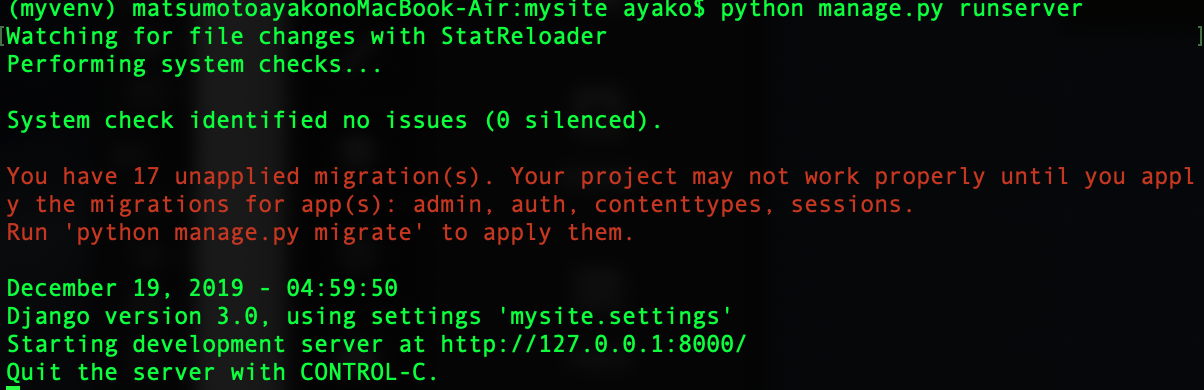
適用されていないデータベースマイグレーション
についての警告はここでは無視します
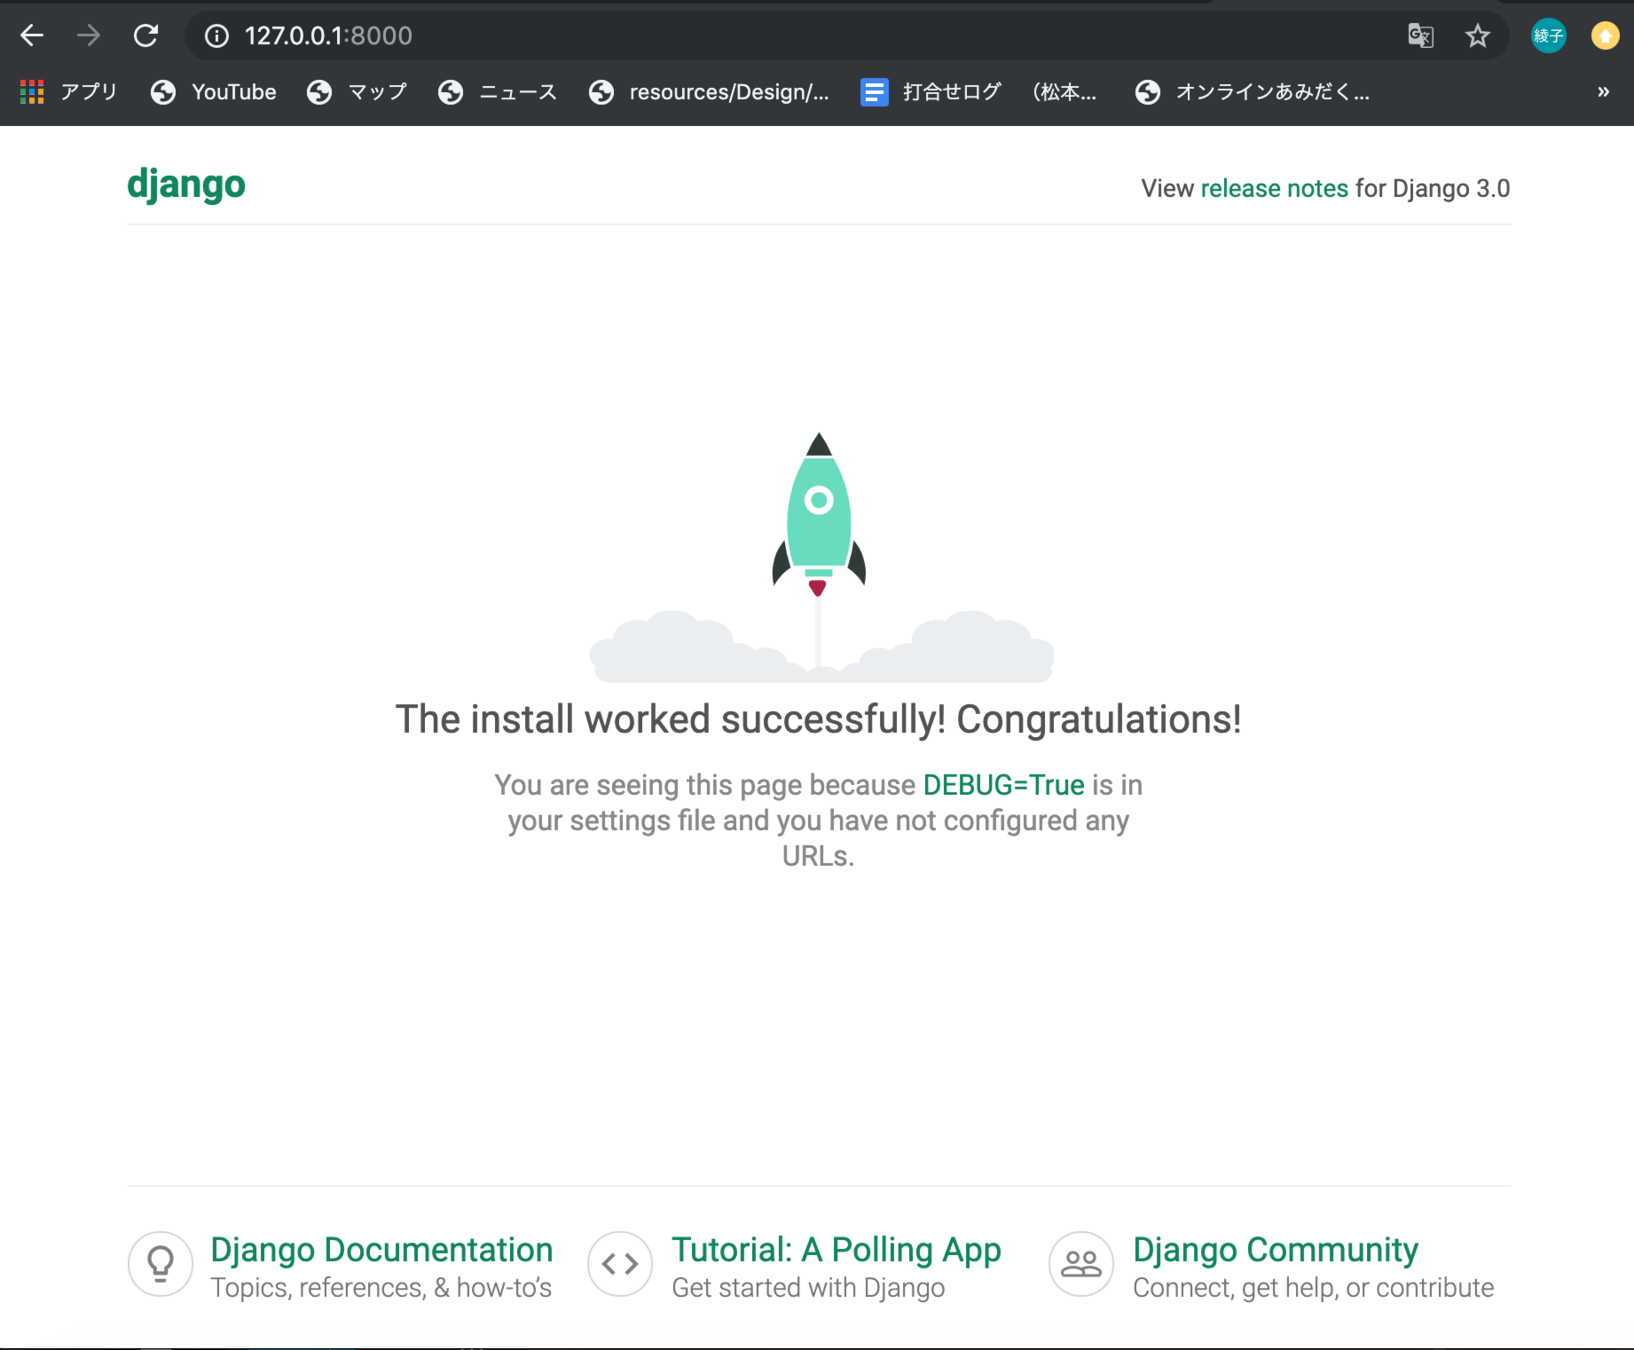
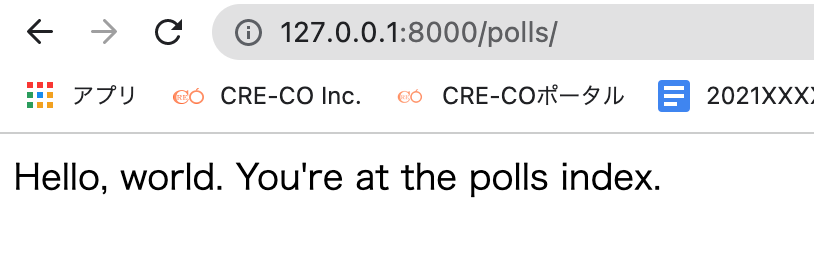
ブラウザでhttp://127.0.0.1:8000/ をみてみます
上記URLが見られなかった人は、以下のコマンドで
ポートの変更をしてみてください。
python manage.py runserver 8080make an application
Polls アプリを作る
python manage.py startapp polls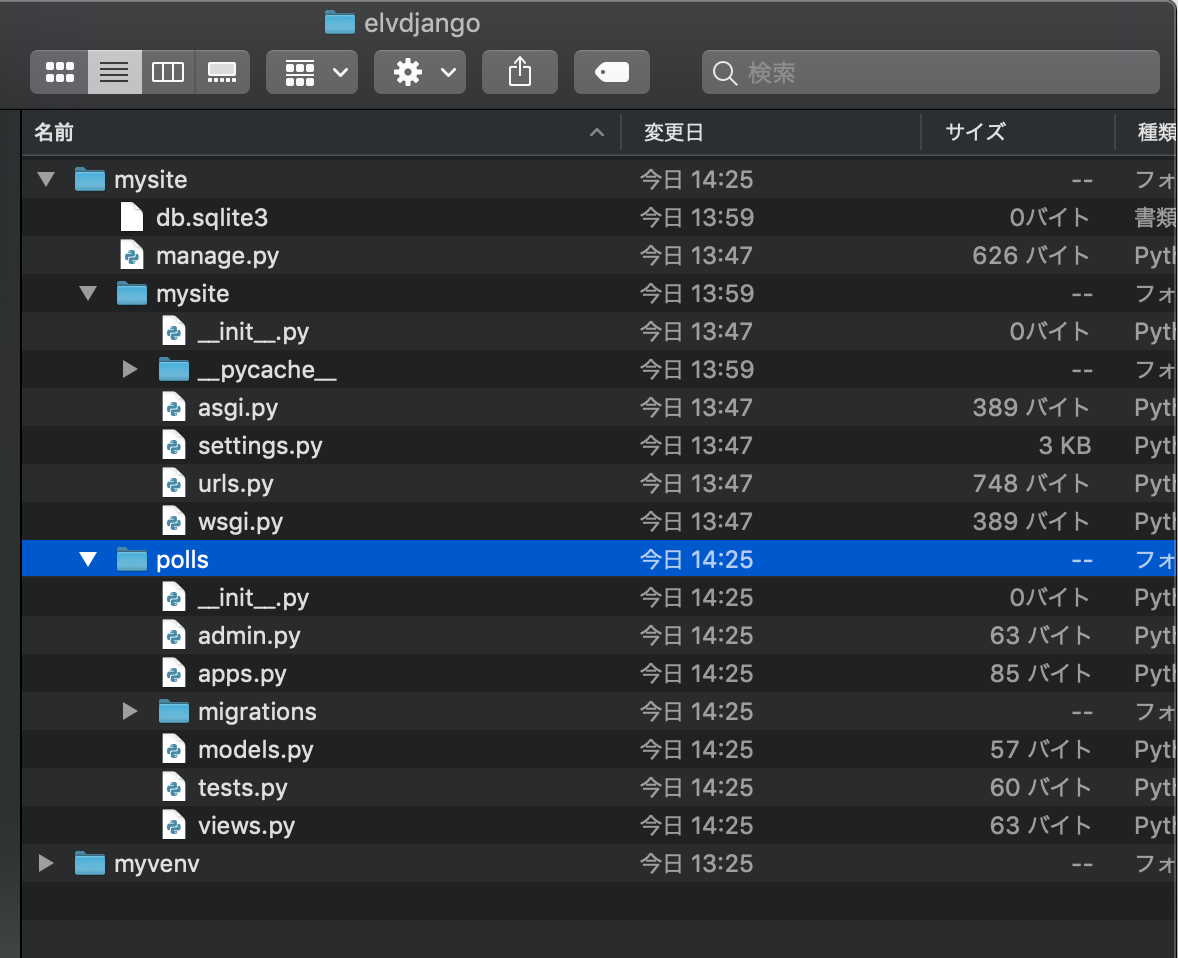
views.py
polls/views.py
from django.shortcuts import render
from django.http import HttpResponse


def index(request):
    return HttpResponse("Hello, world. You're at the polls index.")
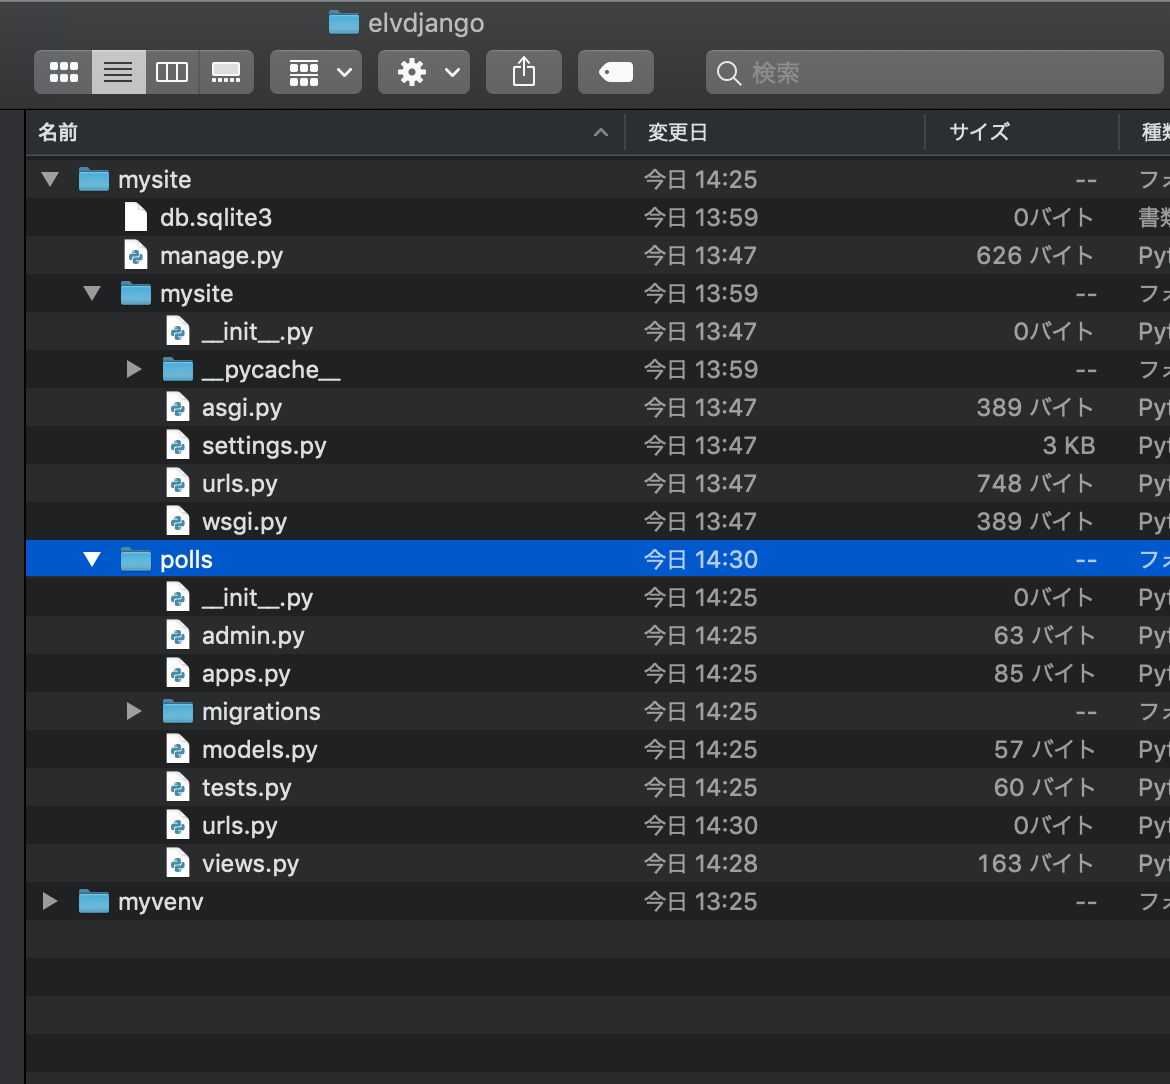
URL を対応付けしてやる必要があります。
そのためには URLconf が必要です。
polls ディレクトリに URLconf を作るには
urls.py というファイルを作ります。
2行目と 5、6行目を追加
urls.py
polls/urls.py
from django.urls import path

from . import views

urlpatterns = [
    path('', views.index, name='index'),
]
次は、ルートのURLconfに polls.urls モジュールの記述を反映させます。 mysite/urls.py に django.urls.include のimportを追加して、 urlpatterns のリストに include() を挿入します。
from django.contrib import admin
from django.urls import include, path

urlpatterns = [
    path('polls/', include('polls.urls')),
    path('admin/', admin.site.urls),
]
mysite/urls.py
views.py
def index(request):
    return HttpResponse("Hello, world. You're at the polls index.")
polls/urls.py
from django.urls import path

from . import views

urlpatterns = [
    path('', views.index, name='index'),
]
mysite/urls.py
from django.contrib import admin
from django.urls import include, path

urlpatterns = [
    path('polls/', include('polls.urls')),
    path('admin/', admin.site.urls),
]
urlが'polls/'だった場合は、
polls/urls.pyを参照しなさいという意味。
views.index で、polls/の下に何もない時は、view.pyのindex関数を呼び出すという意味になる
name=で、このURLパターンに名前をつけることが出来る。
ここでつけた名前によって実際のurlを取得する事が出来る
同じ階層にある
views.pyの全てを
読み込む
http://127.0.0.1:8000/polls/
python manage.py runserver でもう一度サーバーを起動して
Databaseの設定
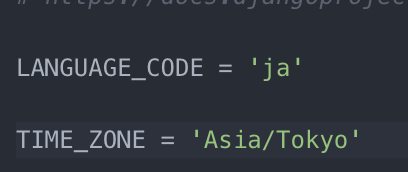
mysite/settings.py
LANUGUAGE_CODEとTIME_ZONEを書き換えてください。
#コマンドプロンプト or ターミナル
python manage.py migrate
migrateでDBを作成します。
from django.db import models


class Question(models.Model):
    question_text = models.CharField(max_length=200)
    pub_date = models.DateTimeField('date published')

    def was_published_recently(self):
        return self.pub_date >= timezone.now() - datetime.timedelta(days=1)


class Choice(models.Model):
    question = models.ForeignKey(Question, on_delete=models.CASCADE)
    choice_text = models.CharField(max_length=200)
    votes = models.IntegerField(default=0)
polls/models.pyを書き換えてください。
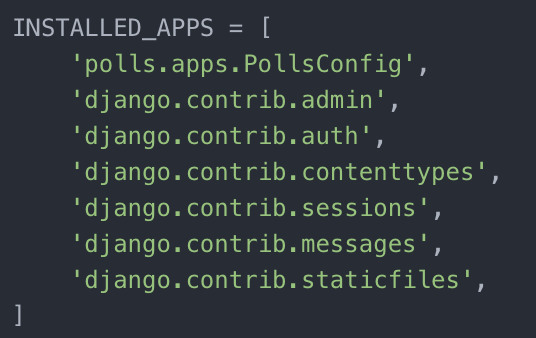
INSTALLED_APPS = [
    'polls.apps.PollsConfig',
    'django.contrib.admin',
    'django.contrib.auth',
    'django.contrib.contenttypes',
    'django.contrib.sessions',
    'django.contrib.messages',
    'django.contrib.staticfiles',
]
mysite/settings.py
INSTALLED_APPSに作成したアプリを追加します。
#コマンドプロンプト or ターミナル
python manage.py makemigrations polls
DBに投げるファイルを作成します。
#コマンドプロンプト or ターミナル
python manage.py migrate
DBに↑で作ったファイルを投げます
from django.contrib import admin
from .models import Question, Choice

admin.site.register(Question)
admin.site.register(Choice)
polls/admin.pyを書き換えてください。
管理ユーザーを作成する
以下順番にコマンドプロンプトorターミナルで設定してください。
python manage.py createsuperuser

#ここから下は入力するかしないでエンターすると次が表示されます。
Username: admin


Email address:


Password:


Password (again):
メールアドレスは入れなくてOK
パスワードは入力しても、何も表示されないので、間違いが無いように注意
パスワードは、単純なものはエラーとなるので、アルファベットと数字の組み合わせで眺めのものを設定
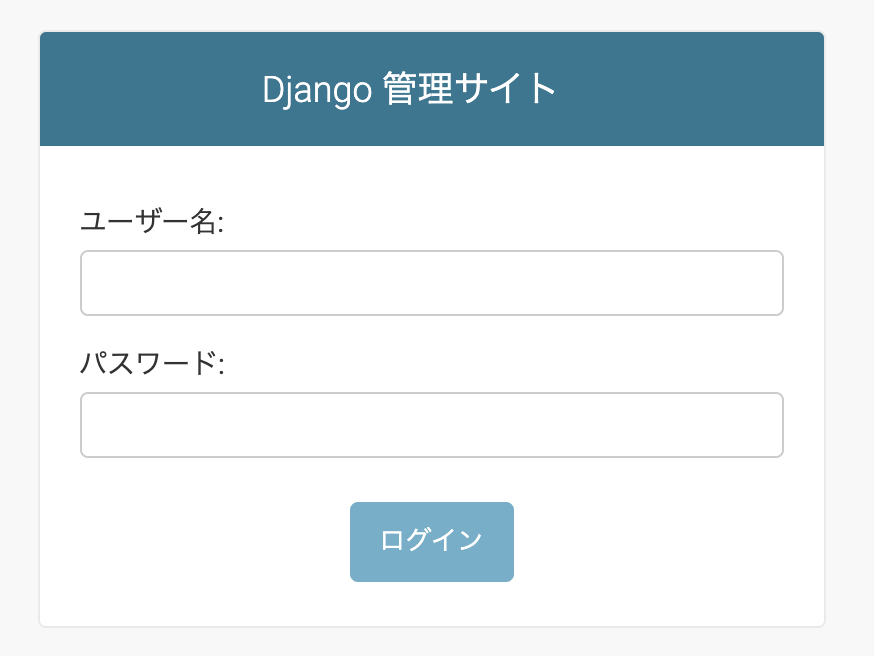
ユーザー名 admin
と設定したパスワードを入力してログイン
python manage.py runserver でもう一度サーバーを起動して
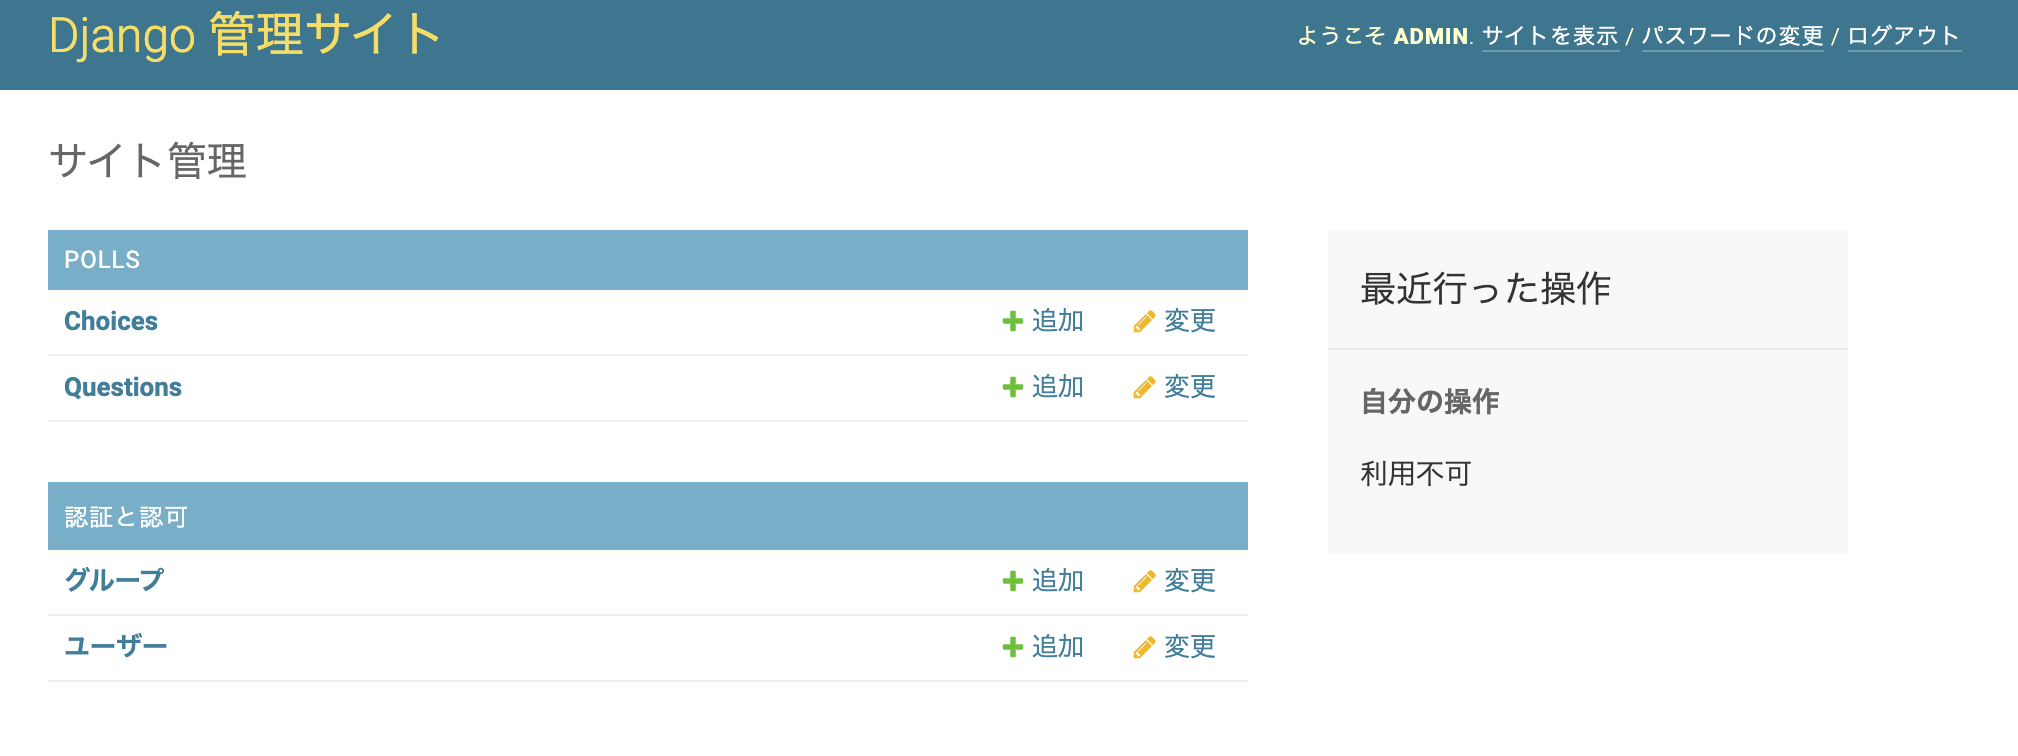
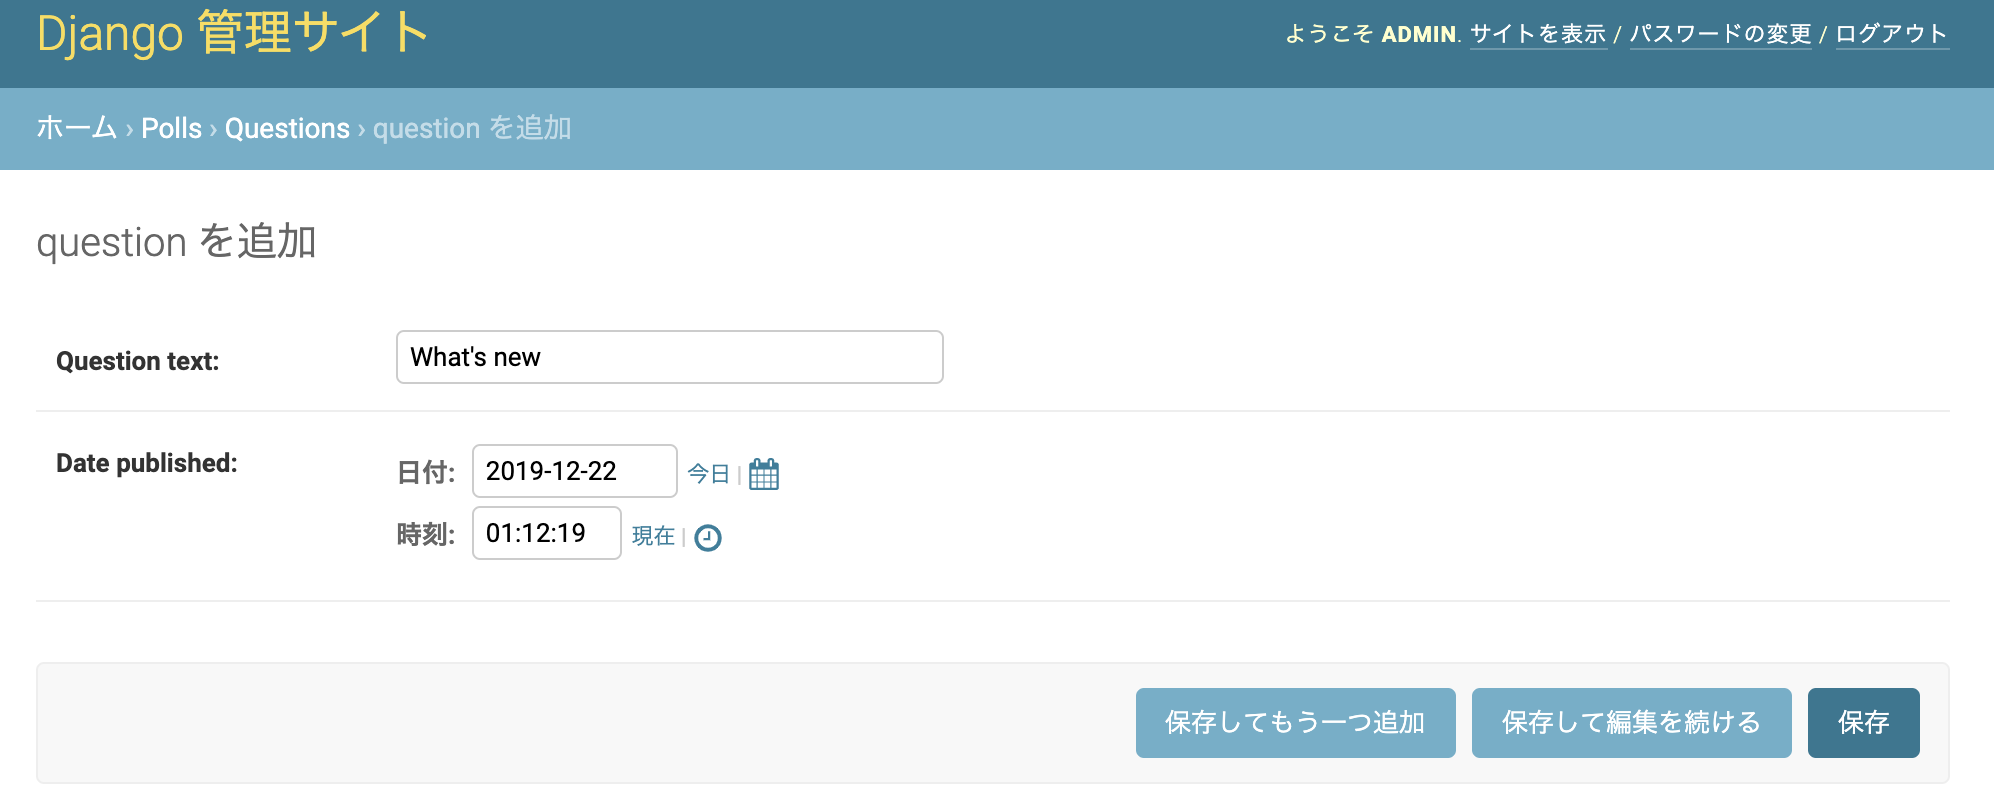
Questionsを開く
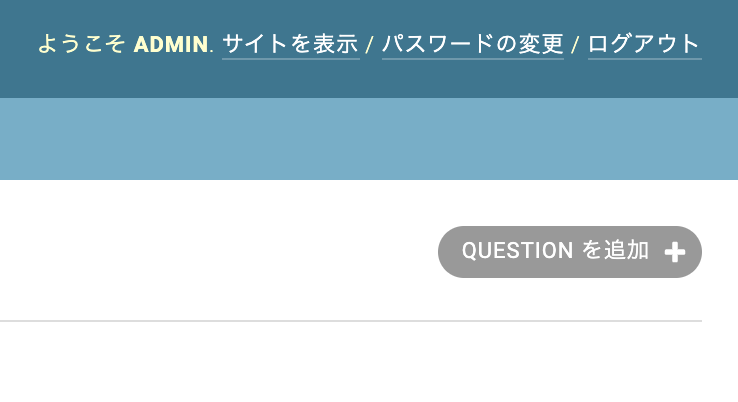
Questionsを追加をクリック
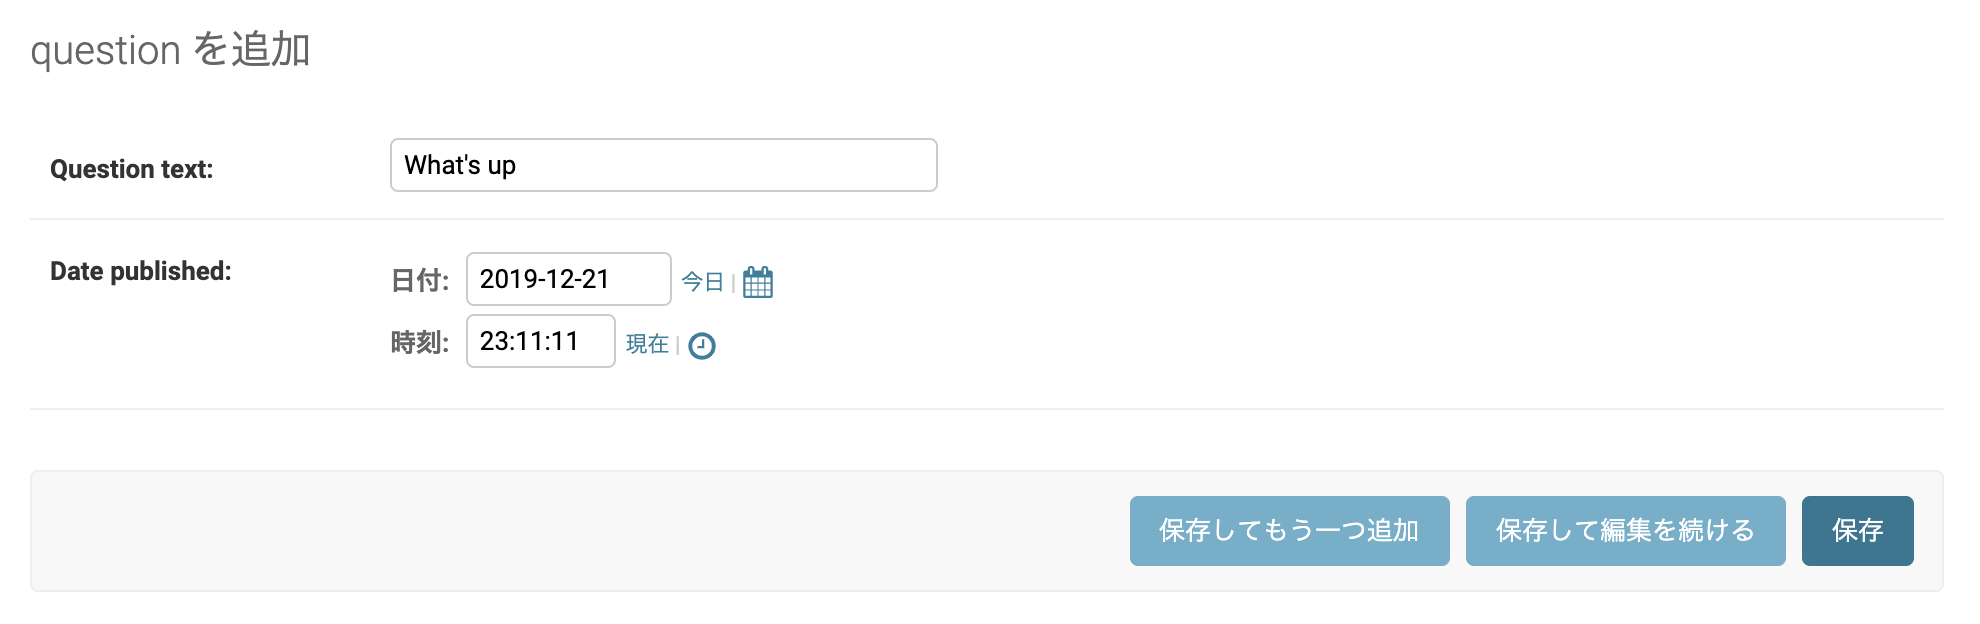
Questions textと日付時間を入力して保存
Write more views
from django.shortcuts import render
from django.http import HttpResponse


def index(request):
    return HttpResponse("Hello, world. You're at the polls index.")

def detail(request, question_id):
    return HttpResponse("You're looking at question %s." % question_id)

def results(request, question_id):
    response = "You're looking at the results of question %s."
    return HttpResponse(response % question_id)

def vote(request, question_id):
    return HttpResponse("You're voting on question %s." % question_id)
polls/views.py
8行目以下を追加
from django.urls import path

from . import views

urlpatterns = [
    # ex: /polls/
    path('', views.index, name='index'),
    # ex: /polls/5/
    path('<int:question_id>/', views.detail, name='detail'),
    # ex: /polls/5/results/
    path('<int:question_id>/results/', views.results, name='results'),
    # ex: /polls/5/vote/
    path('<int:question_id>/vote/', views.vote, name='vote'),
]
polls/urls.py
from django.shortcuts import render
from django.http import HttpResponse


def index(request):
    return HttpResponse("Hello, world. You're at the polls index.")

def detail(request, question_id):
    return HttpResponse("You're looking at question %s." % question_id)

def results(request, question_id):
    response = "You're looking at the results of question %s."
    return HttpResponse(response % question_id)

def vote(request, question_id):
    return HttpResponse("You're voting on question %s." % question_id)
from django.urls import path

from . import views

urlpatterns = [
    # ex: /polls/
    path('', views.index, name='index'),
    # ex: /polls/5/
    path('<int:question_id>/', views.detail, name='detail'),
    # ex: /polls/5/results/
    path('<int:question_id>/results/', views.results, name='results'),
    # ex: /polls/5/vote/
    path('<int:question_id>/vote/', views.vote, name='vote'),
]
views.py
urls.py
http://127.0.0.1:8000/polls/34/ を開いてみてください。

def detail(request, question_id):
    return HttpResponse("You're looking at question %s." % question_id)
path('<int:question_id>/', views.detail, name='detail'),urls.py
views.py
def results(request, question_id):
    response = "You're looking at the results of question %s."
    return HttpResponse(response % question_id)
http://127.0.0.1:8000/polls/34/results/ を開いてみてください。
path('<int:question_id>/results/', views.results, name='results'),views.py
urls.py
http://127.0.0.1:8000/polls/34/vote/ を開いてみてください。
def vote(request, question_id):
    return HttpResponse("You're voting on question %s." % question_id)
path('<int:question_id>/vote/', views.vote, name='vote'),urls.py
views.py
templates
ここまでは、ページに表示する内容をviews.pyの中の
関数に直接記載していましたが、本来はhtmlに記載します。ここからは、その方法を説明します。
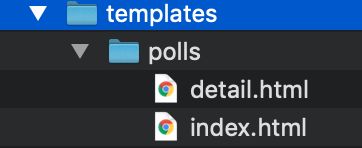
pollsの中に
templates という名前の
ディレクトリを作成します。
templatesの中に再度
polls という名前の
ディレクトリを作成します。
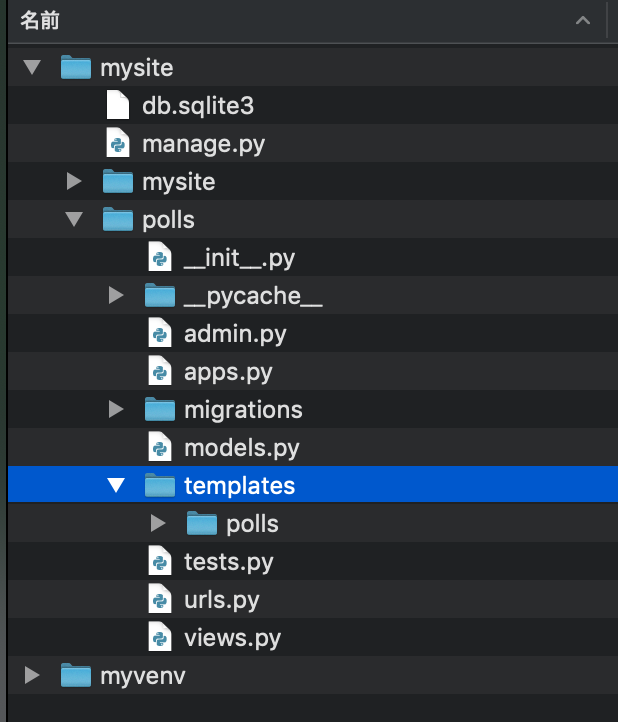
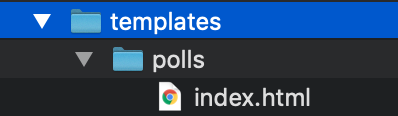
templates/polls の中に
index.htmlを保存します。
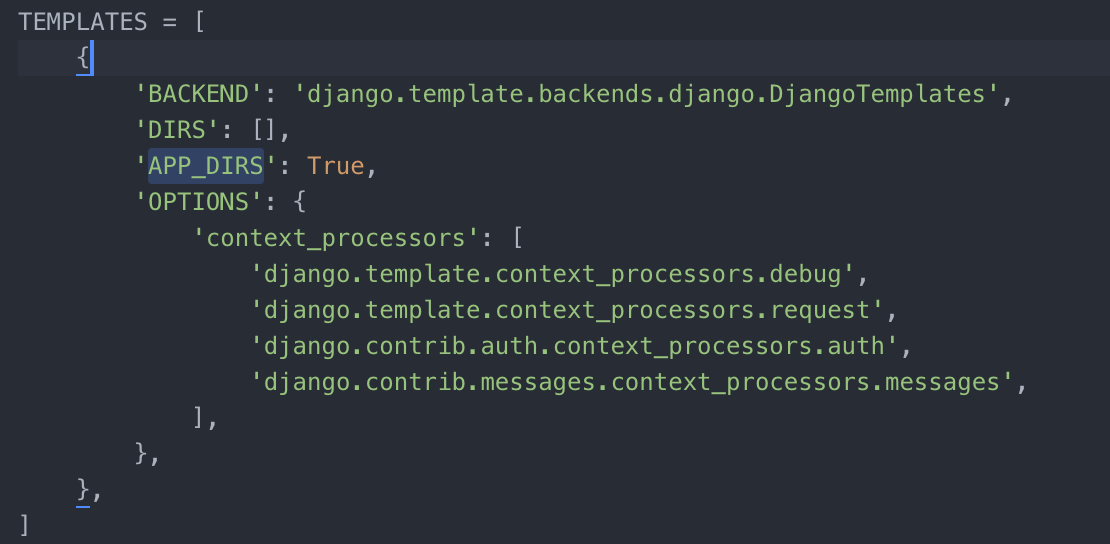
settings.pyの TEMPLATES には、Django がどのようにテンプレートをロードしレンダリングするかが書かれています。デフォルトの設定ファイルでは、 DjangoTemplates バックエンドが設定されており、その APP_DIRS のオプションが True になっています。規約により、 DjangoTemplates は INSTALLED_APPS のそれぞれの "templates" サブディレクトリを検索します。
{% if latest_question_list %}
    <ul>
    {% for question in latest_question_list %}
        <li><a href="/polls/{{ question.id }}/">{{ question.question_text }}</a></li>
    {% endfor %}
    </ul>
{% else %}
    <p>No polls are available.</p>
{% endif %}
polls/templates/polls/index.html
from django.template import loader
from .models import Question

def index(request):
    latest_question_list = Question.objects.order_by('-pub_date')[:5]
    template = loader.get_template('polls/index.html')
    context = {
        'latest_question_list': latest_question_list,
    }
    return HttpResponse(template.render(context, request))
views.pyに
from django.template import loader
from .models import Question を追加し、
index関数を書き換えます。
from django.shortcuts import render
from django.http import HttpResponse
from django.template import loader
from .models import Question

def index(request):
    latest_question_list = Question.objects.order_by('-pub_date')[:5]
    template = loader.get_template('polls/index.html')
    context = {
        'latest_question_list': latest_question_list,
    }
    return HttpResponse(template.render(context, request))

def detail(request, question_id):
    return HttpResponse("You're looking at question %s." % question_id)

def results(request, question_id):
    response = "You're looking at the results of question %s."
    return HttpResponse(response % question_id)

def vote(request, question_id):
    return HttpResponse("You're voting on question %s." % question_id)
現時点のviews.py の全体
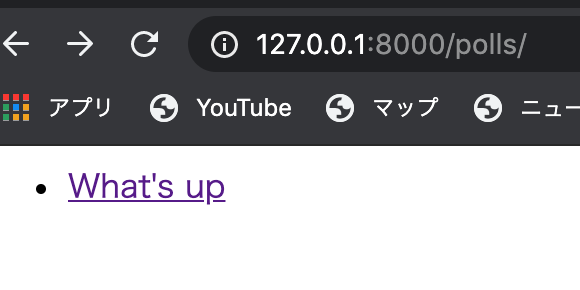
Questionに追加した質問がちゃんと表示されていますね。
を開いて、Questionを追加してみましょう。
http://127.0.0.1:8000/polls/ を再度開くか
開いているページをリロードしてみましょう。
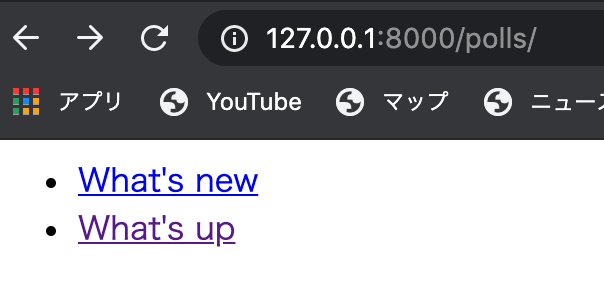
表示されたリンクの
どちらかを開いてみましょう。

views.py
urls.py
path('<int:question_id>/', views.detail, name='detail'),def detail(request, question_id):
return HttpResponse("You're looking at question %s." % question_id)detailが表示されています。
polls/templates/polls/index.html
{% if latest_question_list %}
    <ul>
    {% for question in latest_question_list %}
        <li><a href="/polls/{{ question.id }}/">{{ question.question_text }}</a></li>
    {% endfor %}
    </ul>
{% else %}
    <p>No polls are available.</p>
{% endif %}
def detail(request, question_id):
return HttpResponse("You're looking at question %s." % question_id) path('<int:question_id>/', views.detail, name='detail'),urls.py
views.py
index.htmlのaタグを確認してください。
polls/の後にquestionのidを指定しています。
これは先に作っていたdetailをさしています。
Shortcuts
render()
from django.template import loader
from .models import Question

def index(request):
    latest_question_list = Question.objects.order_by('-pub_date')[:5]
    template = loader.get_template('polls/index.html')
    context = {
        'latest_question_list': latest_question_list,
    }
    return HttpResponse(template.render(context, request))
今、views.pyのindexの関数の中はこのようになっています。
まずlatest_question_list変数 にQuestionオブジェクトを日付で降順で
取り出し、0-4つ目までを取り出しています。
template 変数にpolls/index.htmlをロードする指定をしています。
context に書き出す内容を設定しています。 HTTPResponseにtemplateのrenderメソッドを使ってreturnしています。全ての関数にこのような処理を行うのは、大変ですし、無駄ですのでrender()を使って簡単に記載してみます。
from django.shortcuts import render

def index(request):
    latest_question_list = Question.objects.order_by('-pub_date')[:5]
    context = {'latest_question_list': latest_question_list}
    return render(request, 'polls/index.html', context)
views.py
from django.shortcuts import render を追加し
index関数を↑のように書き換えましょう。
http://127.0.0.1:8000/polls/ を再度開くか
開いているページをリロードしてみましょう。
ショートカットを使っても
同じ結果が表示されました。
404 Error

404エラーとは?
detailを使って404エラー処理をしてみましょう。
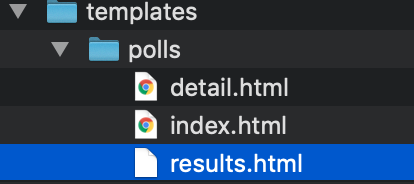
polls/templates/polls/ の中に
detail.htmlを保存します。
<h1>{{ question.question_text }}</h1>
<ul>
{% for choice in question.choice_set.all %}
    <li>{{ choice.choice_text }}</li>
{% endfor %}
</ul>
detail.html は以下のようにしてください。
views.pyのfrom django.shortcuts import render の部分を
from django.shortcuts import get_object_or_404, render
に書き換えて、detail関数を↓のように書き換えます。
from django.shortcuts import get_object_or_404, render


def detail(request, question_id):
    question = get_object_or_404(Question, pk=question_id)
    return render(request, 'polls/detail.html', {'question': question})
def detail(request, question_id):
question = get_object_or_404(Question, pk=question_id)
return render(request, 'polls/detail.html', {'question': question})def detail(request, question_id):
try:
question = Question.objects.get(pk=question_id)
except Question.DoesNotExist:
raise Http404("Question does not exist")
return render(request, 'polls/detail.html', {'question': question})今回記載したdetailは↓と同じ意味になります。
http://127.0.0.1:8000/polls/4/
を開いてみましょう。
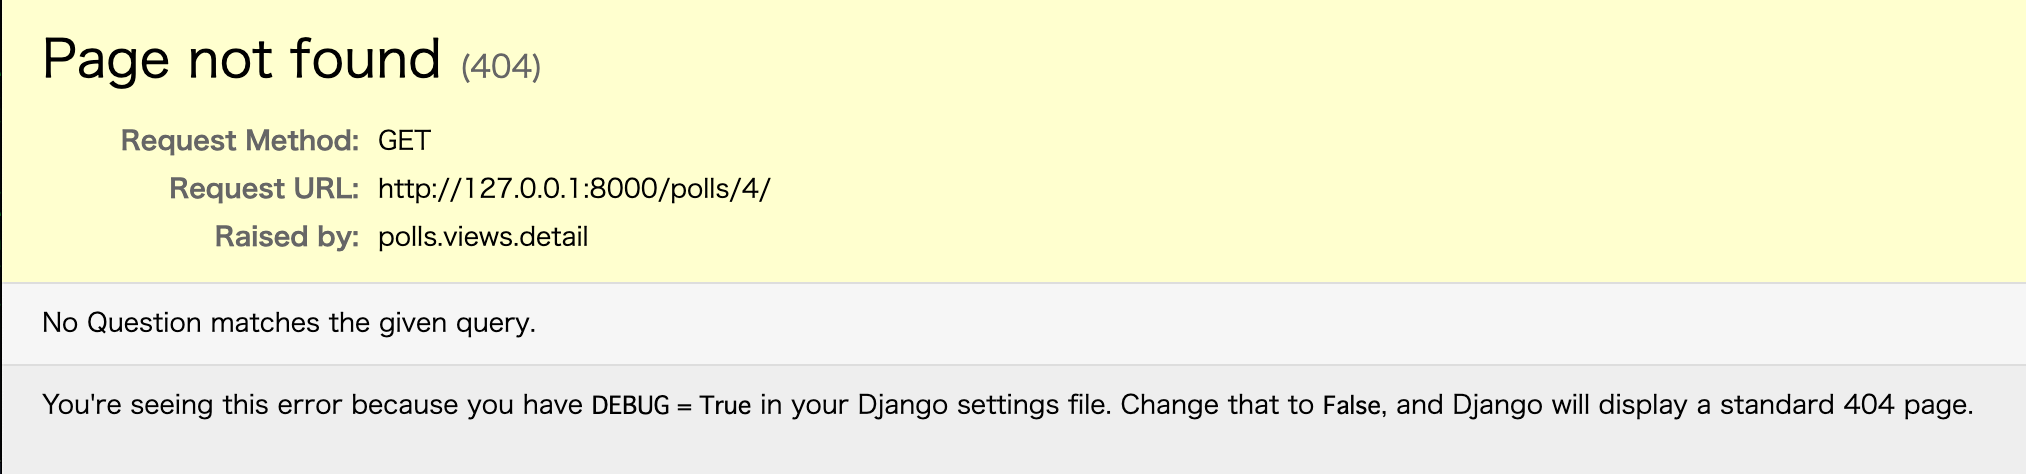
ちゃんと404エラーが表示されました。
urls.pyのnameを使おう
投票の詳細ビューの URL を何か他のものに変更したい場合、
たとえば polls/specifics/12/ のように変更したいとき、
対象となるテンプレートを変更する代わりに、
polls/urls.py を変更します。
path('specifics/<int:question_id>/', views.detail, name='detail'),polls/urls.py
ですが、現状ここを変えるだけでは、対応できません。
なぜなら・・
polls/templates/polls/index.html
{% if latest_question_list %}
    <ul>
    {% for question in latest_question_list %}
        <li><a href="/polls/{{ question.id }}/">{{ question.question_text }}</a></li>
    {% endfor %}
    </ul>
{% else %}
    <p>No polls are available.</p>
{% endif %}
aタグの中身は "/polls/{{ question.id }}" となっています。今時点では一箇所だけですが、他にも同じリンクをはる場所を作っていた場合、全てを書き換える必要が出てしまいます。
とても非効率ですよね。 そこで nameの登場です。
<li><a href="{% url 'detail' question.id %}">{{ question.question_text }}</a></li>polls.urls モジュール の path() 関数で name 引数を定義したので、テンプレートタグの {%url%} を使用して、URL 設定で定義されている特定の URL パスへの依存をなくすことができます。
URL名の名前空間
実際のDjangoのプロジェクトでは、たくさんのアプリを作ります。
今回pollsアプリにdetailビューを作りましたが、
他のアプリにも同様にdetailビューを作る可能性があります。
別々のアプリのdetailである事をDjangoに知らせてあげる必要があります。
from django.urls import path

from . import views

app_name = 'polls'
urlpatterns = [
    # ex: /polls/
    path('', views.index, name='index'),
    # ex: /polls/5/
    path('specifics/<int:question_id>/', views.detail, name='detail'),
    # ex: /polls/5/results/
    path('<int:question_id>/results/', views.results, name='results'),
    # ex: /polls/5/vote/
    path('<int:question_id>/vote/', views.vote, name='vote'),
]
app_name = 'polls' を追加してあげます。
<li><a href="{% url 'detail' question.id %}">{{ question.question_text }}</a></li>この部分を・・・
<li><a href="{% url 'polls:detail' question.id %}">{{ question.question_text }}</a></li>このように書き換えて、
名前空間つきの詳細ビューを指すようにします。
form
<h1>{{ question.question_text }}</h1>

{% if error_message %}<p><strong>{{ error_message }}</strong></p>{% endif %}

<form action="{% url 'polls:vote' question.id %}" method="post">
{% csrf_token %}
{% for choice in question.choice_set.all %}
    <input type="radio" name="choice" id="choice{{ forloop.counter }}" value="{{ choice.id }}">
    <label for="choice{{ forloop.counter }}">{{ choice.choice_text }}</label><br>
{% endfor %}
<input type="submit" value="Vote">
</form>
polls/templates/polls/detail.html を書き換えましょう
各質問の選択肢のラジオボタンを表示するものです。各ラジオボタンの value は、関連する質問の選択肢のIDです。各ラジオボタンの name は "choice" です。つまり、投票者がラジオボタンの1つを選択し、フォームを送信すると、POSTデータ choice=# (#は選んだ選択肢のID)が送信されます。
フォームのアクションを{%url 'polls:vote' question.id%}に設定し、method = "post"を設定します。 method = "get"ではなくmethod = "post"を使用することは非常に重要です。このフォームを送信すると、サーバー側のデータが変更されるためです。
from django.http import HttpResponse, HttpResponseRedirect


from .models import Choice, Question
from django.urls import reverse追加する
def vote(request, question_id):
    question = get_object_or_404(Question, pk=question_id)
    try:
        selected_choice = question.choice_set.get(pk=request.POST['choice'])
    except (KeyError, Choice.DoesNotExist):
        return render(request, 'polls/detail.html', {
            'question': question,
            'error_message': "You didn't select a choice.",
        })
    else:
        selected_choice.votes += 1
        selected_choice.save()
        return HttpResponseRedirect(reverse('polls:results', args=(question.id,)))
書き換える
書き換える
polls/views.py
def vote(request, question_id):
    question = get_object_or_404(Question, pk=question_id)
    try:
        selected_choice = question.choice_set.get(pk=request.POST['choice'])
    except (KeyError, Choice.DoesNotExist):
        return render(request, 'polls/detail.html', {
            'question': question,
            'error_message': "You didn't select a choice.",
        })
    else:
        selected_choice.votes += 1
        selected_choice.save()
        return HttpResponseRedirect(reverse('polls:results', args=(question.id,)))
●request.POST は辞書のようなオブジェクトで選択されたIDを常に文字列で返します。
選択せずに送信した場合、 request.POST['choice'] は KeyError を送出します。選択されていない場合にはエラーメッセージ付きの質問フォームを再表示します。
●このコードは、 通常の HttpResponse ではなく HttpResponseRedirect を返します。 HttpResponseRedirect はひとつの引数(リダイレクト先のURL)をとります。
●HttpResponseRedirect コンストラクタの中で reverse() 関数を使用しています。 reverse() を呼ぶと、次のような文字列が返ってきます。
'/polls/3/results/'
def results(request, question_id):
    question = get_object_or_404(Question, pk=question_id)
return render(request, 'polls/results.html', {'question': question})書き換える
polls/views.py
polls/templates/pollsの中にresults.htmlを保存します。
<h1>{{ question.question_text }}</h1>

<ul>
{% for choice in question.choice_set.all %}
    <li>{{ choice.choice_text }} -- {{ choice.votes }} vote{{ choice.votes|pluralize }}</li>
{% endfor %}
</ul>

<a href="{% url 'polls:detail' question.id %}">Vote again?</a>
http://127.0.0.1:8000/admin/ を開いてChoicesを追加します。

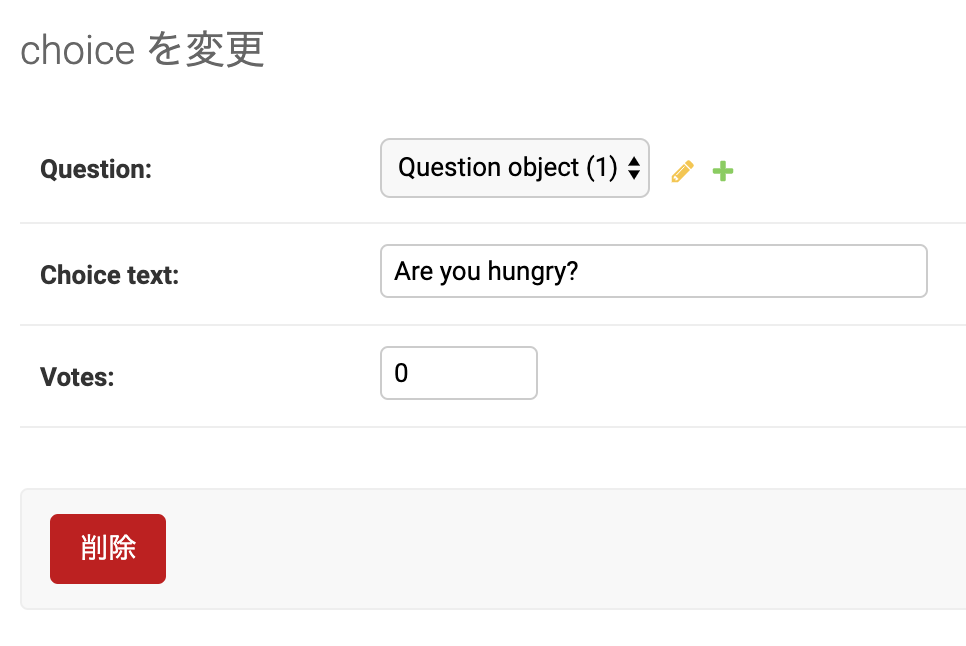
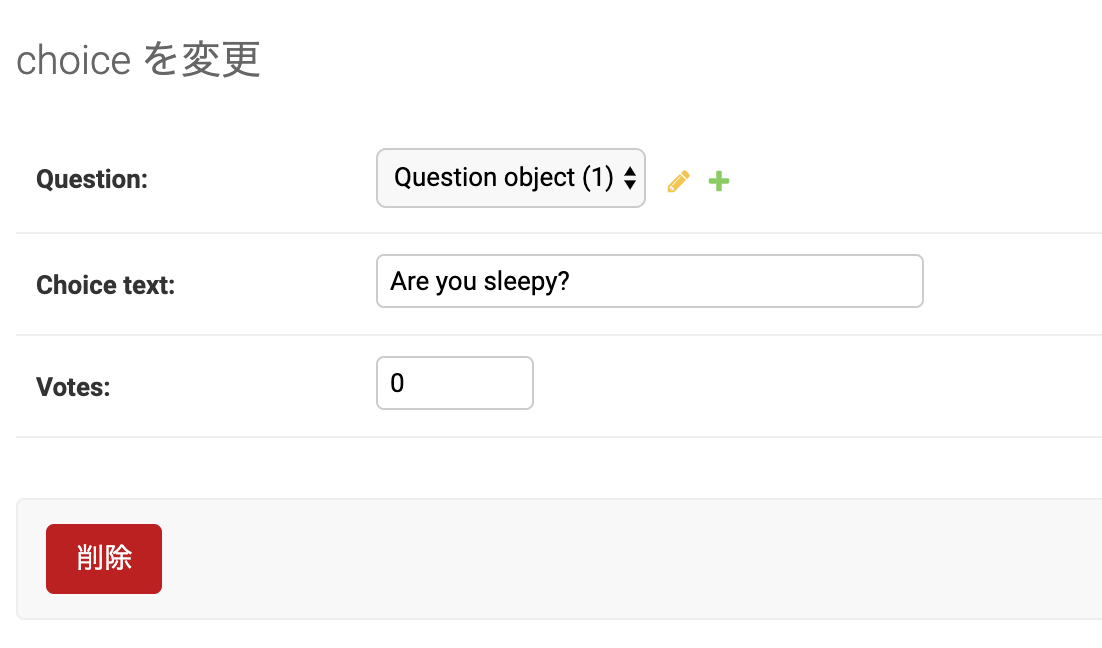
選べるように、2つ程登録してください。
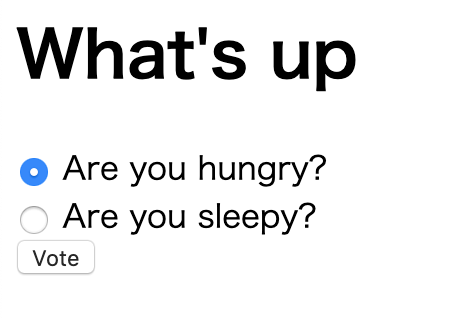
どちらかを選択して
Voteすると結果が表示される。

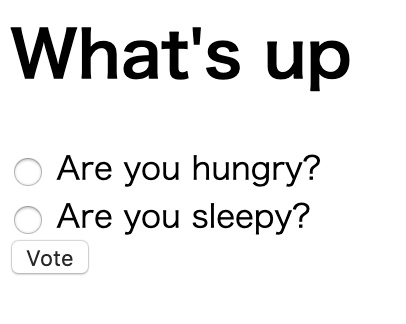
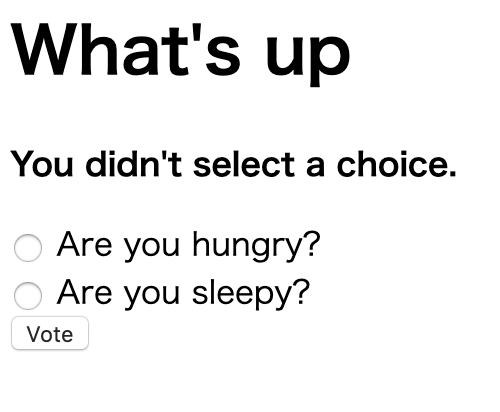
何も選ばずに
Voteするとエラーが表示され、入力画面に戻る。
最後に・・
本日の内容は以上です。
1回目から5回目まで、私も大変勉強になりました。
(特に5回目・・笑)
本日の内容は、Django本家のチュートリアルを
もう少し、噛み砕いて説明したものとなります。
https://docs.djangoproject.com/ja/3.0/intro/tutorial01/
是非、皆様も続きをご自身でやってみてください。
Thank you!
See you next Time!