Building web apps with Meteor
What is Meteor?
Meteor is a web framework that allows you to build modern web applications rapidly.
But Meteor isn't like most other web frameworks, instead of forcing you to write a separate web server and web client, Meteor lets you write both in one single unified JavaScript platform.
This lets you write web apps much faster than you normally would with traditional web frameworks.
Under-the-hood there's still a client and server, but magic happens underneath that makes everything seamless.
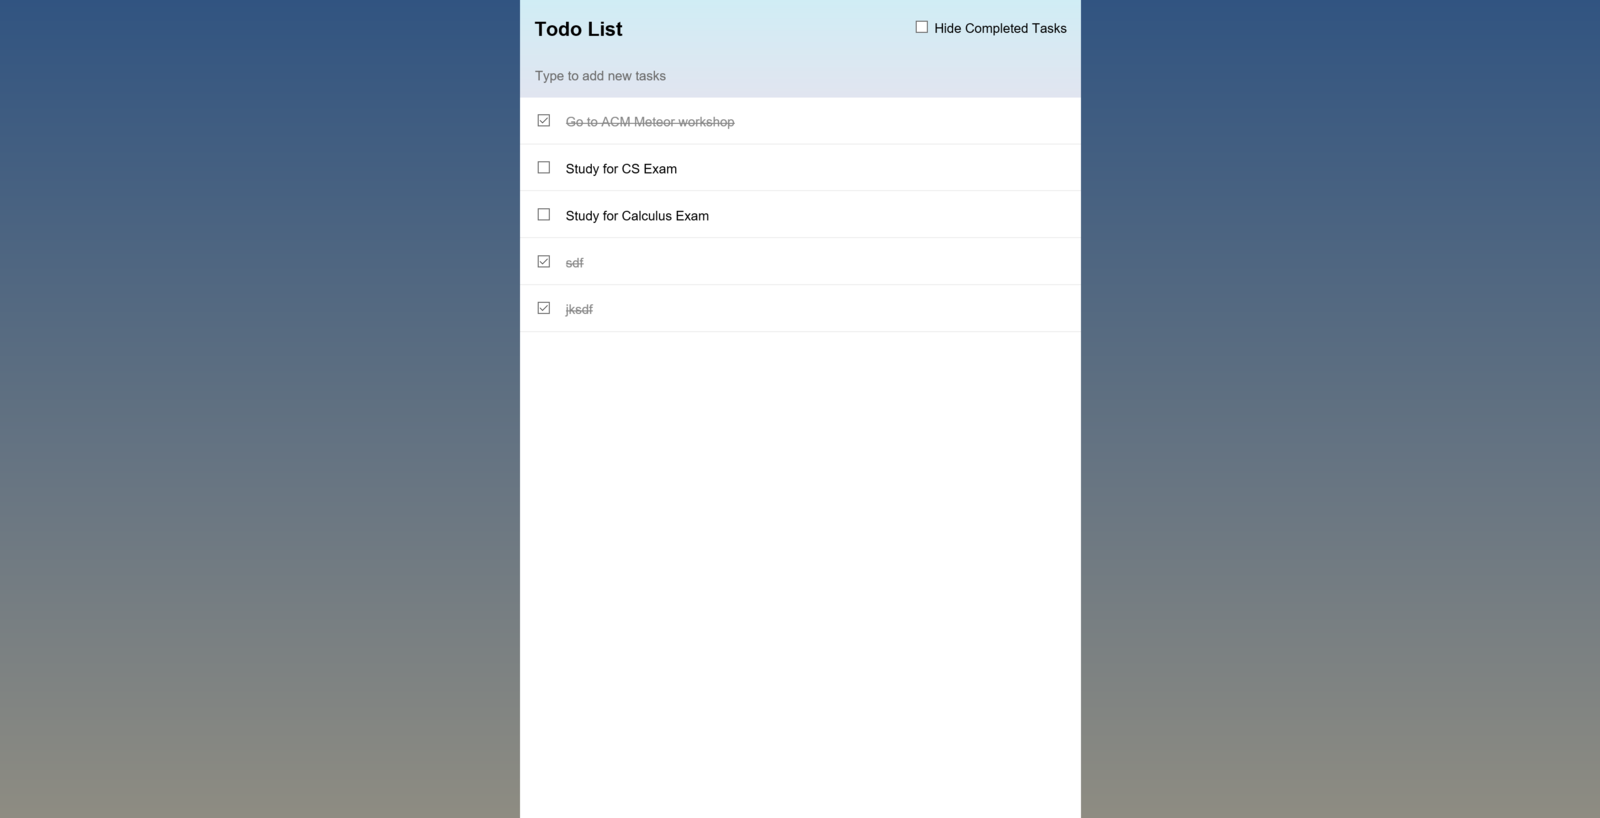
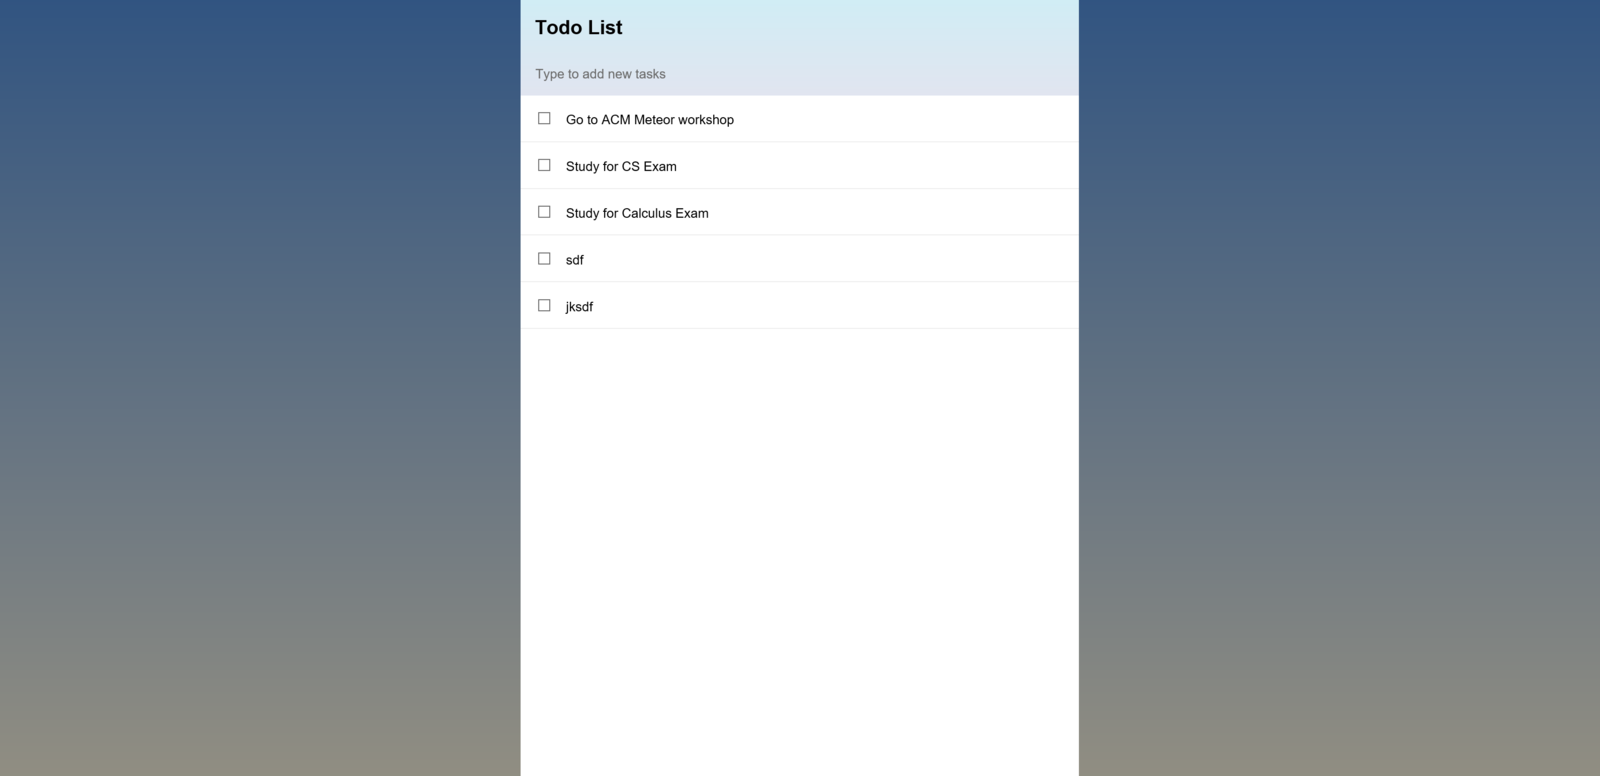
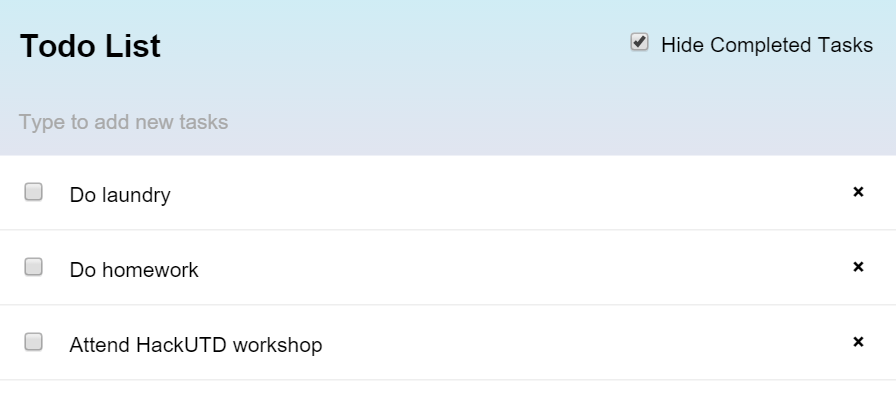
We'll be making a simple to-do list app.
Here's what it'll look like
Fair warning, what we will be making is rather basic, but we'll be able to go through a lot of important concepts you need to know to build great web apps in Meteor.
Install
Head to the Meteor website
(www.meteor.com)
and install the platform on your computer using the appropriate instructions for your OS.
Windows
Download the installer and follow the instructions in the wizard. The installer will ask you to sign up for a Meteor account, you don't have to, but we recommend it.
Mac OS X
You'll have to go into the command line and type the following:
[curl command]
[enter admin password]
Go to Meteor.com and sign up
Create Project
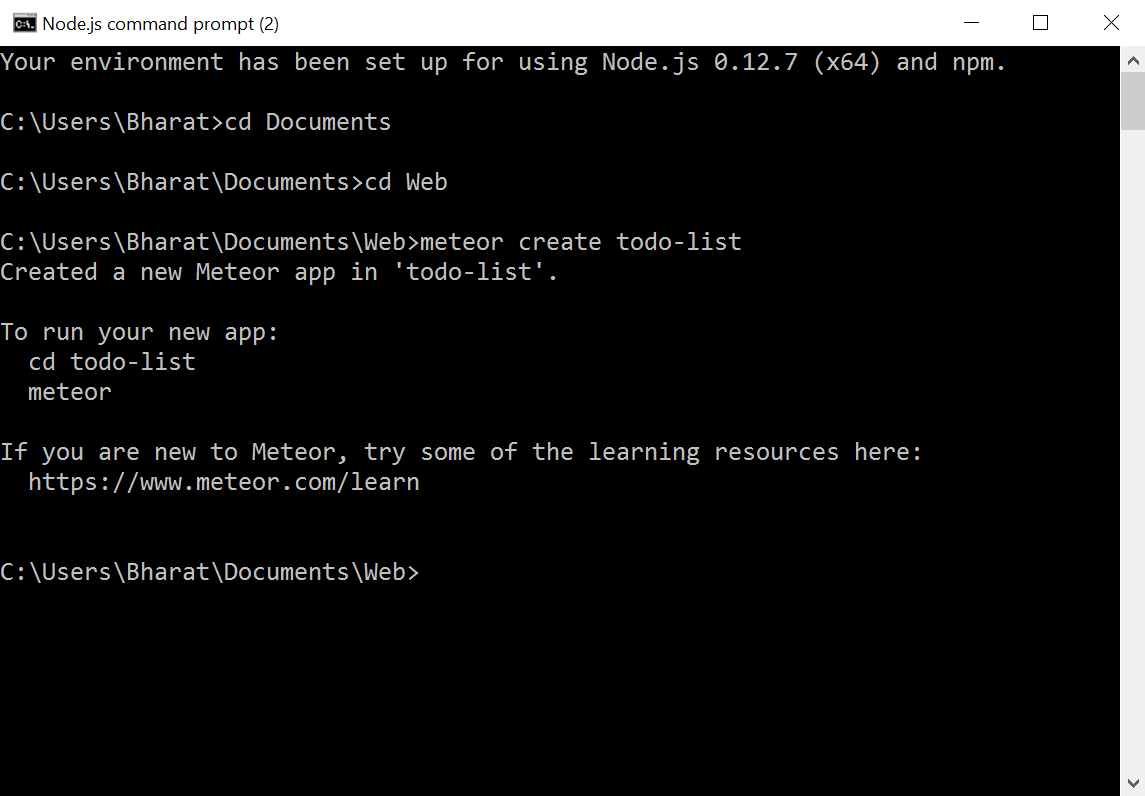
Go to your command prompt environment. Command Prompt on Windows, and Terminal in Linux and OS X.
Cd into the folder where you want to put your project[cd documents]. Then type:
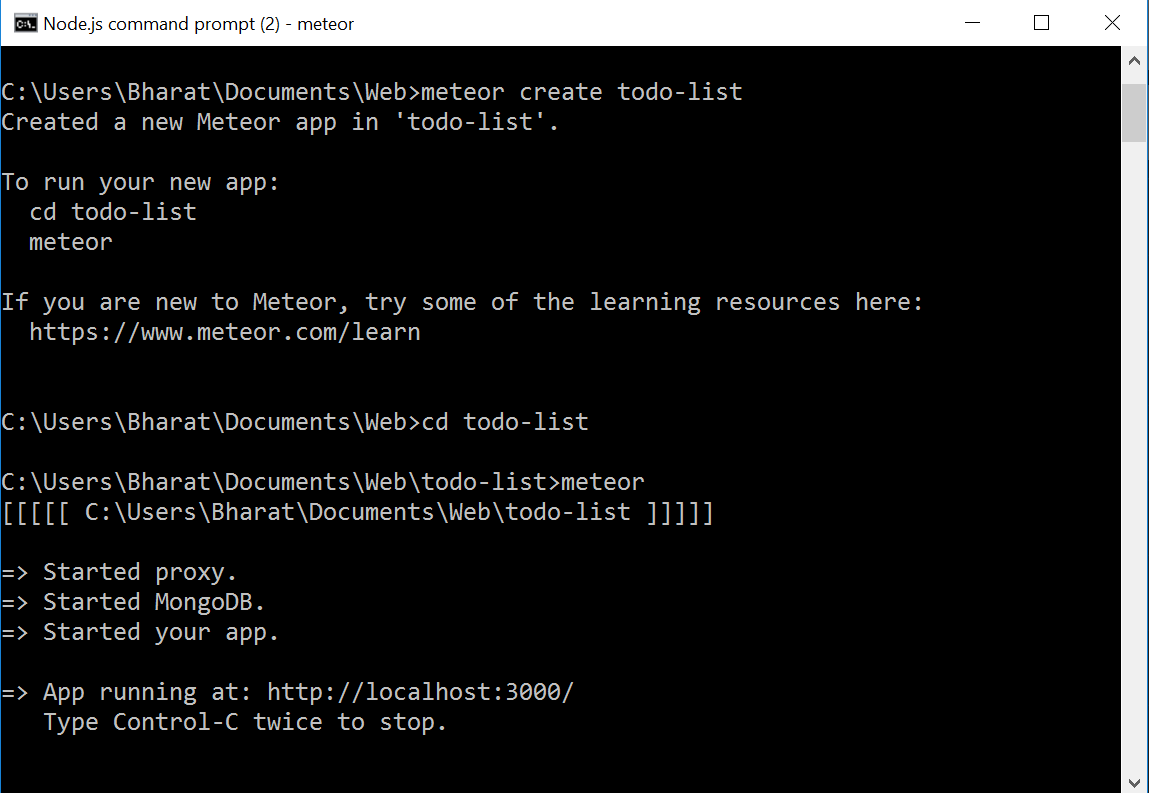
meteor create <project-name>Cd into your project and type 'meteor'
Notice that your todo-list.js file has two outermost if statements.
if (Meteor.isClient) {
  // counter starts at 0
  Session.setDefault('counter', 0);

  Template.hello.helpers({
    counter: function () {
      return Session.get('counter');
    }
  });

  Template.hello.events({
    'click button': function () {
      // increment the counter when button is clicked
      Session.set('counter', Session.get('counter') + 1);
    }
  });
}

if (Meteor.isServer) {
  Meteor.startup(function () {
    // code to run on server at startup
  });
}
Let's take everything inside the if statements out
if (Meteor.isClient) {

}

if (Meteor.isServer) {

}
This how Meteor handles the client and server, client-code goes within the Meteor.isClient if statement, while server code goes in the Meteor.isServer if statement.
Let's clear up our todo-list.html file too
<head>
  <title>todo-list</title>
</head>

<body>

</body>
First, let's edit the view, the user interface, of our application. Open up your application's .html file.
You'll see a <head> tag and a <body> tag. If you know anything about HTML, you'll know that <head> defines your HTML document and imports things, while <body> is what users actually see.
Templates
Templates allow you to combine dynamic data with standard HTML code.
Meteor uses the Spacebar syntax for this (very similar to Handlebars, if you're familiar).
// Spacebar uses statements surrounded by
// double curly braces

// You have a bunch of
// statements like
// if statements and each statements

{{#if userLoggedIn}}
    <p>Welcome, {{user.name}}</p>
{{else}}
    <p>You're logged out</p>
{{/if}}
Templates (cont.)
Multi-line (block) statements start with {{#statement}}
and end with {{/statement}}
{{#each tasks}}

{{/each}}

{{#if something}}

{{/if}}

{{name}}
Templates (cont.)
You have the body template, which is the code in your within the <body> tags.
But you can also define your own templates, with it's own HTML code.
<template name="task">
    <p>{{name}}</p>
</template>
Templates (cont.)
Here is an example where we have a task template, and it's included in the body template with {{ > templateName }}
The each statement means that
output a task template for
every object in the tasks array.
Output whatever is inside, for
every object in the array.
<head>
    <title>Todo List</title>
</head>

<body>
      <ul>
          {{#each tasks}}
            {{> task}}
          {{/each}}
    </ul>
</body>

<template name="task">
  <li>
    <span class="text">{{text}}</span>
  </li>
</template>
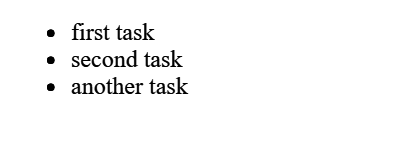
Assuming we had an array of tasks where the tasks names were 'first task', 'second task', 'another task', the output would look like this:
JavaScript
The first thing to know about JavaScript is that it's a dynamically-typed language. What this means is that the types of your variables are determined at runtime.
So you define variables with the 'var' keyword and JavaScript will figure out what the type of the variable is at runtime.
// Number
var age = 18;
// String
var name = "Temoc";
// Boolean
var isUserLoggedIn = true;
Objects
// Objects can be defined directly
// No need to define a class

var task = {
    name: "Do homework",
    dueDate: new Date("12/1/2015"),
    isCompleted: false
};

var person = {
    name: "Temoc",
    address: "800 W Campbell Rd"
};
Arrays
// Arrays can be defined directly as well

// Array of numbers
var ages = [
    10, 24, 12, 22, 32
];

// Array of strings
var buildings = [
    'ATEC', 'Founders', 'Student Union', 'SSB'
];

// Array of objects
var tasks = [
    { name: "Do homework", isCompleted: false },
    { name: "Do laundry", isCompleted: false },
    { name: "Do something else", isCompleted: true }
];
Let's get started with our code.
Head
In the head of the template change the title to <title>Todo App</title>
This text is what appears on the tab of the browser.
Body
In the body, add the following code
<div>
    <header>
        <h1>Todo List</h1>
    </header>

    <ul>

    </ul>
</div>
We just added a few HTML tags to our template, this is all really just structure, it doesn't pertain the actual functionality of the application.
JavaScript
We'll be creating helpers in our body template (which is the HTML in between the <body> tags).
if (Meteor.isClient) {
  // This code only runs on the client
  Template.body.helpers({
    tasks: [
        { text: "Do laundry" },
        { text: "Do homework" },
        { text: "Attend HackUTD workshop" }
    ]
  });
}
Helpers
Helpers let you make values available to your templates. Now that we've defined a tasks helper, we can access this value in our body template.
if (Meteor.isClient) {
  // This code only runs on the client
  Template.body.helpers({
    tasks: [
        { text: "Do laundry" },
        { text: "Do homework" },
        { text: "Attend HackUTD workshop" }
    ]
  });
}
Templating
Inside the <ul> </ul>
tags, we'll add the following snippet:
{{#each tasks}}
<li>{{text}}</li>
{{/each}}
That code uses Meteor's templating syntax, which helps you take dynamic data and display it on your HTML page. It basically means, for each item in the tasks array, that we defined earlier, print a list item with the text of each task. The the <ul> tag defines an unordered list, and the <li> tag defines a list item within it.
Now we have this!
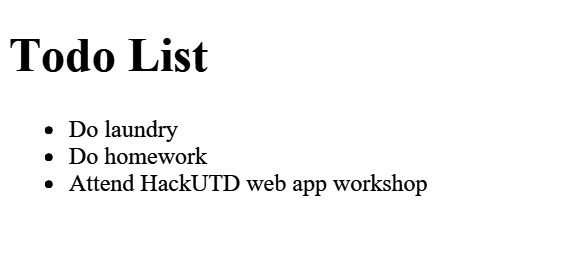
But this is obviously really ugly, so let's get some styling in.
Copy the CSS from our repository into your application's CSS file (the file with the .css extension).
We won't be going over styling, so we're just giving you the styling for this application so we can focus on code.
Refresh, and...better
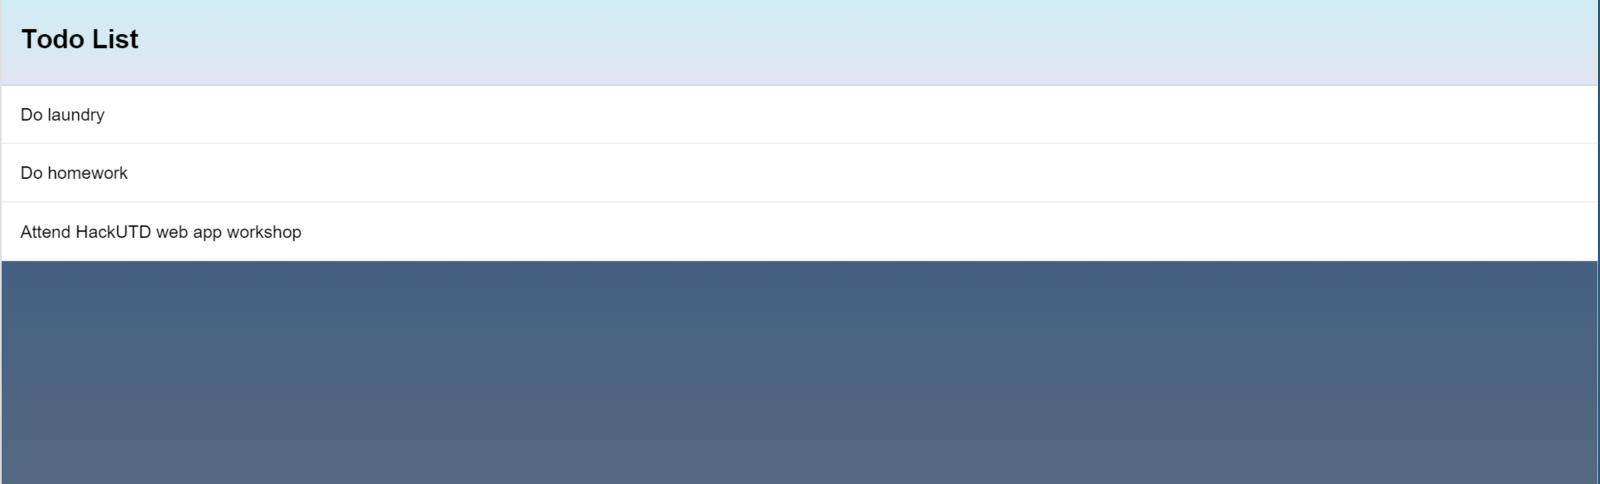
Let's make this a little better by adding the "container" CSS class to our <div> element. This CSS class is defined in the CSS we copied. It basically adds some spacing to make our content better formatted.
Warning! A CSS class is not a class as in object-oriented programming. A CSS class is a style that can be applied to any HTML element.
// In CSS file

.blue {
    color: blue;
}

// In HTML

<p class="blue">Something</p>
<div class="container">
<header>
<h1>Todo List</h1>
</header>
<ul>
{{#each tasks}}
<li>{{text}}</li>
{{/each}}
</ul>
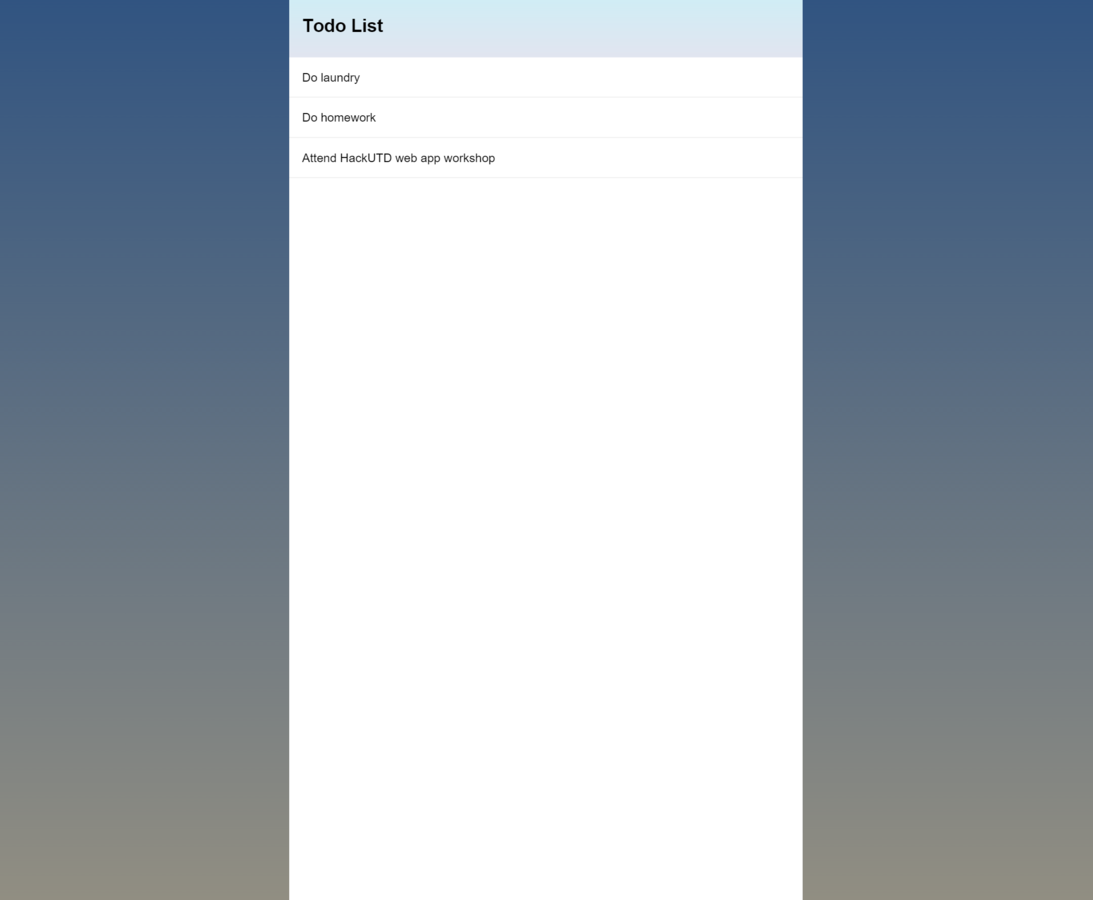
</div>Much better
Let's create a template
        <ul>
            {{#each tasks}}
                {{> task}}
            {{/each}}
        </ul>
    </div>
</body>

<template name="task">
    <li>{{text}}</li>
</template>
By structuring each task as a template, now each task can have it's own events and helpers, so our code can be much more organized and clean.
We now have a very basic app that displays a bunch of tasks from a hardcoded array of tasks. We obviously want users to be able to create and manipulate tasks.
Database
We'll be creating a database collection which stores a single type of data.
The Mongo.Collection constructor takes a parameter of the name of the collection, so we'll call our collection tasks.
We'll make the collection available to our app by saving it in a variable Tasks.
// At the top of your JavaScript file
var Tasks = new Mongo.Collection("tasks");
Database
Now that we have a database collection that will be storing our tasks, let's replace our earlier hardcoded array. Now we'll return Tasks.find({}) which means that it will return all of the tasks found in the database.
if (Meteor.isClient) {
  // This code only runs on the client
  Template.body.helpers({
    tasks: function () {
      return Tasks.find({});
    }
  });
}
Refresh your app in your browser, and your task list will be empty.
We've started pulling data from a database, but our database is empty.
Form
We're going to add a little form for users to be able to add new tasks. We'll then take these tasks and add them to our database.
<header>
  <h1>Todo List</h1>

  <form class="new-task">
    <input type="text" name="text" placeholder="Type to add new tasks" />
  </form>
</header>
We've added an text input HTML element, so that users can input new tasks.
Try to type in the box and hit enter, and the page will just refresh and do nothing. This is because we haven't told our app what to do when a user types something in that box and hits enter.
Events
Events basically respond to user interaction with your application. At the most basic level, you're saying, when the user does this, execute this code.
So we'll be using events to add a task to our database whenever a user types something into the box and hits enter.
So how do you specify in your code what HTML element you're listening to?
CSS Selectors
.new-task or #my-form //you can use eitherCSS Selectors allow you to find or refer to HTML elements. If you want to find an element by one of it's CSS classes, you prefix with a '.' (dot) and if you want to find an element by it's id, you prefix with a '#' (hash).
// Example

<form id="my-form" class="new-task">
    <input id="textbox" type="text" name="text" placeholder="Type to add new tasks" />
</form>#textboxCSS Selectors
Just a note, an HTML element can have multiple classes, like so:
<form id="my-form" class="new-task task-form">
    <input id="textbox" type="text" name="text" placeholder="Type to add new tasks" />
</form>
And multiple HTML elements can have the same class name(s).
Id's on the other hand are supposed to be unique.
Code
// On the client, inside the if(Meteor.isClient) statement

Template.body.events({
    "submit .new-task": function (event) {
      // Prevent default browser form submit
      event.preventDefault();

      // Get value from the input text box
      var text = event.target.text.value;

      // Insert a task into the database collection
      Tasks.insert({
        text: text,
        createdAt: new Date() // new Date() returns the current time
      });

      // Clear the input box
      event.target.text.value = "";
    }
  });
Code
"submit .new-task"This little bit of code is what actually defines what event we're listening for. Basically we are listening for a submit event on an element with the "new-task" CSS class.
// If you recall our form had the new-text class

<form class="new-task">
    <input type="text" name="text" placeholder="Type to add new tasks" />
</form>
Go ahead and try to create some tasks.
You'll notice they appear from oldest to newest, which we probably don't want.
Sorting Data
Our current database request looks like this:
We can easily edit this request so that the database returns an array of tasks sorted the way we want.
return Task.find({})return Tasks.find({}, {sort: {createdAt: -1}});Task
Let's add a checkbox to our task so we can mark it as completed.
<template name="task">
    <li>
        <input type="checkbox" checked="{{checked}}" class="toggle-checked" />

        <span class="text">{{text}}</span>
    </li>
</template>
Open your browser and you'll see that none of the new UI elements do anything. Again, we need to define events for these too.
Events
Notice that we're using Template.task instead of Template.body. This is because the UI elements we're working with are in the task template and not the body template.
this refers to the task object that was acted upon.
// In if(Meteor.isClient) statement

 Template.task.events({
    "click .toggle-checked": function (event) {
      // Set the checked property to the opposite of its current value
      Tasks.update(this._id, {
        $set: {checked: ! this.checked}
      });
    }
  });
Our App
Let's add a little advanced templateing to our HTML. The code to the right adds the "checked" CSS class to the element when the checked property of the task is true.
The "checked" CSS class is defined in the CSS you copied and it basically adds a strike-through the text.
<li class="{{#if checked}}checked{{/if}}">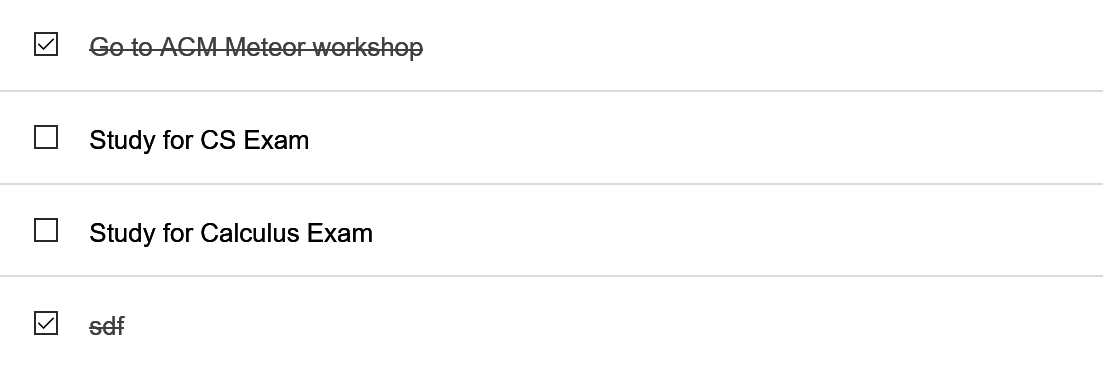
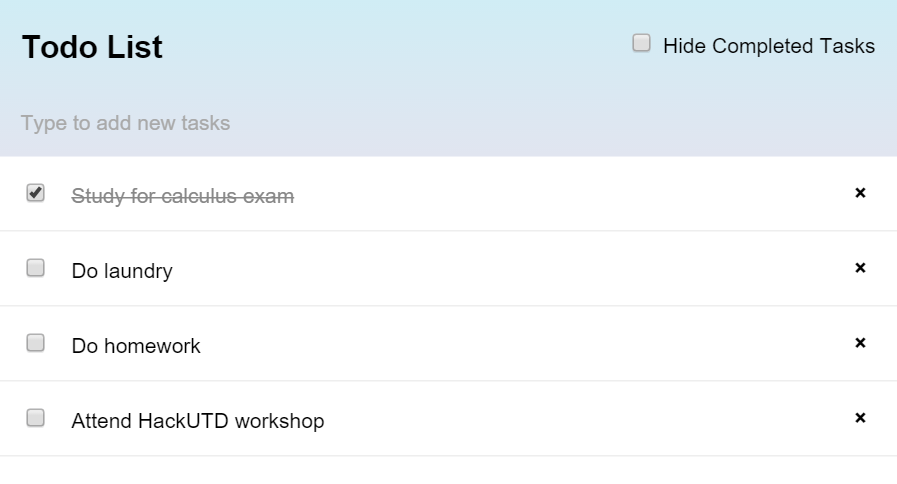
Let's add a feature to hide completed tasks
To do this, we need a place to store temporary state of our application, in this case a boolean value of whether to show completed tasks or not
Template.body.helpers({
    tasks: function () {
        return Tasks.find({}, {sort: {createdAt: -1}});
    },
    hideCompleted: function () {
      return Session.get("hideCompleted");
    }
});
Let's add a helper that returns the value of the hideCompleted session variable.
Session
The session object in Meteor allows you to set certain values to manage temporary UI state.
// Setting a value
Session.set("hideCompleted", true);

// Getting a value
var hideCompleted = Session.get("hideCompleted");
To allow users to hide completed tasks, we need to first create a checkbox for them to do so.
<header>
    <h1>Todo List</h1>

    <label class="hide-completed">
        <input type="checkbox" checked="{{hideCompleted}}" />
        Hide Completed Tasks
    </label>

    <form class="new-task">
        <input type="text" name="text" placeholder="Type to add new tasks" />
    </form>
</header>
Notice the checked="{{hideCompleted}}" code. This binds or links the value of the hideCompleted helper (which we haven't defined yet), to whether the checkbox is checked or not. If the value is true, the checkbox is checked, if it's false, it isn't checked.
Now we create the event
      // Clear form
      event.target.text.value = "";
    },
    "change .hide-completed input": function (event) {
      Session.set("hideCompleted", event.target.checked);
    }
  });
Go to your browser and try to check and uncheck the box, notice nothing changes.
The value of the hideCompleted session variable is being changed properly, but we aren't doing anything with that value.
In our tasks helper, we need to only return tasks that haven't been completed when hideCompleted is true, or return all tasks when it is false.
Template.body.helpers({
    tasks: function () {
      if (Session.get("hideCompleted")) {
        // If hide completed is checked, filter tasks
        return Tasks.find({checked: {$ne: true}}, {sort: {createdAt: -1}});
      } else {
        // Otherwise, return all of the tasks
        return Tasks.find({}, {sort: {createdAt: -1}});
      }
    },
    hideCompleted: function () {
      return Session.get("hideCompleted");
    }
});
This statement only returns tasks where the checked property is not equal to true, hence $ne: true.
There are many query parameters like this. $gt is greater than, $lt is less than.
return Tasks.find({checked: {$ne: true}}, {sort: {createdAt: -1}});It works!
Deploy
Right now your application only exists locally on your computer, let's get it on the web.
Go back to your command-line environment, make sure you're in your project folder and type:
meteor deploy myapp.meteor.comYou may be asked for your Meteor username and password that you created before. Enter your credentials.
When you enter your password, note that you won't see anything being written.