JavaScript
cloud.li


講師介紹 — 語雲
- 不是雨雲
- 北資學術
- DC @cloud
- 可以問我數學(但我可能不會ww
Index
基礎語法

javascript 簡介
讓網頁動起來的魔法
Javascript是什麼?
程式語言
JavaScript 簡稱 JS
和 HTML 、 CSS 不同
JS 是一個程式語言

java
除了名字都有 Java 以外
它們有其他相同的地方嗎?

它們的關係就像狗和熱狗
只有名字有關係
動態
回應用戶操作
(滑鼠點擊、鍵盤輸入等)
讓網頁具有互動性
前端開發不可或缺的一部分

為什麼叫 Javascript ?
Java 和 JavaScript 皆在 1995 年面世
JavaScript 的命名
Mocha ➡ LiveScript ➡ JavaScript
最後改名是出於商業考量,為了搭上當時 Java 的熱潮,結果後來讓許多人搞混。
by wikipedia
歷史
1995

布蘭登·艾克 Brendan Eich
製作時間:
10 天(好扯)
1998
ES2
?
ES4
1999
ES3
1995
誕生
布蘭登·艾克
Brendan Eich
1997
ECMAScript (ES1)

2009
ES5
歷史
strict mode
Array / Object
getter / setter
被放棄ㄌ
2015
ES6 (ES2015)
let / const
Arrow Function
class
Promise
Template Literals
Default Parameters
Destructuring
Import / Export
標準化規範
2018
ES2018
2020
ES2020
2019
ES2019
2016
ES2016
2017
ES2017
2021
ES2021
2022
ES2022
歷史
指數運算符 **
Array.includes()
async / await
Object 相關
2015
ES2015 (ES6)
let / const
Arrow Function
class
Promise
Template Literals
Default Parameters
Destructuring
Import / Export
- 快
- 簡單
- 熱門(資源多)
- 相容性佳
優點
Javascript
- 安全性較低
- 瀏覽器兼容性問題
- 靈活的語法(?)
缺點
↳ 容易出錯
安裝
Node.js
Node.js 讓我們可以直接在本機或伺服器上執行 JavaScript
在 Node.js 出現之前
JavaScript 只能在瀏覽器內執行,無法在伺服器端運作
所以若前端開發者想要開發後端,必須另外學習一門不同的程式語言
前後端整合:
只用 JavaScript 就能開發整個應用程式,從前端到後端,減少學習成本
非同步與高效能:
Node.js 是非同步運行,代表它不會等待一個操作完成再繼續下一步,能同時處理多個請求
大量第三方模組:
Node.js 有一個強大的模組庫,npm(Node Package Manager),有數十萬的模組可以使用
Node.js
Node.js 怎麼用?
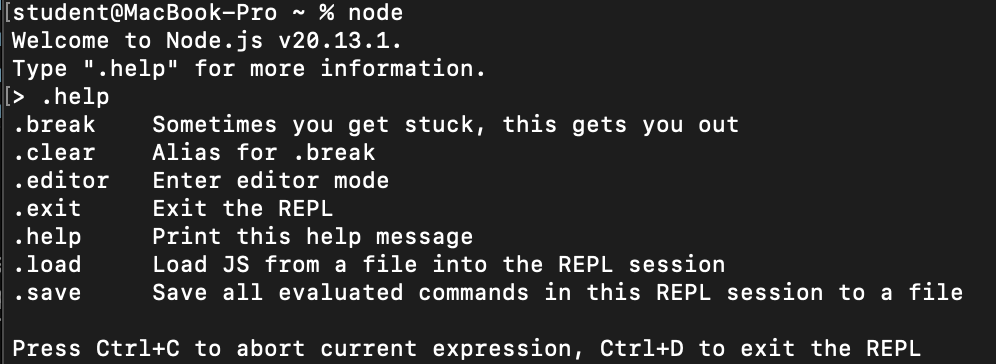
在終端機打 node
VS Code
一個文字編輯器
你們應該下載過
Onecompiler
(我隨便找的)一個線上編譯器
基礎語法
學程式的第一步
Hello, World!
學程式的第一步
alert("hello, world");雖然你們可能不知道自己在打什麼
沒關係,之後會教
引入 JS

用這個
利用元素的「事件屬性」
在屬性值中撰寫 JS 或呼叫 Function (函式)
事件:瀏覽器顯示網頁、使用者對 HTML 元素做的動作等等
行內
<!DOCTYPE html>
<html lang="zh-Hant-TW">
<head>
    <meta charset="UTF-8">
    <title>行內 JS</title>
</head>
<body>
    <button onclick="alert('嗨')">點我</button>
</body>
</html>在 head 或 body 中使用 <script></script> 標籤包住 JS
內部嵌入
<!DOCTYPE html>
<html lang="zh-Hant-TW">
<head>
    <meta charset="UTF-8">
    <title>內部嵌入 JS</title>
    <script>
        // 在這裡寫 JS 程式碼
    </script>
</head>
<body>
    <script>
        // 或這裡
    </script>
</body>
</html>
將 JS 檔連結至 HTML 檔
- 建立 .js 檔
- 在 HTML 的
<script>中連結 .js 檔
外部引入
<!DOCTYPE html>
<html lang="zh-Hant-TW">
<head>
    <meta charset="UTF-8">
    <title>外部引入 JS</title>
    <script type="text/javascript" src="檔案位置.js"></script>
</head>
<body>
    <script type="text/javascript" src="檔案位置.js"></script>
</body>
</html>
src (source):根源、來源,用於 img、script、iframe
href (Hypertext Reference):超文本引用,用於 a、link
CSS 放在 head :
瀏覽器在顯示頁面時會先載入樣式,確保網頁一開始顯示的就是正確的排版
若 CSS 放在其他位置或在 HTML 加載完才載入,會造成「樣式閃爍」
JavaScript 放在 body 底部:
如果在網頁載入一開始就執行 JS,會卡住 HTML 的解析,影響網頁內容顯示速度
將 JS 放在 <body> 底部,先呈現 HTML 內容,所有內容載入完後才開始執行 JS
頁面就不會因 JS 加載而延遲顯示
<script> 放在底部比較好?
<!DOCTYPE html>
<html lang="zh-Hant-TW">
<head>
    <meta charset="UTF-8">
    <title>引入</title>
    <link rel="stylesheet" type="text/css" href="style.css">
</head>
<body>
    // 網頁內容
    <script type="text/javascript" src="script.js"></script>
</body>
</html>
console.log() 是 JavaScript 中常用的除錯工具
可以將訊息或變數的值輸出到瀏覽器的開發者控制台(Console)
幫助我們檢查程式碼的執行狀況、變數的值以及函式的返回結果,好用
-
參數:
console.log()可接受多個參數,你可以輸出單一值、複數值甚至是字串和變數的組合 - 輸出位置:通常會顯示在瀏覽器的開發者工具(F12)裡的 Console
console.log()
console.log("要輸出的內容");Mac: fn+F12
寫註解可以:
- 增加可讀性:讓其他人看得懂
- 測試與除錯:可以暫時註解掉部分程式碼來觀察運行結果
- 寫給未來的自己
註解中的內容不會被執行,不影響程式功能
註解
// 這是單行註解
console.log(123);  // 適合在程式碼的結尾簡短說明

/*
這是多行註解
適合寫較長的解釋或一次註解多行程式碼
*/
變數是一種用來儲存資料的容器
可以儲存各種資料型別的值,並且能在程式中重複使用
變數
JS 可以使用 var、let、const 來宣告變數
不同的宣告方式會影響變數的作用範圍和是否可重新賦值
// JS 的變數宣告
var a = 1;
let b = 2;
const c = 3;
作用域
全域
變數有效範圍是全部
宣告後哪裡都能用
函式作用域
變數有效範圍在
function 內
離開函式就不能用了
區塊作用域
變數有效範圍在
用 { } 包起來的區域內
離開此區域後就不能用了
區域
var
-
不要用,但會看到所以還是要知道它是什麼
-
JS 中最早的變數宣告方式
-
可重新賦值
-
最小有效範圍:函式作用域
變數的宣告
// function 內宣告
function hello() {
  var inFunction = "我不能輸出:(";
}
console.log(inFunction);
// ReferenceError: inFunction is not defined

// 區塊內宣告
{
  var inBlock = "早安";
}
console.log(inBlock);
// 早安
變數的宣告
// function 內宣告
function hello() {
  let inFunction = "你看不到我";
}
console.log(inFunction);
// ReferenceError: inFunction is not defined

// 區塊內宣告
{
  let inBlock = "也看不到我";
}
console.log(inBlock);
// ReferenceError: inBlock is not defined
let
-
ES2015(ES6)
-
同區塊不可重複宣告變數、可重新賦值
-
最小有效範圍:區塊作用域
const
-
ES2015(ES6)
-
同區塊不可重複宣告變數、不可重新賦值(常數 Constant)
-
最小有效範圍:區塊作用域(同
let) -
宣告必須賦值,用於不希望被更動的值
變數的宣告
// const
function circle() {
  const PI = 3.14159;
  console.log(PI);
  // 3.14159
  PI = 3;
  // TypeError: Assignment to constant variable.
}

circle();
console.log(PI);
// ReferenceError: PI is not defined
註:雖然 const 宣告的變數不能重新賦值,但如果它是物件或陣列,則可以修改其內部的屬性或元素
- 必須使用字母、
_、$作為開頭 - 名稱可包含數字(
0-9) -
'A'~'Z'和'a'~'z'皆可使用且不相等(例:Name≠name) - 不能使用保留字
變數命名規範
let userName = "Cloud";   // 正確,使用字母開頭
let $count = 0;           // 正確,使用 $ 符號開頭
let _id = "abc123";       // 正確,使用 _ 符號開頭

let 1stUser = "Cloud";    // 錯誤,不能以數字開頭
let user age = 17;        // 錯誤,不能包含空格
let class = "English";    // 錯誤,保留字不能當變數名稱
let total-score = 60; // 錯誤,破折號不能用於變數名稱一個好的變數名可以幫助我們理解程式碼
- 一眼可看出變數用途(英文不好可以用 這個 )
- 避免縮寫、單字母命名(除了常見數學符號,例如
i、j) - 駝峰式命名 — 除了第一個單字,每個單字的首字母大寫
- 全域常數 — 全大寫、底線分隔
一個好的變數名稱
// 不清楚的變數命名
let a = 55;
let b = 5;
let c = a + b;

console.log(c);
// 60,但這啥
// 清楚的變數命名
let score = 55; // 期中考分數
let extraPoints = 5; // 加分
let finalScore = score + extraPoints;
console.log(finalScore);
// 60,清楚表示這是總分,謝謝老師加分⮕
const PI = 3.14159;
const EULER_NUMBER = 2.71828;
let neverGonnaGiveYouUp = "Rickroll";這我
never gonna give you up ⭢
資料型態
基本型別
不可變動(Immutable)
物件型別
可變的(Mutable)
資料型態
基本型別
- 數字(Number)
表示整數或小數,例如 2147483648 或 3.1415926535
特殊數字值包含 Infinity(無限大)、-Infinity(負無限大)
還有『不是數字』 NaN(Not-a-Number)
資料型態
let a = 123;
let b = 1.23;

// 想知道變數的資料型態嗎?
// 你可以使用 typeof
console.log(typeof a);   // number
console.log(typeof b);   // number

console.log(typeof NaN); // number

console.log(1/+0);       // Infinity
console.log(1/-0);       // -Infinity
console.log(0/0); // NaN- 數字(Number)的整數安全範圍
資料型態
console.log(Number.MAX_SAFE_INTEGER); // 9007199254740991
console.log(Number.MIN_SAFE_INTEGER); // -9007199254740991
如果要計算更大的數字怎麼辦?
- 大整數(BigInt)
只能存放整數,要在數字後加 n
可表示任意大小的整數,取決於你有多少記憶體能用
不可以和 Number 混在一起運算
資料型態
let useBigInt = 1234567890123456789012345678901234567890n;
let useNumber = 1234567890123456789012345678901234567890;

console.log(useBigInt);
// 1234567890123456789012345678901234567890n
console.log(useNumber);
// 1.2345678901234568e+39

console.log(useBigInt % 100);
// TypeError: Cannot mix BigInt and other types, use explicit conversions
console.log(useBigInt % 100n);
// 90n
console.log(useNumber % 100);
// 20- 字串(String)
表示一段文字資料,用單引號、雙引號或反引號包起來
例如:'Hello'、"World"、`Hello World`
資料型態
let sentence0 = "She said, "Hello!"";
// SyntaxError: Unexpected identifier 'Hello'

// 我們可以用跳脫符號 \
let sentence1 = "She said, \"Hello!\"";
// 或換種引號:D
let sentence2 = 'She said, "Hello!"';

let sentence3 = "如果你想多打幾行字
這樣會報錯";
// SyntaxError: Invalid or unexpected token

let sentence4 = `用反引號!
就可以換行了`;- 模板字串 反引號還有很多有趣的用法
資料型態
// 字串插值
let product = "心";
let price = 100000000;

console.log(`您購買的商品是${product},價格為 ${price} 元`);
// 您購買的商品是心,價格為 100000000 元


// 嵌入表達式
let a = 1, b = 1;

console.log(`${a} + ${b} = ${a + b}`);
// 1 + 1 = 2


// 嵌套模板字串
let name = "我也不知道是誰";
let message = `${name}回覆了你的限時動態`;

console.log(`新訊息: "${message}"`);
// 新訊息: "我也不知道是誰回覆了你的限時動態"- 布林值(Boolean)
一種表示「真」或「假」的資料型態
只有兩個可能的值:true 和 false
布林值在條件判斷、控制流程、以及邏輯運算中很重要
因為它們能讓程式根據情況做出不同的反應
資料型態


- 未定義(Undefined)
當變數宣告後未賦值時,默認值為 undefined
表示變數已宣告,但還沒有被初始化
- 空值(Null)
表示「空」或「無值」,通常用來明確表示變數沒有值
是開發者刻意賦予的「空值」
資料型態
let notAssigned;           // 變數宣告但未賦值
console.log(notAssigned);  // undefined

let empty = null;          // 明確將變數設為 null
console.log(empty); // null- 符號(Symbol)
建立獨一無二的值
資料型態
console.log(Symbol() === Symbol());  // false
// 每次生成的 Symbol 都是唯一的

// 用法:Symbol('描述')
let user1 = Symbol('家豪');
let user2 = Symbol('家豪');

console.log(user1);			   // Symbol(家豪)
console.log(user2); 		   // Symbol(家豪)
console.log(user1 === user2);  // false,即使描述相同 Symbol 還是不同
資料型態
物件型別
- 物件 (Object) 是一種包含屬性和方法的集合
- 每個屬性由一個鍵值對組成:
- 鍵 (Key):通常是字串,也可以是 Symbol
- 值 (Value):任何型別,包括數字、字串、布林值、函式,或者其他物件
什麼是物件?

const phoneBook = {
  小明: "0928440308",
  小美: "0919680246",
  張三: "0982727329",
  李四: "0968802962"
};
資料型態
let person = {
  name: 'Alice',
  age: 25,
  greet: function () {
    console.log('Hello!');
  }
};

console.log(person.name); // Alice
person.greet();           // Hello!
let object = {
key1: value1,
key2: value2
};資料型態
let person = new Object();
person.name = 'Alice';
person.age = 25;
person.greet = function () {
  console.log('Hello!');
};

console.log(person.name); // Alice
person.greet();           // Hello!
let object = new Object();
object.key1 = value1;
object.key2 = value2;資料型態
function Person(name = 'Unknown', age = 0) {
  this.name = name;
  this.age = age;
  this.greet = function () {
    console.log('Hello, my name is ' + this.name);
  };
}

let alice = new Person('Alice', 25);
alice.greet(); // Hello, my name is Alice
建構函式
資料型態
let parent = { greeting: 'Hello' };
let child = Object.create(parent);

console.log(child.greeting); // Hello
繼承
資料型態
// 訪問屬性
console.log(person.name); // Alice
console.log(person['name']); // Alice

// 新增&更新屬性
person.job = 'Engineer';
person.age = 26;

// 刪除屬性
delete person.age;
console.log(person.age); // undefined

// 屬性存在?
console.log('name' in person); // true

// 迭代屬性
for (let key in person) {
  console.log(key + ': ' + person[key]);
}- 陣列(Array)
可以儲存不同型別的有序資料集合
資料型態
// 宣告陣列
// 陣列字面值(Array literals)
let num1 = ['壹', '貳', '參'];
// new Array(),功能與上面的相同
let num2 = new Array('壹', '貳', '參');

console.log(num1);  // [ '壹', '貳', '參' ]
console.log(num2);  // [ '壹', '貳', '參' ]

// 也可以宣告空陣列
let emptyArray = [];

console.log(emptyArray); // []- 陣列(Array)
資料型態
// 操作陣列
let num = [1, 2, 3];

// 訪問元素
console.log(num[2]);     // 3

// 修改元素
num[2] = 2;			     // [ 1, 2, 2 ]

// 新增元素
num.push("3");		     // [ 1, 2, 2, '3' ]
num.unshift(false);	  	 // [ false, 1, 2, 2, '3' ]
num[5] = 5;			  	 // [ false, 1, 2, 2, '3', 5 ]

// 刪除元素
num.pop();			     // [ false, 1, 2, 2, '3' ]
num.shift();		     // [ 1, 2, 2, '3' ]
delete num[1];		 	 // [ 1, <1 empty item>, 2, '3' ],不常用,會留下空槽

// 查看陣列長度
console.log(num.length); // 4- 陣列(Array)
資料型態
let num = [1, 5, 3, 7, 5];

// 搜尋元素
console.log(num.indexOf(5));      // 1
console.log(num.includes(3));     // true
console.log(num.includes(2));	  // false

// 複製&切割
let subArray = num.slice(1, 3);   // [ 5, 3 ]

// 新增&刪除
num.splice(3, 2, 3); 			  // 從索引 3 刪除 2 個元素,並插入 3
console.log(num);				  // [ 1, 5, 3, 3 ]

// 排序
num.sort();					 	  // [ 1, 3, 3, 5 ]
num.reverse();				 	  // [ 5, 3, 3, 1 ]

// 合併
let moreNum = [10, 23, 12];
let allNum = num.concat(moreNum); // [ 5, 3, 3, 1, 10, 23, 12 ]

// 轉換(陣列轉字串)
console.log(allNum.join(', ')); // 5, 3, 3, 1, 10, 23, 12- 陣列(Array)
資料型態
let num = [0, 1, 2, 3]
console.log(typeof num); // object
一、陣列是一種特殊物件
鍵:索引
值:屬性
let matrix = [
  ['00', '01', '02'],
  ['10', '11', '12'],
  ['20', '21', '22']
];
console.log(matrix[1][2]); // 12
二、多維陣列


typeof
試試看
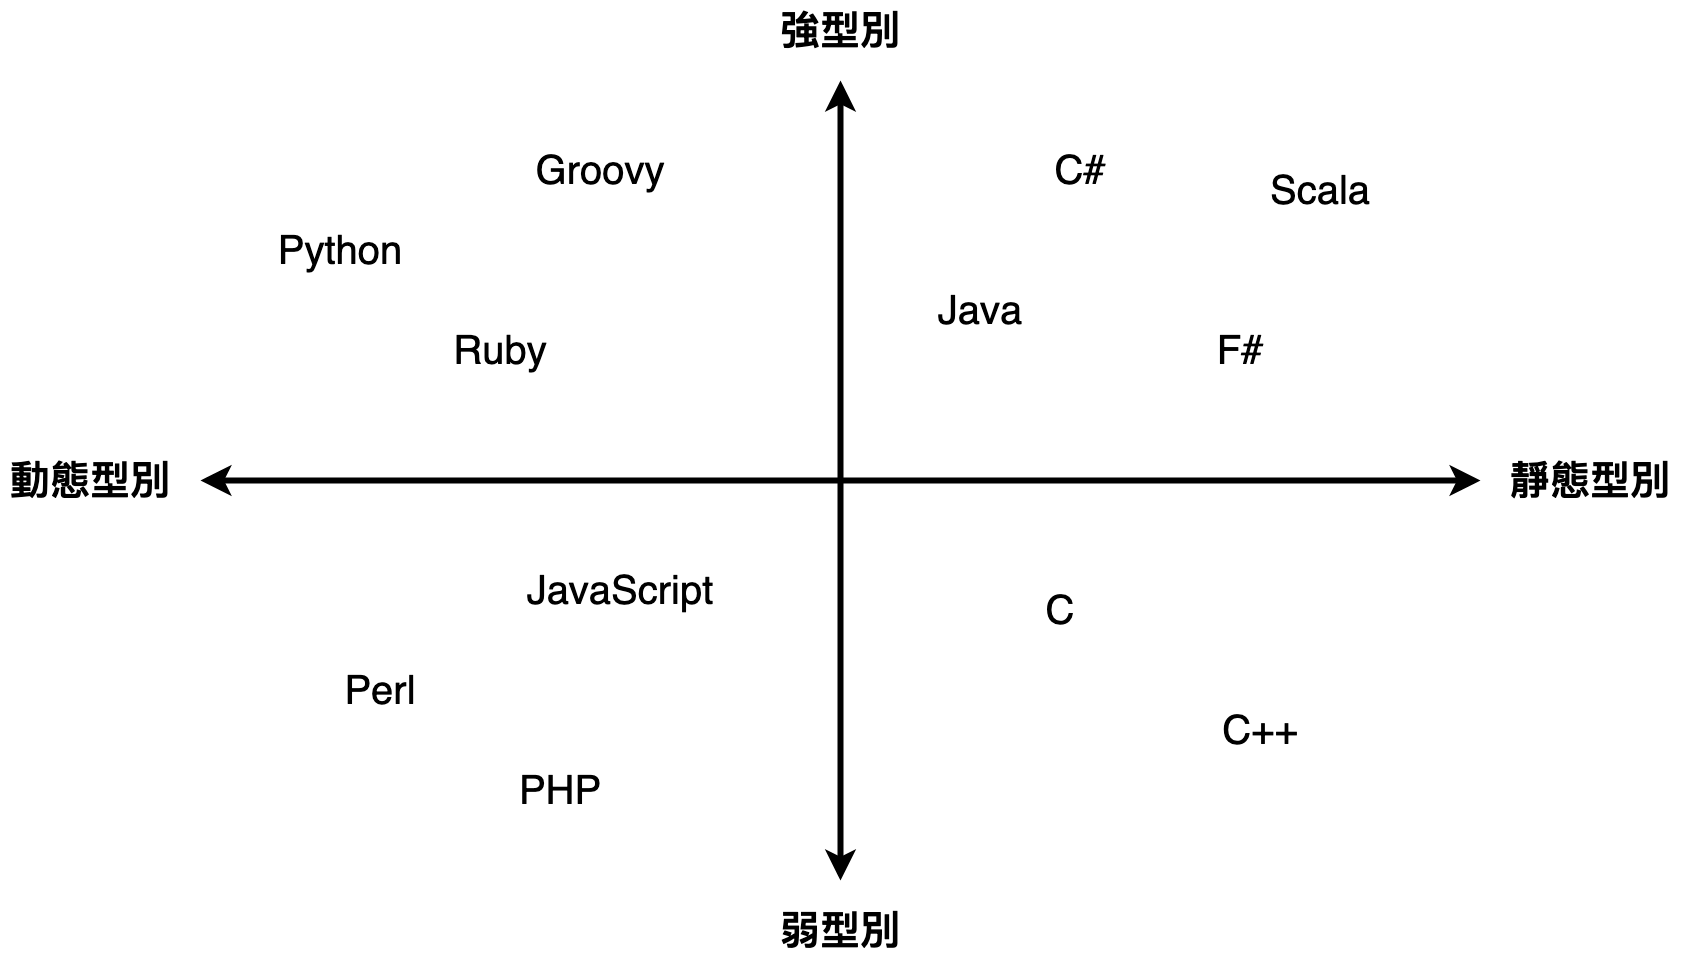
- 靜態型別 vs. 動態型別
靜態型別
定義:在編譯時期就需要指定變數的型別,型別不可隨意更改
語言:C、C++、Java
特點:程式編譯前,所有變數的型別都已確定,編譯器可檢查型別錯誤
,提升程式的執行效能與穩定性
動態型別
定義:在執行時期才會決定變數的型別,型別可隨時更改
語言:JavaScript、Python、Ruby
特點:變數可以在程式執行過程中更改型別,使程式更加靈活,
但較容易出現因型別變化而導致的錯誤
型別
- 強型別 vs. 弱型別
強型別
定義:型別嚴格,不允許隱式轉換或任意混合使用不同型別的資料
語言:Python、Java
特點:強型別語言會在執行過程中嚴格檢查型別,相容性不高
例如,數字和字串不會自動轉換,需要顯式轉型
弱型別
定義:型別鬆散,允許隱式轉換,可混合不同型別的資料
語言:JavaScript、PHP
特點:弱型別語言會自動執行型別轉換,不同型別之間的運算更加簡便
,但也可能導致意外的轉換和錯誤
型別
- 如何區分
靜態/動態型別 是看 變數的型別決定時機
在 編譯時期(靜態)或 執行時期(動態)
強/弱型別 是看 型別規則的嚴格程度
不允許隱式轉換(強)或 允許隱式轉換(弱)
型別
let num = 10;                   // 初始為數字
num = "Hello";                  // 動態型別語言允許改成字串
console.log(num + 5);           // Hello5,弱型別語言允許數字和字串運算
console.log(typeof (num + 5));  // string

/*
JavaScript 是『動態型別』語言,所以 num 可以從數字變成字串;
           是『弱型別』語言,所以數字與字串相加會進行隱式轉換。
*/
型別
算術運算子
基本數學運算
-
+:加法 -
-:減法 -
*:乘法 -
/:除法 -
%:取餘數 -
**:次方
運算子
let a = 10;
let b = 3;

console.log(a + b);  // 13
console.log(a - b);  // 7
console.log(a * b);  // 30
console.log(a / b);  // 3.33333333333333
console.log(a % b);  // 1
console.log(a ** b); // 1000非數字型態(例如字串和布林值)的算數(?)
不是數字
+:數字相加、拼接字串、自動轉換布林值
(例如 true 變成 1、false 變成 0)
console.log("Hello" + " world!");  // "Hello world!",字串拼接
console.log(true + 5); // 6,布林值自動轉換開一個變數儲存名字
利用字串連接
輸出 "hello name"
試試看
其他算術運算子?
試試看
不是數字
其他:如果用在字串或布林值上,JS 會嘗試將它們轉成數字
不合理的情況下會回傳 NaN
console.log("10" - 3);             // 7,字串 "10" 會轉成數字 10
console.log("hello" * 2);          // NaN,字串 "hello" 無法轉成數字
console.log(false / 2);            // 0,false 轉成 0
賦值運算子
將值指派給變數
-
=:基本賦值 -
+=:加法並賦值 -
-=:減法並賦值 -
*=:乘法並賦值 -
/=:除法並賦值 -
%=:取餘並賦值
運算子
let x = 10;

x += 5; // 等價於 x = x + 5,結果為 15
x -= 3; // 等價於 x = x - 3,結果為 12
x *= 2; // 等價於 x = x * 2,結果為 24
x /= 4; // 等價於 x = x / 4,結果為 6
x %= 5; // 等價於 x = x % 5,結果為 1
比較運算子
比較兩個值,通常會回傳布林值 (true 或 false)
-
==:相等(只比較值) -
===:全等(比較值和型別) -
!=:不相等 -
!==:不全等 -
>:大於 -
<:小於 -
>=:大於等於 -
<=:小於等於
運算子
let y = 5;
console.log(y == "5");  // true
console.log(y === "5"); // false
console.log(y != 3);    // true
console.log(y !== "5"); // true
console.log(y > 3);     // true
console.log(y <= 5);    // true
邏輯運算子
布林值的邏輯運算
-
&&:邏輯「AND」 -
||:邏輯「OR」 -
!:邏輯「NOT」
運算子
// && (AND):兩邊都為 true,結果才為 true
console.log(true && false);  // false
console.log(true && true);   // true

// || (OR):只要一邊為 true,結果就是 true
console.log(true || false);  // true
console.log(false || false); // false

// ! (NOT):反轉布林值
console.log(!true);  		 // false
console.log(!false);  		 // true
可以被轉換為 false 的運算式是 null、0、NaN、空字串(""),或 undefined
運算子
console.log(!!false);       // false,假
console.log(!!undefined);   // false,未定義
console.log(!!null);        // false,空值
console.log(!!"");          // false,空字串
console.log(!!NaN);         // false,不是數字
console.log(!!0);           // false,(正)零
console.log(!!-0);          // false,負零

console.log(!!true);        // true,真
console.log(!!'hi');        // true,字串 hi
console.log(!!1);           // true,一
console.log(!![]);          // true,空陣列
console.log(!![0]);         // true,有一個零的陣列
console.log(!![1]);         // true,有一個一的陣列
關於 JS
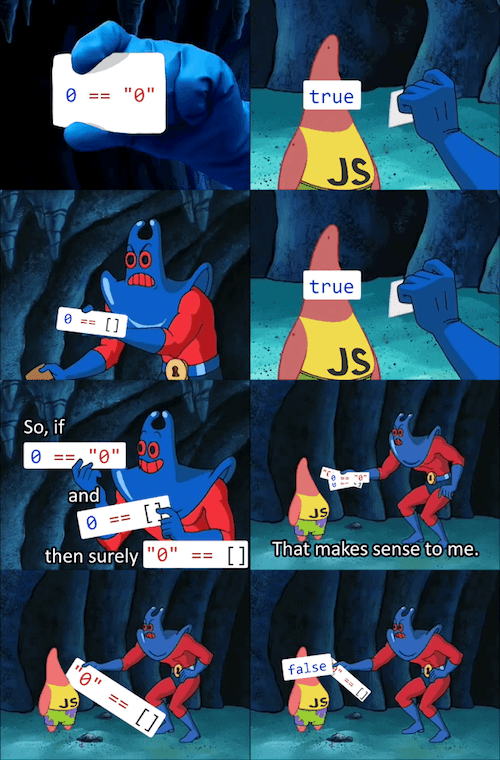
console.log(0 == "0");  // true
console.log(0 == []);   // true
console.log("0" == []); // false

console.log(!!0);       // false
console.log(!!"0");     // true
console.log(!![]);      // true
關於 JS

console.log(null > 0);     // false
console.log(null == 0);    // false
console.log(null === 0);   // false
console.log(null >= 0);    // ture
console.log(Number(null)); // 0

所以...發生什麼事?
顯式轉換
資料型態轉換
// 使用 String() 函數
let num = 123;
let str1 = String(num); // "123"

// 使用 .toString() 方法
let str2 = num.toString(); // "123"

// 轉換布林值
let bool = true;
console.log(String(bool)); // "true"

// 使用 Number() 函數
let str = "123";
let num1 = Number(str); // 123

// 使用 parseInt() 或 parseFloat()
let num2 = parseInt("123px"); // 123(忽略非數字部分)
let num3 = parseFloat("3.14"); // 3.14(保留小數部分)

// 布林值轉數字
console.log(Number(true));  // 1
console.log(Number(false)); // 0

// 使用 Boolean() 函數
console.log(Boolean(1));       // true
console.log(Boolean(0));       // false
console.log(Boolean("Hello")); // true
console.log(Boolean(""));      // false
console.log(Boolean(null));    // false
隱式轉換
-
-×÷- 非
Number⭢Number
- 非
-
+-
String+ ?,? ⭢String -
Number+ 基本型別,基本型別 ⭢Number -
Number+ 其他,Number、其他 ⭢String
-
資料型態轉換
10 + '10'	// '1010'
10 + null	// 10
10 + true	// 11
10 + {}		// '10[object Object]'
1 - true
// 1 - 1 = 0,true ⭢ 1
1 - null
// 1 - 0 = 1,null ⭢ 0
1 * undefined
// 1 * NaN = NaN,undefined ⭢ NaN
2 * ['5']
// 2 * 5 = 10,['5'] ⭢ '5' ⭢ 5隱式轉換(Boolean)
-
null/undefined/''/NaN/0/false⭢false -
==-
NaN == ?,false -
Boolean == ?,Boolean⭢Number -
Number == String,String⭢Number null == undefined,truenull == ?或undefined == ?,false- 其他:
ToPrimitive
-
資料型態轉換
bit 位元(又稱二進制位)
指二進制中的一位
是電腦儲存資料的最小單位
bit 是 binary digit(二進制數位)的混成詞
每個位元有兩種狀態:0、1
1 byte(位元組)= 8 bit
位元
| 0 | 1 | 0 | 0 | 1 | 0 | 1 | 0 | 0 | 0 |
| 0 | 1 | 0 | 0 | 1 | 1 |
1 bit
1 byte
十進位轉二進位
113
01110001
113 ÷ 2 = 56 ... 1
56 ÷ 2 = 28 ... 0
28 ÷ 2 = 14 ... 0
14 ÷ 2 = 7 ... 0
7 ÷ 2 = 3 ... 1
3 ÷ 2 = 1 ... 1
1 ÷ 2 = 0 ... 1
0 ÷ 2 = 0 ... 0
...
二進位轉十進位
1110001
113
1 × 2⁰ = 1
0 × 2¹ = 0
0 × 2² = 0
0 × 2³ = 0
1 × 2⁴ = 16
1 × 2⁵ = 32
1 × 2⁶ = 64
1 + 16 + 32 + 64 = 113
位元運算子
操作數值的位元(以二進位處理)
-
&:AND,兩個位元皆為1時,結果為1 -
|:OR,其中一個位元為1時,結果為1 -
^:XOR,只有一個位元為1時,結果為1 -
~:NOT,將每個位元取反 -
<<:左移,將位元向左移動指定次數,並補上0 -
>>:右移,將位元向右移動指定次數,保留符號位
運算子
運算子
let a = 5;   // 二進位表示為 0101
let b = 3;   // 二進位表示為 0011

let and = a & b;    // 0101 & 0011 = 0001,即 1
let or = a | b;     // 0101 | 0011 = 0111,即 7
let xor = a ^ b;    // 0101 ^ 0011 = 0110,即 6
let not = ~a;       // ~0101 = 1010,即 -6(第一位為符號位)
let left = a << 1;  // 0101 << 1 = 1010,即 10
let right = a >> 1; // 0101 >> 1 = 0010,即 2
運算子
let a = 5;   // 二進位表示為 0000 0101

let not = ~a;       // ~0000 0101 = 1111 1010,即 -6(第一位為符號位)
let left = a << 1;  // 0000 0101 << 1 = 0000 1010,即 10
1111 1010 ⭢ -6 ?
補碼 — 十進位轉二進位
|-6| = 6 = 0000 0110- 求反碼 ⮕
1111 1001 - 加一得到補碼 ⮕
1111 1010
負數 — 補碼表示法
負數 — 二進位轉十進位
1111 1010求反碼 ⮕0000 0101- 加一 ⮕
0000 0110 = 6 - 加上負號 ⮕
-6
- 符號位元法
超直觀,但不方便進行加法或減法
將數字的最高位(最左側)定義為「符號位元」
其值 0 表示正數、1 表示負數
剩餘的位元儲存該數的絕對值
8-bit 可表示範圍:-127 ~ -0、+0 ~ +127
負數 — 符號位元法
| 0 | 1 | 1 | 1 | 0 | 0 | 0 | 1 |
| 1 | 1 | 1 | 1 | 0 | 0 | 0 | 1 |
= +113
= -113
- 反碼表示法
將正數的每一位都取反來表示負數
在 8 位元中, 5 的表示是 0000 0101
-5 的表示是將每一位反過來,也就是 1111 1010
優點是比符號位元法更適合計算
但依然存在問題,例如 0 有兩種表示法,0000 0000 和 1111 1111
8-bit 可表示範圍:-127 ~ -0、+0 ~ +127
負數 — 反碼表示法
| 0 | 1 | 1 | 1 | 0 | 0 | 0 | 1 |
| 1 | 0 | 0 | 0 | 1 | 1 | 1 | 0 |
= +113
= -113
| 1 | 1 | 1 | 1 | 1 | 1 | 1 | 1 |
= -0
+
=
- 補碼表示法
最常用,解決了 0 的重複表示問題,並使正負數的加減法更加方便
8-bit 可表示範圍:-128 ~ +127
負數 — 補碼表示法
| 0 | 1 | 1 | 1 | 0 | 0 | 0 | 1 |
| 1 | 0 | 0 | 0 | 1 | 1 | 1 | 1 |
= +113
= -113
| 0 | 0 | 0 | 0 | 0 | 0 | 0 | 0 |
= 0
+
=
為什麼加減法更方便?
負數 — 編碼
| 十進位值 | 符號位元法 | 反碼表示法 | 補碼表示法 |
|---|---|---|---|
+5 |
0000 0101 |
0000 0101 |
0000 0101 |
-5 |
1000 0101 |
1111 1010 |
1111 1011 |
+0 |
0000 0000 |
0000 0000 |
0000 0000 |
-0 |
1000 0000 |
1111 1111 |
假設數字儲存長度為 8 位元:
if-else
當 if 的條件成立時(true),執行 if 內的程式碼
當條件不成立(false)時,可以用 else 執行另一段程式碼
條件語句
if (條件) {
    // 當條件為 true 時執行的程式碼
}

if (條件) {
    // 當條件為 true 時執行的程式碼
}
else {
    // 當條件為 false 時執行的程式碼
}
if-else if-else
條件語句
let score = 60;
if (score >= 90) {
    console.log("A");
}
else {
    if (score >= 80) {
        console.log("B");
    }
    else {
        console.log("C");
    }
}
// C
let score = 60;
if (score >= 90) {
console.log("A");
}
else
if (score >= 80) {
console.log("B");
}
else {
console.log("C");
}
// Clet score = 60;
if (score >= 90) {
console.log("A");
}
else if (score >= 80) {
console.log("B");
}
else {
console.log("C");
}
// C⤻
⤻
- 巢狀條件
在條件語句中再嵌套另一個條件語句
範例:活動入場資格檢查
條件語句
let age = 20;
let hasParent = false;
let isVIP = true;

if (age >= 18) {  // 成年人
    console.log("可以入場");
}
else {  // 未成年人
    if (hasParent) {
        console.log("可以入場,需由家長陪同");
    }
    else {
        console.log("無法入場");
    }
}- 三元運算子
簡單版 if-else
條件語句
條件 ? 若條件為 true 的結果 : 若條件為 false 的結果;let age = 18;
let canVote = age >= 18 ? "Yes" : "No";
console.log(canVote); // Yeslet age = 18;
let canVote;
if (age >= 18) {
canVote = "Yes";
}
else {
canVote = "No";
}
console.log(canVote); // Yes=
switch
switch 語句適合用來檢查某個值是否符合多個特定情況
特別是有超級多 else if 條件的時候
用 switch 可以簡化程式碼
條件語句
switch (表達式) {
    case 值1:
        // 當表達式等於 值1 時執行的程式碼
        break;
    case 值2:
        // 當表達式等於 值2 時執行的程式碼
        break;
    ...
    default:
        // 當表達式不符合任何情況時執行的程式碼
}
不是這個
while
1. 檢查條件是否為 true
2. 若為 true,執行迴圈內的程式碼
3. 完成一次後,重複第 1 步
4. 若條件為 false,停止迴圈
迴圈
while (條件) {
    // 程式碼
}

// 無限迴圈
while (true) {
    // blablabla
}
for
1. 執行初始化
2. 檢查條件,若為 true,執行程式碼
3. 完成後,執行更新操作
4. 重複第 2 步,直到條件變為 false
迴圈
for (初始化; 條件; 更新) {
    // 迴圈內執行的程式碼
}

// 範例
for (let i = 0; i < 5; i++) {
    console.log(i); // 輸出 0, 1, 2, 3, 4
}-
while/for的差異
迴圈
| 比較 | while | for |
|---|---|---|
| 情境 | 條件未知 不定次數的迴圈 |
已知執行次數 更新邏輯明確 |
| 結構 | 簡單,僅需條件 | 包括初始化、條件和更新 結構較完整 |
| 應用 | 使用者輸入有效數字時 重複要求輸入 |
列印陣列中的每個元素 |
break
1. 直接結束迴圈
2. 跳出該迴圈,繼續執行後續程式碼
迴圈控制
break;for (let i = 0; i < 10; i++) {
if (i === 5) {
break; // 當 i 等於 5 時,停止迴圈
}
console.log(i); // 0 1 2 3 4
}continue
1. 忽略該次迴圈的後續程式碼
2. 直接進入下一次迴圈的條件檢查
迴圈控制
continue;for (let i = 0; i < 10; i++) {
if (i % 2 === 0) {
continue; // 略過偶數
}
console.log(i); // 1 3 5 7 9
}定義函式
// 函式宣告
function 函式名稱(參數1 = 預設值, 參數2, ...) {
  // 函式內的程式碼
  return 回傳值; // 選擇性
  // return 後的程式碼不會執行
}

// 函式表達式
const 函式名稱 = function(參數1, 參數2, ...) {
  // 函式內的程式碼
  return 回傳值; // 選擇性
};

// 箭頭函式
const 函式名稱 = (參數1, 參數2, ...) => {
  // 函式內的程式碼
  return 回傳值; // 選擇性
};

// 簡化版(單行程式碼)
const 函式名稱 = (參數1, 參數2) => 回傳值;
使用函式
// 呼叫函式
函式名稱(參數1, 參數2, ...);
來做個簡單的計算機吧 :D
小實作
function hello(name) {
  console.log(`hello ${name}`);
}
一個簡單的輸入方法
簡易計算機
試試看
小實作
console.log("請輸入 calculator('算式用空格分開')\n");
console.log("範例:calculator('1 + 1')");

function calculator(formula) {
    let arr = formula.split(' ');
    let num1 = Number(arr[0]);
    let operation = arr[1];
    let num2 = Number(arr[2]);
  	let result;
    switch (operation) {
        case "+":
            result = num1 + num2;
            console.log(`${num1} + ${num2} = ${result}`);
            break;
        case "-":
            result = num1 - num2;
            console.log(`${num1} - ${num2} = ${result}`);
            break;
        case "*":
            result = num1 * num2;
            console.log(`${num1} × ${num2} = ${result}`);
            break;
        case "/":
            if (num2 === 0) {
                console.log("除數不能為零");
                return;
            }
            result = num1 / num2;
            console.log(`${num1} ÷ ${num2} = ${result}`);
            break;
        default:
            console.log("???");
            return;
    }
}
事件處理
DOM
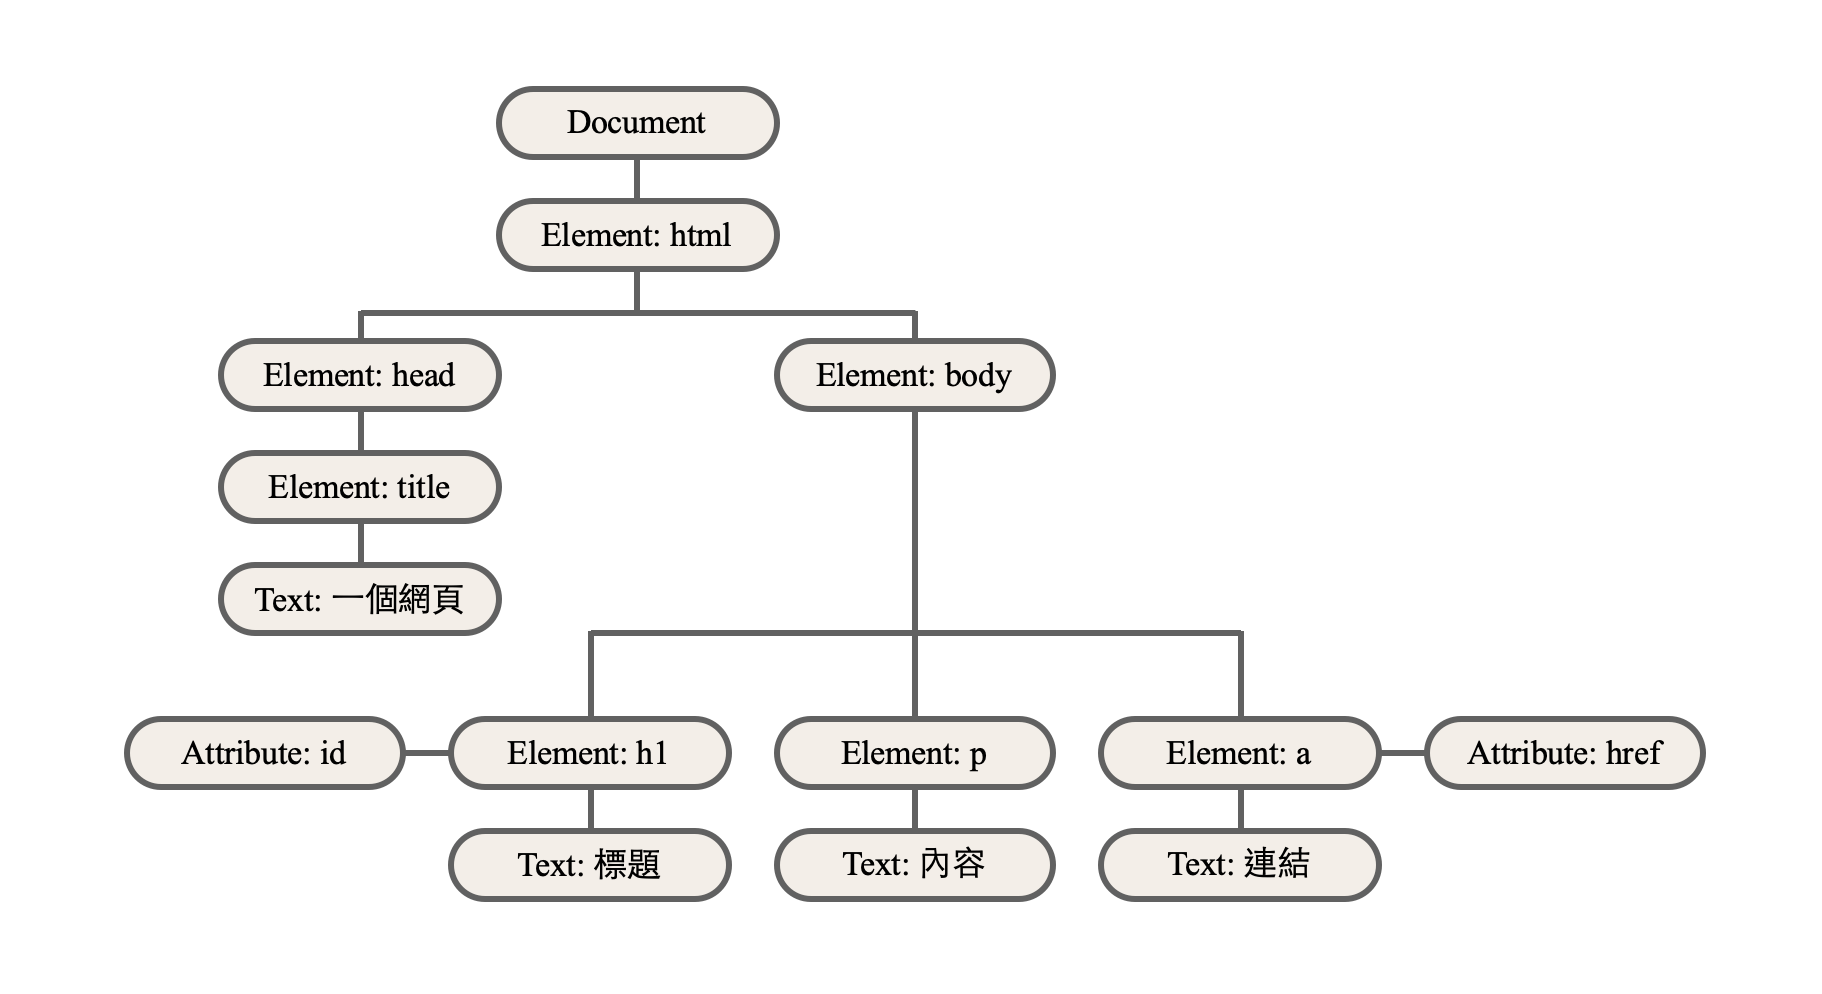
DOM
DOM (Doucument Object Model) 文件物件模型
將 HTML 文件結構化,以 Document 為起點,將文件中的各個標籤都定義成物件,最後用樹狀結構來表示的模型介面
DOM 不是 JS 的一部分,但常用於幫助 JS 操控 HTML 頁面

DOM
DOM 將 HTML 文件轉換為一棵節點樹(Node Tree)
節點類型包括:
- Document(文件):HTML 文件的開端
- Element(元素):標籤
-
<html>、<body>、<p>等等
-
- Text(文本):標籤內的文字
- Attribute(屬性):標籤的屬性
DOM
<!DOCTYPE html>
<html lang="en">
  <head>
    <meta charset="UTF-8" />
    <meta name="viewport" content="width=device-width, initial-scale=1.0" />
    <title>一個網頁</title>
  </head>

  <body>
    <h1 id="title">標題</h1>
    <p>內容</p>
    <a href="#">連結</a>
  </body>
</html>
DOM
選取 DOM 元素
| 方法 | 說明 |
|---|---|
document.getElementById(id) |
根據 ID 選取單一元素 |
document.getElementsByClassName(class) |
根據類別名稱選取多個元素 |
document.getElementsByTagName(tag) |
根據標籤名稱選取多個元素 |
document.querySelector(selector) |
根據 CSS 選擇器選取第一個匹配的元素 |
document.querySelectorAll(selector) |
根據 CSS 選擇器選取所有匹配的元素 |
<p id="myId" class="myClass">Hello</p>
<script>
  // 根據 ID 選取
  let elementById = document.getElementById("myId");
  console.log(elementById); // <p id="myId" class="myClass">Hello</p>

  // 根據類別選取
  let elementsByClass = document.getElementsByClassName("myClass");
  console.log(elementsByClass[0]); // <p id="myId" class="myClass">Hello</p>

  // 使用 querySelector
  let element = document.querySelector("#myId");
  console.log(element); // <p id="myId" class="myClass">Hello</p>
</script>
操作 DOM 元素
let element = document.getElementById("id");

// 修改內容
element.innerText = "新的文字內容"; // 修改純文字
element.innerHTML = "<strong>加粗的文字</strong>"; // 插入 HTML

// 修改屬性
element.setAttribute("class", "new-class"); // 設置屬性
element.id = "new-id"; // 直接修改 id

// 修改樣式 .style
element.style.color = "red"; // 改變文字顏色
element.style.fontSize = "20px"; // 改變文字大小

// 管理 class .classList
element.classList.add("new-class"); // 添加 class
element.classList.remove("old-class"); // 移除 class
element.classList.toggle("toggle-class"); // 切換 class
節點操作
let parent = document.getElementById("parent");
let child = document.getElementById("child");
let element = document.getElementById("element");
let newElement = document.createElement("p");

// 新增節點
newElement.innerText = "新段落內容";
parent.appendChild(newElement); // 新節點加入到父元素中
parent.insertBefore(newElement, element);

// 移除節點
parent.removeChild(child);
element.remove();
DOM 事件監聽
let button = document.getElementById("myButton");
let text = document.getElementById("text");

button.addEventListener("click", () => {
  text.innerText = "文字已改變!";
});
<button id="myButton">點擊我</button>
<p id="text">原始文字</p>DOM
<!DOCTYPE html>
<html lang="zh-Hant-TW">
<head>
    <meta charset="UTF-8">
    <title>Change Color</title>
</head>
<body>
    <button id="changeColor">Change Color</button>
    <p id="text">Watch me change!</p>
    <script>
    const button = document.getElementById("changeColor");
    const text = document.getElementById("text");

    button.addEventListener("click", () => {
        text.style.color = text.style.color === "blue" ? "red" : "blue";
    });
    </script>
</html>
點擊改變網頁背景色?
試試看
小實作
<!DOCTYPE html>
<html lang="en">
<head>
  <meta charset="UTF-8">
  <meta name="viewport" content="width=device-width, initial-scale=1.0">
  <title>改變背景色</title>
  <style>
    body {
      font-family: Arial, sans-serif;
      text-align: center;
      padding: 50px;
    }
    #color-button {
      padding: 10px 20px;
      font-size: 16px;
      cursor: pointer;
      background-color: #007BFF;
      color: white;
      border: none;
      border-radius: 5px;
    }
    #color-button:hover {
      background-color: #0056b3;
    }
  </style>
</head>
<body>
  <h1>點擊按鈕改變背景色</h1>
  <button id="color-button">改變背景色</button>
  <script>
    const button = document.getElementById('color-button');

    // 顏色陣列
    const colors = ['#FF5733', '#33FF57', '#3357FF', '#F0FF33', '#FF33A6'];

    // 點擊事件
    button.addEventListener('click', () => {
      // 隨機選擇一個顏色
      const randomColor = colors[Math.floor(Math.random() * colors.length)];
      // 設定背景色
      document.body.style.backgroundColor = randomColor;
    });
  </script>
</body>
</html>
動態清單
試試看
小實作
<!DOCTYPE html>
<html lang="en">
<head>
  <meta charset="UTF-8">
  <meta name="viewport" content="width=device-width, initial-scale=1.0">
  <link rel="stylesheet" type="text/css" href="style.css">
  <title>動態清單</title>
</head>
<body>
  <h1>動態清單範例</h1>
  <input id="itemInput" type="text" placeholder="輸入清單項目">
  <button id="addItem">新增項目</button>
  <ul id="itemList"></ul>
  <script src="script.js"></script>
</body>
</html>
小實作
// 選取輸入框、按鈕和清單
const input = document.getElementById("itemInput");
const button = document.getElementById("addItem");
const list = document.getElementById("itemList");

// 為按鈕綁定點擊事件
button.addEventListener("click", () => {
  const newItemText = input.value.trim(); // 取得輸入框內容並移除多餘空白

  if (newItemText !== "") {
    // 建立新的 <li> 元素
    const newItem = document.createElement("li");
    newItem.innerText = newItemText;

    // 添加刪除按鈕
    const deleteButton = document.createElement("button");
    deleteButton.innerText = "刪除";
    deleteButton.style.marginLeft = "10px";

    // 為刪除按鈕綁定事件
    deleteButton.addEventListener("click", () => {
      list.removeChild(newItem);
    });

    // 將刪除按鈕加入到 <li> 中
    newItem.appendChild(deleteButton);

    // 將 <li> 加入到清單中
    list.appendChild(newItem);

    // 清空輸入框
    input.value = "";
  } else {
    alert("請輸入有效的清單項目!");
  }
});
小實作
/* 通用樣式 */
body {
    font-family: Arial, sans-serif;
    background-color: #f9f9f9;
    color: #333;
    margin: 0;
    padding: 20px;
    display: flex;
    flex-direction: column;
    align-items: center;
}

h1 {
    color: #4CAF50;
    font-size: 2rem;
    margin-bottom: 20px;
}

/* 輸入框和按鈕 */
#itemInput {
    width: 300px;
    padding: 10px;
    border: 1px solid #ccc;
    border-radius: 4px;
    font-size: 1rem;
    margin-right: 10px;
    outline: none;
}

#itemInput:focus {
    border-color: #4CAF50;
}

#addItem {
    background-color: #4CAF50;
    color: white;
    border: none;
    border-radius: 4px;
    padding: 10px 20px;
    margin-top: 10px;
    font-size: 1rem;
    cursor: pointer;
    transition: background-color 0.3s;
}

#addItem:hover {
    background-color: #45a049;
}

/* 清單樣式 */
#itemList {
    list-style: none;
    padding: 0;
    margin-top: 20px;
    width: 100%;
    max-width: 400px;
}

#itemList li {
    display: flex;
    justify-content: space-between;
    align-items: center;
    background-color: #fff;
    border: 1px solid #ccc;
    border-radius: 4px;
    padding: 10px;
    margin-bottom: 10px;
    box-shadow: 0 2px 4px rgba(0, 0, 0, 0.1);
}

/* 刪除按鈕 */
#itemList li button {
    background-color: #f44336;
    color: white;
    border: none;
    border-radius: 4px;
    padding: 5px 10px;
    font-size: 0.9rem;
    cursor: pointer;
    transition: background-color 0.3s;
}

#itemList li button:hover {
    background-color: #d32f2f;
}
TypeScript
增加程式碼的可讀性和可維護性
先裝好 Node.js
然後在終端機輸入
npm install -g typescript或是用線上版
TypeScript 是一種由 Microsoft 開發的 開源程式語言
在 JavaScript 的基礎上進行擴展
增加了 靜態型別系統 和 編譯時檢查
什麼是 TypeScript?
即使沒有明確標註型別,TypeScript 也能自動推斷變數型別
靜態型別檢查
let count = 10; // TypeScript 推斷 count 的型別為 numberTypeScript 要求明確定義變數、參數、返回值的型別
降低運行時發生錯誤的機會
let 變數名: 型別 = 值;
型別推斷
let message: number = "Hello, TypeScript!";
// 編譯器會報錯
TypeScript 是 JavaScript 的 超集,也就是:
-
所有 JavaScript 程式碼在 TypeScript 中都有效
但 TypeScript 增加了許多額外功能 - TypeScript 程式碼需要經過 編譯
轉換成純 JavaScript 程式碼後才能執行
與 JavaScript 的關係
// 一個有效的 JavaScript 程式碼
function add(a, b) {
  return a + b;
}

// TypeScript:加上型別註解
function add(a: number, b: number): number {
  return a + b;
}- 減少錯誤
為什麼使用 TypeScript?
function greet(name) {
  return "Hello, " + name.toUpperCase(); // 如果 name 是 null,程式會崩潰
}

function greet(name: string): string {
  return "Hello, " + name.toUpperCase(); // TypeScript 確保 name 必須是 string
}- 減少錯誤
變數宣告
// 不帶型別註解,型別由 TypeScript 推斷
let age = 18;       // 推斷為 number
const name = "Anna"; // 推斷為 string

// 帶型別註解
let score: number = 100;
const greeting: string = "Hello, TypeScript!";

// 不允許賦值不符合型別的值
score = "high"; // Type 'string' is not assignable to type 'number'-
string字串 -
number數字 -
boolean布林 -
array陣列- 元素型別後加上
[] - 使用
Array<型別>語法
- 元素型別後加上
基本型別
let numbers: number[] = [1, 2, 3, 4];
let strings: Array<string> = ["a", "b", "c"];

// 錯誤示範
numbers.push("5"); // Type 'string' is not assignable to type 'number'-
tuple元組- 固定數量、且每個元素型別可能不同的陣列
基本型別
let user: [string, number]; // 第一個元素是 string,第二個是 number
user = ["Alice", 25];

// 錯誤示範
user = [25, "Alice"]; // 錯誤:型別順序不符-
enum列舉- 定義一組命名的常數
基本型別
enum Color {
  Red,   // 預設值為 0
  Green, // 預設值為 1
  Blue   // 預設值為 2
}
let color: Color = Color.Green;

enum Status {
  Success = 200,
  NotFound = 404,
  ServerError = 500
}
let statusCode: Status = Status.Success; // 200-
any任意型別- 可接收任何型別,根本 JS
-
unknown未知型別- 使用前需要先進行型別檢查,較安全
基本型別
let value: any = 123;
value = "This is a string";
value = true; // 可以是任意型別

let data: unknown;
data = 123;
data = "Hello";

// 需要型別檢查
if (typeof data === "string") {
  console.log(data.toUpperCase());
}-
void空值- 表示 函式沒有返回值
-
never不會發生的值- 表示程式不可能有正常結束的情況,例如錯誤或死循環
基本型別
function logMessage(message: string): void {
  console.log(message);
}

function throwError(message: string): never {
  throw new Error(message);
}-
null- 空值
-
undefined未定義
基本型別
let u: undefined = undefined;
let n: null = null;

// 默認情況下 null 和 undefined 是所有型別的子型別
let str: string = null; // 嚴格模式下會報錯
附錄
| 屬性 | 說明 |
|---|---|
| onclick | 點擊滑鼠時發生 |
| ondblclick | 連續點擊滑屬兩次時發生 |
| ondrag | 拖拉網頁上的元素時發生 |
| ondragend | 拖拉網頁上的元素結束時發生 |
| ondragenter | 網頁上的元素被拖拉到目標時發生 |
| ondragleave | 網頁上的元素被拖拉離開目標時發生 |
| ondragover | 網頁上的元素被拖拉到目標上方時發生 |
| ondragstart | 拖拉網頁上的元素開始時發生 |
| ondrop | 放開拖拉網頁上的元素時發生 |
| onmousedown | 按下滑鼠按紐時發生 |
| onmousemove | 滑鼠游標移動時發生 |
| onmouseout | 滑鼠游標移除目標時發生 |
| onmouseover | 滑鼠游標移動到到目標上方時發生 |
| onmouseup | 鬆開滑鼠按紐時發生 |
| onmousewheel | 轉動滑鼠中間滾輪時發生 |
| onscroll | 移動元素的捲軸時發生 |
| abstract | arguments | boolean | break | byte |
| case | catch | char | class* | const |
| continue | debugger | default | delete | do |
| double | else | enum* | eval | export* |
| extends* | false | final | finally | float |
| for | function | goto | if | implements |
| import* | in | instanceof | int | interface |
| let | long | native | new | null |
| package | private | protected | public | return |
| short | static | super* | switch | synchronized |
| this | throw | throws | transient | true |
| try | typeof | var | void | volatile |
| while | with | yield |
* ES5 新增