OPenCV
BY 企鵝
Argparse
從cmd/terminal執行Python程式
有鑒於這次我們要教的OpenCV
和VScode的執行相性似乎不怎麼好,
這次我們要在終端機上直接執行Python檔案!
首先先建一個簡單的檔案:
# python3 hello.py
def main():
  print("Hello World!")
main()
出於專案管理的角度,
我們習慣將主程式寫在 main()
從cmd/terminal執行Python程式
可以看到我的終端機現在路徑在hanachou這個資料夾中
到檔案總管/Finder的目標資料夾取得路徑,
在終端機上打 cd 路徑,
enter後打上python3 檔名,
就能在終端機上執行囉!

sys.argv
當你在命令列呼叫 Python 程式、
又同時需要修改變數內容,
你可以用命令列引數(command-line argument)
的方式將變數資訊傳入執行程式中,
初學Python常會使用 sys.argv,例如:
# python3 sys_test.py
import sys
print(f"sys.argv is a list, length: {len(sys.argv)}")
print("The first argument of sys.argv is you filename: ")
print(sys.argv[0])
print("The second argument of sys.argv: ")
print(sys.argv[1])
print("The third argument of sys.argv: ")
print(sys.argv[2])
print("The last argument of sys.argv: ")
print(sys.argv[3])
sys.argv
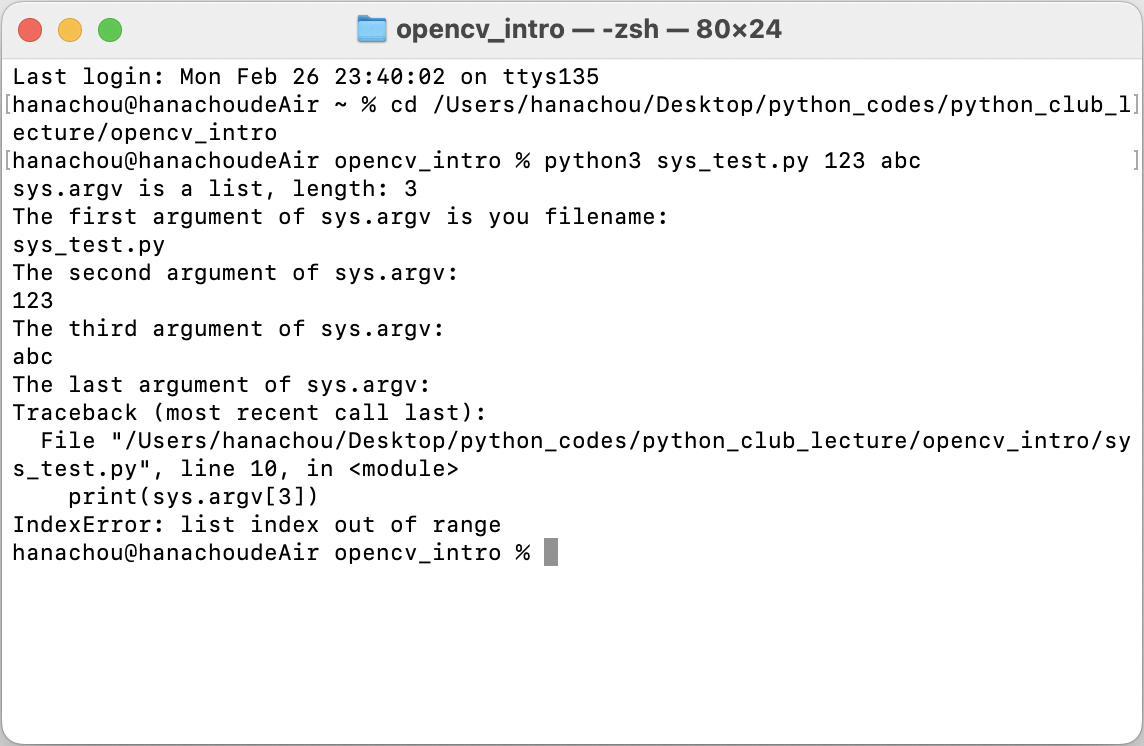
打法和剛才類似,
只是必須在檔名後給引數
可以看到,因為沒有給第四個引數,
所以raise error
argparse (Argument Parser)
如範例所見,sys.argv只能將
程式引數一個個以陽春的陣列傳遞,
當你需要解析更複雜的引數,
包括讓使用者輸入引數內容有彈性、
又能讓程式整潔有序地管理引數,
你就需要 argparse 函式庫!
pip install argparse我不確定需不需要,如果有error可以試試
argparse (Argument Parser)
使用 argparse 的三個基本步驟包括:
- 先創造
argparse.ArgumentParser()物件,它是我們管理引數需要的 “parser” -
add_argument()告訴 parser 我們需要的命令列引數有哪些 - 使用
parse_args()來從 parser 取得引數傳來的 Data
Positional Argument
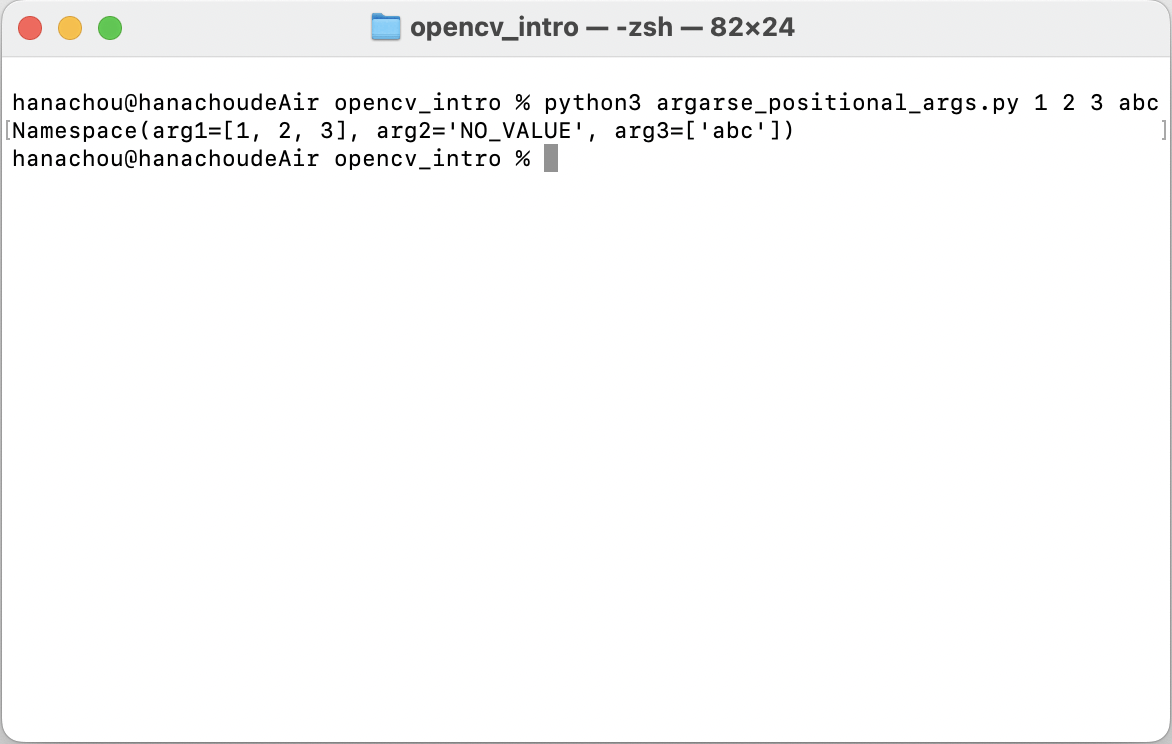
# python3 argarse_positional_args.py
import argparse
parser = argparse.ArgumentParser()
parser.add_argument("arg1",
                    nargs=3, # 限定引數數量為3
                    type=int, # 限定資料型態
                    help="This is the first argument,\
                    please input three intergers.")
parser.add_argument("arg2",
                    nargs='?', # 限定引數數量為0或1
                    default="NO_VALUE", # 無輸入時的預設值
                    help="This is the second argument,\
                    you can input an argument or not.")
parser.add_argument("arg3",
                    nargs='+', # 引數數量至少為1(1或任意多個)
                    help="This is the third argument,\
                    you can input one or more arguments.")
args = parser.parse_args()
print(args)
位置引數(Positional Argument)會把使用者輸入的引數
依照輸入順序放進你宣告的引數變數中,
在下方範例中,add_argument() 最前面的參數
就是你的命令列引數名稱:
Positional Argument
如果缺少或沒有引數、輸入太多引數、
輸入之引數資料型態錯誤等等,
都可能raise error
add_argument( )
nargs : 限制引數數量:
-
nargs=3:引數只能恰好是 3 個 -
nargs='?':引數只能是 0 個或是 1 個 -
nargs='+':引數至少 1 個(1 個或任意多個) -
nargs='*':引數可以是任意數量(0 個或任意多個)
help : 告訴使用者這部分要打什麼,說明書的概念
type : 限制資料型態
default : 若使用者沒有輸入,則使用該預設
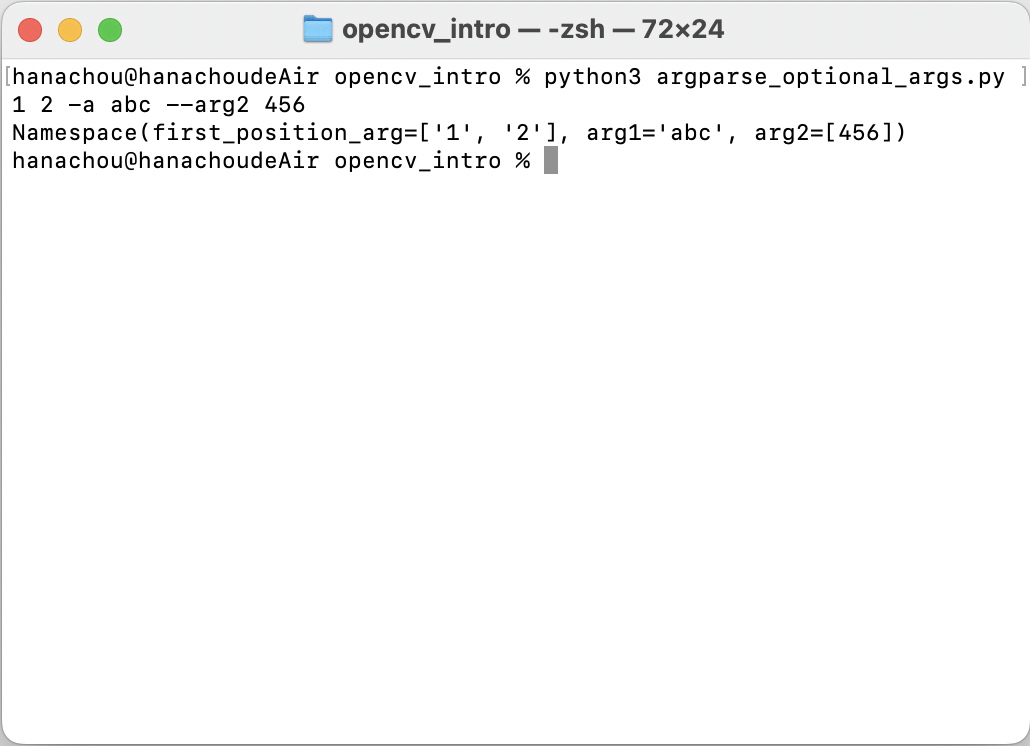
Optional Argument
選項引數(Optional Argument)
必須放在位置引數之後、可以是任意順序,
只要使用特定符號表示(通常用破折號 - 或 --),
parser 就知道該引數表示相對應的內容為何。
選項引數的名稱同樣放在 add_argument()
參數最前面的位置,通常會分成長與短兩種型態。
短型態是長型態的一個字縮寫、讓選項引數可以更簡短,
例如 --arg1 的短型態寫成 -a。
範例如下:
Optional Argument
# python3 argparse_optional_args.py
import argparse
parser = argparse.ArgumentParser()
parser.add_argument("first_position_arg",
                    nargs=2,
                    help="This is the first positional argument,\
                    please input two intergers.")
parser.add_argument("-a",
                    "--arg1",
                    type=str,
                    help="This is the first optional argument,\
                    please input a string.")
parser.add_argument("--arg2",
                    nargs=1,
                    type=int,
                    default=0,
                    help="This is the second positional argument\
                    please input an interger, or the default would be 0.")
args = parser.parse_args()
print(args)
Optional Argument
關於argparse的介紹就先到這,
有興趣可以自行上網搜尋更多資料
快樂的隨堂練習
題目:利用argparse製作一個範圍0~99的數字 --> 英文轉換器
例如:0 --> zero, 45 --> forty five
提示:會用到字典
額外介紹一個好用的函式vars(),
vars(parser.parse_args())能將其形式轉換成字典
# 節省時間,部分程式碼在此
zero_2_nine = {0: 'zero', 1: 'one', 2: 'two', 3: 'three', 4: 'four',
               5: 'five', 6: 'six', 7: 'seven', 8: 'eight', 9: 'nine'}
ten_2_nineteen = {10: 'ten', 11: 'eleven', 12: 'twelve', 13: 'thirteen',
                  14: 'forteen', 15: 'fifteen', 16: 'sixteen', 17: 'seventeen',
                  18: 'eighteen', 19: 'nineteen'}
twenty_2_ninety = {20: 'twenty', 30: 'thirty', 40: 'forty', 50: 'fifty',
                   60: 'sixty', 70: 'seventy', 80: 'eighty', 90: 'ninety'}
如果還是沒有頭緒,可參照下頁範例程式碼
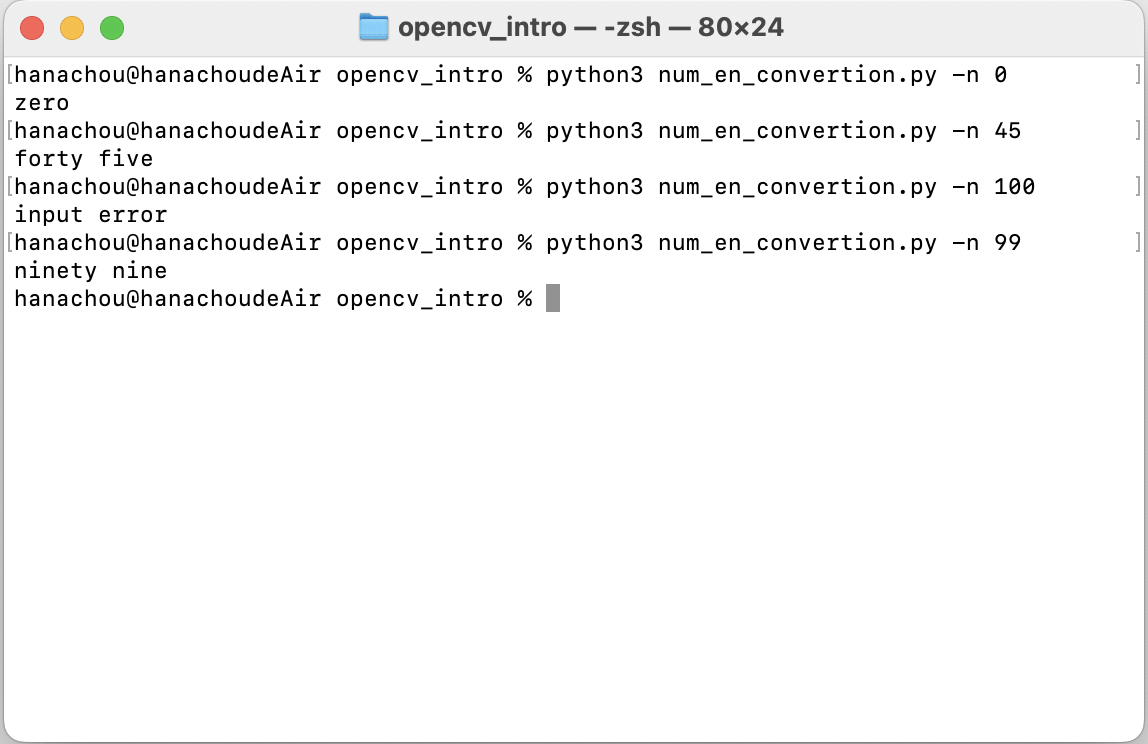
# python3 num_en_convertion.py
from argparse import ArgumentParser

parser = ArgumentParser()
parser.add_argument("-n", help = "Enter a number from 0 to 99.")
args = vars(parser.parse_args())

digits = int(args['n']) % 10
tens = int(args['n']) - digits

zero_2_nine = {0: 'zero', 1: 'one', 2: 'two', 3: 'three', 4: 'four',
               5: 'five', 6: 'six', 7: 'seven', 8: 'eight', 9: 'nine'}
ten_2_nineteen = {10: 'ten', 11: 'eleven', 12: 'twelve', 13: 'thirteen',
                  14: 'forteen', 15: 'fifteen', 16: 'sixteen',
                  17: 'seventeen', 18: 'eighteen', 19: 'nineteen'}
twenty_2_ninety = {20: 'twenty', 30: 'thirty', 40: 'forty', 50: 'fifty',
                   60: 'sixty', 70: 'seventy', 80: 'eighty', 90: 'ninety'}

def number_2_words(num):
    if int(num) >= 100:
        print('input error')

    else:
        if int(num) < 10:
            print(zero_2_nine[digits])
        elif int(num) < 20:
            print(ten_2_nineteen[int(num)])
        elif int(num) % 10 == 0:
            print(twenty_2_ninety[tens])
        else:
            print(twenty_2_ninety[tens], zero_2_nine[digits])

def main():
    number_2_words(args['n'])

main()
執行結果:
Library
pip
Python有相當多第三方、非官方人士所開發的套件,
通常都需要自行去下載,
如果這時有一個標準的下載方式將會方便許多,
這時誕生的就是pip!
相信這裡許多人都對pip不陌生,甚至剛剛有用過
做法相當簡單:在terminal/cmd輸入指令,
如:
pip install opencv-pythonvirtual environment
Python通常會用到不在標準函式庫的套件和模組。
應用程式有時候會需要某個特定版本的函式庫,
因為這個應用程式可能需要某個特殊的臭蟲修正,
或是這個應用程式是根據該函式庫特定版本的介面所撰寫。
這意味著不太可能安裝一套 Python 就可以滿足所有應用程式的要求。
如果應用程式 A 需要一個特定的模組的 1.0 版,
但另外一個應用程式 B 需要 2.0 版,
那麼這整個需求不管安裝 1.0 或是 2.0 都會衝突,
以致於應用程式無法使用。
對我抄Python說明文件
virtual environment
解決方案是建立一個虛擬環境 (virtual environment),
這是一個獨立的資料夾,
並且裡面裝好了特定版本的 Python,以及一系列相關的套件。
不同的應用程式可以使用不同的虛擬環境。
以前述中需要被解決的例子中,
應用程式 A 能夠擁有它自己的虛擬環境,並且是裝好 1.0 版,
然而應用程式 B 則可以是用另外一個有 2.0 版的虛擬環境。
要是應用程式 B 需要某個函式庫被升級到 3.0 版,
這並不會影響到應用程式 A 的環境。
virtual environment
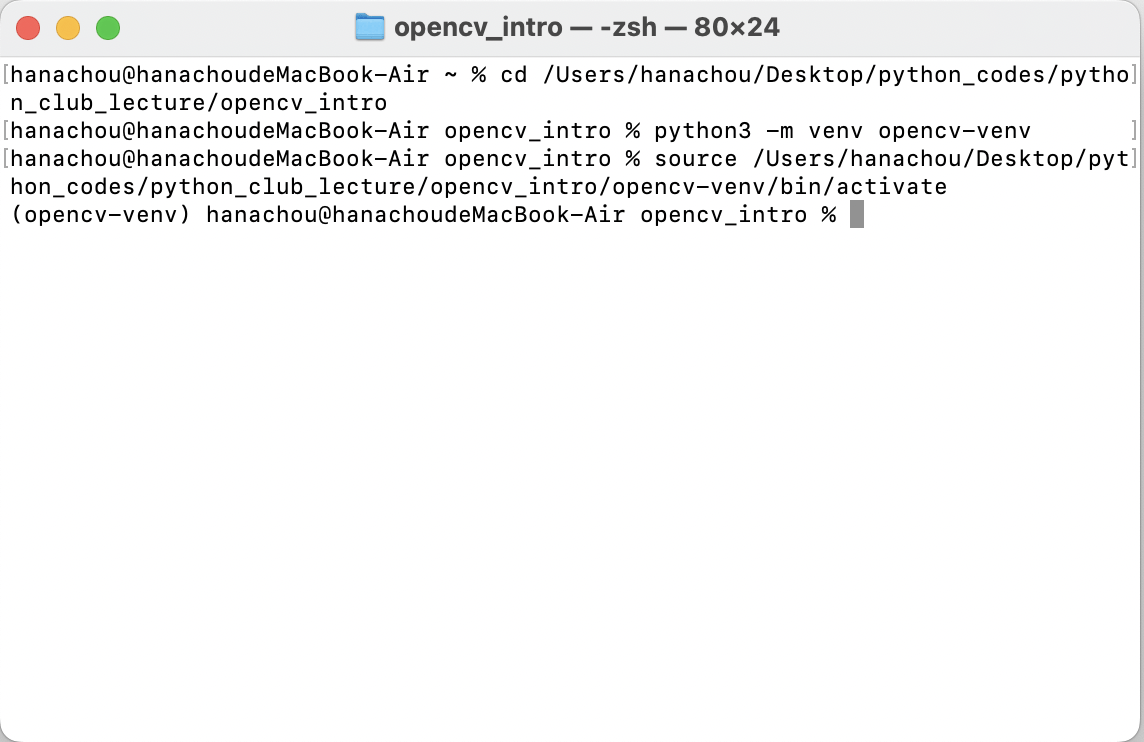
在terminal/cmd貼上這段程式碼,
它將會在你現在的路徑下建立一個叫做tutorial-env的虛擬環境,
而要啟動該虛擬環境則需要輸入:
python3 -m venv tutorial-env# Windows:
tutorial-env\Scripts\activate# Unix or MacOS:
source tutorial-env/bin/activate# 停止
deactivatePyPI (a.k.a. “The Cheese Shop”)
PyPI (Python Package Index),
是Python的正式第三方軟體套件儲存庫,
pip即是預設從PyPl下載套件,
為安全可靠的套件下載來源。
PyPl:https://pypi.org
Image Basics
So, what’s a pixel?
每張圖片都是由pixel組成,
一個pixel是一個單色的小方格,
同時,一個pixel也被視為一個影像的最小完整取樣。
單位面積內pixel愈多,解析度愈高,
表示其愈接近真實物體。
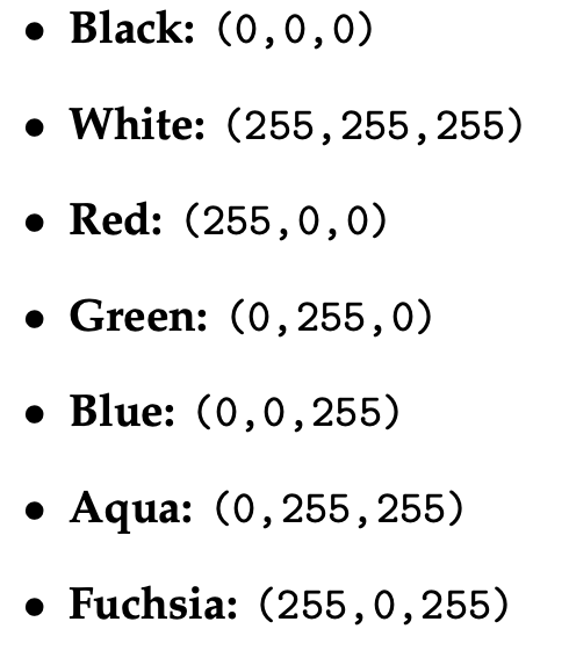
pixels 通常有兩種表現方式:彩色及灰階。
以灰階來說,每個pixel的值介於0~255之間,
0代表黑色,而255代表白色,
愈靠近0愈黑,反之愈靠近255愈白。
So, what’s a pixel?
彩色色階則有三個數值表現其顏色,
也就是我們耳熟能詳的RGB,
在Python裡就是(Red, Green, Blue)的tuple。
pixel是最高8-bit的數字,所以依前述理論,
白色(0, 0, 0) ; 黑色(255, 255, 255) ; 紅色則是(255, 0, 0)
overview of the coordinate system
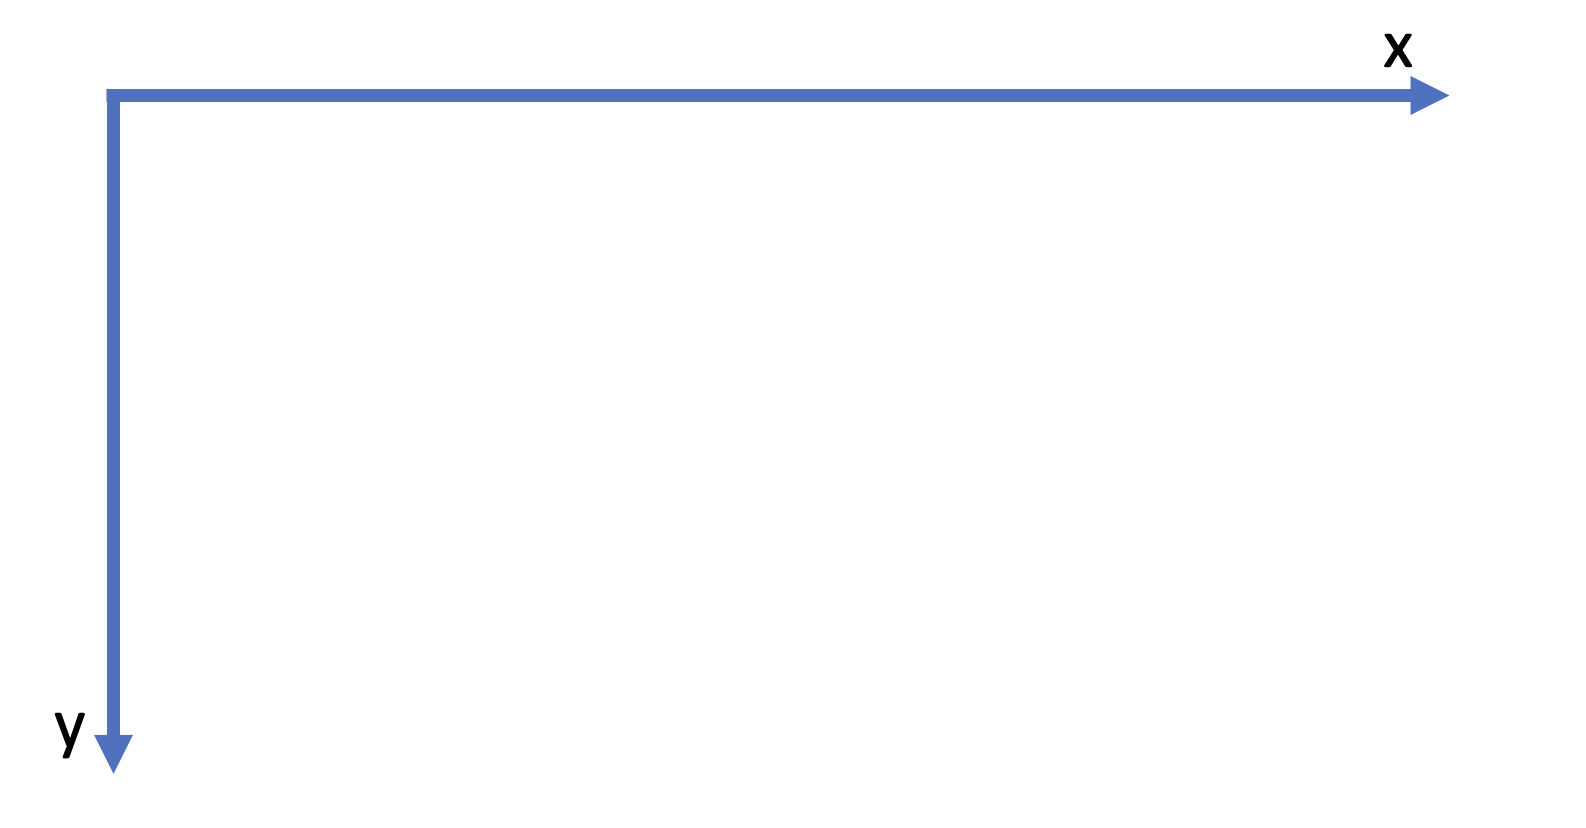
在影像處理的座標系統上,反直覺的是
y軸的方向和數學上的相反,向下為正。
x軸則依然維持右邊正向。
overview of the coordinate system
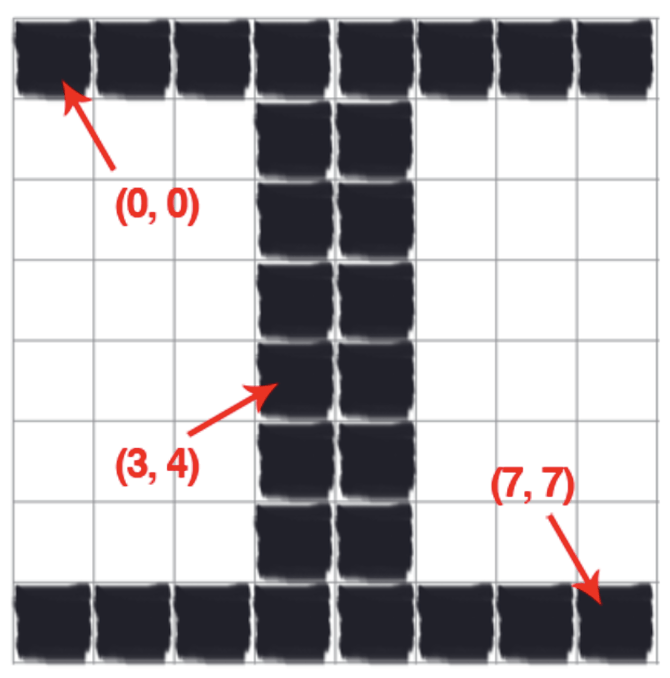
另一件反直覺的事情是,
右圖是一個8x8的正方形,
最右下角卻是(7, 7)。
而左上角的原點(0, 0)依然維持
大部分程式語言的習慣:
從0開始數。
Get started
Get Started
拖了這麼久終於要進入正題了,
首先把該載的東西載一載。
先來建虛擬環境:
記得啟動喔
Get Started
pip install 一些東西:
pip install argparsepip install opencv-python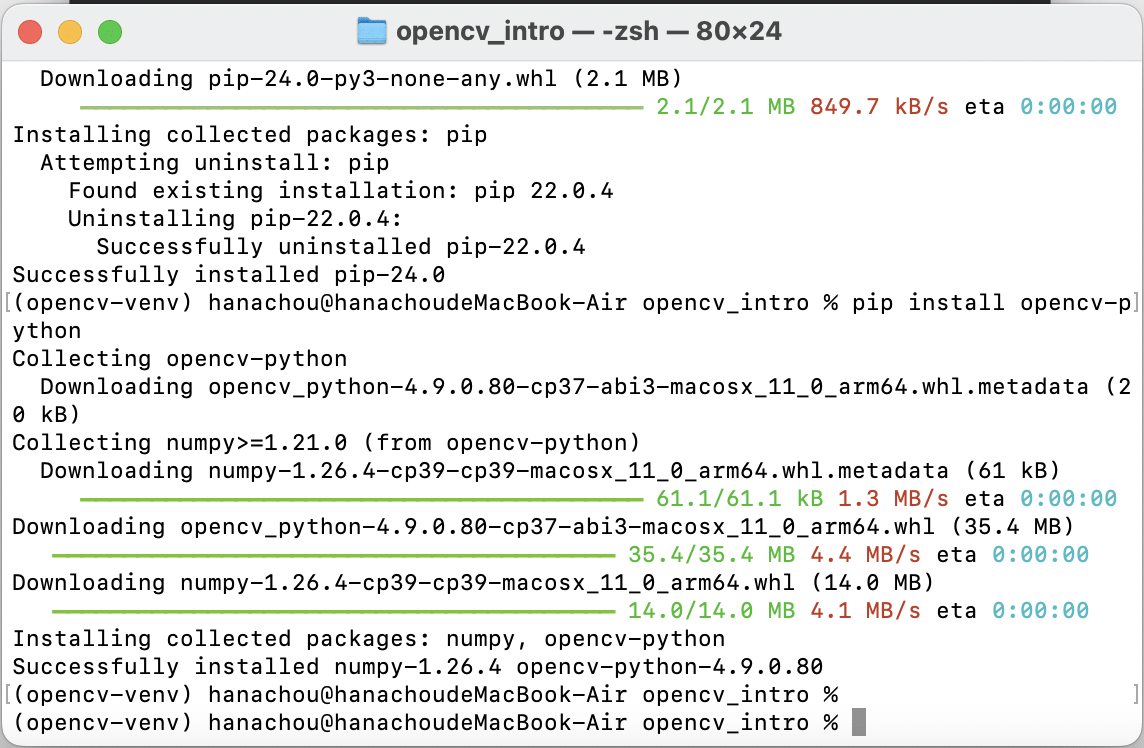
accessing and manipulating pixels
# python3 opencv_get_started.py

# import the necessary packages
import argparse
import cv2

# construct the argument parser and parse the arguments
ap = argparse.ArgumentParser()
ap.add_argument("-i", "--image", type=str, default="adrian.png",
	help="path to the input image")
args = vars(ap.parse_args())
先來點基礎設定:
accessing and manipulating pixels
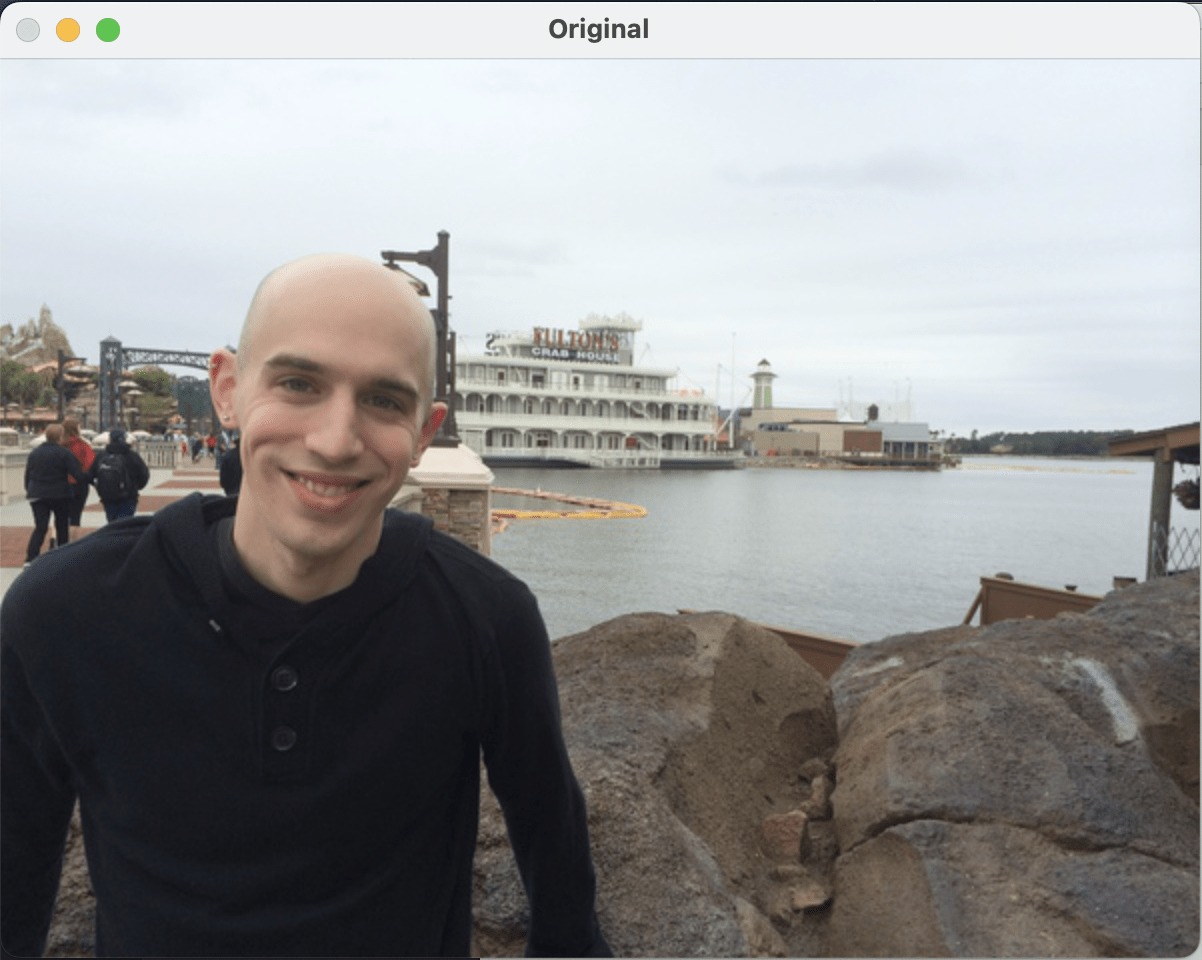
# load the image, grab its spatial dimensions (width and height),
# and then display the original image to our screen
image = cv2.imread(args["image"]) #read file
(h, w) = image.shape[:2] #抓取長寬
cv2.imshow("Original", image) #前者字串是圖片標題,後者是要顯示的圖片
cv2.waitKey(0) #按下任意鍵繼續
首先必須讀取圖片,
我們可以用opencv的特殊函式抓取圖片的長寬,
並且將該圖片輸出在螢幕上。
accessing and manipulating pixels
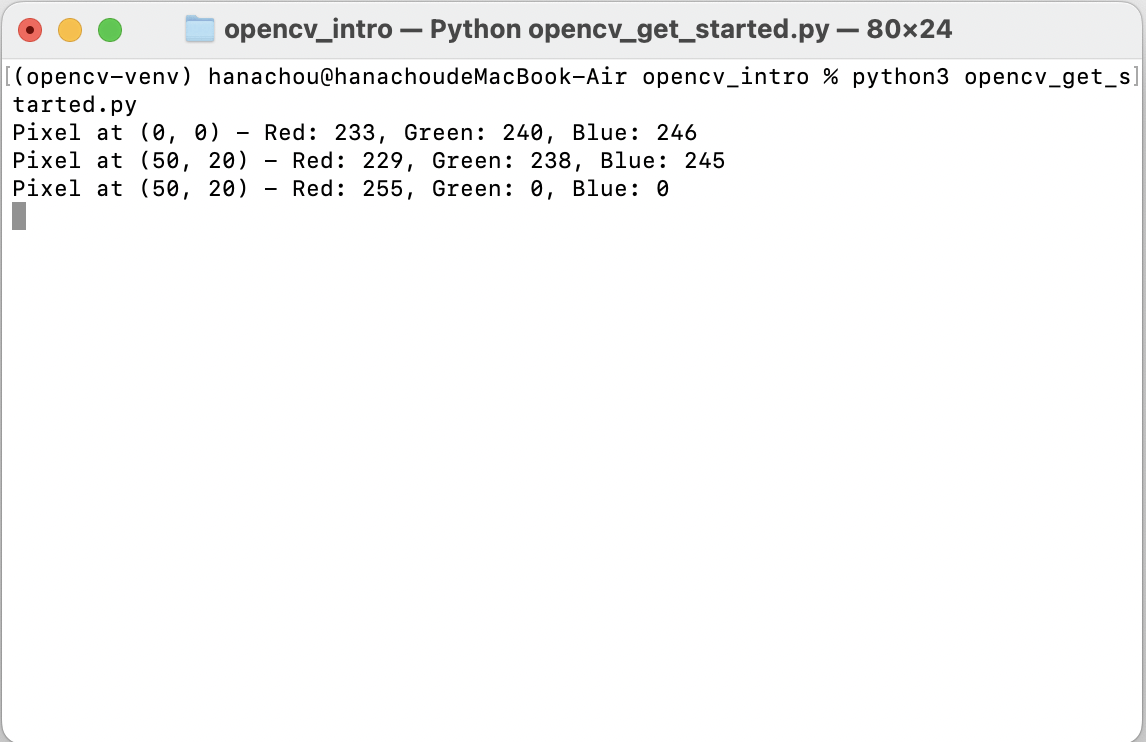
accessing and manipulating pixels
# images are simply NumPy arrays -- with the origin (0, 0) located at
# the top-left of the image
(b, g, r) = image[0, 0]
print("Pixel at (0, 0) - Red: {}, Green: {}, Blue: {}".format(r, g, b))

# access the pixel located at x=50, y=20
(b, g, r) = image[20, 50]
print("Pixel at (50, 20) - Red: {}, Green: {}, Blue: {}".format(r, g, b))

# update the pixel at (50, 20) and set it to red
image[20, 50] = (0, 0, 255)
(b, g, r) = image[20, 50]
print("Pixel at (50, 20) - Red: {}, Green: {}, Blue: {}".format(r, g, b))
我們可以對單一pixel做操作,
例如取得數個pixel的RGB數值。
值得注意的是,opencv在取色彩值時是倒著取,
也就是照B-G-R順序。
accessing and manipulating pixels
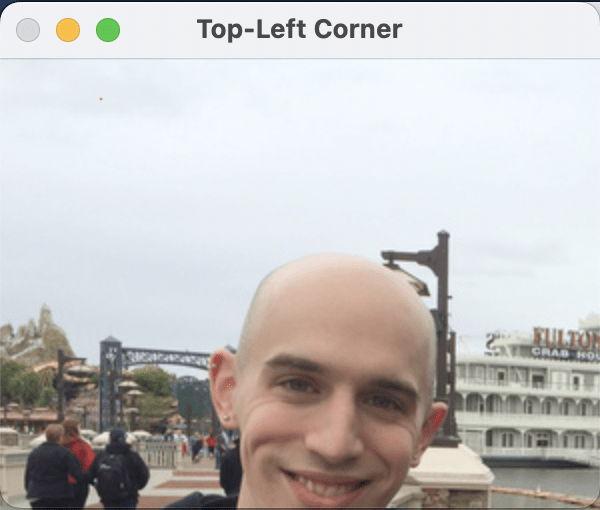
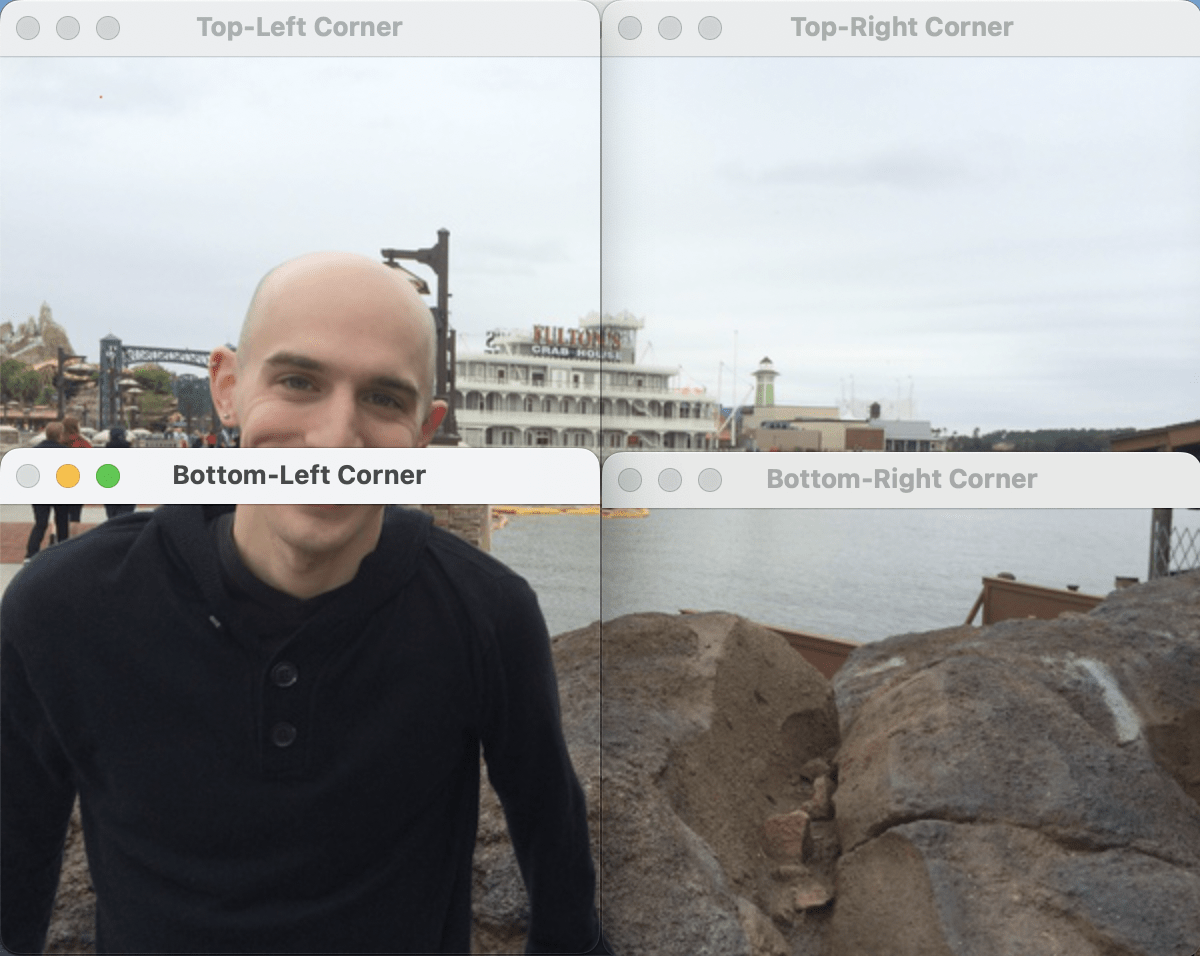
accessing and manipulating pixels
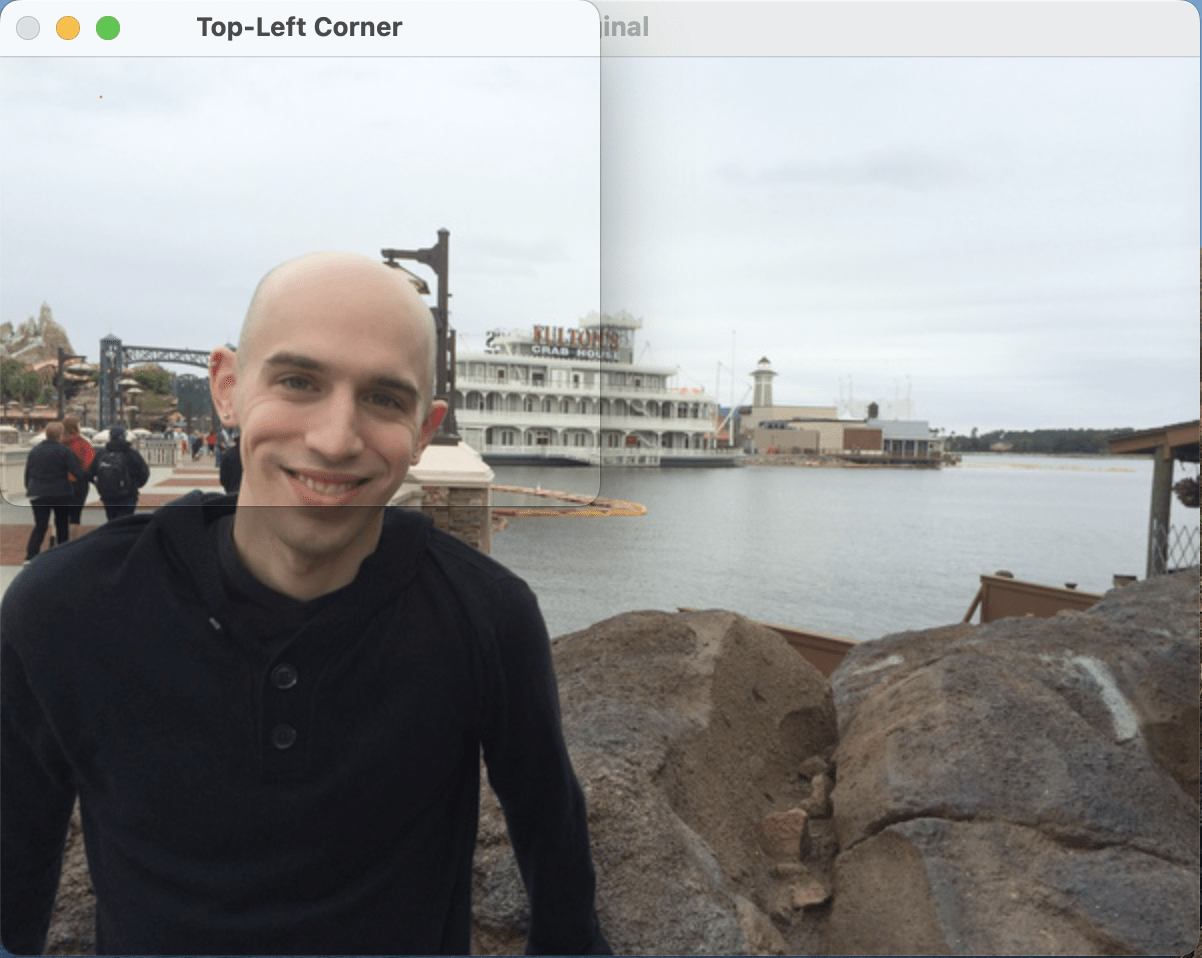
# compute the center of the image, which is simply the width and height
# divided by two
(cX, cY) = (w // 2, h // 2) #取中心點

# since we are using NumPy arrays, we can apply array slicing to grab
# large chunks/regions of interest from the image -- here we grab the
# top-left corner of the image
tl = image[0:cY, 0:cX] #裁切圖片
cv2.imshow("Top-Left Corner", tl)
cv2.waitKey(0)
在opencv,照片也允許被裁切。
透過取得中間點座標,
我們可以獲得只有左上角的圖片。
accessing and manipulating pixels
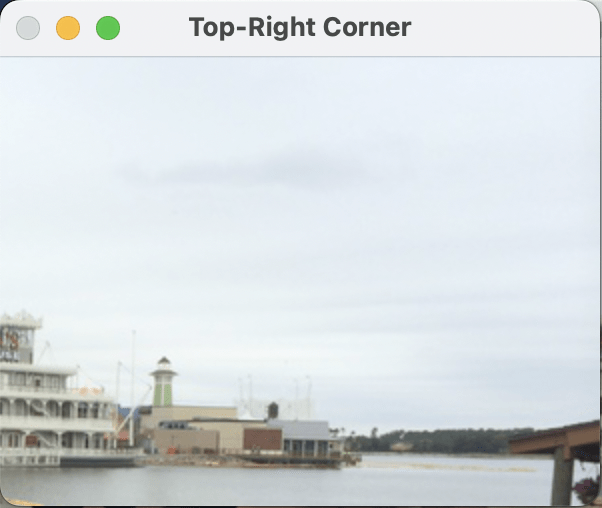
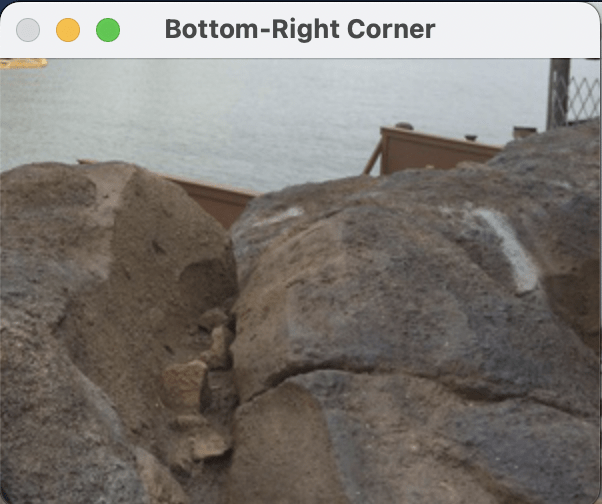
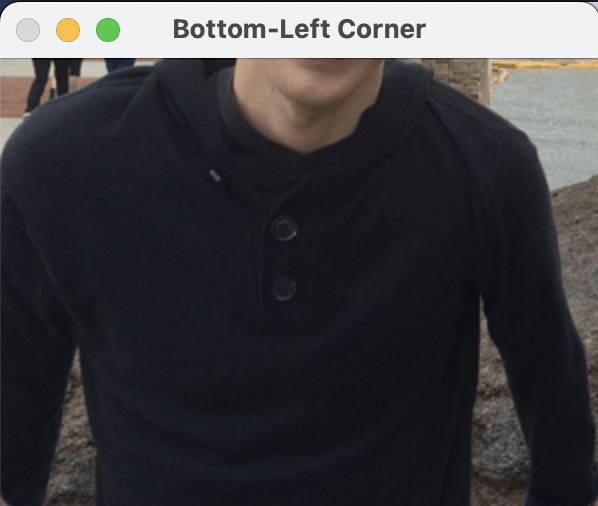
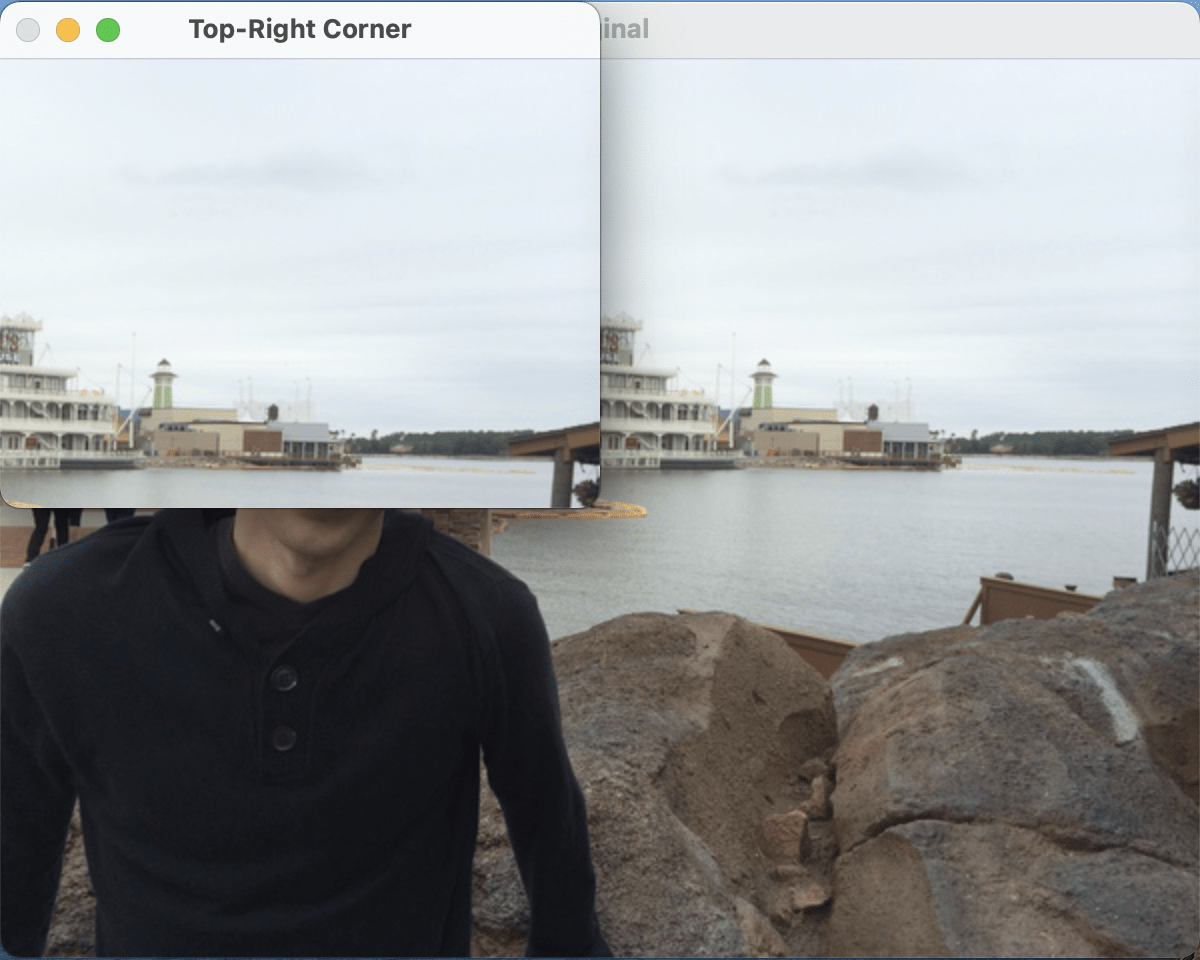
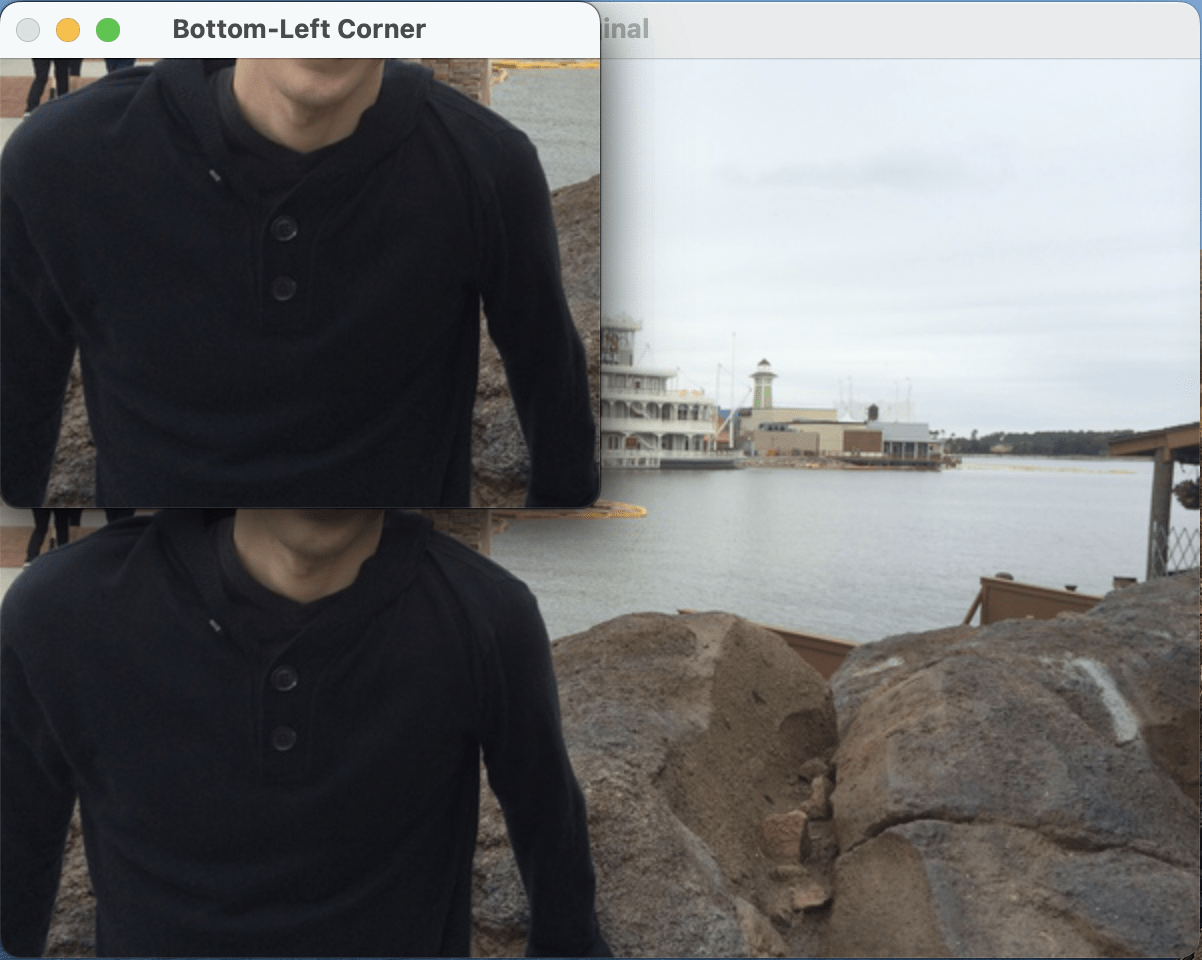
accessing and manipulating pixels
# in a similar fashion, we can crop the top-right, bottom-right, and
# bottom-left corners of the image and then display them to our
# screen
tr = image[0:cY, cX:w]
br = image[cY:h, cX:w]
bl = image[cY:h, 0:cX]
cv2.imshow("Top-Right Corner", tr)
cv2.waitKey(0)

cv2.imshow("Bottom-Right Corner", br)
cv2.waitKey(0)

cv2.imshow("Bottom-Left Corner", bl)
cv2.waitKey(0)
類似地,我們一樣能裁切獲得
右上角、左下角、右下角的圖片。
accessing and manipulating pixels
accessing and manipulating pixels
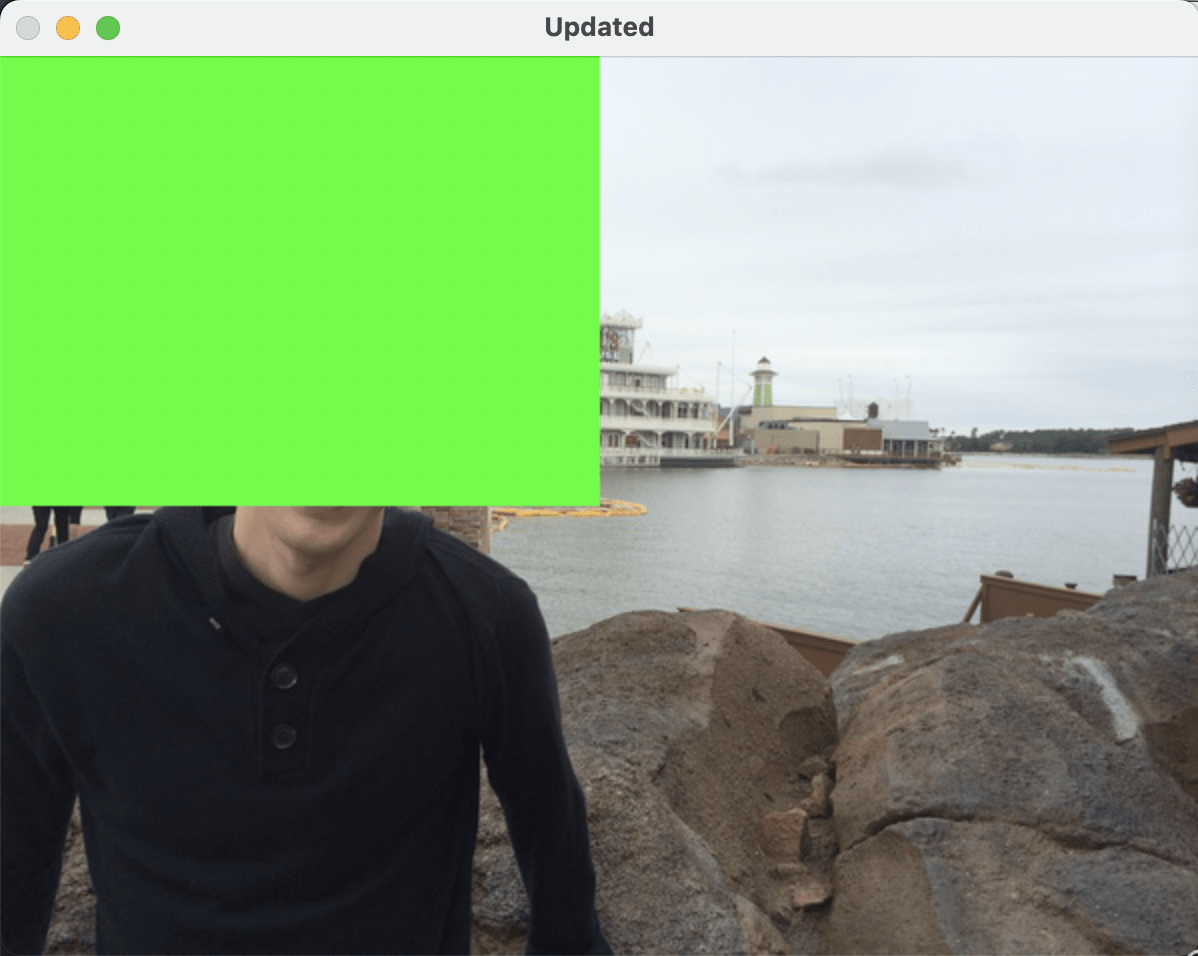
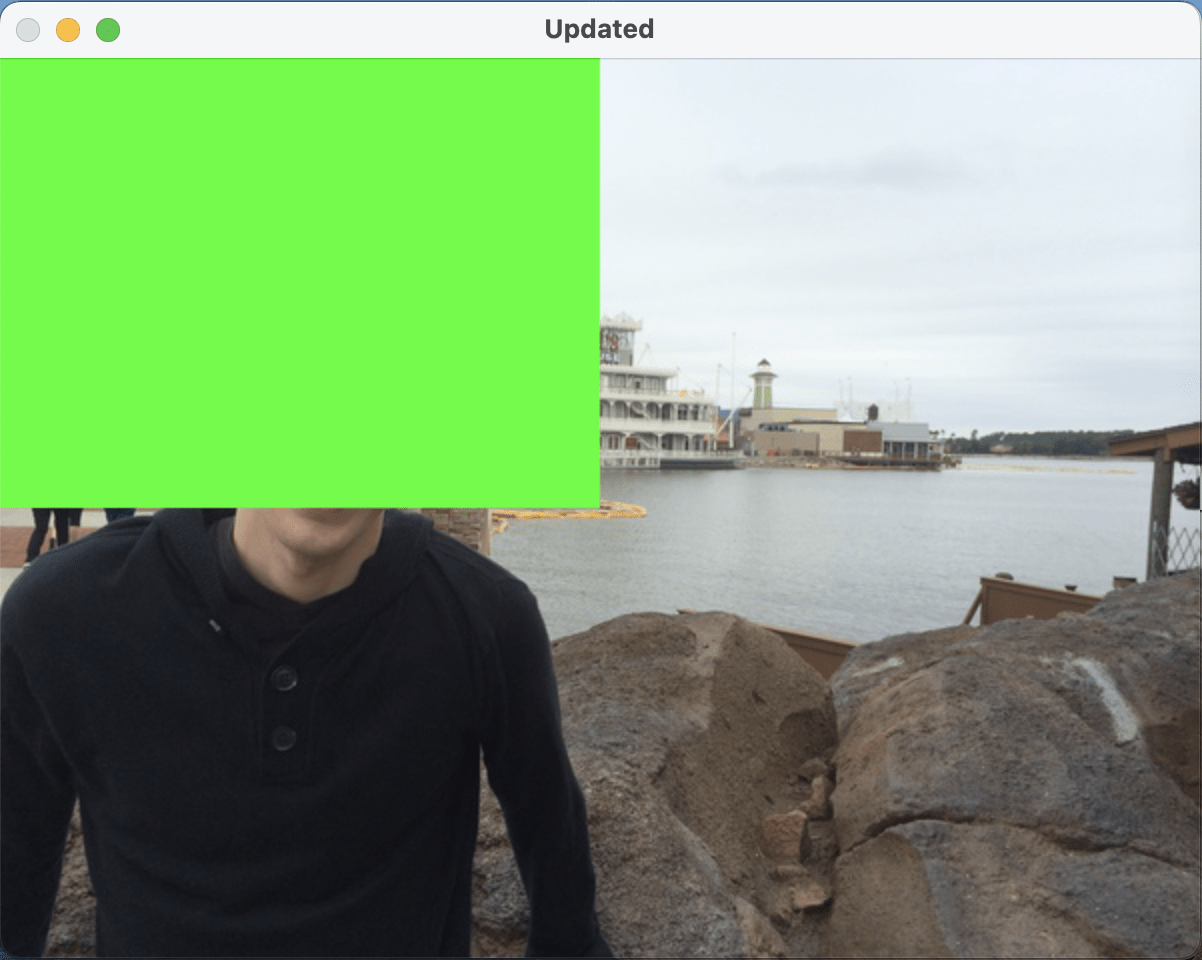
# set the top-left corner of the original image to be green
image[0:cY, 0:cX] = (0, 255, 0) #更改顏色呈綠色

# Show our updated image
cv2.imshow("Updated", image)
cv2.waitKey(0)

# Shut down
cv2.destroyAllWindows() #關閉所有視窗
最後,我們也能改變某指定部分pixel的顏色,
例如,將左上角所有pixel都改成綠色。
accessing and manipulating pixels
accessing and manipulating pixels
# python3 opencv_get_started.py
import argparse
import cv2
ap = argparse.ArgumentParser()
ap.add_argument("-i", "--image", type=str, default="adrian.png", help="path to the input image")
args = vars(ap.parse_args())
image = cv2.imread(args["image"])
(h, w) = image.shape[:2]
cv2.imshow("Original", image)
cv2.waitKey(0)
(b, g, r) = image[0, 0]
print("Pixel at (0, 0) - Red: {}, Green: {}, Blue: {}".format(r, g, b))
(b, g, r) = image[20, 50]
print("Pixel at (50, 20) - Red: {}, Green: {}, Blue: {}".format(r, g, b))
image[20, 50] = (0, 0, 255)
(b, g, r) = image[20, 50]
print("Pixel at (50, 20) - Red: {}, Green: {}, Blue: {}".format(r, g, b))
(cX, cY) = (w // 2, h // 2)
tl = image[0:cY, 0:cX]
cv2.imshow("Top-Left Corner", tl)
cv2.waitKey(0)
tr = image[0:cY, cX:w]
br = image[cY:h, cX:w]
bl = image[cY:h, 0:cX]
cv2.imshow("Top-Right Corner", tr)
cv2.waitKey(0)
cv2.imshow("Bottom-Right Corner", br)
cv2.waitKey(0)
cv2.imshow("Bottom-Left Corner", bl)
cv2.waitKey(0)
image[0:cY, 0:cX] = (0, 255, 0)
cv2.imshow("Updated", image)
cv2.waitKey(0)
cv2.destroyAllWindows()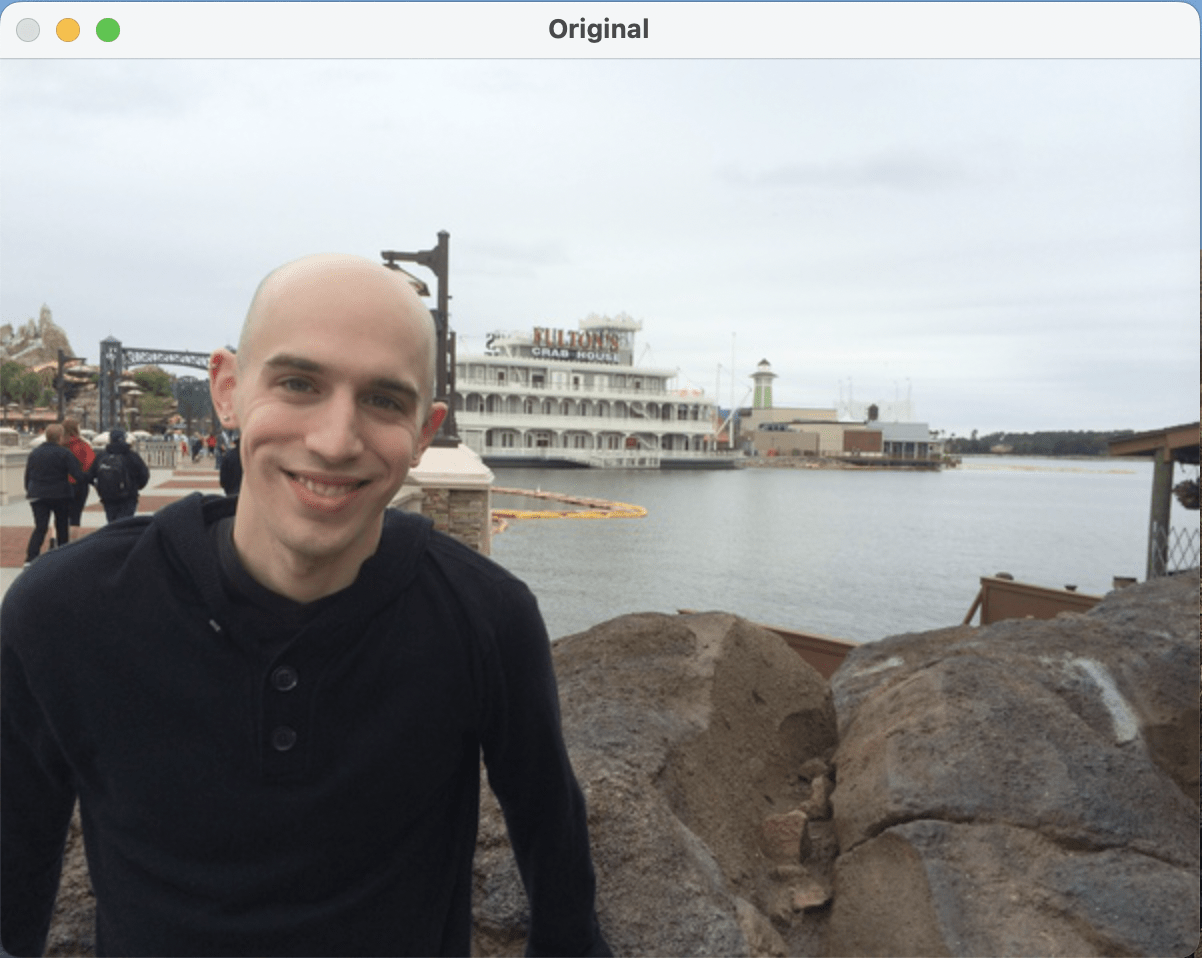

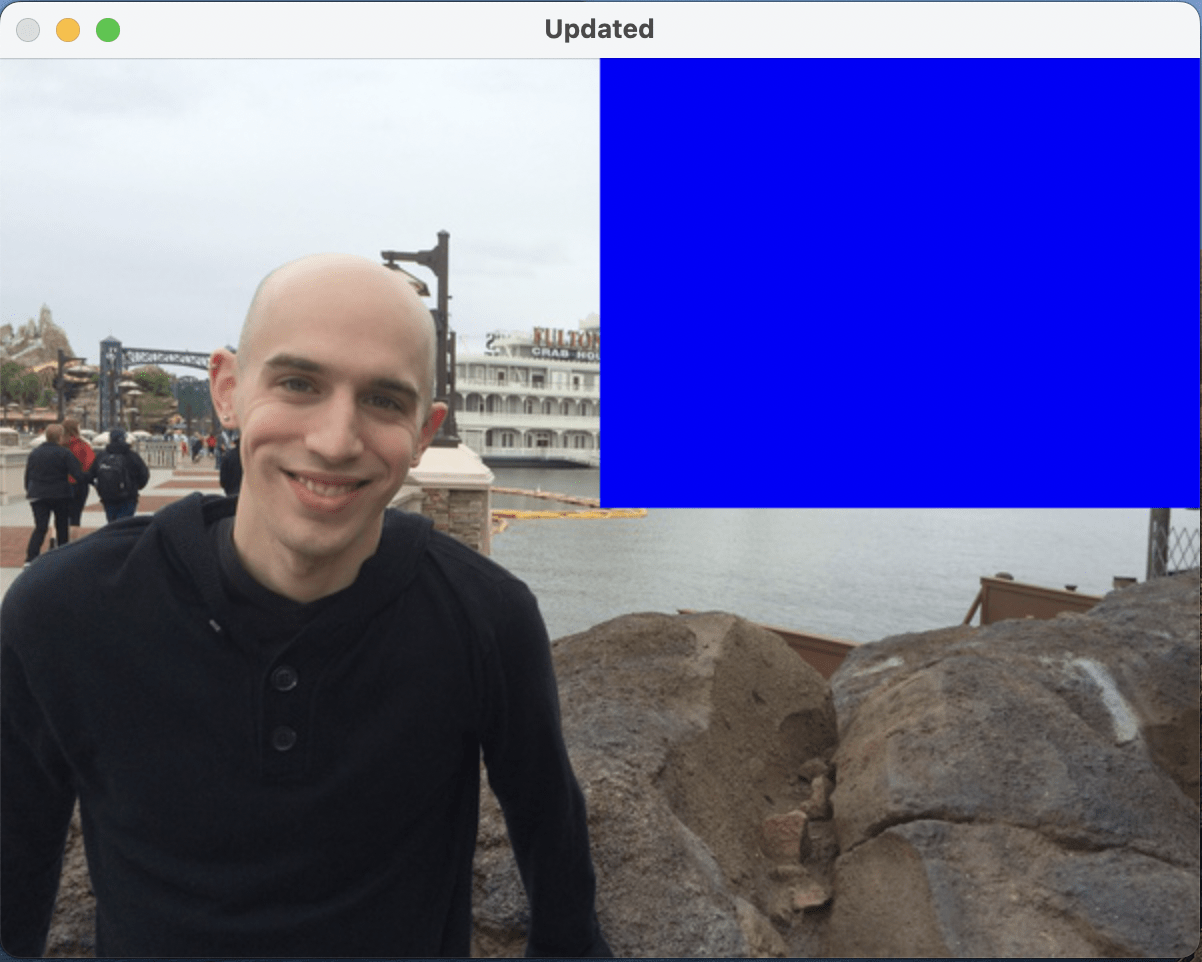
練習:
請自備一張圖片,並依照以下順序輸出操組後的圖片:
原圖→左半邊圖片→右下角圖片
→將右上角圖片改成全藍色的pixel
可以的話自己寫看看,
真的不行也可以用剛剛範例的程式碼去改寫喔
然後圖片記得要放在同一個資料夾底下
參考解答:
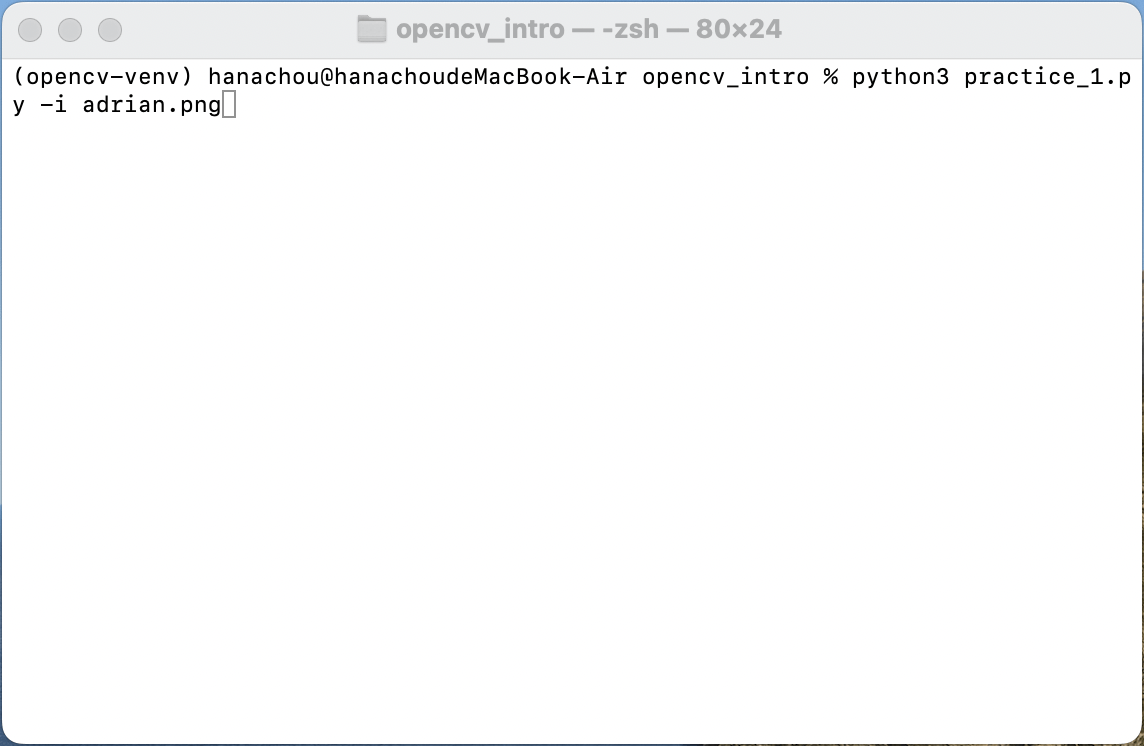
# python3 practice_1.py
import argparse
import cv2
ap = argparse.ArgumentParser()
ap.add_argument("-i", "--image", type=str, default="adrian.png",
help="path to the input image")
args = vars(ap.parse_args())
image = cv2.imread(args["image"])
(h, w) = image.shape[:2]
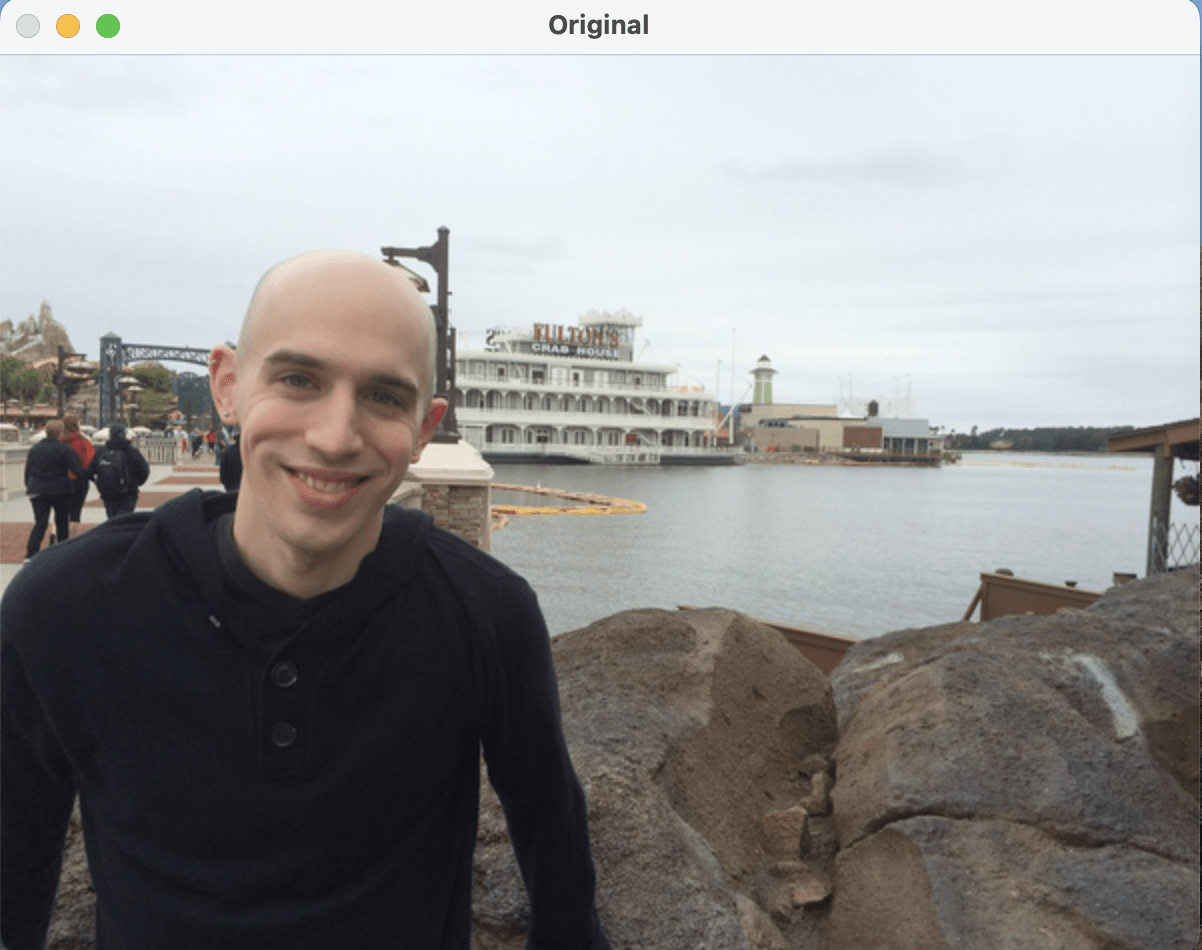
cv2.imshow("Original", image)
cv2.waitKey(0)
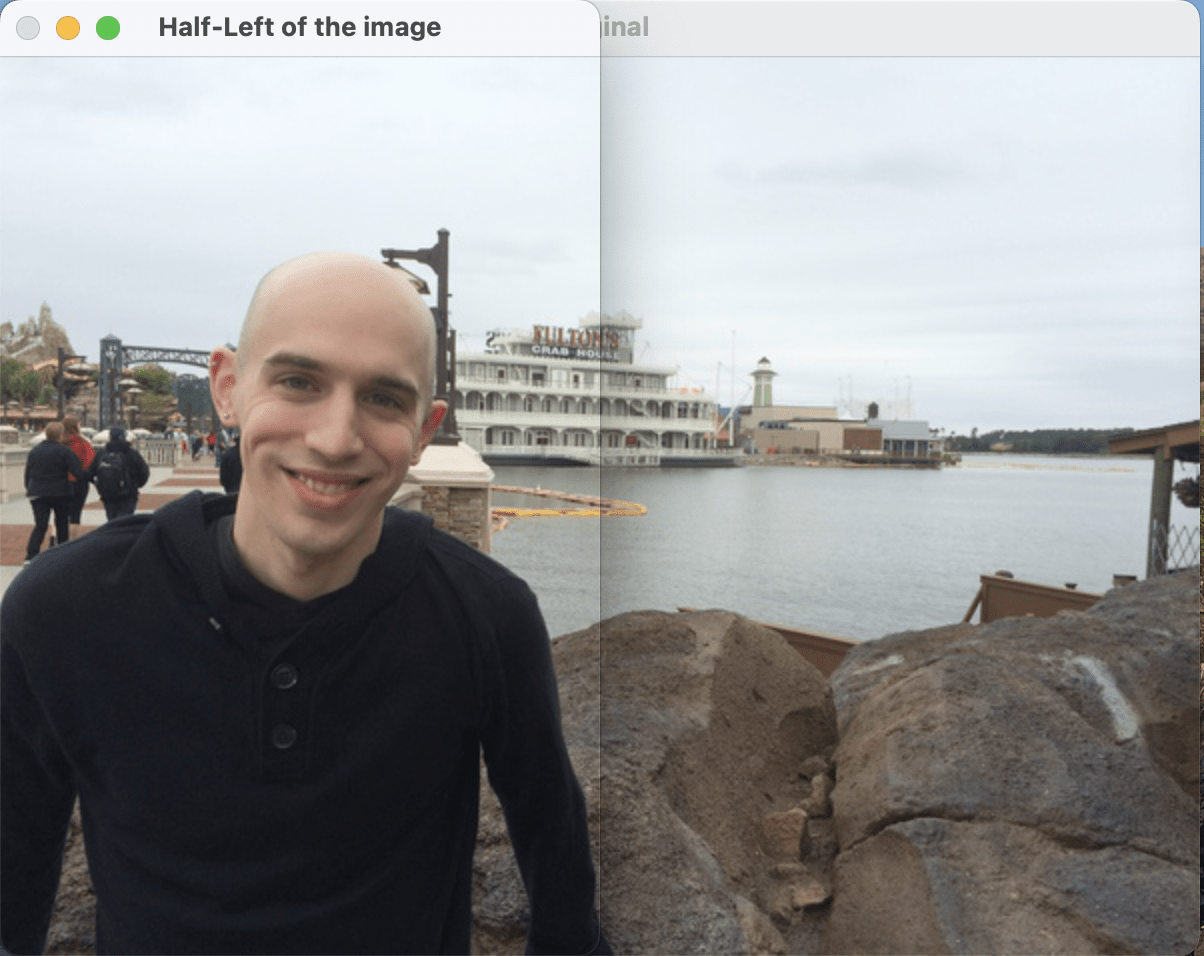
(cX, cY) = (w // 2, h // 2)
tl = image[0:h, 0:cX]
cv2.imshow("Half-Left of the image", tl)
cv2.waitKey(0)
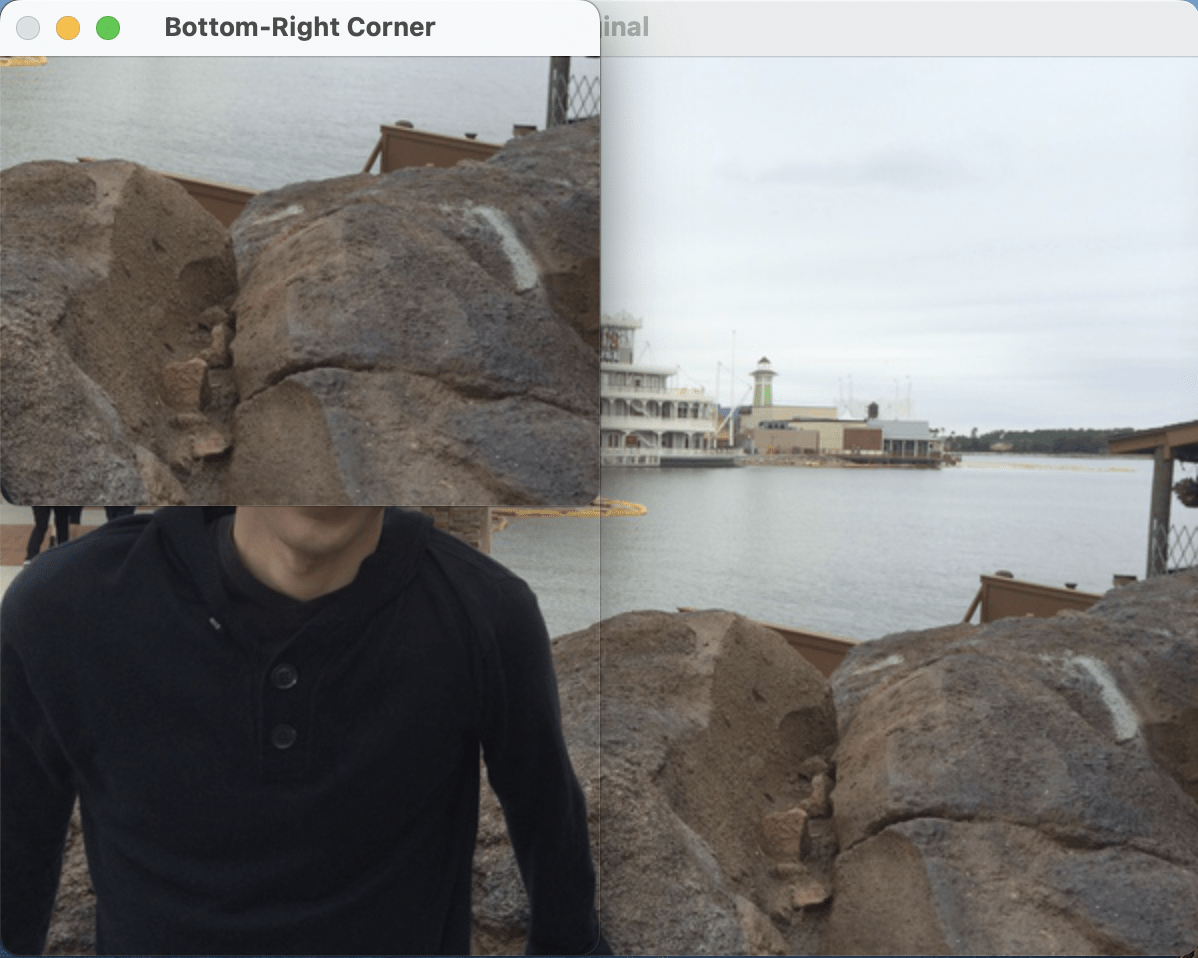
br = image[cY:h, cX:w]
cv2.imshow("Bottom-Right Corner", br)
cv2.waitKey(0)
image[0:cY, cX:w] = (255, 0, 0)
cv2.imshow("Updated", image)
cv2.waitKey(0)
cv2.destroyAllWindows()執行:
Drawing
Drawing
# python3 opencv_basic_drawing.py

# import the necessary packages
import numpy as np
import cv2

# initialize our canvas as a 300x300 pixel image with 3 channels
# (Red, Green, and Blue) with a black background
canvas = np.zeros((300, 300, 3), dtype="uint8")
既然要畫圖,當然不能少了畫布,
先初始化一張300x300pixel、有RGB三色的、
是黑色背景的畫布。
Drawing
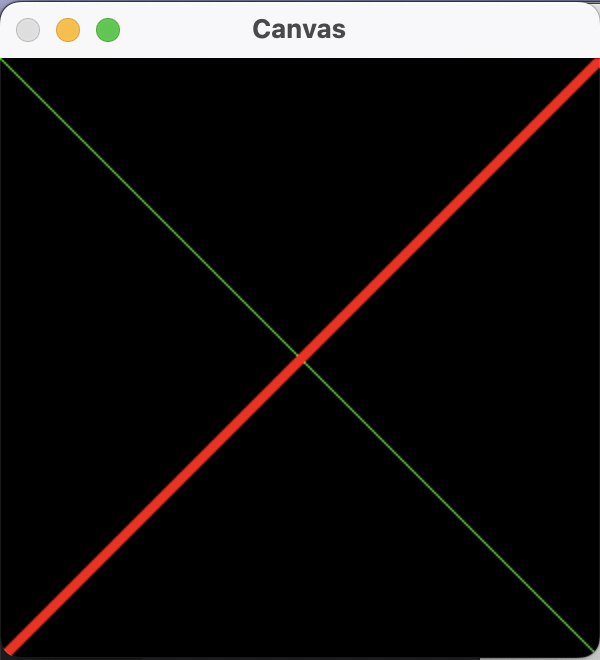
# draw a green line from the top-left corner of our canvas to the
# bottom-right
green = (0, 255, 0) #設定顏色
# cv2.line(畫布, 座標起始點, 座標終點, 顏色, 線寬)
# cv2.line(canvas, (x1, y1), (x2, y2), color)
cv2.line(canvas, (0, 0), (300, 300), green)
cv2.imshow("Canvas", canvas)
cv2.waitKey(0)

# draw a 3 pixel thick red line from the top-right corner to the
# bottom-left
red = (0, 0, 255) #(b, g, r)
cv2.line(canvas, (300, 0), (0, 300), red, 3)
cv2.imshow("Canvas", canvas)
cv2.waitKey(0)
我們可以畫一條從左上角穿到右下角的對角線、
也可以更改座標起始點與終點、顏色、寬度等
Drawing
Drawing
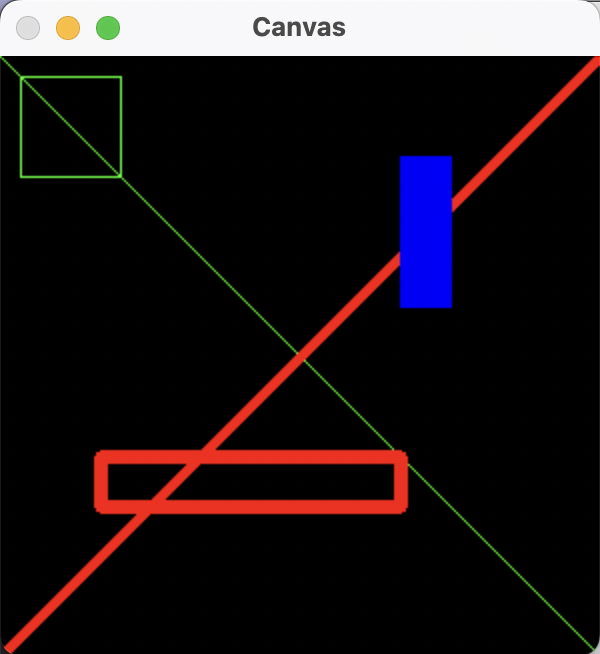
# draw a green 50x50 pixel square, starting at 10x10 and ending at 60x60
cv2.rectangle(canvas, (10, 10), (60, 60), green)
cv2.imshow("Canvas", canvas)
cv2.waitKey(0)

# draw another rectangle, this one red with 5 pixel thickness
cv2.rectangle(canvas, (50, 200), (200, 225), red, 5)
cv2.imshow("Canvas", canvas)
cv2.waitKey(0)

# draw a final rectangle (blue and filled in )
blue = (255, 0, 0)
cv2.rectangle(canvas, (200, 50), (225, 125), blue, -1)
cv2.imshow("Canvas", canvas)
cv2.waitKey(0)
接著是多邊形,概念其實差不多。
如果要填滿多邊形,可以在寬度的位置輸入-1。
Drawing
Drawing
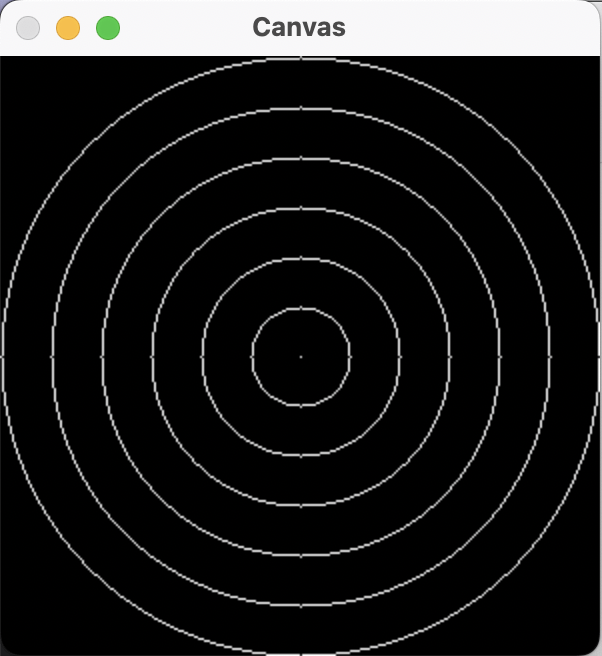
# re-initialize our canvas as an empty array, then compute the
# center (x, y)-coordinates of the canvas
canvas = np.zeros((300, 300, 3), dtype="uint8")
(centerX, centerY) = (canvas.shape[1] // 2, canvas.shape[0] // 2) #找圓心
white = (255, 255, 255)
如果覺得畫面太亂,
當然也能重置畫布。
接著我們要畫圓,
先找出圓心、設定畫筆顏色。
Drawing
# loop over increasing radii, from 25 pixels to 150 pixels in 25
# pixel increments
for r in range(0, 175, 25):
	# draw a white circle with the current radius size
	cv2.circle(canvas, (centerX, centerY), r, white)

# show our work of art
cv2.imshow("Canvas", canvas)
cv2.waitKey(0)

# re-initialize our canvas once again
canvas = np.zeros((300, 300, 3), dtype="uint8")我們可以利用for迴圈和range()
畫同心圓!
Drawing
Drawing
# let's draw 5 random circles
for i in range(0, 5):
	# randomly generate a radius size between 5 and 200, generate a
	# random color, and then pick a random point on our canvas where
	# the circle will be drawn
	radius = np.random.randint(5, high=200)
	color = np.random.randint(0, high=256, size=(3,)).tolist()
	# print(type(color))
	pt = np.random.randint(0, high=300, size=(2,))

	# draw our random circle on the canvas
	# we use a thickness of -1, so our circles are drawn as a solid color
	# and not just an outline.
	# cv2.circle(canvas, center, radius, color, thickness)
	cv2.circle(canvas, tuple(pt), radius, color, 5)
	cv2.imshow("Canvas", canvas)
	cv2.waitKey(0)

# display our masterpiece to our screen
cv2.imshow("Canvas", canvas)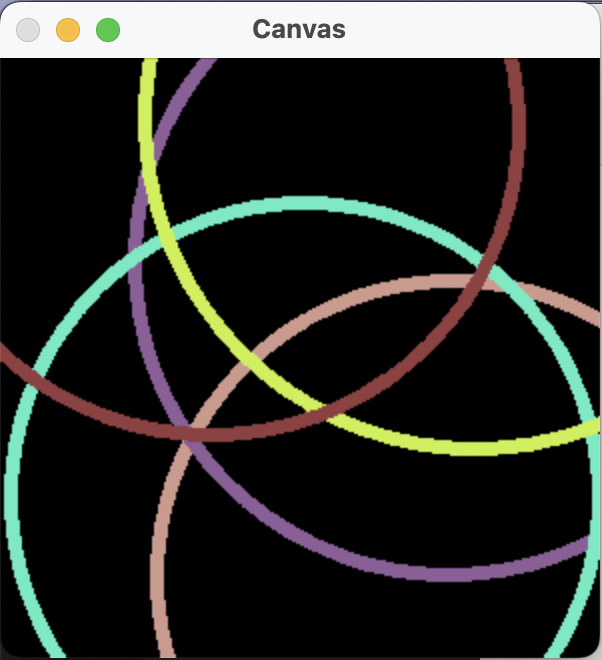
cv2.waitKey(0)利用Numpy的random,
我們可以隨機指定圓心、半徑、顏色,
創造出獨一無二的畫作。
Drawing
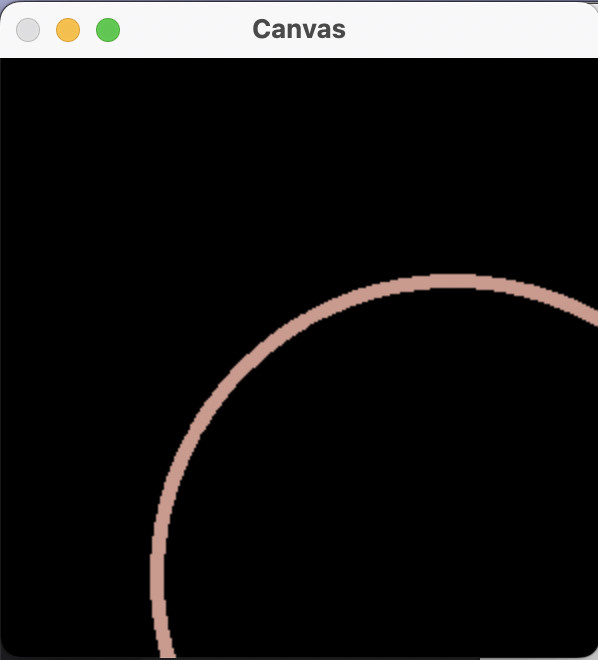
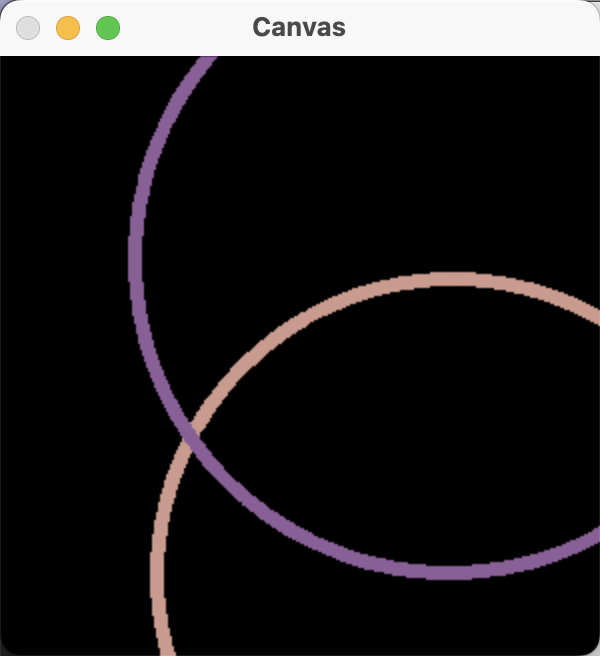
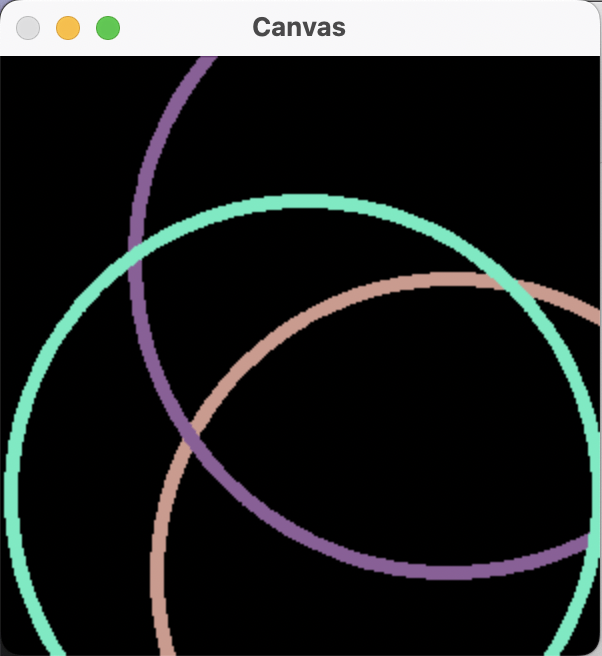
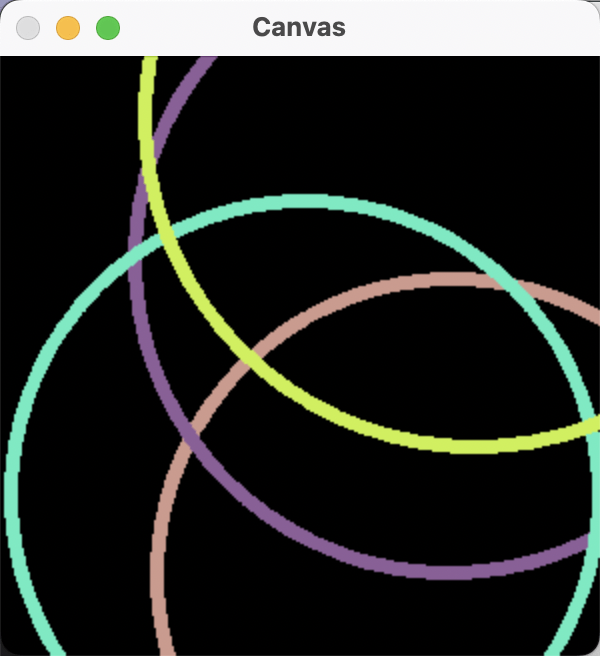
練習:隨機圖形生成器
參照剛才的隨機圓形生成器,
製作出一個可以生成隨機顏色、位置的
線、矩形(空心)、圓形(空心)共三種生成器,
線寬為5 pixel。
並且可以讓使用者指定各圖形的生成次數,
並畫在同一張畫布上。
線:隨機起始點、隨機終止點、隨機顏色
矩形:隨機起始點、隨機終止點、隨機顏色
圓:隨機圓心、隨機半徑(最大200px)、隨機顏色
範例程式碼:
# python3 practice_2.py
import numpy as np
import cv2
import argparse
canvas = np.zeros((300, 300, 3), dtype="uint8")
parser = argparse.ArgumentParser()
parser.add_argument("-l", "--line", type=int, help="How many lines do you want to draw.")
parser.add_argument("-s", "--square", type=int, help="How many squares do you want to draw.")
parser.add_argument("-c", "--circle", type=int, help="How many circles do you want to draw.")
args = vars(parser.parse_args())
# random lines
for i in range(args["line"]):
    color = np.random.randint(0, high=256, size=(3,)).tolist()
    pt_s = np.random.randint(0, high=300, size=(2,))
    pt_e = np.random.randint(0, high=300, size=(2,))
    cv2.line(canvas, tuple(pt_s), tuple(pt_e), color, 5)
    cv2.imshow("Canvas", canvas)
    cv2.waitKey(0)
# random squares
for i in range(args["square"]):
    color = np.random.randint(0, high=256, size=(3,)).tolist()
    pt_s = np.random.randint(0, high=300, size=(2,))
    pt_e = np.random.randint(0, high=300, size=(2,))
    cv2.rectangle(canvas, tuple(pt_s), tuple(pt_e), color, 5)
    cv2.imshow("Canvas", canvas)
    cv2.waitKey(0)
# random circles
for i in range(args["circle"]):
    radius = np.random.randint(5, high=200)
    color = np.random.randint(0, high=256, size=(3,)).tolist()
    pt = np.random.randint(0, high=300, size=(2,))
    cv2.circle(canvas, tuple(pt), radius, color, 5)
    cv2.imshow("Canvas", canvas)
    cv2.waitKey(0)
cv2.destroyAllWindows()