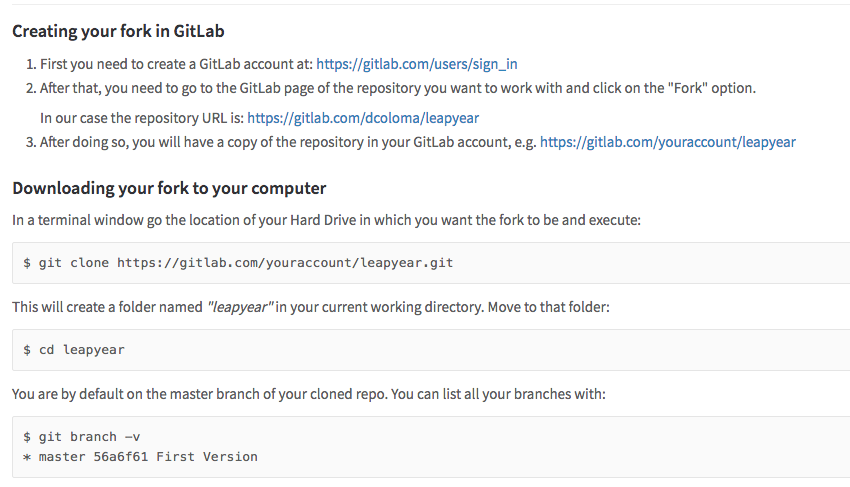
GIT HANDS-ON
We are going to work with the software for the "Leap Year"
We are going to see:
- How to upload it to a repository
- How to contribute to the project
- How to add a deployment/test infrastructure
The detailed doc is available at:
https://gitlab.com/dcoloma/leapyear/wikis/git-and-gitlab:-a-guided-tour
https://gitlab.com/dcoloma/leapyear/wikis/con

https://gitlab.com/dcoloma/leapyear
AN EMPTY REPOSITORY
My Laptop HD
https://gitlab.com/dcoloma/leapyear
$ git clone https://gitlab.com/dcoloma/leapyear.gitNow, I have an exact copy of the project in my computer (empty as the project was empty)
CLONE CREATION
My Laptop HD
https://gitlab.com/dcoloma/leapyear
$ git add index.html script.js  style.css
$ git commit -m "Initial Version"
$ git push
Now, the three files have been added to my computer, I let Git know I wanted them to by staged and later on I committed and pushed them.
ADDING CONTENT DIRECTLY
https://gitlab.com/dcoloma/leapyear/wikis/git-and-gitlab:-a-guided-tour
YOUR TURN STEP 1: YOUR FORK
My Laptop HD
https://gitlab.com/dcoloma/leapyear
Now, every of you have a fork in GitLab and a working copy after the clone in your computers
Alice's Laptop HD
https://gitlab.com/alice/leapyear
YOUR ENVIRONMENT
https://gitlab.com/dcoloma/leapyear/wikis/git-and-gitlab:-a-guided-tour
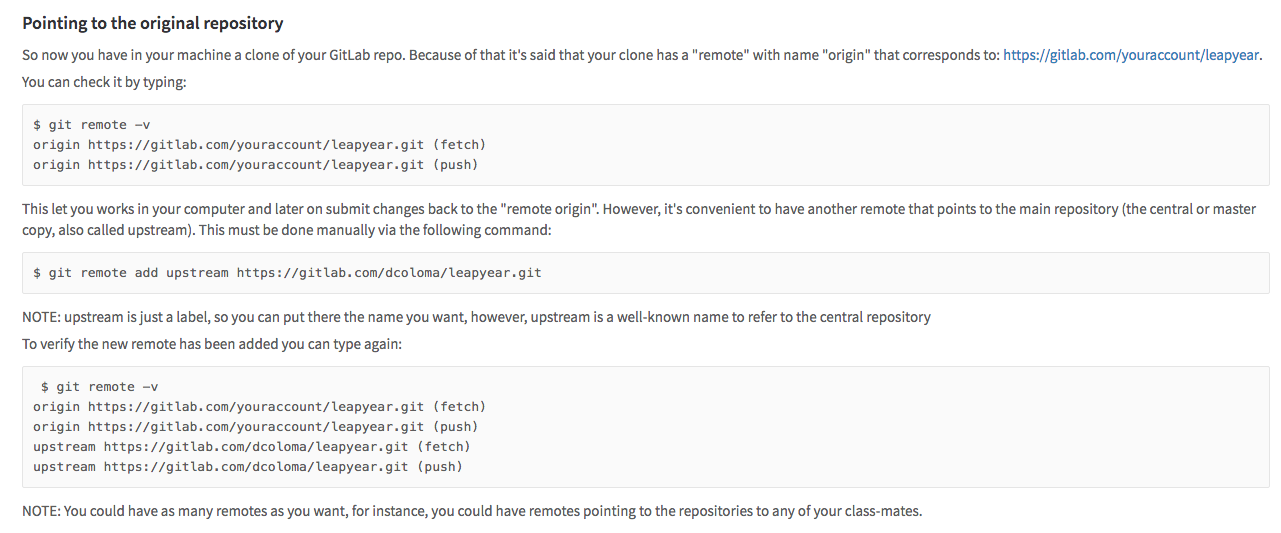
YOUR TURN - STEP 2- CONFIGURING REMOTES
My Laptop HD
https://gitlab.com/dcoloma/leapyear
Let's inform git about the repository forks we are working with
Alice's Laptop HD
https://gitlab.com/alice/leapyear
ORIGIN
UPSTREAM
A GRAPHICAL VIEW OF REMOTES
My Laptop HD
https://gitlab.com/dcoloma/leapyear
Alice's Laptop HD
https://gitlab.com/alice/leapyear
$ git add test.html
$ git add tests.js
$ git commit -m "Added First Version of Unit Tests"
$ git push origin
MAKING YOU OUT OF SYNC
https://gitlab.com/dcoloma/leapyear/wikis/git-and-gitlab:-a-guided-tour
YOUR TURN - STEP 3 - SYNCING
My Laptop HD
https://gitlab.com/dcoloma/leapyear
Alice's Laptop HD
https://gitlab.com/alice/leapyear
YOUR LOCAL COPY IS SYNCED
https://gitlab.com/dcoloma/leapyear/wikis/git-and-gitlab:-a-guided-tour
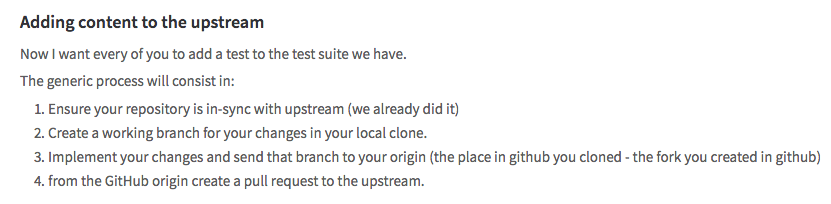
YOUR TURN - STEP 4 (SUMMARY) - ADDING CONTENT TO THE UPSTREAM
https://gitlab.com/dcoloma/leapyear/wikis/git-and-gitlab:-a-guided-tour

YOUR TURN - STEP 4 (A) - CREATE A DEVELOPMENT BRANCH
https://gitlab.com/dcoloma/leapyear/wikis/git-and-gitlab:-a-guided-tour


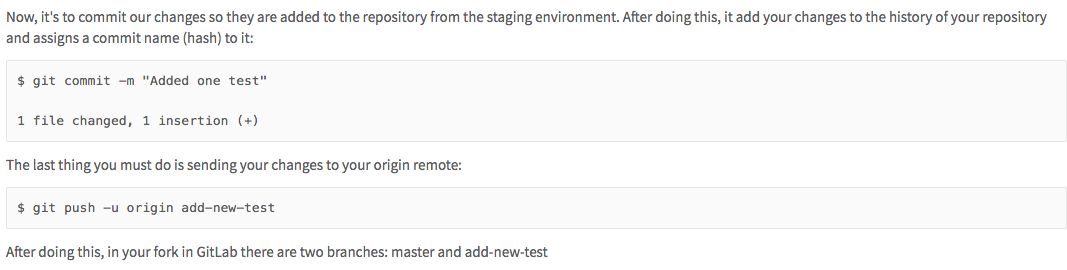
YOUR TURN - STEP 4 (B) - ADDING YOUR CHANGES TO YOUR BRANCH LOCALLY AND REMOTELY
My Laptop HD
https://gitlab.com/dcoloma/leapyear
Alice's Laptop HD
https://gitlab.com/alice/leapyear
YOUR CONTENT IN YOUR COPIES
https://gitlab.com/dcoloma/leapyear/wikis/git-and-gitlab:-a-guided-tour

YOUR TURN - STEP 4 (C) - CREATING A PULL/MERGE REQUEST
My Laptop HD
https://gitlab.com/dcoloma/leapyear
Alice's Laptop HD
https://gitlab.com/alice/leapyear
PULL REQUEST
A REQUEST TO THE ADMIN TO GET YOUR CHANGES
My Laptop HD
https://gitlab.com/dcoloma/leapyear
Alice's Laptop HD
https://gitlab.com/alice/leapyear
MERGE
THE FINAL PICTURE