Title Text


facebook/react
vuejs
GitHub stats
react is maintained by

facebook/react
vuejs
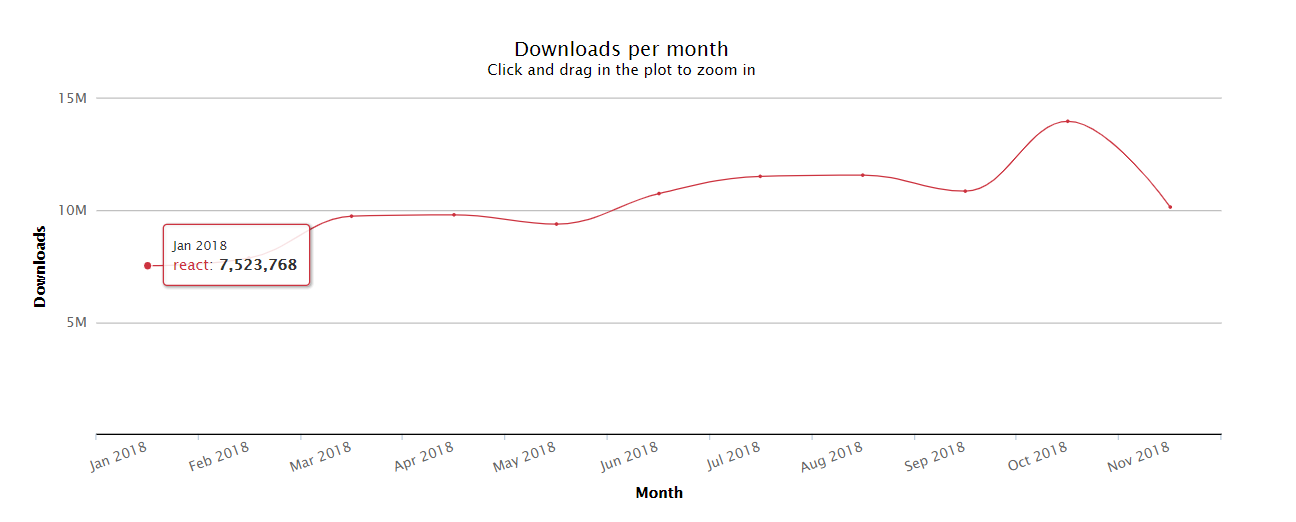
What Is React?
React is a JavaScript library for building user interfaces.
class ShoppingList extends React.Component {
  render() {
    return (
      <div className="shopping-list">
        <h1>Shopping List for {this.props.name}</h1>
        <ul>
          <li>Instagram</li>
          <li>WhatsApp</li>
          <li>Oculus</li>
        </ul>
      </div>
    );
  }
}

// Example usage: <ShoppingList name="Mark" />
React Component example
Try React
Online Playgrounds
CodePen or CodeSandbox.
Basic html usage
React with Wepback 4
npm i react react-domnpm i babel-loader @babel/core @babel/preset-env @babel/preset-react --save-dev{
"presets": ["@babel/preset-env", "@babel/preset-react"]
}module: {
rules: [
{
test: /\.(js|jsx)$/,
exclude: /node_modules/,
use: {
loader: 'babel-loader',
},
},
],
},Install React
Install Babel and loader
Add .babelrc config
Add loader to the webpack config
Create React App
Create React App is a comfortable environment for learning React, and is the best way to start building a new single-page application in React.
It sets up your development environment so that you can use the latest JavaScript features, provides a nice developer experience, and optimizes your app for production.
You’ll need to have Node >= 6 and npm >= 5.2 on your machine. To create a project, run:
npx create-react-app my-app
cd my-app
npm start
Introducing JSX
const element = <h1>Hello, world!</h1>;

/* Babel transformation ===> */

const element = React.createElement(
  "h1",
  null,
  "Hello, world!"
);
JSX Represents Objects
const element = (
  <h1 className="greeting">
    Hello, world!
  </h1>
);

==>

const element = React.createElement(
  'h1',
  {className: 'greeting'},
  'Hello, world!'
);

==>

// Note: this structure is simplified
const element = {
  type: 'h1',
  props: {
    className: 'greeting',
    children: 'Hello, world!'
  }
};
Babel is a JavaScript compiler
-
Transform syntax
-
Polyfill features that are missing in your target environment (through @babel/polyfill)
-
Source code transformations (codemods)
-
And more! https://babeljs.io/docs/en/
Embedding Expressions in JSX
const name = 'Dan Abramov';
const element = <h1>Hello, {name}</h1>;

ReactDOM.render(
  element,
  document.getElementById('root')
);
Embedding Expressions in JSX
function formatName(user) {
  return user.firstName + ' ' + user.lastName;
}

const user = {
  firstName: 'Elon',
  lastName: 'Musk'
};

const element = (
  <h1>
    Hello, {formatName(user)}!
  </h1>
);

ReactDOM.render(
  element,
  document.getElementById('root')
);
Specifying Attributes with JSX
const element1 = <div tabIndex="0"></div>;


const user = {
    name: 'admin',
    avatarUrl: './img1.jpg'
};

const element2 = <img src={user.avatarUrl}></img>;
Since JSX is closer to JavaScript than to HTML, React DOM uses camelCase property naming convention instead of HTML attribute names.
Rendering Elements
Elements are the smallest building blocks of React apps.
const element = <h1>Hello, world!</h1>;
Rendering an Element into the DOM
<!doctype html>
<html lang="en">
<head>
  <meta charset="utf-8">
</head>
<body>
  <div id="root"></div>
</body>
</html>
const element = <h1>Hello, world</h1>;
ReactDOM.render(element, document.getElementById('root'));To render a React element into a root DOM node, pass both to ReactDOM.render():
Time to code
Components and Props
function Welcome(props) {
  return <h1>Hello, {props.name}</h1>;
}

// or even simply, using the ES6

const Welcome = (props) => <h1>Hello, {props.name}</h1>;
The simplest way to define a component is to write a JavaScript function:
You can also use an ES6 class to define a component:
class Welcome extends React.Component {
  render() {
    return <h1>Hello, {this.props.name}</h1>;
  }
}
Rendering a Component
function Welcome(props) {
  return <h1>Hello, {props.name}</h1>;
}

const element = <Welcome name="Sara" />;
ReactDOM.render(
  element,
  document.getElementById('root')
);- We call ReactDOM.render() with the <Welcome name="Sara" /> element.
- React calls the Welcome component with {name: 'Sara'} as the props.
- The Welcome component returns a <h1>Hello, Sara</h1> element.
- React DOM efficiently updates the DOM to match <h1>Hello, Sara</h1>.
Composing Components
function Welcome(props) {
  return <h1>Hello, {props.name}</h1>;
}

function App() {
  return (
    <div>
      <Welcome name="Vika" />
      <Welcome name="Masha" />
      <Welcome name="Oksana" />
    </div>
  );
}

ReactDOM.render(
  <App />,
  document.getElementById('root')
);
Components can refer to other components in their output. This lets us use the same component abstraction for any level of detail.
Props are Read-Only
function Welcome(props) {
  props.name = 'Andrey'; // never mutate your props!!!!
  return <h1>Hello, {props.name}</h1>;
}


ReactDOM.render(
  <Welcome name="Pasha"/>,
  document.getElementById('root')
);
All React components must act like pure functions with respect to their props.
Whether you declare a component as a function or a class, it must never modify its own props.
State and Lifecycle
Consider the ticking clock example. To update UI call ReactDOM.render() to change the rendered output:
function tick() {
  const element = (
    <div>
      <h1>Hello, world!</h1>
      <h2>It is {new Date().toLocaleTimeString()}.</h2>
    </div>
  );
  ReactDOM.render(
    element,
    document.getElementById('root')
  );
}

setInterval(tick, 1000);
In this section, we will learn how to make the Clock component truly reusable and encapsulated. It will set up its own timer and update itself every second
We can start by encapsulating how the clock looks:
function Clock(props) {
  return (
    <div>
      <h1>Hello, world!</h1>
      <h2>It is {props.date.toLocaleTimeString()}.</h2>
    </div>
  );
}

function tick() {
  ReactDOM.render(
    <Clock date={new Date()} />,
    document.getElementById('root')
  );
}

setInterval(tick, 1000);
However, it misses a crucial requirement: the fact that the Clock sets up a timer and updates the UI every second should be an implementation detail of the Clock.
Ideally we want to write this once and have the Clock update itself:
ReactDOM.render(
  <Clock />,
  document.getElementById('root')
);
class Clock extends React.Component {
render() {
return (
<div>
<h1>Hello, world!</h1>
<h2>It is {this.props.date.toLocaleTimeString()}.</h2>
</div>
);
}
}Convert a function to a class
The render method will be called each time an update happens, but as long as we render <Clock /> into the same DOM node, only a single instance of the Clock class will be used. This lets us use additional features such as local state and lifecycle methods.
Adding Local State to a Class
class Clock extends React.Component {
  constructor(props) {
    super(props);
    this.state = {date: new Date()};
  }

  render() {
    return (
      <div>
        <h1>Hello, world!</h1>
        <h2>It is {this.state.date.toLocaleTimeString()}.</h2>
      </div>
    );
  }
}
Add a class constructor that assigns the initial this.state:
Note how we pass props to the base constructor.
Class components should always call the base constructor with props.
Adding Lifecycle Methods
In applications with many components, it’s very important to free up resources taken by the components when they are destroyed.
We want to set up a timer whenever the Clock is rendered to the DOM for the first time. This is called “mounting” in React.
We also want to clear that timer whenever the DOM produced by the Clock is removed. This is called “unmounting” in React.
We can declare special methods on the component class to run some code when a component mounts and unmounts:
class Clock extends React.Component {
  constructor(props) {
    super(props);
    this.state = {date: new Date()};
  }

  componentDidMount() {

  }

  componentWillUnmount() {

  }

  render() {
    return (
      <div>
        <h1>Hello, world!</h1>
        <h2>It is {this.state.date.toLocaleTimeString()}.</h2>
      </div>
    );
  }
}
These methods are called “lifecycle methods”.
The componentDidMount() method runs after the component output has been rendered to the DOM. This is a good place to set up a timer:
  componentDidMount() {
    this.timerID = setInterval(
      () => this.tick(),
      1000
    );
  }
Note how we save the timer ID right on this.
While this.props is set up by React itself and this.state has a special meaning, you are free to add additional fields to the class manually if you need to store something that doesn’t participate in the data flow (like a timer ID).
We will tear down the timer in the componentWillUnmount() lifecycle method:
  componentWillUnmount() {
    clearInterval(this.timerID);
  }
Implement the tick method:
tick() {
    this.setState({
      date: new Date()
    });
}
Every second the browser calls the tick() method. Inside it, the Clock component schedules a UI update by calling setState() with an object containing the current time. Thanks to the setState() call, React knows the state has changed, and calls the render() method again to learn what should be on the screen. This time, this.state.date in the render() method will be different, and so the render output will include the updated time. React updates the DOM accordingly.
Using State Correctly
There are four things you should know about state React Component :
1. Do Not Modify State Directly
// Wrong
this.state.comment = 'Hello';

// Correct
this.setState({comment: 'Hello'});
Using State Correctly
2. The only place where you can assign this.state is the constructor.
class MyComponent extends React.Component {
    constructor(props) {
      super(props);
      this.state = {
          name: 'My Name'
      };
    }
State Updates May Be Asynchronous
3. React may batch multiple setState() calls into a single update for performance.
Because this.props and this.state may be updated asynchronously, you should not rely on their values for calculating the next state.
// Wrong
this.setState({
  counter: this.state.counter + this.props.increment,
});


// Correct
this.setState((state, props) => ({
  counter: state.counter + props.increment
}));
State Updates are Merged
4. When you call setState(), React merges the object you provide into the current state.
  constructor(props) {
    super(props);
    this.state = {
      posts: [],
      comments: []
    };
  }

  componentDidMount() {
    fetchPosts().then(response => {
      this.setState({
        posts: response.posts
      });
    });

    fetchComments().then(response => {
      this.setState({
        comments: response.comments
      });
    });
  }
Handling Events
Handling events with React elements is very similar to handling events on DOM elements. There are some syntactic differences:
- React events are named using camelCase, rather than lowercase.
- With JSX you pass a function as the event handler, rather than a string.
For example, the HTML:
<button onclick="activateLasers()">
  Activate Lasers
</button>
is slightly different in React:
<button onClick={activateLasers}>
  Activate Lasers
</button>
Binding context (this) to a handler
1. Bind inside the constructor
constructor(props) {
    super(props);
    this.state = {isToggleOn: true};

    // This binding is necessary to make `this` work in the callback
    this.handleClick = this.handleClick.bind(this);
  }

  handleClick() {
    this.setState(state => ({
      isToggleOn: !state.isToggleOn
    }));
  }
You have to be careful about the meaning of this in JSX callbacks. In JavaScript, class methods are not bound by default. If you forget to bind this.handleClick and pass it to onClick, this will be undefined when the function is actually called.
This is not React-specific behavior; it is a part of how functions work in JavaScript. Generally, if you refer to a method without () after it, such as onClick={this.handleClick}, you should bind that method.
2. If calling bind annoys you, there is a way you can get around this. If you are using the experimental public class fields syntax, you can use class fields to correctly bind callbacks:
  // This syntax ensures `this` is bound within handleClick.
  // Warning: this is *experimental* syntax.
  handleClick = () => {
    console.log('this is:', this);
  }
This syntax is enabled by default in Create React App.
Conditional Rendering
function Greeting(props) {
  const isLoggedIn = props.isLoggedIn;
  if (isLoggedIn) {
    return <UserGreeting />;
  }
  return <GuestGreeting />;
}

ReactDOM.render(
  // Try changing to isLoggedIn={true}:
  <Greeting isLoggedIn={false} />,
  document.getElementById('root')
);
We’ll create a Greeting component that displays either of these components depending on whether a user is logged in:
Lists and Keys
Rendering Multiple Components
You can build collections of elements and include them in JSX using curly braces {}.
const List = () => {
    const names = ['Sveta', 'Ira', 'Artem', 'Andrei', 'Pasha', 'Egor', 'Nadia'];
    const listItems = names.map(name => <li>{name}</li>);

    return (
        <ul>
            {listItems}
        </ul>
    );
}

ReactDOM.render(
  <List />,
  document.getElementById('root')
);
Keys
Keys help React identify which items have changed, are added, or are removed. Keys should be given to the elements inside the array to give the elements a stable identity:
const List = () => {
    const users = [
        { name: 'Sveta', id: 1},
        { name: 'Ira', id: 2},
        { name: 'Artem', id: 3},
        { name: 'Andrei', id: 4},
        { name: 'Pasha', id: 5},
        { name: 'Egor', id: 6},
        { name: 'Nadia', id: 7},
    ];
    const listItems = users.map(user=> <li key={user.id.toString()}>{user.name}</li>);

    return (
        <ul>
            {listItems}
        </ul>
    );
}

ReactDOM.render(
  <List />,
  document.getElementById('root')
);
When you don’t have stable IDs for rendered items, you may use the item index as a key as a last resort:
const todoItems = todos.map((todo, index) =>
  // Only do this if items have no stable IDs
  <li key={index}>
    {todo.text}
  </li>
);
We don’t recommend using indexes for keys if the order of items may change. This can negatively impact performance and may cause issues with component state. Check out Robin Pokorny’s article for an in-depth explanation on the negative impacts of using an index as a key. If you choose not to assign an explicit key to list items then React will default to using indexes as keys.
Here is an in-depth explanation about why keys are necessary if you’re interested in learning more.
Forms
HTML form elements work a little bit differently from other DOM elements in React, because form elements naturally keep some internal state. For example, this form in plain HTML accepts a single name:
<form>
  <label>
    Name:
    <input type="text" name="name" />
  </label>
  <input type="submit" value="Submit" />
</form>
Controlled Components
We can combine a form state and a react component state by making the React state be the “single source of truth”.
class NameForm extends React.Component {
  constructor(props) {
    super(props);
    this.state = {value: ''};
  }

  handleChange = event => this.setState({value: event.target.value});

  handleSubmit = (event) => {
    event.preventDefault();

    alert('A name was submitted: ' + this.state.value);
  }

  render() {
    return (
      <form onSubmit={this.handleSubmit}>
        <label>
          Name:
          <input type="text" value={this.state.value} onChange={this.handleChange} />
        </label>
        <input type="submit" value="Submit" />
      </form>
    );
  }
}
Lifting State Up
Often, several components need to reflect the same changing data. We recommend lifting the shared state up to their closest common ancestor. Let’s see how this works in action.
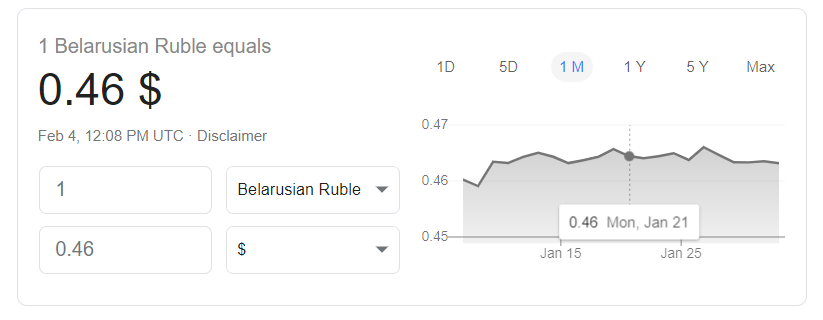
Let's imagine, that we should implement a live currency converter, something like google provide to us:
The data should be in sync in two inputs, which could be the same React Component
The final variant should look like this gif