Webpack

What is Webpack
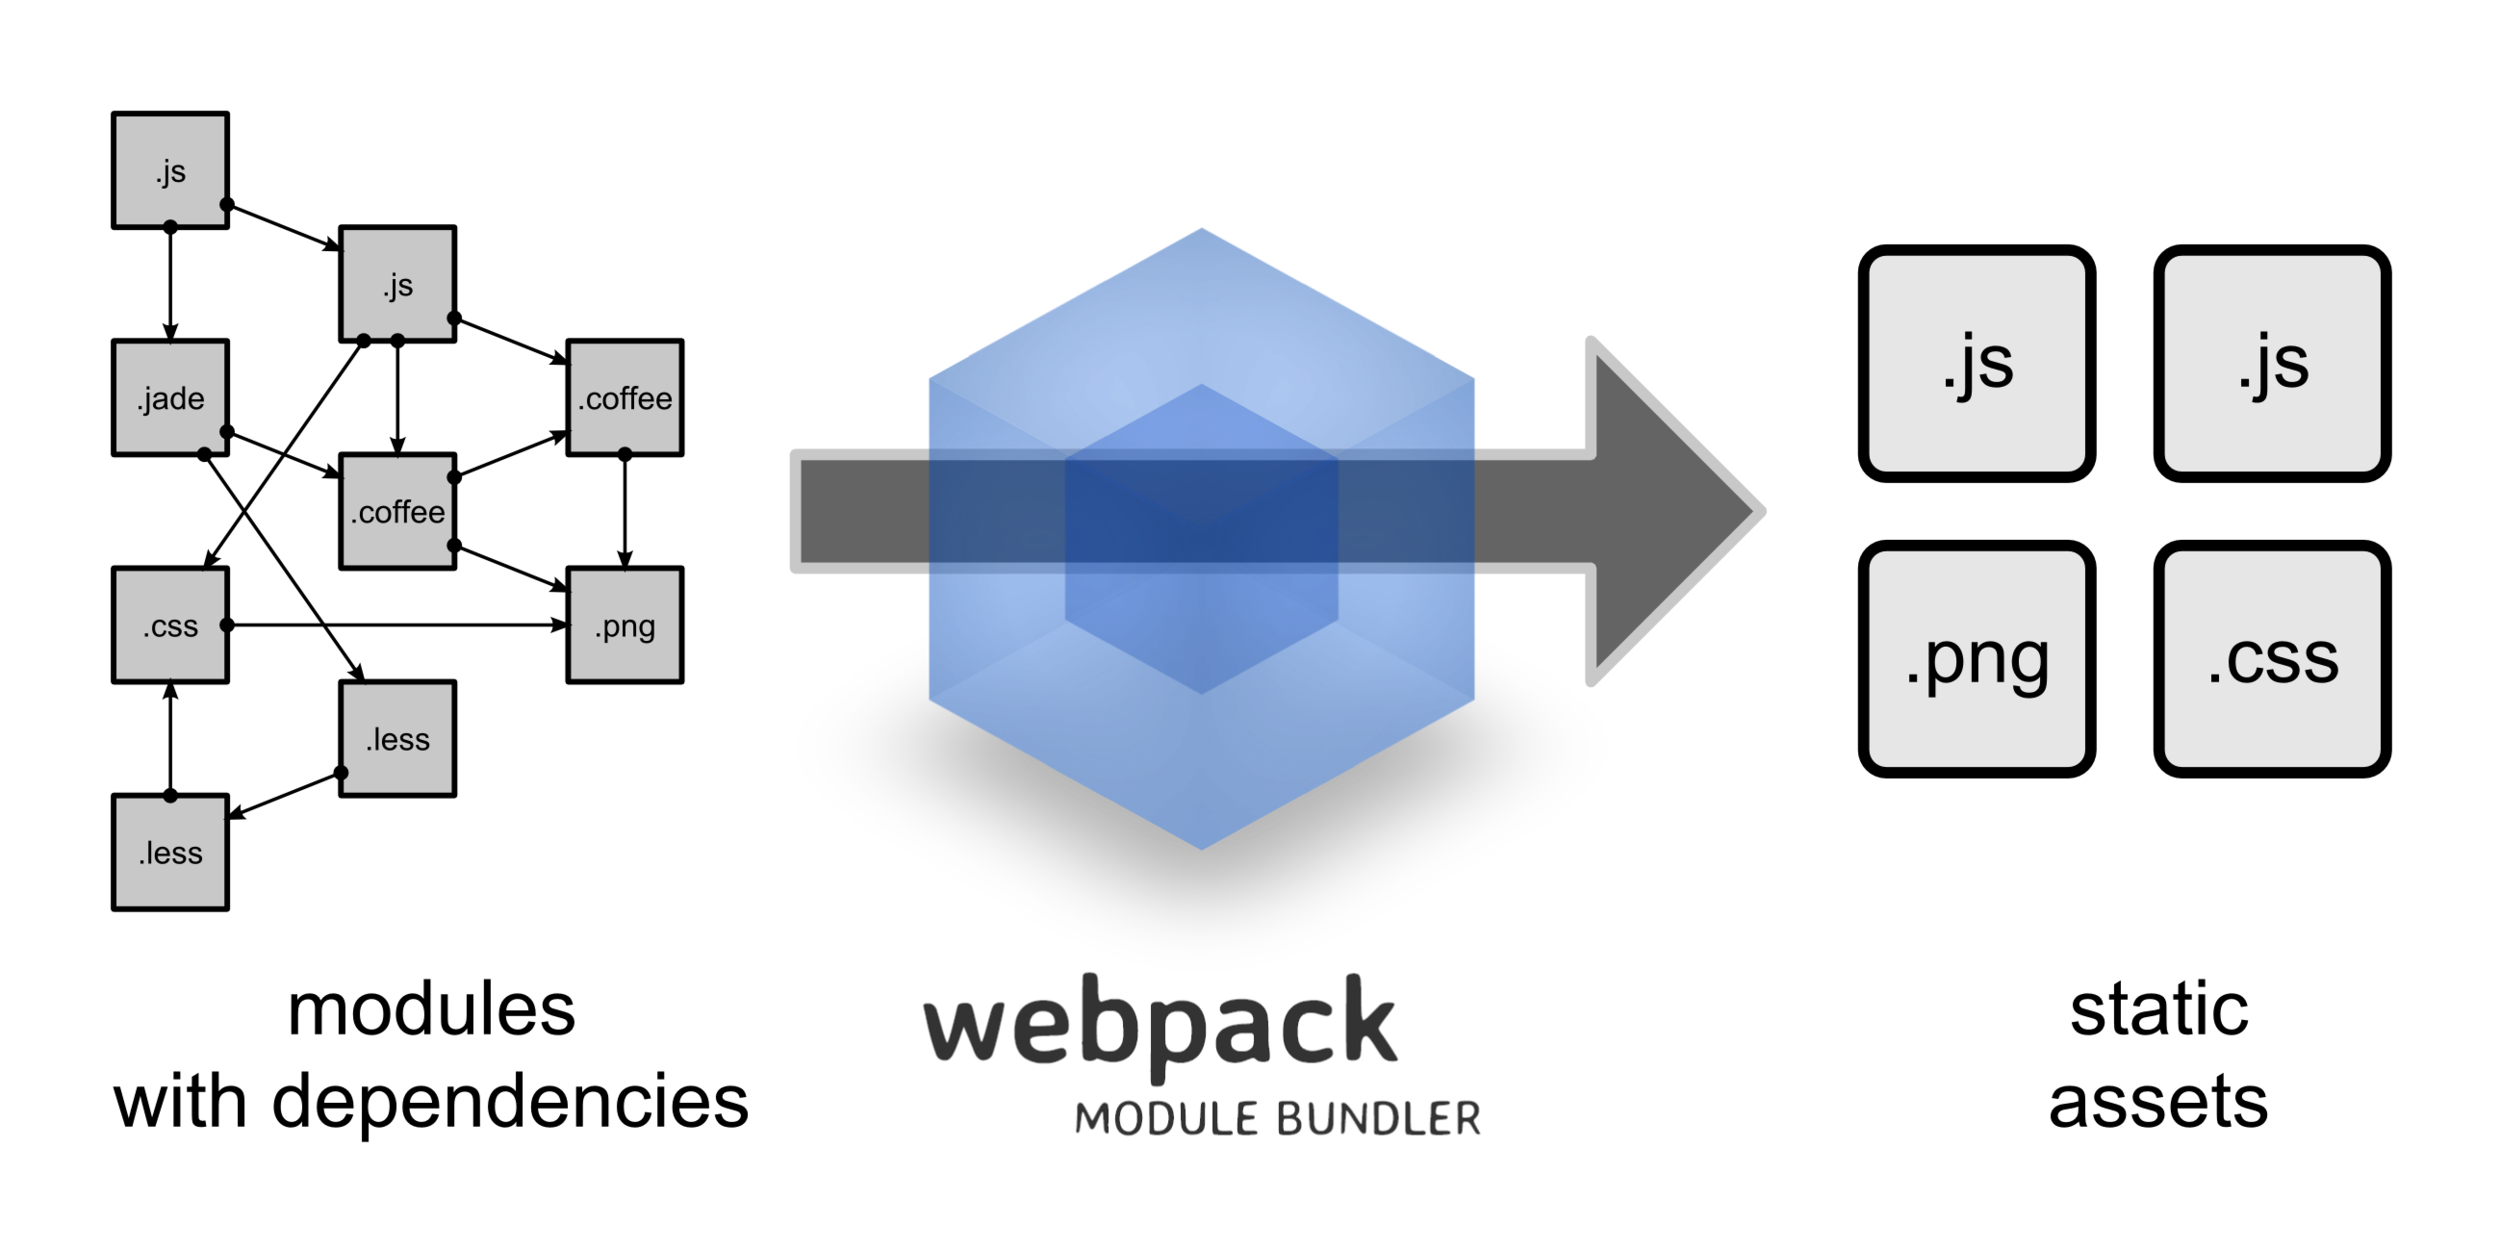
Webpack is an open-source JavaScript module bundler. Its main purpose is to bundle JavaScript files for usage in a browser, yet it is also capable of transforming, bundling, or packaging just about any resource or asset. Webpack takes modules with dependencies and generates static assets representing those modules. It is a module bundler primarily for JavaScript, but it can transform front-end assets like HTML, CSS, even images if the corresponding plugins are included. (WIKI)
Webpack can perform many operations:
- helps you bundle your resources.
- watches for changes and re-runs the tasks.
- can run Babel transpilation to ES5, allowing you to use the latest JavaScript features without worrying about browser support.
- can transpile TypeScript and CoffeeScript to JavaScript
- can convert inline images to data URIs.
- allows you to use require() for CSS files.
- can run a development webserver.
- can handle hot module replacement.
- can split the output files into multiple files, to avoid having a huge js file to load in the first page hit.
- can perform tree shaking.
-
Why exactly webpack? - Comparison with others
-
Webpack core concepts
-
A short introduction to webpack
-
Useful youtube videos about Webpack 4
Always take care about webpack version you use and a guide or video you lead. Webpack significantly differs from version to version!
Installation
To install the latest release or a specific version, run one of the following commands:
npm install --save-dev webpack
npm install --save-dev webpack@<version>
If you're using webpack v4 or later, you'll need to install the CLI.
npm install --save-dev webpack-cliInstalling locally is what webpack official page recommend for most projects. This makes it easier to upgrade projects individually when breaking changes are introduced.
Running
When webpack installed, let's run
npx webpack
which will take our script at src/index.js as the entry point, and will generate dist/main.js as the output. The npx command, which ships with Node 8.2/npm 5.2.0 or higher, runs the webpack binary (./node_modules/.bin/webpack) of the webpack package we installed in the beginning
Modules
The import and export statements have been standardized in ES2015 and are supported in most browsers. Some older browsers still lag behind but webpack supports modules out of the box.
Behind the scenes, webpack actually "transpiles" the code so that older browsers can also run it. If you inspect dist/main.js, you might be able to see how webpack does this, it's quite ingenious! Besides import and export, webpack supports various other module syntaxes as well, see Module API for more information.
Note that webpack will not alter any code other than import and export statements. If you are using other ES2015 features, make sure to use a transpiler such as Babel via webpack's loader system.
Using a Configuration
As of version 4, webpack doesn't require any configuration, but most projects will need a more complex setup, which is why webpack supports a configuration file. This is much more efficient than having to manually type in a lot of commands in the terminal, so let's create one:
webpack.config.js
const path = require('path');

module.exports = {
  entry: './src/index.js',
  output: {
    filename: 'main.js',
    path: path.resolve(__dirname, 'dist')
  }
};
Using a Configuration
Now, let's run the build again but instead using our new configuration file:
npx webpack --config webpack.config.jsIf a webpack.config.js is present, the webpack command picks it up by default. We use the --config option here only to show that you can pass a config of any name. This will be useful for more complex configurations that need to be split into multiple files.
A configuration file allows far more flexibility than simple CLI usage. We can specify loader rules, plugins, resolve options and many other enhancements this way. See the configuration documentation to learn more.
NPM Scripts
Given it's not particularly fun to run a local copy of webpack from the CLI, we can set up a little shortcut. Let's adjust our package.json by adding an npm script:
{
    "name": "webpack-demo",
    "version": "1.0.0",
    "description": "",
    "scripts": {
      "test": "echo \"Error: no test specified\" && exit 1",
      "build": "webpack"
    },
    "keywords": [],
    "author": "",
    "license": "ISC",
    "devDependencies": {
      "webpack": "^4.20.2",
      "webpack-cli": "^3.1.2"
    },
    "dependencies": {
      "lodash": "^4.17.5"
    }
  }
NPM Scripts
Now the npm run build command can be used in place of the npx command we used earlier. Note that within scripts we can reference locally installed npm packages by name the same way we did with npx. This convention is the standard in most npm-based projects because it allows all contributors to use the same set of common scripts (each with flags like --config if necessary).
npm run buildNow run the following command and see if your script alias works:
Asset Management
Loading CSS
In order to import a CSS file from within a JavaScript module, you need to install and add the style-loader and css-loader to your module configuration:
npm install --save-dev style-loader css-loader
webpack.config.js
  const path = require('path');

  module.exports = {
    entry: './src/index.js',
    output: {
      filename: 'bundle.js',
      path: path.resolve(__dirname, 'dist')
    },
+   module: {
+     rules: [
+       {
+         test: /\.css$/,
+         use: [
+           'style-loader',
+           'css-loader'
+         ]
+       }
+     ]
+   }
  };
Loading CSS
This enables you to import './style.css' into the file that depends on that styling. Now, when that module is run, a <style> tag with the stringified css will be inserted into the <head> of your html file.
import './style.css';Note that you can, and in most cases should, minimize css for better load times in production. On top of that, loaders exist for pretty much any flavor of CSS you can think of -- postcss, sass, and less to name a few.
Loading images
Using the file-loader we can easily incorporate those in our system as well:
npm install --save-dev file-loader
webpack.config.js
  const path = require('path');

  module.exports = {
    entry: './src/index.js',
    output: {
      filename: 'bundle.js',
      path: path.resolve(__dirname, 'dist')
    },
   module: {
     rules: [
+       {
+         test: /\.(png|svg|jpg|gif)$/,
+         use: [
+           'file-loader'
+         ]
+       }
     ]
   }
  };
Loading images
A logical next step from here is minifying and optimizing your images. Check out the image-webpack-loader and url-loader for more on how you can enhance your image loading process.
import Icon from './icon.png';

var myIcon = new Image();
myIcon.src = Icon;

document.body.appendChild(myIcon);
Loading fonts
  const path = require('path');

  module.exports = {
    entry: './src/index.js',
    output: {
      filename: 'bundle.js',
      path: path.resolve(__dirname, 'dist')
    },
   module: {
     rules: [
+       {
+         test: /\.(woff|woff2|eot|ttf|otf)$/,
+         use: [
+           'file-loader'
+         ]
+       }
     ]
   }
  };
+ @font-face {
+ font-family: 'MyFont';
+ src: url('./my-font.woff2') format('woff2'),
+ url('./my-font.woff') format('woff');
+ font-weight: 600;
+ font-style: normal;
+ }Usage:
Output Management
npm install --save-dev html-webpack-plugin+ const HtmlWebpackPlugin = require('html-webpack-plugin');
module.exports = {
// previous code base
+ plugins: [
+ new HtmlWebpackPlugin({
+ title: 'Output Management'
+ })
+ ]
};webpack.config.js
Cleaning up the /dist folder
npm install --save-dev clean-webpack-pluginwebpack.config.js
+ const CleanWebpackPlugin = require('clean-webpack-plugin');

  module.exports = {

    // previous code base


    plugins: [
      // ...

+     new CleanWebpackPlugin(),

    ]
  };
Development
The tools in this guide are only meant for development, please avoid using them in production!
module.exports = {
+   mode: 'development',


    // previous code base

};
Using source maps
There are a lot of different options available when it comes to source maps. Be sure to check them out so you can configure them to your needs.
For this guide, let's use the inline-source-map option, which is good for illustrative purposes (though not for production):
webpack.config.js
module.exports = {

    // previous code base

+   devtool: 'inline-source-map',


  };
Choosing a Development Tool
It quickly becomes a hassle to manually run npm run build every time you want to compile your code.
There are a couple of different options available in webpack that help you automatically compile your code whenever it changes:
- webpack's Watch Mode
- webpack-dev-server
- webpack-dev-middleware
In most cases, you probably would want to use
webpack-dev-server, but let's explore all of the above options.
Using Watch Mode
You can instruct webpack to "watch" all files within your dependency graph for changes. If one of these files is updated, the code will be recompiled so you don't have to run the full build manually.
package.json
{
    "name": "demo-app",
    "version": "1.0.0",
    "description": "",
    "scripts": {
      "test": "echo \"Error: no test specified\" && exit 1",
+     "watch": "webpack --watch",
      "build": "webpack"
    },

    /* previous code base */
  }
Using webpack-dev-server
The webpack-dev-server provides you with a simple web server and the ability to use live reloading.
package.json
{
    "name": "demo-app",
    "version": "1.0.0",
    "description": "",
    "scripts": {
      "test": "echo \"Error: no test specified\" && exit 1",
+     "watch": "webpack-dev-server",
      "build": "webpack"
    },

    /* previous code base */
  }
npm install --save-dev webpack-dev-server
Hot Module Replacement

Hot Module Replacement
Hot Module Replacement (HMR) exchanges, adds, or removes modules while an application is running, without a full reload. This can significantly speed up development in a few ways:
- Retain application state which is lost during a full reload.
- Save valuable development time by only updating what's changed.
- Modifications made to CSS/JS in the source code results in an instant browser update which is almost comparable to changing styles directly in the browser's dev tools.
HMR is not intended for use in production, meaning it should only be used in development. See the building for production guide for more information.
Enabling HMR
This feature is great for productivity. All we need to do is update our webpack-dev-server configuration, and use webpack's built in HMR plugin.
+ const webpack = require('webpack');

  module.exports = {
    devServer: {
      contentBase: './dist',
+     hot: true
    },
    plugins: [

+     new webpack.HotModuleReplacementPlugin()
    ]
  };
Production
In this guide we'll dive into some of the best practices and utilities for building a production site or application.

Setup
The goals of development and production builds differ greatly. In development, we want strong source mapping and a localhost server with live reloading or hot module replacement. In production, our goals shift to a focus on minified bundles, lighter weight source maps, and optimized assets to improve load time. With this logical separation at hand, we typically recommend writing separate webpack configurations for each environment.
npm install --save-dev webpack-mergewebpack-demo
|- package.json
- |- webpack.config.js
+ |- webpack.common.js
+ |- webpack.dev.js
+ |- webpack.prod.js
|- /dist
|- /src
|- index.js
|- math.js
|- /node_modulesproject structure
Now move common code into the webpack.common.js, then use merge to merge two parts of common and custom code.
Minimize CSS for production
Minimize JS for production with:
- built-in webpack minimizer
- BabelMinifyWebpackPlugin
- UglifyjsWebpackPlugin
- TerserWebpackPlugin and so on..