Android formation
Présentation
Moi c'est Edouard
Introduction au développement Android
- Un peu d'histoire
- Architecture d'une application
- Les fonctionnalités de la plateforme
- Problématique de la plateforme
Introduction au développement Android
Un peu d'histoire
Un peu d'histoire
- Android crée en 2003, puis racheté par Google en 2005
- Pour contrer IOS, OHA (Open Handset Alliance) s'est formé
- Le but est de créer un système d'exploitation qui fonctionne sur plusieurs terminaux.
- Project gratuit et opensource basé sur un noyau Linux
- Système évolutif : s'adapte au téléphone, tablette, TV box, voiture !, ...
- Développement accessible : Anciennement sous Eclipse, maintenant sur Android Studio
Un peu d'histoire
Android 1.0 le 22 octobre 2008
Pas de clavier, pas de multitouch
Android 1.1 en février 2009 Banana Bread
Mise à jour par le réseau
Android 1.5 le 30 avril 2009 CupCake
Clavier tactile
Presse papier

Un peu d'histoire
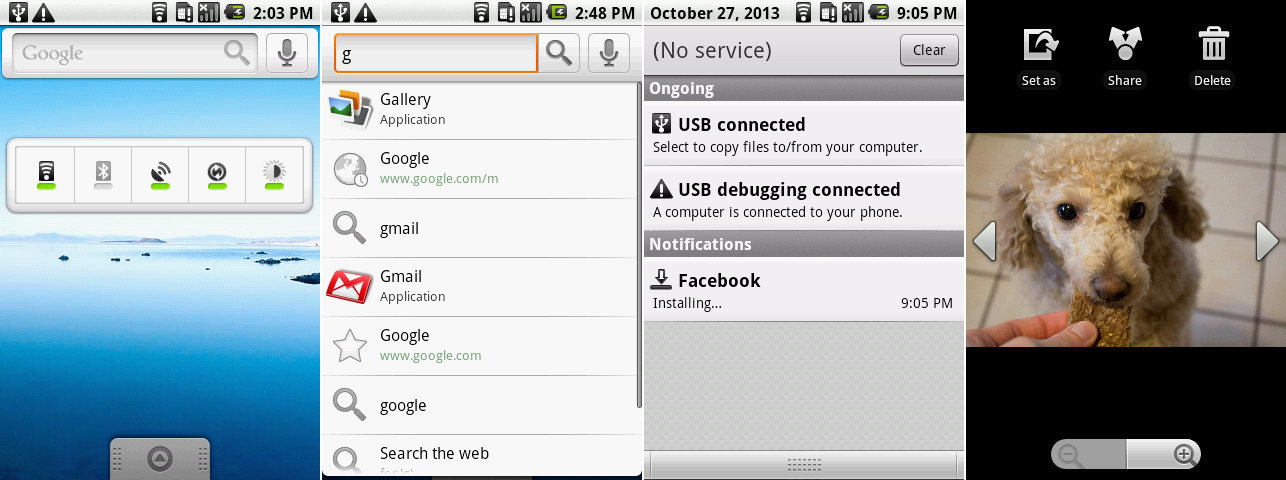
Android 1.6 Donut
Gestion des définition d'écran 1280x720
Fonction de recherche local sur le téléphone
Un peu d'histoire
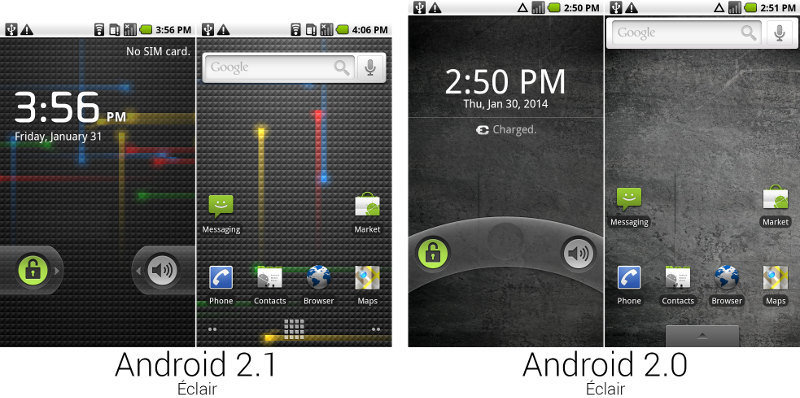
Android 2.0 et 2.1 Eclair
- Amélioration du clavier tactile
- Fonds d’écran animés
- Prise en charge du Bluetooth 2.1
- Arrivée de Google Maps
- Nouvelles fonctions pour l’appareil photo (flash, zoom digital, balance des blancs, effets de couleurs et focus macro)
Un peu d'histoire
Android 2.1 le 20 mai 2010 Froyo
- Pour le Nexus One (google)
- Téléphone et navigateur en natif
- Nouvelle galerie photo
- Nouveaux effets de transition
- Support du Flash 10.1
- Ecran de vérouillage
Un peu d'histoire
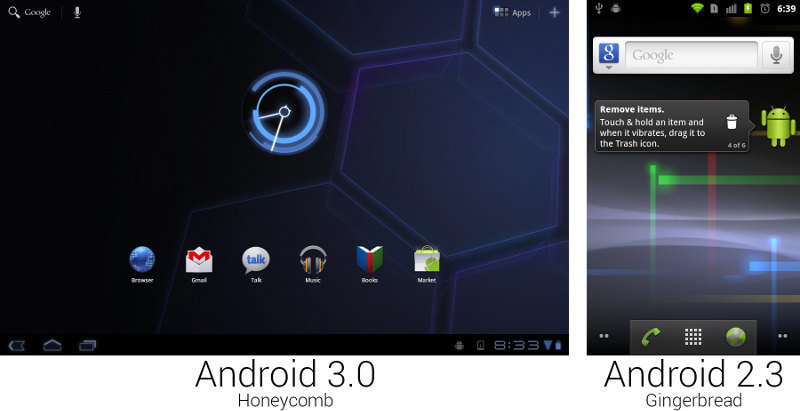
Android 2.3 le 6 décembre 2010 Gingerbread
- Prise en charge de la VoIP
- NFC
- Système de fichier ext4
- Refonte de l'interface en ton vert et la bar de notification en noir
- Gain en autonomie
Un peu d'histoire
Android 3.0 le 22 février 2011 Honeycomb
- Réservé au tablette
- Bouton retour et menu en tactiles
- Multitache
- Support processeur multicore
- Crypter les données utilisateur
Un peu d'histoire
Android 4.0 le 19 octobre 2011 Ice Cream Sandwich
- Création plus facile des dossiers
- Nouveau launcher personnalisable
- Capture d'écran native
- Amélioration du correcteur orthographique
- Nouveau navigateur
- Nouvelle font
- Refonte de l'application "Contacts" avec une meilleur intégration des réseaux sociaux
- ....
Un peu d'histoire
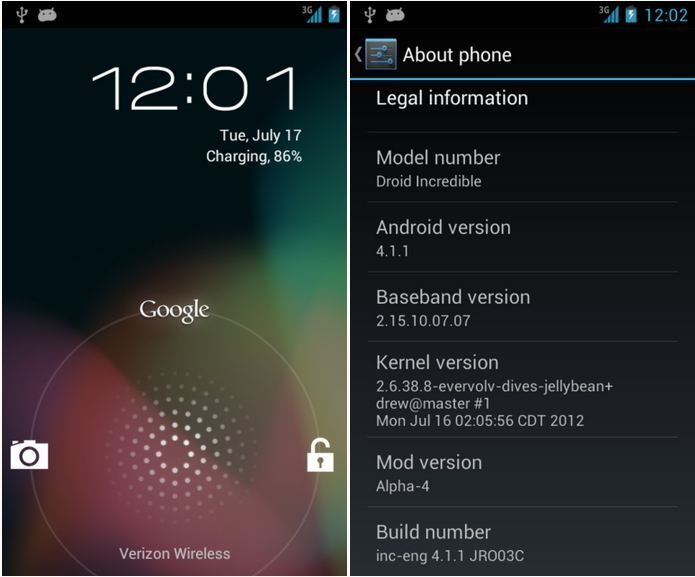
Android 4.1, 4.2, 4.3 le 9 juillet 2012 Jelly Bean
- Interface plus fluide
- Notifications extensibles
- Recherche vocal local offline
- Création de panorama 360
- Des améliorations ...
Un peu d'histoire
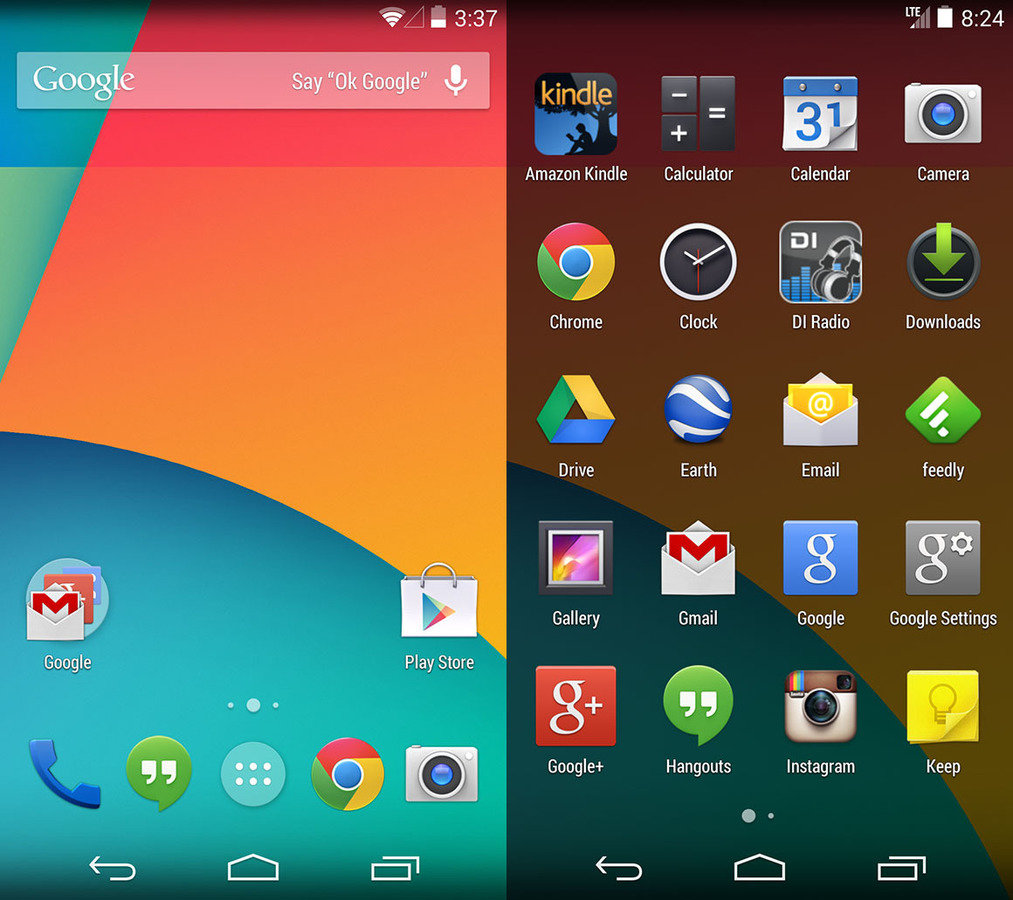
Android 4.4 le 31 octobre 2013 KitKat
- Nouveau style Holo
- Fonctionne sur des devices avec uniquement 512Mo
- Intégration de plus en plus poussé de "Google Now"
- Mode immersif, qui cache la barre de notifications
Un peu d'histoire
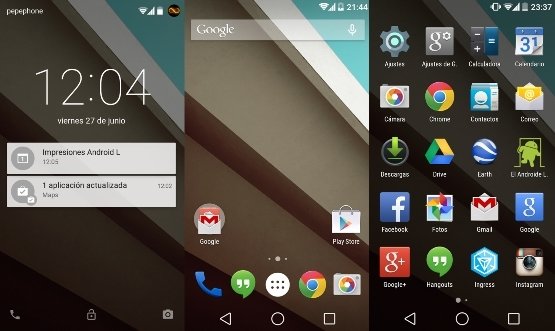
Android 5.0 le 15 octobre 2014 Lollipop
- Nouveau style Matérial Design
- Amélioration du système de notification
- Activation par defaut du chiffrement des données utilisateur
- Nouvelle VM ART
Introduction au développement Android
Architecture d'une application Android
Architecture
Architecture
- Model de permission par utilisateur
- Isolation des processus
- Mécanisme extensible pour sécurisé les IPC*
- Jail and sandbox
Ce qui ceux dire ?
- Empêche l'utilisateur A de lire les fichiers de l'utilisateur B
- Assure que l'utilisateur A ne peux pas lire la mémoire ou les ressource de l'utilisateur B
- Assure que l'utilisateur A ne peux pas prendre possession des entrées ou sorties de l'utilisateur B (par exemple la téléphonie, GPS, Bluetooth)
Architecture
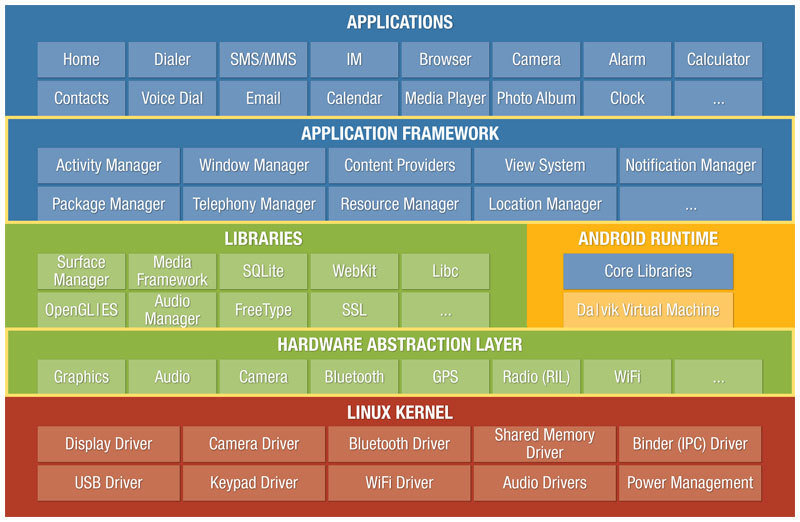
- L'Hardware Abstraction Layer donne a chaque application un accès directe au Hardware resources
- Chaque application tourne avec sa VM java.
- ART replace Dalvik VM
- Amélioration de la garbage collection
- Accélération de l'application profiling
- Combien de processus sont dans une class donnée
- Filtrer les évènements pour un instance spécifique
- ....
- More info : https://source.android.com/devices/tech/dalvik/
Introduction au développement Android
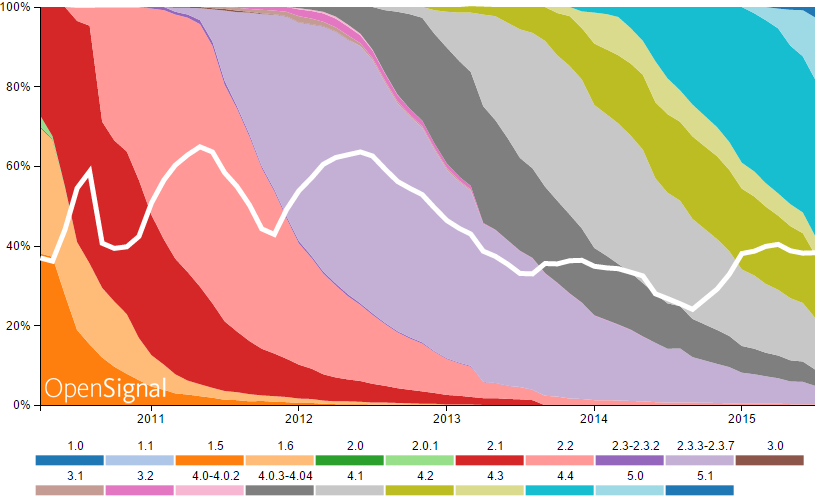
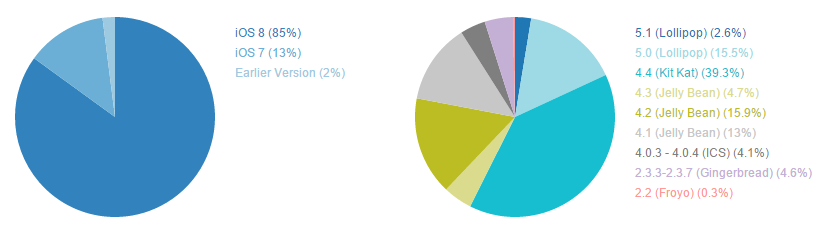
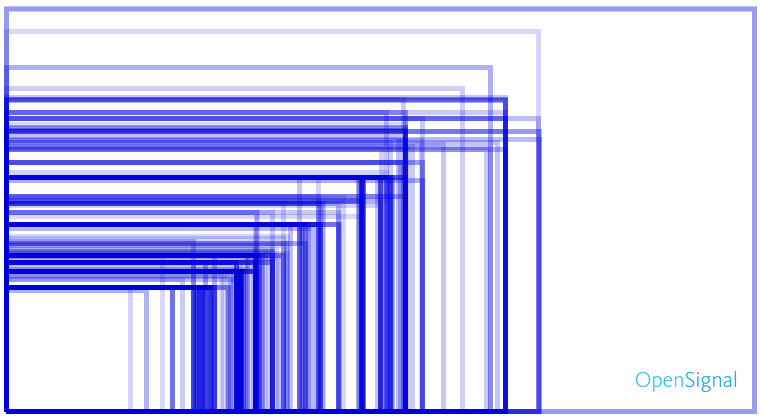
Problématique de la plateforme Android
Problématiques
La fragmentation de device
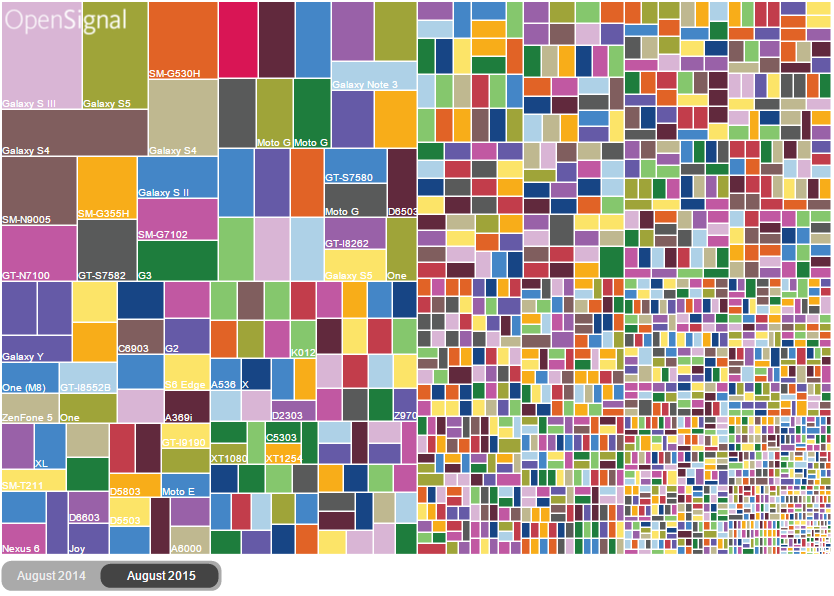
Problématiques
La fragmentation par marque

Problématiques
La fragmentation par version
Problématiques
Comparons avec IOS
Problématiques
La fragmentation par écran
Les plus
- Opensource : gratuit, fonctionne sur énormenent de device
- Customisation : Il est possible de paramétrer énormément de chose
- Sécurité : Chaque application est dans sa VM
- Multitache
- Des nouvelles mise à jour
- Développement facile
Les moins
- La fragmentation !
- Les versions
Android Studio
- Instalation
- d
- d
- d
- d
Android Studio
VS
Eclipse
Android Studio vs Eclipse
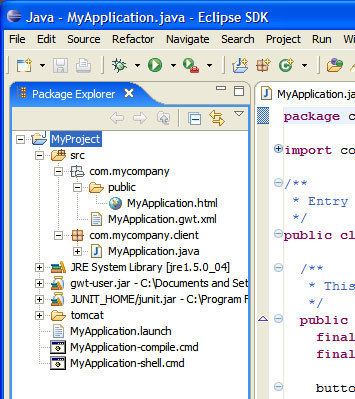
Adieu Workspace and sous-projet
On avait different projet ou sous projet qui étaient compilé en .jar et réinjecté dans le projet principal
Android Studio vs Eclipse
Bonjour les Modules
Les modules sont une «unité discrète de fonctionnalité qui peut être exécuté, testé et débogué indépendamment»
Chaque module doit avoir son propre son propre fichier Gradle.
Tout comme Eclipse, ces modules peuvent être des bibliothèque jar.
Android Studio vs Eclipse
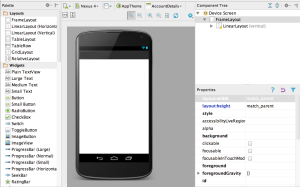
Une nouvelle interface Designer éprouvé
Android Studio a amélioré la partie designer pour la rendre plus robuste au design complexe et mieux gérer les intéractions entre les différentes vues
Android Studio vs Eclipse
Ajout facile de library .jar
Ajout facile de dépendance par module
Le AndroidManifest ne regroupe plus la vie l'univers et le reste.
Toutes les informations de compilation ou des jointures des modules sont mis dans différents fichiers gradle.
Migration facilité d'Eclipse vers Android Studio
Android Studio vs Eclipse
Les fichiers gradle sont au centre d'Android Studio
Les tests unitaires sont mise à disposition par defaut
Maven !
Téléchargement et importation automatique de module/librarie à la compilation.
Android
Tools
Tools
Android SDK (Software Developpement Kit)
Contient les outils nécessaire pour créer, compiler et empacter les applications
Android Debug Bridge (ADB)
Est l'outil qui permet de se connecter aux device Android et de les debugger (Breakpoint, stack, watch, log, ...)
Android Developer Tools and Android Studio
Google nous fourni un IDE préféré pour developper les application android basé sous IntelliJ IDE.
Cet IDE regroupe des éditeurs pour le code, le design, la configuration, le debug, etc
Tools
Gradle
Android studio se base sur des fichiers Gradles qui permette de définir comme le projet se fait compiler.
Android RunTime (ART)
A partir de Android 5.0. ART utilise la compilation Ahead Of Time Compilation. Pendant le processus de déploiement de l'application sur un device android, le code de l'application est traduit en code machine.
Le résultat est que le code compilé est 30% plus gros mais l'application s'execute plus rapidement dès le début
Ce processus sauvegarde de la batterie vu que le code n'est plus traduit en code machine à chaque lancement d'application
Android Studio
Téléchargement

Android Studio
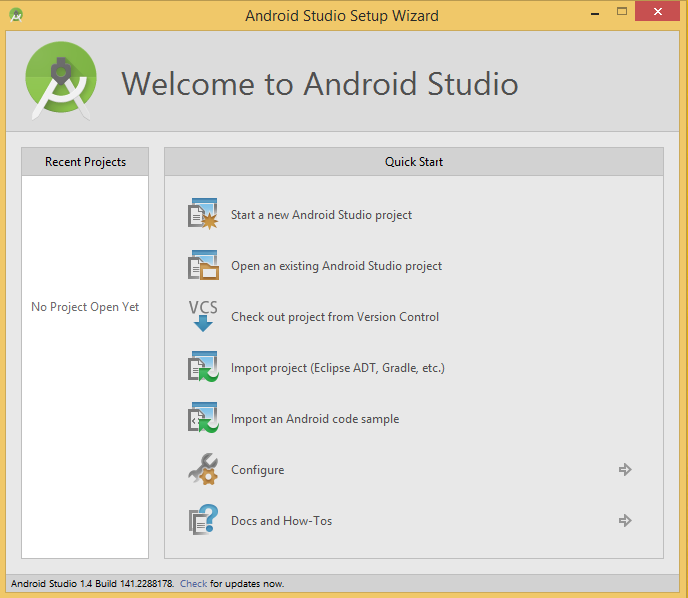
Premier lancememt
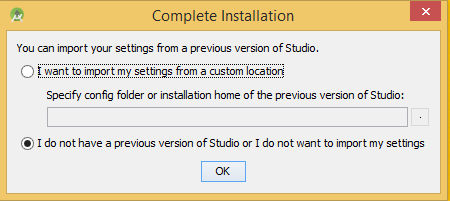
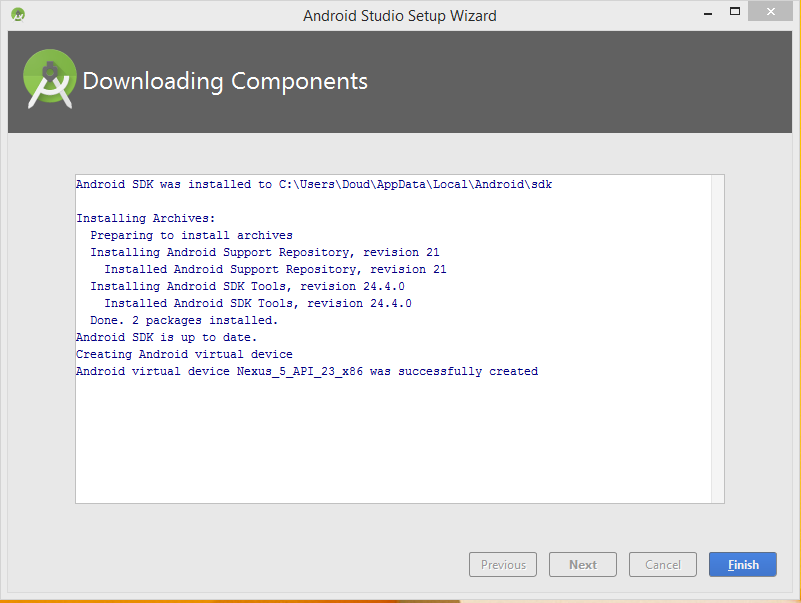
Premier lancement
Android Studio télécharge les premiers SDK
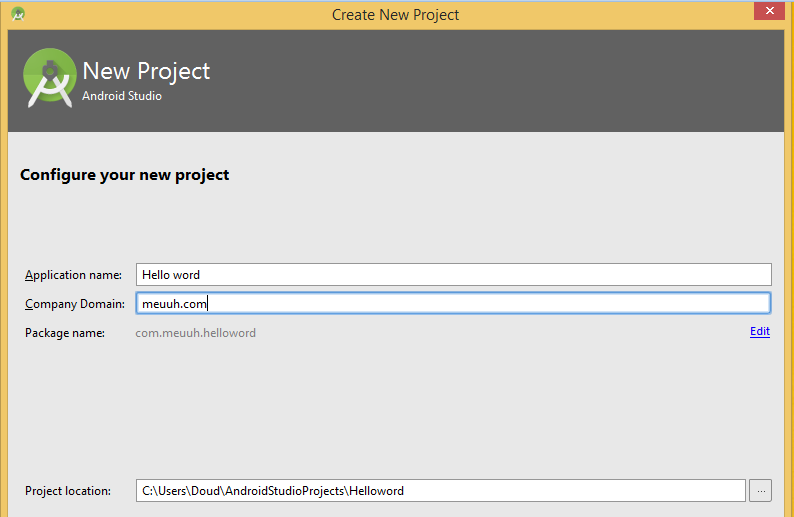
Premier projet
Hello word
Hello word
Hello word
Hello word

Comment choisir ?
En fonction de :
- La cible géographique
- La population
- Les fonctionnalitées
- ...
Hello word
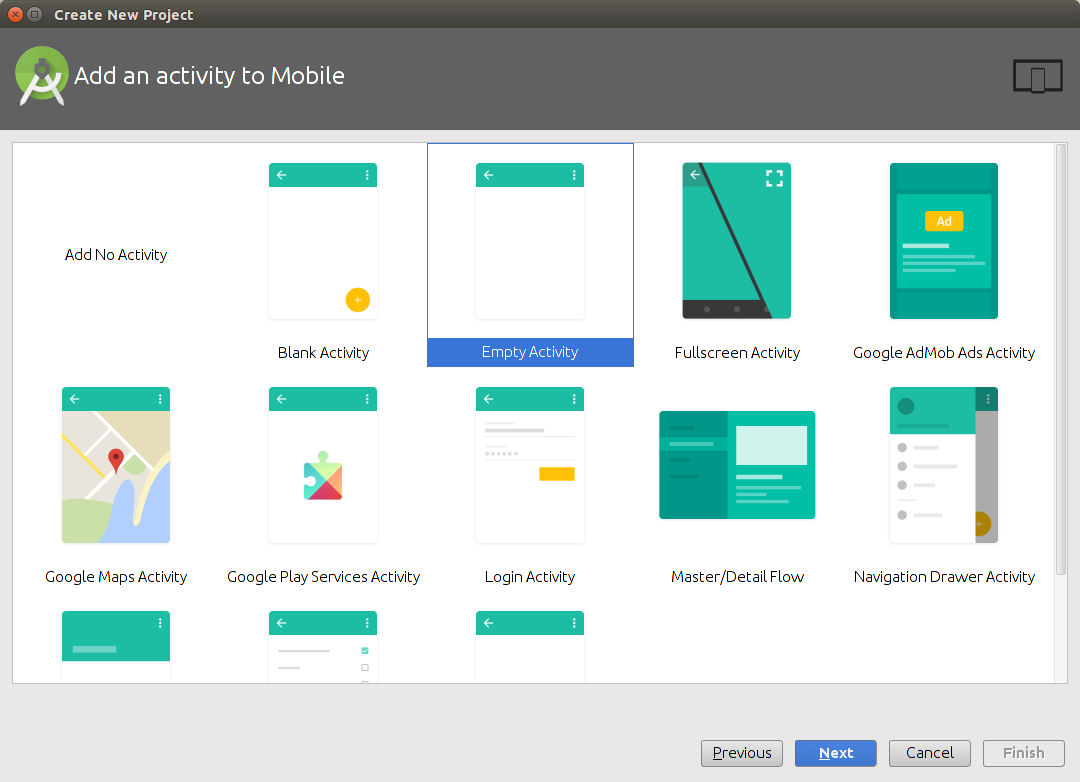
Empty Activity
Hello word
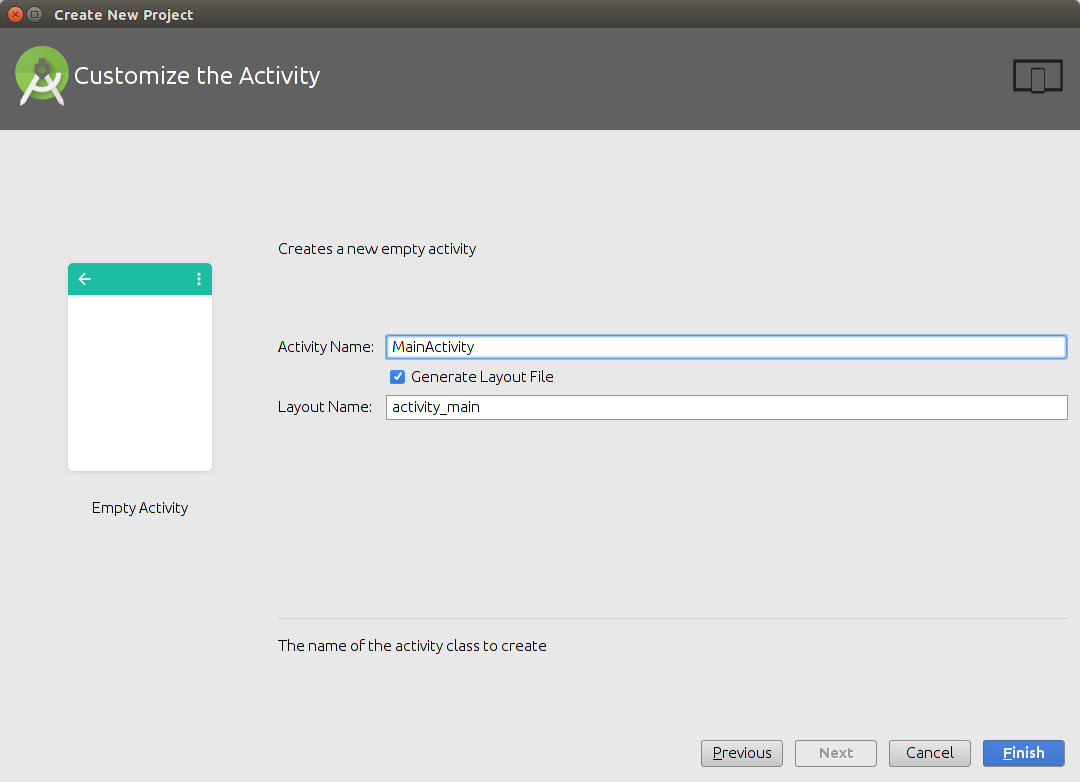
Main Activity
Hello word

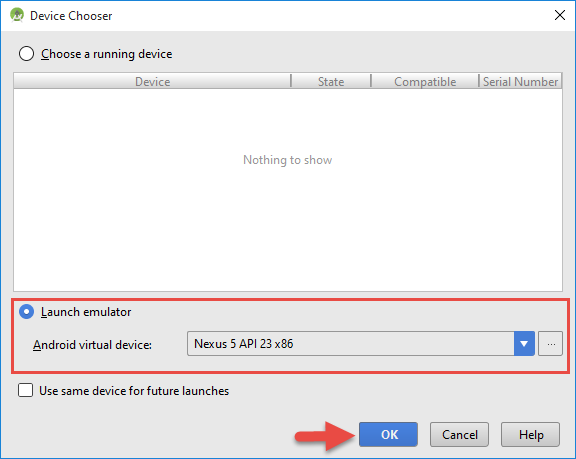
Virtual Device (AVB)
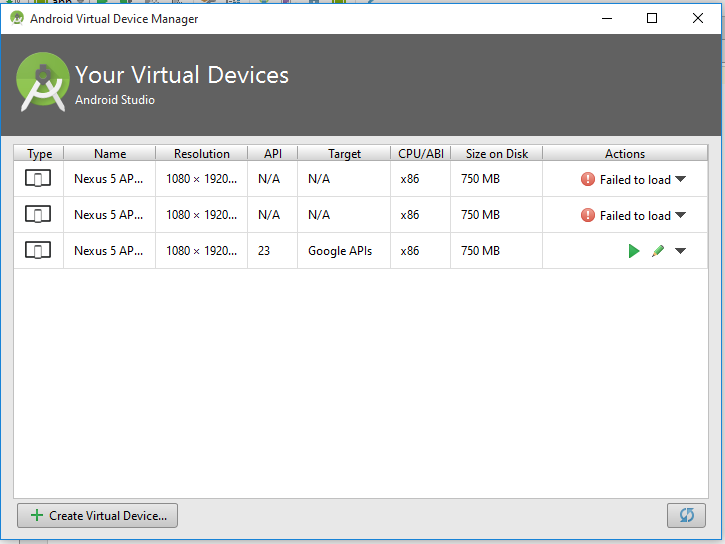
Cliquer sur "Create Virtual Device..."
Hello word
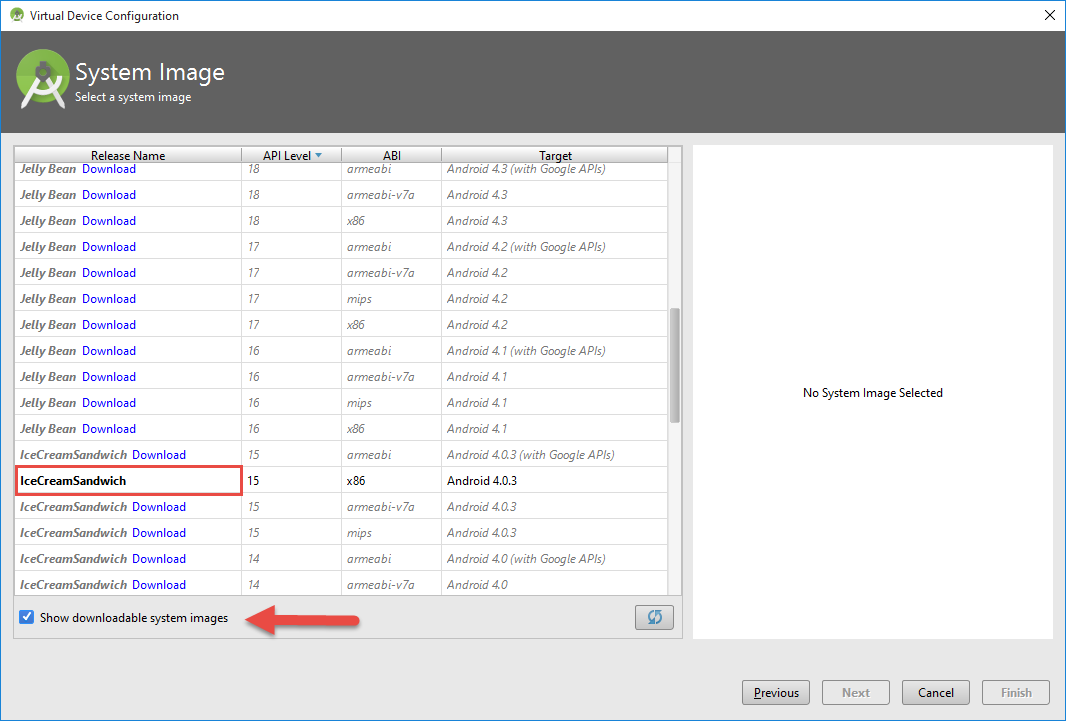
Virtual Device (AVB)
Hello word
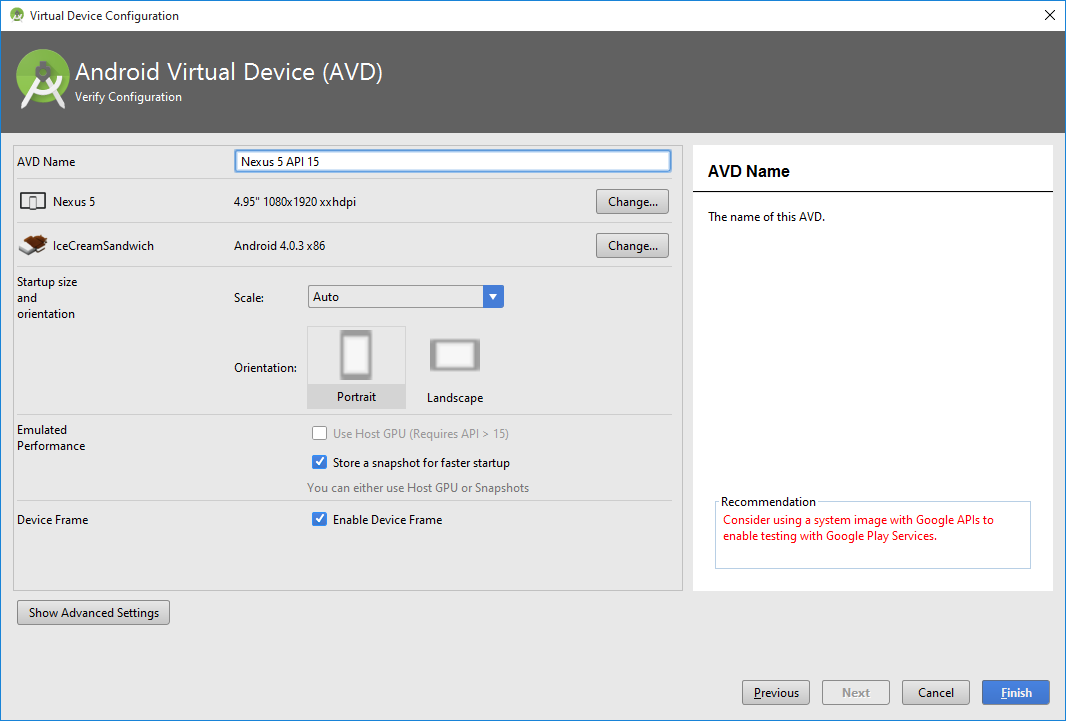
Virtual Device (AVB)
Hello word
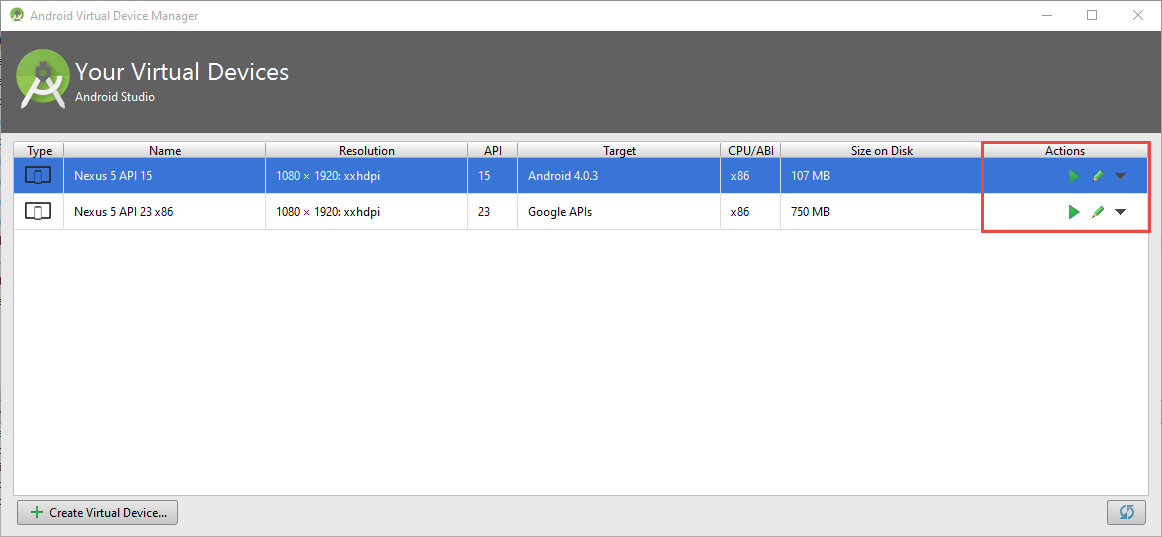
Virtual Device (AVB)
Hello word
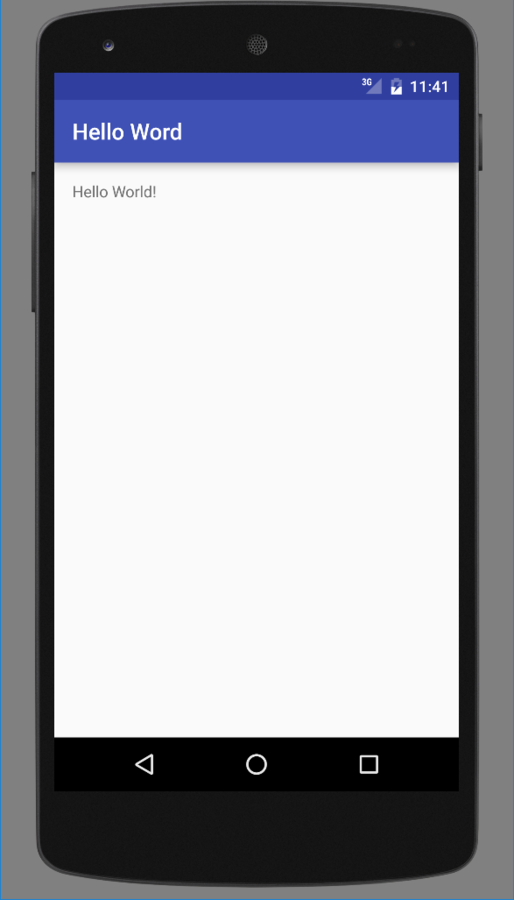
Lançons l'application !

Hello word
Votre première application
Félicitation !
Android Studio
L'interface
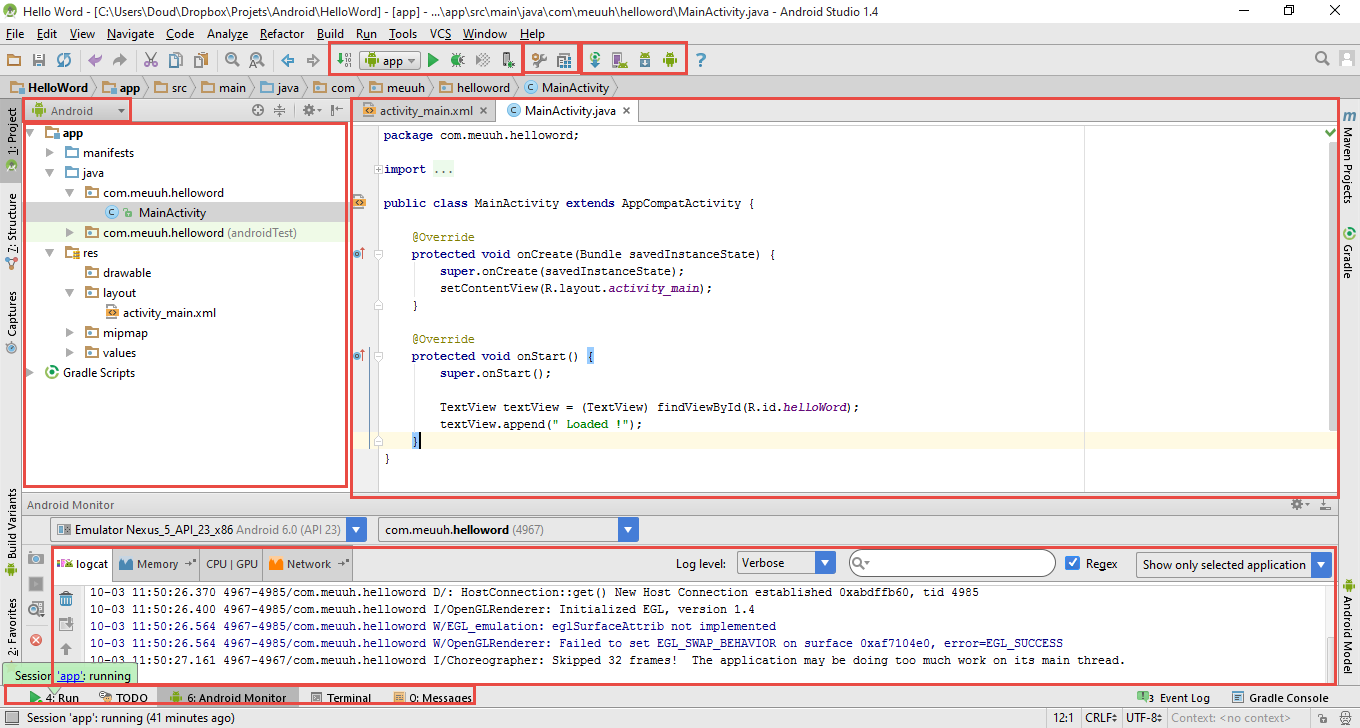
Make yourself at home
Les vues
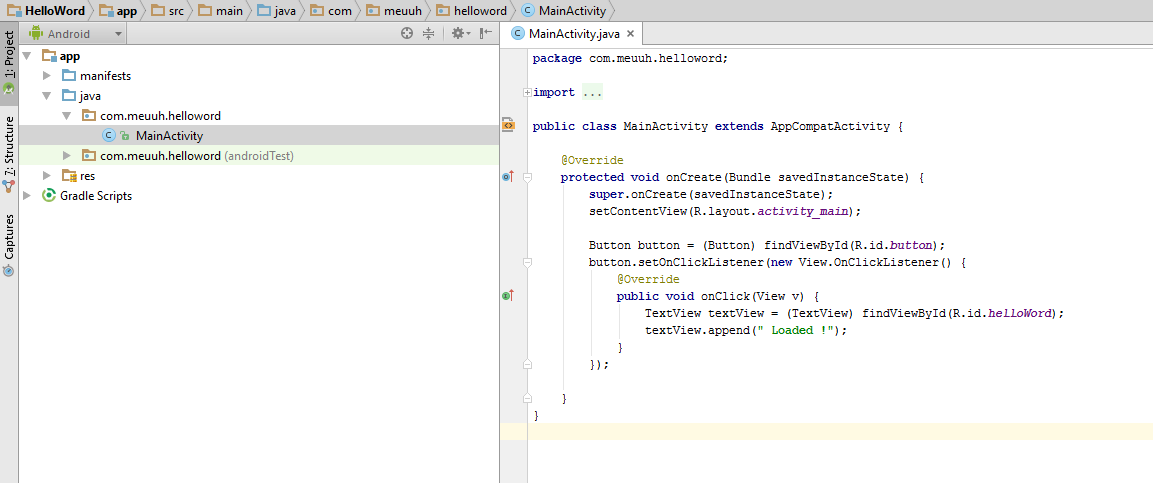
Vue "Android" / Vue simplifiée
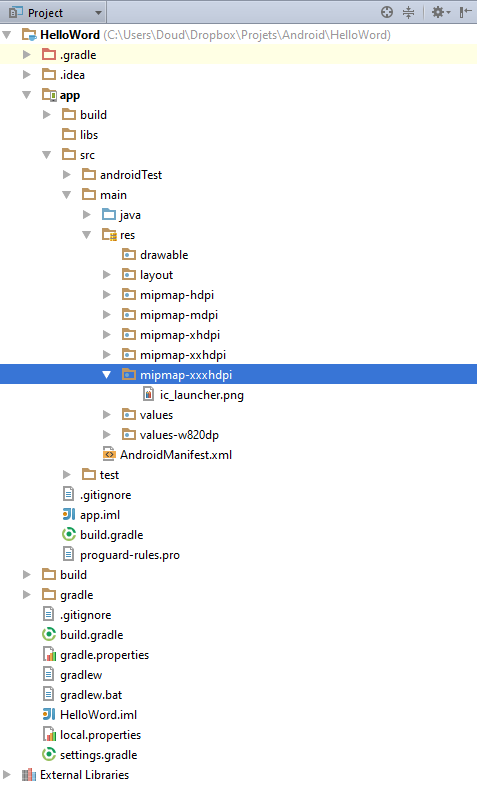
Vue "Project" / Vue réel
Fonctions de debug
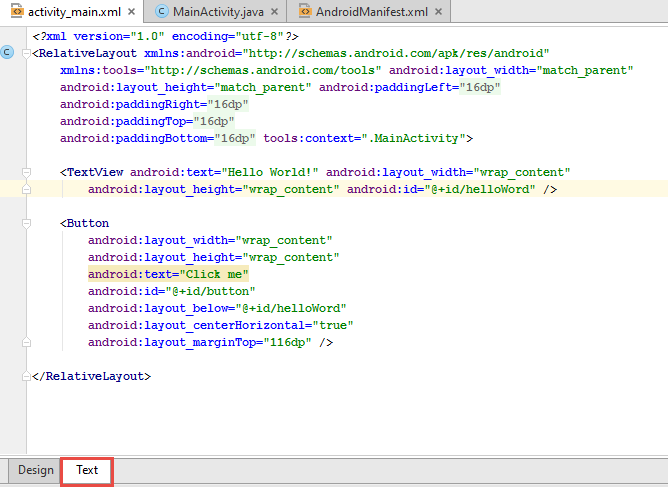
<?xml version="1.0" encoding="utf-8"?>
<RelativeLayout xmlns:android="http://schemas.android.com/apk/res/android"
    xmlns:tools="http://schemas.android.com/tools" android:layout_width="match_parent"
    android:layout_height="match_parent" android:paddingLeft="@dimen/activity_horizontal_margin"
    android:paddingRight="@dimen/activity_horizontal_margin"
    android:paddingTop="@dimen/activity_vertical_margin"
    android:paddingBottom="@dimen/activity_vertical_margin" tools:context=".MainActivity">

    <TextView android:text="Hello World!" android:layout_width="wrap_content"
        android:layout_height="wrap_content" android:id="@+id/helloWord" />

    <Button
        android:layout_width="wrap_content"
        android:layout_height="wrap_content"
        android:text="Click me"
        android:id="@+id/button"
        android:layout_below="@+id/helloWord"
        android:layout_centerHorizontal="true"
        android:layout_marginTop="116dp" />

</RelativeLayout>
public class MainActivity extends AppCompatActivity {
@Override
protected void onCreate(Bundle savedInstanceState) {
super.onCreate(savedInstanceState);
setContentView(R.layout.activity_main);
Button button = (Button) findViewById(R.id.button);
button.setOnClickListener(new View.OnClickListener() {
@Override
public void onClick(View v) {
TextView textView = (TextView) findViewById(R.id.helloWord);
textView.append(" Loaded !");
}
});
}
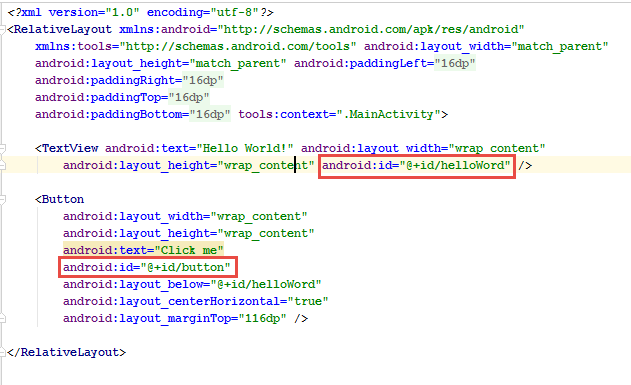
}res/layout/activity_main.xml
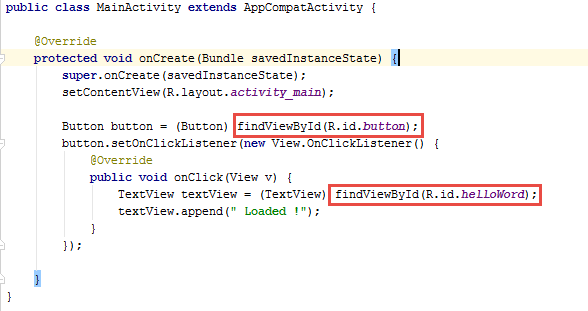
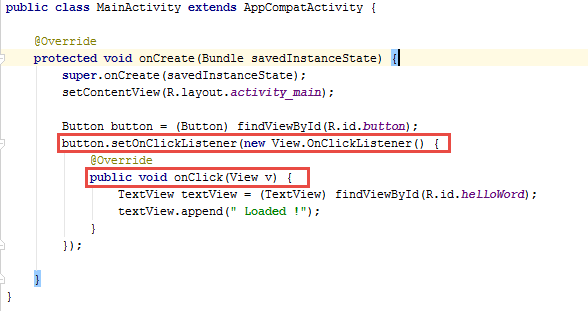
Code java/MainActivity
Set a breakpoint and launch with debug
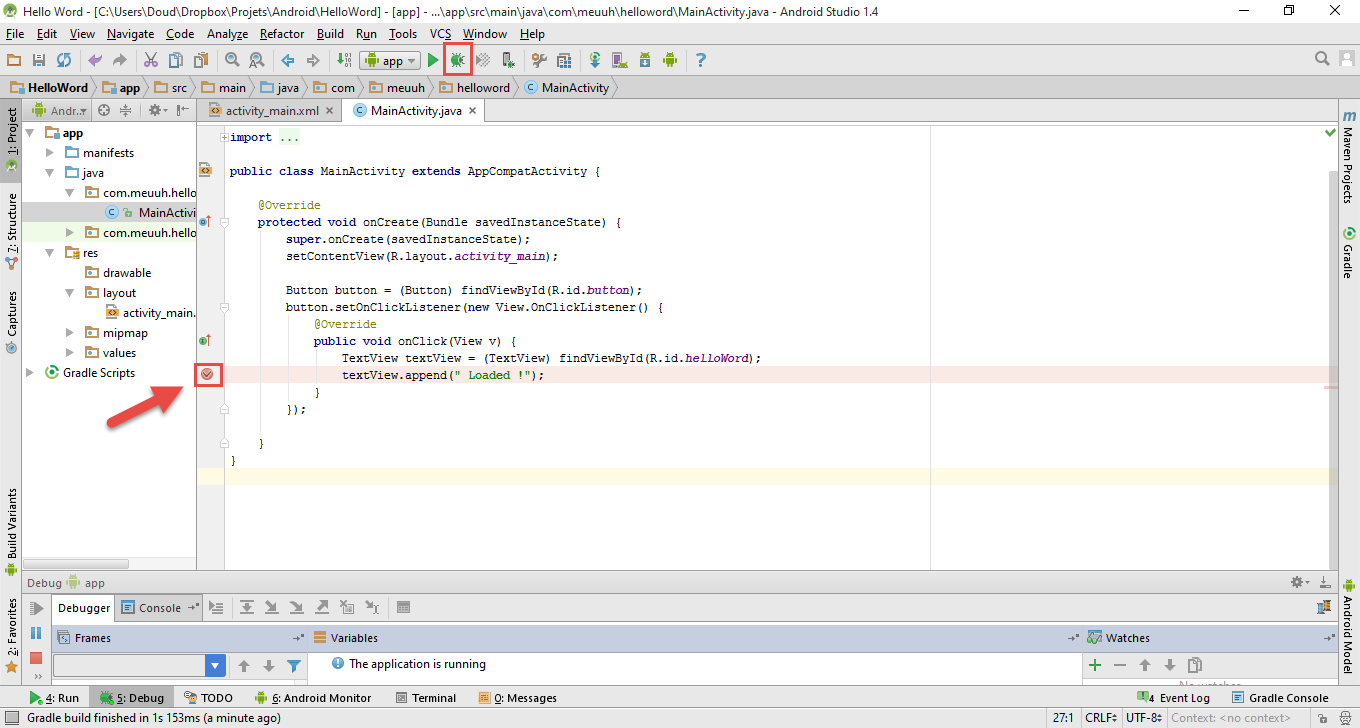
Fonctions de debug
Clique "Click me" sur l'application, quand l’exécution passe par le breakpoint. L'exécution s’interrompt, nous avons accès aux fonctions de debuggage

Fonctions de debug
Android Studio
Reproduisez ces lancements sur votre téléphone physique
Des questions ?
COMPOSITION D’UNE APPLICATION ANDROID
- Fichiers gradle
- Le code source
- Le manifest et les permissions
- Les ressources
Fichiers gradle
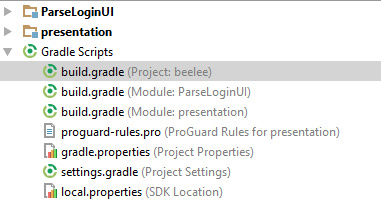
- Project : Fichier de configuration global à tout le projet (dépendances, repositories)
- Module : Fichiers spécifiques à chaque module
- Project Settings : Liste les différents modules
Code source
Le code d'Android est en Java
Le manifest et les permissions

Les ressources
Ce sont :
- Des images
- Des icones
- Des fonts
- Des fichiers de description de design
Chaque dossier peut être spécifique à une taille d'écran :
- ldpi (low) ~120dpi
- mdpi (medium) ~160dpi
- hdpi (high) ~240dpi
- xhdpi (extra-high) ~320dpi
- xxhdpi (extra-extra-high) ~480dpi
- xxxhdpi (extra-extra-extra-high) ~640dpi
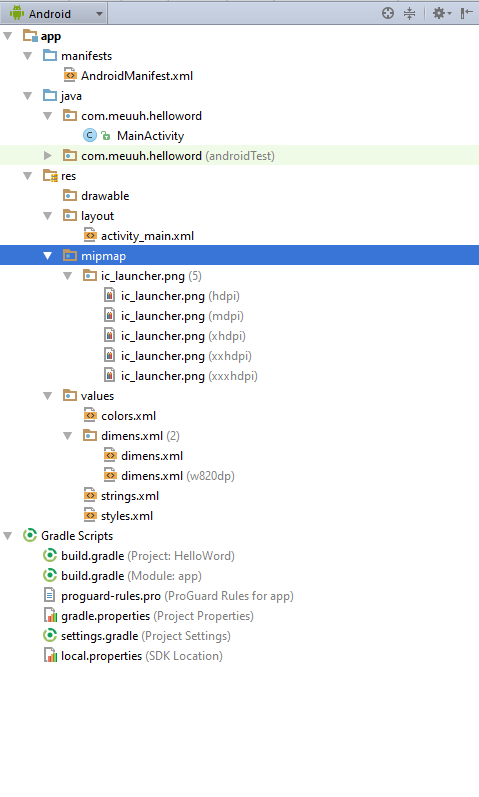
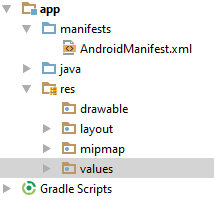
Ouvrez : en mode 'Project', app/src/main/res
Les ressources
Différent types
- drawable : Images
- layout : Layout
- mipmap : Icons
- values : Les valeurs ou strings
- animator : Les animations
- raw : Les données brut
- menu : Liste des champs dans un menu
L’INTERFACE UTILISATEUR ANDROID
- Composants d'interface de base
- Fichier de resource Layout
- Relation entre les ressources et le code
- Gestion des événements
- ViewGroup and layout manager
- Workout
L'interface utilisateur
Composants d'interface de base
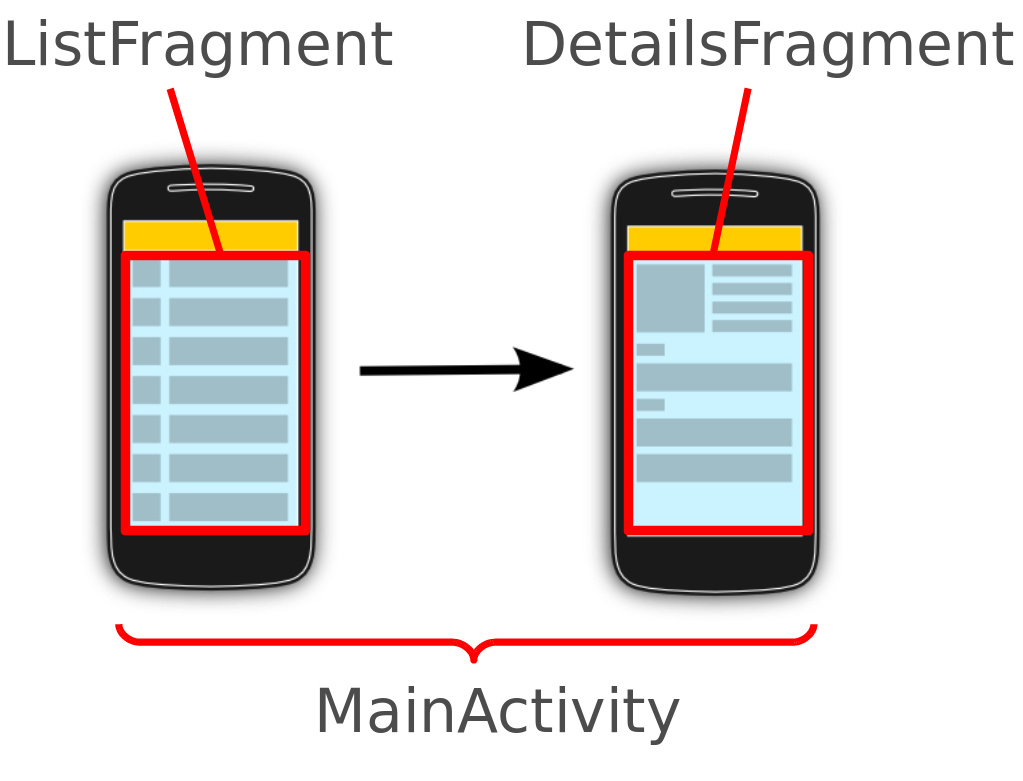
Activity
Une Acitvity est un représentation visuelle d'une application. Une application peut avoir plusieurs activity.
Exemple pour une Twitter:
- A1 : Gestion des tweet (List + détail d'un tweet)
- A2 : Login
- A3 : Configuration du compte
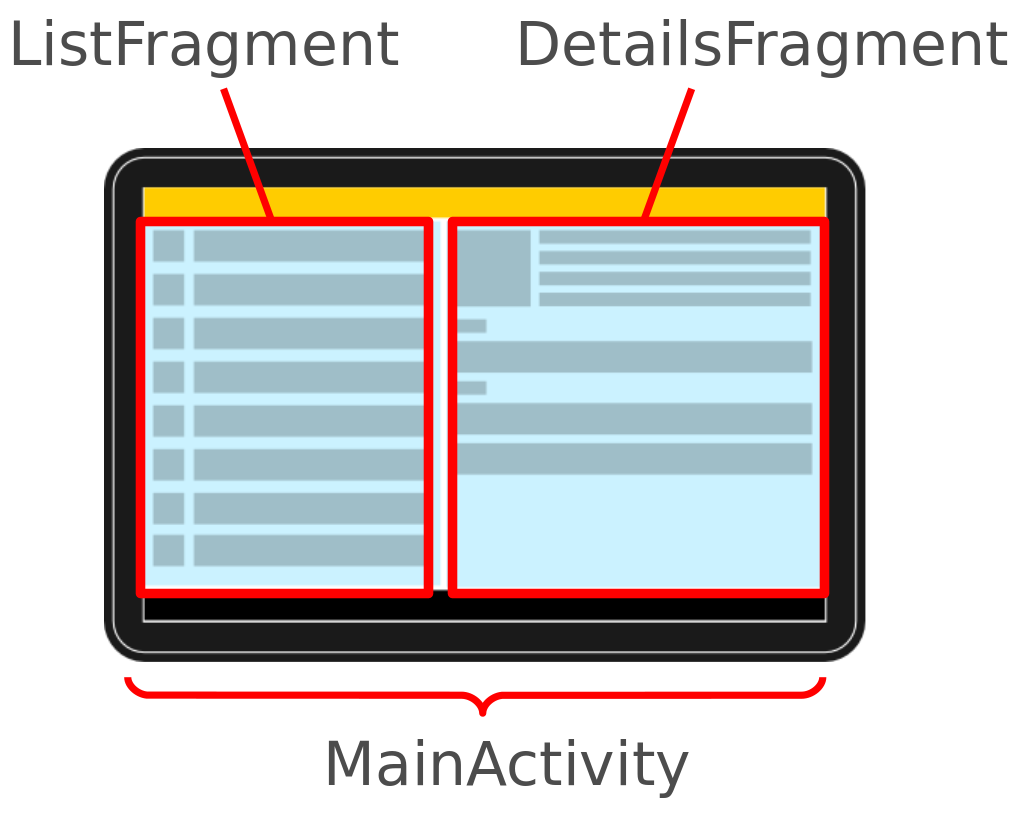
Fragments
Un fragment est un composant qui tourne dans le context d'une activity.
Un fragment encapsule le code fonctionnel pour que ça soit plus simple à réutiliser et pour gérer différentes tailles d'écrans.
Composants d'interface de base
Composants d'interface de base
Composants d'interface de base
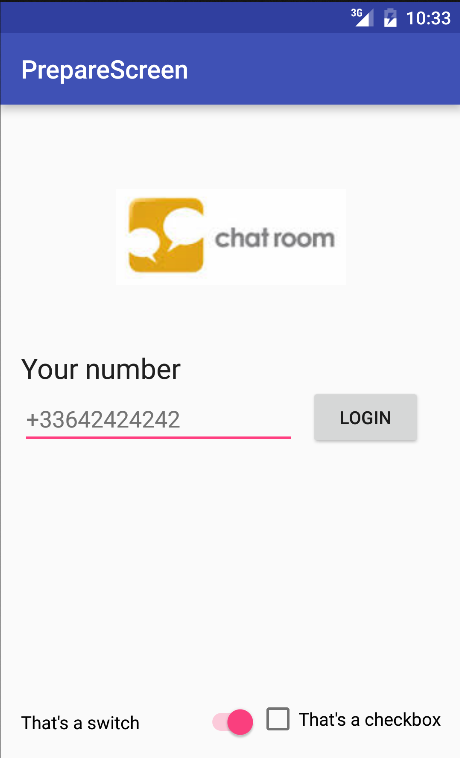
Views
User interface widget
- Buttons
- Text
- Radio
- checkbox
- Switch
- Images
- ProgressBar
- ...
View group
Is responsible to arranging other views
- FrameLayout
- LineartLayout
- TableLayout
- TableRow
- GridLayout
- RelativeLayout
Composants d'interface de base
L'interface utilisateur
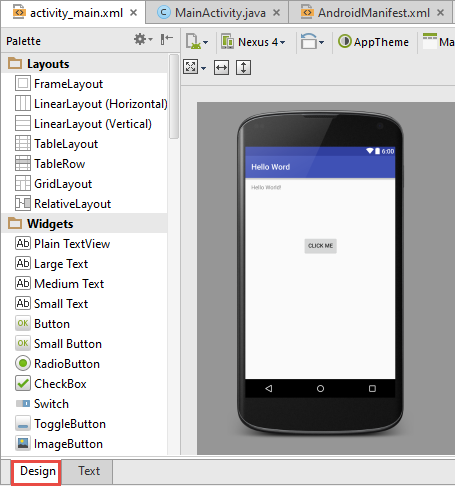
Fichiers de ressource Layout
Fichiers de resource Layout
Les interface utilisateur sont défini par les Xml Layout qui se trouve dans res/layout.
Android studio permet d'ajouter des widget en wysiwyg
L'interface utilisateur
Relation entre les ressources et le code
Relation entre les ressources et le code
Chaque élément dans un layout xml peut être identifié par un id
Relation entre les ressources et le code
Ces id peuvent être retrouvés dans le code
L'interface utilisateur
Gestion des événements
Gestion des événements
On peut associer des widget a certain événement
L'interface utilisateur
ViewGroup et Layout manager
ViewGroup et Layout manager
Un layout Manager est une sous classe de ViewGroup et est responsable de son layout et de celui de ces enfants.
Les plus important layout managers sont :
- Lineartlayout
- FrameLayout
- RelativeLayout
- GridLayout
AbsoluteLayout est deprecated et TableLayout peux être implémenté avec plus d'efficacité par GridLayout
ViewGroup et Layout manager
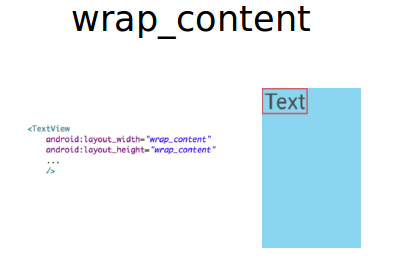
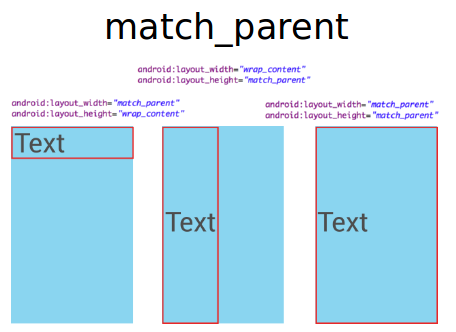
Les layouts permettent aux développeurs de définir des attributs.
Les enfants peuvent aussi définir des attributs qui seront évalué par le layout parents
Par exemple, les enfants peuvent définir leur taille désiré avec les attributs ci-dessous :
- android:layout_width
- android:layout_heigth
ViewGroup et Layout manager
ViewGroup et Layout manager
ViewGroup et Layout manager
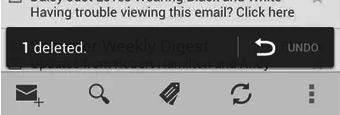
FrameLayout
FrameLayout permet de placer les elements enfants au dessus des autres.
Sur ce screenshot, on voit que l'application Gmail utilise le FrameLayout pour faire apparaitre des buttons au dessus du layout courant
ViewGroup et Layout manager
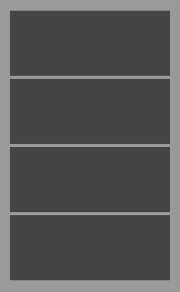
LinearLayout
LinearLayout place tous les elements enfants sur un seule colone suivant l'attribut android:orientation
ViewGroup et Layout manager
RelativeLayout
- RelativeLayout permet de faire un layout en basant les objets les un par rapport au autres
- Il y a énormément d'options
- 90% des design sont fait avec les relativeLayout
| android:layout_above | Positions the bottom edge of this view above the given anchor view ID and must be a reference to another resource, in the form "@[+][package:]type:name" |
| android:layout_alignBottom | Makes the bottom edge of this view match the bottom edge of the given anchor view ID and must be a reference to another resource, in the form "@[+][package:]type:name". |
| android:layout_alignLeft | Makes the left edge of this view match the left edge of the given anchor view ID and must be a reference to another resource, in the form "@[+][package:]type:name". |
| android:layout_alignParentBottom | If true, makes the bottom edge of this view match the bottom edge of the parent. Must be a boolean value, either "true" or "false". |
| android:layout_alignParentEnd | If true, makes the end edge of this view match the end edge of the parent. Must be a boolean value, either "true" or "false". |
| android:layout_alignParentLeft | If true, makes the left edge of this view match the left edge of the parent. Must be a boolean value, either "true" or "false". |
| android:layout_alignParentRight | If true, makes the right edge of this view match the right edge of the parent. Must be a boolean value, either "true" or "false". |
| android:layout_alignParentStart | If true, makes the start edge of this view match the start edge of the parent. Must be a boolean value, either "true" or "false". |
| android:layout_alignParentTop | If true, makes the top edge of this view match the top edge of the parent. Must be a boolean value, either "true" or "false". |
| android:layout_alignRight | Makes the right edge of this view match the right edge of the given anchor view ID and must be a reference to another resource, in the form "@[+][package:]type:name". |
| android:layout_alignStart | Makes the start edge of this view match the start edge of the given anchor view ID and must be a reference to another resource, in the form "@[+][package:]type:name". |
| android:layout_alignTop | Makes the top edge of this view match the top edge of the given anchor view ID and must be a reference to another resource, in the form "@[+][package:]type:name". |
| android:layout_below | Positions the top edge of this view below the given anchor view ID and must be a reference to another resource, in the form "@[+][package:]type:name". |
| android:layout_centerHorizontal | If true, centers this child horizontally within its parent. Must be a boolean value, either "true" or "false". |
| android:layout_centerInParent | If true, centers this child horizontally and vertically within its parent. Must be a boolean value, either "true" or "false". |
| android:layout_centerVertical | If true, centers this child vertically within its parent. Must be a boolean value, either "true" or "false". |
| android:layout_toEndOf | Positions the start edge of this view to the end of the given anchor view ID and must be a reference to another resource, in the form "@[+][package:]type:name". |
| android:layout_toLeftOf | Positions the right edge of this view to the left of the given anchor view ID and must be a reference to another resource, in the form "@[+][package:]type:name". |
| android:layout_toRightOf | Positions the left edge of this view to the right of the given anchor view ID and must be a reference to another resource, in the form "@[+][package:]type:name". |
| android:layout_toStartOf | Positions the end edge of this view to the start of the given anchor view ID and must be a reference to another resource, in the form "@[+][package:]type:name". |
ViewGroup et Layout manager
RelativeLayout
Let's try !
Project name : RelativeLayout
Minimum API : 17
Design
ViewGroup et Layout manager
GridLayout
Les gridLayout peuvent être vus comme des tableaux, chaque objet est placé par des numéros de colonne et de ligne
<GridLayout
        android:layout_width="match_parent"
        android:layout_height="match_parent">

        <Button
            android:layout_width="wrap_content"
            android:layout_height="wrap_content"
            android:text="New Button"
            android:id="@+id/button3"
            android:layout_row="0"
            android:layout_column="0" />

        <Button
            android:layout_width="wrap_content"
            android:layout_height="wrap_content"
            android:text="New Button"
            android:id="@+id/button2"
            android:layout_row="1"
            android:layout_column="1" />
L'interface utilisateur Android
Le cycle de vie
Le cycle de vie
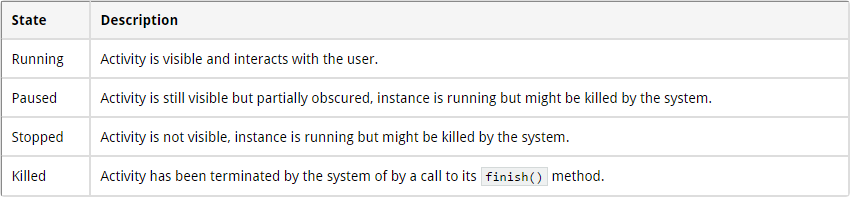
Une application peut être à différent stade suivant l’interaction avec l'utilisateur.
Le cycle de vie
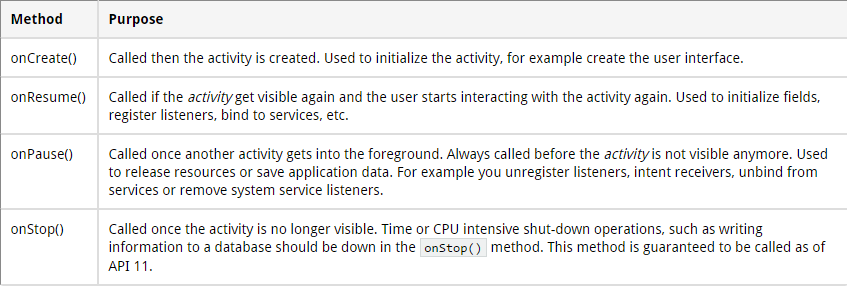
Ces cycles de vie se retrouvent dans le code avec des méthodes, les méthodes les plus importantes sont celle là :
Le cycle de vie

La méthode onDestroy() n'est pas sur de ce faire appeler !
Le cycle de vie
Dans le meilleur des cas, les applications qui sont démarrer par un utilisateur resteraient en mémoire, ce qui les rendras leur redémarrage plus rapide.
Mais dans la réalité, la mémoire disponible pour un téléphone est limité.
Pour gérer ces limites de ressource, Android est permis de tuer l'application pour récupérer des ressources
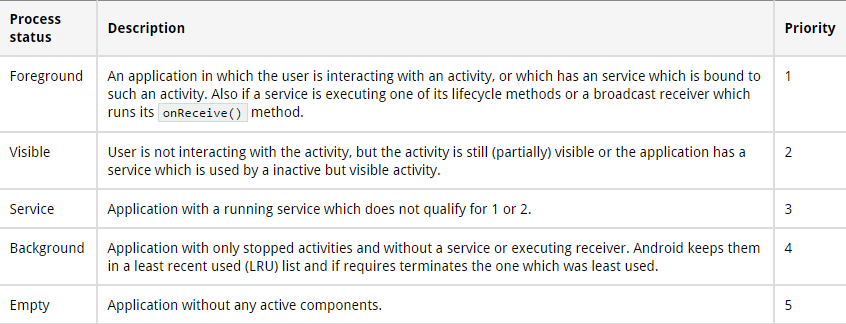
Le cycle de vie
Si android a besoin de ressource, il va tuer les applications suivant cette ordre :
Le cycle de vie
Workout
Project name : LifeCycle
Minimum API : 17
Type : Empty activity
Créer une classe java : TracerActivity.java
public class TracerActivity extends Activity {

  @Override
  protected void onCreate(Bundle savedInstanceState) {
    super.onCreate(savedInstanceState);
    notify("onCreate");
  }

  @Override
  protected void onPause() {
    super.onPause();
    notify("onPause");
  }

  @Override
  protected void onResume() {
    super.onResume();
    notify("onResume");
  }

  @Override
  protected void onStop() {
    super.onStop();
    notify("onStop");
  }

  @Override
  protected void onDestroy() {
    super.onDestroy();
    notify("onDestroy");
  }

  @Override
  protected void onRestoreInstanceState(Bundle savedInstanceState) {
    super.onRestoreInstanceState(savedInstanceState);
    notify("onRestoreInstanceState");
  }

  @Override
  protected void onSaveInstanceState(Bundle outState) {
    super.onSaveInstanceState(outState);
    notify("onSaveInstanceState");
  }

  private void notify(String methodName) {
    String name = this.getClass().getName();
    String[] strings = name.split("\\.");
    Notification noti = new Notification.Builder(this)
     .setContentTitle(methodName + " " + strings[strings.length - 1]).setAutoCancel(true)
     .setSmallIcon(R.drawable.ic_launcher)
     .setContentText(name).build();
    NotificationManager notificationManager =
        (NotificationManager) getSystemService(NOTIFICATION_SERVICE);
    notificationManager.notify((int) System.currentTimeMillis(), noti);
  }
Remplacer la classe MainActivity
public class MainActivity extends TracerActivity {

  @Override
  protected void onCreate(Bundle savedInstanceState) {
    super.onCreate(savedInstanceState);
    setContentView(R.layout.activity_main);
  }

  public void onClick(View view) {
    Intent intent = new Intent(this, SecondActivity.class);
    startActivity(intent);
  }

}
Créer une seconde classe : SecondActivity.java
package com.vogella.android.lifecycle.activity;

import android.os.Bundle;
import android.app.Activity;
import android.view.Menu;

public class SecondActivity extends TracerActivity {
  @Override
  protected void onCreate(Bundle savedInstanceState) {
    super.onCreate(savedInstanceState);
    setContentView(R.layout.activity_second);
  }
}
Sur le layout activity_main.xml, ajouter un bouton et setter l'événement 'Click' sur la fonction 'onClick'
Workout
Résolvez les bugs !
Et oui, ca marche rarement du premier coup ;-)
Workout
Workout
- On clique sur la liste déroulante pour IOS
- On clique sur le bouton
- On revient
- On clique sur le Menu
- On revient sur l'application
- On clique sur Retour
Qu'est ce qu'on observe ?
On continue, dans strings.xml
<string-array name="operating_systems">
        <item >Ubuntu</item>
        <item >Android</item>
        <item >iOS</item>
    </string-array>
Dans activity_main.xml, avant le bouton, on ajoute un spinner
<Spinner
        android:id="@+id/spinner"
        android:layout_width="wrap_content"
        android:layout_height="wrap_content"
        android:layout_marginRight="58dp"
        android:entries="@array/operating_systems" />
Workout
- On clique sur la liste déroulante pour IOS
- On clique sur le bouton
- On revient
- On clique sur le Menu
- On revient sur l'application
- On clique sur Retour
Qu'est ce qu'on observe ?
Workout
L'interface utilisateur
Changer d'activity et gestion des Intents
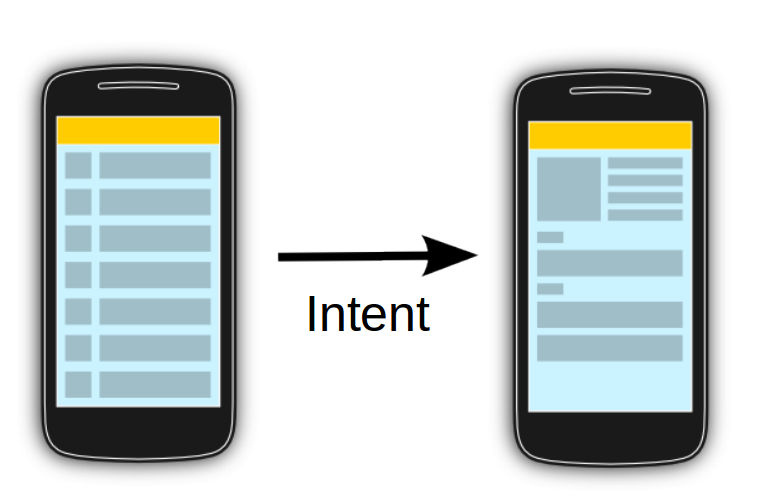
Intents
Les intents sont des messages asynchrone qui permettent transmettre des messages à d'autres activités.
A l'interieur même d'une application.
Mais aussi avec d'autres applications.
Intents
Ce code montre comment vous pouvez démarrer une nouvelle activité avec un intent
# Start the activity connect to the
# specified class

Intent i = new Intent(this, ActivityTwo.class);
startActivity(i);
Intents
Il existe deux type d'intents
Implicite
Intent i = new Intent(this, ActivityTwo.class);
i.putExtra("Value1", "This value one for ActivityTwo");
i.putExtra("Value2", "This value two ActivityTwo");
Intent i = new Intent(Intent.ACTION_VIEW
, Uri.parse("http://www.vogella.com"));
startActivity(i); Explicite
Il est possible de passer par les intents des int, float, String, bundle, Parceable, Serializable
Intents
A la fin d'une activity enfant, il est possible de retourner un intent
MainActivity
int code = 42;
startActivityWithResult(indent, code);
Intent i = new Intent();
i.putExtrat("result", "the response !");
setResult(RESULT_OK, i);Explicite
protected void onActivityResult(int requestCode, int resultCode, Intent data) {Les intents
Workout
Project name : Intents
Minimum API : 17
Type : Empty activity
Intent
activity_main.xml
<RelativeLayout xmlns:android="http://schemas.android.com/apk/res/android"
    xmlns:tools="http://schemas.android.com/tools"
    android:layout_width="match_parent"
    android:layout_height="match_parent"
    android:paddingBottom="@dimen/activity_vertical_margin"
    android:paddingLeft="@dimen/activity_horizontal_margin"
    android:paddingRight="@dimen/activity_horizontal_margin"
    android:paddingTop="@dimen/activity_vertical_margin"
    tools:context=".MainActivity" >

    <EditText
        android:id="@+id/inputforintent"
        android:layout_width="wrap_content"
        android:layout_height="wrap_content"
        android:minHeight="60dip"
        android:text="First Activity"
        android:textSize="20sp" >
    </EditText>

    <Button
        android:id="@+id/startintent"
        android:layout_width="wrap_content"
        android:layout_height="wrap_content"
        android:layout_alignLeft="@+id/inputforintent"
        android:layout_below="@+id/inputforintent"
        android:onClick="onClick"
        android:text="Calling an intent" />

</RelativeLayout>
Intent
activity_result.xml
<?xml version="1.0" encoding="utf-8"?>
<LinearLayout xmlns:android="http://schemas.android.com/apk/res/android"
    android:layout_width="match_parent"
    android:layout_height="match_parent"
    android:orientation="vertical" >

    <TextView
        android:id="@+id/displayintentextra"
        android:layout_width="wrap_content"
        android:layout_height="wrap_content"
        android:text="Input"
       />

    <EditText
        android:id="@+id/returnValue"
        android:layout_width="match_parent"
        android:layout_height="wrap_content" >

        <requestFocus />
    </EditText>

</LinearLayout>
Intent
Crée une class ResultActivity
        <activity
            android:label="Result Activity"
            android:name=".ResultActivity" >
        </activity>
On oublie pas d'ajouter la class au manifest
public class ResultActivity extends Activity {

  @Override
  public void onCreate(Bundle bundle) {
    super.onCreate(bundle);
    setContentView(R.layout.activity_result);
  }
}
Intent
Dans MainActivity.java, on remplit les todos
  public void onClick(View view) {
    EditText text = (EditText) findViewById(R.id.inputforintent);
    // used later
    String value = text.getText().toString();
    // TODO 1 create new Intent(context, class)
    // use the activity as context parameter
    // and "ResultActivity.class" for the class parameter

    // TODO 2 start second activity with
    // startActivity(intent);
  }
Dans ResultActivity, on va récupérer les données stocké dans l'intent
getIntent().getExtras().getString("MY_STRING")Et on le passe au EditText
On compile et on vérifie que tout fonctionne
Intent
Dans ResultActivity
@Override
public void finish() {

  // TODO 1 create new Intent
  // Intent intent = new Intent();

  // TODO 2 read the data of the EditText field
  // with the id returnValue

  // TODO 3 put the text from EditText
  // as String extra into the intent
  // use editText.getText().toString();

  // TODO 4 use setResult(RESULT_OK, intent);
  // to return the Intent to the application

  super.finish();
}
Intent
Dans MainActivity, dans la méthode onClick(View view), remplace
startActivity(i);par
startActivity(i, REQUEST_CODE);Au début de la class, n'oublie pas de déclarer REQUEST_CODE en static
  @Override
  protected void onActivityResult(int requestCode, int resultCode, Intent data) {
    if (resultCode == RESULT_OK && requestCode == REQUEST_CODE) {
      if (data.hasExtra("returnkey")) {
        String result = data.getExtras().getString("returnkey");
        if (result != null && result.length() > 0) {
          Toast.makeText(this, result, Toast.LENGTH_SHORT).show();
        }
      }
    }
  }
Résout les derniers trous et bugs
Intent
L'interface utilisateur
ListView, GridView, Recycler et Adapter
ListView, GridView, Recycler et Adapter
L'affichage de liste ou de grille est trés courant dans les applications mobiles.
L'utilisateur voit une collection d'object et peut scroller dessus.

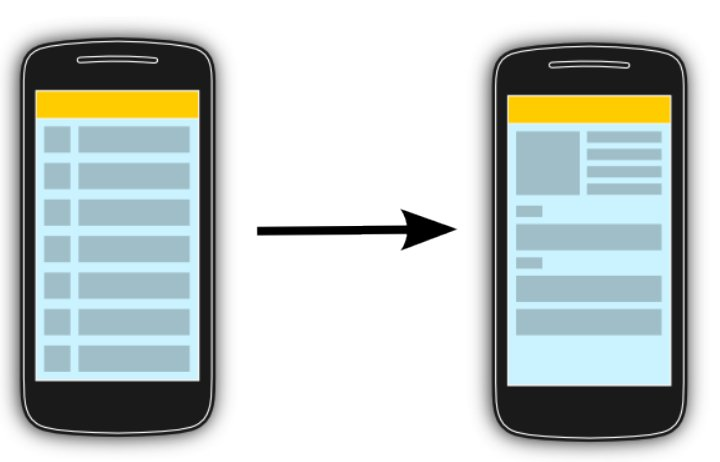
ListView, GridView, Recycler et Adapter
Typiquement quand un utilisateur clique sur un élément de cette liste, l'application bascule sur une autre activité.
ListView, GridView, Recycler et Adapter
Les adapter sont des models de donnée, chaqu'un de ses objects représente un item dans la liste
Un adapter pour un RecyclerView est une extension de RecyclerView.Adapter.
Et peut avoir plusieurs sortes de donnée, tel qu'un titre, une description, une image, ...

ListView, GridView, Recycler et Adapter
Un object d'un recycler est inflate avec son propre layout.
<RelativeLayout xmlns:android="http://schemas.android.com/apk/res/android"
    android:layout_width="fill_parent"
    android:layout_height="?android:attr/listPreferredItemHeight"
    android:padding="6dip" >

    <ImageView
        android:id="@+id/icon"
        android:layout_width="wrap_content"
        android:layout_height="fill_parent"
        android:layout_alignParentBottom="true"
        android:layout_alignParentTop="true"
        android:layout_marginRight="6dip"
        android:contentDescription="TODO"
        android:src="@drawable/ic_launcher" />

    <TextView
        android:id="@+id/secondLine"
        android:layout_width="fill_parent"
        android:layout_height="26dip"
        android:layout_alignParentBottom="true"
        android:layout_alignParentRight="true"
        android:layout_toRightOf="@id/icon"
        android:ellipsize="marquee"
        android:singleLine="true"
        android:text="Description"
        android:textSize="12sp" />

    <TextView
        android:id="@+id/firstLine"
        android:layout_width="fill_parent"
        android:layout_height="wrap_content"
        android:layout_above="@id/secondLine"
        android:layout_alignParentRight="true"
        android:layout_alignParentTop="true"
        android:layout_alignWithParentIfMissing="true"
        android:layout_toRightOf="@id/icon"
        android:gravity="center_vertical"
        android:text="Example application"
        android:textSize="16sp" />

</RelativeLayout>
Il faut ajouter la dépendance suivant dans gradle
dependencies {
    ...
    compile "com.android.support:recyclerview-v7:23.0.1"
}
ListView, GridView, Recycler et Adapter
Il est possible d'avoir des layout différent pour chaque item :
Une animation customiser avec une classe hérité de Recycler.ItemAnimator

L'ordre et le tri doit être fait sur l'adapter. Le RecyclerView affiche uniquement les données
ListView, GridView, Recycler et Adapter
Workout
Project name : RecyclerView
Minimum API : 17
Type : Empty activity
ListView, GridView, Recycler et Adapter
dependencies {
    ...
    compile "com.android.support:recyclerview-v7:23.0.1"
}
Ajouter la ligne de compile dans build.gradle (Module: app)
<RelativeLayout xmlns:android="http://schemas.android.com/apk/res/android"
    xmlns:tools="http://schemas.android.com/tools"
    android:layout_width="match_parent"
    android:layout_height="match_parent"
    tools:context="${relativePackage}.${activityClass}" >

    <!-- A RecyclerView with some commonly used attributes -->

    <android.support.v7.widget.RecyclerView
        android:id="@+id/my_recycler_view"
        android:layout_width="match_parent"
        android:layout_height="match_parent"
        android:scrollbars="vertical" />

    <ImageView
        android:id="@+id/imageView1"
        android:layout_width="wrap_content"
        android:layout_height="wrap_content"
        android:layout_alignParentBottom="true"
        android:layout_alignParentRight="true"
        android:layout_marginBottom="12dp"
        android:layout_marginRight="12dp"
        android:elevation="2dp"
        android:src="@drawable/ic_add_circle" />

</RelativeLayout>
activity_main.xml
<RelativeLayout xmlns:android="http://schemas.android.com/apk/res/android"
    android:layout_width="fill_parent"
    android:layout_height="?android:attr/listPreferredItemHeight"
    android:padding="6dip" >

    <ImageView
        android:id="@+id/icon"
        android:layout_width="wrap_content"
        android:layout_height="fill_parent"
        android:layout_alignParentBottom="true"
        android:layout_alignParentTop="true"
        android:layout_marginRight="6dip"
        android:contentDescription="TODO"
        android:src="@drawable/ic_launcher" />

    <TextView
        android:id="@+id/secondLine"
        android:layout_width="fill_parent"
        android:layout_height="26dip"
        android:layout_alignParentBottom="true"
        android:layout_alignParentRight="true"
        android:layout_toRightOf="@id/icon"
        android:ellipsize="marquee"
        android:singleLine="true"
        android:text="Description"
        android:textSize="12sp" />

    <TextView
        android:id="@+id/firstLine"
        android:layout_width="fill_parent"
        android:layout_height="wrap_content"
        android:layout_above="@id/secondLine"
        android:layout_alignParentRight="true"
        android:layout_alignParentTop="true"
        android:layout_alignWithParentIfMissing="true"
        android:layout_toRightOf="@id/icon"
        android:gravity="center_vertical"
        android:text="Example application"
        android:textSize="16sp" />

</RelativeLayout>
items.xml
ListView, GridView, Recycler et Adapter
public class MyAdapter extends RecyclerView.Adapter<MyAdapter.ViewHolder> {
    private ArrayList<String> mDataset;

    // Provide a reference to the views for each data item
    // Complex data items may need more than one view per item, and
    // you provide access to all the views for a data item in a view holder
    public class ViewHolder extends RecyclerView.ViewHolder {
        // each data item is just a string in this case
        public TextView txtHeader;
        public TextView txtFooter;

        public ViewHolder(View v) {
            super(v);
            txtHeader = (TextView) v.findViewById(R.id.firstLine);
            txtFooter = (TextView) v.findViewById(R.id.secondLine);
        }
    }

    public void add(int position, String item) {
        mDataset.add(position, item);
        notifyItemInserted(position);
    }

    public void remove(String item) {
        int position = mDataset.indexOf(item);
        mDataset.remove(position);
        notifyItemRemoved(position);
    }

    // Provide a suitable constructor (depends on the kind of dataset)
    public MyAdapter(ArrayList<String> myDataset) {
        mDataset = myDataset;
    }

    // Create new views (invoked by the layout manager)
    @Override
    public MyAdapter.ViewHolder onCreateViewHolder(ViewGroup parent,
                                                   int viewType) {
        // create a new view
        View v = LayoutInflater.from(parent.getContext()).inflate(R.layout.item, parent, false);
        // set the view's size, margins, paddings and layout parameters
        ViewHolder vh = new ViewHolder(v);
        return vh;
    }

    // Replace the contents of a view (invoked by the layout manager)
    @Override
    public void onBindViewHolder(ViewHolder holder, int position) {
        // - get element from your dataset at this position
        // - replace the contents of the view with that element
        final String name = mDataset.get(position);
        holder.txtHeader.setText(mDataset.get(position));
        holder.txtHeader.setOnClickListener(new View.OnClickListener() {
            @Override
            public void onClick(View v) {
                remove(name);
            }
        });

        holder.txtFooter.setText("Footer: " + mDataset.get(position));

    }

    // Return the size of your dataset (invoked by the layout manager)
    @Override
    public int getItemCount() {
        return mDataset.size();
    }

}
Créer la classe MyAdapter
    @Override
    protected void onCreate(Bundle savedInstanceState) {
        super.onCreate(savedInstanceState);
        setContentView(R.layout.activity_main);

        ArrayList<String> myDataset = new ArrayList<String>();

        mRecyclerView = (RecyclerView) findViewById(R.id.my_recycler_view);

        // use a linear layout manager
        mLayoutManager = new LinearLayoutManager(this);
        mRecyclerView.setLayoutManager(mLayoutManager);

        // specify an adapter (see also next example)
        mAdapter = new MyAdapter(myDataset);
        mRecyclerView.setAdapter(mAdapter);

        mAdapter.add(0, "Salut");
        mAdapter.add(1, "ca");
        mAdapter.add(2, "va");
    }
Dans MainActivity
ListView, GridView, Recycler et Adapter
On compile !
On commente le code
On continue :
Rendre le bouton + clickable et crée un événement pour qu'il ajoute un item à chaque clique
    @Override
    protected void onCreate(Bundle savedInstanceState) {
        super.onCreate(savedInstanceState);
        setContentView(R.layout.activity_main);

        ArrayList<String> myDataset = new ArrayList<String>();

        mRecyclerView = (RecyclerView) findViewById(R.id.my_recycler_view);

        // use a linear layout manager
        mLayoutManager = new LinearLayoutManager(this);
        mRecyclerView.setLayoutManager(mLayoutManager);

        // specify an adapter (see also next example)
        mAdapter = new MyAdapter(myDataset);
        mRecyclerView.setAdapter(mAdapter);

        ArrayList<String> items = new ArrayList<String>();
        items.add("Premier message");
        items.add("Second message");
        items.add("Troixième message");
        items.add("Quatrième message");

        //code here
        // mAdapter.add(???)
    }
ListView, GridView, Recycler et Adapter
On continue :
Ajouter la classe Message
public class Message {
    public String contact = "";
    public String message = "";

    public Message(String contact, String message) {
        this.message = message;
        this.contact = contact;
    }

    public String getContact() {
        return contact;
    }

    public void setContact(String contact) {
        this.contact = contact;
    }

    public String getMessage() {
        return message;
    }

    public void setMessage(String message) {
        this.message = message;
    }
}
ListView, GridView, Recycler et Adapter
Au lieu que l'adapter soit associé à un ArrayList<String>, on l'associe avec un ArrayList<Message>
- Changer le code pour gérer cet nouvel ArrayList
- Dans onBindViewHolder, associé le contact avec txtHeader et message avec TxtFooter.
        ArrayList<Message> items = new ArrayList<Message>();
        items.add(new Message("0642698745", "Premier message"));
        items.add(new Message("0654879635", "Second message"));
        items.add(new Message("0654323698", "Troixième message"));
        items.add(new Message("0610584559", "Quatrième message"));
ChatWithMe
Side-project
Project name : ChatWithMe
Minimum API : 21
Type : Empty activity
ChatWithMe
Constuire les designs suivant
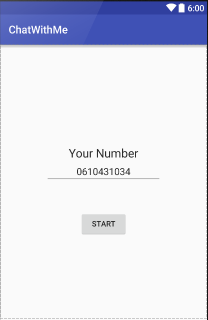
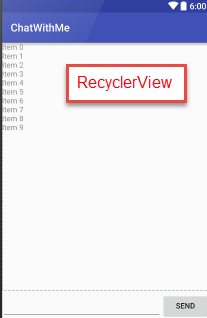
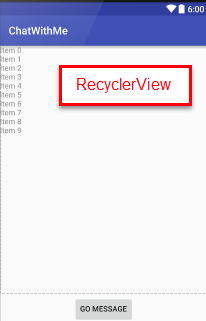
activity_main
activity_contacts_list
activity_messages
ChatWithMe
Constuire les designs suivant
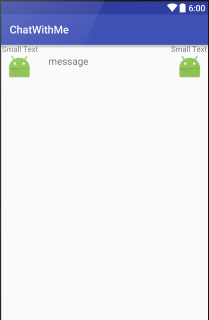
item_contact
item_message
Hint, appliquer la hauteur :
android:layout_height="?android:attr/listPreferredItemHeight"ChatWithMe
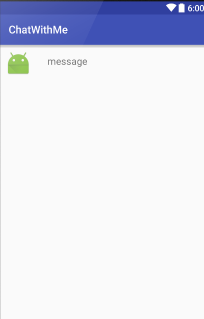
Constuire les designs suivant
item_contact
item_message
Hint, appliquer la hauteur :
android:layout_height="?android:attr/listPreferredItemHeight"ChatWithMe
1 - Lier toutes les activités entre-elles
2 - Developper la gestion des recyclerView et des adapters.
Ajouter des fausses données
Communication inter-application
- Intent filters
- Services
- Broadcast
Communication inter-application
Intent filters
Intent filters
Il est possible de lancer des intents pour d'autres applications.
String url = "http://www.google.com";
Intent i = new Intent(Intent.ACTION_VIEW);
i.setData(Uri.parse(url));
startActivity(i);
Un composant d'une application peut s'enregistrer avec un intent filter pour recevoir des intents.
Un intent filter permet de spécifier un type d'intent qu'une activity, un service ou un broadcaster peut recevoir
Intent filters
S'inscrire pour ouvrir une page web
<activity android:name=".BrowserActivitiy"
          android:label="@string/app_name">
  <intent-filter>
     <action android:name="android.intent.action.VIEW" />
     <category android:name="android.intent.category.DEFAULT" />
     <data android:scheme="http"/>
  </intent-filter>
</activity>
S'inscrire pour recevoir du Content Type text/plain
<activity
  android:name=".ActivityTest"
    android:label="@string/app_name" >
    <intent-filter>
      <action android:name="android.intent.action.SEND" />
      <category android:name="android.intent.category.DEFAULT" />
      <data android:mimeType="text/plain" />
    </intent-filter>
</activity>
Workout
Project name : MyBrowser
Minimum API : 17
Type : Empty activity
Intent filters
MyBrowser
<?xml version="1.0" encoding="utf-8"?>
<RelativeLayout xmlns:android="http://schemas.android.com/apk/res/android"
    xmlns:tools="http://schemas.android.com/tools" android:layout_width="match_parent"
    android:layout_height="match_parent" android:paddingLeft="@dimen/activity_horizontal_margin"
    android:paddingRight="@dimen/activity_horizontal_margin"
    android:paddingTop="@dimen/activity_vertical_margin"
    android:paddingBottom="@dimen/activity_vertical_margin" tools:context=".MainActivity">

    <TextView
        android:layout_width="wrap_content"
        android:layout_height="wrap_content"
        android:textAppearance="?android:attr/textAppearanceLarge"
        android:text="Launch CallBrowser"
        android:id="@+id/textView"
        android:layout_centerVertical="true"
        android:layout_centerHorizontal="true" />
</RelativeLayout>
activity_main.xml
<?xml version="1.0" encoding="utf-8"?>
<RelativeLayout xmlns:android="http://schemas.android.com/apk/res/android"
    xmlns:tools="http://schemas.android.com/tools" android:layout_width="match_parent"
    android:layout_height="match_parent" android:paddingLeft="@dimen/activity_horizontal_margin"
    android:paddingRight="@dimen/activity_horizontal_margin"
    android:paddingTop="@dimen/activity_vertical_margin"
    android:paddingBottom="@dimen/activity_vertical_margin" tools:context=".BrowserActivity">

    <WebView
        android:layout_width="match_parent"
        android:layout_height="match_parent"
        android:id="@+id/webView2"
        android:layout_alignParentTop="true"
        android:layout_alignParentStart="true"
        android:layout_alignParentEnd="false"
 />

</RelativeLayout>
activity_browser.xml
    @Override
    protected void onCreate(Bundle savedInstanceState) {
        super.onCreate(savedInstanceState);
        setContentView(R.layout.activity_browser);

        // To keep this example simple, we allow network access
        // in the user interface thread
        StrictMode.ThreadPolicy policy = new StrictMode.ThreadPolicy.Builder()
                .permitAll().build();
        StrictMode.setThreadPolicy(policy);

        Intent intent = getIntent();
        WebView webView = (WebView) findViewById(R.id.webView2);
        // To get the action of the intent use
        String action = intent.getAction();
        if (!action.equals(Intent.ACTION_VIEW)) {
            throw new RuntimeException("Should not happen");
        }
        // To get the data use
        Uri data = intent.getData();
        URL url;
        try {
            url = new URL(data.getScheme(), data.getHost(), data.getPath());
            webView.setWebViewClient(new WebViewClient());
            webView.getSettings().setJavaScriptEnabled(true);
            webView.loadUrl(url.toString());
        } catch (Exception e) {
            e.printStackTrace();
        }

    }
Crée une class java, BrowserActivity
MyBrowser
    <uses-permission android:name="android.permission.INTERNET" ></uses-permission>
    <uses-permission android:name="android.permission.BLUETOOTH" ></uses-permission>

    <application
        android:allowBackup="true"
        android:icon="@mipmap/ic_launcher"
        android:label="@string/app_name"
        android:supportsRtl="true"
        android:theme="@style/AppTheme" >
        <activity android:name=".MainActivity" >
            <intent-filter>
                <action android:name="android.intent.action.MAIN" />

                <category android:name="android.intent.category.LAUNCHER" />
            </intent-filter>
        </activity>
        <activity android:name=".BrowserActivity" >
            <intent-filter>
                <action android:name="android.intent.action.VIEW" />

                <category android:name="android.intent.category.DEFAULT" />

                <data android:scheme="http" />
                <data android:scheme="https" />
            </intent-filter>
        </activity>
    </application>
AndroidManifest.xml
On commente le code
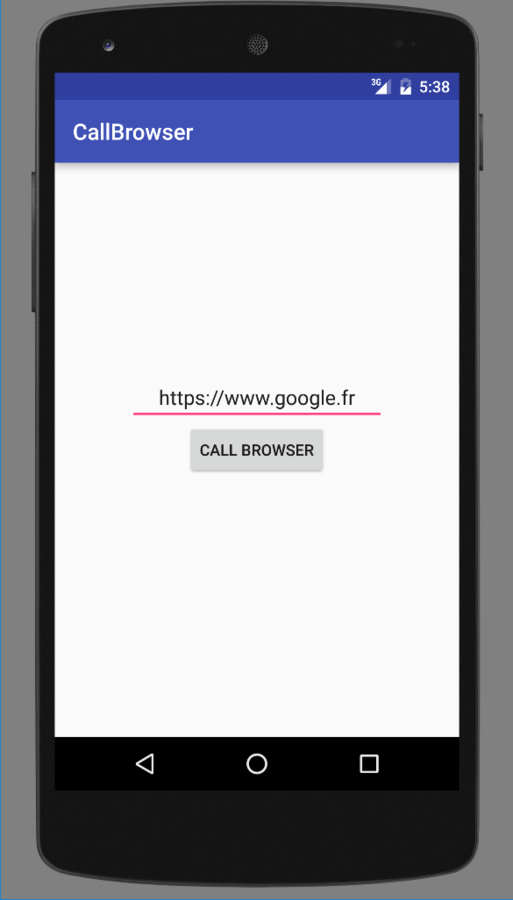
Pour tester l'application, il nous faut une application qui appelle une url
Workout
Project name : CallBrowser
Minimum API : 17
Type : Empty activity
Intent filters
MyBrowser
Communication inter-application
Services
Services
Les services sont des composants qui tournent en background sans aucune intéraction avec l'utilisateur.
Il n'a aucune interface utilisateur.
Les services sont utilisés pour les actions répétitives et/ou longues.
Les services tournent avec un plus grosse priorités que les composants ordinaires.
De la même manière que les applications, il n'est pas possible de faire tourner des actions bloquant sur le main thread.
Services
AndroidManifest.xml
Start service
<service
  android:name="MyService"
  android:icon="@drawable/icon"
  android:label="@string/service_name"
  >
</service>
public class MyService extends Service {
@Override
public int onStartCommand(Intent intent, int flags, int startId) {
//TODO do something useful
return Service.START_NOT_STICKY;
}
@Override
public IBinder onBind(Intent intent) {
//TODO for communication return IBinder implementation
return null;
}
} // use this to start and trigger a service
Intent i= new Intent(context, MyService.class);
// potentially add data to the intent
i.putExtra("KEY1", "Value to be used by the service");
context.startService(i); On peut aussi démarrer le service bindService(), cela nous permettra de communiquer directement avec le service.
Implémentation et déclaration
Services
Démarrage
Aprés que startService(intent) soit appelé, le service ne tourne toujours pas. Le service est créé et la méthode onCreate() est appelé.
Une fois que le service est démarré, la méthode onStartCommand(Intent) est appelée. On peut récupérer l'Intent.
Même si vous appelez plusieurs fois startService(), le service ne sera appelé qu'une seule fois.
Services
Redémarrage
La méthode appelé doit retourne la méthode de redémarrage du service
| options | Description |
|---|---|
| Service.START_STICKY | Le service est redémarré. L'intent ne sera pas renvoyé. |
| Service.START_NOT_STICKY | Le service ne sera pas redémarré. |
| Service.START_REDELIVER_INTENT | Le service est redémarré. L'intent sera renvoyé. |
Services
Arret
Pour arrêter le service :
Depuis l'application, on faut appeler stopService()
Depuis le service lui-même, il faut appeler stopSelf()
IntentServices
Il est possible de lancer les services pour une seule fois.
Une fois que fois que le service est fini, onHandleIntent() est appelé dans l'application.
Services
IntentService ou AsyncTask ?
AsyncTask est une suite de gestions de thread avec beaucoup d'options. Très pratique à mettre en place. Est tout à fait adapté pour les petites tâches récurrentes.
IntentService est similaire à AsyncTask, mais il permet de faire continuer l'exécution même quand l'application est en background.
Par exemple, une application qui upload une vidéo, avec l'application, on sélectionne la vidéo et l'utilisateur n'est pas obligé de laisser l'application ouverte pour que l'upload fonctionne.
Services
BindService
Si une activité veut interagir avec avec un service, elle peut appeler la méthode bindService().
Local services bindings
Si le service est lancé à l'interrieur d'une activité, il est possible de retourne le service dans l'activité. Ca permet d'accéder aux methodes du service directement
Communication interprocesses
Si le service tourne dans son propre service, on a besoin de l'IPC (interprocess Communication) pour communiquer avec le service.
Services
Lancer un service dans son propre processus
Les deux points à l'élément process indique à android que ce service est privé à son application. Sinon, le service pourrait être accédé par d'autres application.
Et si vous voulez communiqué avec le service à travers le réseau, il faudra faire les appels en asynchrone. Android n'autorise pas de faire ces appels sur le main thread.
<service
  android:name="WordService"
  android:process=":my_process"
  android:icon="@drawable/icon"
  android:label="@string/service_name"
  >
</service>
Services
Communiquer avec un service ?
Soit par les intents, c'est le scénario le plus simple.
Soit en utilisant les receivers
Si le service est local, on peut accéder aux méthodes de la classe
Soit en utilisant les IPC par les fichiers Aidl
Soit par le réseau
Workout
Project name : IntentService
Minimum API : 17
Type : Empty activity
Services
Services
Exercice 1 : Les intentServices
Class DownloadService
public class DownloadService extends IntentService {
private int result = Activity.RESULT_CANCELED;
public static final String URL = "urlpath";
public static final String FILENAME = "filename";
public static final String FILEPATH = "filepath";
public static final String RESULT = "result";
public static final String NOTIFICATION = "com.meuuh.android.service.receiver";
public DownloadService() {
super("DownloadService");
}
// will be called asynchronously by Android
@Override
protected void onHandleIntent(Intent intent) {
String urlPath = intent.getStringExtra(URL);
String fileName = intent.getStringExtra(FILENAME);
File output = new File(Environment.getExternalStorageDirectory(),
fileName);
if (output.exists()) {
output.delete();
}
InputStream stream = null;
FileOutputStream fos = null;
try {
URL url = new URL(urlPath);
stream = url.openConnection().getInputStream();
InputStreamReader reader = new InputStreamReader(stream);
fos = new FileOutputStream(output.getPath());
int next = -1;
while ((next = reader.read()) != -1) {
fos.write(next);
}
// successfully finished
result = Activity.RESULT_OK;
} catch (Exception e) {
e.printStackTrace();
} finally {
if (stream != null) {
try {
stream.close();
} catch (IOException e) {
e.printStackTrace();
}
}
if (fos != null) {
try {
fos.close();
} catch (IOException e) {
e.printStackTrace();
}
}
}
publishResults(output.getAbsolutePath(), result);
}
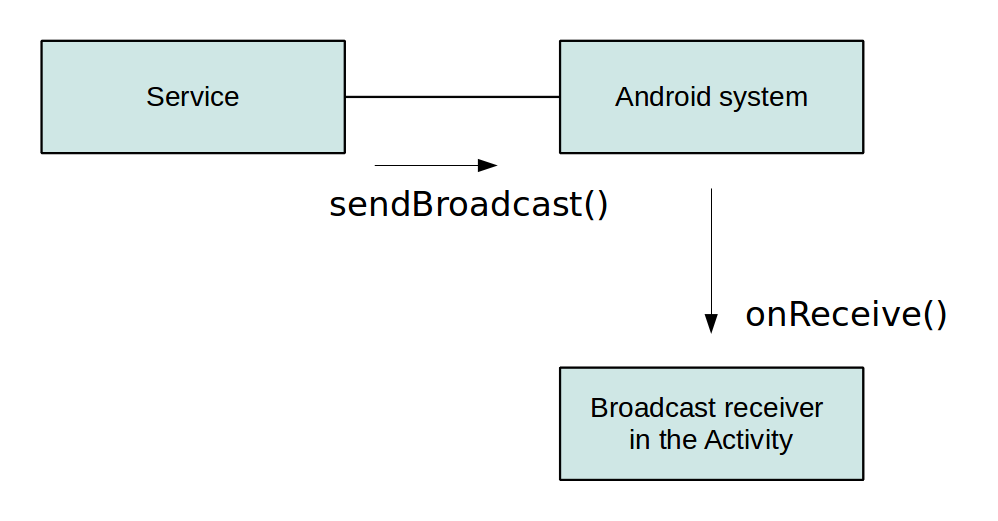
private void publishResults(String outputPath, int result) {
Intent intent = new Intent(NOTIFICATION);
intent.putExtra(FILEPATH, outputPath);
intent.putExtra(RESULT, result);
sendBroadcast(intent);
}
}Class MainActivity
public class MainActivity extends AppCompatActivity {

    private TextView textView;
    private BroadcastReceiver receiver = new BroadcastReceiver() {

        @Override
        public void onReceive(Context context, Intent intent) {
            Bundle bundle = intent.getExtras();
            if (bundle != null) {
                String string = bundle.getString(DownloadService.FILEPATH);
                int resultCode = bundle.getInt(DownloadService.RESULT);
                if (resultCode == RESULT_OK) {
                    Toast.makeText(MainActivity.this,
                            "Download complete. Download URI: " + string,
                            Toast.LENGTH_LONG).show();
                    textView.setText("Download done");
                } else {
                    Toast.makeText(MainActivity.this, "Download failed",
                            Toast.LENGTH_LONG).show();
                    textView.setText("Download failed");
                }
            }
        }
    };

    @Override
    public void onCreate(Bundle savedInstanceState) {
        super.onCreate(savedInstanceState);
        setContentView(R.layout.activity_main);
        textView = (TextView) findViewById(R.id.status);


    }

    @Override
    protected void onResume() {
        super.onResume();
        registerReceiver(receiver, new IntentFilter(DownloadService.NOTIFICATION));
    }
    @Override
    protected void onPause() {
        super.onPause();
        unregisterReceiver(receiver);
    }

    public void onClick(View view) {

        Intent intent = new Intent(this, DownloadService.class);
        // add infos for the service which file to download and where to store
        intent.putExtra(DownloadService.FILENAME, "image.jpg");
        intent.putExtra(DownloadService.URL,
                "http://s2.quickmeme.com/img/d2/d2a55033bd85f86fdb077fc6f1fb54db0d4543d2c1951a6b174a15d650c8ad90.jpg");
        startService(intent);
        textView.setText("Service started");
    }
}
AndroidManifest
<?xml version="1.0" encoding="utf-8"?>
<manifest xmlns:android="http://schemas.android.com/apk/res/android"
    package="com.meuuh.intentservice" >

    <uses-sdk
        android:minSdkVersion="17"
        android:targetSdkVersion="18" />

    <uses-permission android:name="android.permission.INTERNET" />
    <uses-permission android:name="android.permission.WRITE_EXTERNAL_STORAGE" />

    <application
        android:allowBackup="true"
        android:icon="@mipmap/ic_launcher"
        android:label="@string/app_name"
        android:theme="@style/AppTheme" >
        <activity
            android:name=".MainActivity"
            android:label="@string/app_name" >
            <intent-filter>
                <action android:name="android.intent.action.MAIN" />

                <category android:name="android.intent.category.LAUNCHER" />
            </intent-filter>
        </activity>

        <service android:name=".DownloadService" >
        </service>
    </application>

</manifest>
activity_main.xml
<?xml version="1.0" encoding="utf-8"?>
<RelativeLayout xmlns:android="http://schemas.android.com/apk/res/android"
    xmlns:tools="http://schemas.android.com/tools" android:layout_width="match_parent"
    android:layout_height="match_parent" android:paddingLeft="@dimen/activity_horizontal_margin"
    android:paddingRight="@dimen/activity_horizontal_margin"
    android:paddingTop="@dimen/activity_vertical_margin"
    android:paddingBottom="@dimen/activity_vertical_margin" tools:context=".MainActivity">

    <Button
        android:id="@+id/button1"
        android:layout_width="wrap_content"
        android:layout_height="wrap_content"
        android:onClick="onClick"
        android:text="Download"
        android:layout_alignParentBottom="true"
        android:layout_centerHorizontal="true"
        android:layout_marginBottom="63dp" />

    <LinearLayout
        android:layout_width="wrap_content"
        android:layout_height="wrap_content"
        android:layout_alignParentTop="true"
        android:layout_centerHorizontal="true"
        android:layout_marginTop="150dp">

        <TextView
            android:layout_width="wrap_content"
            android:layout_height="wrap_content"
            android:text="Status: "
            android:textSize="@dimen/abc_text_size_large_material" />

        <TextView
            android:id="@+id/status"
            android:layout_width="wrap_content"
            android:layout_height="wrap_content"
            android:text="Not started"
            android:textSize="@dimen/abc_text_size_large_material" />
    </LinearLayout>
</RelativeLayout>
Workout
Project name : OwnService
Minimum API : 17
Type : Empty activity
Services
Services
Exercice 1 : Les intentServices
Class DownloadService
public class DownloadService extends IntentService {

    private int result = Activity.RESULT_CANCELED;
    public static final String URL = "urlpath";
    public static final String FILENAME = "filename";
    public static final String FILEPATH = "filepath";
    public static final String RESULT = "result";
    public static final String NOTIFICATION = "com.meuuh.android.service.receiver";

    public DownloadService() {
        super("DownloadService");
    }

    // will be called asynchronously by Android
    @Override
    protected void onHandleIntent(Intent intent) {
        String urlPath = intent.getStringExtra(URL);
        String fileName = intent.getStringExtra(FILENAME);
        File output = new File(Environment.getExternalStorageDirectory(),
                fileName);
        if (output.exists()) {
            output.delete();
        }

        InputStream stream = null;
        FileOutputStream fos = null;
        try {

            URL url = new URL(urlPath);
            stream = url.openConnection().getInputStream();
            InputStreamReader reader = new InputStreamReader(stream);
            fos = new FileOutputStream(output.getPath());
            int next = -1;
            while ((next = reader.read()) != -1) {
                fos.write(next);
            }
            // successfully finished
            result = Activity.RESULT_OK;

        } catch (Exception e) {
            e.printStackTrace();
        } finally {
            if (stream != null) {
                try {
                    stream.close();
                } catch (IOException e) {
                    e.printStackTrace();
                }
            }
            if (fos != null) {
                try {
                    fos.close();
                } catch (IOException e) {
                    e.printStackTrace();
                }
            }
        }
        publishResults(output.getAbsolutePath(), result);
    }

    private void publishResults(String outputPath, int result) {
        Intent intent = new Intent(NOTIFICATION);
        intent.putExtra(FILEPATH, outputPath);
        intent.putExtra(RESULT, result);
        sendBroadcast(intent);
    }
}
Class MainActivity
public class MainActivity extends AppCompatActivity {

    private TextView textView;
    private BroadcastReceiver receiver = new BroadcastReceiver() {

        @Override
        public void onReceive(Context context, Intent intent) {
            Bundle bundle = intent.getExtras();
            if (bundle != null) {
                String string = bundle.getString(DownloadService.FILEPATH);
                int resultCode = bundle.getInt(DownloadService.RESULT);
                if (resultCode == RESULT_OK) {
                    Toast.makeText(MainActivity.this,
                            "Download complete. Download URI: " + string,
                            Toast.LENGTH_LONG).show();
                    textView.setText("Download done");
                } else {
                    Toast.makeText(MainActivity.this, "Download failed",
                            Toast.LENGTH_LONG).show();
                    textView.setText("Download failed");
                }
            }
        }
    };

    @Override
    public void onCreate(Bundle savedInstanceState) {
        super.onCreate(savedInstanceState);
        setContentView(R.layout.activity_main);
        textView = (TextView) findViewById(R.id.status);


    }

    @Override
    protected void onResume() {
        super.onResume();
        registerReceiver(receiver, new IntentFilter(DownloadService.NOTIFICATION));
    }
    @Override
    protected void onPause() {
        super.onPause();
        unregisterReceiver(receiver);
    }

    public void onClick(View view) {

        Intent intent = new Intent(this, DownloadService.class);
        // add infos for the service which file to download and where to store
        intent.putExtra(DownloadService.FILENAME, "image.jpg");
        intent.putExtra(DownloadService.URL,
                "http://s2.quickmeme.com/img/d2/d2a55033bd85f86fdb077fc6f1fb54db0d4543d2c1951a6b174a15d650c8ad90.jpg");
        startService(intent);
        textView.setText("Service started");
    }
}
AndroidManifest
<?xml version="1.0" encoding="utf-8"?>
<manifest xmlns:android="http://schemas.android.com/apk/res/android"
    package="com.meuuh.intentservice" >

    <uses-sdk
        android:minSdkVersion="17"
        android:targetSdkVersion="18" />

    <uses-permission android:name="android.permission.INTERNET" />
    <uses-permission android:name="android.permission.WRITE_EXTERNAL_STORAGE" />

    <application
        android:allowBackup="true"
        android:icon="@mipmap/ic_launcher"
        android:label="@string/app_name"
        android:theme="@style/AppTheme" >
        <activity
            android:name=".MainActivity"
            android:label="@string/app_name" >
            <intent-filter>
                <action android:name="android.intent.action.MAIN" />

                <category android:name="android.intent.category.LAUNCHER" />
            </intent-filter>
        </activity>

        <service android:name=".DownloadService" >
        </service>
    </application>

</manifest>
activity_main.xml
<?xml version="1.0" encoding="utf-8"?>
<RelativeLayout xmlns:android="http://schemas.android.com/apk/res/android"
    xmlns:tools="http://schemas.android.com/tools" android:layout_width="match_parent"
    android:layout_height="match_parent" android:paddingLeft="@dimen/activity_horizontal_margin"
    android:paddingRight="@dimen/activity_horizontal_margin"
    android:paddingTop="@dimen/activity_vertical_margin"
    android:paddingBottom="@dimen/activity_vertical_margin" tools:context=".MainActivity">

    <Button
        android:id="@+id/button1"
        android:layout_width="wrap_content"
        android:layout_height="wrap_content"
        android:onClick="onClick"
        android:text="Download"
        android:layout_alignParentBottom="true"
        android:layout_centerHorizontal="true"
        android:layout_marginBottom="63dp" />

    <LinearLayout
        android:layout_width="wrap_content"
        android:layout_height="wrap_content"
        android:layout_alignParentTop="true"
        android:layout_centerHorizontal="true"
        android:layout_marginTop="150dp">

        <TextView
            android:layout_width="wrap_content"
            android:layout_height="wrap_content"
            android:text="Status: "
            android:textSize="@dimen/abc_text_size_large_material" />

        <TextView
            android:id="@+id/status"
            android:layout_width="wrap_content"
            android:layout_height="wrap_content"
            android:text="Not started"
            android:textSize="@dimen/abc_text_size_large_material" />
    </LinearLayout>
</RelativeLayout>
Communication inter-application
Broadcast Receiver
Broadcast Receiver
Les broadcast receivers ou plus simplement nommé les receivers, sont des composants androidqui permet de s'inscrire à des événements systèmes.
Par exemple, on peut s'inscrire à l'événement ACTION_BOOT_COMPLETED, qui sera appelé dès que le système android aura completement fini sont process de boot.
Pour s'enregistrer, on peut renseigner l'android_manifest
Ou plus dynamiquement grâce à Context.registerReceiver()
Broadcast Receiver
Il faut que la classe recevant le receiver soit étendu de BroadcastReceiver
Quand l'event est appelé, la méthode onReceiver() est appelé.
Après que la méthode onReceiver() soit appelé, Android va recycler le receiver.
Depuis API 11, vous pouvez appeler goAsync() qui retourne un object PendingResult. Android va considérer que le receiver est toujours actif jusqu'a ce que PendingResult.finish() soit appelé.
Broadcast Receiver
/!\ A partir de Android 3, Android exclut tous les receivers par défaut avant que l'utilisateur ne le lance ou si l'utilisateur stop volontairement l'application dans la configuration.
Il faut uniquement lancer une fois l'application pour enlever cette restriction. Au prochain reboot la restriction sera toujours retiré à moins que l'utilisateur ne stop l'application.
Broadcast Receiver
Certains événements sont définis comme des champs final static

D'autres sont dans des classes d'Android, par exemple TelephonyManager.
Broadcast Receiver
Pour démarrer automatiquement un Service à partir un Receiver
    <application
        [...]
        <receiver android:name=".MyReceiver" >
            <intent-filter>
                <action android:name="android.intent.action.BOOT_COMPLETED" />
            </intent-filter>
        </receiver>
    </application>
public class MyReceiver extends BroadcastReceiver {

  @Override
  public void onReceive(Context context, Intent intent) {
    // assumes WordService is a registered service
    Intent intent = new Intent(context, WordService.class);
    context.startService(intent);
  }
}
Broadcast Receiver
Implémenter un receiver pour un événement lié au téléphone
    <uses-permission android:name="android.permission.READ_PHONE_STATE" ></uses-permission>

    <application
        [...]
        <receiver android:name="MyPhoneReceiver" >
            <intent-filter>
                <action android:name="android.intent.action.PHONE_STATE" >
                </action>
            </intent-filter>
        </receiver>
    </application>
public class MyPhoneReceiver extends BroadcastReceiver {
@Override
public void onReceive(Context context, Intent intent) {
Bundle extras = intent.getExtras();
if (extras != null) {
String state = extras.getString(TelephonyManager.EXTRA_STATE);
Log.w("MY_DEBUG_TAG", state);
if (state.equals(TelephonyManager.EXTRA_STATE_RINGING)) {
String phoneNumber = extras
.getString(TelephonyManager.EXTRA_INCOMING_NUMBER);
Log.w("MY_DEBUG_TAG", phoneNumber);
}
}
}
}
Workout
Project name : AlarmReceiver
Minimum API : 17
Type : Empty activity
Broadcast Receiver
Broadcast Receiver
<?xml version="1.0" encoding="utf-8"?>
<manifest xmlns:android="http://schemas.android.com/apk/res/android"
    package="com.meuuh.alarmreceiver" >

    <uses-permission android:name="android.permission.VIBRATE" >
    </uses-permission>

    <application
        android:allowBackup="true"
        android:icon="@mipmap/ic_launcher"
        android:label="@string/app_name"
        android:supportsRtl="true"
        android:theme="@style/AppTheme" >
        <activity android:name=".MainActivity" >
            <intent-filter>
                <action android:name="android.intent.action.MAIN" />

                <category android:name="android.intent.category.LAUNCHER" />
            </intent-filter>
        </activity>
        <receiver android:name=".MyBroadcastReceiver" >
        </receiver>
    </application>

</manifest>
public class MyBroadcastReceiver extends BroadcastReceiver {
@Override
public void onReceive(Context context, Intent intent) {
Toast.makeText(context, "Time's up buddy !",
Toast.LENGTH_LONG).show();
// Vibrate the mobile phone
Vibrator vibrator = (Vibrator) context.getSystemService(Context.VIBRATOR_SERVICE);
vibrator.vibrate(2000);
}
} public void startAlert(View view) {
EditText text = (EditText) findViewById(R.id.time);
int i = Integer.parseInt(text.getText().toString());
Intent intent = new Intent(this, MyBroadcastReceiver.class);
PendingIntent pendingIntent = PendingIntent.getBroadcast(this.getApplicationContext(), 234324243, intent, 0);
AlarmManager alarmManager = (AlarmManager) getSystemService(ALARM_SERVICE);
alarmManager.set(AlarmManager.RTC_WAKEUP, System.currentTimeMillis()
+ (i * 1000), pendingIntent);
Toast.makeText(this, "Alarm set in " + i + " seconds",
Toast.LENGTH_LONG).show();
}On push, on test, on commente
Broadcast Receiver
        <receiver android:name="MyReceiver" >
            <intent-filter>
                <action android:name="com.meuuh.android.mybroadcast" />
            </intent-filter>
        </receiver>
Intent intent = new Intent();
intent.setAction("com.android.android.mybroadcast");
sendBroadcast(intent); Il est possible d'enregistrer nos propres événements
Ajouter un nouveau bouton au layout.
Quand on clique sur ce bouton, vous appellerez l'action que vous aurez défini dans le manifest
Appel de méthode asynchrone
AsyncTask
AsyncTask
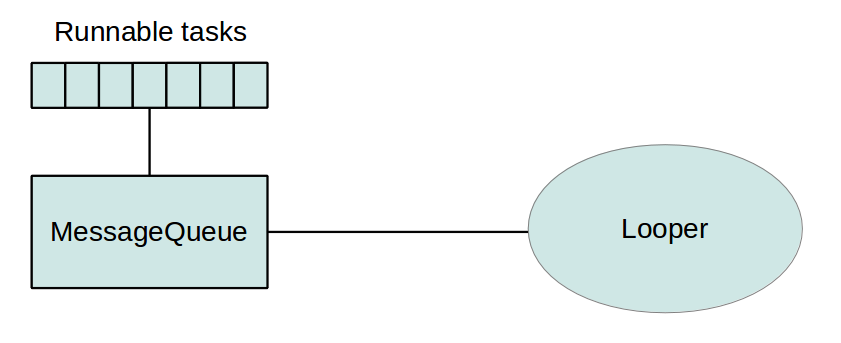
Android modifie l'UI et gères les input event avec un seul thread. On l'appel le main thread
Android collecte tous les events dans une queue et process ces tasks dans le looper.
AsyncTask
Dans le main thread, chaque tache est résolu l'un aprés l'autre.
Si nous gérons mal le code, et que nous mettons un longue tâche dans le main thread, l'UI va se bloquer.
Par example: HTTP request, SQL Request, ...
Pour assurer une bonne expérience utilisateur, il faut lancer ces tables dans des taches asynchrones
De toutes les facons, si nous bloquons l'application pendant plus de 5 secondes, Android la tue.
"Application not responding"
AsyncTask
Une solution est d'utiliser les Threads de Java.
Android met à disposition les classes ci-dessous :
Thread
java.utils.concurrent
ThreadPools
Executor
Mais il faut gérer soit même :
- les synchronisations de thread, si l'utisateur annule la tache
- Pas d'annulation de thread par default
- Pas de Thread pooling par default
- Pas de gestion du changement de configuration
Pour toutes ces raisons, Android a développer ses propres méthodes.
AsyncTask
Android nous met à disposition 3 classes ci-dessous :
- andriod.os.Handler
- AsyncTasks
- Loader
AsyncTask
APPEL DE METHODE ASYNCHRONES
Project name : DownloadHtml
Minimum API : 17
Type : Empty activity
AsyncTask
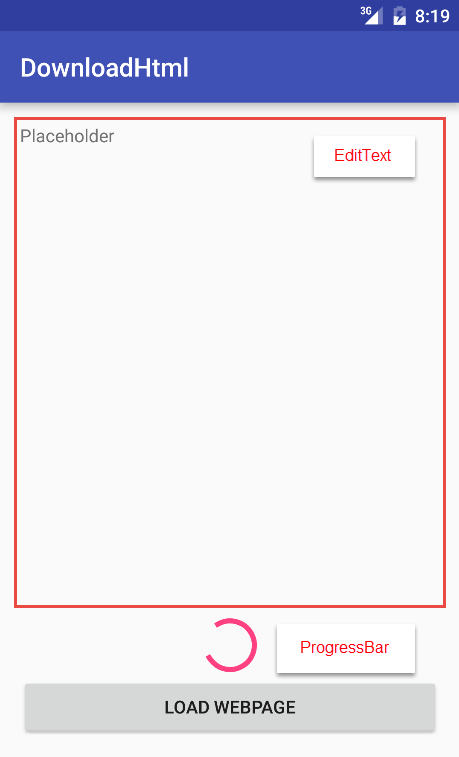
Construire activity_main.xml
AsyncTask
MainActivity
public class MainActivity extends AppCompatActivity {

    private TextView textView;

    @Override
    public void onCreate(Bundle savedInstanceState) {
        super.onCreate(savedInstanceState);
        setContentView(R.layout.activity_main);
        textView = (TextView) findViewById(R.id.TextView01);
    }

    private class DownloadWebPageTask extends AsyncTask<String, Void, String> {
        @Override
        protected String doInBackground(String... urls) {
            String response = "";
            for (String url : urls) {
                try {
                    Thread.sleep(2*1000);
                } catch (InterruptedException e) {
                    e.printStackTrace();
                }
                response += ("Get response for url : ") + response.concat(url);
            }
            return response;
        }

        @Override
        protected void onPostExecute(String result) {
            textView.setText(result);
        }
    }

    public void onClick(View view) {
        DownloadWebPageTask task = new DownloadWebPageTask();
        task.execute(new String[]{"https://www.google.com"});

    }
}
On commente le code
AsyncTask
Seconde partie
Cacher par default le progressBar
Quand on clique sur le bouton, on fait apparaitre la progressBar
Quand la tache est fini, on cache le progressBar
Libraries externes
- Volley
- Picasso
Libraries externes
Volley
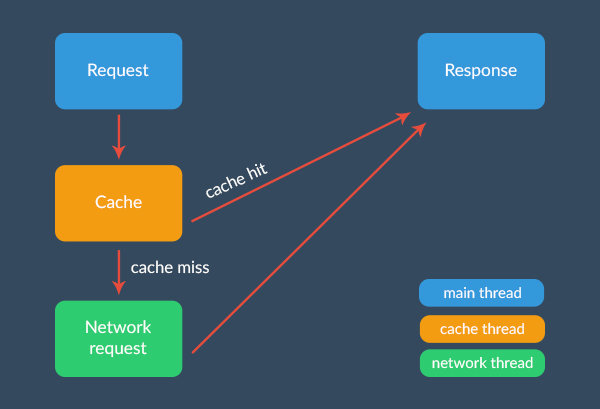
Volley
Volley est une library de Google, présenté lors du Google I/O de 2013
Avant Volley, pour récupérer un object sur internet (JSON, HTML, images, ...), on pouvait utilisé deux classes.
java.net.HttpUrlConnection
org.apache.http.client
Et ces deux libs n'avait comme fonction d'uniquement faire les requêtes HTTP. Pas de cache, pas de priorité.
Il fallait TOUT développer soit même ....
Volley
Pourquoi Volley ?
- Eviter les libs HttpClient et HttpUrlConnection.
Elles sont deprecated API 22 et supprimé API 23
- Eviter AsyncTask
Depuis l'API 11, on doit faire les requêtes réseaux dans un thread. On doit implémenter la couche l'AsyncTask ...
De plus les requêtes avec AsyncTask sont FIFO. L'application doit finir de télécharger toute la page pour commencer à télécharger le reste du contenu.
Par exemple facebook, tweeter
Volley
... Pourquoi Volley ?
- C'est plus rapide !
- Il cache tout
- Optimisé pour les petits appels
Volley
On ajoute la library grâce à Maven, build.gradle (Module: app)
compile 'com.mcxiaoke.volley:library-aar:1.0.0'On n'oublie pas les permissions
<uses-permission android:name="android.permission.INTERNET"></uses-permission>Request GET
String url = "http://httpbin.org/html";

// Request a string response
StringRequest stringRequest = new StringRequest(Request.Method.GET, url,
            new Response.Listener<String>() {
    @Override
    public void onResponse(String response) {

        // Result handling
        System.out.println(response.substring(0,100));

    }
}, new Response.ErrorListener() {
    @Override
    public void onErrorResponse(VolleyError error) {

        // Error handling
        System.out.println("Something went wrong!");
        error.printStackTrace();

    }
});

// Add the request to the queue
Volley.newRequestQueue(this).add(stringRequest);
Volley
Request JSON
String url = "http://httpbin.org/get?site=code&network=tutsplus";

JsonObjectRequest jsonRequest = new JsonObjectRequest
        (Request.Method.GET, url, null, new Response.Listener<JSONObject>() {
            @Override
            public void onResponse(JSONObject response) {
                // the response is already constructed as a JSONObject!
                try {
                    response = response.getJSONObject("args");
                    String site = response.getString("site"),
                            network = response.getString("network");
                    System.out.println("Site: "+site+"\nNetwork: "+network);
                } catch (JSONException e) {
                    e.printStackTrace();
                }
            }
        }, new Response.ErrorListener() {

            @Override
            public void onErrorResponse(VolleyError error) {
                error.printStackTrace();
            }
        });

Volley.newRequestQueue(this).add(jsonRequest);
Request Image
String url = "http://i.imgur.com/Nwk25LA.jpg";
mImageView = (ImageView) findViewById(R.id.image);

ImageRequest imgRequest = new ImageRequest(url,
        new Response.Listener<Bitmap>() {
    @Override
    public void onResponse(Bitmap response) {
        mImageView.setImageBitmap(response);
    }
}, 0, 0, ImageView.ScaleType.FIT_XY, Bitmap.Config.ARGB_8888, new Response.ErrorListener() {
    @Override
    public void onErrorResponse(VolleyError error) {
        mImageView.setBackgroundColor(Color.parseColor("#ff0000"));
        error.printStackTrace();
    }
});

Volley.newRequestQueue(this).add(imgRequest);
Volley
Request POST
String url = "http://httpbin.org/post";

StringRequest postRequest = new StringRequest(Request.Method.POST, url,
        new Response.Listener<String>() {
            @Override
            public void onResponse(String response) {
                try {
                    JSONObject jsonResponse = new JSONObject(response).getJSONObject("form");
                    String site = jsonResponse.getString("site"),
                            network = jsonResponse.getString("network");
                    System.out.println("Site: "+site+"\nNetwork: "+network);
                } catch (JSONException e) {
                    e.printStackTrace();
                }
            }
        },
        new Response.ErrorListener() {
            @Override
            public void onErrorResponse(VolleyError error) {
                error.printStackTrace();
            }
        }
) {
    @Override
    protected Map<String, String> getParams()
    {
        Map<String, String>  params = new HashMap<>();
        // the POST parameters:
        params.put("site", "code");
        params.put("network", "tutsplus");
        return params;
    }
};
Volley.newRequestQueue(this).add(postRequest);
Volley
Librairies externes
Project name : GetJson
Minimum API : 17
Type : Empty activity
Volley
Créer un projet qui téléchargera du JSON depuis
https://api.summview.com/v2/debug
et l'affichera dans un textView
Bonus : Parser ce JSON
http://www.tutorialspoint.com/android/android_json_parser.htm
Libraries externes
Picasso
Picasso
On ajoute la library grâce à Maven, build.gradle (Module: app)
compile 'com.squareup.picasso:picasso:2.3.3'On n'oublie pas les permissions
<uses-permission android:name="android.permission.INTERNET" />Request GET
String url = "http://httpbin.org/html";

// Request a string response
StringRequest stringRequest = new StringRequest(Request.Method.GET, url,
            new Response.Listener<String>() {
    @Override
    public void onResponse(String response) {

        // Result handling
        System.out.println(response.substring(0,100));

    }
}, new Response.ErrorListener() {
    @Override
    public void onErrorResponse(VolleyError error) {

        // Error handling
        System.out.println("Something went wrong!");
        error.printStackTrace();

    }
});

// Add the request to the queue
Volley.newRequestQueue(this).add(stringRequest);
Picasso
Librairies externes
Project name : DownloadImages
Minimum API : 17
Type : Empty activity
Picasso
Crée un projet avec :
- Une ImageView et un bouton
- Quand on clique sur le bouton, un fois sur 3, il exécutera ces 3 morceaux de code dans l'ordre.
 Picasso.with(self)
      .load("http://s2.quickmeme.com/img/d2/d2a55033bd85f86fdb077fc6f1fb54db0d4543d2c1951a6b174a15d650c8ad90.jpg?t="+options)
      .into(imageView);
Picasso.with(self)
.load("http://s2.quickmeme.com/img/d2/d2a55033bd85f86fdb077fc6f1fb54db0d4543d2c1951a6b174a15d650c8ad90.jpg?t="+options)
.rotate(180)
.into(imageView);Picasso.with(self)
.load("http://s2.quickmeme.com/img/d2/d2a55033bd85f86fdb077fc6f1fb54db0d4543d2c1951a6b174a15d650c8ad90.jpg?t="+options)
.placeholder(R.drawable.loading)
.into(imageView);Stockage de données
- Les préférences utilisateurs
- Stocker des fichiers sur le mobile
- Utiliser une base de données SQL
- Parse.com
Stockage des données
Méthodes de stockage local :
- Files : Vous pouvez créer et mettre à jour des fichiers
- Preferences : Android permet de saugarder et retrouver des key-value
- SQLite database : Les instance de SQL sont stocké sur le file système local
Stockage des données
Shared preferences
Méthodes de stockage local :
- Files : Sont stockés dans le dossier files
- Preferences : Sont stockées dans des fichiers XML, dans le dossier shared_prefs
- SQLite database : Sont stockés dans le dossier databases
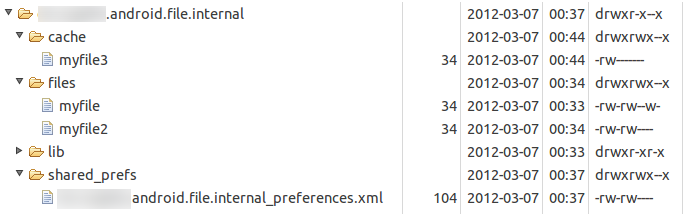
Shared preferences
Android propose d'avoir un stockage interne et externe. Le stockage externe n'est pas obligatoire. Certain device n'en ont pas.
Android propose de déplacer le stockage de l'application de l'interne vers l'externe. Il déplacera tout sauf les préferences et les databases
Internal vs external
Shared preferences
Les shared preferences sont des pairs de key-value contenant des primitives.
Les définitions peuvent se faire grâce à une ressource XML.
Shared preferences
Récupération
SharedPreferences settings = PreferenceManager.getDefaultSharedPreferences(getActivity();
String url = settings.getString("url", "n/a");
Modification
Editor edit = preferences.edit();
edit.putString("username", "new_value_for_user");
edit.apply();
Shared preferences
Shared preferences
Il est possible d'écouter les changements grâce à un listener
SharedPreferences prefs =
    PreferenceManager.getDefaultSharedPreferences(this);

// Instance field for listener
listener = new SharedPreferences.OnSharedPreferenceChangeListener() {
  public void onSharedPreferenceChanged(SharedPreferences prefs, String key) {
    // Your Implementation
  }
};

prefs.registerOnSharedPreferenceChangeListener(listener);
Shared preferences
ChatWithMe
Side-project
Développer la fonctionnalité suivante :
Une fois que l'utilisateur a rentré son numéro de téléphone, au futur redémarrage, la page de login ne lui est plus présenté.
ChatWithMe
Stockage des données
Stocker des fichiers sur le mobile
Stocker des fichiers sur le mobile
Files
Pour accéder au file internal ou external, il faut utiliser les libraries Java de base.
Pour accéder au fichier sur l'external FS, il faut ajouter des permissions supplémentaires
android.permission.READ_EXTERNAL_STORAGE
android.permission.WRITE_EXTERNAL_STORAGE
Environment.getExternalStorageState().equals(Environment.MEDIA_MOUNTED) Pour récupérer le répertoire de l'external storage
private void readFileFromSDCard() {
  File directory = Environment.getExternalStorageDirectory();
  // assumes that a file article.rss is available on the SD card
  File file = new File(directory + "/article.rss");
  if (!file.exists()) {
    throw new RuntimeException("File not found");
  }
  Log.e("Testing", "Starting to read");
  BufferedReader reader = null;
  try {
    reader = new BufferedReader(new FileReader(file));
    StringBuilder builder = new StringBuilder();
    String line;
    while ((line = reader.readLine()) != null) {
      builder.append(line);
    }
  } catch (Exception e) {
    e.printStackTrace();
  } finally {
    if (reader != null) {
      try {
        reader.close();
      } catch (IOException e) {
        e.printStackTrace();
      }
    }
  }
}
Example de code
Stockage des données
Base de données SQL
Base de données SQL
Android utilise le moteur SQLite
SQLite est une base de donnée openSource qui respecte les standards de la syntaxe SQL.
La base de donnée n'a besoin d'uniquement 250ko de mémoire pour fonctionner.
La base de données supportent 3 types de données :
- Text
- Integer
- Real
Base de données SQL
SQLite est embarqué dans tous les devices android. Utiliser une base de donnée Android ne demande pas de procédure particulière d'installation.
Accéder à la base donnée implique d'accéder au système de fichier. Ca peut être lent. C'est recommandé de me mettre la base de donnée en asynchrone.
Base de données SQL
Pour créer ou mettre à jour une DB, il faut créer une sous class de SQLiteOpenHelper.
Dans la méthode super(), spécifiez le nom de la DB et la version courante.
Dans la sous classe, on a besoin d'override les méthodes suivante :
onCreate() : Quand la DB est accédée mais pas encore crée.
onUpgrade() : Quand la version a augmentée et qu'il faut mettre à jour la DB.
Ces deux méthodes retournent un object SQLiteDatabase qui nous propose deux méthodes getReadableDatabase() et getWritableDatabase().
Base de données SQL
(Etude de code)
Stockage de données
Project name : Todos
Minimum API : 17
Type : Empty activity
Base de données SQL
(Etude de code)
Class TodoDetailHelper
import android.content.Context;
import android.database.sqlite.SQLiteDatabase;
import android.database.sqlite.SQLiteOpenHelper;

/**
 * Created by Doud on 10/9/2015.
 */
public class TodoDatabaseHelper extends SQLiteOpenHelper {

    private static final String DATABASE_NAME = "todotable.db";
    private static final int DATABASE_VERSION = 1;

    public TodoDatabaseHelper(Context context) {
        super(context, DATABASE_NAME, null, DATABASE_VERSION);
    }

    // Method is called during creation of the database
    @Override
    public void onCreate(SQLiteDatabase database) {
        TodoTable.onCreate(database);
    }

    // Method is called during an upgrade of the database,
    // e.g. if you increase the database version
    @Override
    public void onUpgrade(SQLiteDatabase database, int oldVersion,
                          int newVersion) {
        TodoTable.onUpgrade(database, oldVersion, newVersion);
    }
}
Class TodoDetailActivity
import android.app.Activity;
import android.content.ContentValues;
import android.database.Cursor;
import android.net.Uri;
import android.os.Bundle;
import android.text.TextUtils;
import android.view.View;
import android.widget.Button;
import android.widget.EditText;
import android.widget.Spinner;
import android.widget.Toast;

import com.meuuh.mytodo.contentprovider.MyTodoContentProvider;


/*
 * TodoDetailActivity allows to enter a new todo item
 * or to change an existing
 */
public class TodoDetailActivity extends Activity {
    private Spinner mCategory;
    private EditText mTitleText;
    private EditText mBodyText;

    private Uri todoUri;

    @Override
    protected void onCreate(Bundle bundle) {
        super.onCreate(bundle);
        setContentView(R.layout.todo_edit);

        mCategory = (Spinner) findViewById(R.id.category);
        mTitleText = (EditText) findViewById(R.id.todo_edit_summary);
        mBodyText = (EditText) findViewById(R.id.todo_edit_description);
        Button confirmButton = (Button) findViewById(R.id.todo_edit_button);

        Bundle extras = getIntent().getExtras();

        // check from the saved Instance
        todoUri = (bundle == null) ? null : (Uri) bundle
                .getParcelable(MyTodoContentProvider.CONTENT_ITEM_TYPE);

        // Or passed from the other activity
        if (extras != null) {
            todoUri = extras
                    .getParcelable(MyTodoContentProvider.CONTENT_ITEM_TYPE);

            fillData(todoUri);
        }

        confirmButton.setOnClickListener(new View.OnClickListener() {
            public void onClick(View view) {
                if (TextUtils.isEmpty(mTitleText.getText().toString())) {
                    makeToast();
                } else {
                    setResult(RESULT_OK);
                    finish();
                }
            }

        });
    }

    private void fillData(Uri uri) {
        String[] projection = { TodoTable.COLUMN_SUMMARY,
                TodoTable.COLUMN_DESCRIPTION, TodoTable.COLUMN_CATEGORY };
        Cursor cursor = getContentResolver().query(uri, projection, null, null,
                null);
        if (cursor != null) {
            cursor.moveToFirst();
            String category = cursor.getString(cursor
                    .getColumnIndexOrThrow(TodoTable.COLUMN_CATEGORY));

            for (int i = 0; i < mCategory.getCount(); i++) {

                String s = (String) mCategory.getItemAtPosition(i);
                if (s.equalsIgnoreCase(category)) {
                    mCategory.setSelection(i);
                }
            }

            mTitleText.setText(cursor.getString(cursor
                    .getColumnIndexOrThrow(TodoTable.COLUMN_SUMMARY)));
            mBodyText.setText(cursor.getString(cursor
                    .getColumnIndexOrThrow(TodoTable.COLUMN_DESCRIPTION)));

            // always close the cursor
            cursor.close();
        }
    }

    protected void onSaveInstanceState(Bundle outState) {
        super.onSaveInstanceState(outState);
        saveState();
        outState.putParcelable(MyTodoContentProvider.CONTENT_ITEM_TYPE, todoUri);
    }

    @Override
    protected void onPause() {
        super.onPause();
        saveState();
    }

    private void saveState() {
        String category = (String) mCategory.getSelectedItem();
        String summary = mTitleText.getText().toString();
        String description = mBodyText.getText().toString();

        // only save if either summary or description
        // is available

        if (description.length() == 0 && summary.length() == 0) {
            return;
        }

        ContentValues values = new ContentValues();
        values.put(TodoTable.COLUMN_CATEGORY, category);
        values.put(TodoTable.COLUMN_SUMMARY, summary);
        values.put(TodoTable.COLUMN_DESCRIPTION, description);

        if (todoUri == null) {
            // New todo
            todoUri = getContentResolver().insert(MyTodoContentProvider.CONTENT_URI, values);
        } else {
            // Update todo
            getContentResolver().update(todoUri, values, null, null);
        }
    }

    private void makeToast() {
        Toast.makeText(TodoDetailActivity.this, "Please maintain a summary",
                Toast.LENGTH_LONG).show();
    }
}
Class TodosOverviewActivity
import android.app.ListActivity;
import android.app.LoaderManager;
import android.content.CursorLoader;
import android.content.Intent;
import android.content.Loader;
import android.database.Cursor;
import android.net.Uri;
import android.os.Bundle;
import android.view.ContextMenu;
import android.view.ContextMenu.ContextMenuInfo;
import android.view.Menu;
import android.view.MenuInflater;
import android.view.MenuItem;
import android.view.View;
import android.widget.AdapterView.AdapterContextMenuInfo;
import android.widget.ListView;
import android.widget.SimpleCursorAdapter;

import com.meuuh.mytodo.contentprovider.MyTodoContentProvider;


/*
 * TodosOverviewActivity displays the existing todo items
 * in a list
 *
 * You can create new ones via the ActionBar entry "Insert"
 * You can delete existing ones via a long press on the item
 */

public class TodosOverviewActivity extends ListActivity implements
        LoaderManager.LoaderCallbacks<Cursor> {
    private static final int ACTIVITY_CREATE = 0;
    private static final int ACTIVITY_EDIT = 1;
    private static final int DELETE_ID = Menu.FIRST + 1;
    // private Cursor cursor;
    private SimpleCursorAdapter adapter;


    /** Called when the activity is first created. */

    @Override
    public void onCreate(Bundle savedInstanceState) {
        super.onCreate(savedInstanceState);
        setContentView(R.layout.todo_list);
        this.getListView().setDividerHeight(2);
        fillData();
        registerForContextMenu(getListView());
    }

    // create the menu based on the XML defintion
    @Override
    public boolean onCreateOptionsMenu(Menu menu) {
        MenuInflater inflater = getMenuInflater();
        inflater.inflate(R.menu.listmenu, menu);
        return true;
    }

    // Reaction to the menu selection
    @Override
    public boolean onOptionsItemSelected(MenuItem item) {
        switch (item.getItemId()) {
            case R.id.insert:
                createTodo();
                return true;
        }
        return super.onOptionsItemSelected(item);
    }

    @Override
    public boolean onContextItemSelected(MenuItem item) {
        switch (item.getItemId()) {
            case DELETE_ID:
                AdapterContextMenuInfo info = (AdapterContextMenuInfo) item
                        .getMenuInfo();
                Uri uri = Uri.parse(MyTodoContentProvider.CONTENT_URI + "/"
                        + info.id);
                getContentResolver().delete(uri, null, null);
                fillData();
                return true;
        }
        return super.onContextItemSelected(item);
    }

    private void createTodo() {
        Intent i = new Intent(this, TodoDetailActivity.class);
        startActivity(i);
    }

    // Opens the second activity if an entry is clicked
    @Override
    protected void onListItemClick(ListView l, View v, int position, long id) {
        super.onListItemClick(l, v, position, id);
        Intent i = new Intent(this, TodoDetailActivity.class);
        Uri todoUri = Uri.parse(MyTodoContentProvider.CONTENT_URI + "/" + id);
        i.putExtra(MyTodoContentProvider.CONTENT_ITEM_TYPE, todoUri);

        startActivity(i);
    }


    private void fillData() {

        // Fields from the database (projection)
        // Must include the _id column for the adapter to work
        String[] from = new String[] { TodoTable.COLUMN_SUMMARY };
        // Fields on the UI to which we map
        int[] to = new int[] { R.id.label };

        getLoaderManager().initLoader(0, null, this);
        adapter = new SimpleCursorAdapter(this, R.layout.todo_row, null, from,
                to, 0);

        setListAdapter(adapter);
    }

    @Override
    public void onCreateContextMenu(ContextMenu menu, View v,
                                    ContextMenuInfo menuInfo) {
        super.onCreateContextMenu(menu, v, menuInfo);
        menu.add(0, DELETE_ID, 0, R.string.menu_delete);
    }

    // creates a new loader after the initLoader () call
    @Override
    public Loader<Cursor> onCreateLoader(int id, Bundle args) {
        String[] projection = { TodoTable.COLUMN_ID, TodoTable.COLUMN_SUMMARY };
        CursorLoader cursorLoader = new CursorLoader(this,
                MyTodoContentProvider.CONTENT_URI, projection, null, null, null);
        return cursorLoader;
    }

    @Override
    public void onLoadFinished(Loader<Cursor> loader, Cursor data) {
        adapter.swapCursor(data);
    }

    @Override
    public void onLoaderReset(Loader<Cursor> loader) {
        // data is not available anymore, delete reference
        adapter.swapCursor(null);
    }

}
TodoTable
public class TodoTable {

    // Database table
    public static final String TABLE_TODO = "todo";
    public static final String COLUMN_ID = "_id";
    public static final String COLUMN_CATEGORY = "category";
    public static final String COLUMN_SUMMARY = "summary";
    public static final String COLUMN_DESCRIPTION = "description";

    // Database creation SQL statement
    private static final String DATABASE_CREATE = "create table "
            + TABLE_TODO
            + "("
            + COLUMN_ID + " integer primary key autoincrement, "
            + COLUMN_CATEGORY + " text not null, "
            + COLUMN_SUMMARY + " text not null,"
            + COLUMN_DESCRIPTION
            + " text not null"
            + ");";

    public static void onCreate(SQLiteDatabase database) {
        database.execSQL(DATABASE_CREATE);
    }

    public static void onUpgrade(SQLiteDatabase database, int oldVersion,
                                 int newVersion) {
        Log.w(TodoTable.class.getName(), "Upgrading database from version "
                + oldVersion + " to " + newVersion
                + ", which will destroy all old data");
        database.execSQL("DROP TABLE IF EXISTS " + TABLE_TODO);
        onCreate(database);
    }
}
Base de données SQL
(Etude de code)
Class contentprovider/MyTodoContentProvider
import android.content.ContentProvider;
import android.content.ContentResolver;
import android.content.ContentValues;
import android.content.UriMatcher;
import android.database.Cursor;
import android.database.sqlite.SQLiteDatabase;
import android.database.sqlite.SQLiteQueryBuilder;
import android.net.Uri;
import android.text.TextUtils;

import com.meuuh.mytodo.TodoDatabaseHelper;
import com.meuuh.mytodo.TodoTable;

import java.util.Arrays;
import java.util.HashSet;

/**
 * Created by Doud on 10/9/2015.
 */
public class MyTodoContentProvider extends ContentProvider {

    // database
    private TodoDatabaseHelper database;

    // used for the UriMacher
    private static final int TODOS = 10;
    private static final int TODO_ID = 20;

    private static final String AUTHORITY = "com.meuuh.android.todos.contentprovider";

    private static final String BASE_PATH = "todos";
    public static final Uri CONTENT_URI = Uri.parse("content://" + AUTHORITY
            + "/" + BASE_PATH);

    public static final String CONTENT_TYPE = ContentResolver.CURSOR_DIR_BASE_TYPE
            + "/todos";
    public static final String CONTENT_ITEM_TYPE = ContentResolver.CURSOR_ITEM_BASE_TYPE
            + "/todo";

    private static final UriMatcher sURIMatcher = new UriMatcher(UriMatcher.NO_MATCH);
    static {
        sURIMatcher.addURI(AUTHORITY, BASE_PATH, TODOS);
        sURIMatcher.addURI(AUTHORITY, BASE_PATH + "/#", TODO_ID);
    }

    @Override
    public boolean onCreate() {
        database = new TodoDatabaseHelper(getContext());
        return false;
    }

    @Override
    public Cursor query(Uri uri, String[] projection, String selection,
                        String[] selectionArgs, String sortOrder) {

        // Uisng SQLiteQueryBuilder instead of query() method
        SQLiteQueryBuilder queryBuilder = new SQLiteQueryBuilder();

        // check if the caller has requested a column which does not exists
        checkColumns(projection);

        // Set the table
        queryBuilder.setTables(TodoTable.TABLE_TODO);

        int uriType = sURIMatcher.match(uri);
        switch (uriType) {
            case TODOS:
                break;
            case TODO_ID:
                // adding the ID to the original query
                queryBuilder.appendWhere(TodoTable.COLUMN_ID + "="
                        + uri.getLastPathSegment());
                break;
            default:
                throw new IllegalArgumentException("Unknown URI: " + uri);
        }

        SQLiteDatabase db = database.getWritableDatabase();
        Cursor cursor = queryBuilder.query(db, projection, selection,
                selectionArgs, null, null, sortOrder);
        // make sure that potential listeners are getting notified
        cursor.setNotificationUri(getContext().getContentResolver(), uri);

        return cursor;
    }

    @Override
    public String getType(Uri uri) {
        return null;
    }

    @Override
    public Uri insert(Uri uri, ContentValues values) {
        int uriType = sURIMatcher.match(uri);
        SQLiteDatabase sqlDB = database.getWritableDatabase();
        int rowsDeleted = 0;
        long id = 0;
        switch (uriType) {
            case TODOS:
                id = sqlDB.insert(TodoTable.TABLE_TODO, null, values);
                break;
            default:
                throw new IllegalArgumentException("Unknown URI: " + uri);
        }
        getContext().getContentResolver().notifyChange(uri, null);
        return Uri.parse(BASE_PATH + "/" + id);
    }

    @Override
    public int delete(Uri uri, String selection, String[] selectionArgs) {
        int uriType = sURIMatcher.match(uri);
        SQLiteDatabase sqlDB = database.getWritableDatabase();
        int rowsDeleted = 0;
        switch (uriType) {
            case TODOS:
                rowsDeleted = sqlDB.delete(TodoTable.TABLE_TODO, selection,
                        selectionArgs);
                break;
            case TODO_ID:
                String id = uri.getLastPathSegment();
                if (TextUtils.isEmpty(selection)) {
                    rowsDeleted = sqlDB.delete(TodoTable.TABLE_TODO,
                            TodoTable.COLUMN_ID + "=" + id,
                            null);
                } else {
                    rowsDeleted = sqlDB.delete(TodoTable.TABLE_TODO,
                            TodoTable.COLUMN_ID + "=" + id
                                    + " and " + selection,
                            selectionArgs);
                }
                break;
            default:
                throw new IllegalArgumentException("Unknown URI: " + uri);
        }
        getContext().getContentResolver().notifyChange(uri, null);
        return rowsDeleted;
    }

    @Override
    public int update(Uri uri, ContentValues values, String selection,
                      String[] selectionArgs) {

        int uriType = sURIMatcher.match(uri);
        SQLiteDatabase sqlDB = database.getWritableDatabase();
        int rowsUpdated = 0;
        switch (uriType) {
            case TODOS:
                rowsUpdated = sqlDB.update(TodoTable.TABLE_TODO,
                        values,
                        selection,
                        selectionArgs);
                break;
            case TODO_ID:
                String id = uri.getLastPathSegment();
                if (TextUtils.isEmpty(selection)) {
                    rowsUpdated = sqlDB.update(TodoTable.TABLE_TODO,
                            values,
                            TodoTable.COLUMN_ID + "=" + id,
                            null);
                } else {
                    rowsUpdated = sqlDB.update(TodoTable.TABLE_TODO,
                            values,
                            TodoTable.COLUMN_ID + "=" + id
                                    + " and "
                                    + selection,
                            selectionArgs);
                }
                break;
            default:
                throw new IllegalArgumentException("Unknown URI: " + uri);
        }
        getContext().getContentResolver().notifyChange(uri, null);
        return rowsUpdated;
    }

    private void checkColumns(String[] projection) {
        String[] available = { TodoTable.COLUMN_CATEGORY,
                TodoTable.COLUMN_SUMMARY, TodoTable.COLUMN_DESCRIPTION,
                TodoTable.COLUMN_ID };
        if (projection != null) {
            HashSet<String> requestedColumns = new HashSet<String>(Arrays.asList(projection));
            HashSet<String> availableColumns = new HashSet<String>(Arrays.asList(available));
            // check if all columns which are requested are available
            if (!availableColumns.containsAll(requestedColumns)) {
                throw new IllegalArgumentException("Unknown columns in projection");
            }
        }
    }

}
layout/todo_edit.xml
<?xml version="1.0" encoding="utf-8"?>
<LinearLayout xmlns:android="http://schemas.android.com/apk/res/android"
    android:layout_width="match_parent"
    android:layout_height="match_parent"
    android:orientation="vertical" >

    <Spinner
        android:id="@+id/category"
        android:layout_width="wrap_content"
        android:layout_height="wrap_content"
        android:entries="@array/priorities" >
    </Spinner>

    <LinearLayout
        android:id="@+id/LinearLayout01"
        android:layout_width="match_parent"
        android:layout_height="wrap_content" >

        <EditText
            android:id="@+id/todo_edit_summary"
            android:layout_width="wrap_content"
            android:layout_height="wrap_content"
            android:layout_weight="1"
            android:hint="@string/todo_edit_summary"
            android:imeOptions="actionNext" >
        </EditText>
    </LinearLayout>

    <EditText
        android:id="@+id/todo_edit_description"
        android:layout_width="match_parent"
        android:layout_height="match_parent"
        android:layout_weight="1"
        android:gravity="top"
        android:hint="@string/todo_edit_description"
        android:imeOptions="actionNext" >
    </EditText>

    <Button
        android:id="@+id/todo_edit_button"
        android:layout_width="wrap_content"
        android:layout_height="wrap_content"
        android:text="@string/todo_edit_confirm" >
    </Button>

</LinearLayout>
layout/todo_list.xml
<?xml version="1.0" encoding="utf-8"?>
<LinearLayout xmlns:android="http://schemas.android.com/apk/res/android"
    android:layout_width="match_parent"
    android:layout_height="match_parent"
    android:orientation="vertical" >

    <ListView
        android:id="@android:id/list"
        android:layout_width="match_parent"
        android:layout_height="wrap_content" >
    </ListView>

    <TextView
        android:id="@android:id/empty"
        android:layout_width="wrap_content"
        android:layout_height="wrap_content"
        android:text="@string/no_todos" />

</LinearLayout>
layout/todo_row.xml
<?xml version="1.0" encoding="utf-8"?>
<LinearLayout xmlns:android="http://schemas.android.com/apk/res/android"
    android:orientation="vertical" android:layout_width="match_parent"
    android:layout_height="match_parent">

    <ImageView
        android:id="@+id/icon"
        android:layout_width="30dp"
        android:layout_height="24dp"
        android:layout_marginLeft="4dp"
        android:layout_marginRight="8dp"
        android:layout_marginTop="8dp"
        android:src="@mipmap/ic_launcher" >
    </ImageView>

    <TextView
        android:id="@+id/label"
        android:layout_width="match_parent"
        android:layout_height="wrap_content"
        android:layout_marginTop="6dp"
        android:lines="1"
        android:text="@+id/TextView01"
        android:textSize="24dp"
        >
    </TextView>


</LinearLayout>
Base de données SQL
(Etude de code)
menu/listmenu.xml
<?xml version="1.0" encoding="utf-8"?>
<menu xmlns:android="http://schemas.android.com/apk/res/android" >

    <item
        android:id="@+id/insert"
        android:showAsAction="always"
        android:title="Insert">
    </item>

</menu>
values/strings.xml
    <string name="hello">Hello World, Todo!</string>
    <string name="no_todos">Currently there are no Todo items maintained</string>
    <string name="menu_insert">Add Item</string>
    <string name="menu_delete">Delete Todo</string>
    <string name="todo_summary">Summary</string>
    <string name="todo_description">Delete Todo</string>
    <string name="todo_edit_summary">Summary</string>
    <string name="todo_edit_description">Description</string>
    <string name="todo_edit_confirm">Confirm</string>
AndroidManifest.xml
<?xml version="1.0" encoding="utf-8"?>
<manifest xmlns:android="http://schemas.android.com/apk/res/android"
    package="com.meuuh.mytodo" >

    <application
        android:icon="@mipmap/ic_launcher"
        android:label="@string/app_name" >
        <activity
            android:name=".TodosOverviewActivity"
            android:label="@string/app_name" >
            <intent-filter>
                <action android:name="android.intent.action.MAIN" />

                <category android:name="android.intent.category.LAUNCHER" />
            </intent-filter>
        </activity>
        <activity
            android:name=".TodoDetailActivity"
            android:windowSoftInputMode="stateVisible|adjustResize" >
        </activity>

        <provider
            android:name=".contentprovider.MyTodoContentProvider"
            android:authorities="com.meuuh.android.todos.contentprovider" >
        </provider>
    </application>

</manifest>
On résoult les bugs et on lance l'appli
Qui veux commenter le code ?
Stockage des données
Parse.com
Parse.com
- Databases
- ACL
- Notification
- Analytics
Fonctionne avec de nombreuse plateforme
Qu'est ce que Parse peut faire ?
Parse.com
- 30 requêtes par secondes
- 1 000 000 première push notification
- Analytics, unilimited
C'est gratuit ! ... ou presque
Parse.com
- Vraiment facile à utiliser
- Pas de developpement Back-end
- Pas de serveur à gérer
- Gratuit tant que l'application n'est pas vraiment utilisée
Et surtout
Parse
Stockage de données
Project name : Parse
Minimum API : 21
Type : Empty
Parse.com
Dans build.gradle (Module: app)
apply plugin: 'com.android.application'

buildscript {
    repositories {
        mavenCentral()
        maven { url 'https://maven.parse.com/repo' }
    }
    dependencies {
        classpath 'com.parse.tools:gradle:1.+'
    }
}

android { ... }

dependencies {
    compile 'com.parse.bolts:bolts-android:1.2.1'
    compile 'com.parse:parse-android:1.10.3'

    testCompile 'junit:junit:4.12'
    compile 'com.android.support:appcompat-v7:23.0.1'
}
Créer une class ThisApplication étendu de Application
public class ThisApplication extends Application {
    @Override
    public void onCreate() {
        super.onCreate();

        Parse.enableLocalDatastore(this);

        Parse.initialize(this, "application_id_key", "Client_key");
    }
}
Dans AndroidManifest, on ajoute les permissions pour internet et l'accés au status du réseau (ACCESS_NETWORK_STATE)
De plus, dans <application>, on ajoute le name qui pointe vers ThisApplication
Parse.com
activity_main.xml
<?xml version="1.0" encoding="utf-8"?>
<RelativeLayout xmlns:android="http://schemas.android.com/apk/res/android"
    xmlns:tools="http://schemas.android.com/tools" android:layout_width="match_parent"
    android:layout_height="match_parent" android:paddingLeft="@dimen/activity_horizontal_margin"
    android:paddingRight="@dimen/activity_horizontal_margin"
    android:paddingTop="@dimen/activity_vertical_margin"
    android:paddingBottom="@dimen/activity_vertical_margin" tools:context=".MainActivity">

    <TextView
        android:layout_width="wrap_content"
        android:layout_height="wrap_content"
        android:id="@+id/textView"/>

    <Button
        android:layout_width="wrap_content"
        android:layout_height="wrap_content"
        android:text="save"
        android:id="@+id/button"
        android:layout_alignParentBottom="true"
        android:layout_alignParentEnd="true" />

    <EditText
        android:layout_width="wrap_content"
        android:layout_height="wrap_content"
        android:id="@+id/editText"
        android:layout_alignParentBottom="true"
        android:layout_alignParentStart="true"
        android:layout_toStartOf="@+id/button" />
</RelativeLayout>
On crée une classe Message qui est étendu de ParseObject
@ParseClassName("Message")
public class Message extends ParseObject{
    public String getMessage() { return getString("message"); }
    public void setMessage(String message) { put("message", message); }
}
Dans la classe MainActivity, quand on clique sur le button, on sauvegarde dans parse :
        Message message = new Message();
        message.setMessage(editText.getText().toString());
        message.saveInBackground();
Text
On compile, on debug et on commente
Parse.com
        ParseQuery<Message> query = ParseQuery.getQuery(Message.class);
        query.findInBackground(new FindCallback<Message>() {
            @Override
            public void done(List<Message> objects, ParseException e) {
                String text = "";
                for (int i = 0; i < objects.size(); i++) {
                    text += objects.get(i).getMessage();
                    text += "\n";
                }
                textView.setText(text);
            }
        });
Ensuite, on récupérer les données de Parse et on les afficher
Parse.com
On améliore le code :
- Mise à jour de l'affichage à chaque clique
- Bloquer le mode paysage
- Enlever le clavier apres l'envoie
ChatWithMe
Side-project
Lions les adapter avec les données
this.contacts.clear(); // Delete all data from l'ArrayList
this.contacts.addAll(contacts); // Copy all data
this.roomsAdapters.notifyDataSetChanged(); // prévient que l'adapter que les données lié on changé
recyclerView.invalidate(); // recrée l'affichage
Hint, il est possible de remplir complement un ArrayList et de prévenir l'adapter et le RecyclerView
ChatWithMe
Quand on lance ContactsActivity
- On récupère tous les contacts de Parse
- Si le numero, contenu dans l'intent, n'est pas dans la liste, on l'ajoute dans parse
- Si le numero, contenu dans l'intent, est dans la liste, on le retire avant de donner cette liste au RecyclerView
this.contacts.clear(); // Delete all data from l'ArrayList
this.contacts.addAll(contacts); // Copy all data
this.roomsAdapters.notifyDataSetChanged(); // prévient que l'adapter que les données lié on changé
recyclerView.invalidate(); // recrée l'affichage
Hint, il est possible de remplir complement un ArrayList et de prévenir l'adapter et le recyclerList
ChatWithMe
Quand on clique sur un contact :
- Il faut récupérer tous les messages dont la source et le recipient est en commun
        ParseQuery<Message> q1 = ParseQuery.getQuery("Message");
        q1.whereEqualTo("source", source.getNumber())
                .whereEqualTo("recipient", recipient.getNumber());

        ParseQuery<Message> q2 = ParseQuery.getQuery("Message");
        q2.whereEqualTo("source", recipient.getNumber())
                .whereEqualTo("recipient", source.getNumber());

        List<ParseQuery<Message>> queries = new ArrayList<ParseQuery<Message>>();
        queries.add(q1);
        queries.add(q2);

        ParseQuery<Message> mainQuery = ParseQuery.or(queries);
        mainQuery.orderByAscending("createAt");
        mainQuery.findInBackground(new FindCallback<Message>() {
            public void done(List<Message> results, ParseException e) {
                /// ....
            }
        });
- Requête pour demande tous les messages :
@ParseClassName("Message")
public class Message extends ParseObject{
    public void setSource(String source) { put("source", source);}
    public String getSource() { return getString("source"); }

    public void setRecipient(String recipient) { put("recipient", recipient);}
    public String getRecipient() { return getString("recipient"); }

    public void setMessage(String message) { put("message", message); }
    public String getMessage() { return getString("message"); }
}
Notification
- Notification Manager
- Google cloud messaging
Notification Manager
Android nous permet de d'afficher des notifications dans la bar de notification. L'utilisateur peut les étendre ou cliquer sur la notification qui exécutera une activité.
La gestion des notification depuis l'application se fait grace au Notification Manager.
On peut l'appeler grace à getSystemService(NOTIFICATION_SERVICE) qui est dans présent dans les context / activité / Service.
NotificationManager notificationManager = (NotificationManager)
  getSystemService(NOTIFICATION_SERVICE);
Intent intent = new Intent(this, NotificationReceiver.class);
// use System.currentTimeMillis() to have a unique ID for the pending intent
PendingIntent pIntent = PendingIntent.getActivity(this, (int) System.currentTimeMillis(), intent, 0);
// build notification
// the addAction re-use the same intent to keep the example short
Notification n = new Notification.Builder(this)
.setContentTitle("New mail from " + "test@gmail.com")
.setContentText("Subject")
.setSmallIcon(R.drawable.icon)
.setContentIntent(pIntent)
.setAutoCancel(true)
.addAction(R.drawable.icon, "Call", pIntent)
.addAction(R.drawable.icon, "More", pIntent)
.addAction(R.drawable.icon, "And more", pIntent).build();
NotificationManager notificationManager =
(NotificationManager) getSystemService(NOTIFICATION_SERVICE);
notificationManager.notify(0, n); Notification Manager
Google Cloud Messaging
Pour envoyer et recevoir des messages
Créer un nouveau projet et générer un API key
https://console.developers.google.com/
Générer un fichier de configuration
https://developers.google.com/cloud-messaging/android/client
Copier le fichier dans app/
Google Cloud Messaging
Dans build.gradle (Project)
[...]
    dependencies {
        classpath 'com.android.tools.build:gradle:1.3.0'
        classpath 'com.google.gms:google-services:1.4.0-beta3'
        // NOTE: Do not place your application dependencies here; they belong
        // in the individual module build.gradle files
    }
[...]
Dans build.gradle (Module)
[...]
apply plugin: 'com.google.gms.google-services'
[...]
dependencies {
    compile 'com.parse.bolts:bolts-android:1.2.1'
    compile 'com.parse:parse-android:1.10.3'

    compile 'com.squareup.picasso:picasso:2.5.0'
    compile "com.android.support:recyclerview-v7:23.0.1"

    testCompile 'junit:junit:4.12'
    compile 'com.android.support:appcompat-v7:23.0.1'

    compile 'com.google.android.gms:play-services-gcm:8.1.0'
}
Google Cloud Messaging
MyGcmListenerService
public class MyGcmListenerService extends GcmListenerService {

    private static final String TAG = "MyGcmListenerService";

    /**
     * Called when message is received.
     *
     * @param from SenderID of the sender.
     * @param data Data bundle containing message data as key/value pairs.
     *             For Set of keys use data.keySet().
     */
    // [START receive_message]
    @Override
    public void onMessageReceived(String from, Bundle data) {
        String message = data.getString("message");
        Log.d(TAG, "From: " + from);
        Log.d(TAG, "Message: " + message);

        if (from.startsWith("/topics/")) {
            // message received from some topic.
        } else {
            // normal downstream message.
        }

        // [START_EXCLUDE]
        /**
         * Production applications would usually process the message here.
         * Eg: - Syncing with server.
         *     - Store message in local database.
         *     - Update UI.
         */

        /**
         * In some cases it may be useful to show a notification indicating to the user
         * that a message was received.
         */
        sendNotification(message);
        // [END_EXCLUDE]
    }
    // [END receive_message]

    /**
     * Create and show a simple notification containing the received GCM message.
     *
     * @param message GCM message received.
     */
    private void sendNotification(String message) {
        Intent intent = new Intent(this, MainActivity.class);
        intent.addFlags(Intent.FLAG_ACTIVITY_CLEAR_TOP);
        PendingIntent pendingIntent = PendingIntent.getActivity(this, 0 /* Request code */, intent,
                PendingIntent.FLAG_ONE_SHOT);

        Uri defaultSoundUri = RingtoneManager.getDefaultUri(RingtoneManager.TYPE_NOTIFICATION);
        NotificationCompat.Builder notificationBuilder = new NotificationCompat.Builder(this)
                .setSmallIcon(R.drawable.ic_stat_ic_notification)
                .setContentTitle("GCM Message")
                .setContentText(message)
                .setAutoCancel(true)
                .setSound(defaultSoundUri)
                .setContentIntent(pendingIntent);

        NotificationManager notificationManager =
                (NotificationManager) getSystemService(Context.NOTIFICATION_SERVICE);

        notificationManager.notify(0 /* ID of notification */, notificationBuilder.build());
    }
}
MyInstanceIDListenerService
import android.content.Intent;

import com.google.android.gms.iid.InstanceIDListenerService;
import com.meuuh.chatwithme.GCM.RegistrationIntentService;

public class MyInstanceIDListenerService extends InstanceIDListenerService {

    private static final String TAG = "MyInstanceIDLS";

    /**
     * Called if InstanceID token is updated. This may occur if the security of
     * the previous token had been compromised. This call is initiated by the
     * InstanceID provider.
     */
    // [START refresh_token]
    @Override
    public void onTokenRefresh() {
        // Fetch updated Instance ID token and notify our app's server of any changes (if applicable).
        Intent intent = new Intent(this, RegistrationIntentService.class);
        startService(intent);
    }
    // [END refresh_token]
}
MyInstanceIDListenerService
public class QuickstartPreferences {

    public static final String SENT_TOKEN_TO_SERVER = "sentTokenToServer";
    public static final String REGISTRATION_COMPLETE = "registrationComplete";

}
MyInstanceIDListenerService
import android.app.IntentService;
import android.content.Intent;
import android.content.SharedPreferences;
import android.preference.PreferenceManager;
import android.support.v4.content.LocalBroadcastManager;
import android.util.Log;

import com.google.android.gms.gcm.GcmPubSub;
import com.google.android.gms.gcm.GoogleCloudMessaging;
import com.google.android.gms.iid.InstanceID;
import com.meuuh.chatwithme.R;

import java.io.IOException;

/**
 * Created by Edouard on 15/10/2015.
 */
public class RegistrationIntentService extends IntentService {

    private static final String TAG = "RegIntentService";
    private static final String[] TOPICS = {"global"};

    public RegistrationIntentService() {
        super(TAG);
    }

    @Override
    protected void onHandleIntent(Intent intent) {
        SharedPreferences sharedPreferences = PreferenceManager.getDefaultSharedPreferences(this);

        try {
            // [START register_for_gcm]
            // Initially this call goes out to the network to retrieve the token, subsequent calls
            // are local.
            // [START get_token]
            InstanceID instanceID = InstanceID.getInstance(this);
            String token = instanceID.getToken(getString(R.string.gcm_defaultSenderId),
                    GoogleCloudMessaging.INSTANCE_ID_SCOPE, null);
            // [END get_token]
            Log.i(TAG, "GCM Registration Token: " + token);

            // TODO: Implement this method to send any registration to your app's servers.
            sendRegistrationToServer(token);

            // Subscribe to topic channels
            subscribeTopics(token);

            // You should store a boolean that indicates whether the generated token has been
            // sent to your server. If the boolean is false, send the token to your server,
            // otherwise your server should have already received the token.
            sharedPreferences.edit().putBoolean(QuickstartPreferences.SENT_TOKEN_TO_SERVER, true).apply();
            // [END register_for_gcm]
        } catch (Exception e) {
            Log.d(TAG, "Failed to complete token refresh", e);
            // If an exception happens while fetching the new token or updating our registration data
            // on a third-party server, this ensures that we'll attempt the update at a later time.
            sharedPreferences.edit().putBoolean(QuickstartPreferences.SENT_TOKEN_TO_SERVER, false).apply();
        }
        // Notify UI that registration has completed, so the progress indicator can be hidden.
        Intent registrationComplete = new Intent(QuickstartPreferences.REGISTRATION_COMPLETE);
        LocalBroadcastManager.getInstance(this).sendBroadcast(registrationComplete);
    }

    /**
     * Persist registration to third-party servers.
     *
     * Modify this method to associate the user's GCM registration token with any server-side account
     * maintained by your application.
     *
     * @param token The new token.
     */
    private void sendRegistrationToServer(String token) {
        // Add custom implementation, as needed.
    }

    /**
     * Subscribe to any GCM topics of interest, as defined by the TOPICS constant.
     *
     * @param token GCM token
     * @throws IOException if unable to reach the GCM PubSub service
     */
    // [START subscribe_topics]
    private void subscribeTopics(String token) throws IOException {
        GcmPubSub pubSub = GcmPubSub.getInstance(this);
        for (String topic : TOPICS) {
            pubSub.subscribe(token, "/topics/" + topic, null);
        }
    }
    // [END subscribe_topics]

}
Google Cloud Messaging
AndroidManifest
    <uses-permission android:name="com.google.android.c2dm.permission.RECEIVE" />
    <uses-permission android:name="android.permission.WAKE_LOCK" />

[...]

       <!-- [START gcm_receiver] -->
        <receiver
            android:name="com.google.android.gms.gcm.GcmReceiver"
            android:exported="true"
            android:permission="com.google.android.c2dm.permission.SEND" >
            <intent-filter>
                <action android:name="com.google.android.c2dm.intent.RECEIVE" />
                <category android:name="com.meuuh.chatwithme" />
            </intent-filter>
        </receiver>
        <!-- [END gcm_receiver] -->

        <!-- [START gcm_listener] -->
        <service
            android:name=".GCM.MyGcmListenerService"
            android:exported="false" >
            <intent-filter>
                <action android:name="com.google.android.c2dm.intent.RECEIVE" />
            </intent-filter>
        </service>
        <!-- [END gcm_listener] -->
        <!-- [START instanceId_listener] -->
        <service
            android:name=".GCM.MyInstanceIDListenerService"
            android:exported="false">
            <intent-filter>
                <action android:name="com.google.android.gms.iid.InstanceID"/>
            </intent-filter>
        </service>
        <!-- [END instanceId_listener] -->
        <service
            android:name=".GCM.RegistrationIntentService"
            android:exported="false">
        </service>
Télécharger et dezipper dans res/
Utilisation du GPS
- Location Provider
- Geocoding
- API Google Map (???)
Utilisation du GPS
Location Provider
Location Provider
De nos jours la plupart des téléphones ont une puce GPS. Android nous permet de demander sa position.
La classe LocationManager nous permet d'accéder à la location GPS du téléphone, de nous enregistrer a un location update listeners, à des alertes de proximité et plus encore.
Location Provider
Il existe plusieurs providers
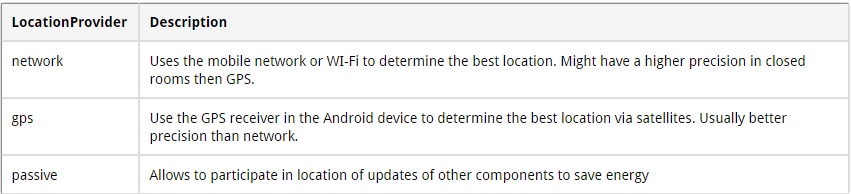
Pour plus de facilité, la selection des providers peut se faire avec Criteria, qui choisira qui est le meilleurs provider.
    // Get the location manager
    locationManager = (LocationManager) getSystemService(Context.LOCATION_SERVICE);
    // Define the criteria how to select the locatioin provider -> use
    // default
    Criteria criteria = new Criteria();
    provider = locationManager.getBestProvider(criteria, false);
    Location location = locationManager.getLastKnownLocation(provider);
Location Provider
Il n'est pas possible d'activer le GPS directement dans le code, il faut que ca soit l'utilisateur qui l'active.
La meilleur méthode est de lancer un intent de la configuration GPS
LocationManager service = (LocationManager) getSystemService(LOCATION_SERVICE);
boolean enabled = service
  .isProviderEnabled(LocationManager.GPS_PROVIDER);

// check if enabled and if not send user to the GSP settings
// Better solution would be to display a dialog and suggesting to
// go to the settings
if (!enabled) {
  Intent intent = new Intent(Settings.ACTION_LOCATION_SOURCE_SETTINGS);
  startActivity(intent);
}
Location Provider
N'oublions pas les permissions à ajouter dans le manifest
INTERNET
ACCESS_FINE_LOCATION
ACCESS_COARSE_LOCATION
Location manager
Utilisation du GPS
Project name : LocateMe
Minimum API : 17
Type : Empty
Location manager
    <uses-permission android:name="android.permission.ACCESS_COARSE_LOCATION"></uses-permission>
    <uses-permission android:name="android.permission.ACCESS_FINE_LOCATION"></uses-permission>
    <uses-permission android:name="android.permission.INTERNET"></uses-permission>

    <application
        android:allowBackup="true"
        android:icon="@mipmap/ic_launcher"
        android:label="@string/app_name"
        android:supportsRtl="true"
        android:theme="@style/AppTheme" >
        <activity android:name=".MainActivity" >
            <intent-filter>
                <action android:name="android.intent.action.MAIN" />

                <category android:name="android.intent.category.LAUNCHER" />
            </intent-filter>
        </activity>
    </application>
public class MainActivity extends AppCompatActivity implements LocationListener {
private TextView latituteField;
private TextView longitudeField;
private LocationManager locationManager;
private String provider;
/** Called when the activity is first created. */
@Override
public void onCreate(Bundle savedInstanceState) {
super.onCreate(savedInstanceState);
setContentView(R.layout.activity_main);
latituteField = (TextView) findViewById(R.id.TextView02);
longitudeField = (TextView) findViewById(R.id.TextView04);
// Get the location manager
locationManager = (LocationManager) getSystemService(Context.LOCATION_SERVICE);
// Define the criteria how to select the locatioin provider -> use
// default
Criteria criteria = new Criteria();
provider = locationManager.getBestProvider(criteria, false);
Location location = locationManager.getLastKnownLocation(provider);
// Initialize the location fields
if (location != null) {
System.out.println("Provider " + provider + " has been selected.");
onLocationChanged(location);
} else {
latituteField.setText("Location not available");
longitudeField.setText("Location not available");
}
}
/* Request updates at startup */
@Override
protected void onResume() {
super.onResume();
locationManager.requestLocationUpdates(provider, 400, 1, this);
}
/* Remove the locationlistener updates when Activity is paused */
@Override
protected void onPause() {
super.onPause();
locationManager.removeUpdates(this);
}
@Override
public void onLocationChanged(Location location) {
int lat = (int) (location.getLatitude());
int lng = (int) (location.getLongitude());
latituteField.setText(String.valueOf(lat));
longitudeField.setText(String.valueOf(lng));
}
@Override
public void onStatusChanged(String provider, int status, Bundle extras) {
// TODO Auto-generated method stub
}
@Override
public void onProviderEnabled(String provider) {
Toast.makeText(this, "Enabled new provider " + provider,
Toast.LENGTH_SHORT).show();
}
@Override
public void onProviderDisabled(String provider) {
Toast.makeText(this, "Disabled provider " + provider,
Toast.LENGTH_SHORT).show();
}
}<?xml version="1.0" encoding="utf-8"?>
<LinearLayout xmlns:android="http://schemas.android.com/apk/res/android"
android:layout_width="match_parent"
android:layout_height="match_parent"
android:orientation="vertical" >
<LinearLayout
android:id="@+id/linearLayout1"
android:layout_width="match_parent"
android:layout_height="wrap_content"
android:layout_marginTop="40dip"
android:orientation="horizontal" >
<TextView
android:id="@+id/TextView01"
android:layout_width="wrap_content"
android:layout_height="wrap_content"
android:layout_marginLeft="10dip"
android:layout_marginRight="5dip"
android:text="Latitude: "
android:textSize="20dip" >
</TextView>
<TextView
android:id="@+id/TextView02"
android:layout_width="wrap_content"
android:layout_height="wrap_content"
android:text="unknown"
android:textSize="20dip" >
</TextView>
</LinearLayout>
<LinearLayout
android:id="@+id/linearLayout2"
android:layout_width="match_parent"
android:layout_height="wrap_content" >
<TextView
android:id="@+id/TextView03"
android:layout_width="wrap_content"
android:layout_height="wrap_content"
android:layout_marginLeft="10dip"
android:layout_marginRight="5dip"
android:text="Longitute: "
android:textSize="20dip" >
</TextView>
<TextView
android:id="@+id/TextView04"
android:layout_width="wrap_content"
android:layout_height="wrap_content"
android:text="unknown"
android:textSize="20dip" >
</TextView>
</LinearLayout>
</LinearLayout> Accès au mobile
- Accès au contact
- Lancer un appel
- Envoyer / Recevoir des sms
- Accéder avec l'appareil photo, au flash
- Accéder à la sonnerie, au vibreur, à la LED central (???)
- Style et thème ??
On redeveloppe Whatsapp !?
- Design
- Architecture
- Login / lecture contact
- Adapter / contact / message
- Sauvegarde et envoi des données
- Notifications
- Broadcast receiver
- Intent externe
- Géolocalisation
Avanced
- Architecture MVP
- Injector
- Test unitaire / test fonctionnel
- ...
BONUS