events
Hoon
event handler
<!DOCTYPE html>
<html>
<body>
  <button class="myButton">Click me!</button>
  <script>
    document.querySelector('.myButton')
    .addEventListener('click', function () {
      alert('Clicked!');
    });
  </script>
</body>
</html>
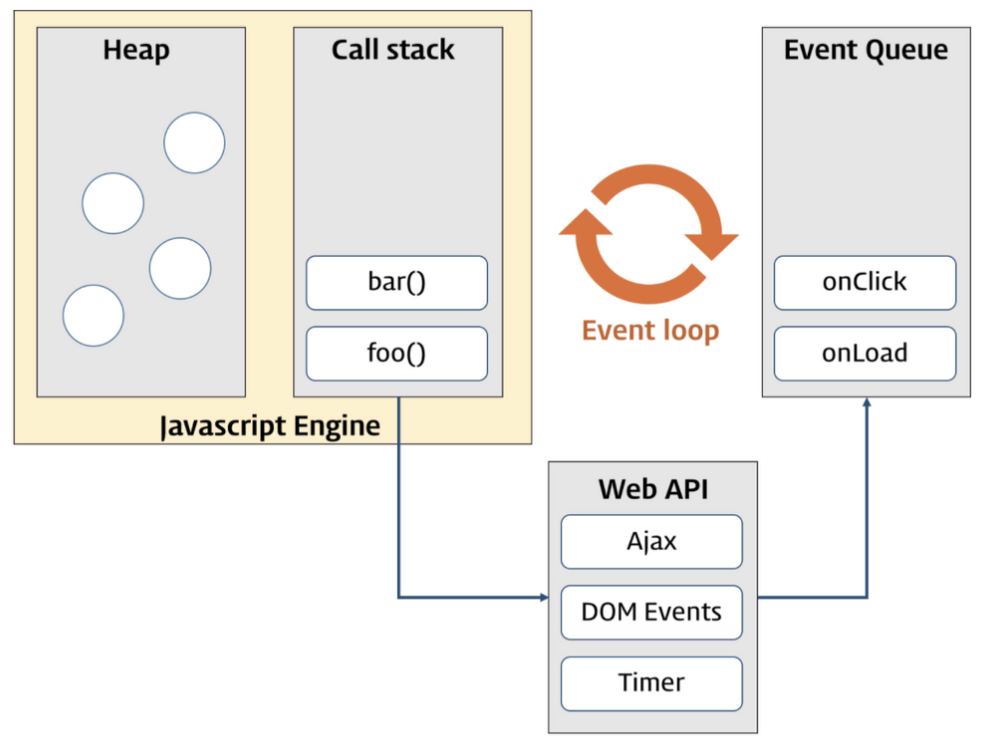
이벤트 루프
Single Threaded
Event Driven Programming Language
이벤트 루프
자바스크립트는 C++로 작성된 V8 엔진 위에서 실행된다
C++ 언어는 운영체제에서 제공하는 네트워킹 기능들을 사용할 수 있다
V8 엔진은, 이러한 기능들을 자바스크립트로 사용할 수 있게 해준다!
이벤트 루프

이벤트 루프
function func1() {
  console.log('func1');
  func2();
}

function func2() {
  setTimeout(function () {
    console.log('func2');
  }, 0);

  func3();
}

function func3() {
  console.log('func3');
}

func1();
DOM의 이벤트 핸들러
function func1() {
  console.log('func1');
  func2();
}

function func2() {
  // <button class="foo">foo</button>
  const elem = document.querySelector('.foo');

  elem.addEventListener('click', function () {
    this.style.backgroundColor = 'indigo';
    console.log('func2');
  });

  func3();
}

function func3() {
  console.log('func3');
}

func1();
이벤트 등록 방식
// 프로퍼티 등록 방식
<button onclick="myHandler()">Click me</button>

const btn = document.querySelector('.btn');

// 이벤트 핸들러 프로퍼티 방식은 이벤트에 하나의 이벤트 핸들러만을 바인딩할 수 있다
// 첫번째 바인딩된 이벤트 핸들러 => 실행되지 않는다.
btn.onclick = function () {
  alert('① Button clicked 1');
};

// 두번째 바인딩된 이벤트 핸들러
btn.onclick = function () {
  alert('① Button clicked 2');
};

// Add listener 방식
btn.addEventListener('click', function () {
  console.log('button click');
});
인라인 / 프로퍼티에 등록하는 방식
이벤트 핸들러의 this
<!DOCTYPE html>
<html>
<body>
  <button onclick="foo()">Button</button>
  <script>
    function foo () {
      console.log(this); // window
    }
  </script>
</body>
</html>
인라인으로 작성된 경우, 일반 함수로 호출되기 때문에 this는 전역 객체를 가리킨다!
이벤트 핸들러의 this
<!DOCTYPE html>
<html>
<body>
  <button class="btn">Button</button>
  <script>
    const btn = document.querySelector('.btn');

    btn.onclick = function (e) {
      console.log(this); // <button id="btn">Button</button>
      console.log(e.currentTarget); // <button id="btn">Button</button>
      console.log(this === e.currentTarget); // true
    };
  </script>
</body>
</html>
프로퍼티 바인딩 을 활용하면, 메소드로 등록이 되기 때문에 바인딩된 요소를 가리킨다!
이벤트 핸들러의 this
<!DOCTYPE html>
<html>
<body>
  <button class="btn">Button</button>
  <script>
    const btn = document.querySelector('.btn');

    btn.addEventListener('click', function (e) {
      console.log(this); // <button id="btn">Button</button>
      console.log(e.currentTarget); // <button id="btn">Button</button>
      console.log(this === e.currentTarget); // true
    });
  </script>
</body>
</html>
addEventListener를 사용하는 경우, 리스너에 바인딩된 요소를 가리킨다!
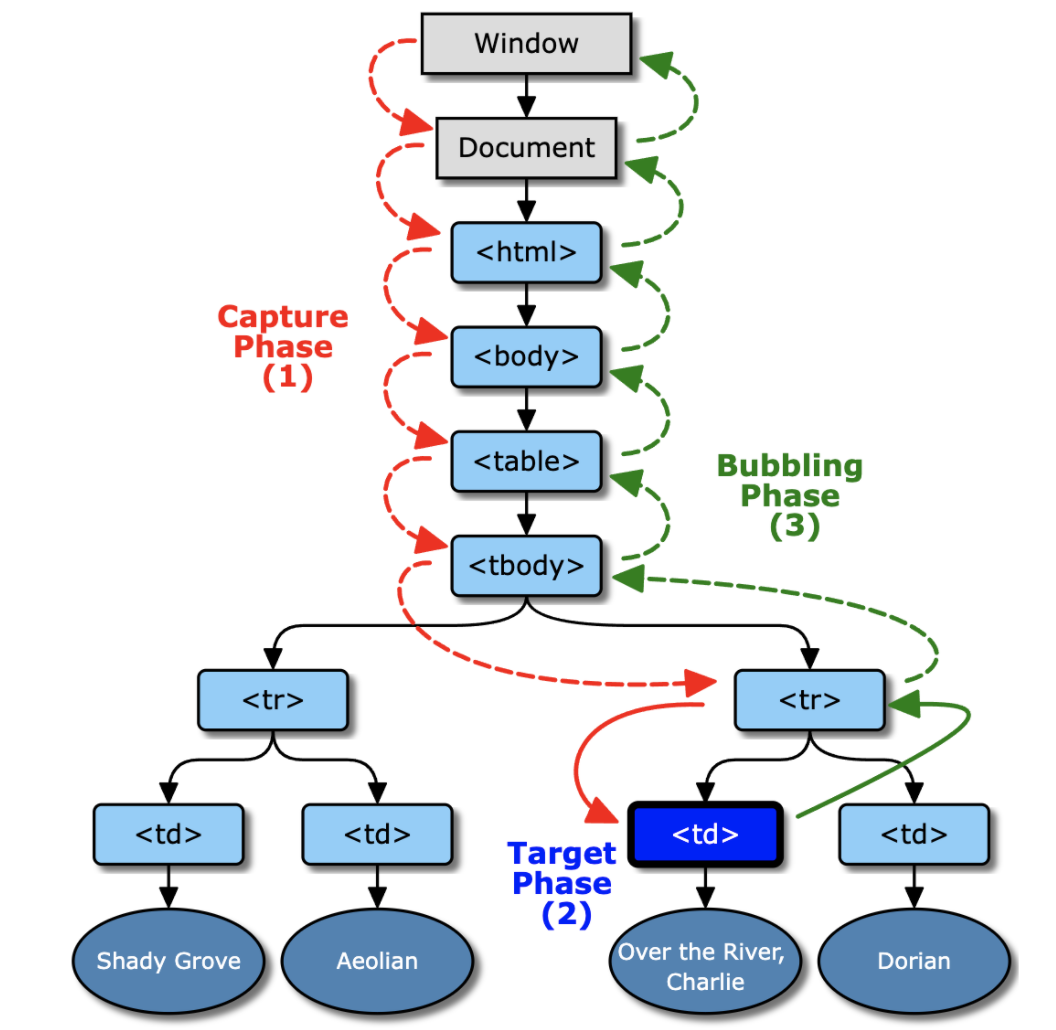
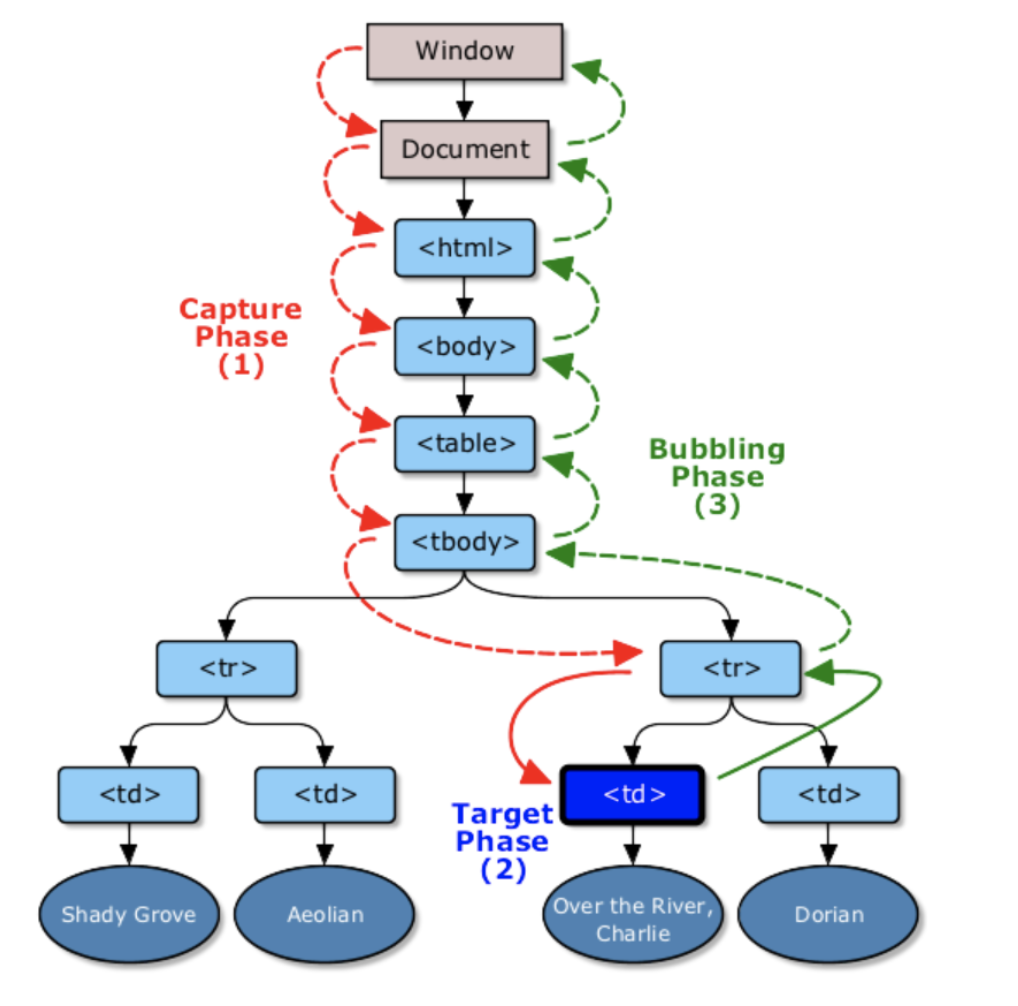
이벤트의 흐름

이벤트의 흐름
라이브 코딩 세션!
이벤트 위임
<ul id="post-list">
  <li id="post-1">Item 1</li>
  <li id="post-2">Item 2</li>
  <li id="post-3">Item 3</li>
  <li id="post-4">Item 4</li>
  <li id="post-5">Item 5</li>
  <li id="post-6">Item 6</li>
</ul>

function printId() {
  console.log(this.id);
}

document.querySelector('#post-1').addEventListener('click', printId);
document.querySelector('#post-2').addEventListener('click', printId);
document.querySelector('#post-3').addEventListener('click', printId);
document.querySelector('#post-4').addEventListener('click', printId);
document.querySelector('#post-5').addEventListener('click', printId);
document.querySelector('#post-6').addEventListener('click', printId);
이벤트의 위임
<!DOCTYPE html>
<html>
<body>
  <ul class="post-list">
    <li id="post-1">Item 1</li>
    <li id="post-2">Item 2</li>
    <li id="post-3">Item 3</li>
    <li id="post-4">Item 4</li>
    <li id="post-5">Item 5</li>
    <li id="post-6">Item 6</li>
  </ul>
  <div class="msg">
  <script>
    const msg = document.querySelector('.msg');
    const list = document.querySelector('.post-list')

    list.addEventListener('click', function (e) {
      // 이벤트를 발생시킨 요소
      console.log('[target]: ' + e.target);
      // 이벤트를 발생시킨 요소의 nodeName
      console.log('[target.nodeName]: ' + e.target.nodeName);

      // li 요소 이외의 요소에서 발생한 이벤트는 대응하지 않는다.
      if (e.target && e.target.nodeName === 'LI') {
        msg.innerHTML = 'li#' + e.target.id + ' was clicked!';
      }
    });
  </script>
</body>
</html>
not only on browser
how to use events
이벤트 핸들러
const btn = document.querySelector('button');

btn.onclick = function() {
  const rndCol = 'rgb(' + random(255) + ',' + random(255) + ',' + random(255) + ')';
  document.body.style.backgroundColor = rndCol;
}
how to use events
이벤트 핸들러
const btn = document.querySelector('button');

function bgChange() {
  const rndCol = 'rgb(' + random(255) + ',' + random(255) + ',' + random(255) + ')';
  document.body.style.backgroundColor = rndCol;
}

btn.onclick = bgChange;
how to use events
인라인 이벤트 핸들러
<button onclick="bgChange()">Press me</button>

function bgChange() {
  const rndCol = 'rgb(' + random(255) + ',' + random(255) + ',' + random(255) + ')';
  document.body.style.backgroundColor = rndCol;
}

<button onclick="alert('Hello, this is my old-fashioned event handler!');">Press me</button>
how to use events
여러개에 이벤트 등록하기
const buttons = document.querySelectorAll('button');

for (let i = 0; i < buttons.length; i++) {
  buttons[i].onclick = bgChange;
}
how to use events
핸들러 추가 및 제거
const btn = document.querySelector('button');

function bgChange() {
  const rndCol = 'rgb(' + random(255) + ',' + random(255) + ',' + random(255) + ')';
  document.body.style.backgroundColor = rndCol;
}

btn.addEventListener('click', bgChange);
how to use events
핸들러 추가 및 제거
const btn = document.querySelector('button');

function bgChange() {
  const rndCol = 'rgb(' + random(255) + ',' + random(255) + ',' + random(255) + ')';
  document.body.style.backgroundColor = rndCol;
}

btn.addEventListener('click', bgChange);

btn.removeEventListener('click', bgChange);
how to use events
핸들러 추가 및 제거
const controller = new AbortController();
btn.addEventListener('click', function() {
  var rndCol = 'rgb(' + random(255) + ',' + random(255) + ',' + random(255) + ')';
  document.body.style.backgroundColor = rndCol;
}, { signal: controller.signal }); // 이 핸들러에 AbortSignal을 전달

controller.abort(); // 이 컨트롤러와 연관된 어떠한/모든 이벤트 핸들러를 제거
how to use events
TL; DR
HTML 이벤트 핸들러 어트리뷰트 사용 금지!
AddEventListener 활용하기 !
Event object
function bgChange(e) {
  const rndCol = 'rgb(' + random(255) + ',' + random(255) + ',' + random(255) + ')';
  e.target.style.backgroundColor = rndCol;
  console.log(e);
}

btn.addEventListener('click', bgChange);
preventDefault
라이브 코딩 세션 !
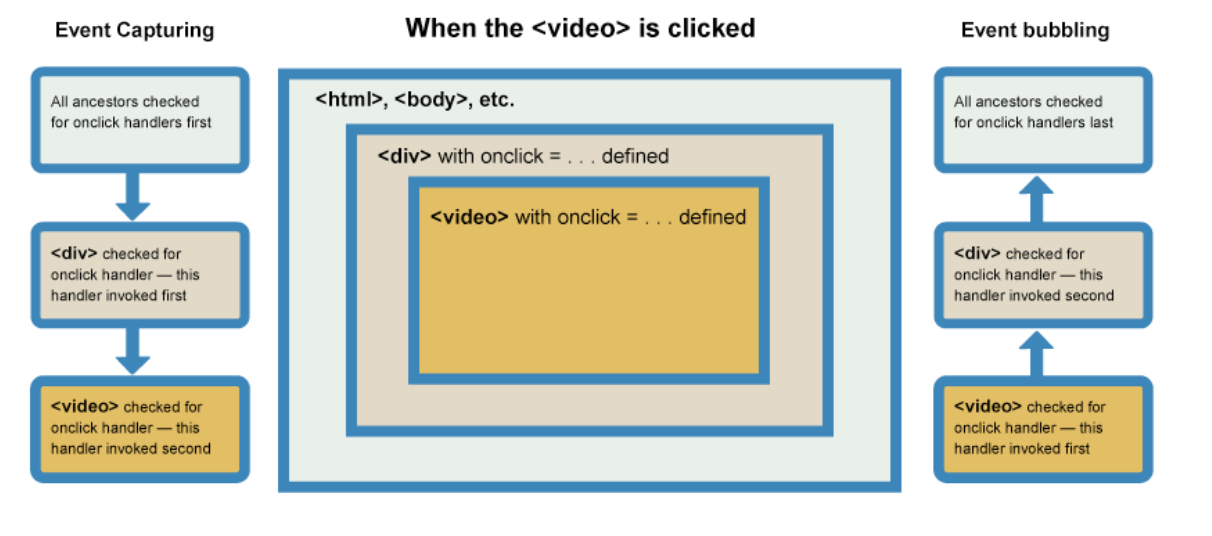
event bubbling & capture
라이브 코딩 세션 !
event bubbling & capture
캡쳐링
- 가장 바깥쪽 조상이 등록된 이벤트 핸들러가 있는지 검사하고 실행
- 다음요소로 이동하여 같은 작업 실행
- 실제 선택된 요소에 닿을때까지 실행
버블링
- 선택된 요소에 등록된 핸들러가 있는지 검사하고 실행
- 다음 요소로 올라가 실행
- html 요소에 닿을때까지 실행
event bubbling & capture


stopPropagation
video.onclick = function(e) {
  e.stopPropagation();
  video.play();
};
event delegation
라이브 코딩 세션!