React Router v4
with TypeScript
React Router?
홈
소개
https://hudson.io
https://hudson.io/intro
일반 정적 웹페이지
홈
홈
https://hudson.io
https://hudson.io/intro
Single Page Application
홈
소개
https://hudson.io
https://hudson.io/intro
React with Router
즉, React Router는,
- 특정 URL로 유저가 접근했을 때, URL을 해석하여
- 기존에 개발자가 선언한대로
- 요청한 URL에 알맞는 React Component를 렌더링해서 보여주는 역할.
- Facebook의 공식 라이브러리는 아니지만
- React 관련 Router 라이브러리 중에서는 가장 많은 사용자 보유
React Router v4
- React Router의 최신버전
- React Router v3, 그 이하와는 API가 다름
- v3도 여전히 유지보수는 진행 중
- 대부분의 동작이 React Component로 이루어짐
React Router 맛보기
import * as React from 'react';
import './App.css';
import { BrowserRouter as Router, Route } from 'react-router-dom';

const logo = require('./logo.svg');

class App extends React.Component<{}, {}> {
  render() {
    return (
      <div className="App">
        <div className="App-header">
          <img src={logo} className="App-logo" alt="logo" />
          <h2>Welcome to React</h2>
        </div>
        <Router>
          <Route path="/" render={() => <h3>Home</h3>}/>
        </Router>
      </div>
    );
  }
}

export default App;

항상 렌더링
주소에따라 렌더링
<Router>
  <div>
    <nav>
      <ul>
        <li><Link to="/">Home</Link></li>
        <li><Link to="/intro">소개</Link></li>
      </ul>
    </nav>
    <Route path="/" exact={true} render={() => <h3>Home</h3>}/>
    <Route path="/intro" render={() => <p>안녕하세요. 이현섭입니다.</p>}/>
  </div>
</Router>
Basic Routing
<BrowserRouter>
- 다른 라우팅 컴포넌트(Route, Link)를 사용하기 위해서 기본적으로 감싸줘야 함
- 오직 하나의 자식만을 가질 수 있음
- `window.history.pushState()`로 동작하는 라우터
- 이와 비슷하게 HashRouter는 Hash(#/)으로 동작하는 Router임
<Route>
- path 속성으로 경로지정
- render, component, children 속성으로 렌더링
- 실제 경로가 지정한 경로와 완벽히 매치되지 않더라도, 경로를 포함만 해도 렌더링
- 정확히 매칭될 때만 렌더하고 싶은 경우 exact 옵션 사용
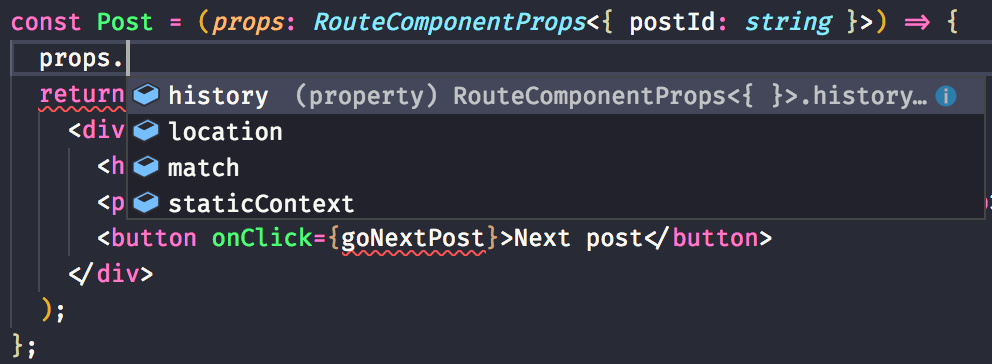
- 컴포넌트에 match, location, history라는 객체를 넘김
<Link>
- <a>로 렌더링되고 사용법도 비슷하지만,
- 실제 동작은 <a>와 다르게 페이지 전체를 리로드하지 않고
- 필요한 부분만 리로드하게 됨
<Route> props 알아보기
URL Parameter Routing
<Route path="/post/:postId" component={Post}/>const Post = (props: RouteComponentProps<{ postId: string }>) => {
return (
<h3>Post: {props.match.params.postId}</h3>
);
};Route Component Props

match 객체

- <Route>의 `path`에 정의한 것과 매치된 정보를 담고있음
location 객체
- 브라우저의 window.location 객체와 비슷함
- URL을 다루기 쉽게 쪼개서 가지고 있음

/post/2?a=b&c=d#hash
history 객체
- 브라우저의 window.history 객체와 비슷함
- 주소를 임의로 변경하거나 되돌아갈 수 있음
- 주소를 변경하더라도 SPA 동작방식에 맞게 페이지 일부만 리로드

예제
Next post 버튼
const Post = (props: RouteComponentProps<{ postId: string }>) => {
  function goNextPost() {
    const currPostId = props.match.params.postId;
    const nextPostId = +props.match.params.postId + 1 + '';
    const { pathname } = props.location;
    const nextPath = pathname.replace(currPostId, nextPostId);

    props.history.replace(nextPath);
  }

  return (
    <div>
      <h3>Post {props.match.params.postId}</h3>
      <p>{new URLSearchParams(props.location.search).get('body')}</p>
      <button onClick={goNextPost}>Next post</button>
    </div>
  );
};
예제
Query string 파싱
중첩 라우팅
const PostList = (props: RouteComponentProps<{}>) => {
  return (
    <div>
      <Route exact={true} path={props.match.url} render={() => <h3>포스트 목록</h3>}/>
      <Route path={`${props.match.url}/:postId`} component={Post}/>
    </div>
  );
};
<Switch>
<Route path="/intro" render={() => <p>소개</p>}/>
<Route path="/:postId" component={Post}/>
소개
https://hudson.io/intro
<Switch>를 사용하지 않은 경우
Post
소개
https://hudson.io/intro
<Switch>로 감싼 경우
<Switch>
  <Route path="/intro" render={() => <p>소개</p>}/>
  <Route path="/:postId" component={Post}/>
</Switch>
<Switch>
- <Route>를 감싸서 사용
- JavaScript의 switch 문과 비슷
- <Route>중 매치되는 첫번째만 렌더
- <Route>에 path를 지정하지 않은 경우, 매치되는 <Route> 컴포넌트가 없을 때 렌더
- 따라서 순서에 유의해야함
예제
404 페이지
<Switch>
  <Route path="/" exact={true} render={() => <h3>Home</h3>}/>
  <Route path="/intro" render={() => <p>안녕하세요. 이현섭입니다.</p>}/>
  <Route path="/post/:postId" component={Post}/>
  <Route render={() => <h3>Not found</h3>}/>
</Switch>
<Redirect>
<Redirect>
- 말그대로 Redirect를 하는 컴포넌트
- 마운트 되면 지정한 경로로 이동함
- 기본적으로 replace 방식
- location 객체를 통해 리다이렉트 할 수도 있음
예제
Admin
const Admin = () => {
  const isAdmin = false; // 임의로 설정

  return isAdmin
    ? <h3>Admin</h3>
    : <Redirect to="/"/>;
};
예제
Old path
<Switch>
  <Route path="/" exact={true} render={() => <h3>Home</h3>}/>
  <Route path="/intro" render={() => <p>안녕하세요. 이현섭입니다.</p>}/>
  <Route path="/admin" render={(props) => <Admin {...props} isAdmin={false}/>}/>
  <Redirect from="/about" to="/intro"/>
  <Route path="/post/:postId" component={Post}/>
  <Route render={() => <h3>Not found</h3>}/>
</Switch>
<NavLink>
<NavLink>
- 조금 특별한 <Link>
- `to`에 지정한 path와 URL이 매칭되는 경우,
- 특별한 스타일, 클래스를 적용할 수 있음
<nav>
  <ul>
    <li><NavLink exact={true} to="/" activeStyle={{ fontWeight: 'bold', color: 'blue' }}>Home</NavLink></li>
    <li><NavLink to="/intro" activeStyle={{ fontWeight: 'bold', color: 'blue' }}>소개</NavLink></li>
    <li><NavLink to="/admin" activeStyle={{ fontWeight: 'bold', color: 'blue' }}>Admin</NavLink></li>
  </ul>
</nav>