Introduction to HTML
What is HTML

Install the Live Server plugin
by Ritwick Dey
Title Text
HTML Elements
e.g. button, link, textbox, form, headings, div
<!DOCTYPE html>
<html>
<head>
  <meta charset="UTF-8">
  <meta name="viewport" content="width=device-width, initial-scale=1.0">
  <title>My First HTML Page</title>
</head>
<body>

</body>
</html>
Everything inside tags <> is an HTML element
<!DOCTYPE html>
<html>
<head>
<title>My title</title>
</head>
<body>
<h1>A heading</h1>
<a href="https://www.google.com/">Link text</a>
</body>
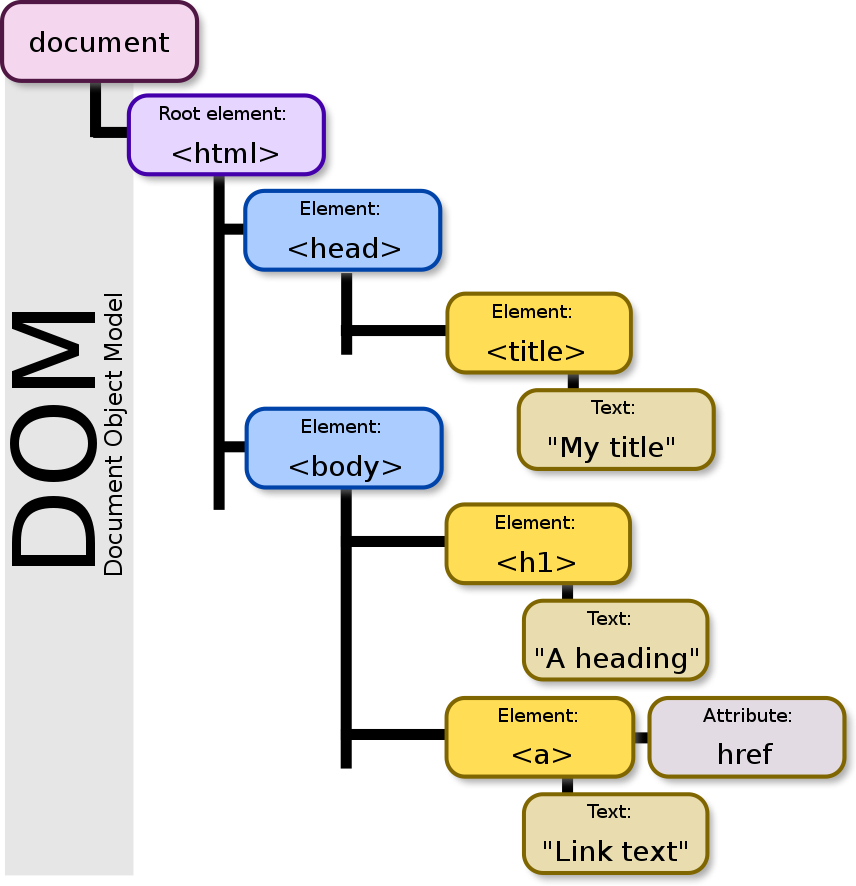
</html>Image source: https://en.wikipedia.org/wiki/File:DOM-model.svg
Text
<script></script>
Adding internal JavaScript to your webpage
<!DOCTYPE html>
<html>
  <head>
    <title>You Are Here</title>
  </head>
  <body>
    <p>Press <code>alt+command+i</code> Mac / <code>ctrl+shift+i</code> Windows to open your Dev Tools. Make sure the console tab is open.</p>
    <script>
      (function() {
        // This is where you would put your Javascript
        // Inside the script tags
        console.log("Success!");
      })();
    </script>
  </body>
</html>
<script></script>
Adding an external CSS file to your webpage
(optimal way)
<!DOCTYPE html>
<html>
  <head>
    <title>You Are Here</title>
    <script src="path/to/file.js" defer></script>
  </head>
  <body>
    <p>Press <code>alt+command+i</code> Mac /
      <code>ctrl+shift+i</code> Windows to open your Dev Tools.
      Make sure the console tab is open.</p>
  </body>
</html>
.message {
color: blue;
}CSS file
HTML file
|
<!DOCTYPE html> |
declaration defines the document type and version of HTML used in the document. |
|
<html> |
element is the root element of the HTML document and contains all other elements. |
| <head> | element contains metadata about the document, such as the title, which is displayed in the browser's title bar or tab. |
|
<meta charset="UTF-8"> |
declaration specifies the character encoding for the document, which is set to UTF-8 |
| <meta name="viewport" content="width=device-width, initial-scale=1.0"> | declaration is used to control the scaling of the page on smaller screens, such as those of mobile devices |
| <title> | element specifies the title of the document, which is displayed in the browser's title bar or tab |
| <body> | element contains the content of the HTML document, such as text, images, and other elements. |
| <h1> - <h6> | Defines headings of different sizes | <h1>My Name</h1> |
| <p> | Defines a paragraph | <p>I am a software engineer</p> |
|
<img> |
Displays an image | <img src="profile.jpg" alt="My Profile Picture"> |
| <ul> | Defines an unordered list | <ul>...</ul> |
| <li> | Defines a list item | <li>Graduated from XYZ University</li> |
| <a> | Defines a hyperlink | <a href="https://www.linkedin.com/in/myusername">My LinkedIn Profile</a> |
Anatomy of an HTML Head
<meta charset="UTF-8">attribute
attribute name
character encoding value
element
<meta name="viewport" content="width=device-width, initial-scale=1.0">attribute value
attribute
value
Anatomy of an HTML Head cont...
Anatomy of an HTML button element
<button type="submit">Text Content</button>attribute
attribute name
attribute value
element
HTML Semantic
Elements
Semantic HTML Elements
- Semantic HTML elements are used to describe the meaning and structure of the content on a web page.
- The purpose of using semantic HTML elements is to make the code more readable and accessible for both humans and machines.
- semantic HTML elements makes it easier to style and manipulate the content with CSS and JavaScript, as the elements are well defined and have specific meanings.
| <header> | Used to define a header for a document or section |
|---|---|
| <nav> | Used to define navigation links |
| <main> | Used to define the main content of a document |
| <article> | Used to define an independent self-contained piece of content |
| <section> | Used to define a section of a document |
| <footer> | Used to define a footer for a document or section |
| <figure> | Used to define self-contained content, such as images, diagrams, code snippets, etc. |
| <figcaption> | Used to provide a caption for a <figure> element |
<!DOCTYPE html>
<html>
  <head>
    <meta charset="UTF-8">
    <title>Sample Semantic HTML Page</title>
  </head>
  <body>
    <header>
      <h1>Welcome to our site</h1>
      <nav>
        <ul>
          <li><a href="#about">About</a></li>
          <li><a href="#services">Services</a></li>
          <li><a href="#contact">Contact</a></li>
        </ul>
      </nav>
    </header>
    <main>
      <section id="about">
        <h2>About Us</h2>
        <p>Learn about our company and what we offer.</p>
      </section>
      <section id="services">
        <h2>Our Services</h2>
        <ul>
          <li>Service 1</li>
          <li>Service 2</li>
          <li>Service 3</li>
        </ul>
      </section>
      <section id="contact">
        <h2>Contact Us</h2>
        <form>
          <label for="name">Name:</label>
          <input type="text" id="name" name="name">
          <label for="email">Email:</label>
          <input type="email" id="email" name="email">
          <label for="message">Message:</label>
          <textarea id="message" name="message"></textarea>
          <input type="submit" value="Submit">
        </form>
      </section>
    </main>
    <footer>
      <p>Copyright © 2023 Sample Site</p>
    </footer>
  </body>
</html>
HTML Links
Different Types of Links
- Internal links (linking within the same website)
- External links (linking to other websites)
- Email links (linking to an email address)
- Anchor links (linking within the same page)
Anatomy of an HTML link element
An HTML link is a special tag that allows you to link one web page to another.
<a href="URL">Link Text</a>attribute
attribute name
attribute value
element
Anatomy of an HTML internal link
<a href="#section1">Link to Section 1</a>- The
<a>tag is used to create a hyperlink in HTML - The
hrefattribute specifies the destination of the link, in this case#section1which means it is an internal link to a specific section within the same HTML document - The text between the
<a>tags is the text that will be displayed as the link on the webpage
- They are created using the anchor tag (<a>) and the href attribute. The href attribute specifies the URL or web address of the page you want to link to. External links are useful for providing additional resources or information related to the topic on the current page.
Anatomy of an HTML external link
<a href="https://www.example.com">Link</a>Anatomy of an HTML email link
<a href="mailto:example@email.com">Send email</a>The display text: This is the text that is displayed as a hyperlink on the webpage. The display text is placed between the opening and closing "a" tags. For example, <a href="mail to:example@email.com">Send an email</a>The closing "a" tag: </a>
When a user clicks on the email link, their default email client will open with a new email pre-filled with the specified email address.
HTML Forms
Understanding the Fundamentals of HTML Forms
Introduction to HTML Forms
- A. What is an HTML form: A form in HTML allows users to input and send data to a server.
- B. Purpose of forms in web development: Forms are an essential part of web development and are used to gather information from users.
- C. Common use cases: User registration, contact forms, surveys, etc.
HTML basic form structure
<form>
  <label for="input-field">Input Field:</label>
  <input type="text" id="input-field" name="input-field">

  <label for="radio-button">Radio Button:</label>
  <input type="radio" id="radio-button" name="radio-group">

  <label for="checkbox">Checkbox:</label>
  <input type="checkbox" id="checkbox" name="checkbox">

  <button type="submit" value="Submit">
</form>- Form tag: The form tag is the container that holds all the form elements. It is used to define the start and end of the form.
- Input elements: These are the various input elements such as text fields, radio buttons, checkboxes, and submit buttons that are used to collect data from the user.
-
Labels: Labels are used to describe the input elements and are associated with a specific input element using the "for" attribute.
- Form action and method: The form action attribute specifies where the form data is sent when the form is submitted
<form id="randomForm">
  <!-- ... -->
</form>
HTML
Forms
submit
<input type="text" id="name">HTML
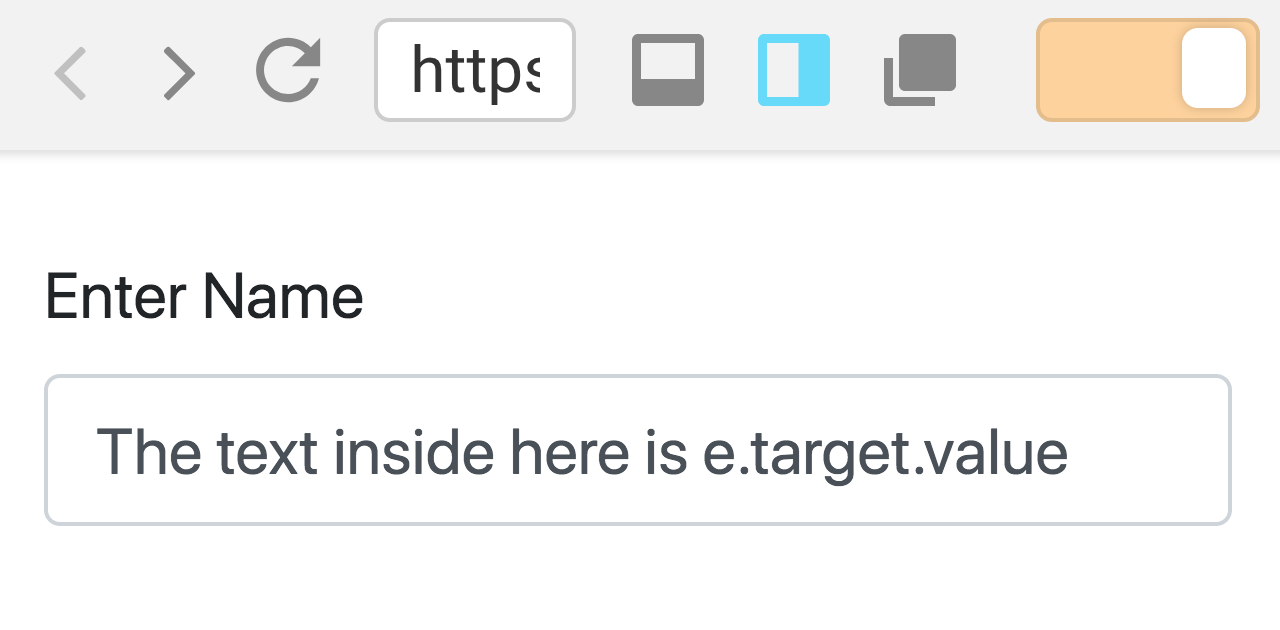
By using the event target's value
Textboxes
change or input
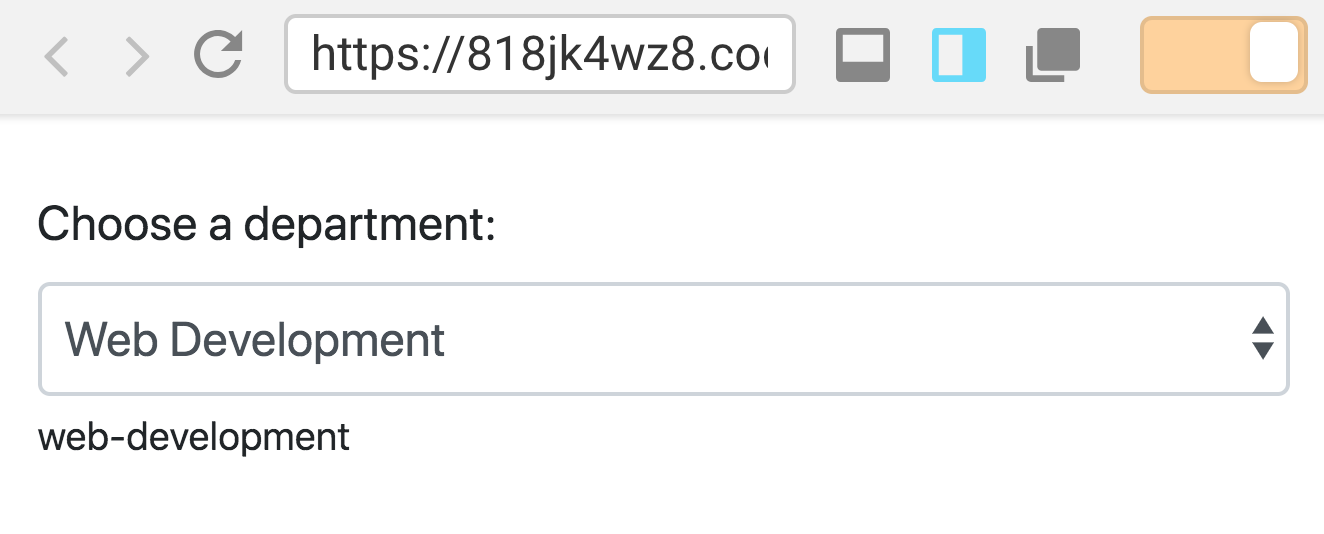
<select id="department" class="form-control">
  <option value=""></option>
  <option value="web-design">Web Design</option>
  <option value="web-development">Web Development</option>
  <!-- ... -->
</select>
HTML
Selectboxes
change
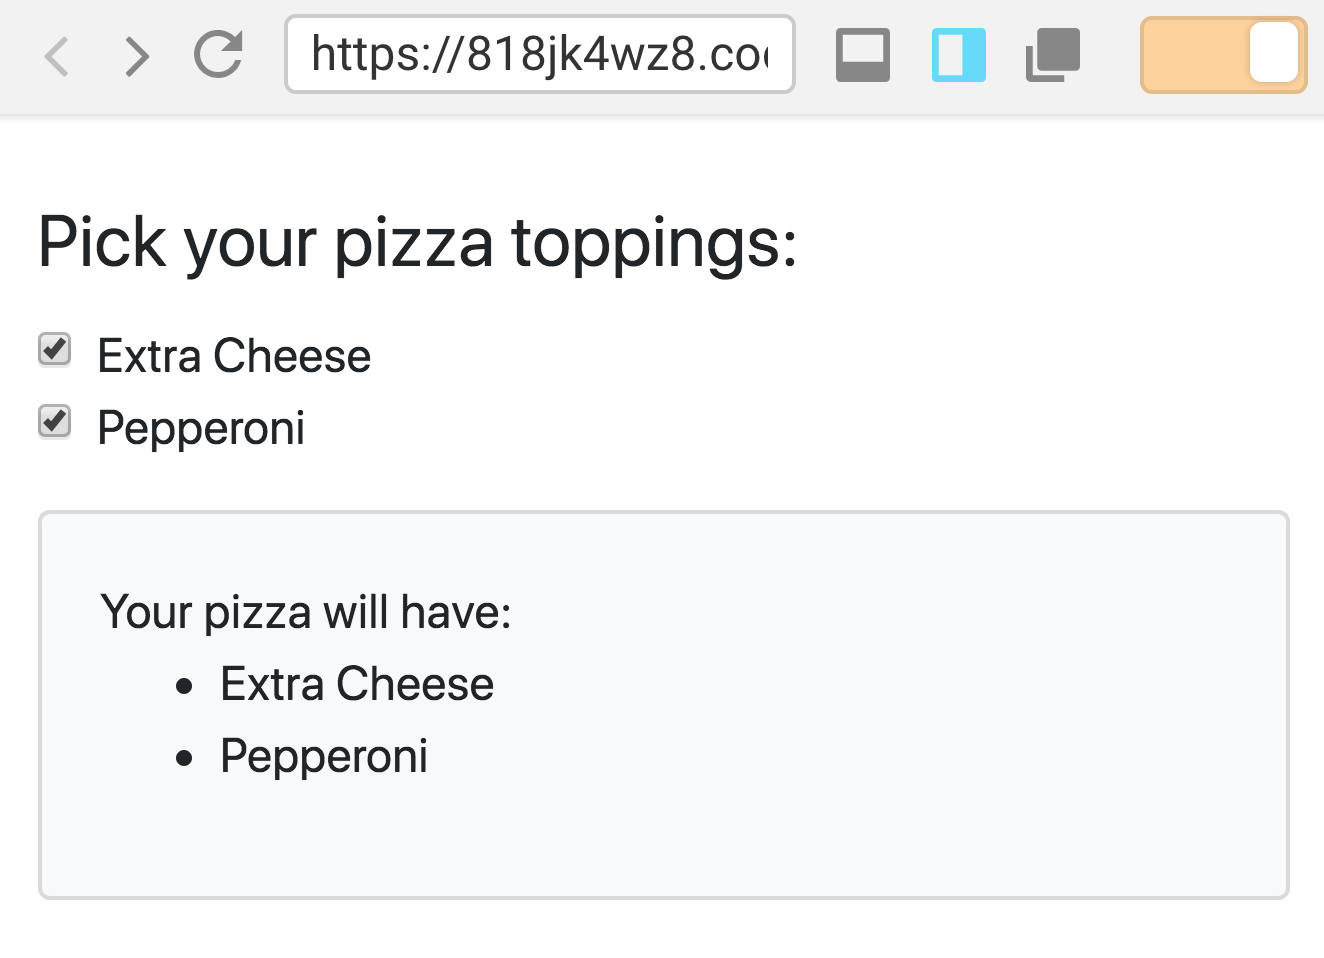
<input type="checkbox" id="addExtraCheese">
<label or="addExtraCheese">Extra Cheese</label>
HTML
Checkboxes
click or change
<input type="text" required/>HTML
Textboxes
input validation
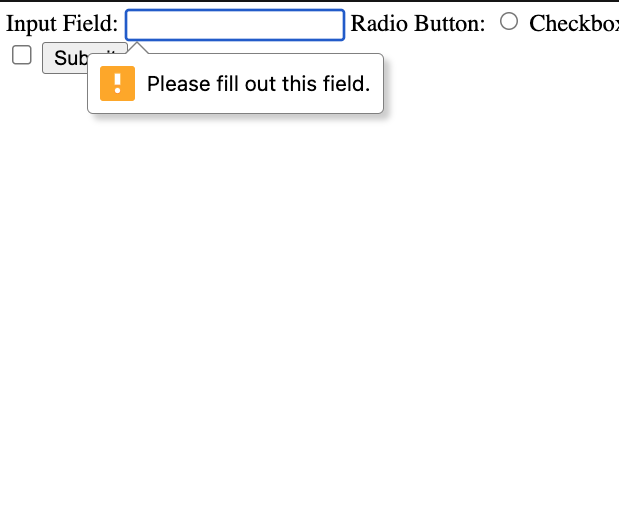
The required attribute in HTML marks an input field as mandatory. The form cannot be submitted until a value is entered in the required field.