Agility Developer Workshop
Before We Start
- Sign up for a Sandbox: bit.ly/agl-sandbox
-
Visual Studio 2015/2017 Community or higher installed
- AgilityCMS Model Updater VS extension installed
By - James Vidler
VP, Product
About Me

- Former head of professional services team
- Partner and Developer advocate
Ask me About:
- Development
- Architecture
- Training + Docs
- Feature Requests
- Azure
Workshop Tips
- Open this presentation on your laptop: http://bit.ly/aglDev-0619
- Follow-along on Labs
- Time for catching up during breaks
-
Presentation includes step-by-step instructions for each lab
- Ask for help if stuck
Agenda
-
Agility Overview
-
Building a Blog
- Deployments
Agility Architecture
True Cloud
- Multi-tenanted, cloud hosted
Hybrid
- Traditional with the Agility.Web SDK, Headless with the REST API, or both!
Agility

Agility Architecture
Web
Content Management
WCM: Unlimited Creative Freedom
-
Build your bespoke schema in the cloud.
- You define the Pages, Page Templates, Modules, and Content
- Output code on your website using your front-end framework of choice
WCM: Demonstration
- Pages
- Shared Content
- Media & Documents
- Settings
- Preview & Publishing
WCM: What's in a Page?
Page
Page Template
Content Zones
Modules


A
B
WCM: What's in a Page? (...)
Page Template

Content Zone A
Content Zone B
Module A
Module B
WCM: Content Defintions
- Define structured content definitions such as a Blog Post, Product, etc.
- Create content items and lists based on the definition
- Content can be scoped to a specific page
- Content can be 'Shared' in Shared Content and accessible from any Page
WCM: Developer Sandbox Overview
+
.NET MVC + Agility (...)
-
Follows MVC pattern
-
Agility.Web nuget package
-
AgilityWebsiteService.svc endpoint for syncing content
-
Customizable routing
- Can be setup in an existing MVC application
.NET MVC + Agility
-
Page Template Output = Razor Partial View
-
Module Output = ControllerActionResult or Razor Partial View
- Agility provides auto-generated, C# API classes representing ALL content and module definitions
Agility.Web
- Page routing
- Page Template execution
- Module execution
- Content access and deserialization
- Url Redirections
- Output Caching
- Core assembly of Agility SDK
- Dependency on MVC
- Handles syncing
- Available on nuget
- Preview Mode
- Development Mode
- Live Mode
- Language Context Management
- Channel Management
Does a lot of other stuff too:
And more...
HTTP(s) Request
~/about-us
RouteConfig.cs
Matches Agility route constraint
Agility.Web.dll
Renders Page Template and each Module
RenderBody()
Rendered HTML served in Layout file
Agility Page Render Lifecycle
Lab: Running an Agility MVC Website Locally
Steps to Run a Project Locally
- Locate and open the .sln file
- Go to "Build" > "Start without Debugging"
- Will build and download missing nuget packages
- Websites loads over IIS express on localhost:{random-port}
BREAK - 15 mins
Now that we understand some basic concepts, we are going to build a blog ...
In the end, we should have a simple blog template, a list of posts, and a module to output the post details.
Lab: Create a new Page Template
Create a new Page Template
What we are going to do:
- Create a new Page Template definition called Blog Template with a single Main Content Zone
- Add code for our page template output
- Create a page using our new page template
- Verify the results
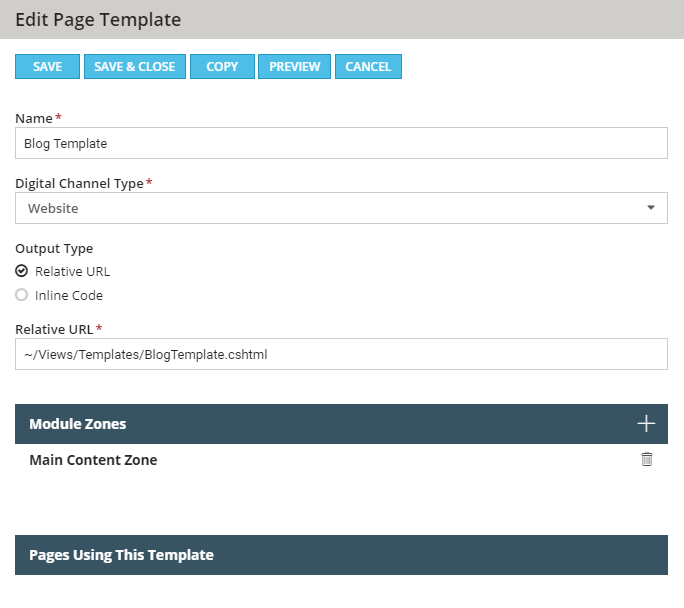
- In the Manager, go to Settings > Page Templates and click New to create a new Page template
- For New Page Template, use the following values:
Name = Blog Template
Digital Channel Type = Website
Output Template = Relative URL
Relative URL = ~/Views/Templates/BlogTemplate.cshtml
Create Page Template Definition
- Under Module Zones, click the + icon to create a module zone
- For Module Zone Details, enter the following values:
Display Name = Main Content Zone
Reference Name = [auto-populated]
Create Page Template Definition (...)
- Click Save to apply the module zone
- Click Save and Close to finish the Page Template creation
Create Page Template Definition (...)
Create Page Template Definition Result
Add Partial View for Page Template
- In Visual Studio, create a new Partial View for the template using the Relative URL value you set for the Page Template
- Add the following code:
<!-- Normally, you'd but this in a CSS file -->
<style>
.blog-template__wrapper {
max-width: 730px;
margin: 0 auto;
}
</style>
<!-- Page Template Code -->
<div class="blog-template container contentWrap" role="main">
<div class="blog-template__wrapper">
@{Html.RenderContentZone("MainContentZone");}
</div>
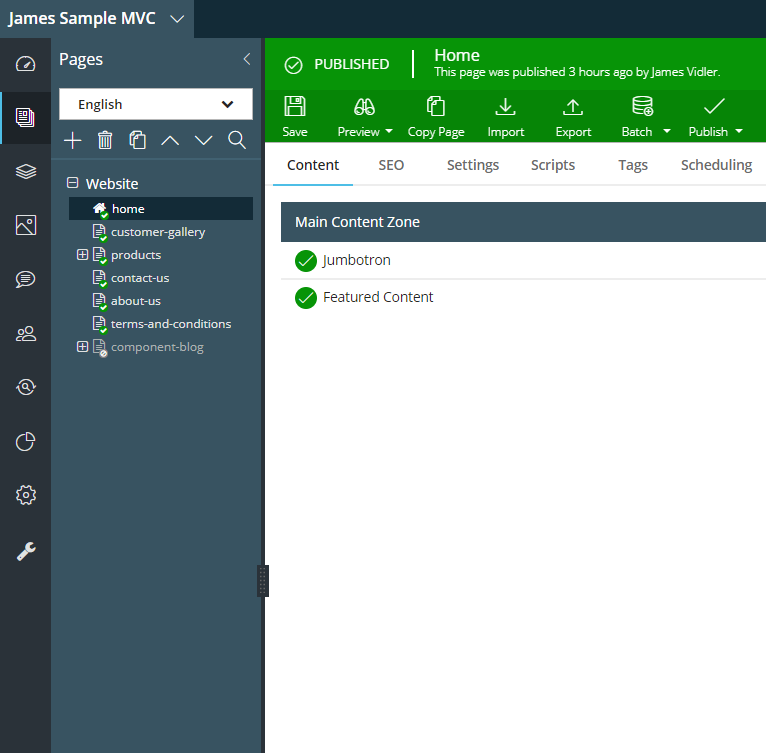
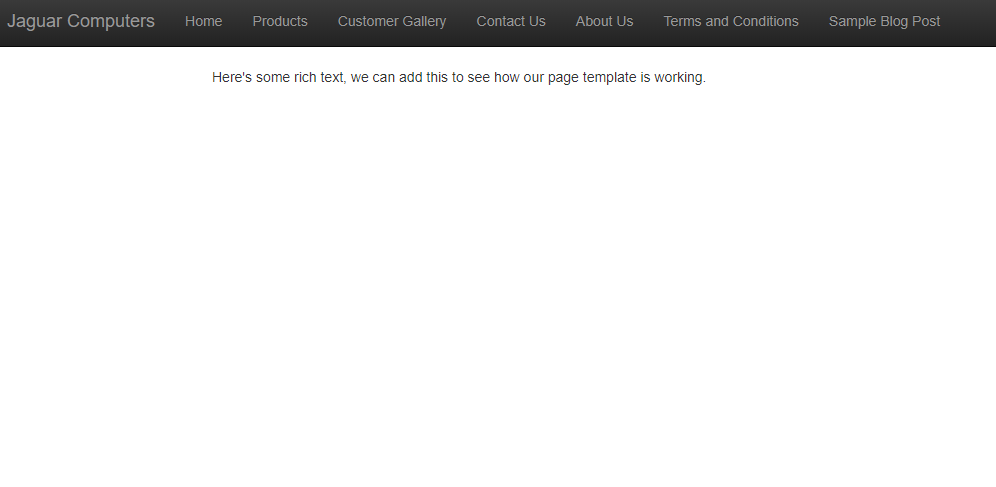
</div>Create a Page using the Page Template
- In the Content Manager, go to Pages and create a new Page, using your new Blog Template
- In the Main Content Zone of the page, add a Rich Text Area and input some sample content to test your template
- On your localhost, navigate to the page you just created and verify the output
Blog Page Template Result
Lab: Create a Module
Create a Module
What we are going to do:
- Create a new Module Definition called Blog Post Details
- Download and refresh the C# API
- Add code for our module output
- Add our module to a page a test the output
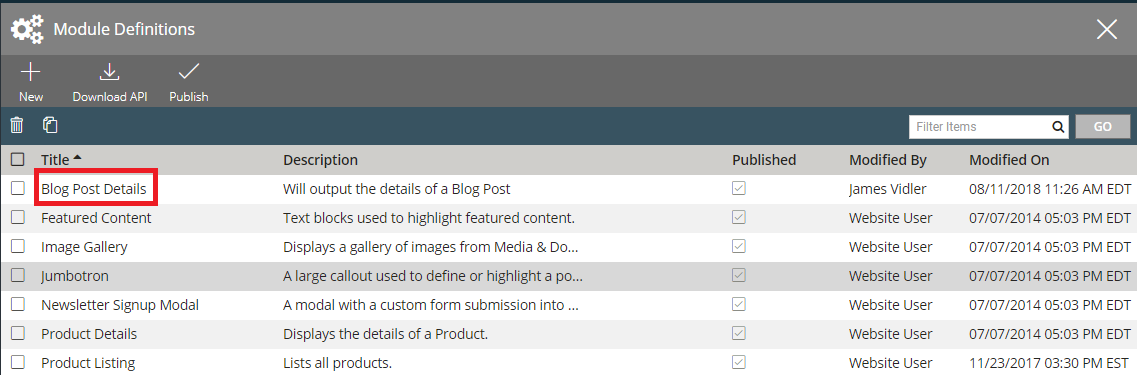
Create a new Module Definition
- In the Content Manager, navigate to Settings > Module Definitions and click New+ to open the New Module Definition fly-out
- In the Definition Details tab, enter the following values:
Title = Blog Post Details
Reference Name = [auto-populate]
Description = Will output the details of a Blog Post
Create a new Module Definition (...)
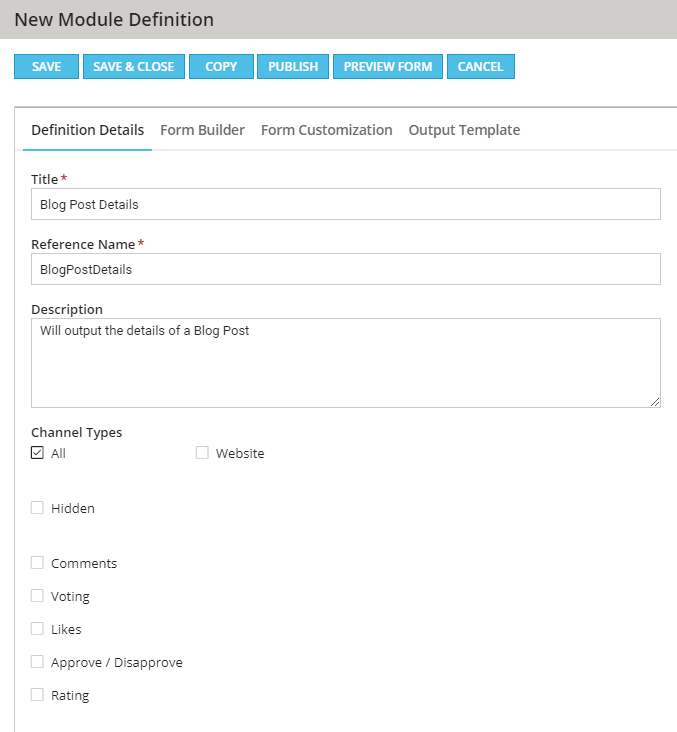
Create a new Module Definition (...)
- On the Form Builder tab, add the following field types:
Title - Text - [Required]*
Details - HTML - [Required]*
Image - Image - [Required]*
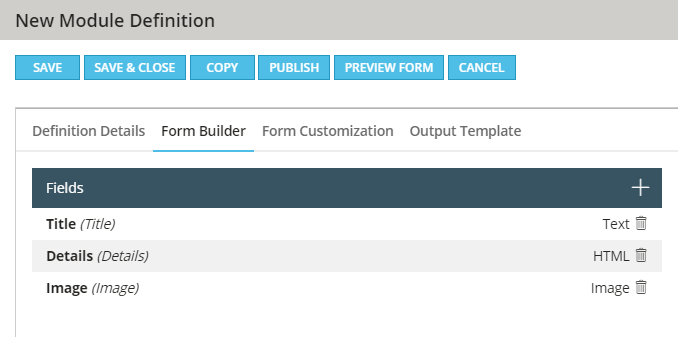
Create a new Module Definition (...)
- On the Output Template tab, select MVC Controller Action and set the following values:
Controller = Blog
Action = BlogPostDetails
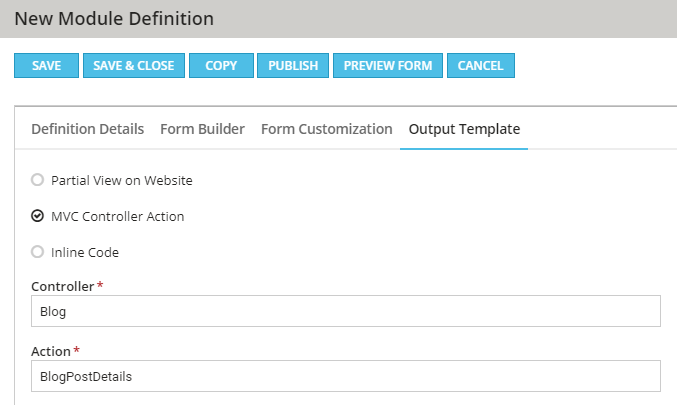
Create a new Module Definition (...)
- Click Save & Close to complete the creation of the module definition
Refresh C# Classes
- Need to download and refresh C# API for definitions
- Includes all module and content definitions as partial classes
- Take full advantage of intellisense and compile-time error checking
- Two ways to do this:
- Download the file from the Content Manager
- Refresh the file from within Visual Studio
Refresh C# Classes - From Content Manager
- In Content Manager, go to Settings > Module Definitions, click the Download API button
- Open the file and copy EVERYTHING below the namespace declaration
Note: Namespace may not match project
Refresh C# Classes - From Content Manager (...)
- Find the existing file in your project - in the sandbox, it can be found in Models > MVCSampleSite_API.cs
- Replace EVERYTHING below the namespace, save and Build your project
Refresh C# Classes - From Visual Studio
- Requires AgilityCMS Model Updater Visual Studio extension
- Find the existing file in your project - in the sandbox, it can be found in Models > MVCSampleSite_API.cs
- Right-click the file in Visual Studio and select AgilityCMS from the context menu
Refresh C# Classes - From Visual Studio (...)
- Select Update Model and enter your Agility Username and Password and click OK
- Confirm your Namespace, by default it will maintain your current Namespace - click OK to update the file
Add Code for Module Output
- In Visual Studio, add a new Controller called "Blog" - filename will be BlogController
- Set the following code in the BlogController:
using MVC4SampleSite.Models;
using System;
using System.Collections.Generic;
using System.Linq;
using System.Web;
using System.Web.Mvc;

namespace MVC4SampleSite.Controllers
{
    public class BlogController : Controller
    {
        public ActionResult BlogPostDetails(Module_BlogPostDetails module)
        {
            return PartialView("~/Views/Blog/BlogPostDetails.cshtml", module);
        }

    }
}
Add Code for Module Output (...)
- In Visual Studio, create a new folder under Views called "Blog"
- Add a new PartialView called "BlogPostDetails" so the location of the file becomes "~/Views/Blog/BlogPostDetails.cshtml"
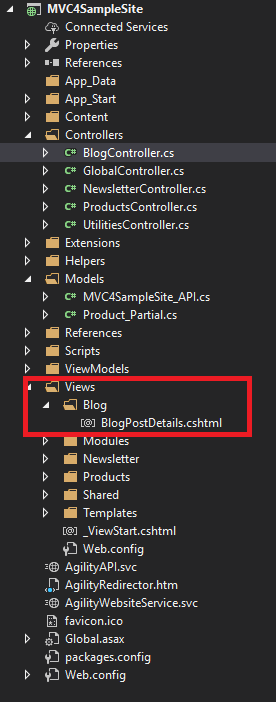
Add Code for Module Output (...)
- In Visual Studio, add the following code to the "BlogPostDetailis.cshtml" PartialView:
@model MVC4SampleSite.Models.Module_BlogPostDetails
<div class="blog-post-details">
@if(Model.Image != null)
{
<!-- This img is being thumbnailed to 730px -->
<img class="img-responsive" src="@Model.Image.URL?w=730" alt="@Model.Image.Label" />
}
<h1>@Model.Title</h1>
@Html.Raw(Model.Details)
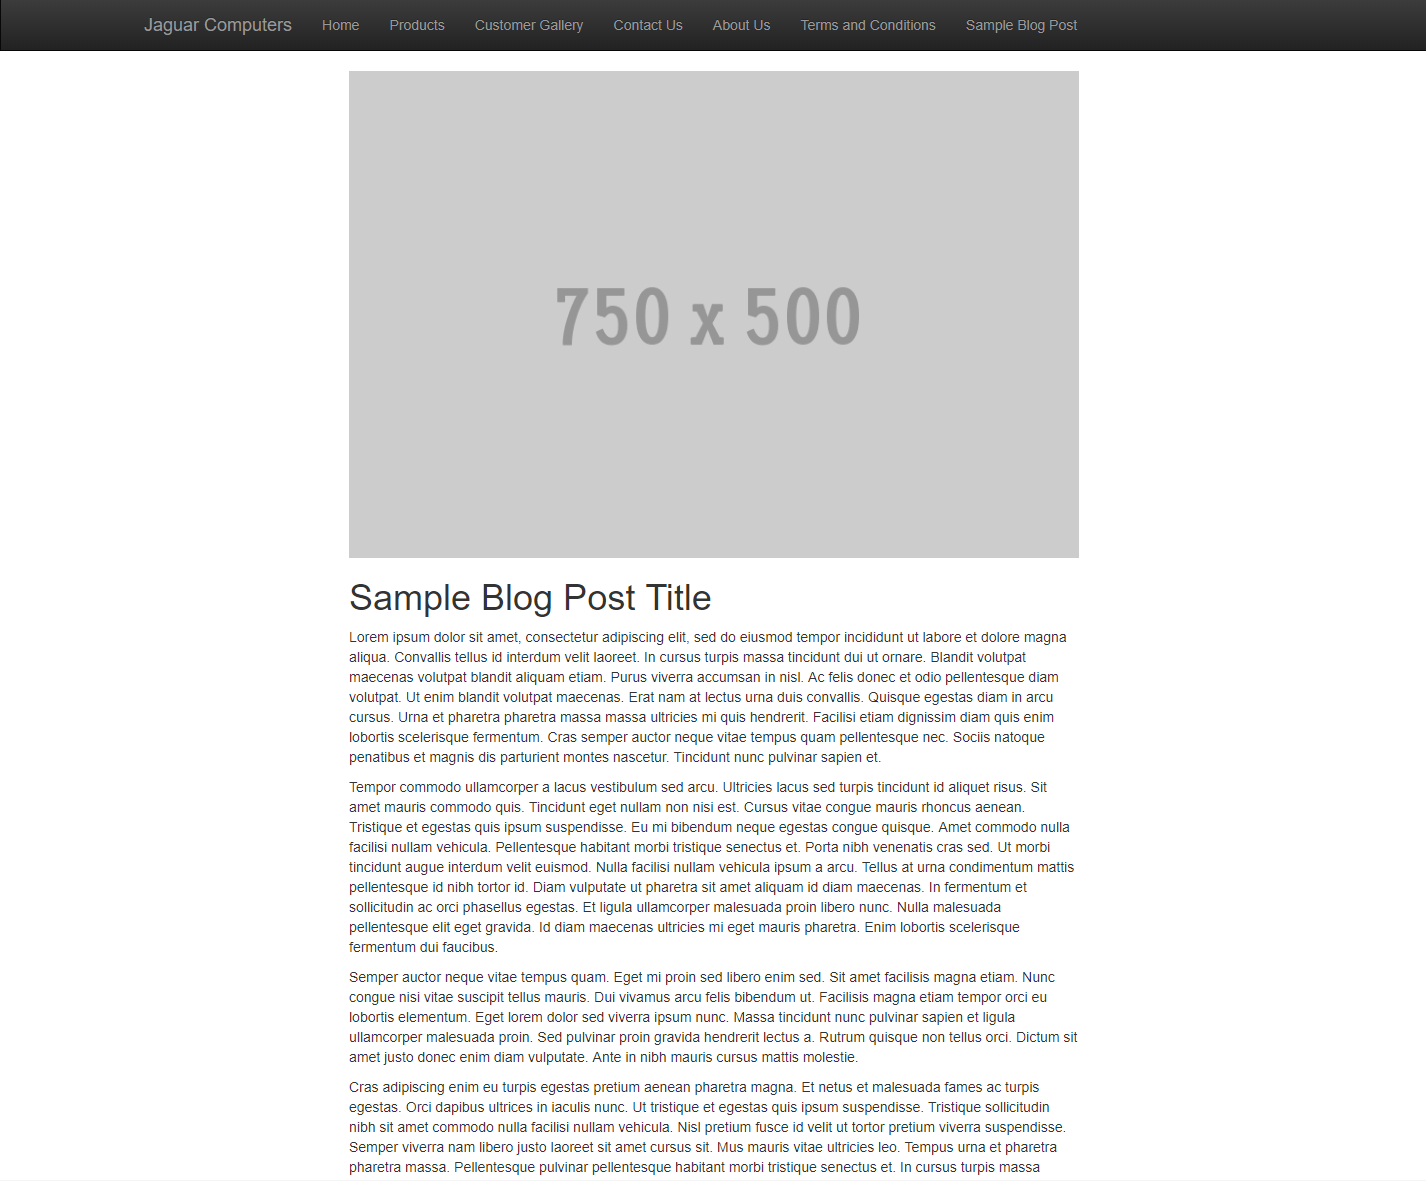
</div>Add Module to a Page and set Content
- In Content Manager, go to Pages and add the Blog Post Details module to the page you created earlier with the Blog Template
- Set some sample values in the input form for the module, filling out the Title, Details, and Image fields
- Click Save & Close to save the module to the page
- Next, in Visual Studio, click Build, and navigate on your localhost to the page you added the module to
Verify Module Output
Content Architecture Challenge
Do you think our current Blog Post architecture is scalable? Why not?
How can it be improved?
Lab: Implementing Dynamic Pages
Implementing Dynamic Pages
What we are going to do:
-
Create a new Content Definition representing our Blog Post schema
-
Create a new Blog Post Dynamic List in Shared Content
- Create a new Dynamic Page in Pages
- Remove redundant fields in our Blog Post Details module
- Update our Blog Post Details module code to retrieve the current Dynamic Page Item
Create a new Content Definition
- In the Content Manager, go to Settings > Content Definitions and click on New+ to launch the New Content Definition fly-out
- In the Definition Details tab, enter the following values:
Type = Content List
Title = Blog Post
Reference Name = [auto-generated]
Description = This is the definition for a Blog Post
Creating a Dynamic Page in your Page Tree
- In the Content Manager, go to Pages and from the Page Tree, select the page you where previously testing which has the Blog Post Details module
- Within the Page Tree, click the + button to create a new page underneath your current page
- In the Add a New Page fly-out, click the Dynamic Page tab
Creating a Dynamic Page in your Page Tree (...)
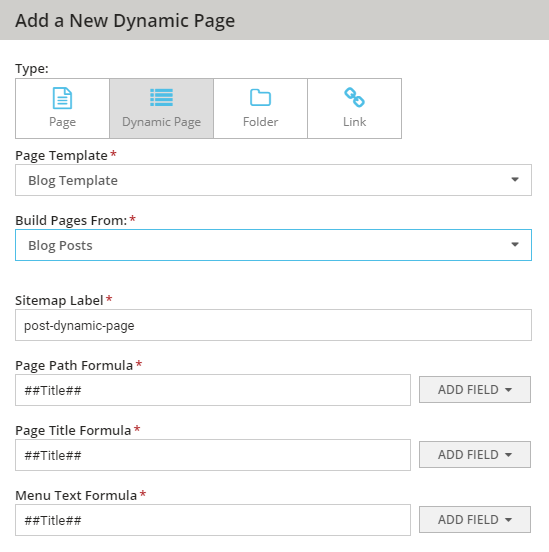
- In the Add a New Dynamic Page tab, enter the following values:
Page Template = Blog Template
Build Pages From = Blog Posts
Sitemap Label = post-dynamic
Page Path Formula = ##Title##
Page Title Formula = ##Title##
Menu Text Formula = ##Title##
- Click Save to create the dynamic page
Creating a Dynamic Page in your Page Tree (...)
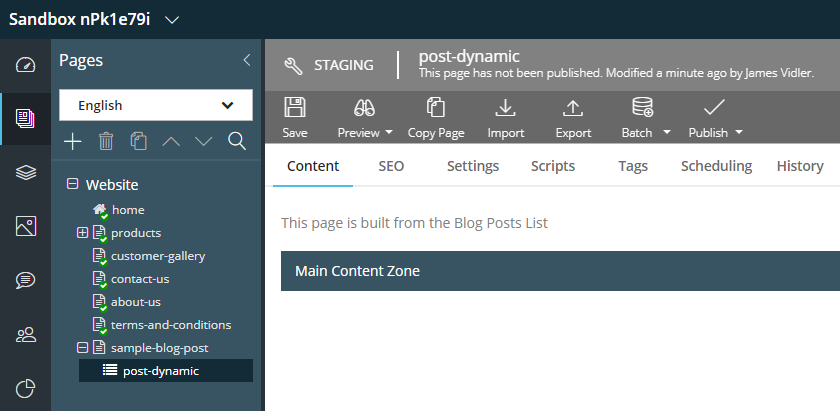
Note: Dynamic Pages CANNOT be created in the page root and must be under a page or folder
Clean-up the Parent Page
- Click on the page this is now the parent of the post-dynamic page
- Remove the Blog Post Details module from the Main Content Zone
- Click on the SEO tab, and rename the page:
Page Title = Blog
Page Name = blog
Menu Text = Blog
Note: This page will be empty for demonstration purposes, but normally this would be your root listing page that lists links to all your dynamic page items
Remove Redundant fields from Module Definition
- In the Content Manager, go to Settings > Module Definitions and select the Blog Post Details module
- In the Edit Module Definition fly-out, click on the Form Builder tab and remove ALL fields
- Click Save & Close to save the module definition, then select the definition from the grid using the checkbox and click Publish to publish the definition
Add the Module to the Dynamic Page in the Page Tree
- In the Content Manager, go to Pages and select the dynamic page you created
- Add the Blog Post Details module to the dynamic page's Main Content Zone
- Click Save & Close to save the module
Note: You will notice the module itself no longer has any fields, because the Blog Post will be dynamically resolved at run-time based on the Page Path Formula
Modify the Module Code to Resolve the Dynamic Page Item
- In Visual Studio, open the BlogController.cs file and update the code:
using MVC4SampleSite.Models;
using System;
using System.Collections.Generic;
using System.Linq;
using System.Web;
using System.Web.Mvc;
using Agility.Web.Extensions;
using Agility.Web;
namespace MVC4SampleSite.Controllers
{
public class BlogController : Controller
{
public ActionResult BlogPostDetails(Module_BlogPostDetails module)
{
BlogPost blogPost = AgilityContext.GetDynamicPageItem<BlogPost>();
if(blogPost == null)
{
throw new HttpException(404, "No blog post found matching the Page Path Formula.");
}
return PartialView("~/Views/Blog/BlogPostDetails.cshtml", blogPost);
}
}
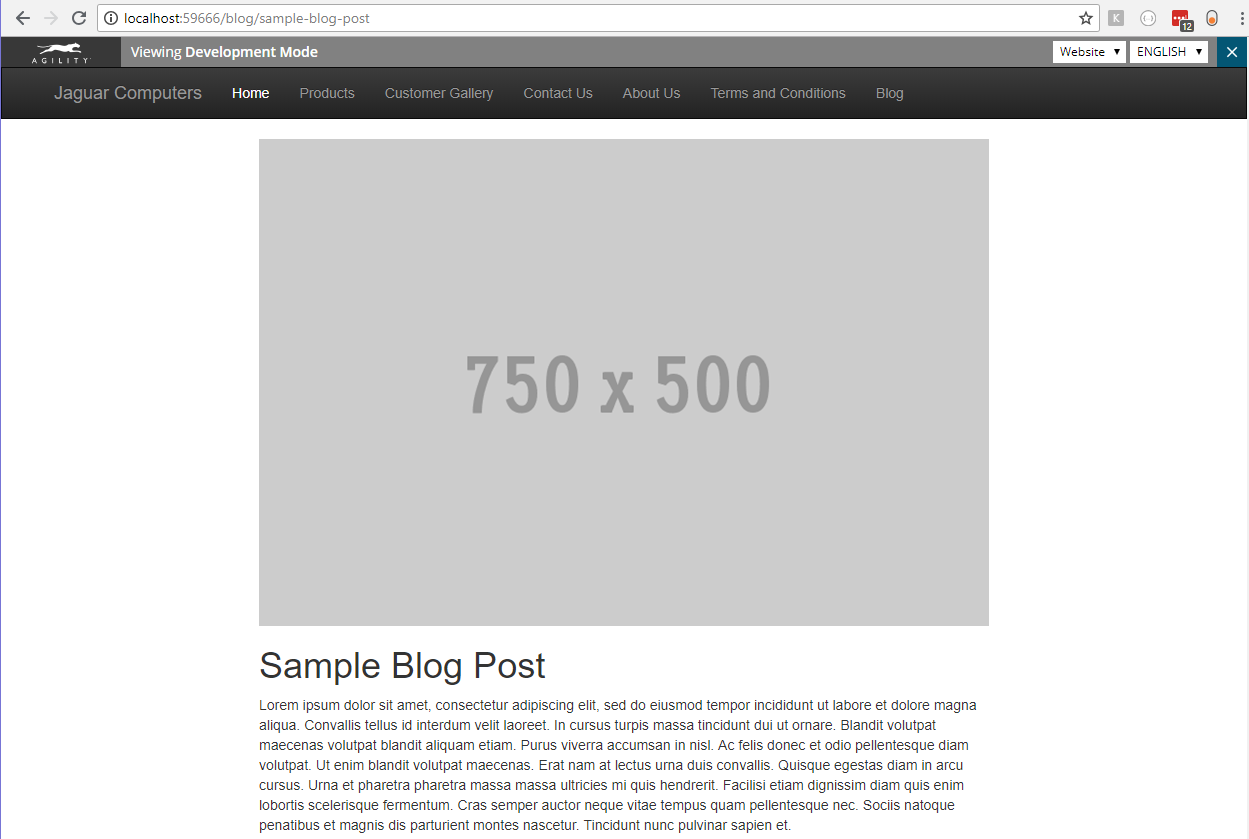
}Verify Module Output
- In Visual Studio, build your project and run on your localhost
- In your browser, enter a URL like this:
http://localhost:{port}/blog/{some-post-title}
Where {port} is the auto-determined port by your IIS Express and {some-post-title} represents the Title field of one of your Blog Posts
Note: Agility.Web will automatically convert a standard string like Title to strip out whitespaces and special characters and force a friendly, lowercase URL
Verify Module Output (...)
BREAK - 15 mins
Lab: Create a Listing Module
Creating a Listing Module
What we are going to do:
-
Create a new Module Definition called Blog Listing
- Add code to output the Module
- Add this module to our listing page (parent page of our dynamic page)
Creating a Listing Module Definition
- Go to Settings > Module Definitions and create a new definition
- In the Definition Details tab, enter the following values:
Title = Blog Listing
Reference Name = [auto-populate]
Description = Will list blog posts
Creating a Listing Module Definition (...)
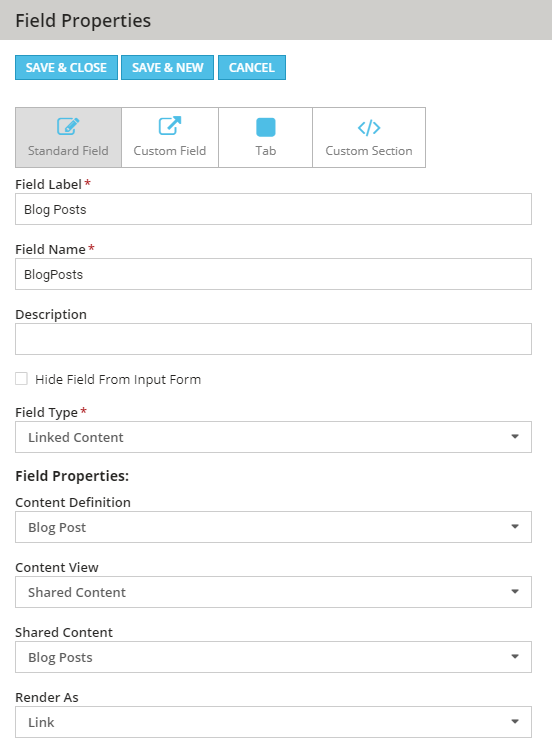
- On the Form Builder tab, add the following field types:
Title - Text - [Required]*
Blog Posts - Linked Content, Blog Post Definition, Blog Posts Shared Content - Render as "Link"
Creating a Listing Module Definition (...)
- On the Output Template tab, enter the following values:
Output Type = Partial View
PartialViewPath =
~/Views/Blog/BlogListing.cshtml
-
Save & Close the module definition
- Refresh your C# classes
Add Code for Listing Module
- Create the Partial View for the listing called "BlogListing.cshtml" and add this code:
@using Agility.Web.Objects;
@using MVC4SampleSite.Models
@model MVC4SampleSite.Models.Module_BlogListing

@* // Some Functions *@

@{
    //get the entire list of blog posts - the module already knows the type and reference name
    var posts = Model.BlogPosts.Items();

    //or another, more verbose way...
    posts = new AgilityContentRepository<BlogPost>("BlogPosts").Items();
}

@helper GetPostLink(BlogPost p, string dynamicPagePath)
{
        //returns a full href tag with the dynamic url slug for the page
        DynamicPageItem d = Data.GetDynamicPageItem(dynamicPagePath, p.ReferenceName, p.Row);
        Uri url = new Uri(
            VirtualPathUtility.ToAbsolute(
                String.Format(
                 "{0}/{1}",
                 dynamicPagePath.Substring(0, dynamicPagePath.LastIndexOf('/')),
                 d.Name
                ).ToLowerInvariant()
            ), UriKind.Relative
        );

        <a href="@url" title="@p.Title">@p.Title</a>
}

@* // Out Output *@

<h1>@Model.Title</h1>

@foreach (var p in posts)
{
    <div class="post-listing-item">
        <h3>@GetPostLink(p, "~/blog/post-dynamic")</h3>
        @if (p.Image != null)
        {
        <img src="@p.Image.URL?w=150" alt="@p.Image.Label" />
        }
        @Html.Raw(p.Details)
    </div>
}
Add Module to Listing Page
- Go to Pages and select the parent page of the dynamic page
- Add the Blog Listing module to page
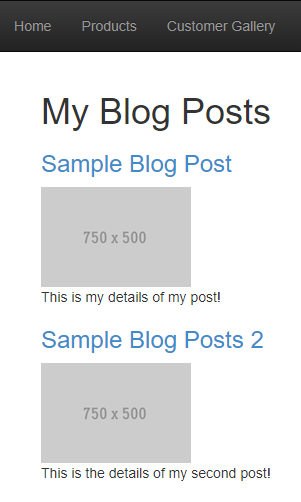
Verify Output
- Ensure you Build your website project
- Using localhost go to the listing page
Lab: Deploying your Website
Deploying your Website
What we are going to do:
- Import Publish Profile into the Visual Studio website project
- Verify web.config values
- Deploy the website using Web Deploy from Visual Studio
- Verify deployment
Import Publish Profile
- In Visual Studio, right-click on the project and click Publish
- Select Import Profile, then click Create Profile
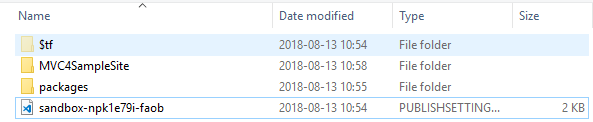
- Find and select the publish profile to import the credentials - found in the root source code directory:
"s/sandbox-{random-str}.publishsettings"
Verify Stage/Release Web.Config
- Ensure that DevelopmentMode is set to False
- Ensure the TraceLevel is set to Warning
<agility.web>
    <settings applicationName="Agility Sample MVC4 (Live)"
 developmentMode="false" contentCacheFilePath="d:\home\AgilityContent\" xdt:Transform="SetAttributes">
      <trace traceLevel="Warning" emailErrors="true" logFilePath="d:\home\AgilityLogs\SampleMVC4.log"
 xdt:Transform="SetAttributes" />
    </settings>
  </agility.web>
Publish Website
- In Visual Studio, right-click on the project and click Publish
- Select "sandbox-{random-str} - Web Deploy" as the publish option
- Click Publish
Verify Deployment
- If successful, Visual Studio will launch a new browser window of your deployed website
- Verify your latest code has been updated
- You will need to Publish Pages, and Content Items in order for them to appear
Deployment Best Practices
- Use a Continuous Integration and Deployment where possible
- Always deploy to a UAT/Stage website before deploying to production
In New/Preview + Roadmap
New: Agility Search
- Designed to replace Google Site Search and alternative to Bing Site Search
- Frequent crawls
- Control over index
- JS widget + intellisense for auto-complete
New: Agility .NET Core Support
- Cross-platform development and hosting
- 100% VS Code
- Asynchronous module rendering

New: Starter Templates w/.NET Core
Alpha: Agility Fetch API
- Alternative to using the .NET Sync SDK (Agility.Web)
- Get Sitemap, Pages, and Content via a high-availability API, backed by a CDN
-
JS SDK for browsers and node.js
- Supports JAM Stack (JS, API, Markups) apps, and any type of JS site
- Roadmap: Content Webhooks for events such as onSave and onPublish f