ReactJS

What is React?
- Component based library from Facebook
- Only handles your front-end UI
- Lightweight, performant , efficient, minimal code to accomplish amazing things
- Handles updates with Virtual DOM diffs
- Component heirarchy of data flowing downwards to children
Setting Up
npx i create-react-appWe can use a cli tool to setup our react project
React Components & ReactDOM.render()
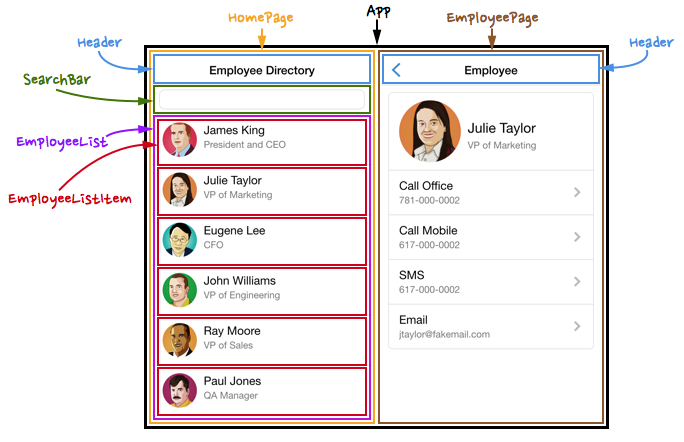
Very important to think of your entire UI as components.

The render() method is required and must return an element(s) to be rendered
class SimpleComponent extends React.Component{
  render() {
    return (
      React.createElement('h1', {className: 'hello'}, 'Hello React!!')
    );
  }
}
To create components in React, we can extend the React.Component class.
ReactDOM.render(
  React.createElement('h1', { className: "hello" }, 'Hello React!!'),
  document.getElementById("content")
);
React-dom gives us the render() method that acts as the main entry point for our components to render!
When compiled to the browser...
<body>
  <div id="content">
    <h1 class="hello">Hello React!!</h1>
  </div>
</body>
JSX
React comes with the ability to use JSX ( JavaScript syntax ) to render HTML elements.
Although JSX looks like HTML, it is very important to note that IT IS NOT HTML! It's an XML like language that compiles to JS!
JSX Examples
// attach function handlers
return (
  <Form
    onSubmit={this.handleSubmit}
  />
);

// conditional statements
return (
  { true ?
    <div>
      <h1>You can see me if state data exists</h1>
    </div>
   : null }
);

// comments
return (
  <Nav>
    { /* child comment wrapped by curly braces */}
  </Nav>
);

// boolean attr.
return (
  <input
    type="button"
    disabled={false}
  />
);

// style attr.
return (
  <div className="container">
  </div>
);
class SimpleComponent extends React.Component{
render() {
return (
<div className="container">
<h1 className="hello">Hello React!!</h1>
<div>
);
}
}
// Rendering SimpleComponent
ReactDOM.render(
<SimpleComponent/>,
document.getElementById("content")
);JSX to Render Components
When defining components, capitalize so that JSX will recognize as a component and not an HTML tag.
Nesting Components in JSX
class ChildComponent extends React.Component{
  render() {
    return (
      <div>
        <h1>Child Component</h1>
      </div>
    );
  }
}

class ParentComponent extends React.Component{
  render() {
    return (
      <div className="container">
        <ChildComponent/>
      </div>
    );
  }
}
Props
React uses props to pass values from the parent component to its children.
class ParentComponent extends React.Component{
  render() {
    return (
      <ChildComponent
        name="John" />
    );
  }
}

class ChildComponent extends React.Component{
  render() {
    return (
      <h1>My name is {this.props.name}!!</h1>
    );
  }
}
this.props.children give us all of the components children that it encompasses when used.
class ParentComponent extends React.Component{
  render() {
    return (
      <ChildComponent>
        {this.props.data}
      </ChildComponent>
    );
  }
}

class ChildComponent extends React.Component{
  render() {
    return (
      <div className="child-data">
        {/* Hello React!! */}
        {this.props.children}
      </div>
    );
  }
}

ReactDOM.render(
  <ParentComponent data="Hello React!">,
  document.getElementById("content")
);
Component State
Setting the state object allows us to store values in memory on the component that we can use or pass to children.
class SimpleComponent extends React.Component{
  constructor(props) {
    super(props);

    this.state = {
      email: ''  // setting initial state object
    }
  }

  render() {
    return (
      <div>
       <h2>{this.state.email}</h2>
      </div>
    );
  }
}
In order to add values to the state object, we use this.setState().
this.setState({numbers: [1, 2, 3]});And we can retrieve these values using this.state.
this.state.numbers // returns [1, 2, 3]// In constructor
this.state = {
numbers: []
}Event Handlers
React allows us to attach event handlers to our JSX elements.
class SimpleComponent extends React.Component{
  handleFullNameChange(event){
    // event.target.value gives input value
  }
  render(){
    return (
      <div>
        <form>
          <input
            type="text"
            name="full-name"
            placeholder="Full Name"
            onChange={this.handleFullNameChange}
        </form>
      </div>
    );
  }
}
Passing Prop Handlers to Children
class ParentComponent extends React.Component{
  handleEmailSubmit(){
    // submit email to server
  }
  render(){
    return(
      <ChildComponent
        onUserSubmit={this.handleEmailSubmit} />
    );
  }
}
class ChildComponent extends React.Component{
  getInitialState(){
    return { email: ''};
  }
  handleEmailChange(event){
    this.setState({email: event.target.value})
  }
  handleSubmit(){
    this.props.onUserSubmit({email: this.state.email})
  }
  render(){
    return(
      <form className="email-form" onSubmit={this.handleSubmit}>
        <input
          value={this.state.email}
          onChange={this.handleEmailChange}
      </form>
    );
  }
}
Iterators
JavaScripts functional array methods help us dynamically generate JSX.
Array.prototype.some()
Array.prototype.every()
Array.prototype.forEach()
Array.prototype.filter()
Array.prototype.map()
Array.prototype.filter()
Array.prototype.reduce()
...
class ChildList extends React.Component{
render(){
const user = this.props.userData;
return(
<div>
<h1>{user.firstName}</h1>
<h2>{user.email}</h2>
</div>
);
}
}
class ParentComponent extends React.Component{
render(){
const usersArray = this.state.data;
return(
<div>
{usersArray.map(function(user, idx){
return <ChildList key={idx} userData={user} />
})}
</div>
);
}
}Taking advantage of JavaScripts map array method and returning the ChildList component on each iteration.
Lifecycle Methods
class SimpleComponent extends React.Component{
  constructor(props) {
    super(props);

    this.state = {
      data: []
    };
  }
  componentWillMount() {
    fetch(/* some endpoint */)
      .then(response => {
        return response.json();
      })
      .then(fetchedData => {
        this.setState({ data: fetchedData });
      })
      .catch(err => {
        console.error(err.toString());
      });
  }
  render(){
    return (
      <div>{this.state.data}</div>
    );
  }
}
The optional componentWillMount() method is automatically invoked right before the component is rendered.
Another optional lifecycle method is componentDidMount(), invoked after the initial rendering of the component occurs
class SimpleComponent extends React.Component{
  constructor(props) {
    super(props);

    this.state = {
      data: []
    };
  }
  handleUpdates(){
    fetch(/* some endpoint */)
      .then(response => {
        return response.json();
      })
      .then(fetchedData => {
        this.setState({ data: fetchedData });
      })
      .catch(err => {
        console.error(err.toString());
      });
  }
  componentDidMount(){
    this.handleUpdates();
    setInterval(this.handleCommentUpdates, 3000);
  }
  render(){
    return (
      <div>{this.state.data}</div>
    );
  }
}