RSCSS
Part 1
RSCSS
Reasonable System for CSS Stylesheet Structure
Components
แยก UI ออกเป็นองค์ประกอบต่างๆ แต่ละชิ้นส่วนของ UI เป็น 1 Component
แต่ละ component จะตั้งชื่อโดยใช้ อย่างน้อย 2 คำ แยกกันด้วยขีดกลาง
- ปุ่มไลค์ (.like-button)
- กล่องค้นหา (.search-form)
- การ์ดบทความ (.article-card)
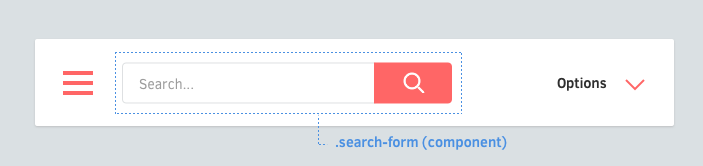
elements
Elements คือ ของที่อยู่ข้างใน Component
+ Element ที่อยู่ภายใต้ Component ชื่อของ Class ควรมีเพียง 1 คำ
การตั้งชื่อ ELEMENTS
.search-form > .field { /* ... */ }
.search-form > .action { /* ... */ }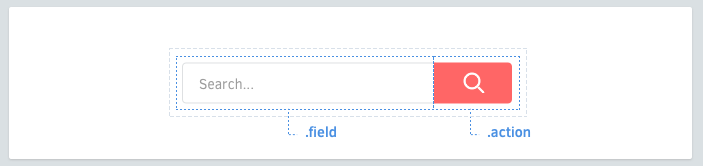
elements (cont.)
+ ถ้าทำได้ให้ใช้ > สำหรับ Child Selector (Element ที่ลึกลงไปแค่ชั้นเดียว) เพื่อป้องกันไม่ให้มันไปเลือก component ลึก ๆ และช่วยให้ได้ประสิทธิภาพดีกว่าด้วย
ELEMENT SELECTORS
.article-card .title     { /* okay */ }
.article-card  > .author  { /* ✓ better */ }
+ สำหรับชื่อ Class ที่ต้องยาว 2 คำหรือมากกว่า ให้เอาคำมาต่อกันเลย โดยไม่ต้องมีเส้นกลาง/เส้นใต้
ถ้าต้องใช้หลายคำ
.profile-box > .firstname { /* ... */ }
.profile-box > .lastname { /* ... */ }
.profile-box > .avatar { /* ... */ }
elements (cont.)
+ ใช้ Classname ไว้ก่อน ถึงแม้การใช้ Tag Selectors จะใช้ได้เหมือนกัน บางทีอาจจะมีปัญหาเรื่องประสิทธิภาพเล็กน้อย ตามมาโดยไม่รู้ตัว
ระวังการใช้ TAG SELECTORS
.article-card > h3    { /* ✗ avoid */ }
.article-card  > .name { /* ✓ better */ }
Element เดียวกัน ก็ใช่ว่าจะหน้าตาเหมือนกันหมด ให้ใช้ Variants ช่วย
VARIANTS
+ ชื่อ Class ของ Variants ให้ขึ้นต้นด้วยขีดกลาง
การตั้งชื่อ VARIANTS
.like-button-wide { /* ... */ }
.like-button-short { /* ... */ }
.like-button-disabled { /* ... */ }
VARIANTS (COnt.)
Varants ของ element ก็ใช้รูปแบบเดียวกัน
ELEMENT VARIANTS
.shopping-card > .title { /* ... */ }
.shopping-card > .title.-small { /* ... */ }- ช่วยให้เราไม่สับสนกับ Elements
- Class ใน CSS สามารถนำหน้าได้ด้วยตัวอักษร _ หรือ - เท่านั้น
- ขีดกลางพิมพ์ง่ายกว่าขีดล่าง
ทำไมใช้ขีดกลางนำหน้า
เราจะจัดการ Element ที่ซับซ้อนอย่างไร? จับมันซ้อนกัน?
COMPONENT ที่ซ้อนกัน
<div class='article-link'>
  <div class='vote-box'>
    ...
  </div>
  <h3 class='title'>...</h3>
  <p class='meta'>...</p>
</div>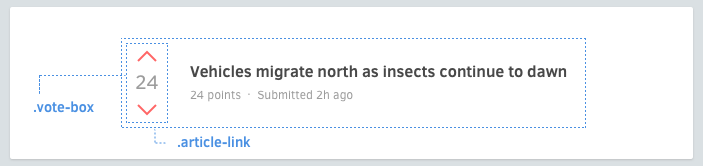
บางทีมันจำเป็นที่ต้องให้ Components กัน
COMPONENT ที่ซ้อนกัน (CONT.)
.article-header > .vote-box > .up { /* ✗ ระวังแบบนี้ */ }แต่ละ Component อาจจะต้องแสดงผลต่างออกไป ให้เหมือนมันไปอยู่ใน Component อื่น ให้ระวังการแก้ไข Component นั้นโดยการอ้างอิงผ่าน Component ที่อยู่ด้านนอก
VARIANTS
แทนที่จะทำแบบนั้น ให้ใช้วิธีเพิ่ม Variant เข้าไป แล้วใช้มันที่ Component ด้านใน
<div class='article-header'>
  <div class='vote-box -highlight'>
    ...
  </div>
  ...
</div>
.vote-box.-highlight > .up { /* ... */ }COMPONENT ที่ซ้อนกัน (CONT.)
<div class='search-form'>
  <input class='input' type='text'>
  <button class='search-button -red -large'></button>
</div>
บางครั้ง การซ้อน components จะทำให้ HTML ดูรก
การทำให้ COMPONENTS หลายชั้น ดูง่ายขึ้น
สามารถทำให้มันอ่านง่ายขึ้นได้ด้วยการใช้เทคนิค @extend (,) ใน CSS preprocessor
<div class='search-form'>
  <input class='input' type='text'>
  <button class='submit'></button>
</div>
.search-form > .submit ,
.search-button
.search-button.-red
.search-button.-large { /* ... */ }.search-form {
> .submit {
@extend .search-button;
@extend .search-button.-red;
@extend .search-button.-large;
}
}LAYOUTS
Components ควรออกแบบให้สามารถใช้ช้ำได้ในหลากหลายบริบท ให้ระวังการกำหนด Property เหล่านี้
ระวังการกำหนด PROPERTIES
- Positioning (position, top, left, right, bottom)
- Floats (float, clear)
- Margins (margin)
- Dimensions (width, height) *
LAYOUTS (CONTS.)
ให้ใช้เฉพาะ Element ที่มีความกว้าง ความสูงแน่นอน อย่าง Avatars หรือ Logos
การกำหนดขนาดตายตัว
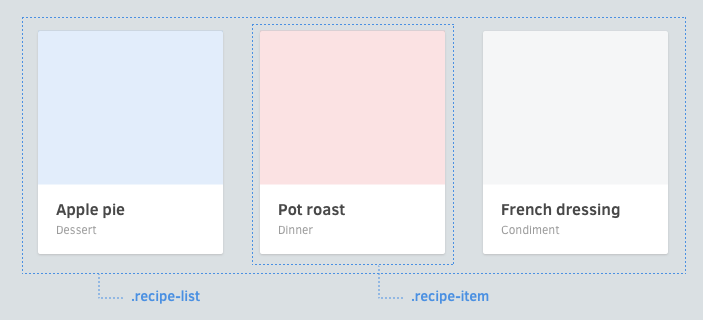
ถ้าต้องกำหนดตำแหน่ง พยายามเขียนให้อยู่ในบริบทที่มันอยู่ เช่น ในตัวอย่างข้างล่าง เราอ่านแล้วจะเดารู้เลยว่า width และ float เกิดขึ้นเฉพาะใน list ไม่เกี่ยวกับ component card
กำหนดตำแหน่งตาม COMPONENT ด้านนอก
.article-list > .article-card { width: 33.3%; float: left; }
.article-card { /* ... */ }
.article-card > .image { /* ... */ }
.article-card > .title { /* ... */ }
.article-card > .category { /* ... */ }
แล้วจะกำหนด Margins นอก Layout ได้อย่างไร?
HELPERS
โดยทั่วไป Class เหล่านี้จะหมายถึงการแทนที่ค่าบางอย่าง ให้เราแยกไฟล์ออกไป แลัวตั้งชื่อนำหน้าด้วยขีดล่าง class พวกนี้มักจะใส่ !important ไว้ด้วย ให้พยายามใช้เฉพาะที่จำเป็นจริง ๆ
ให้นำหน้าชื่อด้วยขีดล่าง จะช่วยให้เรามองออกอย่างรวดเร็วว่ามันไม่ได้เป็นส่วนกำหนดรูปแบบของ component นอกจากนั้นขีดล่างยังดูไม่สวยงาม ช่วยให้เราไม่อยากใช้มันบ่อย ๆ
การตั้งชื่อ HELPERS
<div class='order-graphs -slim _unmargin'>
</div>
._unmargin { margin: 0 !important; }
._center { text-align: center !important; }
._pull-left { float: left !important; }
._pull-right { float: right !important; }HELPERS (Cont.)
รวบรวม helpers ไว้เป็นไฟล์เดียว ตั้งชื่อว่า helpers แทนที่จะแยกมันเป็นหลายไฟล์ จะช่วยให้เรารักษาจำนวน helpers ให้มีอยู่น้อยที่สุด ไปในตัว
การจัดระเบียบ HELPERS