Appium Workshop
Selenium Conference 2017 - Berlin, Germany
@isonic1
justin.ison@gmail.com
Install Dependencies
-
Install Windows Dependencies.
-
Install Mac Dependencies.
-
Validate everything is installed correctly by running the test example listed these instructions.
Appium is an open-source tool for automating native, mobile web, and hybrid applications on iOS, Windows and Android platforms.
Importantly, Appium is "cross-platform": it allows you to write tests against multiple platforms (iOS, Android, Windows), using the same API. This enables code reuse between iOS, Windows and Android test suites.
Appium is at its heart a webserver that exposes a REST API. It receives connections from a client, listens for commands, executes those commands on a mobile device, and responds with an HTTP response representing the result of the command execution.
What is Appium?
Dan Cuellar was the Test Manager at Zoosk in 2011, when he encountered a problem. The length of the test passes on the iOS product was getting out of hand. Less testing was an option, but would come with additional risk, especially with it taking several days to get patches through the iOS App Store Review process. He thought back to his days working on websites and realized automation was the answer.
Dan thought, what if I could get the UIAutomation framework to run in real time like an interpreter? He looked into it and he determined that all he would need to do is find a way to receive, execute, and reply to commands from within a UIAutomation javascript program. Using the utility Apple provided for executing shell commands he was able to cat sequentially ordered text files to receive commands, eval() the output to execute them, and write them back to disk with python. He then prepared code in C# that implemented the Selenium-style syntax to write the sequentially ordered javascript commands. iOSAuto is born.
History of Appium
Selenium Conference 2012: On the second day of the conference, Dan stepped up on stage to give the lightning talk. Jason Huggins, co-creator of Selenium, moderated the lightning talks. Dan experienced technical difficulties getting his presentation to load, and Jason nearly had to move on to the next lightning talk. At the last moment, the screen turned on and Dan jumped into his presentation. He explained the details of his implementation and how it worked, begged for contributors, and in five minutes it was over..
The Mobile Testing Summit: Jason decided that the project should be presented at the Mobile Testing Summit in November, but suggested that the project get a new name first. Many ideas were thrown out and they settled on AppleCart. A day later, while he was perusing some of Apple's guidance on copyright and trademarks, Jason noticed that under the section of examples for names Apple would defend its trademarks against, the first example was "AppleCart". He called Dan and informed him of the situation, and they brainstormed for a bit before Jason hit the jackpot. Appium... Selenium for Apps.
>>>>> Watch the Appium Intro Video <<<<<
Before We Start!
-
Download, clone or pull the latest changes from the appium-workshop repo .
-
Goto appium-workshop directory and run: bundle install
-
This workshop is meant to accommodate all skill levels, so we are starting from the very basics. If you are comfortable working ahead of the workshop pace, please do so. However, please DO NOT ask questions on a topic until the workshop is caught up to that point.
-
I will also try to answer all of your questions. If do not have an answer I will try my best to find it. I’ll follow up with the class later with an email to all unanswered questions.
-
Please take notes!
- Feedback to about the workshop would be much appreciated!
- What I can improve upon.
- Anything that didn't make sense to you.
- What you thought I did well.
- What you'd like me to go more in-depth into.
Lets Get Started!
The Appium Desktop
- Start the Appium Desktop client by double-clicking the Appium icon on your desktop.
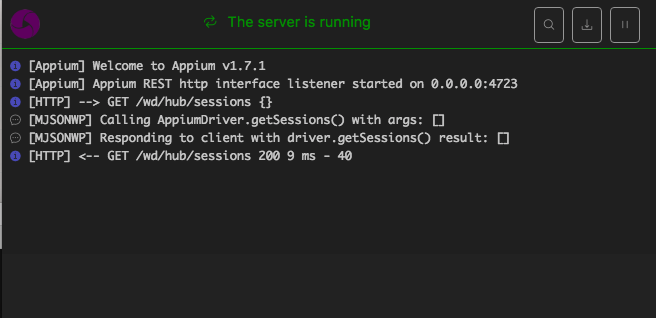
- Click the "Start Server" button.
- You should see "The server is running" message.
- Click the "Start Inspection Session" button.

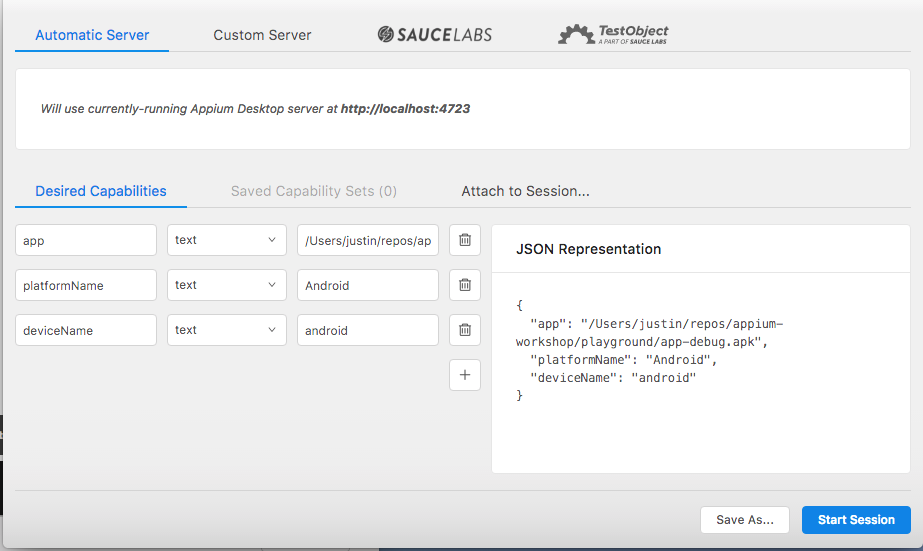
Lets add our Capabilities
- Go ahead and add the capabilities below.
- Make sure to set the app path to your machine.
- Mac: /Users/<your-user-name/appium-workshop/playground/app-debug.apk
- Windows: C:\Users\<your-user-name>\appium-workshop\playground\app-debug.apk
- Click the "Start Session" button.
-
What did the Appium Desktop just do?
- It started a new Appium session with the following server capabilities:
- --platform-name "Android"
- --app "/Users/<your_username>/appium-workshop/playground/app-debug.apk"
- --device-name "android"
- See full list of capabilities here
- Go ahead and explore the inspector. Notice the hierarchy of the elements and elements are highlighted when clicked.
-
See how the inspector breaks down the element hierarchy.
- Interact with the test app by clicking buttons and sending keys.
- You may need to Click the refresh button occasionally for the GUI to display what the app is displaying.
- Click the Record button. You should see a new Recorder area appear in the middle of the app.
- Switch the language to Ruby in the drop-down.
- Click the Show/Hide boilerplate button to show the boilerplate.
- Click the Refresh button to make sure it displays the current view.
-
Ok! Now let's create a test to trigger the Alert popup. Note: You may need to click the Refresh button after every step.
- Tap the Hamburger button. (Note: This may not tap via the Inspector. )
- Tap the Alerts menu button.
- Tap the ALERT button.
- Tap the OK button.
- Tap the Hamburger button.
- Tap the Home button.
- Click the "Copy code to clipboard" button.
- Create a new file in the playground directory named "alert.rb" and paste the code inside of it.
Let's record a test!
alert.rb
# This sample code uses the Appium ruby client
# gem install appium_lib
# Then you can paste this into a file and simply run with Ruby

require 'rubygems'
require 'appium_lib'

caps = {}
caps["app"] = "/Users/justin/repos/appium-workshop/playground/app-debug.apk"
caps["platformName"] = "Android"
caps["deviceName"] = "android"
opts = {
    sauce_username: nil,
    server_url: "http://localhost:4723/wd/hub"
}
driver = Appium::Driver.new({caps: caps, appium_lib: opts}).start_driver

el1 = driver.find_elements(:accessibility_id, "ReferenceApp")
el1.click
el2 = driver.find_elements(:xpath, "(//android.widget.TextView[@content-desc=\"Row Category Name\"])[7]")
el2.click
el3 = driver.find_elements(:id, "com.amazonaws.devicefarm.android.referenceapp:id/notifications_alert_button")
el3.click
el4 = driver.find_elements(:id, "android:id/button1")
el4.click
el5 = driver.find_elements(:accessibility_id, "ReferenceApp")
el5.click
el6 = driver.find_elements(:xpath, "(//android.widget.TextView[@content-desc=\"Row Category Name\"])[1]")
el6.click

driver.quit- Your test should look close to this.
Let's try running it...
- Restart/Start the Appium Desktop server if it's not already.
- Navigate to the playground directory in terminal (cd ~/appium-workshop/playground) or PowerShell (cd C:\Users\<your-user-name>\appium-workshop\playground).
- Run: ruby alert.rb
- Did it run? Probably, not...
UI Automator Viewer
Analyze the UI components of an android application
- Open a terminal or PowerShell window
- Windows run: uiautomatorviewer
- Mac run: $ANDROID_HOME/tools/bin/uiautomatorviewer
- Open the test application (Reference App) on the emulator or mobile device.
- Click the Compressed Hierarchy view button.
- Now let's step through each action in alert.rb and get better locators.
- Open alert.rb in Sublime.
Bad Xpath, Bad!
- Xpath leads to flaky and unreliable tests. These are index based and your UI hierarchy will shift whenever a UI element is added or removed.
- Use resource-id instead, which is :id in Selenium. These are much less likely to change in the future.
-
What to do if you don't have a resource-id ?
- Ask a developer to add one for the object you need to interact with.
- If available, use content-desc as :accessibility_id too. It's the Accessibility ID and an even better locator to use. However, in this workshop, we'll keep it as :id always.
- Notice Appium Desktop used find_elements. This is not correct and we need to change these to find_element. Go ahead and change all of them in alert.rb.
- Let's change all our xpath locators to :id's or :accessibility_id. Using the uiautomatorviewer select each element and get it's resource-id.
- On the Alert side menu step. Here is where I'll contradict myself a bit. I've told you to use resource-id when one is available. However, in this case, each menu option has the same resource-id locator. Take a look for yourself in the uiautomatorviewer.
-
We have options!
- Since the only uniqueness is the element text, we can use that. Although, text is not ideal to use, especially if you're automating a multi-language application.
- appium_lib has a very handy method to search for elements by text, and rightly named "text".
- Remove the entire xpath line and change it to text("Alerts").click. We will go in-depth more on this later.
- Tapping the ALERT button should now be: (:id, "com.amazonaws.devicefarm.android.referenceapp:id/notifications_alert_button")
- Tapping the OK button should now be: (:id, "android:id/button1") or text("OK")
- Reuse the same Hamburger click above. e.g. (:id, "ReferenceApp")
- Tapping the Home menu button should now be: text("Home").click
- Save the alert.rb script.
require 'rubygems'
require 'appium_lib'

capabilities = {
	'platformName': 'Android',
	'deviceName': 'android',
	'app': '/Users/<your name>/appium-workshop/playground/app-debug.apk',
}

server_url = "http://0.0.0.0:4723/wd/hub"

Appium::Driver.new(caps: capabilities).start_driver
Appium.promote_appium_methods Object

find_element(:id, "ReferenceApp").click
scroll_to "Alerts"
text("Alerts").click
find_element(:id, "com.amazonaws.devicefarm.android.referenceapp:id/notifications_alert_button").click
find_element(:id, "android:id/button1").click
find_element(:id, "ReferenceApp").click
text("Home").click
driver_quit
Assertions!
- Ok, Great! We have some things automated, but now we want to know if the app does what it should.
-
We need to add Rspec to do our assertions.
- Copy the alert.rb file to the spec folder in playground.
- Rename alert.rb to alert_spec.rb.
- Open alert_spec.rb in Sublime.
Lets setup RSpec!
Ruby Specification
- First we need to require rspec. Add require 'rspec' at the top of alert_spec.rb.
- Next we need to define our Describe and Scenario blocks.
- We need to add our setup methods. We will place these in our before(:each) block.
- Next we need to add test steps and our assertion. This will be placed in the "it" block.
- Finally, we need to add our teardown methods. We will place these in our after(:each) block.
- See next slide for example.
alert_spec.rb
require 'appium_lib'
require 'rspec'

describe 'Click Alert Popup' do

  before(:each) do
    capabilities = {
        'platformName': 'Android',
	'deviceName': 'android',
	'app': '/Users/<your name>/appium-workshop/playground/app-debug.apk'
    }
    server_url = "http://0.0.0.0:4723/wd/hub"
    Appium::Driver.new(caps: capabilities).start_driver
    Appium.promote_appium_methods Object
  end

  it 'Clicks popup and returns to Home view' do
    find_element(:id, "ReferenceApp").click
    scroll_to "Alerts"
    text("Alerts").click
    find_element(:id, "com.amazonaws.devicefarm.android.referenceapp:id/notifications_alert_button").click
    find_element(:id, "android:id/button1").click
    find_element(:id, "ReferenceApp").click
    scroll_to "Home"
    text("Home").click
  end

  after(:each) do
    driver_quit
  end

end
Let's run again...
- Start the Appium server.
- Goto the spec directory in playground. We have a new runner command now, rightly named "rspec".
- From the command line, run: rspec alert_spec.rb
- You should see "1 example, 0 failures" returned.
- Raise your hand if you do not see this.
That's great! but... What's wrong with this?
-
For one, we need to add an assertion. Basically, rspec ran and completed because it didn’t encounter a assertion failure, or an error.
- An error can be anything that occurs between steps that prevents another step.
- Lets add the assertion. We want to validate the app returns to the home screen and displays text "Homepage". We will use the ".text" method to accomplish this.
-
Open uiautomatorviewer again. Lets get the resource-id for the Homepage title.
- The :id is 'com.amazonaws.devicefarm.android.referenceapp:id/toolbar_title'
-
Add the following below text("Home").click
- home_page_text = find_element(:id, "com.amazonaws.devicefarm.android.referenceapp:id/toolbar_title").text
- expect(home_page_text).to eq "Homepage"
alert_spec.rb
require 'appium_lib'
require 'rspec'

describe 'Click Alert Popup' do

  before(:each) do
    capabilities = {
        'platformName': 'Android',
	'deviceName': 'android',
	'app': '/Users/<your name>/appium-workshop/playground/app-debug.apk'
    }
    server_url = "http://0.0.0.0:4723/wd/hub"
    Appium::Driver.new(caps: capabilities).start_driver
    Appium.promote_appium_methods Object
  end

  it 'Clicks popup and returns to Home view' do
    find_element(:id, "ReferenceApp").click
    text("Alerts").click
    find_element(:id, "com.amazonaws.devicefarm.android.referenceapp:id/notifications_alert_button").click
    find_element(:id, "android:id/button1").click
    find_element(:id, "ReferenceApp").click
    text("Home").click
    home_page_text = find_element(:id, "com.amazonaws.devicefarm.android.referenceapp:id/toolbar_title").text
    expect(home_page_text).to eq "Homepage"
  end

  after(:each) do
    driver_quit
  end

end
Lets run it again...
- Start the Appium Desktop server
- Goto the spec directory in playground.
- From the command line, run: rspec alert_spec.rb
- You should see "1 example, 0 failures" returned.
- Ok, same as before but this time it actually validated something. But… we still don't really know it did.
- In the alert_spec.rb, change the expected text from "Homepage" to "OMG WHERE AM I”.
- This is good practice. Always test your tests!
- From the command line, run: rspec alert_spec.rb
-
This time we should get:
- Failure/Error: expect(home_page_text).to eq "OMG WHERE AM I" got: "Homepage"
- 1 example, 1 failure
- Raise your hand if you did not get this.
Awesome! What else is wrong with this?
- We are doing actions outside of the scope of the test.
- The scenario is to "Click Alert Popup" so we really shouldn’t do any more steps after we click the popup.
- Also, we should change the describe to be more specific to the Alert and Dialogs page.
- We should split these into two tests!
Test Refactor
- Create a new file named home_spec.rb in the playground spec folder.
- Copy and paste the contents from alert_spec.rb into home_spec.rb.
- Lets change the describe to: "Home Page".
- Change the "it" block to: "Should Display Correct Text"
- Remove all test steps up to where we get the home title text. e.g. leave the last two steps inside the “it” block.
- Change the expect text back to "Homepage"
- In the alert_spec.rb.
- Change the describe to: "Alerts Page"
- Change the "it" block to: "Should Display Alert Popup"
- Remove everything after: find_element(:id,"com.amazonaws.devicefarm.android.referenceapp:id/notifications_alert_button").click
- Now we need to add an assertion for the alerts_spec.
-
Open uiautomatorviewer again. Lets get the resource-id’s for the Alert popup title and message.
- The title :id is "android:id/alertTitle"
- The message :id is "android:id/message"
-
Lets add the expects for these:
- expect(find_element(:id, "android:id/alertTitle").text).to eq "Alert Title"
- expect(find_element(:id, "android:id/message").text).to eq "This is the alert message"
alert_spec.rb
require 'appium_lib'
require 'rspec'

describe 'Alerts Page' do

  before(:each) do
    capabilities = {
        'platformName': 'Android',
	'deviceName': 'android',
	'app': '/Users/<your name>/appium-workshop/playground/app-debug.apk'
    }
    server_url = "http://0.0.0.0:4723/wd/hub"
    Appium::Driver.new(caps: capabilities).start_driver
    Appium.promote_appium_methods Object
  end

  it 'Should Display Popup' do
    find_element(:id, "ReferenceApp").click
    scroll_to "Alerts"
    text("Alerts").click
    find_element(:id, "com.amazonaws.devicefarm.android.referenceapp:id/notifications_alert_button").click
    expect(find_element(:id, "android:id/alertTitle").text).to eq "Alert Title"
    expect(find_element(:id, "android:id/message").text).to eq "This is the alert message"
  end

  after(:each) do
    driver_quit
  end

end- alert_spec should look like this.
home_spec.rb
require 'appium_lib'
require 'rspec'

describe 'Home Page' do

  before(:each) do
    capabilities = {
        'platformName': 'Android',
	'deviceName': 'android',
	'app': '/Users/<your name>/appium-workshop/playground/app-debug.apk'
    }
    server_url = "http://0.0.0.0:4723/wd/hub"
    Appium::Driver.new(caps: capabilities).start_driver
    Appium.promote_appium_methods Object
  end

  it 'Should Display Correct Text' do
    home_page_text = find_element(:id, "com.amazonaws.devicefarm.android.referenceapp:id/toolbar_title").text
    expect(home_page_text).to eq "Homepage"
  end

  after(:each) do
    driver_quit
  end

end- home_spec should look like this.
We have two specs now!
Lets run them!
- Start your Appium server. (if it’s not already)
- On the command line, go back/up one directory to the playground dir.
- Run: rspec spec
- This should have ran both specs. You should see: 2 examples, 0 failures
- Raise your hand if you didn’t get this.
What else is wrong with this?
We have some code duplication!
- Thankfully, rspec has something for this called spec_helper.
- Create a new file in playground/spec named spec_helper.rb.
- Lets take our before(:each) from the home and alert specs and put these in a "config.before :each do" block of the spec_helper.rb.
- Lets put the driver.quit in the "config.after :each do" block on the spec_helper.
- Then remove these before and after blocks from each spec.
-
Add require "spec_helper" to the top of each spec.
- This should be the only require for each spec.
- See next slides for examples.
spec_helper.rb
require 'appium_lib'
require 'rspec'

RSpec.configure do |config|
  config.color = true
  config.tty = true
  config.formatter = :documentation

  config.before :all do

  end

  config.before :each do
    capabilities = {
	'platformName': 'Android',
	'deviceName': 'android',
	'app': '/Users/<your user>/appium-workshop/playground/app-debug.apk',
    }
    server_url = "http://0.0.0.0:4723/wd/hub"
    Appium::Driver.new(caps: capabilities).start_driver
    Appium.promote_appium_methods Object
  end

  config.after :each do |e|
    driver_quit
  end

  config.after :all do

  end
end- spec_helper.rb should look like this.
home_spec.rb
require 'spec_helper'

describe 'Home Page' do

  it 'Should Display Correct Text' do
    home_page_text = find_element(:id, 'com.amazonaws.devicefarm.android.referenceapp:id/toolbar_title').text
    expect(home_page_text).to eq "Homepage"
  end

end
alert_spec.rb
require 'spec_helper'

describe 'Alerts Page' do

  it 'Should Display Alert Popup' do
    find_element(:id, 'ReferenceApp').click
    scroll_to "Alerts"
    text("Alerts").click
    find_element(:id, 'com.amazonaws.devicefarm.android.referenceapp:id/notifications_alert_button').click
    expect(find_element(:id, 'android:id/alertTitle').text).to eq "Alert Title"
    expect(find_element(:id, 'android:id/message').text).to eq "This is the alert message"
  end

end
Appium.txt
- There is one more thing we can do to clean things up a bit. We can create a appium.txt file to store our capabilities.
- In the playground directory, run: arc setup android <- This creates a appium.txt file.
- Open appium.txt in sublime.
- Set the capabilities in appium.txt like below:
- In the spec_helper.rb remove the capabilities hash.
-
Replace the capabilities hash with the below in the before(:each) block:
- caps = Appium.load_appium_txt file: "appium.txt"
- Remove the server_url line as well. By default appium will point to this url.
- See example in next slides.
[caps]
platformName = "ANDROID"
deviceName = "android"
app = "/Users/<your name>/appium-workshop/playground/app-debug.apk"

[appium_lib]
sauce_username = false
sauce_access_key = false
spec_helper.rb
require 'appium_lib'
require 'rspec'


RSpec.configure do |config|
  config.color = true
  config.tty = true
  config.formatter = :documentation

  config.before :all do

  end

  config.before :each do
    caps = Appium.load_appium_txt file: 'appium.txt'
    Appium::Driver.new(caps).start_driver
    Appium.promote_appium_methods Object
  end

  config.after :each do |e|
    driver_quit
  end

  config.after :all do

  end
end
Lets Run The Specs
- Start the appium Desktop server if not already.
- From the playground directory, run: rspec spec
-
You should now see a much nicer output detailing what was tested.
- This is set from the config.color and config.formatter in spec_helper.rb.
- Raise your hand if you didn’t see this.
Metadata
- Tests aren't a lot of help unless you capture good metadata!
-
Lets capture some for our tests.
- Screenshots
- Logs
Screenshots!
- Lets add the command to capture a screenshot at the end of each test.
- The best place to put this is in the spec_helper.rb and inside the after(:each) block.
- First we need to figure the name of the screenshot. The test name makes the most sense!
- Update your config.after :each block to look like the below.
- This will take a screenshot after each test regardless of pass or fail.
-
FYI - If you only want a screenshot on failure you can use a "unless".
- e.g. screenshot "./output/#{test}.png" unless e.exception.nil?
  config.after :each do |e|
    test = e.description.gsub(" ","_")
    screenshot "./output/#{test}.png"
    driver_quit
  end
Lets Run the Specs
- Start the appium Desktop server.
- From the playground directory, run: rspec spec
- After the tests are finished you should see two screenshots named after each test in the output folder.
- Raise your hand if you don't see this.
Logs
- In a shell or terminal, run: adb logcat -v long
- That will print out the log output of your android devices. the "-v long" makes it a bit nicer and easier to read.
-
This is great information to capture for your tests! Especially, since sometimes errors occur that aren't seen in the UI.
-
So lets add some methods to start capturing the log output at test start and stopping at test end.
-
Add the methods below (for your specific platform). You should put these below the last end in the spec_helper.rb:
- Update your spec_helper.rb to look like it is on the next slide. For windows systems make sure you replace it with the method above and same for mac.
- Note: The Appium server can capture logcat for you. However, I think it's good knowledge to know to do this yourself. You might also want to filter or exclude captured content.
def start_logcat test
  pid = spawn("adb logcat -v long", :out=>"./output/logcat-#{test}.log")
  ENV["LOGCAT"] = pid.to_s
end

#for mac
def stop_logcat
  `kill #{ENV["LOGCAT"]} >> /dev/null 2>&1`
end

#for windows
def stop_logcat
  system("taskkill /f /pid #{ENV["LOGCAT"]} > NUL")
end
require 'appium_lib'
require 'rspec'
RSpec.configure do |config|
config.color = true
config.tty = true
config.formatter = :documentation
config.before :all do
end
config.before :each do |e|
caps = Appium.load_appium_txt file: 'appium.txt'
Appium::Driver.new(caps).start_driver
Appium.promote_appium_methods Object
test = e.description.gsub(" ","_")
start_logcat test
end
config.after :each do |e|
test = e.description.gsub(" ","_")
screenshot "./output/#{test}.png"
stop_logcat
driver_quit
end
config.after :all do
end
end
def start_logcat test
pid = spawn("adb logcat -v long", :out=>"./output/logcat-#{test}.log")
ENV["LOGCAT"] = pid.to_s
end
def stop_logcat
`kill #{ENV["LOGCAT"]} >> /dev/null 2>&1`
endLets Run the Specs
- From the playground directory, run: rspec spec
- After the tests are finished you should see two logs named for each test in the output folder.
- Raise you hand if you don't see this.
Reporting
- Tests are worthless without good reporting! That is why we are going to use Allure.
- Allure is a cross-platform reporting framework that lets you attach files (metadata).
- Lets go ahead and (require "allure-rspec") at the top of spec_helper.rb. Then we will add the appropriate allure hooks. This should should be added below our logcat methods.
def start_logcat test
  pid = spawn("adb logcat -v long", :out=>"./output/logcat-#{test}.log")
  ENV["LOGCAT"] = pid.to_s
end

def stop_logcat
  `kill #{ENV["LOGCAT"]} >> /dev/null 2>&1`
end
#Add below these methods...

AllureRSpec.configure do |config|
  config.include AllureRSpec::Adaptor
  config.output_dir = "./output/allure"
  config.clean_dir = true
end
require 'appium_lib'
require 'rspec'
require 'pathname'
require 'allure-rspec'
RSpec.configure do |config|
config.color = true ...
...  ENV["LOGCAT"] = pid.to_s
end

def stop_logcat
  `kill #{ENV["LOGCAT"]} >> /dev/null 2>&1`
end

AllureRSpec.configure do |config|
  config.include AllureRSpec::Adaptor
  config.output_dir = "./output/allure"
  config.clean_dir = true
end
spec_helper.rb top
spec_helper.rb bottom
Lets Run the Specs
- From the playground directory, run: rspec spec
- After the tests are finished you should see a new folder in the output directory named allure with some xml files in it.
- Raise you hand if you don't see this.
-
Lets generate the report!
- From the command line, run: allure report generate output/allure
- Then run: allure report open
- Raise you hand if the report did not open.
- Go ahead and click the menu buttons on the left side and see the report details.
- On the XUnit screen you can see your tests here. By default it shows only the failed tests. You can , however, change this by clicking the Passed tab.
- Something is missing, though. The test data we generated!
Attaching Files to Allure
- Now we need to attach the files to the report.
- First we need to get the files to attach.
- Update your config.after :each block in spec_helper.rb to look like the below.
- As you can see the spec_helper.rb is becoming large and messy. We’ll fix this later.
  config.after :each do |e|
    test = e.description.gsub(" ","_")
    screenshot "./output/#{test}.png"
    stop_logcat
    files = Dir.entries("./output/").grep(/#{test}/)
    files.each { |file| e.attach_file("File:", File.new("./output/#{file}")) } unless files.empty?
    driver_quit
  end
Let's run the Specs
- From the playground directory, run: rspec spec
-
Lets generate the report!
- From the command line, run: allure report generate output/allure
- Then run: allure report open
- Click the XUnit button (left side) and then the Passed tab (right side).
- Then click any of the tests to view the results. Notice the screenshot and log files that are now attached to the report.
- Raise you hand if you don't see this.
Interactive Ruby (IRB)
REPL (read–eval–print loop)
- We are going to see a new way of finding elements without having to use the Appium Desktop Inspector or the uiautomatorviewer.
-
From the command line in playground directory, run: arc
- This should put you into the appium console and start the app on the emulator/device.
- Make sure appium server and android device/emulator are connected first.
- Raise your hand if you don't see this.
Finding Elements
- Thankfully, appium_lib has a lot of really nice helper methods baked into it.
-
To name a few:
- get_source <- This returns you xml of page elements. Hard to read, though.
- page <- parses the get_source xml and returns a nice printout of the elements.
- buttons <- returns an array of "android.widget.ImageButton" class type.
- texts <- returns an array of "android.widget.TextView" class type.
- textfields <- returns an array of "android.widget.EditText" class type.
- back <- This will tap the android back button. Use this carefully.
- find_element <- A method to get a single element.
- find_elements <- Like find_element except it gets all elements with the same locators and returns an array.
- There are many more helper methods that can be found here.
-
Go ahead and play around with them and interact with the app in realtime.
- Get the name of a element by doing: texts.first.text or buttons.first.text
- texts.each { |e| puts e.text } <- prints all "android.widget.TextView" types.
- buttons.each { |e| puts e.text } <- prints all "android.widget.ImageButton" types.
- Run: page
- Get the :id of an element, then do a find_element(:id, "<the locator>").click or .text
- You can also do a .methods to see whats available for the selenium object. e.g. find_element(:id, "<the locator>").methods.
- If you are getting a method by the :id locator. You can also use a helper method named "id". e.g. id("android:id/content").click instead of find_element(:id, "<the locator>").click
Lets Create Another Test
- Create a new file in the spec folder and name it "crash_spec.rb".
- Copy the contents of alert_spec.rb file and put it into the crash_spec.rb and save.
- Rename describe to "Crash Page and the "it" block to "Click Crash Button".
-
Using the "page" method, get the elements for below steps.
- You need the hamburger button :id, which we already have.
- Click the "Crash/Bug" menu button.
- Click the CRASH button.
- Now set an assertion. e.g. expect(texts.last.text).to eq "Pressing this button will crash the app"
- The app of course is going to crash, but this good! We’ll then have the logcat output included in our test report to help debug the issue!
- Exit out of appium_console by typing: driver.quit and exit.
crash_spec.rb
require 'spec_helper'

describe 'Crash Page' do

  it 'Click Crash Button' do
    find_element(:id, 'ReferenceApp').click
    text("Crash/Bug").click
    find_element(:id, 'com.amazonaws.devicefarm.android.referenceapp:id/crash_button').click
    expect(texts.last.text).to eq "Pressing this button will crash the app"
  end

end- crash_spec.rb should look like this.
Lets Run the Specs
- From the playground directory, run: rspec spec/crash_spec.rb
- Only the crash_spec test should have run and thus the app crashed.
-
Lets generate the report!
- From the command line, run: allure report generate output/allure
- Then run: allure report open
- Click the XUnit button (left side) and then the Passed tab (right side).
- Click the test to view the results. The screenshot and log files should be attached.
- Raise your hand if you don't see this.
Gestures
- A lot of apps use gestures to enable/disable or perform specific actions.
- From the command line in playground directory, run: arc
-
Navigate the app to the Input Controls page. Then scroll to the right until your reach the Gesture tab.
- Extra credit if you can do this using IRB!
- There are a ton of different gestures we can do, but we’ll only go through a few.
Common Gestures
-
Lets get the element :id for the Swipe Here box.
- run: page
- Looks like we can use: id("Gesture Action Pad")
-
A Tap: A basic tap/click
- id("Gesture Action Pad").click
- Notice the output on the screen tells you what actions were just made. You should see Down, Show Press, Single Tap Up, Single tap confirm.
-
This is the same as:
- button = id("Gesture Action Pad").location.to_h <- Creates a location hash.
- button.merge!(fingers: 1) <- the "!" writes it to the button hash.
- Appium::TouchAction.new.tap(button).release.perform
-
Long Press: Tap and hold an element for 2 seconds
- button = id("Gesture Action Pad").location.to_h
- button.merge!(fingers: 1, duration: 2000)
- Appium::TouchAction.new.long_press(button).release.perform
-
Swipe Up:
- start = id("Gesture Action Pad").location.to_h
- finish = text("Gestures").location.to_h
- Appium::TouchAction.new.press(start).wait(200).move_to(finish).release.perform
-
Swipe Left:
- start = text("Submit Button").location.to_h
- finish = text("Gestures").location.to_h
- Appium::TouchAction.new.press(start).wait(200).move_to(finish).release.perform
-
Swipe Down: Pull to Refresh
- Navigate to the Pull to Refresh tab.
- start = text("Pull To Refresh").location.to_h
- start[:y] = start[:y] + 100
- finish = id("com.amazonaws.devicefarm.android.referenceapp:id/input_refresh_display").location.to_h
- Appium::TouchAction.new.press(start).wait(2000).move_to(finish).release.perform
-
Swipe Up:
- start = id("Gesture Action Pad").location.to_h
- finish = text("Gestures").location.to_h
- Appium::TouchAction.new.press(start).wait(200).move_to(finish).release.perform
-
Scroll To:
- Tap the Hamburger/menu button.
- Make sure the menu is at the top. e.g. You see the Home menu option.
- scroll_to "Fixtures" <- Appium will scroll until it finds the text "Fixtures"
- Lets play around with some common controls you will most likely have to use.
-
Text Input:
- Move app to the Input Controls > Text Field view.
- type "page" to get the page elements.
-
Look for a class name of "android.widget.EditText".
- Get the :id for this field. e.g. "com.amazonaws.devicefarm.android.referenceapp:id/input_edit_text"
-
Now lets type in the text field.
- id("com.amazonaws.devicefarm.android.referenceapp:id/input_edit_text").send_keys "HELLO\n" <- The \n creates a new line.
- Go ahead and play around with this control.
- Raise your hand if you have any questions or issues.
- Checkboxes:
-
Move app to the Input Controls > Checkbox view.
- run: page
- Look for the class name of "android.widget.CheckBox".
- Get the :id for the checkbox. e.g. "com.amazonaws.devicefarm.android.referenceapp:id/input_checkbox".
-
Now lets check it!
- id("com.amazonaws.devicefarm.android.referenceapp:id/input_checkbox").click
- Test if it's checked, run: id("com.amazonaws.devicefarm.android.referenceapp:id/input_checkbox").attribute("checked") <- Should return true.
- Radio Buttons:
-
Move app to the Input Controls > Radion Buttons view.
- Run: page
- Look for the class name of "android.widget.RadioButton"
- Get the :id for one of the Web Radio button. e.g. "com.amazonaws.devicefarm.android.referenceapp:id/radio_button_2"
- Now lets select it!
- id("com.amazonaws.devicefarm.android.referenceapp:id/radio_button_2").click
-
Lets verify it’s selected!
- id("com.amazonaws.devicefarm.android.referenceapp:id/radio_button_2").attribute("checked") <- this should return true
Waits
- appium_lib has a nice helper method to wrap a wait on locator finders.
- Lets test this out!
- In appium_console/arc terminal run: id("DOES NOT EXIST") <- Notice it returns an error right away saying it cannot find the element. This would be pretty annoying if it did exist but just hadn’t loaded yet.
-
The wait method.
- wait(5) { id("DOES NOT EXIST") } <- Notice this now waits for 5 seconds.
-
Lets try this with an element on another page.
- Start on the Homepage of the app.
- Type wait(60) { id("com.amazonaws.devicefarm.android.referenceapp:id/notifications_alert_button") } <- this is the alert popup button locator on the Alerts and Dialog page.
- The Appium session is now waiting 60 seconds until it can find that element.
- Navigate the app the Alerts and Dialog page. Notice Appium returns the element once you navigate to the Alerts and Dialog page.
- Raise your hand if you don't see this.
Global Implicit Wait
- Open appium.txt file in sublime.
-
Under the [appium_lib] section. Set the below:
- wait = 30
- Now when Appium starts it gets this value and sets a global implicit wait on finding locators.
- 30 seconds it quite long, but as you get more comfortable with waits and finding elements, you can remove the global implicit wait and set only explicit ones.
appium.txt
- appium.txt should look like this.
[caps]
platformName = "ANDROID"
deviceName = "android"
app = "/Users/<your name>/appium-workshop/playground/app-debug.apk"
appPackage = ""

[appium_lib]
wait = 30
sauce_username = false
sauce_access_key = false
Mobile Web
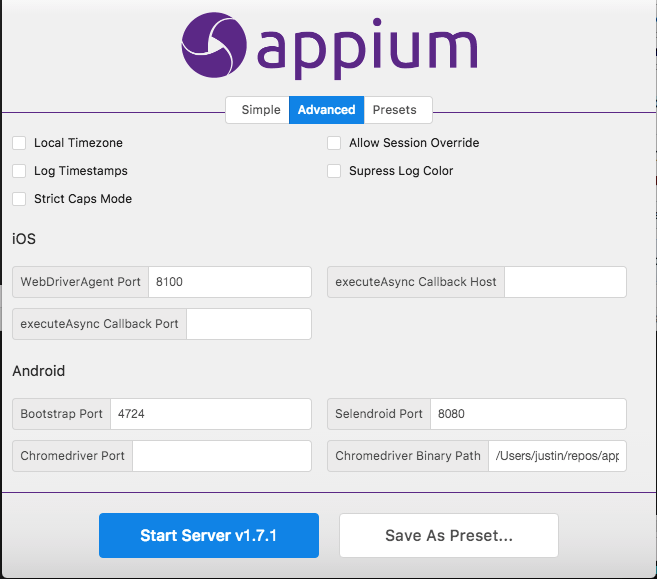
- Stop the Appium Desktop Server
- Click the Advanced menu tab.
- Scroll down until you see the "Chromedriver Binary Path" field. Set the chromedriver binary for your platform.
- Windows: C:\Users\<your_username>\appium-workshop\playground\chromedriver\windows\2.20-chromedriver.exe
- Mac: Users/<your_username>/appium-workshop/playground/chromedriver/osx/2.20-chromedriver
- Click the Start Server button.
Update the appium.txt file
- We need to tell Appium to launch a browser instead of an application.
- Cut and paste the below into the appium.txt file.
[caps]
platformName = "ANDROID"
deviceName = "android"
app = ""
browserName = "browser"

[appium_lib]
sauce_username = false
sauce_access_key = false- Open your mac terminal or PowerShell window and run: arc
- Raise your hand if you do not see google loaded on your emulator or device.
Let's explore a bit...
-
Click inside of the search field: id("sb_ifc0").click
-
Let's search for "Selenium Conference Berlin": driver.action.send_keys("Selenium Conference Berlin\n").perform
-
Click the first link: driver.find_element(:css, "div.ad_cclk").click
-
You should now be on the Selenium Conf Berlin home page. Raise your hand if you don't see this.
-
Let's click the Hamburger menu button: driver.find_element(:css, "button.navbar-toggle.collapsed").click
-
Click the WORKSHOP link: driver.find_element(:link, "WORKSHOPS").click
-
You should now be on the Appium Workshop page!
-
The best way to find web elements is using the chrome device emulator toolbar option in the console. I will demo this for you.
-
Let's exit out of our web session. Type driver.quit and quit the Appium server.
Eliminating Duplication
Cleanup Time!
- Ok, so now our test suite is starting to grow a bit. We should start cleaning things up.
- Move your specs (alert and crash) from the spec folder in the playground directory to the spec folder in the android directory. I’ve created an example for the home_spec.rb already so no need to move that.
- I’ve also already setup the whole framework of our new test suite to run in a single process, parallel and distributed.
- Lets go over everything… It’s a lot!
-
How is this done?
- We already did it using the spec_helper.
- Lets now create common methods and functions.
- Lets also create page objects.
Locator Methods
- Using Sublime, open the locators.rb in the android > spec > pages directory.
- This is where we can create our own custom methods or wrap more logic around the global appium_lib and selenium ones.
- I’ve shortened the find_element to fe and find_elements to fa (find all).
- This eliminates duplication because we now have one source containing this logic. So in the future, for example, if the appium project changes the .click function to .tap we would only need to change it in one place.
- The is_displayed? Will return true or false if the element is displayed.
Page Objects
- Open the home.rb in the android > spec > pages directory.
- home.rb is where we will put the page objects for the home/landing page.
- We create a Home class which will contain our objects for this page.
- We assign each object/id to a constant.
- The page_displayed? now shows an example of where we can extend the default implicit wait we set in the appium.txt. Some apps rely on a web service and if the service is slow, we are giving Appium an extra 30 seconds (60 total) to wait.
- A good practice to do is then include the page_displayed? of your page class, so if you’re performing an action on that page, it will first check (and wait if necessary) for the page to exist before it does anything else.
- Also notice how we now get the text for the the home page title. Instead of doing find_element(:id, "com.amazonaws.devicefarm.android.referenceapp:id/toolbar_title").text, we just do "get_text HOME_PAGE_TITLE_ID". So if .text later becomes something else we just change it on the locator.rb page.
Common Objects
- Some apps (including this one) share a lot of the same elements across views.
- Instead of duplicating the page objects for every page, we can instead create a common page class, and each page then inherits that class.
- The Hamburger button! This is displayed on every page so it’s a good one to add! same for the page title object.
- Open the common.rb in the android > spec > pages directory.
- I’ve gone ahead and created the click_hamburger and page_title_text methods for you as an example. See how it inherits the Locators class. Now from here on, every new page inherits the Common class.
common.rb
require_relative 'locators'

class Common < Locators

  TOOLBAR_TITLE = { id: 'com.amazonaws.devicefarm.android.referenceapp:id/toolbar_title' }
  HAMBURGER_BUTTON = { id: 'ReferenceApp' }
  POPUP_ALERT_TITLE = { id: "android:id/alertTitle" }
  POPUP_ALERT_MESSAGE = { id: "android:id/message" }

  def click_hamburger
    click HAMBURGER_BUTTON
  end

  def page_title_text
    get_text TOOLBAR_TITLE
  end

  def popup_title
    get_text POPUP_ALERT_TITLE
  end

  def popup_message
    get_text POPUP_ALERT_MESSAGE
  end
end
Lets Add Pages
- Go ahead and create new files named alert.rb and crash.rb in the pages directory.
-
Use the home.rb as an example of how the the boiler plate code should look.
- Name the class for each page the same as the page filename.
- Add the objects each spec uses to execute the validations. Note: you should not add objects you don’t use. This would add clutter and make things messy.
- If you’re stuck. Take a look at each example I’ve create in the pages directory. e.g. alert.rb.example and crash.rb.example.
require_relative 'common'

class Alert < Common

  POPUP_ID = { id: "com.amazonaws.devicefarm.android.referenceapp:id/notifications_alert_button" }

  def page_displayed?
    wait_true(60) { page_title_text == "Alerts and Dialogs" } #we override the implicit appium_lib wait (30).
  end

  def click_alert_button
    page_displayed?
    click POPUP_ID
  end
end
require_relative 'common'
class Crash < Common
CRASH_BUTTON_ID = { id: "com.amazonaws.devicefarm.android.referenceapp:id/crash_button" }
CRASH_PAGE_TEXT = { id: "com.amazonaws.devicefarm.android.referenceapp:id/bug_fragment_message" }
def page_displayed?
wait_true(60) { page_title_text == "Crash/Bug Simulator" } #we override the implicit appium_lib wait (30).
end
def click_crash_button
page_displayed?
click CRASH_BUTTON_ID
end
def crash_page_text
get_text CRASH_PAGE_TEXT
end
endGetting Device Data
- With Sublime, open the server_launcher.rb in the android directory.
- The methods at the top of the file will capture the information we want.
- Why is this important information to have? Well, you need to know everything about the platform your tests are running on. A test might run on OS: 6.0 but will fail on 4.4. Also the manufacture makes a difference. I’ve had Samsung and LG phones just act completely different from other manufactures with the same OS version.
- Notice we put the device data into an environment variable "DEVICES". We will touch on this a bit later.
-
You can get your device data yourself by running the following in a shell:
- OS: adb shell getprop ro.build.version.release
- Manufacturer: adb shell getprop ro.product.manufacturer
- Model: adb shell getprop ro.product.model
- SDK: adb shell getprop ro.build.version.sdk
- Lastly, the save_device_data method. We use this to save the data to a file which we will later attach to our Allure report so we know all about the device the test ran on.
Starting Appium
The Programmatic Way!
- There comes a time when you cannot use the Appium Desktop anymore. That time is now!
- But why? If you ever want to scale your tests you have to launch the server pragmatically.
-
In sublime, open the server_launcher.rb file located in appium-workshop > android directory. You will see a method name appium_server_start.
- Basically, what it does is launch an Appium server in the background with passed arguments.
Generating Node Configs
- What is a node? A node is what connects to a selenium hub (grid). The hub then distributes tests to it. So in our case, it’s a device (emulator or physical phone).
- So we need to create node configs to tell the node server (Appium) what information to pass to the selenium hub.
- We will do this programmatically using the generate_node_config method in the server_launcher.rb file.
- However, I separated this into it’s own file to demo in the playground directory.
- On the command line, navigate to the appium-workshop playground directory.
- Open another shell/terminal window and navigate to the same directory.
- In one shell/terminal run: java -jar selenium-server-standalone-3.6.0.jar -role hub
- Open a browser and goto: http://localhost:4444/grid/console
-
In the other shell/terminal run: adb devices
- Get a UDID of a connected device. e.g. emulator-5554
- Run: ruby gen_node_config.rb emulator-5554 4755 <-The first argument is the filename, the second the port number. This will then place a file names emulator-5554.json in the node_configs directory.
-
Now lets start a Appium session using this config!
- From the playground directory run: appium --nodeconfig ./node_configs/emulator-5554.json
- Open a browser and goto: http://localhost:4444/grid/console
- You would create one of these for every device you have connected to your machine.
- Go ahead and kill the selenium hub and Appium node servers.
Helpers
- In sublime, open the helpers.rb file located in appium-workshop > android > spec directory.
-
So as part of our code cleanup we want to split out our methods that are helpers functions.
- In our case, these will be the video and logcat.
- Note: we didn’t cover video earlier because we are using emulators. However, this will work for those of you using a real device.
- Here we are creating a module named Helpers. This will be promoted after we start the appium driver and included as methods we can use globally.
Setup
- In sublime, open the setup.rb file located in appium-workshop > android > spec directory.
- This is more cleanup. We’ve moved some functions from the spec_helper.rb file to keep it clean and easier to read. Some of these functions you should recognize from earlier.
-
Now you will see where the "DEVICE" environment variable and thread value come into play. When we run in parallel, the library splits the tests into separate processes and we need a way to connect a device to each one.
- Thankfully the library we use creates a "TEST_ENV_NUMBER" environment variable we then match to the thread value we assigned to the device.
- We then get the UDID from the get_device_data it matches it in the "DEVICE" variable.
-
Why is the UDID important? There are couple reasons.
- Most importantly, we pass it in as a capability so when the appium driver is initialize it knows which device to run the test on.
- When you have multiple devices connected to one machine you need the UDID to tell adb which device to do the command against. e.g. adb -s emulator-5554 shell
- We use them to add to filenames and test descriptions. e.g. describe "Home Page #{ENV['Device UDID']}" do...
- Take a look at the remaining file and raise your hand if you have any questions.
Spec_helper
- In sublime, open the spec_helper.rb file located in appium-workshop > android > spec directory.
- Notice how much cleaner it is now. You can see the helper and setup methods.
- This is basically everything we did before in the playground, but now it is more organized and easier to read.
Rake
- Ruby’s version of Make is Rake!
- In sublime, open the Rakefile file located in appium-workshop > android directory.
- This file contains the tasks to run our entire automaton suite easily. So instead of running several individual commands or scripts, we can run one command to start everything.
- Run rake -T from the command line to see all available tasks. There is only one for this demo but you could add one later for iOS. See here for an example.
-
Run single process:
- rake android[single]
- Starts a Appium server.
- Runs the specs in a single process. It executed "rspec spec" for us.
-
Run in parallel:
-
rake android[parallel]
- Creates an Appium node and Appium session for each device.
- Splits the "test suite" into separate processes based on how many devices are connected to your machine, which is defined by the THREADS variable.
- Parallel in the case means it will run all tests on every device.
- This runs: parallel_test #{threads} -e 'rspec spec'
-
rake android[parallel]
-
Run distributed:
-
rake android[dist]
- Creates an Appium node for each device.
- Splits the "specs" into separate processes based on how many devices are connected to your machine, which is defined by the THREADS variable.
- Distributed means it distributes the tests to each available process/device thus reducing the total run time.
-
rake android[dist]
Lets Run the Specs
- But… before we do, lets create another emulator.
- Make sure both the EM1 and EM2 emulators are started.
- On the command line navigate to the appium-workshop > android directory.
- Run: bundle install
- Run rake android[single]
-
Lets generate the Allure report!
- Run: allure report generate output/allure/*
- Run: allure report open
-
Run rake android[parallel]
- Run: allure report generate output/allure/*
- Run: allure report open
-
Run rake android[dist]
- Run: allure report generate output/allure/*
- Run: allure report open
Running in the Cloud
- There comes a time when you need to scale your tests even more. The best way to do this is by running your tests on a cloud server. In our case, it's Sauce Labs!
- First, let's go to sauce labs website and register a new account. We need to get a access_key in order to connect to Sauce Labs.
- Once you've registered your account and obtained your access key, you need to add them to the Rakefile in the appium-workshop/android directory.
-
Open the Rakefile with Sublime:
- Set the sauce_user = "your-sauce-user"
- Set the sauce_access_key = "your access key"
- Navigate to appium-workshop > android directory.
- Let's go ahead and run on Sauce! run the following: rake android[sauce]
- Open your browser and goto Sauce Labs website dashboard. Notice our tests are now running in parallel (distributed) on Sauce!
- Raise your hand if you are not seeing this.