Angular 5
Kamil Lolo
for dummies begginers

Jakie są wasze oczekiwania?

Wstęp

O czym będziemy mówić
Podstawy typescript
Nowości w angular
Reaktywne programowanie
component
service
TDD
shadow DOM
pipe
jasmine
protractor
routing
i18n
CLI
dyrektywy
subscribe
observable
semantyczne wersjonowanie
binding
template expression
http
guard
form
reactive form
Wymagania
- znajomość javascript
- ulubione IDE + terminal
- Node (7+)
- npm
- Zainstalowane:
- npm install -g typescript @angular/cli
- Chrome
Materiał do samodzielnej nauki
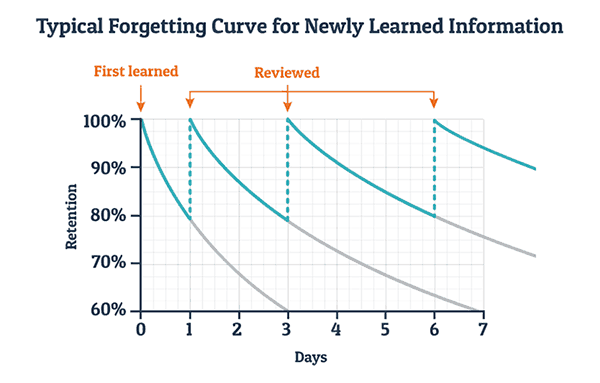
https://quizlet.com/271131809/angular-5-flash-cards/
Co się zmieniło od czasu AngularJS?
- Brak controlerów, scope
- Porzucenie architektury MVC na rzecz komponentowej
- Przejście na Typescript
- Komponent jako klasa, obiektowość
- Inna składnia bindowania na widoku
- Reaktywne programowanie za pomocą RxJS
- Modularność w samym angularze
- Shadow DOM i enkapsulacja
- server side rendering, kompilacja AOT
- Zmiany w sposobie bindowania
- Niezależność od przeglądarki
- Module lazy loading

Semantic Versioning (SEMVER).


https://semver.org/

5.2.4
6.0.0-beta.4
Dlaczego nie było Angular 3?

Angular is being developed in a MonoRepo. That means a single repo for everything. @angular/core, @angular/compiler, @angular/router etc are in the same repo and may have there own versions. The advantage of MonoRepo is, you don’t have to deal with the versioning of the code dependencies. Now the problem is with the @angular/router which is already in a 3.X version. And that’s because of some active and huge developments on the router section, like route-preload.

Architektura

komponentowa
W architekturze komponentowej oprogramowanie budowane jest w oparciu o współpracujących ze sobą, niezależne komponenty programowe. Komponent to element oprogramowania posiadający dobrze wyspecyfikowany interfejs oraz zachowanie. Każdy komponent powinien realizować założoną funkcjonalność i dostarczać jej innym komponentom tylko za pośrednictwem własnego interfejsu. Komponenty traktuje się jako twory generyczne. Dopiero zbiór takich połączonych ze sobą komponentów stanowi rzeczywistą aplikację.
http://architektura-oprogramowania.blogspot.com/p/architektura-komponentowa.html
Co to jest?

https://stackoverflow.com/questions/46950642/is-there-a-tool-to-view-all-the-react-components-name-on-the-webpage
komponent == tag html
If you have a background in AngularJS, you can think of components as the new version of directives*
*source: ng-book 2, The Complete Guide to Angular
Components are the most basic building block of an UI in an Angular application. An Angular application is a tree of Angular components. Angular components are a subset of directives. Unlike directives, components always have a template and only one component can be instantiated per an element in a template.
Shadow

DOM
Co to jest shadow DOM?
Shadow DOM provides encapsulation for DOM and CSS in a Web Component. Shadow DOM makes it so these things remain separate from the DOM of the main document. You can also use Shadow DOM by itself, outside of a web component.

Shadow DOM & Angular
Whenever we create a component, Angular puts it’s template into a shadowRoot, which is the Shadow DOM of that particular component. Doing that, we get DOM tree and style encapsulation for free, right? But what if we don’t have Shadow DOM in the browser? Does that mean we can’t use Angular in those environments? We can. In fact, Angular doesn’t use native Shadow DOM by default, it uses an emulation.
https://blog.thoughtram.io/angular/2015/06/29/shadow-dom-strategies-in-angular2.html#shadow-dom-in-angular
Jak to działa w praktyce?
Angular obsługuje następujące tryby enkapsulacji:
-
Native view encapsulation uses the browser's native shadow DOM implementation (see Shadow DOM on the MDN site) to attach a shadow DOM to the component's host element, and then puts the component view inside that shadow DOM. The component's styles are included within the shadow DOM.
-
Emulated view encapsulation (the default) emulates the behavior of shadow DOM by preprocessing (and renaming) the CSS code to effectively scope the CSS to the component's view.
-
None means that Angular does no view encapsulation. Angular adds the CSS to the global styles. The scoping rules, isolations, and protections discussed earlier don't apply. This is essentially the same as pasting the component's styles into the HTML.
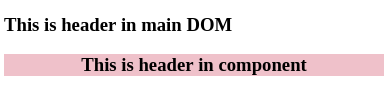
Jak to działa w praktyce?
1. Mamy komponent app-root z stylem:
2. Ten komponent ma szablon:
3. Po za komponentem jest szablon:
<div style="text-align:center">
  <h3> This is header in component</h3>
</div>
h3 {
  background-color: pink;
}
<h3>This is header in main DOM</h3>
<app-root></app-root>
Jak to działa w praktyce?
Dla różnych wartości ustawionych w komponencie w polu encapsulation:
ViewEncapsulation.Emulated
<app-root ng-version="5.2.1">
<div style="text-align:center">
  <h3>
    This is header in component
  </h3>
</div>
</app-root>
<app-root
_nghost-c0=""
ng-version="5.2.1">
<div
_ngcontent-c0=""
style="text-align:center">
<h3 _ngcontent-c0="">
This is header in component
</h3>
</div>
</app-root>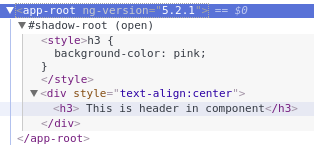
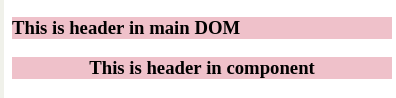
ViewEncapsulation.None
ViewEncapsulation.Native
Emulacja shadow DOM
When using emulated view encapsulation, Angular preprocesses all component styles so that they approximate the standard shadow CSS scoping rules. There are two kinds of generated attributes:
- An element that would be a shadow DOM host in native encapsulation has a generated _nghost attribute. This is typically the case for component host elements.
- An element within a component's view has a _ngcontent attribute that identifies to which host's emulated shadow DOM this element belongs.
[_nghost-pmm-5] {
  display: block;
  border: 1px solid black;
}

h3[_ngcontent-pmm-6] {
  background-color: white;
  border: 1px solid #777;
}
Czy do tworzenia komponentów potrzebujemy Angulara?
class HelloElement extends HTMLElement {
  // Monitor the 'name' attribute for changes.
  static get observedAttributes() {return ['name']; }

  // Respond to attribute changes.
  attributeChangedCallback(attr, oldValue, newValue) {
    if (attr == 'name') {
      this.textContent = `Hello, ${newValue}`;
    }
  }
}

// Define the new element
customElements.define('hello-element', HelloElement);
<hello-element name="Anita"></hello-element>
https://developer.mozilla.org/en-US/docs/Web/Web_Components/Custom_Elements
https://developers.google.com/web/fundamentals/web-components/customelements
coffee
break

TypeScript

https://slides.com/kamillolo/typescript/

Zadanie
rozgrzewkowe
{
  "name": "typescript-exercise",
  "version": "1.0.0",
  "main": "index.js",
  "directories": {
    "test": "test"
  },
  "scripts": {
    "test": "./node_modules/.bin/mocha --compilers ts:ts-node/register ./test/*.spec.ts"
  },
  "devDependencies": {
    "@types/chai": "^4.1.1",
    "@types/jasmine": "^2.8.4",
    "chai": "^4.1.2",
    "mocha": "^5.0.0",
    "ts-node": "^4.1.0",
    "typescript": "^2.6.2"
  }
}
{
  "compilerOptions":{
    "module": "commonjs",
    "sourceMap": true,
    "target": "es2015",
    "isolatedModules": true
  }
}
package.json + tsconfig.json
    it("Should fibbonaci generator work correctly", () => {
        // given
        const generator = new FibboGenerator();

        // than
        expect(generator.generate(2)).to.equal(2);
        expect(generator.generate(3)).to.equal(3);
        expect(generator.generate(4)).to.equal(5);
        expect(generator.generate(5)).to.equal(8);
    });
Udrożnij testy jednostkowe
export class FibboGenerator {
    public generate(step: number): number {
        let prev = 0;
        let next = 1;
        let result = 0;
        for (let i = 0; i < step; i++) {
            result = prev + next;
            prev = next;
            next = result;
        }
        return result;
    }
}
Zaimplementuj wzorzec obserwator
interface IObservable<T> {
    subscribe(observer: (value:T) => void): ISubscription;

    next(value: T): void;
}

class Observable<T> implements IObservable<T> {
    private constructor(t: T) {
        TODO
    }

    static of<P>(p: P): Observable<P> {
        TODO
    }
}
const observable: IObservable = Observable.of("some value");
const subscription = observable.subscribe( item => console.log(item) );
observable.next("another value");
subscription.unsubscribe();interface ISubscription {
unsubscribe(): void;
}
Zaimplementuj wzorzec builder klasy User
Pola w klasie:
-first name
-last nam
-age
-Accounts (no, id, saldo)
-całkowita suma środków na koncie

Pora na kodowanie

Angular CLI
The Angular CLI helps you to quickly create an Angular application with all the configuration files and packages in one single command. It also helps us to add features (components, directives, services etc) to existing Angular applications. The Angular CLI creates the Angular Application and uses Typescript, Webpack, Karma, Protractor.
Co to jest?
Zalety używania Angular-CLI
http://www.consdata.pl/blog/7-szybki-start-z-angular-cli
- korzystanie z najnowszych technologii
- ustandaryzowanie struktury i konfiguracji projektu
- zrzucenie utrzymania procesu budowania na community
- szybkie wsparcie dla nowych wersji frameworka przy minimalnym koszcie
- stosowanie wzorcowej/zalecanej konfiguracji
- szybkie uruchamianie nowych projektów
- stosowanie podejścia convention over configuration

Struktura projektu
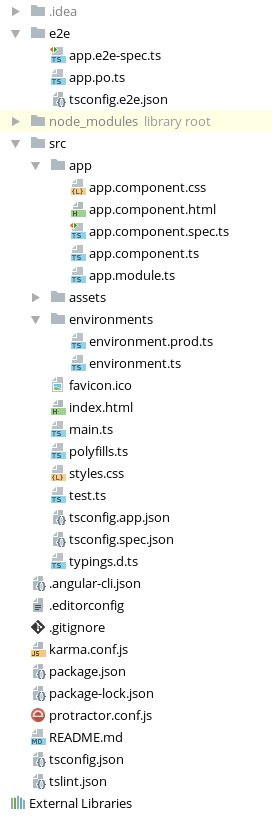
Testy e2e
Kod aplikacji, każdy komponent w osobnym folderze
Pliki statyczne
Konfiguracja projektu
Konfiguracja kompilatora ts
Najważniejsze parametry angular-cli
| Parametr | Opis/Opcje | Przykład |
|---|---|---|
| new | Generuje nowy projekt | ng new my-project |
| serve | Zbudowanie developersko aplikacji i uruchomienie w trybie śledzenia zmian. Parametr posiada sporo opcji, najciekawsze z nich: port, host, ssl, ssl-cert | ng serve --port 8000 |
| generate | Automatycznie wygenerujemy szablony dla wszystkich składowych frameworka: component, directive, pipe, service, class, interface, enum, module | ng generate component hello-world ng g service my-new-service |
| build | Zbudowanie projektu w finalną wersję w katalogu dist. Jeżeli chcemy zbudować produkcyjną aplikację, wykorzystującą uglifying, tree-shaking, ahead of time compilation, powinniśmy wskazać profil prod. Najważniejsze paranetry: output-path, base-href, locale... | ng build --prod |
| test | Zarówno testy jednostkowe, jak i end-to-end możemy spokojnie uruchamiać za pomocą CLI, wszystkie potrzebne konfiguracje są już dostarczone w ramach wygenerowanego szkieletu aplikacji. | ng test --watch false ng e2e |
| eject | Generuje plik webpack.config.js z konfiguracją projektu. Config template: angular-cli/addon/ng2/models | |
| lint | Uruchomienie lintera skanującego projekt |
Ahead-of-Time (AOT) Compiler
The Angular Ahead-of-Time (AOT) compiler converts your Angular HTML and TypeScript code into efficient JavaScript code during the build phase before the browser downloads and runs that code.
An Angular application consists largely of components and their HTML templates. Before the browser can render the application, the components and templates must be converted to executable JavaScript by an Angular compiler. Angular offers two ways to compile your application:
- Just-in-Time (JIT), which compiles your app in the browser at runtime
- Ahead-of-Time (AOT), which compiles your app at build time.
Why compile with AOT?
-
Faster rendering
With AOT, the browser downloads a pre-compiled version of the application. The browser loads executable code so it can render the application immediately, without waiting to compile the app first.
-
Fewer asynchronous requests
The compiler inlines external HTML templates and CSS style sheets within the application JavaScript, eliminating separate ajax requests for those source files.
-
Smaller Angular framework download size
There's no need to download the Angular compiler if the app is already compiled. The compiler is roughly half of Angular itself, so omitting it dramatically reduces the application payload.
-
Detect template errors earlier
The AOT compiler detects and reports template binding errors during the build step before users can see them.
-
Better security
AOT compiles HTML templates and components into JavaScript files long before they are served to the client. With no templates to read and no risky client-side HTML or JavaScript evaluation, there are fewer opportunities for injection attacks.
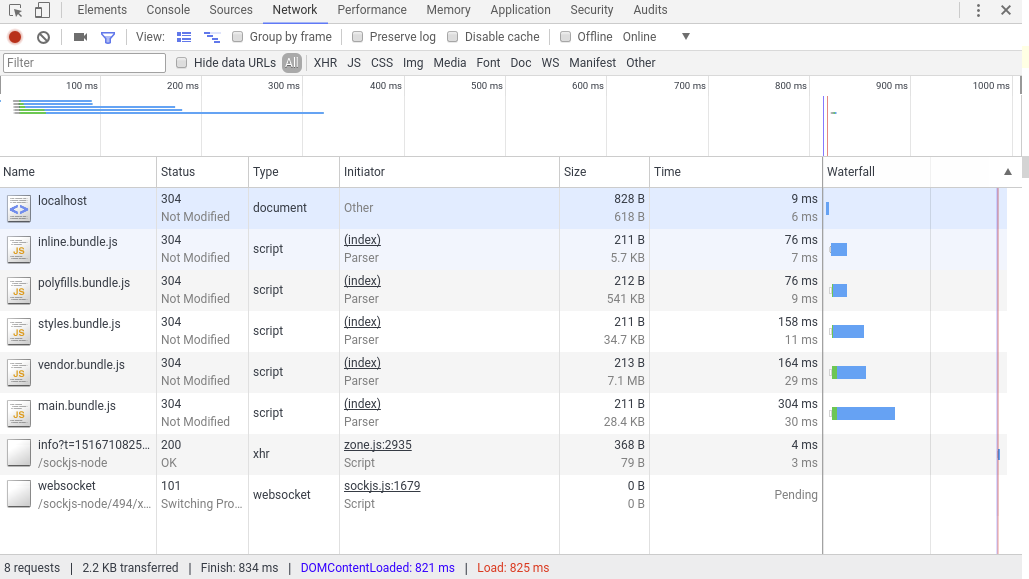
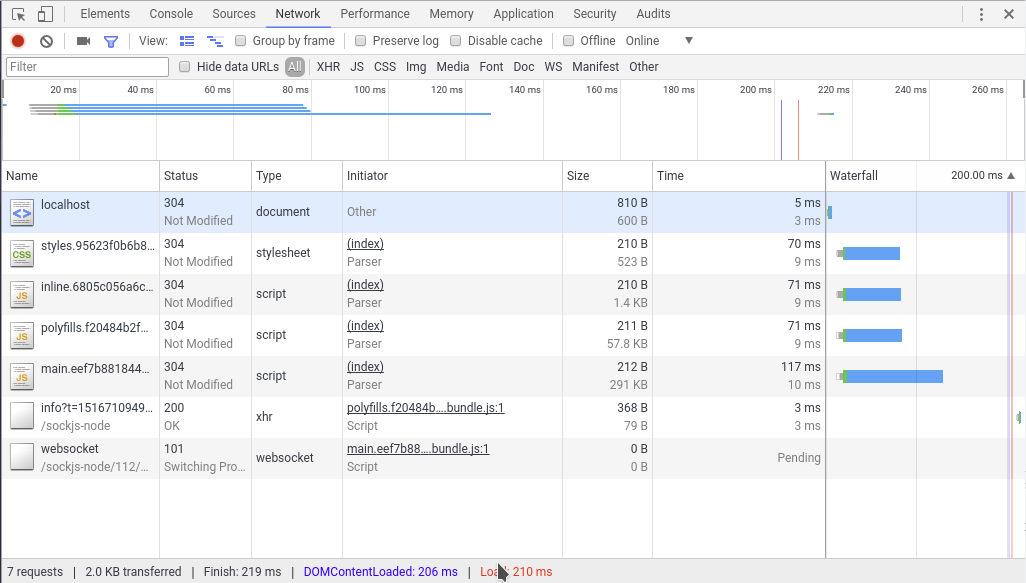
Różnice widać nawet na pustym projekcie
TODO: Zweryfikować AOT na projekcie końcowym
Opis kompilacji: https://angular.io/guide/aot-compiler
Pora na kodowanie

I. Wygeneruj szablon projektu na którym będziemy pracować
II. Utwórz ręcznie komponent dashboard
III. Wygeneruj komponent settings korzystając z generatora
Component I

import {Component} from '@angular/core';

@Component({
  selector: 'app-root',
  template: `
    <p>{{greetings}}</p>
  `
})
export class AppComponent {
  public greetings = 'Hello Angular!';
}
Nasz pierwszy komponent
Modułowość Angulara wymusza na nas importowanie używanych komponentów. Podajemy listę importowanych elementów w {} (destructing)
Dekorator sprawiający że klasa staje się komponentem
Szablon komponentu. Alternatywnie można podać zewnętrzny plik: templateUrl
Pola w klasie są dostępne w szablonie
<app-root></app-root>Nasz pierwszy komponent
@Component({
  changeDetection?: ChangeDetectionStrategy
  viewProviders?: Provider[]
  moduleId?: string
  templateUrl?: string
  template?: string
  styleUrls?: string[]
  styles?: string[]
  animations?: any[]
  encapsulation?: ViewEncapsulation
  interpolation?: [string, string]
  entryComponents?: Array<Type<any> | any[]>
  preserveWhitespaces?: boolean
  selector?: string
  inputs?: string[]
  outputs?: string[]
  host?: {...}
  providers?: Provider[]
  exportAs?: string
  queries?: {...}
})
https://angular.io/api/core/Component
import {Component} from '@angular/core';

@Component({
  selector: 'app-root',
  templateUrl: './app.component.html',
  styles: [
    'p { color: rainbow; }'
  ],
})
export class AppComponent {
  public title: string;

  constructor() {
    this.title = 'Hello World';
  }
}
Component styles
@Component({
  selector: 'app-top-menu',
  templateUrl: './top-menu.component.html',
  styleUrls: ['./top-menu.component.css']
})
export class TopMenuComponent {

}
- You can use the CSS class names and selectors that make the most sense in the context of each component.
- Class names and selectors are local to the component and don't collide with classes and selectors used elsewhere in the application.
- Changes to styles elsewhere in the application don't affect the component's styles.
- You can co-locate the CSS code of each component with the TypeScript and HTML code of the component, which leads to a neat and tidy project structure.
- You can change or remove component CSS code without searching through the whole application to find where else the code is used.
Component selector
| Selector | Description |
|---|---|
| element-name | select by element name |
| .class | select by class name |
| [attribute] | select by attribute name |
| [attribute=value] | select by attribute name and value. |
| :not(sub_selector) | select only if the element does not match the sub_selector. |
| selector1, selector2 | select if either selector1 or selector2 matches. |
The CSS selector that triggers the instantiation of a directive.
| Selector | Description | |
|---|---|---|
| :host | Pseudo-class selector to target styles in the element that hosts the component (as opposed to targeting elements inside the component's template). | :host(.active) { border-width: 3px; } |
| :host-context | Use the :host-context() pseudo-class selector, which works just like the function form of :host(). The :host-context() selector looks for a CSS class in any ancestor of the component host element, up to the document root. The :host-context() selector is useful when combined with another selector. | :host-context(.theme-light) h2 { background-color: #eef; } |
Template syntax

stay with me and focus
Template syntax
template statement
template expression
A template expression produces a value. Angular executes the expression and assigns it to a property of a binding target; the target might be an HTML element, a component, or a directive.
JavaScript expressions that have or promote side effects are prohibited, including:
- assignments (=, +=, -=, ...)
- new
- chaining expressions with ; or ,
- increment and decrement operators
Allowed new template expression operators, such as |, ?. and !.
A template statement responds to an event raised by a binding target such as an element, component, or directive. You'll see template statements in the event binding section, appearing in quotes to the right of the = symbol as in (event)="statement".
The template statement parser differs from the template expression parser and specifically supports both basic assignment (=) and chaining expressions (with ; or ,).
Not allowed: template expression operators
Template expression operators
Pipe operator
Safe navigator
non-null assertion (dla trybu: strictNullChecks)
<div>Title through uppercase pipe: {{title | uppercase | magic: 'foo'}}</div>User address is {{user?.address?.street}}The hero's marker is {{$any(hero).marker}}$any type cast
The hero's name is {{hero!.name}}Template syntax/expression guide
Template expressions can make or break an application. Please follow these guidelines:
- No visible side effects
- Quick execution
- Simplicity
- Idempotence
The only exceptions to these guidelines should be in specific circumstances that you thoroughly understand.
*Idempotentność – właściwość pewnych operacji, która pozwala na ich wielokrotne stosowanie bez zmiany wyniku.
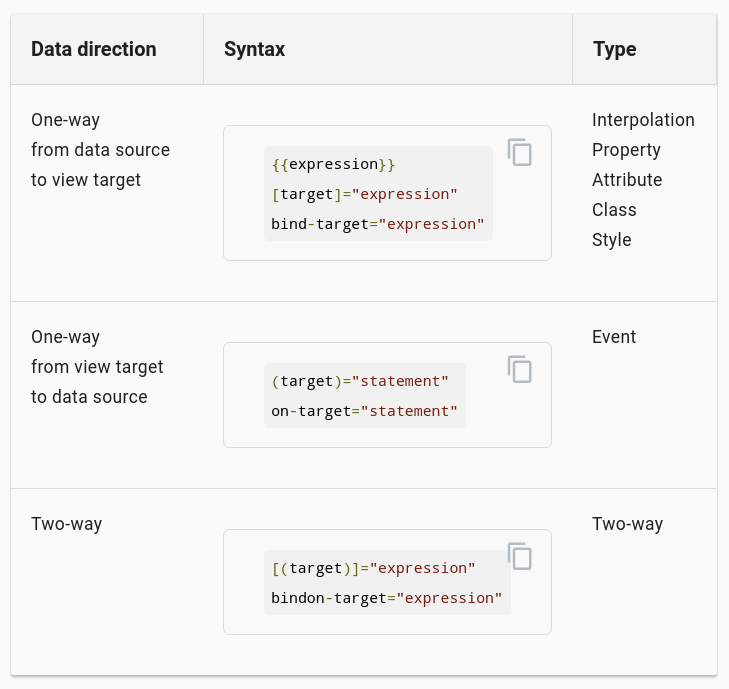
Binding syntax
{{ Interpolacja }}
{{ expression }}
The text between the braces is often the name of a component property. Angular replaces that name with the string value of the corresponding component property. Interpolation is a special syntax that Angular converts into a property binding.
<h3>
  {{title}}
  <img src="{{heroImageUrl}}" style="height:30px">
</h3>
Property bindings (one way)
Write a template property binding to set a property of a view element. The binding sets the property to the value of a template expression.
<button [disabled]="isUnchanged">Cancel is disabled</button>

<app-hero-detail [hero]="currentHero"></app-hero-detail>

<img bind-src="heroImageUrl">
HTML attribute vs. DOM property
The distinction between an HTML attribute and a DOM property is crucial to understanding how Angular binding works. Attributes are defined by HTML. Properties are defined by the DOM (Document Object Model).
- A few HTML attributes have 1:1 mapping to properties. id is one example.
- Some HTML attributes don't have corresponding properties. colspan is one example.
- Some DOM properties don't have corresponding attributes. textContent is one example.
- Many HTML attributes appear to map to properties ... but not in the way you might think!
Attribute bindings
Can't bind to 'colspan' since it isn't a known native property
This is the only exception to the rule that a binding sets a target property. This is the only binding that creates and sets an attribute.
<tr><td colspan="{{1 + 1}}">Three-Four</td></tr><tr><td [attr.colspan]="1 + 1">One-Two</td></tr>Class bindings
You can add and remove CSS class names from an element's class attribute with a class binding.Class binding syntax resembles property binding. Instead of an element property between brackets, start with the prefix class, optionally followed by a dot (.) and the name of a CSS class: [class.class-name].
<!-- reset/override all class names with a binding  -->
<div class="bad curly special" [class]="badCurly">Bad curly</div>

<!-- toggle the "special" class on/off with a property -->
<div [class.special]="isSpecial">The class binding is special</div>
Style bindings
Style binding syntax resembles property binding. Instead of an element property between brackets, start with the prefix style, followed by a dot (.) and the name of a CSS style property: [style.style-property].
<button [style.background-color]="canSave ? 'cyan': 'grey'" >Save</button>

<button [style.font-size.em]="isSpecial ? 3 : 1" >Big</button>

<button [style.fontSize.%]="!isSpecial ? 150 : 50" >Small</button>
Events bindings
The only way to know about a user action is to listen for certain events such as keystrokes, mouse movements, clicks, and touches. You declare your interest in user actions through Angular event binding.Event binding syntax consists of a target event name within parentheses on the left of an equal sign, and a quoted template statement on the right.
<button (click)="onSave()">Save</button>

<!-- `myClick` is an event on the custom `ClickDirective` -->
<div (myClick)="clickMessage=$event" clickable>click with myClick</div>
https://developer.mozilla.org/en-US/docs/Web/Events
Build-in attribute directive
*An Attribute directive changes the appearance or behavior of a DOM element.
ngClass
Dyrektywa odpowiednia do dynamicznego dodawania, usuwania wielu klas jednocześnie
<div [class.special]="isSpecial">The class binding is special</div><div [ngClass]="currentClasses">This div is special</div>
// komponent:
this.currentClasses = {
'saveable': this.canSave,
'modified': !this.isUnchanged,
'special': this.isSpecial
};ngStyle
Dyrektywa odpowiednia do dynamicznego dodawania, usuwania wielu styli jednocześnie
<div [style.font-size]="isSpecial ? 'x-large' : 'smaller'" >
  This div is x-large or smaller.
</div>
<div [ngStyle]="currentStyle">This div is special</div>
// komponent:
this.currentStyle = {
fontSize: '2em',
color: 'red'
};Build-in structural directive
*They shape or reshape the DOM's structure, typically by adding, removing, and manipulating the host elements to which they are attached.
Why asterisk?
The asterisk is "syntactic sugar" for something a bit more complicated. Internally, Angular translates the *ngIf attribute into a <ng-template> element, wrapped around the host element, like this. Angular consumed the <ng-template> content during its actual rendering and replaced the <ng-template> with a diagnostic comment.
<div *ngIf="hero" class="name">{{hero.name}}</div><ng-template [ngIf]="hero">
<div class="name">{{hero.name}}</div>
</ng-template>
*ngIf
You can add or remove an element from the DOM by applying an NgIf directive to that element (called the host element).
The difference between hiding and removing doesn't matter for a simple paragraph. It does matter when the host element is attached to a resource intensive component. Such a component's behavior continues even when hidden. The component stays attached to its DOM element. It keeps listening to events. Angular keeps checking for changes that could affect data bindings. Whatever the component was doing, it keeps doing.
// kiedy renderowanie komponentu jest powolne mozna go tylko ukryć
<div [class.hidden]="isSpecial">Hide with class</div>
<div [style.display]="isSpecial ? 'none'  : 'block'">Hide with style</div>

// usuniecie z DOM i zniszczenie komponentu
<app-hero-detail *ngIf="isActive"></app-hero-detail>
*ngForOf (NgFor is implemented by the NgForOf)
NgForOf is a repeater directive — a way to present a list of items. You define a block of HTML that defines how a single item should be displayed. You tell Angular to use that block as a template for rendering each item in the list.
// 1. Przekazanie aktualnego itema do komponentu
<app-hero-detail *ngFor="let hero of heroes" [hero]="hero"></app-hero-detail>

// 2. Odwolanie do indeksu
<div *ngFor="let hero of heroes; let i=index">{{i + 1}} - {{hero.name}}</div>

// 3.
<div *ngFor="let hero of heroes; trackBy: trackByHeroes">
  ({{hero.id}}) {{hero.name}}
</div>

// w komponencie:
trackByHeroes(index: number, hero: Hero): number { return hero.id; }
The NgForOf directive may perform poorly, especially with large lists. A small change to one item, an item removed, or an item added can trigger a cascade of DOM manipulations. Angular can avoid this churn with trackBy.
<div *ngFor="let hero of heroes; let i=index; let odd=odd; trackBy: trackById" [class.odd]="odd">
  ({{i}}) {{hero.name}}
</div>

<ng-template ngFor let-hero [ngForOf]="heroes" let-i="index" let-odd="odd" [ngForTrackBy]="trackById">
  <div [class.odd]="odd">({{i}}) {{hero.name}}</div>
</ng-template>
*ngForOf
<li *ngFor="let user of userObservable | async as users; index as i; first as isFirst">
   {{i}}/{{users.length}}. {{user}} <span *ngIf="isFirst">default</span>
</li>
NgForOf provides several exported values that can be aliased to local variables:
- index: number: The index of the current item in the iterable.
- first: boolean: True when the item is the first item in the iterable.
- last: boolean: True when the item is the last item in the iterable.
- even: boolean: True when the item has an even index in the iterable.
- odd: boolean: True when the item has an odd index in the iterable.
- $implicit: T: The value of the individual items in the iterable (ngForOf).
- ngForOf: NgIterable<T>: The value of the iterable expression. Useful when the expression is more complex then a property access, for example when using the async pipe (userStreams | async).
ngSwitch
NgSwitch is like the JavaScript switch statement. It can display one element from among several possible elements, based on a switch condition. Angular puts only the selected element into the DOM.
<div [ngSwitch]="currentHero.emotion">
  <app-happy-hero    *ngSwitchCase="'happy'"    [hero]="currentHero"></app-happy-hero>
  <app-sad-hero      *ngSwitchCase="'sad'"      [hero]="currentHero"></app-sad-hero>
  <app-confused-hero *ngSwitchCase="'confused'" [hero]="currentHero"></app-confused-hero>
  <app-unknown-hero  *ngSwitchDefault           [hero]="currentHero"></app-unknown-hero>
</div>
<div [ngSwitch]="hero?.emotion">
<ng-template [ngSwitchCase]="'happy'">
<app-happy-hero [hero]="hero"></app-happy-hero>
</ng-template>
<ng-template [ngSwitchCase]="'sad'">
<app-sad-hero [hero]="hero"></app-sad-hero>
</ng-template>
<ng-template [ngSwitchCase]="'confused'">
<app-confused-hero [hero]="hero"></app-confused-hero>
</ng-template >
<ng-template ngSwitchDefault>
<app-unknown-hero [hero]="hero"></app-unknown-hero>
</ng-template>
</div>Pora na kodowanie

Podpięcie usługi
- live demo
export default class User {
constructor(public readonly name: string,
public readonly surname: string,
public readonly gender: string,
public readonly email: string,
public readonly phone: string,
public readonly photo: string) {
}
}
constructor(private http: HttpClient) {
this.http
.get('https://uinames.com/api/?amount=10®ion=germany&ext')
.subscribe(data => this.users = data as User[]);
}
Najprostsze wywołanie usługi REST
TODO
- Utwórz pusty projekt
- Uruchom go na porcie 8000
- Wepnij usługę do pobierania fiszek
- Wyświetl je na formatce
- Ostylizuj formatkę korzystając z bootstrap lub materialize
- Po kliknięciu w zestaw fiszek wyświetl szczegóły
- Dodaj filtrowanie po nazwie
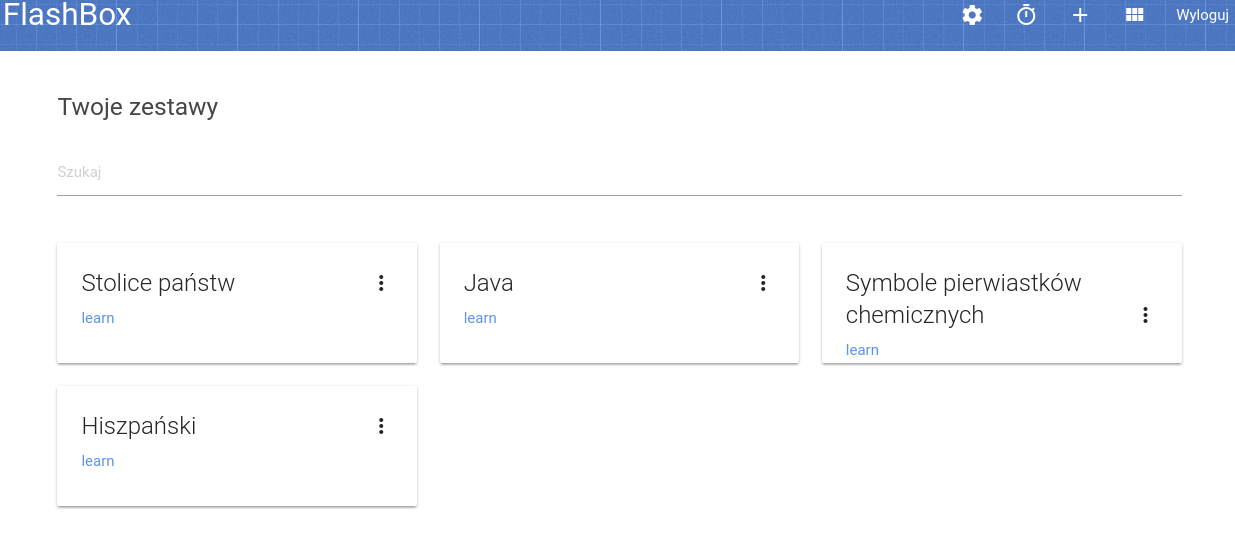
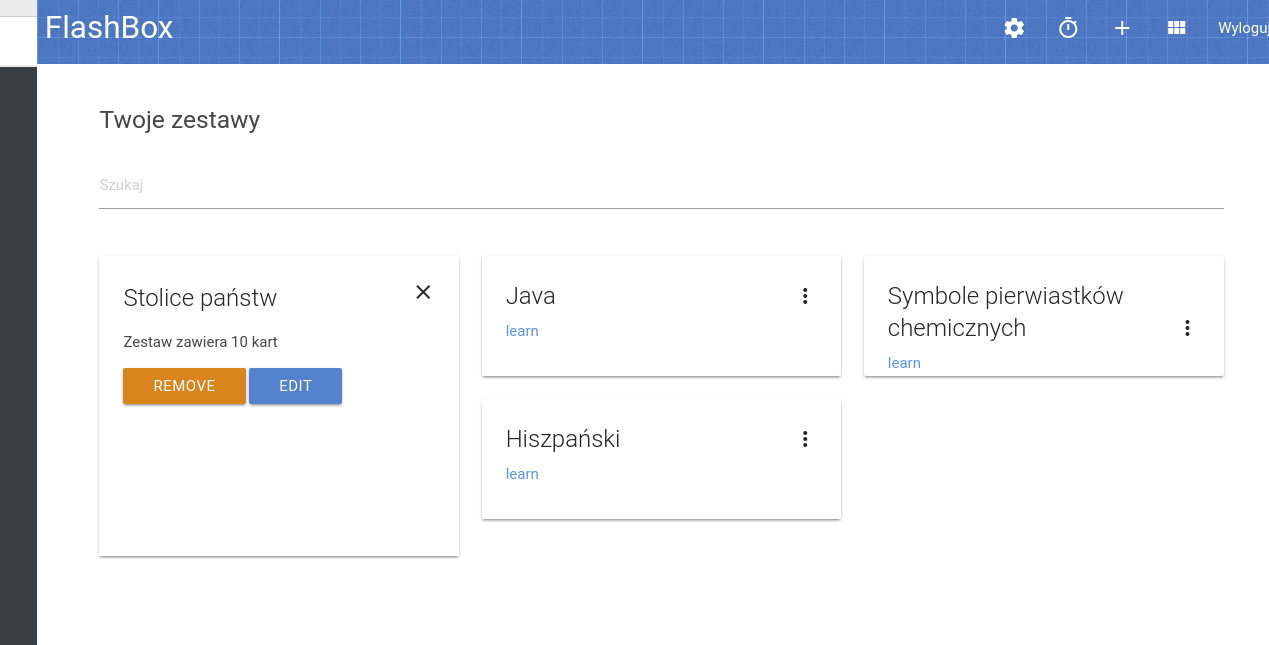
Sygerowany wygląd
Component II
Component

life cycle
Component lifecycle
constructor
ngOnChanges
ngOnInit
ngDoCheck
ngAfterContentInit
ngAfterContentChecked
ngAfterViewInit
ngAfterViewChecked
ngOnDestroy
*A directive has the same set of lifecycle hooks, minus the hooks that are specific to component content and views.
| Hook | Purpose and Timing |
|---|---|
| ngOnChanges | Respond when Angular (re)sets data-bound input properties. The method receives a SimpleChanges object of current and previous property values. |
| ngOnInit | Hook is called when your directive properties have been initialized, and before any of the child directive properties are initialized. |
| ngDoCheck | Detect and act upon changes that Angular can't or won't detect on its own. Called during every change detection run, immediately after ngOnChanges and ngOnInit. |
| ngAfterContentInit | Respond after Angular projects external content into the component's view. Called once after the first ngDoCheck. A component-only hook. |
| ngAfterContentChecked | Respond after Angular checks the content projected into the component. Called after the ngAfterContentInit and every subsequent ngDoCheck. A component-only hook. |
| ngAfterViewInit | Respond after Angular initializes the component's views and child views. Called once after the first ngAfterContentChecked. A component-only hook. |
| ngAfterViewChecked | Respond after Angular checks the component's views and child views. Called after the ngAfterViewInit and every subsequent ngAfterContentChecked. A component-only hook. |
| ngOnDestroy | Cleanup just before Angular destroys the directive/component. Unsubscribe Observables and detach event handlers to avoid memory leaks. Called just before Angular destroys the directive/component. |
Opis hooków
import {Component, OnInit} from '@angular/core';

@Component({
  selector: 'app-register-form',
  templateUrl: './register-form.component.html',
  styleUrls: ['./register-form.component.css']
})
export class RegisterFormComponent implements OnInit {

  constructor() {
    console.log('1. constructor');
  }

  ngOnInit() {
    console.log('2. on init');
  }

}
Przykład wykorzystania hooka
The interfaces are optional for JavaScript and Typescript developers from a purely technical perspective. The JavaScript language doesn't have interfaces. Angular can't see TypeScript interfaces at runtime because they disappear from the transpiled JavaScript.
Przykład w seed: PrettyAmountComponent.ts
Binding syntax
Two way binding
You often want to both display a data property and update that property when the user makes changes. On the element side that takes a combination of setting a specific element property and listening for an element change event.
<app-sizer [(size)]="fontSizePx"></app-sizer>
<div [style.font-size.px]="fontSizePx">Resizable Text</div>
banana in the box [()]
ngModel
Zapewnia dwukierunkowy binding danych z pól formularza. W celu użycia należy dodać import FormsModule.
<input [value]="currentHero.name"
       (input)="currentHero.name=$event.target.value" >
// 1
<input [ngModel]="currentHero.name" (ngModelChange)="setUppercaseName($event)">
// 2
<input [(ngModel)]="userName">
{{userName}}Component communication

@Input
An Input property is a settable property annotated with an @Input decorator. Values flow into the property when it is data bound with a property binding
@Component({
    selector: 'my-component'
})
class MyComponent {
    @Input('shortName') name: string;
    @Input('oldAge') age: number;
}
import {Component} from '@angular/core';
import {MenuEntry} from './top-menu/MenuEntry';
@Component({
selector: 'app-root',
template: `
<my-component shortName="lorem ipsum" [oldAge]="userAge"></my-component>
`
})
export class AppComponent {
userAge = 18;
}
import {Component} from '@angular/core';

@Component({
  selector: 'app-root',
  template: `
      <app-sandobx [userName]="userName"></app-sandobx>
  `
})
export class AppComponent {
  userName = 'Kamil';

  constructor() {
    setTimeout(() => this.userName = 'Zenek', 4000);
  }

}
import {Component, Input} from '@angular/core';

@Component({
  selector: 'app-sandobx',
  template: `
    <div class="container">
      {{userName}}
    </div>
  `
})
export class SandobxComponent {
  _userName: string;

  @Input()
  set userName(newUserName: string) {
    console.log(newUserName);
    this._userName = newUserName;
  }

  get userName(): string {
    return this._userName;
  }

}
Wykorzystanie get/set
@Output
import {Component} from '@angular/core';

@Component({
  selector: 'app-root',
  template: `
    <app-sandobx
        (dataLoaded)="displayData($event)">
    </app-sandobx>
  `
})
export class AppComponent {

  displayData(data: string) {
    console.log(data);
  }

}
import {Component, EventEmitter, Output} from '@angular/core';

@Component({
  selector: 'app-sandobx',
  template: `
      <button (click)="sendData()">sendData</button>
      <input [(ngModel)]="data"/>
  `
})
export class SandobxComponent {
  @Output()
  dataLoaded = new EventEmitter<number>();

  data: string;

  sendData() {
    this.dataLoaded.emit(this.data);
  }

}
An Output property is an observable property annotated with an @Output decorator. The property almost always returns an Angular EventEmitter. Values flow out of the component as events bound with an event binding.
IN/OUT
<app-sizer [(size)]="fontSizePx"></app-sizer>
<div [style.font-size.px]="fontSizePx">Resizable Text</div>
import { Component, EventEmitter, Input, Output } from '@angular/core';
@Component({
selector: 'app-sizer',
template: `
<div>
<button (click)="dec()" title="smaller">-</button>
<button (click)="inc()" title="bigger">+</button>
<label [style.font-size.px]="size">FontSize: {{size}}px</label>
</div>`
})
export class SizerComponent {
@Input() size: number | string;
@Output() sizeChange = new EventEmitter<number>();
dec() { this.resize(-1); }
inc() { this.resize(+1); }
resize(delta: number) {
this.size = Math.min(40, Math.max(8, +this.size + delta));
this.sizeChange.emit(this.size);
}
}Pora na kodowanie

- wywołaj usługę do pobierania fiszek i wyświetl je na dashboard
- zrób komponent life-search do filtrowania danych na dashboard (z wykorzystaniem two way binding)
- po wybraniu zestawu fiszek wyświetl szczegóły pod spodem (szczegóły mają osobny komponent, id wybrane zestawu podajemy jako input)
- z poziomu szczegółów pozwól na usuwanie zestawów
- zrób komponent do edycji, gdzie każde pole będzie można edytować za pomocą specjalnego komponentu
- wykorzystaj Materialize
  <script src="https://ajax.googleapis.com/ajax/libs/jquery/3.3.1/jquery.min.js"></script>
  <script src="https://cdnjs.cloudflare.com/ajax/libs/materialize/0.100.2/js/materialize.min.js"></script>

  <link href="https://fonts.googleapis.com/icon?family=Material+Icons" rel="stylesheet">
  <link rel="stylesheet" href="https://cdnjs.cloudflare.com/ajax/libs/materialize/0.100.2/css/materialize.min.css">
Co robimy?
Component III
Template reference variable
Template reference variable
A template reference variable is often a reference to a DOM element within a template. It can also be a reference to an Angular component or directive or a web component. Use the hash symbol (#) to declare a reference variable.
<input #phone placeholder="phone number">

<!-- lots of other elements -->

<!-- phone refers to the input element; pass its `value` to an event handler -->
<button (click)="callPhone(phone.value)">Call</button>
Wykorzystanie dziecka przez rodzica
<app-sandobx #sandbox></app-sandobx>
<button (click)="sandbox.setUserName('Stefan')">click me</button>
import {Component} from '@angular/core';
@Component({
selector: 'app-sandobx',
template: `
<div class="container">
{{userName}}
</div>
`
})
export class SandobxComponent {
userName = 'Kamil';
public setUserName(userName) {
this.userName = userName;
}
}Projekcja

ng-content
<app-sandobx>
    <div>div content</div>
    <span>span content</span>
</app-sandobx>
import {Component} from '@angular/core';

@Component({
  selector: 'app-sandobx',
  template: `
    <div class="container">
      <ng-content select="div"></ng-content>

      It is a span:
      <ng-content select="span"></ng-content>
    </div>
  `
})
export class SandobxComponent {
}
ng-content include the original host element children in a specific part of a view. Projection is a very important concept in Angular. It enables developers to build reusable components and make applications more scalable and flexible. When you do not have selector, only one ng-content could be used.
@ViewChild/@ViewChildren
@Component({
  selector: 'app-root',
  template: `
      <app-sandobx></app-sandobx>
      <button (click)="setUserName()">click me</button>
  `
})
export class AppComponent implements AfterViewInit {
  @ViewChild(SandobxComponent)
  sandbox: SandobxComponent;

  setUserName() {
    this.sandbox.setUserName('Stefan');
  }

  ngAfterViewInit(): void {
    this.sandbox.setUserName('Kamil');
  }
}
You can use ViewChild to get the first element or the directive matching the selector (the directive type or the name) from the view DOM. If the view DOM changes, and a new child matches the selector, the property will be updated. View queries are set before the ngAfterViewInit callback is called.
@Component({
  selector: 'app-root',
  template: `
      <app-sandobx userName="Kamil"></app-sandobx>
      <app-sandobx userName="Jarek"></app-sandobx>
      <app-sandobx userName="Stefan"></app-sandobx>
  `
})
export class AppComponent implements AfterViewInit {
  @ViewChildren(SandobxComponent)
  sandboxList: QueryList<SandobxComponent>;

  ngAfterViewInit(): void {
    console.log(this.sandboxList);
  }
}
@ViewChild/@ViewChildren
  @ViewChild(SandobxComponent, {read: ElementRef})
  sandboxList: ElementRef;

  ngAfterViewInit(): void {
    console.log(this.sandboxList.nativeElement.innerHTML = 'Lorem ipsum';
  }
We could also get a wrapper around a native element inside of a View. Permitting direct access to the DOM can make your application more vulnerable to * XSS attacks. Carefully review any use of `ElementRef` in your code.
<input #someInput placeholder="Your favorite pizza toping">

...

@ViewChild('someInput') someInput: ElementRef;
Animation

Animation
Animations are defined on components via an animation-like DSL*. This DSL approach to describing animations allows for a flexibility that both benefits developers and the framework. Animations work by listening on state changes that occur on an element within the template. When a state change occurs, Angular can then take advantage and animate the arc in between. This works similar to how CSS transitions work, however, by having a programmatic DSL, animations are not limited to environments that are DOM-specific. (Angular can also perform optimizations behind the scenes to make animations more performant.)
*Język dziedzinowy, także język dedykowany, język specjalizowany (ang. domain-specific language, DSL) to język programowania przystosowany do rozwiązywania określonej dziedziny problemów, określonej reprezentacji problemu lub określonej techniki ich rozwiązywania. Przeciwieństwem języków dziedzinowych są języki programowania ogólnego zastosowania.
import {Component} from '@angular/core';
import {trigger, state, style, animate, transition} from '@angular/animations';

@Component({
  selector: 'app-sandobx',
  template: `
    <div [@myAnimation]="state" class="container">
      Lorem ipsum
      <button (click)="toggleState()">change state</button>
    </div>
  `,
  animations: [
    trigger('myAnimation', [
      state('active', style({
        backgroundColor: '#eee',
        transform: 'scale(1)'
      })),
      state('inactive', style({
        backgroundColor: '#cfd8dc',
        transform: 'scale(1.1)'
      })),
      transition('inactive => active', animate('100ms 250ms ease-in')),
      transition('active => inactive', animate('100ms ease-out'))
    ])

  ]
})
export class SandobxComponent {
  state = 'inactive';

  toggleState() {
    this.state = this.state === 'active' ? 'inactive' : 'active';
  }
}
transition(':enter', [ ... ]); // Alias dla przejścia: void => *
transition(':leave', [ ... ]); // * => void
hero-list-enter-leave.component.ts (excerpt)
content_copy
animations: [
  trigger('heroState', [
    state('inactive', style({transform: 'translateX(0) scale(1)'})),
    state('active',   style({transform: 'translateX(0) scale(1.1)'})),
    transition('inactive => active', animate('100ms ease-in')),
    transition('active => inactive', animate('100ms ease-out')),
    transition('void => inactive', [
      style({transform: 'translateX(-100%) scale(1)'}),
      animate(100)
    ]),
    transition('inactive => void', [
      animate(100, style({transform: 'translateX(100%) scale(1)'}))
    ]),
    transition('void => *', [
      animate(300, keyframes([
        style({opacity: 0, transform: 'translateX(-100%)', offset: 0}),
        style({opacity: 1, transform: 'translateX(15px)',  offset: 0.3}),
        style({opacity: 1, transform: 'translateX(0)',     offset: 1.0})
      ]))
    ]),
    transition('active => void', [
      animate(200, style({transform: 'translateX(0) scale(0)'}))
    ])
  ])
]
<ul>
<li *ngFor="let hero of heroes"
(@flyInOut.start)="animationStarted($event)"
(@flyInOut.done)="animationDone($event)"
[@flyInOut]="'in'">
{{hero.name}}
</li>
</ul>
Dalsze przykłady...
HostListener

@HostListener
@Component({
  selector: 'app-sandobx',
  template: '<div [@state]="state" class="container">Hi!</div>',
  animations: [
    trigger('state', [
      state('active', style({
        transform: 'scale(1.05)'
      })),
      state('inactive', style({
        transform: 'scale(1)'
      })),
      transition('inactive => active', animate('100ms ease-in')),
      transition('active => inactive', animate('100ms ease-out'))
    ])

  ]
})
export class SandobxComponent {
  state = 'inactive';

  @HostListener('mouseover')
  @HostListener('mouseleave')
  toggleState() {
    this.state = this.state === 'active' ? 'inactive' : 'active';
  }
}
@HostListener lets you listen for events on the host element or component.
@HostBinding
import {Component, HostBinding, HostListener} from '@angular/core';

@Component({
  selector: 'app-sandobx',
  template: '<div class="container">Lorem ipsum</div>'
})
export class SandobxComponent {
  @HostBinding('style.color')
  color = 'blue';

  @HostListener('mouseover')
  @HostListener('mouseleave')
  toggleState() {
    this.color = this.color === 'red' ? 'blue' : 'red';
  }
}
@HostBinding lets you set properties on the element or component that hosts the directive.
Here are a few more examples of possible bindings:
- @HostBinding(‘class.active’)
- @HostBinding(‘disabled’)
- @HostBinding(‘attr.role’)
Dynamic components
entryComponents
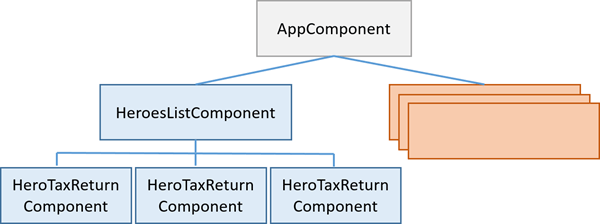
An entry component is any component that Angular loads imperatively, (which means you’re not referencing it in the template), by type. You specify an entry component by bootstrapping it in an NgModule, or including it in a routing definition.
There are two main kinds of entry components:
- The bootstrapped root component.
- A component you specify in a route definition.
deklaratywny vs imperatywny

EntryComponents in module declaration: Specifies a list of components that should be compiled when this module is defined. For each component listed here, Angular will create a ComponentFactory and store it in the ComponentFactoryResolver.
@Directive({
  selector: '[app-template]'
})
export class TemplateDirective {
  constructor(public viewContainerRef: ViewContainerRef) {
  }
}
@Component({
  selector: 'app-dynamic',
  template: '<div class="container"> <ng-template app-template></ng-template></div>'
})
export class DynamicComponent implements AfterViewInit {

  @ViewChild(TemplateDirective)
  dynamicHost: TemplateDirective;

  constructor(private componentFactoryResolver: ComponentFactoryResolver) { }

  ngAfterViewInit(): void {
    const componentFactory = this.componentFactoryResolver.resolveComponentFactory(RegisterFormComponent);
    const viewContainerRef = this.dynamicHost.viewContainerRef;

    viewContainerRef.clear();
    viewContainerRef.createComponent(componentFactory);
  }

}
Dynamicznie ładowane komponenty
Pora na kodowanie

Do zrobienia
- Menu które dynamicznie ładuje komponent aktualnie wyświetlany
- Po najechaniu myszką na pozycje w menu, zmienia się kolor czcionki (użyj HostBinding)
- Komponent który opakowuje przekazany html w div z klasą container i row z wykorzystaniem ng-content
- Na edycji zestawu pozwól na dodawanie nowych elementów. Nowe elementy mają się pojawiać z animacją
- Dane po edycji powinny być wysyłane na backend
Module

import { BrowserModule } from '@angular/platform-browser';
import { NgModule } from '@angular/core';
import { FormsModule } from '@angular/forms';
import { HttpModule } from '@angular/http';

import { AppComponent } from './app.component';

@NgModule({
  declarations: [
    AppComponent
  ],
  imports: [
    BrowserModule,
    FormsModule,
    HttpModule
  ],
  providers: [],
  bootstrap: [AppComponent]
})
export class AppModule { }
In Angular, a module is a mechanism to group components, directives, pipes and services that are related, in such a way that can be combined with other modules to create an application. An Angular application can be thought of as a puzzle where each piece (or each module) is needed to be able to see the full picture. In the same way, a module can export or hide components, directives, pipes and services. The exported elements are meant to be used by other modules, while the ones that are not exported (hidden) are just used inside the module itself and cannot be directly accessed by other modules of our application.
Why?
https://angular-2-training-book.rangle.io/handout/modules/introduction.html
@NgModule({
  providers?: Provider[]
  declarations?: Array<Type<any> | any[]>
  imports?: Array<Type<any> | ModuleWithProviders | any[]>
  exports?: Array<Type<any> | any[]>
  entryComponents?: Array<Type<any> | any[]>
  bootstrap?: Array<Type<any> | any[]>
  schemas?: Array<SchemaMetadata | any[]>
  id?: string
})
providers
list of providers available to this component and its children
declarations
Specifies a list of directives/pipes that belong to this module.
imports
Specifies a list of modules whose exported directives/pipes should be available to templates in this module. This can also contain ModuleWithProviders.
exports
Specifies a list of directives/pipes/modules that can be used within the template of any component that is part of an Angular module that imports this Angular module.
schemas
Elements and properties that are not Angular components nor directives have to be declared in the schema.
id
An opaque ID for this module, e.g. a name or a path. Used to identify modules in getModuleFactory. If left undefined, the NgModule will not be registered with getModuleFactory.
Bootstraping
An NgModule describes how the application parts fit together. Every application has at least one Angular module, the root module that you bootstrap to launch the application. By convention, it is usually called AppModule.
To bootstrap our module based application, we need to inform Angular which one is our root module to perform the compilation in the browser. This compilation in the browser is also known as "Just in Time" (JIT) compilation.
// --> main.ts

if (environment.production) {
  // Disable Angular's development mode, which turns off assertions and other checks within the framework.
  enableProdMode();
}

// Creates an instance of an `@NgModule` for a given platform using the given runtime compiler.
platformBrowserDynamic()
        .bootstrapModule(AppModule)
        .catch(err => console.log(err));
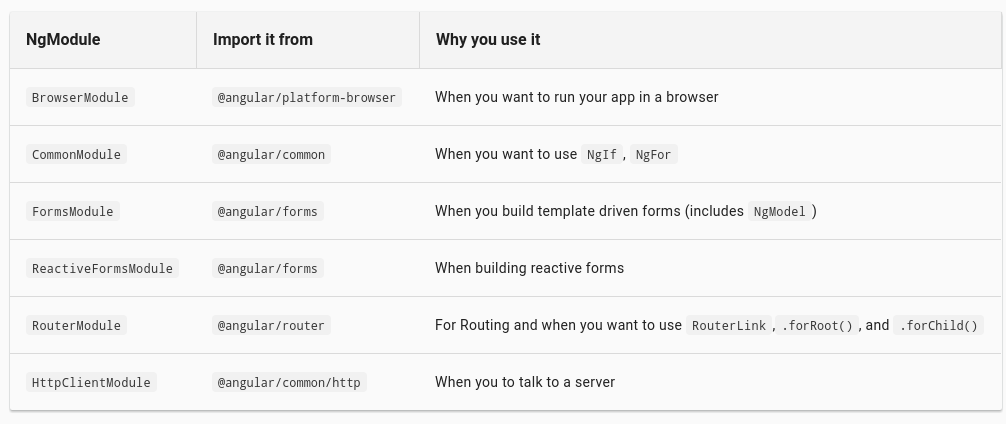
Frequently Used Modules
Pora na kodowanie

Fire! Fire! Fire!
Do zrobienia
LogicModule
AppModule
DashboardModule
UserListComponent
UserDetailsComponent
DashboardComponent
LearnModule

Przerwa
Directive
@Directive({
  selector?: string
  inputs?: string[]
  outputs?: string[]
  host?: {...}
  providers?: Provider[]
  exportAs?: string
  queries?: {...}
})
inputs
list of class property names to data-bind as component inputs
outputs
list of class property names that expose output events that others can subscribe to
host
map of class property to host element bindings for events, properties and attributes (np. '(change)': 'onChange($event)',)
providers
list of providers available to this component and its children
exportAs
name under which the component instance is exported in a template. Can be given a single name or a comma-delimited list of names.
queries
configure queries that can be injected into the component
Attribute directive
*change the appearance or behavior of an element, component, or another directive.
import { Directive, ElementRef, HostListener, Input } from '@angular/core';

@Directive({
  selector: '[appHighlight]'
})
export class HighlightDirective {

  constructor(private el: ElementRef) { }

  @Input('appHighlight') highlightColor: string;

  @HostListener('mouseenter') onMouseEnter() {
    this.highlight(this.highlightColor || 'red');
  }

  @HostListener('mouseleave') onMouseLeave() {
    this.highlight(null);
  }

  private highlight(color: string) {
    this.el.nativeElement.style.backgroundColor = color;
  }
}
inject a reference to the host DOM element. ElementRef grants direct access to the host DOM element through its nativeElement property.
Przykład derektywy
<p [appHighlight]="someColor">Highlight me!</p>

<p appHighlight="red">Highlight me!</p>
Of course you could reach into the DOM with standard JavaScript and attach event listeners manually. There are at least three problems with that approach:
- You have to write the listeners correctly.
- The code must detach the listener when the directive is destroyed to avoid memory leaks.
- Talking to DOM API directly isn't a best practice.
Structural directive
*change the DOM layout by adding and removing DOM elements.
One structural directive per host element
The reason is simplicity. Structural directives can do complex things with the host element and its descendents. When two directives lay claim to the same host element, which one takes precedence? Which should go first, the NgIf or the NgFor? Can the NgIf cancel the effect of the NgFor? If so (and it seems like it should be so), how should Angular generalize the ability to cancel for other structural directives?
ng-template
@Component({
  selector: 'ng-if-else',
  template: `
    <button (click)="show = !show">{{show ? 'hide' : 'show'}}</button>
    show = {{show}}
    <br>
    <div *ngIf="show; else elseBlock">Text to show</div>
    <ng-template #elseBlock>Alternate text while primary text is hidden</ng-template>
`
})
class NgIfElse {
  show: boolean = true;
}
The <ng-template> is an Angular element for rendering HTML. It is never displayed directly. In fact, before rendering the view, Angular replaces the <ng-template> and its contents with a comment.
<ng-template [ngIf]="lessons" [ngIfElse]="loading">
   <div class="lessons-list">
     ...
   </div>
</ng-template>

<ng-template #loading>
    <div>Loading...</div>
</ng-template>
HTML template tag
<template id="myTemplate">
  <div>
    My awesome template!
  </div>
</template>
<div id="host"></div>
<script>
let template = document.querySelector('#myTemplate');
let clone = document.importNode(template.content, true);
let host = document.querySelector('#host');
host.appendChild(clone);
</script>First off, <ng-template> is Angular’s own implementation of the <template> tag, allowing us to think about application design in web components and the ideas behind them. It also provides us with more power than the <template> element gives us by default, seamlessly fitting into the way Angular compiles our code.
Create view based on template
	constructor( private templateRef: TemplateRef<any>,
	             private viewContainer: ViewContainerRef) {

        }

	@Input() set cpIf(condition: boolean) {
	   if (condition) {
		  this.viewContainer.createEmbeddedView(this.templateRef);
	   } else {
		  this.viewContainer.clear();
	  }
	}
Example
@Component({
  selector: 'ng-if-else',
  template: `
    <button (click)="show = !show">{{show ? 'hide' : 'show'}}</button>
    show = {{show}}
    <br>
    <div *ngIf="show; else elseBlock">Text to show</div>
    <ng-template #elseBlock>Alternate text while primary text is hidden</ng-template>
`
})
class NgIfElse {
  show: boolean = true;
}
*If it is necessary to display a template when the expression is falsy use the else template binding as shown. Note that the else binding points to a <ng-template> labeled #elseBlock. The template can be defined anywhere in the component view but is typically placed right after ngIf for readability.
ng-container
<p>
  I turned the corner
  <ng-container *ngIf="hero">
    and saw {{hero.name}}. I waved
  </ng-container>
  and continued on my way.
</p>
The Angular <ng-container> is a grouping element that doesn't interfere with styles or layout because Angular doesn't put it in the DOM.
Custom structural directive
import { Directive, Input, TemplateRef, ViewContainerRef } from '@angular/core';

/**
 * Add the template content to the DOM unless the condition is true.
 */
@Directive({ selector: '[appUnless]'})
export class UnlessDirective {
  private hasView = false;

  constructor(
    private templateRef: TemplateRef<any>,
    private viewContainer: ViewContainerRef) { }

  @Input() set appUnless(condition: boolean) {
    if (!condition && !this.hasView) {
      this.viewContainer.createEmbeddedView(this.templateRef);
      this.hasView = true;
    } else if (condition && this.hasView) {
      this.viewContainer.clear();
      this.hasView = false;
    }
  }
}
<p *appUnless="condition">
(A) This paragraph is displayed because the condition is false.
</p>
Pora na kodowanie

- Stwórz dyrektywę strkturalną loader która wyświetla loader bądź też pobrane dane
- Stwórz dyrektywę która opakowuje inputa i stylizuje go oraz dodaje ikonkę przekazaną jako parametr
Service

Dependency injection
export default class LoggerService {
  info(str: string) { console.log(str); }
}
@Directive({
  selector: '[app-highlight]',
  providers: [
    SandoboxService,
    LoggerService
  ]
})
export default class HighlightDirective {
  constructor(private el: ElementRef,
              private sandoboxService: SandoboxService ) {
    sandoboxService.greetings();
  }
}
The @Injectable() decorator identifies a service class that might require injected dependencies. When Angular creates a class whose constructor has parameters, it looks for type and injection metadata about those parameters so that it can inject the right service.
Services are singletons within the scope of an injector
import {Injectable} from '@angular/core';
import LoggerService from './logger.service';

@Injectable()
export default class SandoboxService {
  constructor(private loggerService: LoggerService) {
  }

  greetings() {
    this.loggerService.info('Hello');
  }
}
@Injectable() is a required coding style for services.
@NgModule vs @Component
@NgModule
@Component
const silentLogger = {}
...
providers: [
  Logger,
  [ UserService, { provide: Logger, useClass: BetterLogger } ],
  [{ provide: SilentLogger, useValue: silentLogger }]
],
@Component({
selector: 'app-heroes',
providers: [ HeroService ],
template: `
<h2>Heroes</h2>
<app-hero-list></app-hero-list>
`
})
export class HeroesComponent { }Angular module providers are registered with the application's root injector. Angular can inject the corresponding services in any class it creates. Once created, a service instance lives for the life of the app and Angular injects this one service instance in every class that needs it.
A component's providers are registered with each component instance's own injector.
Angular can only inject the corresponding services in that component instance or one of its descendant component instances. Angular cannot inject the same service instance anywhere else. Note that a component-provided service may have a limited lifetime. Each new instance of the component gets its own instance of the service and, when the component instance is destroyed, so is that service instance.
Sometimes it's easier to provide a ready-made object rather than ask the injector to create it from a class.
constructor(@Optional() private logger: Logger) {
  if (this.logger) {
    this.logger.log(some_message);
  }
}
Sometimes you need to create the dependent value dynamically, based on information you won't have until the last possible moment. Maybe the information changes repeatedly in the course of the browser session.
export class InjectorComponent implements OnInit {
  constructor(private injector: Injector) { }

  get rodent() {
    return this.injector.get(ROUS, 'default value when not found');
  }
}
export let heroServiceProvider =
{ provide: HeroService,
useFactory: heroServiceFactory,
deps: [Logger, UserService]
};You can tell Angular that the dependency is optional by annotating the constructor argument with @Optional()
The get() method throws an error if it can't resolve the requested service. You can call get() with a second parameter, which is the value to return if the service is not found. Angular can't find the service if it's not registered with this or any ancestor injector.
@Component({
  selector: 'app-hero-of-the-month',
  templateUrl: './hero-of-the-month.component.html',
  providers: [
    { provide: Hero,          useValue:    someHero },
    { provide: TITLE,         useValue:   'Hero of the Month' },
    { provide: HeroService,   useClass:    HeroService },
    { provide: LoggerService, useClass:    DateLoggerService },
    { provide: MinimalLogger, useExisting: LoggerService },
    { provide: RUNNERS_UP,
                useFactory:  runnersUpFactory(2),
                deps: [Hero, HeroService]
    }
  ]
})
export class HeroOfTheMonthComponent {
  logs: string[] = [];

  constructor(
      logger: MinimalLogger,
      public heroOfTheMonth: Hero,
      @Inject(RUNNERS_UP) public runnersUp: string,
      @Inject(TITLE) public title: string)
  {
    this.logs = logger.logs;
    logger.logInfo('starting up');
  }
}
You can't use an interface as a provider token because interfaces are not JavaScript objects. They exist only in the TypeScript design space. They disappear after the code is transpiled to JavaScript. A provider token must be a real JavaScript object of some kind: such as a function, an object, a string, or a class. Using a class as an interface gives you the characteristics of an interface in a real JavaScript object. Of course a real object occupies memory. To minimize memory cost, the class should have no implementation.
Zaawansowane wstrzykiwanie zależności
Application components often need to share information. More loosely coupled techniques such as data binding and service sharing are preferable
What if you don't know the concrete parent component class?
export abstract class MinimalLogger {
  logs: string[];
  logInfo: (msg: string) => void;
}
// The forwardRef breaks the circular reference you just created by having the AlexComponent refer to itself.
providers: [{ provide: Parent, useExisting: forwardRef(() => AlexComponent) }],https://typeofweb.com/2016/07/19/dependency-injection-w-angular-2/
const templateB = `
  <div class="b">
    <div>
      <h3>{{name}}</h3>
      <p>My parent is {{parent?.name}}</p>
    </div>
    <carol></carol>
    <chris></chris>
  </div>`;

@Component({
  selector:   'barry',
  template:   templateB,
  providers:  [{ provide: Parent, useExisting: forwardRef(() => BarryComponent) }]
})
export class BarryComponent implements Parent {
  name = 'Barry';
  constructor( @SkipSelf() @Optional() public parent: Parent ) { }
}
Imagine one branch of a component hierarchy: Alice -> Barry -> Carol. Both Alice and Barry implement the Parent class-interface. Barry is the problem. He needs to reach his parent, Alice, and also be a parent to Carol. That means he must both inject the Parent class-interface to get Alice and provide a Parent to satisfy Carol.
When a component requests a dependency, Angular tries to satisfy that dependency with a provider registered in that component's own injector. If the component's injector lacks the provider, it passes the request up to its parent component's injector. If that injector can't satisfy the request, it passes it along to its parent injector. The requests keep bubbling up until Angular finds an injector that can handle the request or runs out of ancestor injectors. If it runs out of ancestors, Angular throws an error.
Pora na kodowanie

Do zrobienia
- Bullet One
- Bullet Two
- Bullet Three
Pipe

Filter umarł, niech żyje pipe
import { Component } from '@angular/core';

@Component({
  selector: 'app-hero-birthday',
  ...
})
export class HeroBirthdayComponent {
  birthday = new Date(1988, 3, 15); // April 15, 1988
}
<p>The hero's birthday is {{ birthday | date:"MM/dd/yy" }}</p><div *ngFor="let hero of (heroes | flyingHeroes)">
{{hero.name}}
</div><div class="container">
{{currentDate | date:"MM/dd/yy" | example:'W dniu':' zrobiłem pipe'}}
</div>import {Pipe, PipeTransform} from '@angular/core';
@Pipe({
name: 'example'
})
export default class ExamplePipe implements PipeTransform {
transform(value: string, prefix: string, suffix: string): string {
return `${prefix} ${value} ${suffix}`;
}
}
Jak zrobić pipe?
- You must include your pipe in the declarations array of the AppModule.
- Angular looks for changes to data-bound values through a change detection process that runs after every DOM event: every keystroke, mouse move, timer tick, and server response. This could be expensive. Angular strives to lower the cost whenever possible and appropriate. Angular picks a simpler, faster change detection algorithm when you use a pipe.
Pure pipes (default)
Angular executes a pure pipe only when it detects a pure change to the input value. A pure change is either a change to a primitive input value (String, Number, Boolean, Symbol) or a changed object reference (Date, Array, Function, Object). Angular ignores changes within (composite) objects. It won't call a pure pipe if you change an input month, add to an input array, or update an input object property.
import {Pipe, PipeTransform} from '@angular/core';

@Pipe({
  name: 'example',
  pure: false
})
export default class ExamplePipe implements PipeTransform {
  transform(value: string, prefix: string, suffix: string): string {
    return `${prefix} ${value} ${suffix}`;
  }
}
<div class="container">
    {{users | example:'W dniu':' zrobiłem pipe'}}
</div>

...

users = ['1', '2'];

...
setInterval(() => { this.users.push('3'); }, 1000);
Wbudowane pipy
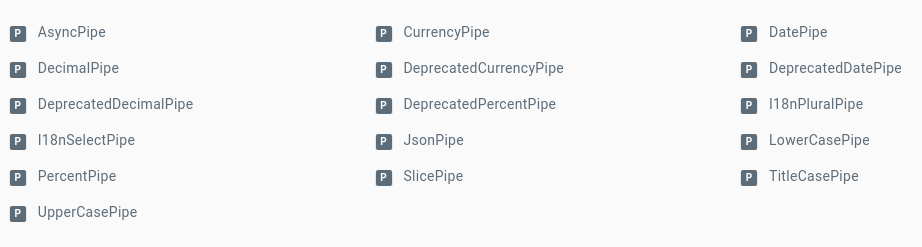
Wbudowane pipy
| Pipe | Description | Example |
|---|---|---|
| DecimalPipe | Formats a number as text. Group sizing and separator and other locale-specific configurations are based on the active locale. | <!--output '002.71828'--> <p>e (3.1-5): {{e | number:'3.1-5'}}</p> |
| JsonPipe | Converts value into string using JSON.stringify. Useful for debugging | <pre>{{object | json}}</pre> |
| SlicePipe | Creates a new List or String containing a subset (slice) of the elements. | <!-- abcdefghij --> <p>{{str}}[0:4]: '{{str | slice:0:4}}' - output is expected to be 'abcd'</p> |
| UpperCasePipe, LowerCasePipe | ||
| CurrencyPipe | Formats a number as currency using locale rules. | <!--output '0 001,35 CA$'--> <p>B: {{b | currency:'CAD':'symbol':'4.2-2':'fr'}}</p> |
| AsyncPipe | The async pipe subscribes to an Observable or Promise and returns the latest value it has emitted. When a new value is emitted, the async pipe marks the component to be checked for changes. When the component gets destroyed, the async pipe unsubscribes automatically to avoid potential memory leaks. | <span>Wait for it... {{ greeting | async }}</span> |
Async
Problem
@Component({
  selector: 'my-app',
  templateUrl: './app.component.html',
  styleUrls: ['./app.component.css']
})
export class AppComponent {
  message = '';

  constructor() {
    this.getData().then(data => this.message = data);
  }

  getData(): Promise<string> {
    return new Promise((resolve, reject) => {
      setTimeout(
        () => resolve('data from promise'), 3000
      );
    });
  }
}
message: {{message}}Async
- pozwala używać observable i promises bezpośrednio na szablonie
- automatycznie wywołuje unsubscribe
- zmienne z $ na końcu to observable
- otrzymane dane z observable można przypisać do zmiennej
import { Component } from '@angular/core';

@Component({
  selector: 'my-app',
  templateUrl: './app.component.html',
  styleUrls: ['./app.component.css']
})
export class AppComponent {
  message$: Promise<string>;

  constructor() {
    this.message$ = this.getData();
  }
  ...
}
message: {{message$ | async}}<div *ngIf="user$ | async as user; else loading">
<user-profile
[user]="user.profile">
</user-profile>
<user-messages
[user]="user.messages">
</user-messages>
</div>
<ng-template #loading>
Loading stuff...
</ng-template><div *ngFor="let item of data$ | async">
{{item}}
</div>
No FilterPipe or OrderByPipe
Angular doesn't provide pipes for filtering or sorting lists. Developers familiar with AngularJS know these as filter and orderBy. There are no equivalents in Angular. This isn't an oversight. Angular doesn't offer such pipes because they perform poorly and prevent aggressive minification. Both filter and orderBy require parameters that reference object properties. Earlier in this page, you learned that such pipes must be impure and that Angular calls impure pipes in almost every change-detection cycle.
The Angular team and many experienced Angular developers strongly recommend moving filtering and sorting logic into the component itself.
Pora na kodowanie

Do zrobienia
- pipe służący do tłumaczenia aplikacji
- pipe pozwala przyjmować parametry które podstawia w tekście
- tłumaczenia są zaszyte w osobnej klasie jako static
// 'Przelew krajowy'
<p> {{ transfer.header.label | translate }} </p>

// Witaj ((param)) -> Witaj Kamil!
<p> {{ user.welcome | translate: user }}</p>
Testowanie

TestBed
At the heart of Angular unit testing is a class called TestBed, which is responsible for simulating the Angular application environment so that tests can be performed.
| Name | Method | |
|---|---|---|
| configureTestingModule | This method is used to configure the Angular testing module. | TestBed.configureTestingModule({ declarations: [ SandobxComponent ] }) |
| createComponent | This method is used to create an instance of the component. | TestBed.createComponent( SandobxComponent ) |
| compileComponents | This method is used to compile components | TestBed.configureTestingModule(...) .compileComponents(); |
import { async, ComponentFixture, TestBed }
        from '@angular/core/testing';
import { SandobxComponent } from './sandobx.component';

describe('SandobxComponent', () => {
  let component: SandobxComponent;
  let fixture: ComponentFixture<SandobxComponent>;

  beforeEach(async(() => {
    TestBed.configureTestingModule({
      declarations: [ SandobxComponent ],
     providers: [
                { provide: Model,
                  useValue: { getData: () => ['mock array']; }
                }
     ]
    })
    .compileComponents();
  }));

  beforeEach(() => {
    fixture = TestBed.createComponent(SandobxComponent);
    component = fixture.componentInstance;
    fixture.detectChanges();
  });

  it('should create', () => {
    expect(component).toBeTruthy();
  });
});
Useful ComponentFixture Methods and Properties:
- componentInstance This property returns the component object.
- debugElement This property returns the test host element for the component.
- nativeElement This property returns the DOM object representing the host element
- detectChanges() This method causes the test bed to detect state changes and reflect them
- whenStable() This method returns a Promise that is resolved
Inject mock service
Testowanie logiki szablonu
beforeEach(...
    debugElement = fixture.debugElement;
    bindingElement = debugElement.query(By.css("span")).nativeElement;
    ...
)

 it("filters categories", () => {
        component.category = "Chess"
        fixture.detectChanges();
        expect(component.getProducts().length).toBe(1);
        expect(bindingElement.textContent).toContain("1");

        component.category = "Soccer";
        fixture.detectChanges();
        expect(component.getProducts().length).toBe(2);
        expect(bindingElement.textContent).toContain("2");
    });
Useful DebugElement Properties and Methods:
- nativeElement - This property returns the object that represents the HTML element in the DOM
- children - This property returns an array of DebugElement objects representing the children of this element
- query(selectorFunction) - The selectorFunction is passed a DebugElement object for each
HTML element in the component’s template, and this method returns the first DebugElement for which the function returns true. - queryAll(selectorFunction) - Similar to the query method, except the result is all the
DebugElement objects for which the function returns true. - triggerEventHandler(name, event) - This method triggers an event. See the “Testing Component
Events” section for details.
Unit test
Jasmine

Jasmine is a Behavior Driven Development testing framework for JavaScript. It does not rely on browsers, DOM, or any JavaScript framework. Thus it's suited for websites, Node.js projects, or anywhere that JavaScript can run.
Co to jest?
E2E
protractor

Pora na kodowanie

Do zrobienia
- Bullet One
- Bullet Two
- Bullet Three
Routing

Jak to wygląda w praktyce?
@Component({
  selector: 'app-ui',
  template: '<router-outlet></router-outlet>'
})
export default class UiComponent {
}
const routes: Routes = [
  {
    path: '',
    component: UiComponent,
    children: [
      {path: 'dashboard', component: DashboardComponent},
      {path: 'create', component: CreateFlashcardComponent},
      {path: '', redirectTo: '/dashboard', pathMatch: 'full'},
      {path: '**', component: PageNotFoundComponent}
    ]
  }
];

....
@NgModule({
  imports: [
    RouterModule.forRoot(routes, {
      enableTracing: true
    }),
    ...
  ],
Kolejność musi być od najbardziej specyficznego do najmniej
Router state
After the end of each successful navigation lifecycle, the router builds a tree of ActivatedRoute objects that make up the current state of the router. You can access the current RouterState from anywhere in the application using the Router service and the routerState property.
@Component({ ... })
export default class FlashcardCollectionDetailsComponent {
  flashCardCollection: FlashCardCollection;

  constructor(private activateRoute: ActivatedRoute,
              private flashcardQueryService: FlashcardQueryService) {
    this.activateRoute.params
            .subscribe(param => this.flashCardCollection = flashcardQueryService.getFlashCardByID(param['id']));

    // lub jezeli komponent nie bedzie reużyty
    const selectedItemID = this.activateRoute.snapshot.paramMap.get('id');
    this.flashCardCollection = this.flashcardQueryService.getFlashCardByID(selectedItemID);
  }
}
  <li>
    <a
        (click)="toogleMenu()"
        routerLinkActive="active-menu-item"
        routerLink="/dashboard"
        href="#">
            Dashboard
    </a>
 </li>
  constructor(private router: Router) {}

  saveDetails() {
    this.router.navigate(['dashboard']);

    // localhost:3000/dashboard;id=15;foo=foo
    this.router.navigate(['/dashboard', { id: heroId, foo: 'foo' }]);
  }
/**
* Navigate based on the provided array of commands and a starting point.
* If no starting route is provided, the navigation is absolute.
*
* Returns a promise that:
* - resolves to 'true' when navigation succeeds,
* - resolves to 'false' when navigation fails,
* - is rejected when an error happens.
*/
navigate(commands: any[], extras?: NavigationExtras): Promise<boolean>;The optional route parameters are not separated by "?" and "&" as they would be in the URL query string. They are separated by semicolons ";" This is matrix URL notation.
Router state

Router events
During each navigation, the Router emits navigation events through the Router.events property. These events range from when the navigation starts and ends to many points in between. The full list of navigation events is displayed in the table below.
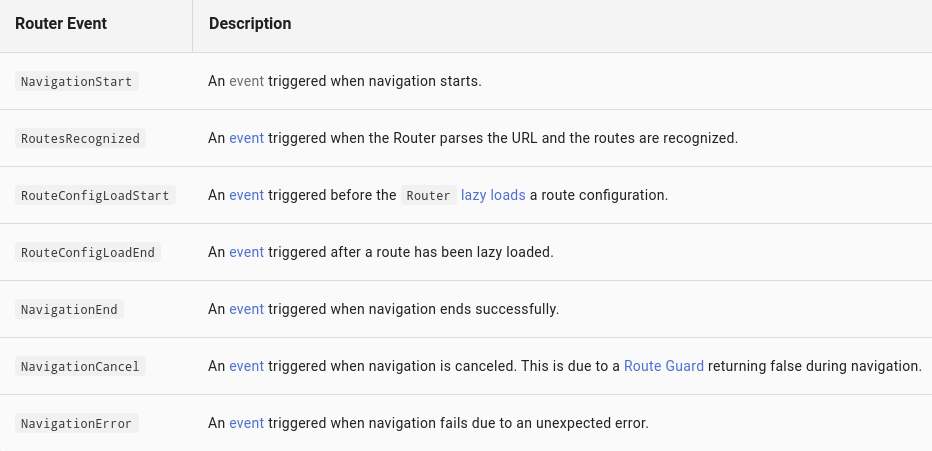
Router events
These events are logged to the console when the enableTracing option is enabled also. Since the events are provided as an Observable, you can filter() for events of interest and subscribe() to them to make decisions based on the sequence of events in the navigation process.
  constructor(private router: Router) {
    router.events.subscribe(e => {
      if (e instanceof NavigationEnd) {
        console.log('zakonczono nawigacje');
      }
    });
  }
By default, the router re-uses a component instance when it re-navigates to the same component type without visiting a different component first. The route parameters could change each time. Unfortunately, ngOnInit is only called once per component instantiation. If instance will never, never, ever be re-used, you can simplify the code with the snapshot.
Guards
@Injectable()
export default class HasAnyFlashcardGuard implements CanActivate {
  constructor(private router: Router, private flashcardQueryService: FlashcardQueryService) { }

  canActivate(route: ActivatedRouteSnapshot, state: RouterStateSnapshot): boolean {
    const hasFlashCards = this.flashcardQueryService.getFlashCards().length !== 0;

    if (!hasFlashCards) {
      this.router.navigate(['dashboard']);
    }
    return hasFlashCards;
  }
}
const routes: Routes = [
  {
    path: 'learning',
    component: LearnigComponent,
    children: [
      { path: 'statistic',
        component: StatisticComponent,
        canActivate: [HasAnyFlashcardGuard]
      },
    ]
  }
];
The router supports multiple guard interfaces:
- CanActivate to mediate navigation to a route.
- CanActivateChild to mediate navigation to a child route
- CanDeactivate to mediate navigation away from the current route.
- Resolve to perform route data retrieval before route activation.
- CanLoad to mediate navigation to a feature module loaded asynchronously.
Pora na kodowanie

Do zrobienia
- formatka logowania i rejestracji
- guard blokujący możliwość wejścia na dashboard bez zalogowania
- formatka z informacją o braku uprawnień
- stwórz osobny moduł zawierający formatki z modułu nauki
- za pomocą nazwanego routerOutlet wyświetlaj komunikaty
HTTP

Most front-end applications communicate with backend services over the HTTP protocol. Modern browsers support two different APIs for making HTTP requests: the XMLHttpRequest interface and the fetch() API. The HttpClient in angular/common/http offers a simplified client HTTP API for Angular applications that rests on the XMLHttpRequest interface exposed by browsers. Additional benefits of HttpClient include testability features, typed request and response objects, request and response interception, Observable apis, and streamlined error handling.
O co chodzi?
@Injectable()
export class FlashcardQueryService {
  constructor(private httpClient: HttpClient) { }

  getFlashCardByID(id: string): Observable<FlashCardCollection> {
    const serviceAddress = 'http://localhost:8080/item/id=' + id;
    return this.httpClient.get<FlashCardCollection>(serviceAddress, /* { observe: 'response' } */)
  }
}
ngOnInit(): void {
this.flashcardQueryService
.getFlashCardByID('123').subscribe(
flashCardCollection => this.flashCardCollection = flashCardCollection
);
}import {HttpErrorResponse, HttpEvent, HttpHandler, HttpInterceptor, HttpRequest} from '@angular/common/http';
import {Observable} from 'rxjs/Observable';
import {Injectable} from '@angular/core';
import 'rxjs/add/operator/do';
import {noop} from 'rxjs/util/noop';
@Injectable()
export default class LoggerInterceptor implements HttpInterceptor {
intercept(req: HttpRequest<any>, nextInterceptorInChain: HttpHandler): Observable<HttpEvent<any>> {
console.log(`START ${req.method} ${req.url}`);
return nextInterceptorInChain.handle(req)
.do(
noop,
(err: any) => this.handleError(err)
);
}
private handleError(err: any) {
if (err instanceof HttpErrorResponse) {
if (err.status === 403) {
console.log('BRAK UPRAWNIEN!');
}
}
}
}
Although interceptors are capable of mutating requests and responses, the HttpRequest and HttpResponse instance properties are readonly, rendering them largely immutable. You can clone and modify the request
You must call subscribe() or nothing happens! The AsyncPipe subscribes (and unsubscribes) for you automatically.

describe('HttpClient testing', () => {
  let httpClient: HttpClient;
  let httpTestingController: HttpTestingController;

  beforeEach(() => {
    TestBed.configureTestingModule({
      imports: [ HttpClientTestingModule ]
    });

    // Inject the http service and test controller for each test
    httpClient = TestBed.get(HttpClient);
    httpTestingController = TestBed.get(HttpTestingController);
  });
  /// Tests begin ///
});
it('can test HttpClient.get', () => {
const testData: Data = {name: 'Test Data'};
// Make an HTTP GET request
httpClient.get<Data>(testUrl)
.subscribe(data =>
// When observable resolves, result should match test data
expect(data).toEqual(testData)
);
// The following `expectOne()` will match the request's URL.
// If no requests or multiple requests matched that URL
// `expectOne()` would throw.
const req = httpTestingController.expectOne('/data');
// Assert that the request is a GET.
expect(req.request.method).toEqual('GET');
// Respond with mock data, causing Observable to resolve.
// Subscribe callback asserts that correct data was returned.
req.flush(testData);
// Finally, assert that there are no outstanding requests.
httpTestingController.verify();
});Pora na kodowanie

Do zrobienia
- Bullet One
- Bullet Two
- Bullet Three
Forms

Angular (v2+) presents two different methods for creating forms, template-driven (what we were used to in AngularJS 1.x), or reactive.
When we talk about “reactive” forms (also known as model-driven), we’ll be avoiding directives such as ngModel, required and friends. The idea is that instead of declaring that we want Angular to power things for us, we can actually use the underlying APIs to do them for us. In a sense, instead of binding Object models to directives like template-driven forms, we in fact boot up our own instances inside a component class and construct our own JavaScript models. This has much more power and is extremely productive to work with as it allows us to write expressive code, that is very testable and keeps all logic in the same place, instead of scattering it around different form templates.
Template-drive vs reactive
Template driven
Binding events
<input type="text" (keyup)="onKeyPress($event)" placeholder="Szukaj"> onKeyPress(event: KeyboardEvent): void {
this.filter = (<HTMLInputElement>event.target).value;
}Typing the event object reveals a significant objection to passing the entire DOM event into the method: the component has too much awareness of the template details. It can't extract information without knowing more than it should about the HTML implementation. That breaks the separation of concerns between the template (what the user sees) and the component (how the application processes user data).
<input #filterField type="text" (keyup.enter)="0" placeholder="Szukaj">

<div class="col s12 m12 l4" *ngFor="let item of flashcards$ | async | flashcardFilter: filterField.value">
1.
2.
Template Form
<form (ngSubmit)="onSubmit()" #registerForm>
    <input #spy [(ngModel)]="user.firstName" placeholder="First name
    <label for="first_name">{{spy.className}}</label>

    <button class="btn blue" (click)="registerForm.form.reset()" type="button">clear</button>
    <button class="btn blue"
            [disabled]="!registerForm.form.valid || !registerForm.form.dirty" type="submit">
        register
    </button>
</form>| State | Class if true | Class if false |
|---|---|---|
| The control has been visited. |
ng-touched |
ng-untouched |
| The control's value has changed. | ng-dirty | ng-pristine |
| The control's value is valid. | ng-valid | ng-invalid |
.ng-invalid:not(form)  {
  border-left: 5px solid #a94442;
}
Walidacja
Angular comes with a subset of built-in validators out of the box. We can apply them either declaratively as directives on elements in our DOM, in case we’re building a template-driven form.
required - Requires a form control to have a non-empty value
minlength - Requires a form control to have a value of a minimum length
maxlength - Requires a form control to have a value of a maximum length
pattern - Requires a form control’s value to match a given regex
import {Directive, forwardRef, Input} from '@angular/core';
import {AbstractControl, FormControl, NG_VALIDATORS, ValidationErrors, Validator, ValidatorFn} from '@angular/forms';

export function forbiddenNameValidator(nameRe: RegExp): ValidatorFn {
  return (control: AbstractControl): { [key: string]: any } => {
    const forbidden = nameRe.test(control.value);
    return forbidden ? {
      forbiddenName: {valid: false}
    } : null;
  };
}

@Directive({
  selector: '[validLogin][ngModel]',
  providers: [
    {provide: NG_VALIDATORS, useExisting: forwardRef(() => LoginValidatorDirective), multi: true}
  ]
})
export default class LoginValidatorDirective implements Validator {
  @Input('validLogin')
  login: string;

  validator: Function = forbiddenNameValidator(/lolcio/);

  validate(c: FormControl): ValidationErrors | null {
    return this.validator(c);
  }
}
Dyrektywa walidująca
Reactive
driven
FormControl is a class that powers an individual form control, tracks the value and validation status, whilst offering a wide set of public API methods.
FormGroup is a group of FormControl instances, also keeps track of the value and validation status for the said group, also offers public APIs.

Reactive Form
   <form (submit)="login()" [formGroup]="loginForm" novalidate class="col s12">
      <div class="row">
        <div class="input-field col s12">
          <input formControlName="login" placeholder="Login" type="text" class="validate">
        </div>
        <div class="input-field col s12">
          <input formControlName="password" type="password" placeholder="Password" class="validate">
        </div>
      </div>
      <div class="row right-align">
        <button [disabled]="loginForm.invalid" class="btn blue" type="submit">login</button>
      </div>
    </form>
  </div>
loginControl = new FormControl('', [
Validators.required,
Validators.minLength(3),
]);
loginForm = new FormGroup({
login: this.loginControl,
password: new FormControl('', [
Validators.required,
Validators.minLength(3),
]),
});
login(): void { console.log(`Login: ${this.loginForm.get('login').value}`); }
ngOnInit() {
this.loginControl.valueChanges.subscribe(value => console.log(value));
} ngOnInit() {
this.rForm.get('validate').valueChanges.subscribe(
(validate) => {
if (validate == '1') {
this.rForm.get('name').setValidators([Validators.required, Validators.minLength(3)]);
this.titleAlert = 'You need to specify at least 3 characters';
}
else {
this.rForm.get('name').setValidators(Validators.required);
}
this.rForm.get('name').updateValueAndValidity();
});
}Dynamiczna zmiana walidatorów
function blacklistLogin(c: FormControl) {
  const EMAIL_REGEXP = /lolcio/;
  return !EMAIL_REGEXP.test(c.value) ? null : {
    validateEmail: {
      valid: false
    }
  };
}

...

  loginControl = new FormControl('', [
    Validators.required,
    Validators.minLength(3),
    blacklistLogin
  ]);
Własny walidator
Pora na kodowanie

i18n
ngx-translate vs built-in i18n
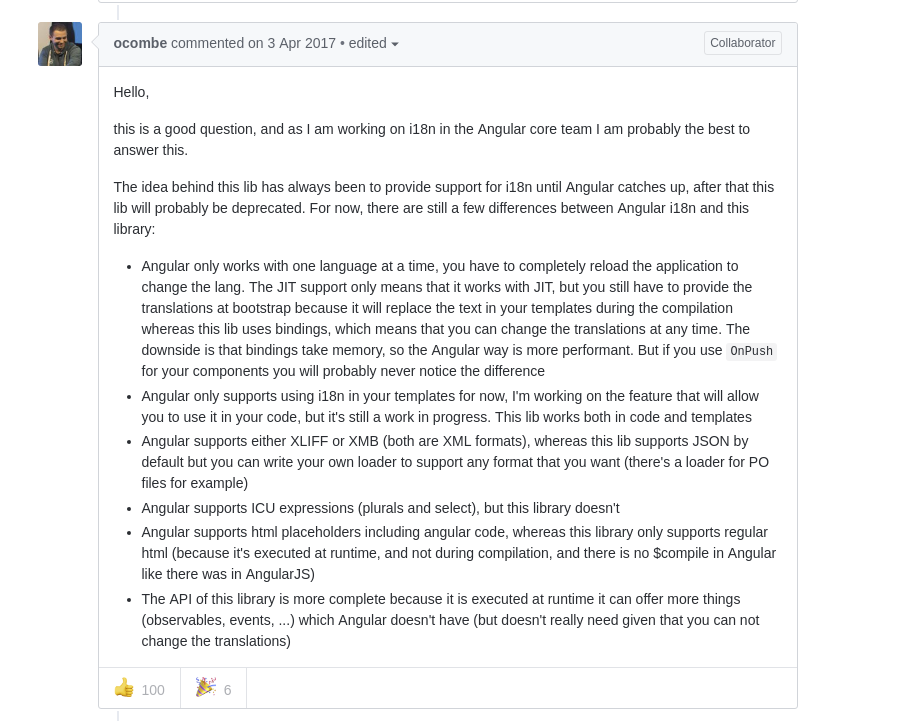
npm install @ngx-translate/core @ngx-translate/http-loaderngx-translate
   TranslateModule.forRoot({
      loader: {
        provide: TranslateLoader,
        useFactory: (http: HttpClient) => new TranslateHttpLoader(http),
        deps: [HttpClient]
      }
    })
constructor(private translate: TranslateService) {
translate.setDefaultLang('pl');
}<!-- translation: translation pipe -->
<p>{{ 'demo.greeting' | translate:{'name':'Andreas'} }}</p>
<!-- translation: directive -->
<p [translate]="'demo.greeting'" [translateParams]="{name: 'Andreas'}"></p>{
"demo": {
…
"greeting": "Hello {{name}}!"
}
}assets/i18n/en.json
https://www.codeandweb.com/babeledit/tutorials/how-to-translate-your-angular-app-with-ngx-translate
Pora na kodowanie

RxJS 5.5

Reaktywne
programowanie
Programowanie reaktywne to paradygmat programowania, którego filozofia opiera się na zdarzeniach. Komponenty naszej aplikacji powinny odpowiednio „reagować” – na interakcję z użytkownikiem, odpowiedź serwera czy błędy. Pozwala nam to również na osiągnięcie luźnych powiązań pomiędzy fragmentami aplikacji dzięki wymianie danych przy pomocy równoległych strumieni.
https://kamilmysliwiec.com/programowanie-reaktywne-wprowadzenie-rxjs
Co to jest?
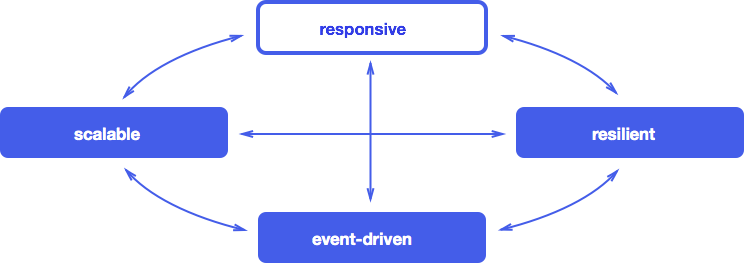
Observable vs Promise
- Promise może zwrócić wartość zaledwie raz, Observable wielokrotnie
- Observable może zostać anulowane
- Observable udostępnia zestaw metod do wygodnego filtrowania i operowania na danych znajdujących się w strumieniu
- Observable zapewnia ujednolicone API do zarządzania zdarzeniami, bez względu na to jakie jest ich źródło (elementy drzewa DOM, zapytanie HTTP, timer),
Synchronicznie
Asynchronicznie
Wiele danych
Pojedyńczy wynik
Funkcja
Iterator
Promise
Observable
public onSubmit() {
  //authenticate the user via the UserService
  this.subscription = this.userService.authenticate(email, password).subscribe(user => {
    this.user = user;
  });
}

ngOnDestroy() {
  this.subscription.unsubscribe();
}
ngOnDestroy & RxJS
T

Projekt praktyczny

Opis
Aplikacja do nauki fiszek, która będzie pozwalać tworzyć nowe zestawy fiszek, edytować istniejące i uczyć się kart z zestawu.
Wymagania
Lorem ipsum dolor sit amet, consectetur adipiscing elit. Proin urna odio, aliquam vulputate faucibus id, elementum lobortis felis. Mauris urna dolor, placerat ac sagittis quis.
Koniec
https://slides.com/kamillolo/angular-5


Linkografia
- Główne źródło informacji: https://angular.io
- https://www.flaticon.com/authors/tutsplus
- https://netbasal.com/create-advanced-components-in-angular-e0655df5dde6
Literatura