Intro to Linux
Agenda
- Day 1 - Key Concepts
- Day 2 - The Basics
- Day 3 - Administration
$ whoami
- Forward Communications
- Linux Enthusiast
- Programmer
+ Rust, Python, Go


Our Stack
- Ubuntu Linux (18.10)
- Gnome 3
- We will also install a few additional applications as we go along
Accessing the Terminal
- Windows Key + Type "Terminal"
- 'user' should be your username
- 'host' should your computer name
- After ':' is your "current directory" (~ means $HOMEDIR)
- '$' is user commands
- '#' is root
- Let's test...
user@host:~$user@host:~$ sudo -i
[sudo] password for user:
root@host:~#- Notice user name changes
Before we start...
-
Windows Key (App Search)
-
Ctrl+Alt+Up OR Ctrl+Alt+Down (Change "Workspace")
user@host:~$ ping -c 3 www.google.com

PING www.google.com (XXX.XXX.XXX.XXX) 56(84) bytes of data.
64 bytes from foo-bar-baz.net (XXX.XXX.XXX.XXX): icmp_seq=1 ttl=55 time=8.60 ms
64 bytes from foo-bar-baz.net (XXX.XXX.XXX.XXX): icmp_seq=2 ttl=55 time=4.59 ms
64 bytes from foo-bar-baz.net (XXX.XXX.XXX.XXX): icmp_seq=3 ttl=55 time=5.66 ms

--- www.google.com ping statistics ---
3 packets transmitted, 3 received, 0% packet loss, time 2004ms
rtt min/avg/max/mdev = 4.591/6.286/8.604/1.698 ms
Taking Notes
-
Go to https://remarkableapp.github.io/
- Click Linux
- Click Download (Top Right)
- Click 'Download .deb'
- Double Click Downloaded File
-
Click Install
-
Markdown is a plain text syntax that allows code formating and highlighting and rendering
-
- Markdown in 30 seconds
# Title

## Sub Title

### etc. etc. etc.


Comments about `commands`

List:

* **bold**
* *italics*
* ++underline++
* ~~strikethrough~~
* ==Highlight==

Even [hyper-links](www.someurl.com)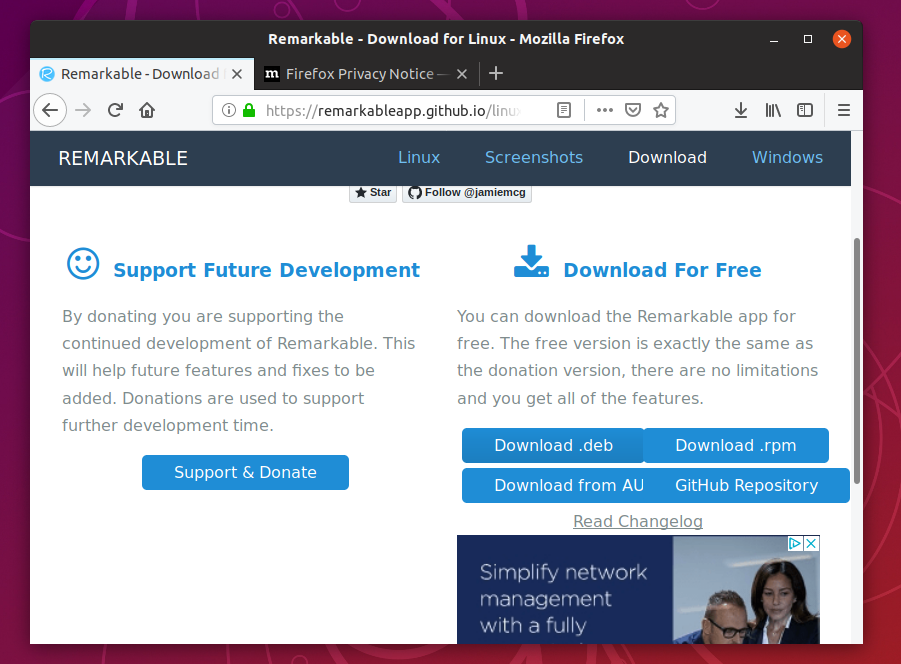
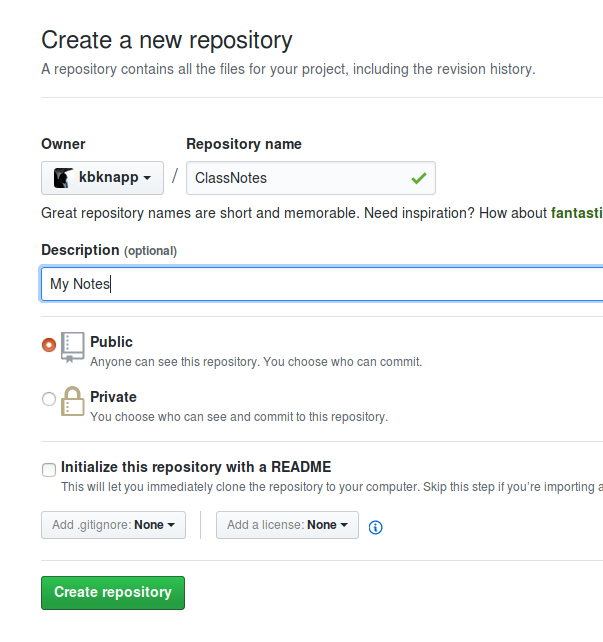
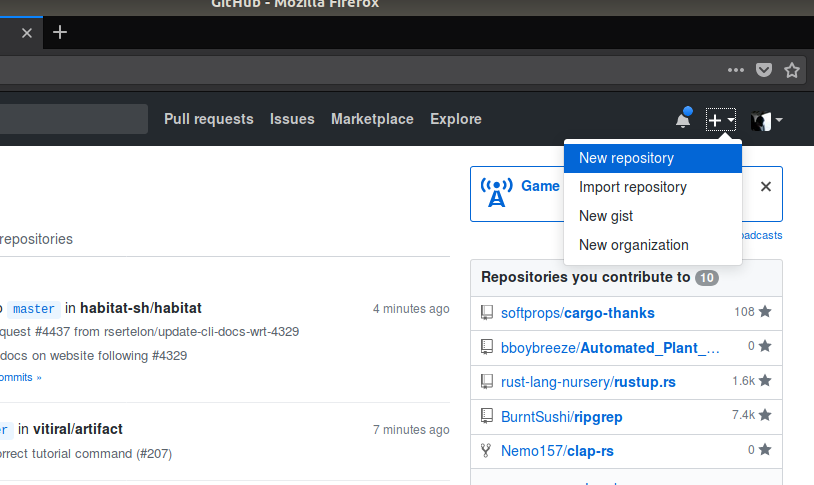
Advanced Taking Notes
- www.github.com
- Open Source Code Repositories
- Create a Repository for "ClassNotes"
- Use Markdown in ".md" files
Day 1 - Module 1
System Overview
Agenda
- Key Concepts
- Commands
- Hardware Structure
- Directories
What is Linux?
- Technically an Open Source kernel
- Commonly known as a Open Source Operating System
- An Operating System is a kernel and tools together
- Also referred to as GNU/Linux to credit the tools + the kernel
- Created in 1991 by Linus Torvalds based on Unix
What is Open Source?
- Software where the source code used to build the software is open to the public
- Usually released under special licenses
- Different licenses have different restrictions
- Licenses have been the topic of holy wars
- 'Free' as in Speech, sometimes 'Free' as in Beer
Why Linux (The Pitch)
- Free as in Beer
- Lower resource consumption
- Options. Options. Options. Options.
- Not subject to 'Corporate Vision Tax'
- Using the same environment at work/home
- Open Source as a philosophy
Why Linux (The Anti-Pitch)
- Steep learning curve (for advanced uses)
- Old dog new tricks issues
- Missing certain niche software
- Can be confusing with so many options
- Can seem like herding cats
Key Concepts
- Everything is a file (including directories)
- Absolute paths start with a leading '/'
- Relative paths start with anything else
- 'Hidden' files start with a leading '.'
- Many configurations and settings are simply text files
- Many GUI programs simply 'wrap' command line programs
- Commands can be 'linked' (or 'chained') with one another
CONCEPT #1
Everything is a file
- EVERYTHING is a file
- Files are files
- Directories are files
- Hardware is a file
- Network is a file
- Why?!
- Read/Write to "files"
- Permissions
File Demo
user@host:~$ sudo dd if=/dev/nvme0n1 count=1 bs=512 | od -v -x
1+0 records in
1+0 records out
512 bytes copied, 1.9505e-05 s, 26.2 MB/s
0000000 0000 0000 0000 0000 0000 0000 0000 0000
0000020 0000 0000 0000 0000 0000 0000 0000 0000
0000040 0000 0000 0000 0000 0000 0000 0000 0000
0000060 0000 0000 0000 0000 0000 0000 0000 0000
0000100 0000 0000 0000 0000 0000 0000 0000 0000
0000120 0000 0000 0000 0000 0000 0000 0000 0000
0000140 0000 0000 0000 0000 0000 0000 0000 0000
0000160 0000 0000 0000 0000 0000 0000 0000 0000
0000200 0000 0000 0000 0000 0000 0000 0000 0000
0000220 0000 0000 0000 0000 0000 0000 0000 0000
0000240 0000 0000 0000 0000 0000 0000 0000 0000
0000260 0000 0000 0000 0000 0000 0000 0000 0000
0000300 0000 0000 0000 0000 0000 0000 0000 0000
0000320 0000 0000 0000 0000 0000 0000 0000 0000
0000340 0000 0000 0000 0000 0000 0000 0000 0000
0000360 0000 0000 0000 0000 0000 0000 0000 0000
0000400 0000 0000 0000 0000 0000 0000 0000 0000
0000420 0000 0000 0000 0000 0000 0000 0000 0000
0000440 0000 0000 0000 0000 0000 0000 0000 0000
0000460 0000 0000 0000 0000 0000 0000 0000 0000
0000500 0000 0000 0000 0000 0000 0000 0000 0000
0000520 0000 0000 0000 0000 0000 0000 0000 0000
0000540 0000 0000 0000 0000 0000 0000 0000 0000
0000560 0000 0000 0000 0000 0000 0000 0000 0000
0000600 0000 0000 0000 0000 0000 0000 0000 0000
0000620 0000 0000 0000 0000 0000 0000 0000 0000
0000640 0000 0000 0000 0000 0000 0000 0000 0000
0000660 0000 0000 0000 0000 0000 0000 0000 0000
0000700 0001 feee ffff 0001 0000 6daf 7470 0000
0000720 0000 0000 0000 0000 0000 0000 0000 0000
0000740 0000 0000 0000 0000 0000 0000 0000 0000
0000760 0000 0000 0000 0000 0000 0000 0000 aa55
CONCEPT #2
Configuration Files
- Most configuration is accomplished via plain text files
- Allows using tools to edit
- Easy to backup
- Easy to edit
- Easy to read
- Con: not as user friendly as GUI configuration for available options
CONCEPT #3
Small Combinable Utilities
- Unix philosophy is small programs that do something specific, very well
- One can then combine these utilities in amazing ways
- Benefits are separation of duties
- Cons are learning all these utilities or discoverability
Commands
- Many Linux commands follow the Unix philosophy
- Understanding how commands are structured is key
- Understanding how to combine commands is key
- Take aways
- Options / Arguments
- Piping
- Redirecting
- Substitution
- Finding Help
Terminal Commands
- Open a Terminal (CTRL+ALT+T)
- Most commands are short words or mnemonics
- Most commands print results to the screen
- Most commands print errors to the screen
- Sometimes No Output is good (i.e. if command is a task instead of info gathering)
- Examples
- pwd
- jobs
- ps
- mount
Hands on!

Try Each one of these Commands
| pwd | ps | mount |
| lsof | ss | jobs |
| uname | ls | free |
| env | whoami | users |
| groups |
Options and Arguments
- Arguments are additional information, or knobs/switches to tune behavior and output
- Three common types of arguments are "arguments", "flags/switch", and "options"
user@host:~$ command information "more information"

user@host:~$ command --flag -F -xod

user@host:~$ command --option=value -O value
Arguments
- Commands accepting arguments varies wildly
- Some support 0, some support 1, 0 or 1, some multiple, etc., etc.
- Arguments are usually single values
- Quotes turn multiple words into a single argument
- In help message, arguments are typically denoted by...
- square brackets [arg] (meaning optional)
- angle brackets <arg> (meaning required)
- Usually used for things like files
user@host:~$ command information "more information"Examples
- echo <text>
- cp <src> <dest>
- mkdir <name>
- rm <path>
Perform the following in order
- echo hello
- echo hello world
- pwd
- mkdir files
- cd files
- pwd
- touch FILE01
- ls
- touch FILE02 FILE03 FILE04
- ls
- touch "FILE 999"
- ls
- rm FILE01
- ls
- mv FILE02 FILE05
- ls
- cp FILE06 FILE07
- ls
Flags / Switches
- Usually "modify" behavior or output of command
- Three types
- Single hyphen followed by single character (-f)
- double hyphen followed by word (--flag)
- Single hyphen followed by word (-flag)
- Varies by utility
- Can be thought of as on/off switch
- Some utilities allow "combining/stacking" single flags (-xod is the same as -x -o -d)
user@host:~$ command --flag -F --ohter-flag -xod
Examples
- rm --recursive --force
- cp -r
- mkdir -p
- ps -aux
Try the following in order
- cd /home/USERNAME/files
- rm FILE07
- rm -i FILE06
- mv -v FILE05 FILE02
- cd ..
- rm files
- rm -r files
Will Error -->
Options
- Flag combined with a value
- Two types
- Single hyphen followed by single character
- double hyphen followed by word
user@host:~$ command -oval -o val -o=valuser@host:~$ command --option val --option=valCombining Commands (Pipes)
- Commands can be combined by using pipes
- Pipes take the output of one command, and make it the input for another command
- Pipes use the | character
- Purpose is to change or modify the output in some way
- This is extremely useful!
user@host:~$ command1 | command2 | command3Pipe Demo
- Counting Lines of text
- 'cat' command outputs a file
- 'wc' command counts lines, words, and characters in files
user@host:~$  cat testfile.txt
Hello! I'm some
file that
needs to be
counted!

user@host:~$  cat testfile.txt | wc
      4       9      47
Try the Following
- In a GUI Text Editor Create and Save a text document with a few lines of text to your "Documents" directory
- Somewhere in the document type your name
- Open the terminal
- cd Documents
- cat FILE.txt
- cat FILE.txt | wc -l
- cat FILE.txt | grep <NAME>
- cat FILE.txt | grep -A1 <NAME>
- cat FILE.txt | grep <NAME> | wc --bytes
Redirecting
- Redirecting is similar to piping, except that either the input, output, or error output can be "sent somewhere else"
- Useful for:
- Sending the output of a command to a file
- Using the contents of a file as input to a command
- Three Operators
- > Output - Start from the beginning
- < Input
- >> Append
user@host:~$  echo "Send me to a file" > file.txt

user@host:~$  echo < file.txt
Send me to a file
Try the Following
- Open a Terminal
- cd Documents
- wc < FILE.txt
- wc < FILE.txt >wc_out.txt
- echo < wc_out.txt
- cat FILE.txt
- cat FILE.txt > wc_out.txt
- echo < wc_out.txt
- cat FILE.txt >> wc_out.txt
- echo < wc_out.txt
Finding Help
- Nobody remembers all the commands and options!
- Google!
- Help Docs exist for most commands
- $ command --help
- $ command -h
- Manpages are good if there is no internet
- $ man command
Try This
- Open a Terminal
- wc --help
- man wc
Break
Hard Drives and File Systems
- Hard drives are not drive letters like in Windows
- Linux file systems are entirely virtual
- A single computer has a virtual file system starting at / (root)
- Physical Hard drives are then "mounted" (akin to "mapped") anywhere in this virtual space
Partitions
- Unlike Windows, each partition does not have a separate drive letter
- Drives are given a base file name, such as
- sd
- nvme (some exceptions...)
- usb
- mmcblk
- These base file names are then given an identifier for multiples of the same type
- sda, sdb, sdc, etc.
- mmcblk0, mmcblk1, etc.
- Partitions are then appended to the drive number
- sda1, sda3, sdb2, sdc1, etc.
- mmcblk0p1, mmcblk1p4, etc.
Try This
- Open a Terminal
- ls /dev
- ls /dev | grep sd
- lsblk
Mount Points
- Now that you know partitions...
- Each partition can be "mounted" to an arbitrary directory in the virtual file system
- sda1 might be located at /boot
- sda2 might be /
- sda3 might be /home
- sdb1 might be /storage/external
- So...how can all these other partitions, and even other drives exist inside sda2 (/ in the example above)?
- Why all the confusion?!
- Makes dealing with other (even remote) file systems easy
- Dealing with TONS of disks becomes very simple
Tools for Working With HDDs
- There are some simple commands to keep this all straight
- lsblk - Displays where partitions are mounted
- mount - mounts a partition to a virtual file system
- umount - unmounts a partition from a file system
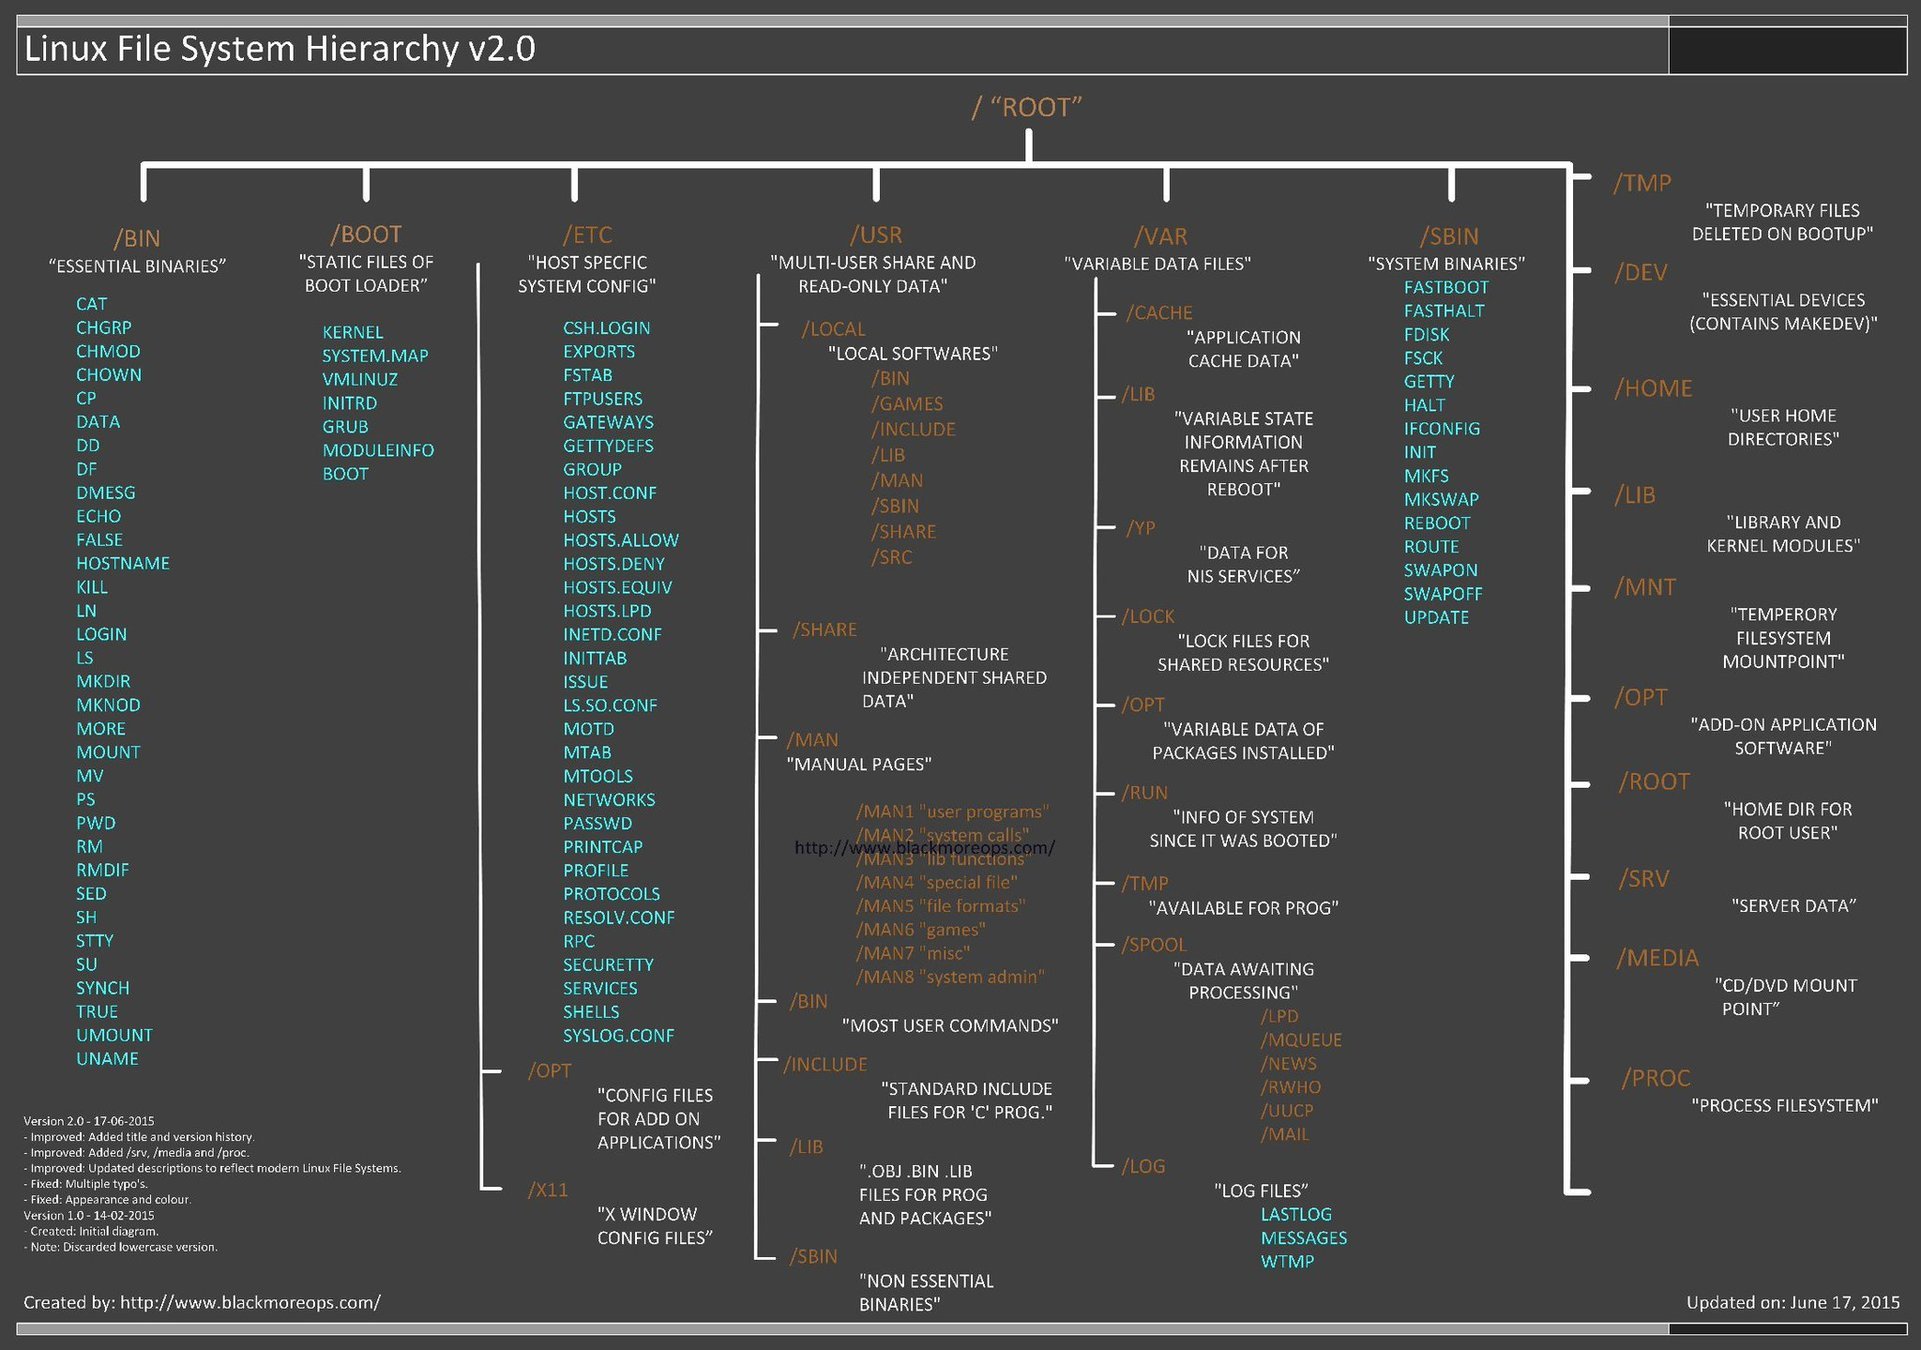
Linux Virtual File System
- Everything starts from /
- There is a standard set of directories on nearly all Linux systems
- Important Directories
- /
- /home
- /etc
- /tmp
- /dev
- /opt
- /proc
- /(s)bin
- /usr/(s)bin
- /usr/share
- /boot
- /var(/log)
- /mnt
- /media
- /storage
Linux Virtual File System
Terminal vs GUI
- GUIs are good
- Terminal is good
- Use what works - ...but also push yourself
If GUIs are good and work...why use terminal?
- Speed
- Scriptability
- Light Resources
- Servers
- Flexibility
- Heavy text file use

Most people in the terminal
Packages
I got something for you...
Key Terms
- Package
- Repository
- Distribution
- Package Manager
Packages
- Usually a program
- May contain the source code to build the program, or just the program
- Usually comes with all "extra" files, like help documentation, scripts, images, license and copyright notices, etc.
- Maintained by someone
- Ensures functionality
- "backports" bug fixes
- Applies patches
- Maybe verifies security
Package Repositories
- A group of (mostly) known working packages to into a repository
- Each Distribution curates and collects packages into various groups and sets
- Package repositories can be grouped by license, level of trust, etc.
- Repositories are versioned
- don't typically allow feature updates
- only bug fixes and security fixes
- Big exception is "rolling distributions"
Distribtuions
- Companies or individuals
- Some Paid
- Some Free
- Takes kernel, programs, and default settings
- Gives to the world
- Usually creates, versions, and curates their own repositories
- Many times, based on the shoulders of giants
Package Managers
- Installing and managing dependencies is HARD
- Most distributions offer a package manager
- Some distributions share a package manager
- Manages the installation, upgrade, and maintenance of packages
- Debian and it's derivatives (Ubuntu included) use 'apt'
apt
- Ubuntu's apt maintains a list of a "current versions" synchronized with Ubuntu repositories
- Our repositories are synchronized with the "18.10" version of Ubuntu
| Command | Action |
|---|---|
| apt update | Updates the list of known versions (synchronizes) |
| apt upgrade | Upgrade installed packages |
| apt search <name> | Search for software |
| apt install <name> | Install software |
| apt remove <name> | Uninstall software |
Let's Try It
- Open a Terminal
- Update the known list of version
- apt update
- Upgrade software if needed
- apt upgrade
- Let's install a single program
- apt install cowsay
- We can also install multiple programs at once
- apt install tilix terminator curl git
Practical
Complete these steps
- Install the following programs
- sl
- figlet
- fortune
- cmatrix
- rev
- pi
- aafire
- asciiview
- rig
- Given these descriptions try to use each program (use help or manpages to figure them out)
- cowsay: A cow says things you tell it to
- sl: makes a steam locomotive appear in the terminal
- figlet: Makes banners of words you give it
- cmatrix: The matrix in your terminal
- rev: reverses words you give it
- pi: calculates pi out to certain decimals places
- aafire: a fire in your terminal
- asciiview: view images in the terminal as asciiart
- rig: make alternate personas
- Watch Starwars in your Terminal
- telnet towel.blinkenlights.nl
- Combine two or more of the above programs and output
Let's keep chuggin

Module 2
Command Line Fu
Agenda
- Navigating the Command Line
- Working with Files
- Finding Help
- I/O
- Users / Groups
- Permissions
Navigating the Command Line
- The most basic task
- Memorize the commands!
- Use shell prompts to assist "current location"
- Most important
| Command | Function |
|---|---|
| ls | List Files |
| cd | Change Directory |
| pwd | Print Working Directory |
| tree | Lists contents of directory tree |
Install -->
ls
- Lists files inside a particular directory
- Can use wildcards (also known as globs)
- Certain flags/switches can change the style of output
╭─student@student01 /home/student
╰─$  ls
Desktop  Documents  Downloads  Music  Pictures   Videos test.txt

╭─student@student01 /home/student
╰─$  ls -l
total 16
drwxr-xr-x 2 student student    6 Dec  7 11:27 Desktop
drwxr-xr-x 2 student student    6 Dec  7 11:27 Documents
drwxr-xr-x 3 student student  288 Jan 10 14:15 Downloads
-rw-r--r-- 1 student student 8980 Dec  7 11:21 test.txt
drwxr-xr-x 2 student student    6 Dec  7 11:27 Music

╭─student@student01 /home/student
╰─$  ls ./D*
./Desktop:

./Documents:

./Downloads:
google-chrome-stable_current_amd64.deb  keybase_amd64.deb
haroopad-v0.13.1-x64.deb
ls
- Useful flags to remember
- Flags can be stacked
| Flag | Function |
|---|---|
| ls -l | Long Listing |
| ls -a | Show hidden files and directories |
| ls -h | Show human readable sizes |
| ls -F | Show a trailing / for directories |
| ls -d | Do not list directory contents |
| ls -G | Disable group display (only used with -l) |
cd
- Changes the current directory to some other directory
- Can use absolute paths by starting with /
- Can use relative paths by omitting / or starting with "special directories"
- Special directories are hidden and are located in every directory
- . - Current Directory
- .. - Parent directory
╭─student@student01 /home/student
╰─$  cd Downloads/

╭─student@student01 /home/student/Downloads
╰─$  cd ../Desktop


╭─student@student01 /home/student/Desktop
╰─$  cd /etc


╭─student@student01 /etc
╰─$
pwd
- Prints out the current location on the terminal
- Useful for shell prompts that do not show current location!
$ cd Downloads/

$ pwd
/home/student/Downloads

$ cd ../Desktop

$ pwd
/home/student/Desktop

$ cd /etc

$ pwd
/etc
tree
- Lists the contents of a directory and all sub directories in pretty output
- Flags and Options can be used to change the output
- Not installed by default!
- Useful options
╭─student@student01 /home/student
╰─$  tree Pictures
Pictures
├── 01.png
└── 02.png

0 directories, 2 files
| Flag / Option | Function |
|---|---|
| tree -L# | Only go # levels deep |
| tree -a | Show hidden files/directories |
| tree -P <pattern> | Only show files which match <pattern> |
| tree -I <pattern> | Ignore files which match <pattern> |
Working with Files
- The second most basic set of commands
| Command | Function |
|---|---|
| mv | Move a file |
| cp | Copy a file |
| rm | Delete (remove) a file |
| mkdir | Make a Directory |
| rmdir | Remove a Directory |
| cat | Show file contents |
| touch | Create a blank file |
| wc | Count components of a file |
mv
- Moves a file from one location to another
- Can also be used for... ?
- Can use relative or absolute paths
╭─student@student01 /home/student
╰─$  ls
Desktop  Documents  Downloads  test.txt  Videos

╭─student@student01 /home/student
╰─$  mv test.txt Downlods/

╭─student@student01 /home/student
╰─$  ls
Desktop  Documents  Downloads  Videos

╭─student@student01 /home/student
╰─$  ls Downloads/
test.txt| Flag | Function |
|---|---|
| mv -v <old> <new> | Display the renames that happen (useful later) |
cp
- Copies a file from one location to another
- Useful flags
╭─student@student01 /home/student
╰─$  ls
Desktop  Documents  Downloads  test.txt  Videos

╭─student@student01 /home/student
╰─$  cp test.txt Downlods/

╭─student@student01 /home/student
╰─$  ls
Desktop  Documents  Downloads  test.txt  Videos

╭─student@student01 /home/student
╰─$  ls Downloads/
test.txt| Flag | Function |
|---|---|
| cp -R <from> <to> | Recursive copy (all subdirectories, etc) |
rm
- Deletes a file
- One of the most dangerous commands!
╭─student@student01 /home/student
╰─$  ls
Desktop  Documents  Downloads  test.txt  Videos

╭─student@student01 /home/student
╰─$  rm test.txt

╭─student@student01 /home/student
╰─$  ls
Desktop Documents Downloads Videos| Flag / Option | Function |
|---|---|
| rm -r | Recursive delete (allows deleting directories) |
| rm -f | Force. Be. Careful. |
| rm -i | Interactive (confirm before deleting) |
cat
- Primarily used to display file contents
- Originally designed to combine files
- Useful to send the file contents to another command
╭─student@student01 /home/student
╰─$  cat some_file.txt
Hello! I'm a file

╭─student@student01 /home/student
╰─$  cat some_file.txt | wc -l
1
touch
- Create an empty file!
- Also modifies the access times if the file already exists
╭─student@student01 /home/student
╰─$  touch some_file.txt

╭─student@student01 /home/student
╰─$  cat some_file.txt
wc
- Counts the Lines, Words, and Characters of a file
- Most useful when combined with other commands
╭─student@student01 /home/student
╰─$  wc some_file.txt
1 8 42 some_file.txt| Flag / Option | Function |
|---|---|
| wc -m | Count characters |
| wc -l | Count lines |
| wc -w | Count words |
mkdir
- Makes a directory
- -p is great with expansions! (more on this later)
╭─student@student01 /home/student
╰─$ mkdir some_dir| Flag / Option | Function |
|---|---|
| mkdir -p <path> | Makes any missing directories in all of <path> |
rmdir
- Removes a directory
- Same as rm -r
╭─student@student01 /home/student
╰─$  rmdir some_dir
Editing Files
- Many built in editors
- Easiest is nano
- Usage is self explanatory
- "best" is vi and vim (*cough* not emacs *cough*)
- vi exists in almost all distributions (keep in mind servers)
- vim is what you want
- In this course I recommend forcing yourself to use vim
vim Basics Cheat Sheet
vim Interactive Tutorial
Finding Help
- Help on commands
| Command | Function |
|---|---|
| man <command> | View the "manpage" or extended help |
| whatis <command> | Basic description |
| which <command> | Where is the binary located |
| <comamnd> --help | Help (not all commands support) |
| <comamnd> -h | Short Help (not all commands support) |
| whereis <command> | Where is the command and associated files |
Input / Output
- I/O is handled by three special files
- stdout - Output
- stdin - Input
- stderr - Error Messages
- All these special files can be re-directed to other locations...just like normal files
- Often stdout and stderr are both sent to the screen
- stdin is normally used as an input method for commands
Redirecting Input / Output
- Redirecting stdout
╭─student@student01 /home/student
╰─$ cat some_file.txt > other_file.txt- Redirecting stdin
╭─student@student01 /home/student
╰─$ cat < some_file.txt- Piping sends stdout of one command to stdin of the next command
Special Redirecting
- All files are accessible via "special numbers" (known as file descriptors)
- stdin = "0"
- stdout = "1"
- stderr = "2"
- Useful to send errors to places such as to log errors, or ignore
╭─student@student01 /home/student
╰─$  cat some_file.txt 2> err_file.txt
  # Redirect stderr to 'err_file.txt'

╭─student@student01 /home/student
╰─$  cat some_file.txt 2>&1
  # Redirect stderr to stdout (stdout still goes to screen)

╭─student@student01 /home/student
╰─$  cat some_file.txt 2>&1 > out.txt
  # Redirect stderr to stdout, then stdout to 'out.txt' file

╭─student@student01 /home/student
╰─$  cat some_file.txt &> some_file.txt
  # Redirect stderr AND stdout to a file
Redirecting Outputs Like

Break
Users
- Have a username
- Usually a home directory (typically in /home)
- Usually have login shell (but not always)
- Have a primary and some number of axillary groups
- Have a User ID (uid)
- Special User Files
- /etc/passwd
- Readable by all
- shows usernames, groups, shells, etc.
- /etc/shadow
- Readable by root
- Contains password hashes of user passwords
- /etc/passwd
Special Users
- root
- Administrator
- UID is 0
- Can do anything
- It's good practice to disable root login, and create a secondary admin account
- Service Like accounts
- Usually have nologin as the "shell"
Elevating Privs
- Two common ways for "normal" users to gain root privs
- su - "Switch User"
- allows switching to another user
- Good practice to run the commands as 'su - <user>' as the - sets up the users env and home
- sudo
- Allows single command as another user (default is root)
- sudo <command>
- Usually must be a member of the "sudo" group to run sudo commands
- Commands can require password, or not
- su - "Switch User"
- Good command to remember 'whoami'
Administering Users
- Users can be created in two ways
- useradd
- A single command which does nothing more than create the user (and any other options YOU specify)
- adduser
- A script that runs asking regular questions to create the user
- useradd
- Users can be modified using 'usermod'
- Most common command is:
- # usermod -a -G <group> <user>
- Adds a user to another axillary group
- -a is "append" and -G is "group"
- # usermod -a -G <group> <user>
- Most common command is:
Groups
- All users are a member of at least one group
- (Usually same as username)
- Groups have an ID (GID)
- /etc/group is a list of groups and their members
- Groups can be created with 'groupadd'
- Like users, they can be modified with 'groupmod'
- Important Groups (convention, not law)
- sudo
- admin
- wheel
- Less important, but still useful on some systems
- power, plugdev, audio, video, cdrom
- Special group: nogroup
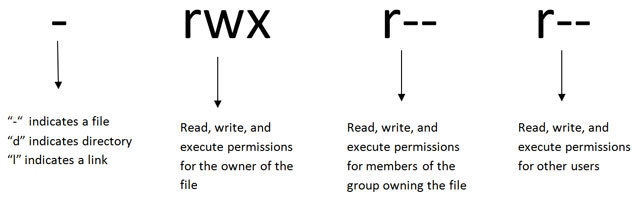
Permissions
- Three sections of three "types" of permissions
- r = read
- w = write
- x = execute
- - = None
- Sections are: Owner, Group, and Other (or World)
- A fourth prefix section includes
- - = file
- d = directory
- l = link
Permissions - Example
╭─student@student01 /home/student
╰─$  touch file

╭─student@student01 /home/student
╰─$  ls -l file
-rw-rw-r-- 1 student student 0 Jan 16 13:58 file

╭─student@student01 /home/student
╰─$  chmod o+x file

╭─student@student01 /home/student
╰─$  ls -l file
-rw-rw-r-x 1 student student 0 Jan 16 13:58 file
Permission are Assigned By User and Group
- A files owner and Group can be seen with 'ls -l'
- All permissions should be read with that understanding in mind
- Ownership can be changed with 'chown'
╭─student@student01 /home/student
╰─$  touch file

╭─student@student01 /home/student
╰─$  ls -l file
-rw-rw-r-- 1 student student 0 Jan 16 13:58 file

╭─student@student01 /home/student
╰─$  sudo chown root:student file

╭─student@student01 /home/student
╰─$  ls -l file
-rw-rw-r-- 1 root student 0 Jan 16 13:58 file
chown
- Changes ownership of a file
- Syntax is 'chown <owner>:<group> <path>'
- Must have permission to change the ownership to the specified owner/group
- 'chown -R' can recursively change ownership of all files inside a directory
╭─student@student01 /home/student
╰─$  touch file

╭─student@student01 /home/student
╰─$  ls -l file
-rw-rw-r-- 1 student student 0 Jan 16 13:58 file

╭─student@student01 /home/student
╰─$  sudo chown root:student file

╭─student@student01 /home/student
╰─$  ls -l file
-rw-rw-r-- 1 root student 0 Jan 16 13:58 file
chmod
- Changes file attributes or modifiers
- Syntax can be 'chmod [section]<change><permission> <path>'
- [section] = u (owner), g (group), or o (other)
- <change> = + (add), or - (remove)
- <permission> = r (read), w (write), x (execute)
- [section]<change><permission> can also be octal!
- Examples
- chmod +x file
- chmod go-rw file
- chmod 677 file
╭─student@student01 /home/student
╰─$  ls -l file
-rw-rw-r-- 1 student student 0 Jan 16 13:58 file

╭─student@student01 /home/student
╰─$  chmod o+x file

╭─student@student01 /home/student
╰─$  ls -l file
-rw-rw-r-x 1 student student 0 Jan 16 13:58 file
You made it

Day 2 - Module 3
Advanced Fu
Agenda
- Review
- Expansions and Substitutions (magic)
- Searching
- Paging
- Parts of Files
- In Files
- For Files
- Using the Results
Review
- Navigating the command line
- working with files
- Finding help
- I/O
- Users
- Groups
- Permissions
Aliases
- You can alias commands so save common options or create your style commands with options you like
- In your shell startup file
alias ls='ls -H --color=always'Variables
- We can store information in variables
- These variables are like "buckets", we may not know exactly what is in the bucket, but we can refer to the contents at use
- Syntax is a dollar sign ($) followed by a word or underscore
- Convention uses UPPER_SNAKE_CASE
- Your environment stores many variables
Variable Continued
- To see current variables in your environment, use the command 'env'
- Some important variables are:
- USER - your current username
- SHELL - Which shell program you are using
- PWD - Your current directory
- EDITOR - Your text editor
- PATH - Where to look for binary executables
Creating and Using Variables
- Create a variable using the variable name, followed by an equals sign, followed by the "value"
- Then get the "value" out of the variable by using a dollar sign ($) followed by the variable name
$  ANIMAL=cat

$  echo $ANIMAL
cat
Substitutions & Expansions

Expansions
- Allows the ability to save some typing and reduce errors
- Two types of expansions
- globs
- parameter expansions
globs
- In short...a wild card
$ ls -l
total 264896
-rw-r--r--  1 kevin kevin 15400455 Jan 17 10:33 09b25a9a5c720.tar.gz
-rw-rw-r--  1 kevin kevin 43487904 Dec  7 13:00 code_1.18.1-1510857349_amd64.deb
-rw-rw-r--  1 kevin kevin 27765264 Dec  7 13:01 encryptr_2.0.0-1_amd64.deb
-rw-rw-r--  1 kevin kevin  1407463 Jan 10 14:14 FEL-r22.pdf
-rw-rw-r--  1 kevin kevin   397750 Jan 10 14:14 FEL.tar.gz
-rw-rw-r--  1 kevin kevin 42004318 Dec  7 13:01 haroopad-v0.13.1-x64.deb
-rw-rw-r--  1 kevin kevin 79941824 Dec  7 13:04 keybase_amd64.deb

$ ls -l *.deb
total 264896
-rw-rw-r--  1 kevin kevin 43487904 Dec  7 13:00 code_1.18.1-1510857349_amd64.deb
-rw-rw-r--  1 kevin kevin 27765264 Dec  7 13:01 encryptr_2.0.0-1_amd64.deb
-rw-rw-r--  1 kevin kevin 42004318 Dec  7 13:01 haroopad-v0.13.1-x64.deb
-rw-rw-r--  1 kevin kevin 79941824 Dec  7 13:04 keybase_amd64.deb
Parameter Expansion
- AKA "curly brace expansion"
- Expands to "lists"
- Can be combined with globs
$ echo {one,two,three}
one two three

$ ls -l {*.deb,0*}
-rw-r--r-- 1 kevin kevin 15400455 Jan 17 10:33 09b2af7a5c720.tar.gz
-rw-rw-r-- 1 kevin kevin 43487904 Dec  7 13:00 code_1.18.1-1510857349_amd64.deb
-rw-rw-r-- 1 kevin kevin 27765264 Dec  7 13:01 encryptr_2.0.0-1_amd64.deb
-rw-rw-r-- 1 kevin kevin 49035482 Dec 19 15:23 google-chrome-stable_current_amd64.deb
-rw-rw-r-- 1 kevin kevin 42004318 Dec  7 13:01 haroopad-v0.13.1-x64.deb
-rw-rw-r-- 1 kevin kevin 79941824 Dec  7 13:04 keybase_amd64.deb
- Supports basic sequences (similar to 'seq' command)
$ echo {A..Z}
A B C D E F G H I J K L M N O P Q R S T U V W X Y Z
Command Substitution
- Allows using the output of a command as the actual input for another command
- In other words, the output is used inline as if it was directly typed on the command line
$ ls $(echo "-l")
total 264896
-rw-r--r--  1 student student 15400455 Jan 17 10:33 09b2afa5c720.tar.gz
-rw-rw-r--  1 student student 43487904 Dec  7 13:00 code_1.18.1-1510857349_amd64.deb
-rw-rw-r--  1 student student 27765264 Dec  7 13:01 encryptr_2.0.0-1_amd64.deb

$ ls -l
total 264896
-rw-r--r--  1 student student 15400455 Jan 17 10:33 09b2afa5c720.tar.gz
-rw-rw-r--  1 student student 43487904 Dec  7 13:00 code_1.18.1-1510857349_amd64.deb
-rw-rw-r--  1 student student 27765264 Dec  7 13:01 encryptr_2.0.0-1_amd64.deb
Parameter Substitution
- Like parameter expansion, but uses a dollar sign ($) and expands variables
$ ANIMAL=cat

$ echo ${ANIMAL}
cat

$ echo ${ANIMAL}s
cats

$ echo $ANIMALs
Parameter Substitution
- Supports internal substitution via forward slashes (/)
$ ANIMAL=cat

$ echo ${ANIMAL/at/ow}
cow
- Other parameter attributes are possible too
- # - length
- ! - variable indirection (Bash ONLY!)
$ CAT=tabby

$ ANIMAL=CAT

$ echo ${!ANIMAL}
tabby

$ echo ${ANIMAL}
CAT

$ echo ${#ANIMAL}
3
Process Substitution
- Very close to command substitution, but subtly different!
- Allows using the output of a command, but stored in a "temporary file" (/dev/fd/<#>) then that file is passed to the next command
- Process substitution uses <(command) whereas command substitution uses $(command)
- Since '<' is stdin redirector, can be thought of as "send output of this command as input to external command"
Wait..wat

Process Substitution Examples
- Using the 'diff' command (which displays the differences between two inputs)
$ diff <(ls -l) <(ls -al)
1c1,3
< total 264896
---
> total 264904
> drwxr-xr-x  3 student student     4096 Jan 17 11:11 .
> drwxr-xr-x 35 student student     4096 Jan 17 12:34 ..

$ diff $(ls -l) $(ls -al)
diff: invalid option -- '-'
diff: Try 'diff --help' for more information.
In otherwords
- If you have a command which accepts multiple FILES as input
- And you want to process the OUTPUT of multiple other commands
- You can either make and store temporary files then use those temporary files as input to the first command
- OR use process substitution to do this all for you automagically

Break
We can use ZSH now
- Provides many of the fish niceties, but still compatible with bash
- Becomes helpful for repeated commands
- Start a command and press the up arrow
student@student01: ~
➜ ls <up_arrow>
Working with Large Files
- Need to be able to deal with large files, and lots of output
- Several ways to handle
- Paging
- Head/Tail
- Searching
Paging
- Sometimes there is more output than can fit on a single screen
- Pagers allows one to "page" through the output
- Some pagers allows moving up and down through output, and searching
- Two most common pagers
- less
- Supports vim movements, and searching
- more (*)
- less
- 'q' to quit
head/tail
- Two commands that display parts of files
- head - Top of file
- tail - Bottom of file
- Using both together can show the middle of a file
| Flag / Option | Function |
|---|---|
| head -n <num> | Show <num> lines of output |
| tail -n <num> | Show <num> lines of output |
| tail -F | Constantly show new lines as they appear |
Searching Inside Files
- Two great search tools
- grep
- ripgrep (not included by default) (command is 'rg')
- compatible with most grep options/flags
- considerably faster
- Simple searches are typically: '$ grep <pattern> <file>'
- More advanced options allow specifying include/exclude locations
| Flag / Option | Function |
|---|---|
| grep -v | Invert searches (show lines not matching <pattern>) |
| grep -A <num> | Show <num> lines of output after found <pattern> |
| grep -B <num> | Show <num> lines of output before found <pattern> |
| grep -C <num> | Show <num> lines before and after found <pattern> |
| grep -e '<expr>' | Search for <expr> instead of a pattern (allows Regex) |
| grep -r <path> | Search recursively through all files starting at <path> |
| grep -o | Only show matching portions of found <pattern> |
| grep -i | Case insensitive |
Searching for Files
- Instead of searching inside files, sometimes you want to search for specific files
- Two applications
- find
- fd (not included by default)
- fd is to find what ripgrep is to grep
Using find to...Find Files
- find specifies a start path, and recursively searches for files in all subdirectories
- Command structure is kind of abnormal, but easy to learn
student@student01: ~
➜ find / -type f -name "*stud*"
              # Find all FILES starting from ROOT that include "stud" in the filename

student@student01: ~
➜ find /home -type d -empty
              # Find all EMPTY DIRECTORIES starting from /HOME
Working with Search Results
- Most of the time you're searching for files, it's because you want to do something with them
- find provides some built in functions such as '-delete' to delete all files that match
- Find can also "execute" an additional command on each match for more complex situations (as long as they don't involve pipes) using '-exec'
student@student01: ~
➜ find / -type f -name "*stud*" -exec wc -l {} \;

    # Find all files
# execute wc -l on every file- '-exec' takes the commands to execute, uses '{}' to stand in for the found file, and ends with \;
- The \; is very important!
Working with Search Results
- For more advanced uses (such as ones that include pipes, and very complex commands) use 'xargs'
- xargs takes all the output from previous commands, and runs a specific command on each part of the command, individually
- xargs is normally used after a pipe
- When used with find, a new flag is required '-print0' which sets up the output for xargs
student@student01: ~
➜ find / -type f -name "*stud*" -print0 2>/dev/null | xargs -0 -I{} wc -l {} | grep -e '^[0-9][0-9] '
Module 4
Becoming a neck beard
Agenda
- Review
- More Devices
- In Depth
- Special Devices
- Troubleshooting Devices
- Scripting Basics
- Shells
- Variables Revisitted
- Loops
Review
- Expansions
- Substitutions
- Searching inside files
- Searching for files
- Working with results
Devices
- As with everything else, they're just files
- You can read and write to most of them
- Devices live in /dev
- Important devices include
- CD/DVD drives
- Hard drives and removable media
- Cameras
- Printers / Scanners
Working with Hard Drives
- Mounting
- Hard drive partitions can be "mounted" onto an arbitrary location in a virtual filesystem
- Mount points can be arbitrarily nested as well
- It's common to mount devices under /mnt
Mount Example
student@student01: ~
➜ ls /mnt/etern

student@student01: ~
➜ mount /dev/nvme0n1p1 /mnt/extern

student@student01: ~
➜ ls /mnt/extern
file_a file_b file_c dir_1/ dir_2/

student@student01: ~
➜ lsblk
NAME        MAJ:MIN RM   SIZE RO TYPE MOUNTPOINT
loop10        7:10   0 405.1M  1 loop /snap/intellij-idea-community/22
nvme0n1     259:0    0 931.5G  0 disk
└─nvme0n1p1 259:1    0 931.5G  0 part /mnt/extern
nvme1n1     259:2    0   477G  0 disk
├─nvme1n1p1 259:3    0 417.3G  0 part /
└─nvme1n1p3 259:4    0  59.6G  0 part [SWAP]


student@student01: ~
➜ umount /mnt/extern

student@student01: ~
➜ ls /mnt/extern
dd
- Disk Duplicator (?)
- Can copy bytes from one "file" to another "file"
- Remember disks are just "files"
- Syntax is
- dd if=<input file> of=<output file> <options>
- Common options
| Flag / Option | Function |
|---|---|
| bs=<SIZE> | Sets the "byte size" or how many bytes to copy |
| count=<num> | How man of "byte size" to copy |
| conv=<OPTS> | Can use options like: * noerror: stop copying on errors * sync: sync up after copying |
| progress=<LEVEL> | Show progress (changes by version), try "verb" |
Special Devices
- Some devices are special and don't necessarily represent physical hardware
- Two common
- Pseudo Random Number Generators (PRNGs)
- Terminals (TTYs)
PRNGs
- Two devices
- /dev/urandom
- /dev/random
- Both use the same PRNG (same seed), but with different attributes
- /dev/urandom
- Faster
- Non blocking (less random)
- /dev/random
- Can be slower
- Blocking (more random)
student@student01: ~
➜ dd if=/dev/random count=2 bs=8 | od -t x1
2+0 records in
2+0 records out
16 bytes copied, 2.1937e-05 s, 729 kB/s
0000000 d9 a4 0c 31 5f 43 6c 55 63 02 fd ec 41 6c 99 9c
0000020

student@student01: ~
➜ dd if=/dev/random count=2 bs=8 | od -t x1
2+0 records in
2+0 records out
16 bytes copied, 5.8776e-05 s, 272 kB/s
0000000 bb 28 7d 99 d9 88 67 a7 fb e9 1f 57 e7 a3 42 6e
0000020
Drivers and Modules
- Unlike Windows, many drivers for hardware are already included in the Linux kernel
- Driver code can also be loaded dynamically at runtime into the kernel via a "module"
- The Linux kernel scans hardware at boot time and loads the appropriate driver code/modules
- Additional modules can be loaded by users
Working with Modules
- There are several commands to work with loading and unloading modules
- lsmod - Lists Current Module Statuses
- modprobe - Load/Unload modules
- insmod - Insert (load) a module
- rmmod - Remove (unload) a module
student@student01: ~
➜ lsmod
Module                  Size  Used by
xt_nat                 16384  1
ebtable_filter         16384  0
ebtables               32768  1 ebtable_filter
ip6table_nat           16384  0
nf_conntrack_ipv6      20480  1
nf_defrag_ipv6         36864  1 nf_conntrack_ipv6
nf_nat_ipv6            16384  1 ip6table_nat
ip6table_filter        16384  0
ip6_tables             28672  2 ip6table_filter,ip6table_nat
ipt_MASQUERADE         16384  1
nf_nat_masquerade_ipv4    16384  1 ipt_MASQUERADE
Trouble Shooting Devices
- Sometimes devices may not appear to work
- Several commands can help assess where the problem lies
- Often it's that a driver/module does not exist, or is improperly loaded
- Other times it's faulty hardware
- Most common commands
- lspci - Lists PCI devices that have been detected
- dmesg - Display kernel buffer messages
- hdparm - (Somewhat niche) Sets or Reads SATA/IDE parameters
- journalctl - Displays system logs (Only on systems with systemd)
- Files in /var/log - Various log files
- Useful: boot.log, auth.log, syslog, kern.log, faillog
- Most often it's useful to (rip)grep or page through output
journalctl
- Very useful!
- Only on systems with systemd
| Flag / Option | Function |
|---|---|
| journalctl -b | Only show messages from current boot (also allows things like -b -1 for boot before current) |
| journalctl -k | Kernel messages |
| journalctl -u <service> | Only messages pertaining to <service> |
| journalctl -f | Live logging (show messages as they appear) |
| journalctl -S <time> | Only messages after <time> (Since) |
| journalctl -U <time> | Only messages before <time> (Until) |
dmesg
- If journalctl isn't available, dmesg may help
- Prints the kernel buffer messages
- Can be very advanced, but to the right people can hold the info they need
- Most important option (IMO) -H (human readable)
student@student01: ~
➜ dmesg -H
[  +0.000000] KERNEL supported cpus:
[  +0.000000]   Intel GenuineIntel
[  +0.000000]   AMD AuthenticAMD
[  +0.000000]   Centaur CentaurHauls
[  +0.000000] x86/fpu: Supporting XSAVE feature 0x001: 'x87 floating point registers'
[  +0.000000] x86/fpu: Supporting XSAVE feature 0x002: 'SSE registers'
[  +0.000000] x86/fpu: Supporting XSAVE feature 0x004: 'AVX registers'
[  +0.000000] x86/fpu: Supporting XSAVE feature 0x008: 'MPX bounds registers'
[  +0.000000] x86/fpu: Supporting XSAVE feature 0x010: 'MPX CSR'
[  +0.000000] x86/fpu: xstate_offset[2]:  576, xstate_sizes[2]:  256
[  +0.000000] x86/fpu: xstate_offset[3]:  832, xstate_sizes[3]:   64
[  +0.000000] x86/fpu: xstate_offset[4]:  896, xstate_sizes[4]:   64
[  +0.000000] x86/fpu: Enabled xstate features 0x1f, context size is 960 bytes, using 'compacted' format.
[  +0.000000] e820: BIOS-provided physical RAM map:
[  +0.000000] BIOS-e820: [mem 0x0000000000000000-0x000000000009dbff] usable
[  +0.000000] BIOS-e820: [mem 0x000000000009dc00-0x000000000009ffff] reserved
[  +0.000000] BIOS-e820: [mem 0x00000000000e0000-0x00000000000fffff] reserved
[  +0.000000] BIOS-e820: [mem 0x0000000000100000-0x000000006dab2fff] usable
[  +0.000000] BIOS-e820: [mem 0x000000006dab3000-0x000000006f528fff] ACPI data
Break
Scripting
- Great for lazy people!
- Also repetitive tests
- At it's most basic form, it's a file containing a list of commands to run

Shells
- We've already seen three shells
- Shells can differ in some very key ways
- built-in commands
- variable operations
- expansion/substitution operations
- availability
- user-facing features (less important to scripting)
- Other shells we haven't seen yet
- sh
- ksh
- csh
- tcsh
Changing Shells
- *assuming the shell is installed
- We can run a shell a single time, by calling the binary
- Most shells run some start-up configurations by looking for specific files
- Remember how the default user shell gets called?
- We can change that by running a command
student@student01: ~
➜ sudo chsh -s fish student
WARNING!
Changing Shells (safe)
student@student01: ~
➜ sudo chsh -s $(which fish) student
Making a Script
- Sh-Bang
- Commands
#!/bin/bash

echo "Hello world!"- Save the file to ~/.local/bin/script_01.sh
Running a Script
- We can run a script with ./ notation
- Alternatively if the script is located in a directory listed in our $PATH variable, we can just use the script name
student@student01: ~
➜ ./.local/bin/script_01.sh
zsh: permission denied: ./.local/bin/script_01.sh
Denied!

Making Scripts Executable
- Remember from the permissions slide that one of the permissions (x) means executable
- If we look at our script, we'll see it's not executable
student@student01: ~
➜ ls -l .local/bin
total 4
-rw-rw-r-- 1 student student 33 Jan 29 10:46 script_01.sh- In order to make it executable we can use the 'chmod' command as discussed before
student@student01: ~
➜ chmod u+x .local/bin/script_01.sh

student@student01: ~
➜ ls -l .local/bin
-rwxrw-r-- 1 student student 33 Jan 29 10:46 script_01.sh

student@student01: ~
➜ ./.local/bin/script_01.sh
Hello world!
Modifying $PATH
- ./ syntax is fine for one-off scripts, but if this is something we'll want to run many times, it's better to have it inside a director in $PATH
student@student01: ~
➜ export PATH=$PATH:$HOME/.local/bin

student@student01: ~
➜ script_01.sh
Hello world!- We can take this a step further by modifying $PATH in our shell startup configuration file
Loops
- Sometimes we want to do a task repeatedly
- We can use a 'for' loop to do something a set number of times, or over a set of data
- We'll start by using a 'for' loop on the command line
- Then move it into a script
- The basic syntax is
- for <VAR> in <SET>; do <CMD>; done
student@student01: ~
➜ for NUM in $(seq 1 10); do echo "Hello World! x$NUM"; done
Hello World! x1
Hello World! x2
Hello World! x3
Hello World! x4
Hello World! x5
Hello World! x6
Hello World! x7
Hello World! x8
Hello World! x9
Hello World! x10
Loops in Scripts
- Although we can do complex things in loops on the command line, it quickly becomes hard to read
- If we move the loop to a script, readability improves
- The basic syntax becomes
for <VAR> in <SET>;
do
    <CMDS>
done
for NUM in $(seq 1 10);
do
echo "Hello $NUM times:"
for _ in $(seq 1 $NUM);
do
echo -e "\tHello"
done
doneWe can even nest loops
Making Decisions
- So far we can only do a set number of tasks in a script
- It's flexible...but it could be better
- Now we'll learn how to do a specific task only in some circumstances, and a different task otherwise
- These types of statements are called conditionals
- The basic syntax is
if [ <CONDITION> ];
then
    <command if true>
else
    <command if NOT true>
fi- The 'else' could even be omitted if we only want to run a command in some circumstances, but nothing in others
Making Decisions
- Full list of "conditions"
Caveat to Conditionals
- '[' vs '[['
- [ <condition> ]
- older
- more portable
- supported everywhere
- less flexible
- [[ <condition> ]]
- Newer
- not as well supported
- allows for much easier testing
- My personal opinion, default to `[[ <condition> ]]` unless you have a reason not to
Failing
- Another form of conditionals is boolean logic
- Instead of if...else...fi blocks, we can use boolean operators
- && - means and
- || - means or
- The basic syntax is
- <command1> && <command2>
- Run command1
- Run command2 only if command1 succeeds
- <command1> || <command2>
- Run command1
- Run command2 only if command1 fails
- <command1> && <command2>
- Can be nested with parenthesis
- Works great on the command line
- Very useful to exit scripts early
- <command that can fail> || (echo "reason" && false)
Putting this all together
- With a script we can
- Use variables
- Use loops
- Use conditionals to make decisions
- Use boolean logic
- Run commands in order
- Use shell expansion/substitution

#!/bin/bash

LINES=$(tput lines)
COLUMNS=$(tput cols)

declare -A snowflakes
declare -A lastflakes

clear

function move_flake() {
    i="$1"

    if [ "${snowflakes[$i]}" = "" ] || [ "${snowflakes[$i]}" = "$LINES" ]; then
        snowflakes[$i]=0
    else
        if [ "${lastflakes[$i]}" != "" ]; then
            printf "\033[%s;%sH \033[1;1H " ${lastflakes[$i]} $i
        fi
    fi

    printf "\033[%s;%sH*\033[1;1H" ${snowflakes[$i]} $i

    lastflakes[$i]=${snowflakes[$i]}
    snowflakes[$i]=$((${snowflakes[$i]}+1))
}

while :
do
    i=$(($RANDOM % $COLUMNS))

    move_flake $i

    for x in "${!lastflakes[@]}"
    do
        move_flake "$x"
    done

    sleep 0.1
done
Module 5
I am Admin
Agenda
- Review
- Services
- Monitoring
- Networking
- Firewalls
- Remote Boxes
- Moving Files Globally
- Data Integrity
Review
- Devices
- Special Devices
- Modules
- Scripting
- Loops
- Conditionals
Services
- Long running programs in the background
- Sometimes referred to as daemons
- Two methods of administration
- init system (old style, but still used in some distros)
- systemd (new style, but some vehemently oppose it)
systemd
- A single, somewhat monolithic project for managing all things "system"
- startup
- networking
- logging
- more
- Allows to managing startup dependencies in a very concise way
- Allows startup jobs to run in parallel
- Primarily managed with the `systemctl` command and through "Unit Files"
Managing Services with systemd
- The most important commands
| Command | Function |
|---|---|
| systemctl start | Starts a service for current boot only |
| systemctl stop | Stops a service |
| systemctl restart | Stops and then starts a service for current boot only |
| systemctl reload | Reloads a service configuration file without restarting |
| systemctl enable | Sets a service to start at bootup |
| systemctl status | See the status of a service |
Unit Files
- Two primary locations
- /etc/systemd/system - Unit files that have priority
- /lib/systemd/system - System Unit files
- Basic anatomy
[Section]
Directive1=value
Directive2=value

[Section2]
Directive3=value

...- Great tutorial: https://www.digitalocean.com/community/tutorials/understanding-systemd-units-and-unit-files
Monitoring
- Networking (covered later)
- The Tops
- top
- memtop
- ptop
- sntop
- vtop
- ps
- Continuous monitoring with: watch
The Tops
- TUI applications similar to Windows System Monitor
| Command | Function |
|---|---|
| top | Process Monitoring |
| memtop | Memory Monitoring (Not installed by default) |
| vtop | All in One monitoring (Not installed by default) |
| ptop | Power Monitoring (Not installed by default) |
| sntop | Host Monitoring (Not installed by default) |
ps
- Process Statistics - Current Snapshot only
- Two styles
- Linux
- BSD
- Most people just remember
- ps aux
student@student01: ~
➜ ps aux | head
USER       PID %CPU %MEM    VSZ   RSS TTY      STAT START   TIME COMMAND
root         1  0.0  0.0 220552  8972 ?        Ss   Jan10   0:38 /sbin/init splash
root         2  0.0  0.0      0     0 ?        S    Jan10   0:00 [kthreadd]
root         6  0.0  0.0      0     0 ?        S<   Jan10   0:00 [mm_percpu_wq]
root         7  0.0  0.0      0     0 ?        S    Jan10   0:00 [ksoftirqd/0]
root         8  0.0  0.0      0     0 ?        S    Jan10   3:19 [rcu_sched]
root         9  0.0  0.0      0     0 ?        S    Jan10   0:00 [rcu_bh]
root        10  0.0  0.0      0     0 ?        S    Jan10   0:00 [migration/0]
root        11  0.0  0.0      0     0 ?        S    Jan10   0:01 [watchdog/0]
root        12  0.0  0.0      0     0 ?        S    Jan10   0:00 [cpuhp/0]
Continuous Monitoring
- The 'watch' command can run a specified command on set intervals
- Useful to watching command output change, every ~second
- KEEP THIS IN MIND FOR IPTABLES!
student@student01: ~
➜ watch -n 1 ps aux
Every 1.0s: ps aux
USER       PID %CPU %MEM    VSZ   RSS TTY      STAT START   TIME COMMAND
root         1  0.0  0.0 220552  8972 ?        Ss   Jan10   0:38 /sbin/init splash
root         2  0.0  0.0      0     0 ?        S    Jan10   0:00 [kthreadd]
root         6  0.0  0.0      0     0 ?        S<   Jan10   0:00 [mm_percpu_wq]
root         7  0.0  0.0      0     0 ?        S    Jan10   0:00 [ksoftirqd/0]
root         8  0.0  0.0      0     0 ?        S    Jan10   3:19 [rcu_sched]
root         9  0.0  0.0      0     0 ?        S    Jan10   0:00 [rcu_bh]
root        10  0.0  0.0      0     0 ?        S    Jan10   0:00 [migration/0]
root        11  0.0  0.0      0     0 ?        S    Jan10   0:01 [watchdog/0]
root        12  0.0  0.0      0     0 ?        S    Jan10   0:00 [cpuhp/0]
root        13  0.0  0.0      0     0 ?        S    Jan10   0:00 [cpuhp/1]
Break
Networking
- Gathering Info
- Troubleshooting
- Firewalls
- Remote Admin
- Moving Files Around
- Ensuring Integrity
Gather Network Info
- 'ip' command
- New Way
- Lists of subcommands for gathering more specific info
- 'ip address show' is one of the most important to remember
- Will also show a list of network devices (NICs)
- 'ifconfig' is the old command
student@student01: ~
➜ ip address show
1: lo: <LOOPBACK,UP,LOWER_UP> mtu 65536 qdisc noqueue state UNKNOWN group default qlen 1000
    link/loopback 00:00:00:00:00:00 brd 00:00:00:00:00:00
    inet 127.0.0.1/8 scope host lo
       valid_lft forever preferred_lft forever
    inet6 ::1/128 scope host
       valid_lft forever preferred_lft forever
2: enp0s31f6: <BROADCAST,MULTICAST,UP,LOWER_UP> mtu 1500 qdisc pfifo_fast state UP group default qlen 1000
    link/ether 28:f1:0e:1a:89:f0 brd ff:ff:ff:ff:ff:ff
    inet 10.17.150.252/24 brd 10.17.150.255 scope global dynamic enp0s31f6
       valid_lft 62598sec preferred_lft 62598sec
    inet6 xxxx::xxxx::xxxx::xxxx::xxxx/64 scope link
       valid_lft forever preferred_lft forever
3: lxdbr0: <NO-CARRIER,BROADCAST,MULTICAST,UP> mtu 1500 qdisc noqueue state DOWN group default qlen 1000
    link/ether 00:00:00:00:00:00 brd ff:ff:ff:ff:ff:ff
    inet 10.243.178.1/24 scope global lxdbr0
       valid_lft forever preferred_lft forever
    inet6 xxxx::xxxx::xxxx::xxxx::xxxx/64 scope link
       valid_lft forever preferred_lft forever
Troubleshooting
- Common Commands
- ping
- nslookup
- arp
- traceroute / mtr
- netstat
- lsof
- tcpdump
ping
- The same as ping -t on Windows
- To limit the number of pings use -c #
student@student01: ~
➜ ping -c 3 www.google.com
PING www.google.com (172.16.1.1) 56(84) bytes of data.
64 bytes from iad23s57-in-f4.1e100.net (172.16.1.1): icmp_seq=1 ttl=54 time=35.7 ms
64 bytes from iad23s57-in-f4.1e100.net (172.16.1.1): icmp_seq=2 ttl=54 time=46.1 ms
64 bytes from iad23s57-in-f4.1e100.net (172.16.1.1): icmp_seq=3 ttl=54 time=30.0 ms

--- www.google.com ping statistics ---
3 packets transmitted, 3 received, 0% packet loss, time 2002ms
rtt min/avg/max/mdev = 30.079/37.305/46.132/6.652 ms
nslookup
- Resolves domain names
student@student01: ~
➜ nslookup google.com
Server:		127.0.0.53
Address:	127.0.0.53#53

Non-authoritative answer:
Name:	google.com
Address: 172.16.1.14
traceroute / mtr
- May or may not be installed by default
- Works like tracert in Windows
- mtr is the new hotness...try it
student@student01: ~
➜ traceroute www.google.com
traceroute to www.google.com (172.217.7.164), 64 hops max
  1   10.1.1.1  1.425ms  0.868ms  1.340ms
  2   172.16.1.254  270.868ms  149.332ms  187.508ms
  3   10.2.1.1  8.302ms  8.083ms  8.066ms
  4   *  *  *
  5   *  *  *
netstat
- Network Statistics
- TONS of different options
- My favorite: 'netstat -ptuna'
- -p: Display programs/PIDs
- -t: TCP
- -u: UDP
- -n: Numeric (i.e. don't resolve IP to hostnames)
- -a: All
student@student01: ~
➜ netstat -ptuna
(Not all processes could be identified, non-owned process info
 will not be shown, you would have to be root to see it all.)
Active Internet connections (servers and established)
Proto Recv-Q Send-Q Local Address           Foreign Address         State       PID/Program name
tcp        0      0 0.0.0.0:5355            0.0.0.0:*               LISTEN      -
tcp        0      0 10.2.1.1:53             0.0.0.0:*               LISTEN      -
tcp        0      0 127.0.0.1:631           0.0.0.0:*               LISTEN      -
tcp        0      0 10.1.1.252:55846        52.4.87.2:443           ESTABLISHED 6593/kbfsfuse
tcp        0      0 10.1.1.252:40098        23.23.209.213:443       ESTABLISHED 3534/firefox
tcp        0      0 10.1.1.252:45328        52.206.36.233:443       ESTABLISHED 6593/kbfsfuse
tcp        0      0 10.1.1.252:40838        35.161.114.234:443      ESTABLISHED 3534/firefox
tcp        0      0 10.1.1.252:55828        52.4.87.2:443           ESTABLISHED 6593/kbfsfuse
tcp        0      0 10.1.1.252:52530        52.84.34.228:443        ESTABLISHED 3534/firefox
lsof
- List of Open Files
- Remember network sockets are "files" in Linux
- Works for regular files too...although we're just concerned with network info right now
- Great for finding details about specific processes or ports
| Command | Function |
|---|---|
| lsof -i | Show open networking files (can also add 'tcp' or 'udp' to be specific) |
| lsof -i -a | All |
| lsof -i -a -c <chars> | Only list processes that start with characters <chars> |
| lsof -i -a -p <PID> | Only list processes with a PID of <PID> |
| lsof -i :<port> | Only show files open for ports <PORT> |
lsof Example
student@student01: ~
➜ lsof -i -a
COMMAND    PID  USER   FD   TYPE   DEVICE SIZE/OFF NODE NAME
firefox   3534 student  111u  IPv4 41734554      0t0  TCP student01:40838->ec2.us.compute.com:https (ESTABLISHED)
firefox   3534 student  200u  IPv4 41979422      0t0  TCP student01:40386->slid.es:https (ESTABLISHED)
keybase   6590 student   16u  IPv4 40646863      0t0  TCP student01:54808->ec2.compute-1.com:https (ESTABLISHED)
kbfsfuse  6593 student   11u  IPv4 40658534      0t0  TCP student01:55828->ec2.compute-1.com:https (ESTABLISHED)
kbfsfuse  6593 student   32u  IPv4 40673896      0t0  TCP student01:55846->ec2.compute-1.com:https (ESTABLISHED)
kbfsfuse  6593 student   33u  IPv4 40732025      0t0  TCP student01:45328->ec2.compute-1.com:https (ESTABLISHED)
chrome   27947 student   98u  IPv4 37653361      0t0  UDP *:mdns
chrome   27947 student  101u  IPv6 37653362      0t0  UDP *:mdns
chrome   27947 student  122u  IPv4 40670442      0t0  TCP student01:57600->qb-in-f188.1e100.net:5228 (ESTABLISHED)
chrome   27947 student  138u  IPv4 41988911      0t0  TCP student01:55586->iad30s09-.1e100.net:https (ESTABLISHED)
tcpdump
- Similar to Wireshark but for the command line
- "dumps" packets from the kernel (not just TCP)
- Requires root privs
- Great tutorial: https://danielmiessler.com/study/tcpdump/
- A list of useful options before we get into the weeds
| Command | Function |
|---|---|
| tcpdump -D | List available interfaces (You'll need this before anything else) |
| tcpdump -i <IFACE> | Dump packets from the <IFACE> interface |
| tcpdump -nn | Don't resolve IP->Hostnames or Port numbers->Names |
| tcpdump -t | Use human readable time stamps |
tcpdump Filters
- Think of listing "filters"
- These "filters" are expressions after the 'tcpdump' command and it's options
- 'tcpdump -nntc3 -i any <FILTERS>'
- These filters can also be combined with words such as
- and
- or
- not
tcpdump Filters - Protocol
- One can filter by protocol by using
- tcp
- udp
- icmp
- Or combined with 'tcp or udp' for example
root@student01: ~
➜ tcpdump -nntc3 -i any tcp
tcpdump: verbose output suppressed, use -v or -vv for full protocol decode
listening on any, link-type LINUX_SLL (Linux cooked), capture size 262144 bytes
IP 10.1.1.252.54808 > 52.200.75.29.443: Flags [P.], seq 35118:3503178, ack 55969, win 293, options [nop,nop,TS val 278801 ecr 6312], length 60
IP 52.200.75.29.443 > 10.1.1.252.54808: Flags [P.], seq 1:42, ack 60, win 114, options [nop,nop,TS val 63511515 ecr 2781761801], length 41
IP 10.1.1.252.54808 > 52.200.75.29.443: Flags [.], ack 42, win 293, options [nop,nop,TS val 2781761814 ecr 63511515], length 0
3 packets captured
3 packets received by filter
0 packets dropped by kernel
tcpdump Filters - Location
- One can filter by the location (source, destination, or network) by using
- src 1.2.3.4
- dst 4.5.6.7
- net 1.2.3.0/24
- These can be used with Ports as well
- port 22
- src port 23
- dst port 21
- Ports also allow ranges
- portrange 5-100
tcpdump - Read/Save
- If you want to save the captured packets for further use
- -w <file>
- "Write file"
- -w <file>
- You can also "read" a captured file to do more processing/filtering
- -r <file>
- Extension is .pcap by convention and can be used in tools like Wireshark
tcpdump - Combinations
- We've already said that we can combine all these filters with conjunctions, however they can also be nested
- To nest, use parenthesis with single quotes
- tcpdump 'src 10.0.2.4 and (dst port 3389 or 22)'
tcpdump - Summary
- tcpdump is extremely powerful and useful
- If you need to see if the kernel is actually receiving a certain type of packet on an interface, this is where you go
- Knowing how to filter and combine filters is key
Go Catch Some Packets

Break
Firewalls
- Some built in firewalls
- ufw: "easy" but less flexible firewall (good for personal use)
- iptables: Our bread and butter...buuuuut complex
- nftables: The newer (still being integrated) variant
- We won't specifically be going over ufw and nftables
- All accomplish roughly the same thing
- All filter packets at the kernel level (thus requiring root)
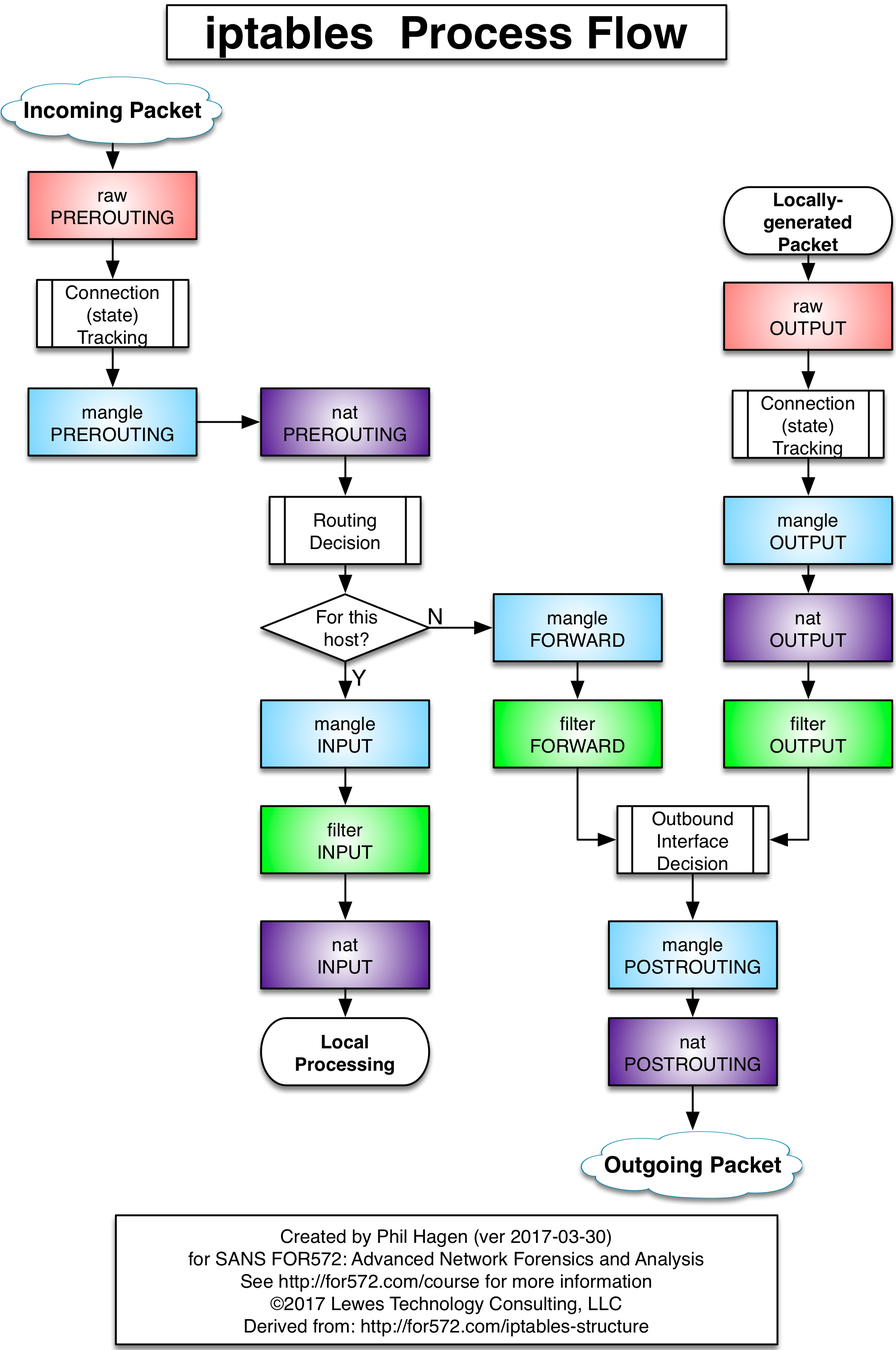
iptables
- Rule based firewalls
- Rules are designated for different "chains" which are part of different "tables"
- Each packet is filtered through these chains of rules, one after the other
- At each rule, the kernel decides whether to perform an action (such as drop) on the packet if it matches the rule, or let it continue processing
- The action may be something simple like, "log and continue processing" or "allow"
- The packet is sent through these chains of rules and through the different tables until either an action is performed on the packet that drops it, or ultimately the default rule is applied (i.e. it makes it all the way through all rules of all chains of all tables)
- Packets can match multiple rules, but are processed in order
- Let's visualize this...

Actually...
iptables - Chains
- In it's simplest form (the default table known as the FILTER table), there are three chains in order of processing
- INPUT: Packets coming in
- FORWARD: Packets being forwarded
- OUTPUT: Packets going out
- When we talk about tables, different tables may have different chains
iptables - Tables
- Although you'll primarily use the default table, there is one other table you should know
- nat
- The nat table includes the following four chains in order of processing:
- PREROUTING
- INPUT
- OUTPUT
- POSTROUTING
iptables - Syntax
- The first thing you should know: iptables -L
- Lists the chains for the default table
- The table can be changed with -t <TABLE>
- One can "Flush" or reset the rules of a table with -F
- iptables -F
- iptables -t nat -F
- Before we spoke about the default policy, which is if the rule makes it to the end of a chain, what should happen.
- By default the policy is ALLOW for all chains
- You can change the policy of a particular chain with -P
- iptables -P INPUT DROP

iptables - Policy
- When changing the default policy, ESPECIALLY of a remote box, be sure not to cut your current connection
- By default iptables rules are non-persistent and will be reset on reboot
- We can save and restore rulesets with
- iptables-save > /tmp/iptables-v4
- iptables-restore < /tmp/iptables-v4
- There are packages which will do this for us automatically at boot
- iptables-persistent
- To save (which will auto restore at next boot):
- dpkg-reconfigure iptables-persistent
- To save (which will auto restore at next boot):
- iptables-persistent
iptables - Modifying Chains
- Rules can be modified (appended, inserted, or deleted) on chains with these various commands
| Command | Function |
|---|---|
| iptables -A <CHAIN> | "Append" a rule at the bottom of <CHAIN> |
| tcpdump -I <CHAIN> <NUM> | Insert a rule on <CHAIN> and rule number <NUM> |
| iptables -D <CHAIN> <NUM> | Delete rule number <NUM> from <CHAIN> |
- TIP: it can be helpful to use the `--line-numbers` option which will display the line numbers of the rules for easier inserting/deleting
iptables - Rules
- Now that we know how to view tables and chains, and list or modify the current rules, we actually learn about the rules themselves
- Most rules are similar to using tcpdump, you can specify "filters" to match packets
- There are various flags and switches which modify or add these filters to the rule
- Some flags/switches enable other flags and switches
- These are known as "match extensions"
iptables - Rules
| Option / Flag | Function |
|---|---|
| -j <ACTION> | What to do with the packet. Normally: * ACCEPT * LOG * DROP * MASQUERADE |
| -p [!] <PROTO> | Match a particular protocol like 'tcp' or 'udp' |
| -i <IFACE> | Match only on input interface <IFACE>. If '!' is included it reverses the rule |
| -d [!] <IP>[/cidr] | Destination IP/network. If '!' is included it reverses the rule |
| -s [!] <IP> | Source IP/network. If '!' is included it reverses the rule |
| -o <IFACE> | Only match output interface <IFACE> |
| -m <NAME> | Performs a "match" matches can be thought of as "modules" and enable other "matching options/flags" More on this later... |
| --dport <NUM> | Destination port |
| --sport <NUM> | Source port |
Common Rule options/switches
iptables - Matches
| Option / Flag | Function |
|---|---|
| -m conntrack | Adds a --ctstate <STATE> flag where you can match connection states * ESTABLISHED * RELATED * NEW * INVALID Can be comma separated like ESTABLISHED,RELATED Also adds --ctproto |
| -m comment | Allows adding comments with --comment "some comment" |
| -m multiport | Allows matching on more than one port with --dports <port1,port2> |
| -m iprange | Allows --src-range and --dst-range for a range of IPs |
| -m log | Adds --log-level <#> to only log at specified logging levels |
| -m udp OR -m tcp | Adds --sport and --dport that will match only TCP or UDP ports |
- Common match names (modules)
List of all extensions: http://ipset.netfilter.org/iptables-extensions.man.html
iptables - Example
iptables -A INPUT -i lo -p all -j ACCEPT
iptables -A OUTPUT -o lo -p all -j ACCEPT
iptables -A INPUT -i eth0 -m state --state ESTABLISHED,RELATED -j ACCEPT
iptables -A INPUT -p tcp --dport ssh -j ACCEPT
iptables -A INPUT -p tcp --dport www -j ACCEPT
iptables -I INPUT -p tcp --dport 22 -i eth0 -m conntrack --ctstate NEW -m recent --set
iptables -I INPUT -p tcp --dport 22 -i eth0 -m conntrack --ctstate NEW -m recent --update \
     --seconds 900 --hitcount 3 -j DROP
iptables -P INPUT DROP
iptables - TIP
- When working with iptables open two terminals, or a split screen
- In one screen run the iptables commands
- In the other run:
- watch -n 1 iptables -L --line-numbers
iptables - Enable IP Forwarding
- In order to use the FORWARD chains or any nat'ing you'll have to enable IP forwarding in the kernel
- To check if forwarding is already enabled
- $ cat /proc/sys/net/ipv4/ip_forward
- if you see a 0 fowarding is NOT enabled
- if you see a 1 forwarding is enabled
- To enable forwarding use
- # echo 1 > /proc/sys/net/ipv4/ip_forward
Break
Connecting to Remote Boxes
- One extremely handy feature of having such a powerful shell is all this power is available remotely
- In the old days, telnet was used. This is now hilariously insecure.
- ssh was developed to enable "Secure SHell"
- ssh gives us access to the shell of another computer
ssh
- ssh is also the base of many other remote connection systems, and allows everything from forwarding of GUI to secure file transfers
- The ssh daemon (sshd) which acts as the connection server can be configured in a multitude of ways (config file is /etc/sshd/sshd_config)
- Conifguration options include which users can connect, how they authenticate, etc.
- Syntax to connect is:
- $ ssh <user>@<ip/host> [-p <NUM>]
- Where <user> is the remote user account
- <ip/host> is the either the IP or hostname of the server
- if -p is included it uses port <NUM>, otherwise the default of 22 is used
ssh Example
student@student01: ~
➜ ssh instructor@instructor01
instructor password:

instructor@instructor01: ~
➜ - Keep in mind that the shell on the remote box may not be the same as the shell on the local box
Moving Files
- Now that we can connect to remote boxes, we may need to transfer files back and forth from time to time
- We have two secure options
- scp - Secure Copy which uses ssh as the tunnel
- sftp - Which is SecureFTP
- scp is like a single shot command
- sftp is a persistent connection
scp
- scp is the more simple command
- The syntax to SEND a file to a remote box is
- scp [-P <NUM>] <FILE> <USER>@<IP>:<RPATH>
- FILE is the file to transfer
- USER is the remote user
- IP is the remote machine's IP
- :RPATH is the remote path to push the file to
- If -P NUM is used, it uses port NUM (if not default of 22 is used)
- scp [-P <NUM>] <FILE> <USER>@<IP>:<RPATH>
student@student01: ~
➜ scp some.txt student@remote:/home/student/- scp is the more simple command
- The syntax to PULL a file from a remote box is
- scp [-P <NUM>] <USER>@<IP>:<RFILE> <LPATH>
- All options are the same sending a file except LPATH is the path to save the file locally
student@student01: ~
➜ scp student@remote:/home/student/some.txt some.txt- Adding '-r' will allow "recursive" copy for entire directories
sftp
- sftp functions more like ssh, but the commands are related to putting (uploading) and getting (downloading) files
- The syntax to connect a remote box is (all options same as scp)
- sftp [-P <NUM>] <USER>@<IP>
- With sftp, most shell commands exist, except are strictly displaying info for the REMOTE box.
- To run shell commands on the LOCAL box, you prefix the command with 'l'
- To upload a file (LOCAL->REMOTE) use 'put FILE' or 'mput FILE FILE FILE'
- To download a file (REMOTE->LOCAL) use 'get FILE' or 'mget FILE FILE FILE'
- get, mget, put, and mput all have '-r' for "recursive"
There is a Third...
- There is a third option to quickly send a file across a network...but it's not secure
- netcat
- With netcat (network cat) we can "listen" for a connection on a port, and as soon as we receive a connection, send a file, then close the connection
- It's quick and dirty but requires access to both boxes
student@remote: ~
➜ netcat -l 2201 < file.txt

student@local: ~
➜ netcat -p 2201 > file.txt| Command | Function |
|---|---|
| netcat -l <NUM> | Listen on port <NUM> |
| netcat -L <NUM> | Listen on port <NUM> but DO NOT close connection after first connection |
| netcat -p <NUM> | Connect to port <NUM> |
Verifying Integrity
- When sending files back and forth how do we know if a bit or byte didn't get flipped or flopped in transmission?!
- Hashing
- Uses a one way algorithm to transform any number of bytes into a fixed length
- Several algorithms with various pros/cons (in order of fastest to slowest):
- md5: 32bytes, not super secure. Good enough for most purposes like this
- sha1: 160bytes, recentlyish "broken"
- sha256: 256bytes, unbroken
- sha512: 512bytes, unbroken but slow
- It's decently safe to compare the first and last few bytes then call it good
Verifying Integrity - Example
student@local: ~
➜ md5sum file.txt
d41d8cd98f00b204e9800998ecf8427e  file.txt

student@local: ~
➜ scp file.txt student@remote:/home/student

student@local: ~
➜ ssh student@remote

student@remote: ~
➜ md5sum file.txt
d41d8cd98f00b204e9800998ecf8427e  file.txt
Zipping
- So we can send files, verify their integrity, but sending files one at a time isn't great
- Even recursive sending is troublesome with all the individual verifying
- On windows I can zip up files...on Linux...
- I can also zip up files
- tar is the Linux command of choice for "archiving" files
tar
- We can 'tar' files with compression or without
- We can use various different types of compression
- But first...

tar
- tar can be complicated...but for our simple tasks it's really not
- The syntax is
- tar <OPTIONS> <files>
- Common options are
- x: eXpand (un-tar)
- c: Create (tar-up)
- f: The file to zip up or unzip
- z: Zip (use compression [GZip])
- v: Verbose (print everything you're doing)
- j: Use Compression [BZip2] (better compression than z)
- J: Use Compression [XZ] (great compresssion, but slow)
- All you need to remember is these two:
- To ZIP:
- tar czf myzip.tar.gz file1 file2 file3
- To UNZIP:
- tar xzf myzip.tar.gz
- To ZIP:
- By taring the files or directories you can hash only the archive, send only the archive, then validate only the archive...MUCH easier
Module 5.5
Making your Life Easier
Your Shell
- Essentially your house
- Controls how you move in the terminal, your features, etc.
- Changing your shell can have dramatic increases in productivity and decreases in frustration
- There are pros and cons to each type of shell
BASH (Bourne Again Shell)
- The most ubiquitous shell out there (other than maybe Bourne Shell [sh] which it's based on)
- Used EVERYWHERE
- Installed by default basically anywhere
- Millions of scripts
- Extremely quirky, but at least documented
- Check Stack Overflow
- Not a whole lot in terms of friendly features...
- CTRL+r to search through history
- Let's look at something more....

fish Shell
- Probably the most user friendly shell out there
- Breaks compatibility with BASH
- Scripts may not run
- Variables act differently
- etc.
- Install via:
apt-add-repository ppa:fish-shell/release-3
apt-get update
apt-get install fish
- Run with: fish
Honorable Mention: ZSH
- My favorite
- Keeps most compatibility with BASH
- Also has some niceties like partial command completion
- Shortcuts for history
- Far better tab-completion than BASH
- CON: takes some additional setup and tweaking to get the full power out of it
Module 6

Task...
- ssh to root@x.x.x.x
- password: password123
- Answer questions from
To Replay the Final
- (optional) Delete the Old Image
- lxc delete student
- Create a new container from the 'student-img' image
- lxc launch student-img student
- Find the IP address of the new container
- lxc list
You now