リクガメの平穏を見守るシステムを作る
JavaScriptつまみ食い LT 会 #4 ~ つまみ食い LT 大会!
2019/01/19
自己紹介
mjima
好きなAws
Lambda, cognito


Qiita

その他60%!!
今回は、
リクガメの平穏を見守るシステムを作っています。
リクガメの平穏
=(イコール)
- 快適な温度
- 快適な湿度
- 適度な明かり、紫外線
- 適度な食事、給水

こういう感じのシステムの
このへんをお話しします
説明したいこと
- rasPiから動画
- ESP8266(≒arduino)からセンサーデータ
- AWS amplify
- buefy
- AWS AppSync
- C3.js
rasPiから動画
- USBカメラ付きのrasberryPi2があり、kinesis video streamに常時データを垂れ流している
- kinesis video streamからの閲覧はlambdaからhls配信用のURLを取得する事によってできる

ESP8266からセンサーデータ
- リクガメの水槽に温度と湿度のセンサーを繋げたESP8266デバイスがあり、5分毎にaws iotにデータを飛ばしている
- awt iotにpublishするとDynamoDbにデータ連携
- 下記のようなセンサーデータが入っている
{
  id: "id12345678",
  expire: "12345678", //TTL
  payload: {
    expire: "12345678",
    d1: "22.2", //温度
    d2: "33.3"  //湿度
  }
}AWS Amplify
Aws Amplify is
AwsのJavaScript向けフレームワーク
- jsでawsリソース(s3, dynamodb, cognito...)を使い倒せる
- React, Angular, Vue.js等のjsフレームワークに対応している他、iOS等のモバイルアプリにも対応。
1.Install and configure the Amplify CLI
    $ npm install -g @aws-amplify/cli
    $ amplify configure
2. Create a New App
$ mkdir -p amplify-js-app/src && cd amplify-js-app
$ touch package.json index.html webpack.config.js src/app.js
$ npm installAuthentication -Amplify-
amplify CLIで認証の仕組みを一気に行えてしまう
$ amplify add auth
$ amplify push
App.js
aws-exports.js
import Amplify, { Auth } from 'aws-amplify';
import aws_exports from './aws-exports';
Amplify.configure(aws_exports);
import Amplify from 'aws-amplify';
Amplify.configure({
Auth: {
identityPoolId: 'XX-XXXX-X:XXXXXXXX-XXXX-1234-abcd-1234567890ab',
region: 'XX-XXXX-X',
userPoolId: 'XX-XXXX-X_abcd1234',
userPoolWebClientId: 'a1b2c3d4e5f6g7h8i9j0k1l2m3',
}
});buefy
buefy is 何?
→ bootstrap的なcssフレームワーク。vue.jsで使うのに適している
$ npm install buefynpm
import Buefy from 'buefy'
import 'buefy/dist/buefy.css'

Vue.use(Buefy)
main.js
でおしまい。
テーブルを書いてみる
<b-table :data="tempdata" :columns="tempcolumns"></b-table>template
data(){
  return{
    tempdata: [],
    tempcolumns: [
      {
        field: 'date',
        label: 'Date'
      },
      {
        field: 'd1',
        label: '温',
        numeric: true,
        width: 80
      },
      {
        field: 'd2',
        label: '湿',
        numeric: true,
        width: 80
      }
    ]
  }
}
script
methods:{
  measurements: async function() {
    res = somefuntion()
    self.tempdata = res.slice(0,20)
}

AppSync

AppSync is ..
- 最近流行りのGraphQL
- Next RestFull API
- SQL Like な問い合わせができるので狙ったデータを取得しやすい
- Endpointが1つにまとまる - フルマネージドなGraphQL
- 面倒な部分はawsにやらせる
- DynamoDBが簡単につかえる
- RDSも使える - 前述のamplifyとも仲良し
AWSコンソールで操作


① Import DynamoDb Table
DynamoDBと同時にAppSyncの
初期設定ができる
③Queriesデモ
コンソールでQueryのテストができる
②マッピング
DynamoDBのカラムをからスキーマを設定
const awsmobile =  {
    "aws_project_region": "ap-northeast-1",
    "aws_appsync_graphqlEndpoint": 'https://xxx.appsync-api.ap-northeast-1.amazonaws.com/graphql',
    "aws_appsync_region": "ap-northeast-1",
    "aws_appsync_authenticationType": "AMAZON_COGNITO_USER_POOLS"
};

export default awsmobile;
import Amplify, { Auth, Storage, Logger, API, graphqlOperation } from 'aws-amplify'
Amplify.configure(awsmobile);
import * as queries from '../graphql/queries';

let _filter = {"expire": {'ge' : (new Date() + 36 * 3600 ) * 0.001}, "limit": (60/5) * 48}
let _res = await API.graphql(graphqlOperation(queries.listMeasurements, _filter))
export const listMeasurements = `query listKamekusaDht22S(
  $filter: TableKamekusaDht22FilterInput
  $limit: Int
  $nextToken: String
) {
  listKamekusaDht22S(filter: $filter, limit: $limit, nextToken: $nextToken) {
    items {
      expire
      id
      payload
    }
    nextToken
  }
}`;
config
script
query
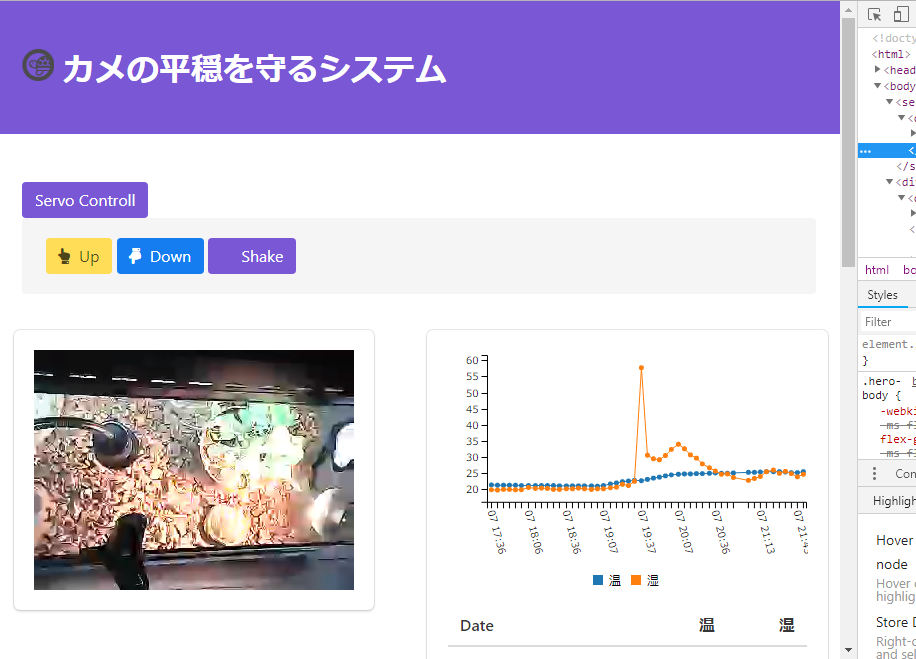
Appsync + Amplify
Amplify + AppSync + Vue
C3.js
c3.js is 何?
→ svgのグラフをjsで簡単に表示できるライブラリ
$ npm install vue-c3
$ npm install c3
npm
<template>
  <div>
    <vue-c3 :handler="handler"></vue-c3>
  </div>
</template>
...(略)...
// to init the graph call:
const options = {
  data: {
    columns: [
      ['data1', 2, 4, 1, 5, 2, 1],
      ['data2', 7, 2, 4, 6, 10, 1]
    ],
  ...
  },
  ...
}
this.handler.$emit('init', options)
抜粋
と、わかりやすい
example:
折れ線グラフ
<vue-c3 :handler="handler"></vue-c3> updateGraph(jsons) {
let x = ['x']
let d1 = ['温']
let d2 = ['湿']
for (let j of jsons){
//x.push(j.date)
x.push(j.fulldate)
d1.push(j.d1)
d2.push(j.d2)
}
const options = {
data: {
x: 'x',
xFormat: '%Y-%m-%dT%H:%M:%S',
columns: [x,d1,d2],
},
axis: {
x: {
type: 'timeseries',
tick: {
format: '%d %H:%M',
rotate: 75
}
}
},
type: 'spline'
}
this.handler.$emit('init', options)
},
template
script

Next..
- mqttのwebからのpublish実装 <- now
- esp8266でsubscribeしてサーボモータを動かす
→餌が投下 <- now - 画像検出
以上です。
ご清聴ありがとう
ございました。
AppSyncとDynamodbとkinesisVideoStreamとリクガメモニタリング
https://qiita.com/ikegam1/items/306b5168701b5ce9c2b9
リクガメのおウチの温度/湿度をモニターしてawsに投げるのを1000円くらいでやる on arduino
https://qiita.com/ikegam1/items/8edcf5f4327226848ee8
https://github.com/ikegam1/Lambda-on-Laravel-on-VueJs-with-Dynamodb