PB138:
Introduction to CSS
What is CSS
CSS (Cascading Style Sheets) is used to define styles for your web pages, including the design, layout and variations in display for different devices and screen sizes.
There is a clear separation of concerns between HTML and CSS. HTML caries content and it's meaning while CSS is responsible for look and feel.
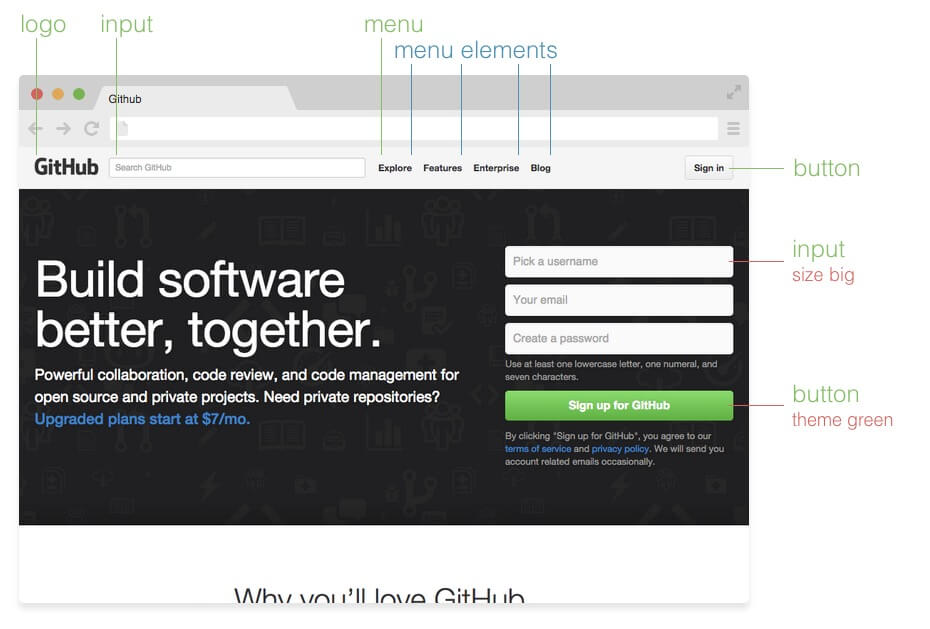
How connect CSS with HTML
There are 3 ways how we can add CSS to your website:
- Link external CSS file
- Inline CSS inside <style> tag
- Inline CSS in style="" attribute
Linking external file
<!DOCTYPE html>
<html lang="en">
<head>
    <meta charset="UTF-8">
    <meta name="viewport" content="width=device-width, initial-scale=1.0">
    <link rel="stylesheet" type="text/css" href="theme.css">
    <link rel="stylesheet" type="text/css" href="theme-override.css">
    <link rel="stylesheet" type="text/css" href="custom-styles.css">
</head>
<body>

</body>
</html>
Using <style>
<!DOCTYPE html>
<html lang="en">
<head>
    <meta charset="UTF-8">
    <meta name="viewport" content="width=device-width, initial-scale=1.0">
    <style>
    	// In this example we are using style element
        /*
        	Some websites dump all their css into this element.
            They are trying to optimize performace of their website by
            mimizing number of requests to server.
        */
    </style>
</head>
<body>

</body>
</html>
Using style=""
<!DOCTYPE html>
<html lang="en">
<head>
    <meta charset="UTF-8">
    <meta name="viewport" content="width=device-width, initial-scale=1.0">
</head>
<body>

	<h1 style="color: red;">Red title</h1>

    <!-- This variant is not recommended. It leads to clutter in website.
    	 And it is much harder to maintain larger sites. -->

</body>
</html>
What is the meaning of cascading?
- Default browser styles
- External CSS or <style>
- Styles inside style attribute
Styles are applied in specific order:
All styles are applied. Later applied style overrides previously applied style.
CSS Selectors
- element selectors
- ID selectors
- class selectors
- pseudo element selectors
In order to apply a style to some elements, we must use CSS selectors.
There are:
Element Selectors
html {
    font-size: 16px;
}

h1 {
    font-size: 2.5rem;
}

h2 {
    font-size: 2rem;
}

h3, h4, h5 {
    font-size: 1rem;
}
ID Selectors
<!DOCTYPE html>
<html lang="en">
<head>
    <meta charset="UTF-8">
    <title>Document</title>
</head>
<body>
    <h1 id="important-header">
       This is main header
    </h1>
</body>
</html>
#important-header {
color: dark-gray;
font-size: 3rem;
}Class Selectors
<!DOCTYPE html>
<html lang="en">
<head>
    <meta charset="UTF-8">
    <title>Document</title>
</head>
<body>
    <h1 class="header header-blue">
       This is blue header
    </h1>
</body>
</html>
.header {
font-size: 3rem;
}
.header-blue {
color: blue;
}Pseudo Selectors
<!DOCTYPE html>
<html lang="en">
<head>
    <meta charset="UTF-8">
    <title>Document</title>
</head>
<body>
    <a href="#link">
       I link somewhere
    </h1>
</body>
</html>
/* unvisited link */
a:link {
color: #FF0000;
}
/* visited link */
a:visited {
color: #00FF00;
}
/* mouse over link */
a:hover {
color: #FF00FF;
}
/* selected link */
a:active {
color: #0000FF;
}Selecting children
<!DOCTYPE html>
<html lang="en">
<head>
    <meta charset="UTF-8">
    <title>Document</title>
</head>
<body>
  <article>
    <h1 class="header header-blue">
      Lorem Ipsum
    </h1>
    <p>
      Lorem Ipsum is simply dummy
      text of the printing and
      typesetting industry. Lorem
      Ipsum has been the industry's
      standard dummy text ever
      since the 1500s
    </p>
  </article>
</body>
</html>
article p {
color: gray;
}Selecting children
<!DOCTYPE html>
<html lang="en">
<head>
    <meta charset="UTF-8">
    <title>Document</title>
</head>
<body>
  <article>
    <h1 class="header header-blue">
      Lorem Ipsum
    </h1>
    <p>
      Lorem Ipsum is simply dummy
      text of the printing and
      typesetting industry. Lorem
      Ipsum has been the industry's
      standard dummy text ever
      since the 1500s
    </p>
  </article>
</body>
</html>
article > p {
color: gray;
}Selecting siblings
<!DOCTYPE html>
<html lang="en">
<head>
    <meta charset="UTF-8">
    <title>Document</title>
</head>
<body>
  <article>
    <h1 class="header header-blue">
      Lorem Ipsum
    </h1>
    <p>
      Lorem Ipsum is simply dummy
      text of the printing and
      typesetting industry. Lorem
      Ipsum has been the industry's
      standard dummy text ever
      since the 1500s
    </p>

    <p>
      Secondary text
    </p>
  </article>
</body>
</html>
// this is only applied on second <p>
article > p + p {
font-style: italic;
}Selector Specificity
HIGHEST SPECIFICITY
LOWEST SPECIFICITY
style="" attribute
ID
class, pseudoclass, attribute
element
Selector Specificity
ul > li {
  color: white;
}
.list > .list-item {
color: black;
}Style
0
ID
Class
Element
0
0
2
Style
0
ID
Class
Element
0
0
2
= second selector wins
Selector Specificity
body .container #hero-container .button a:hover { }Style
0
ID
Class
Element
1
2
3
Class
+ Pseudo
ID
Class
Element
Pseudo
Element
Now how it works internaly
body .container #hero-container .button a { }- Things are evaluated from right to left
- This means we get a list of all <a> in document
- In this list there is filter applied and only subset with parrent .button is returned
- In this subset, we apply filter again and get those with parrent #hero-container
- ...
Now you understand selectors.
Let's get to some concepts
Display
One of commonly used property is display.
There is display: inline for elements:
<a>, <span>, <img>
and display: block for elements:
<div>, <h1> - <h6>, <p>,
<form>, <header>, <footer>, <section>
Display: inline
You cannot set the width and height of the inline element.
Also, it does not respect margins and paddings on top and bottom.
It does NOT add line break before and after element.
Display: inline-block
You can set the width and height of the inline-block element.
Also, it DOES respect margins and paddings on top and bottom.
It does NOT add line break before and after element.
Display: block
You can set the width and height of the block element.
Also, it does respect margins and paddings on top and bottom.
It adds line break before and after element.
Box Model
margin
border
padding
content
content-box
margin
border
padding
content
width
border-box
margin
border
padding
content
width
For some elements, there is default content-box. For other border-box.
Always set border-box
* {
  box-sizing: border-box;
}
Now how to set margins/paddings
.item-with-margins {
    margin: 20px 10px 20px 10px;
}
values are set
clockwise
top
right
left
bottom
Now how to set margins/paddings
.item-with-margins {
    margin: 20px 10px;
}
left&right
top&bottom
Now how to set margins/paddings
.item-with-margins {
    margin: 10px;
}
Often there is need to hide element
.is-hidden {
   display: none;
}
beware of visibility: hidden. This also hides element but still reserves space for it in your layout.
Overflow
.no-overflow {
   overflow: hidden;
}

.visible-overflow {
  overflow: auto; // same as visible
}

.display-scrollbar {
  overflow: scroll;
}
and this is often connected with truncatenation
.truncate {
  white-space: nowrap;
  overflow: hidden;
  text-overflow: ellipsis;
}
Floating
.to-left {
   float: left;
}

.to-right {
  float: right; // same as visible
}
if we want to continue it is good to clear floating afterwards
.clearfix::after {
  content: "";
  clear: both;
  display: table;
}
Now some more advanced concepts
CSS Variables
:root {
  --main-bg-color: coral;
}

#div1 {
  background-color: var(--main-bg-color);
}

#div2 {
  background-color: var(--main-bg-color);
}
We can say the same as for magic numbers and constants in classic programming. Use variables as much as possible. You can create a hierarchy of variables.
Sass, less and other preprocessors
- In past there we no variables in CSS
- This was the reason why people introduces preprocessors
- They provided variables, calculated values and inheritance (now CSS have composes - but this is talk for later)
Many different devices
Mobile First Approach
- We must support mobile, tablet and desktop views
- It is recommended to develop primarily for mobile
- Especially in Asia most of users and revenue is coming from mobile.
- So open your developer tools and switch to mobile view when developing.
- Add tablet and desktop specific styles later.
Media Queries
@media only screen and (max-width: 600px) {
  body {
    background-color: lightblue;
  }
}
Media Queries
/* For desktop: */
.col-1 {width: 8.33%;}
.col-2 {width: 16.66%;}
.col-3 {width: 25%;}
.col-4 {width: 33.33%;}
.col-5 {width: 41.66%;}
.col-6 {width: 50%;}
.col-7 {width: 58.33%;}
.col-8 {width: 66.66%;}
.col-9 {width: 75%;}
.col-10 {width: 83.33%;}
.col-11 {width: 91.66%;}
.col-12 {width: 100%;}

@media only screen and (max-width: 768px) {
  /* For mobile phones: */
  [class*="col-"] {
    width: 100%;
  }
}
But let's do it right


Mobile
Tablet
Desktop
/* For mobile phones: */
[class*="col-"] {
  width: 100%;
}

@media only screen and (min-width: 600px) {
  /* For tablets: */
  .col-s-1 {width: 8.33%;}
  .col-s-2 {width: 16.66%;}
  .col-s-3 {width: 25%;}
  .col-s-4 {width: 33.33%;}
  .col-s-5 {width: 41.66%;}
  .col-s-6 {width: 50%;}
  .col-s-7 {width: 58.33%;}
  .col-s-8 {width: 66.66%;}
  .col-s-9 {width: 75%;}
  .col-s-10 {width: 83.33%;}
  .col-s-11 {width: 91.66%;}
  .col-s-12 {width: 100%;}
}

@media only screen and (min-width: 768px) {
  /* For desktop: */
  .col-1 {width: 8.33%;}
  .col-2 {width: 16.66%;}
  .col-3 {width: 25%;}
  .col-4 {width: 33.33%;}
  .col-5 {width: 41.66%;}
  .col-6 {width: 50%;}
  .col-7 {width: 58.33%;}
  .col-8 {width: 66.66%;}
  .col-9 {width: 75%;}
  .col-10 {width: 83.33%;}
  .col-11 {width: 91.66%;}
  .col-12 {width: 100%;}
}
Typical Device Breakpoints
- Extra small devices (phones, 600px and down)
- Small devices (portrait tablets and large phones, 600px and up)
- Medium devices (landscape tablets, 768px and up)
- Large devices (laptops/desktops, 992px and up)
- Extra large devices (large laptops and desktops, 1200px and up)}
You can even detect if device is in landscape or portrait mode
@media only screen and (orientation: landscape) {
  body {
    background-color: lightblue;
  }
}
Flexbox
Often you must create one dimensional layout with items shrinking, aligning or filling available space. For this you can use display: flex.
<div class="flex-container">
  <div class="flex-item">1</div>
  <div class="flex-item">2</div>
  <div class="flex-item">3</div>
</div>
.flex-container {
display: flex;
}Flexbox
Often you must create one dimensional layout with items shrinking, aligning or filling available space. For this you can use display: flex.
<div class="flex-container">
  <div class="flex-item">1</div>
  <div class="flex-item">2</div>
  <div class="flex-item">3</div>
</div>
.flex-container {
display: flex;
flex-direction: row | column
}justify-content
.flex-container {
  display: flex;
  flex-direction: row;
  justify-content: center;
}
align items
.flex-container {
  display: flex;
  flex-direction: row;
  align-items: stretch
}
flex item
.flex-item {
  flex: 0 1 auto;
  // flex-grow flex-shrink flex-basis
}
CSS Grid
If thinking in one dimension is not sufficient for your use case thank use CSS Grid.
It can be used for layouts, dashboards and other things where you need complex layout.
CSS Grid
.container {
  grid-template-columns:
    40px 50px auto 50px 40px;
  grid-template-rows: 25% 100px auto;
}
CSS Grid
.container {
  grid-template-columns:
    [first] 40px [line2] 50px [line3]
    auto [col4-start] 50px [five] 40px [end];
  grid-template-rows:
    [row1-start] 25% [row1-end]
    100px [third-line] auto [last-line];
}
CSS Grid
.item-b {
  grid-column-start: 1;
  grid-column-end: col4-start;
  grid-row-start: 2;
  grid-row-end: span 2;
}
Note: Items can overlap each other. You can use z-index to control their stacking order.
Now let's explore practices on how to organize CSS.
OOCSS
The purpose of OOCSS is to encourage code reuse and, ultimately, faster and more efficient stylesheets that are easier to add to and maintain.
DOES:
- Use classes for styling
- Separate container and content
- Avoid the descendent selector (i.e. don’t use .sidebar h3)
- Avoid IDs as styling hooks
- Avoid attaching classes to elements in your stylesheet (i.e. don’t do div.header or h1.title)
- Except in some rare cases, avoid using !important
- Use CSS Lint to check your CSS
- Use CSS grids
BEM
Block
A standalone entity that is meaningful on its own.
Element
A part of a block that has no standalone meaning and is semantically tied to its block.
Modifier
A flag on a block or element. Use them to change appearance or behavior.
<button class="button">
	Normal button
</button>
<button class="button button--state-success">
	Success button
</button>
<button class="button button--state-danger">
	Danger button
</button>
.button {
display: inline-block;
border-radius: 3px;
padding: 7px 12px;
border: 1px solid #D5D5D5;
background-image: linear-gradient(#EEE, #DDD);
font: 700 13px/18px Helvetica, arial;
}
.button--state-success {
color: #FFF;
background: #569E3D linear-gradient(#79D858, #569E3D) repeat-x;
border-color: #4A993E;
}
.button--state-danger {
color: #900;
}