PB138 Introduction to React
presented by Lukas Grolig
What is SPA?
SPA = Single Page Application
The app is running on the client.
In the first request client downloads the app and than request only data in JSON required by a particular view or action.
Apps are much more responsive.
The same app can be used anywhere.
Takes more time to develop.
Single Page Appliciaton
Server Side Application
can be written in any lang
client received only HTML
server resources heavy
not many requirements on client
application fast to develop
no offline application (PWA)
flicker of white screen
no mobile or desktop app
can be written in JS or language targeting JS or WASM
in first request client receives app and then only JSON
low consumption of server resources
more performance on client required
PWA is possible = apps can work without connection
same app on desktop and mobile
no flicker of white screen
React.js
is a JavaScript library for building user interfaces.
Why to use it?
it is created to handle large scale applications like Facebook, Messenger, Instagram, Airbnb, Netflix, and others. Even MS is using it
They do really good job delivering backwards compatibility.
Why it is unique?
React introduced concept of virtual DOM. It is simple DOM representation in memory. There are specific algorithms in play to identify if some component needs to be rerendered and only than is synced back to real DOM.
…based on assumption virtual is faster than real
Domain language to create views
To create React components/applications we use special language – JSX (in our case TSX).
It is markup language based on XML.
React's benefit or minus
It used to be only view layer. You can start using it gradualy but you have to build your own stack.
That means…
You have to bring other libraries for state management, handling business logic and so…
What other options?
Angular
Vue.js
Svetle
Blazor
Elixir's LiveView
Elm
Maturity level
Legacy
On edge
React
Ember
There are direct replacement
Just drop react and you can use them changing two lines of code.
Those libs are preact or inferno.
Let's start with React
Integrate React into project
npm i -D create-react-app
npx create-react-app my-app --template typescript
Or just react and react-dom
React is defining interface of components
React-dom knows how to render it into real DOM
Another option is to include react bundle in the website and use it from JS. Note: it‘s pain.
Creating first React component
class ShoppingList extends React.Component {
    render() {
        return (
            <div className="shopping-list">
                 <h1>Shopping List for {this.props.userName}</h1>
            </div>
         );
     }
}
function shoppingListForUser(userName) {
  <div className="shopping-list">
      h1>Shopping List for {userName}</h1>
  </div>
}
Object-oriented way:
Functional way:
React Components in Typescript
class ShoppingList extends
  React.Component<IShoppingListProps, IShoppingListState> {
    // some code
}

// internal state needed only for class components
interface IShoppingListState {
    // ...
}
const ShoppingList: React.FC<IShoppingListProps> = (props) => {...};Define props
// external properties
interface IShoppingListProps {
    userName: string;
}
or
Create component
Passing props to our compent
class ShoppingPage extends React.Component<…> {
    render() {
        return (
            <div className="shopping-page">
                 <ShoppingList userName=“Hulk, the most powerful Avenger">
                 </ShoppingList>
            </div>
         );
     }
}
Variable defined in our prev. example
*Props are one way. If you need to return something back pass callback function.
Notes related to styling
- There is no class but className
- You can use CSS or SASS and import module
- There is also styling in Javascript – called CSS-in-JS (using string templates)
- Use CSS modules if possible!
- You will see it later
Creating methods in Components
*In class I created method. But when I use it I pass it through arrow function to keep context of this
class ShoppingList extends React.Component<IShoppingListProps, IShoppingListState> {
    addItemToList(item: Item) { … }

  	render() {
      // somewhere inside shopping list
      return (
        <Button text=“My shopping list“ onClick={() => this.addItemToList}>
        <ShoppingList >
      )
    };
}
Alternative method creation
// definition using arrow function
addItem = () => { console.log('this is:', this); }

<Button text="My shopping list" onClick={this.addItem}></Button>


// or using bind – method as on example on previous slide
this.handleClick = this.handleClick.bind(this);
<Button text="My shopping list" onClick={this.handleClick}> </Button>
Using component state
class ShoppingList extends React.Component<IShoppingListProps, IShoppingListState> {
    constructor(props) {
        super(props);
         this.state = { items: [] }
    }
}
The state is immutable. You can set it only in the constructor or using setState() function.
Props vs state
Use props when you instantiate the component or control it from the parent.
Use state when you change component internally (keeping internal state) and affecting only it or it‘s children.
Basic lifecycle methods
Component did mount is a good place to make API calls to load data.
// when component loaded
componentDidMount() { }

// when component will be removed
componentWillUnmount() { }
Other lifecycle methods
Except render() they are not so important
static getDerivedStateFromProps()
shouldComponentUpdate() // takes nextProps, nextState
render()
getSnapshotBeforeUpdate()
componentDidUpdate() // takes prevProps, prevState, snapshot
import React, { useState } from 'react';

function Example() {
  // Declare a new state variable, which we'll call "count"
  const [count, setCount] = useState(0);

  return (
    <div>
      <p>You clicked {count} times</p>
      <button onClick={() => setCount(count + 1)}>
        Click me
      </button>
    </div>
  );
}
React Hooks
How to prevent component render
function WarningBanner(props) {
  if (!props.warn) {
    return null;
  }

  return (
    <div className="warning">
      Warning!
    </div>
  );
}
Conditional render
function Greeting(props) {
  const isLoggedIn = props.isLoggedIn;
  if (isLoggedIn) {
    return <UserGreeting />;
  }
  return <GuestGreeting />;
}
Working with lists
function NumberList(props) {
  const numbers = props.numbers;
  const listItems = numbers.map((number) =>
    <li key={number.toString()}>
      {number}
    </li>
  );
  return (
    <ul>{listItems}</ul>
  );
}

const numbers = [1, 2, 3, 4, 5];
ReactDOM.render(
  <NumberList numbers={numbers} />,
  document.getElementById('root')
);
If you are using lists there is an option to add key. It is recommended because it helps React to identify which items have changed, are added, or are removed.
Use unique stable identifier among siblings (like id)
Working with forms
class NameForm extends React.Component {
  constructor(props) {
    super(props);
    this.state = {value: ''};

    this.handleChange = this.handleChange.bind(this);
    this.handleSubmit = this.handleSubmit.bind(this);
  }

  handleChange(event) {
    this.setState({value: event.target.value});
  }

  handleSubmit(event) {
    alert('A name was submitted: ' + this.state.value);
    event.preventDefault();
  }

  render() {
    return (
      <form onSubmit={this.handleSubmit}>
        <label>
          Name:
          <input type="text" value={this.state.value} onChange={this.handleChange} />
        </label>
        <input type="submit" value="Submit" />
      </form>
    );
  }
}
Working with forms
- You don‘t store values of edited form into app state management. You keep it in local state and that sync that.
- If you control form also from other libraries than from React take a look on a technique called uncontrolled components.
- For a more complex form with validation and so use Formik
In this context it would be good to know how to communicate with API
Using fetch
try {
  const moviesResponse = await fetch('http://example.com/movies.json');
  const moview = moviesResponse.json();
}
catch (e) {
  console.log("Fetching data failed.");
}
But fetch gets more complicated
async function postData(url = '', data = {}) {
  // Default options are marked with *
  const response = await fetch(url, {
    method: 'POST', // *GET, POST, PUT, DELETE, etc.
    mode: 'cors', // no-cors, *cors, same-origin
    cache: 'no-cache', // *default, no-cache, reload, force-cache, only-if-cached
    credentials: 'same-origin', // include, *same-origin, omit
    headers: {
      'Content-Type': 'application/json'
      // 'Content-Type': 'application/x-www-form-urlencoded',
    },
    redirect: 'follow', // manual, *follow, error
    referrerPolicy: 'no-referrer', // no-referrer, *no-referrer-when-downgrade,
                                   // origin, origin-when-cross-origin, same-origin,
                                   // strict-origin, strict-origin-when-cross-origin,
                                   // unsafe-url
    body: JSON.stringify(data) // body data type must match "Content-Type" header
  });

  return response.json(); // parses JSON response into native JavaScript objects
}
Now how to approach application development
Start With A Mock
You need prepared design
And some API mock (how response looks like)
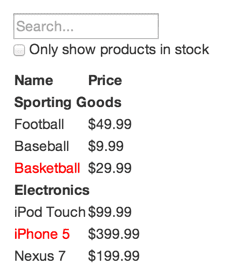
[
  {category: "Sporting Goods", price: "$49.99",
   stocked: true, name: "Football"},
  {category: "Sporting Goods", price: "$9.99",
   stocked: true, name: "Baseball"},
  {category: "Sporting Goods", price: "$29.99",
   stocked: false, name: "Basketball"},
  {category: "Electronics", price: "$99.99",
   stocked: true, name: "iPod Touch"},
  {category: "Electronics", price: "$399.99",
   stocked: false, name: "iPhone 5"},
  {category: "Electronics", price: "$199.99",
   stocked: true, name: "Nexus 7"}
];
Step 1: Break The UI Into A Component Hierarchy
Break UI into components
So you end up with something like
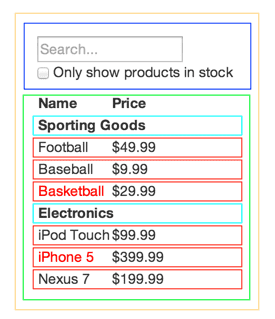
- FilterableProductTable (orange): contains the entirety of the example
- SearchBar (blue): receives all user input
- ProductTable (green): displays and filters the data collection based on user input
- ProductCategoryRow (turquoise): displays a heading for each category
- ProductRow (red): displays a row for each product
Step 3: Identify The Minimal (but complete) Representation Of UI State
To make your UI interactive, you need to be able to trigger changes to your underlying data model. React achieves this with state.
- Is it passed in from a parent via props? If so, it probably isn’t state.
- Does it remain unchanged over time? If so, it probably isn’t state.
- Can you compute it based on any other state or props in your component? If so, it isn’t state.
Step 4: Identify Where Your State Should Live
Ee’ve identified what the minimal set of app state is. Next, we need to identify which component mutates, or owns, this state.
Identify every component that renders something based on that state.
Find a common owner component (a single component above all the components that need the state in the hierarchy).
Either the common owner or another component higher up in the hierarchy should own the state.
If you can’t find a component where it makes sense to own the state, create a new component solely for holding the state and add it somewhere in the hierarchy above the common owner component.
Step 5: Add Inverse Data Flow
You can pass data from state to props now. It is time to pass something back from bottom up.
This is often done by reacting on events.