TIME FOR..
BACKENDS!
Web Server
Database
어떤걸 사용할까?
편한거. 잘하는거.
Express 와 MongoDB
Node.js
아쉽지만 맛보기만.. ;(

그냥 JavaScript 런타임

mkdir express-tutorial
cd express-tutorial
npm init
npm install --save express
var express = require('express');
var app = express();

app.get('/', function(req, res) {
    res.send('Hello World');
});

app.listen(3000, function() {
    console.log('Example App listening on port 3000');
});
main.js
Express 서버 만들기
기본 라우팅
app.METHOD(PATH, HANDLER)
METHOD: HTTP 요청 메소드 - get, post, delete, put ...
PATH: 라우트 경로
HANDLER: 실행 될 콜백 함수
app.get('/user/:id', function(req, res) {
    res.send('Received a GET request, param:' + req.params.id);
});

app.post('/user', function(req, res) {
    res.json({ success: true })
});

app.put('/user', function(req, res) {
    res.status(400).json({ message: 'Hey, you. Bad Request!' });
});

app.delete('/user', function(req, res) {
    res.send('Received a DELETE request');
});
main.js
더 많은 라우팅

API 테스팅 도구
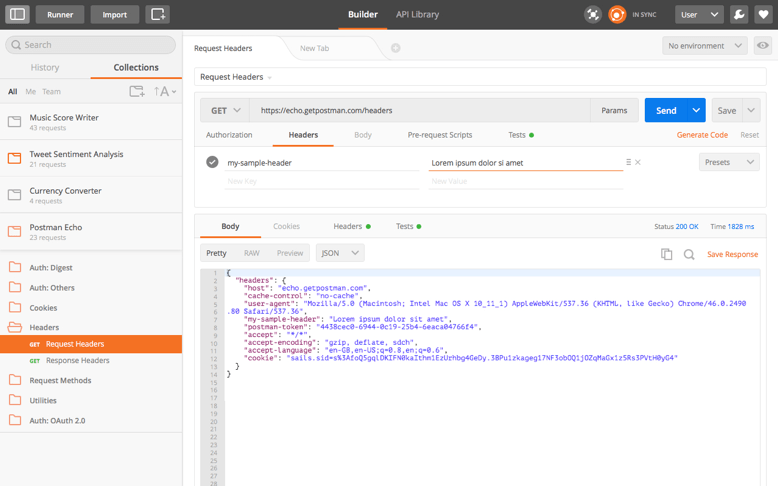
POSTMAN
var express = require('express');
var router = express.Router();

router.get('/:id', function(req, res) {
    res.send('Received a GET request, param:' + req.params.id);
});

router.post('/', function(req, res) {
    res.json({ success: true });
});

router.put('/', function(req, res) {
    res.status(400).json({ message: 'Hey, you. Bad Request!' });
});

router.delete('/', function(req, res) {
    res.send('Received a DELETE request');
});

module.exports = router;
routes/user.js
user 라우트 모듈화해서 내보내기
var user = require('./routes/user');
/* ... */
app.use('/user', user);
main.js
불러와서 사용하기
Express
미들웨어
HTTP 요청
라우트 작업
EXPRESS
HTTP 응답
HTTP 요청
라우트 작업
EXPRESS
HTTP 응답
미들웨어
var myLogger = function (req, res, next) {
  console.log(req.url);
  next();
};

app.use(myLogger);
main.js
미들웨어 직접 만들어보기
NPM 으로 미들웨어 설치
npm install --save morgan body-parsermorgan: 로깅 미들웨어
body-parser: JSON 형태 데이터 파싱
main.js
morgan 미들웨어 설정
var morgan = require('morgan');

/* ... */

app.use(morgan('dev'));

/* ... */
main.js
body-parser 미들웨어 설정
var bodyParser= require('body-parser');

/* ... */

app.use(bodyParser.json());

/* ... */
routes/user.js
JSON 파싱하기
router.post('/user', function(req, res) {
    console.log(JSON.stringify(req.body, null, 2));
    res.json({
        success: true,
        user: req.body.username
    });
});
npm install -g nodemon
nodemon main.js
main.js
정적 (static) 파일 제공
app.use('/', express.static('public'));

NoSQL
| user_id | name | gender | age |
|---|---|---|---|
| 1 | abet | m | 20 |
| 2 | betty | f | 21 |
| user_id | name | gender | age |
|---|---|---|---|
| 1 | abet | m | 20 |
| 2 | betty | f | 21 |
| user_id | phone |
|---|---|
| 1 | 01000000000 |
{
        "_id" : ObjectId("5773de2b5ff1e156ee497cb1"),
        "name" : "abet",
        "gender" : "m",
        "age" : "20",
        "phone" : "01000000000"
}

{
        "_id" : ObjectId("5773de2b5ff1e156ee497cb2"),
        "name" : "betty",
        "gender" : "f",
        "age" : "20"
}
Data Modelling
블로그 데이터베이스
요구사항
- 게시글에는 작성자 이름, 제목, 내용, 작성시간이 담겨져있다.
- 각 게시글은 0개 이상의 태그를 가지고 있을 수 있다.
- 게시글엔 덧글을 달 수 있다.
- 덧글은 작성자 이름, 내용, 작성시간을 담고있다.
RDBMS

NoSQL DBMS
{
    _id: POST_ID,
    title: POST_TITLE,
    content: POST_CONTENT,
    username: POST_WRITER,
    tags: [ TAG1, TAG2, TAG3 ],
    time: POST_TIME
    comments: [
        {
          username: COMMENT_WRITER,
          mesage: COMMENT_MESSAGE,
          time: COMMENT_TIME
        },
       {
          username: COMMENT_WRITER,
          mesage: COMMENT_MESSAGE,
          time: COMMENT_TIME
        }
    ]
}
MongoDB 기본 명령어
MongoDB 서버 실행
mongod
클라이언트로 접속
mongo
λ mongo
MongoDB shell version: 3.2.1
connecting to: test
>
사용 할 데이터베이스 선택
use db_name
> use mongodb_tutorial
switched to db mongodb_tutorial
> show dbs // 데이터베이스 목록 보기
codelab  0.000GB
local    0.000GB
test     0.000GB
// 데이터베이스가 비어있으면 안나옵니다
> db.sample.insert({"name": "sample"}) // document 를 sample 컬렉션에 삽입
WriteResult({ "nInserted" : 1 })
> show dbs
codelab           0.000GB
local             0.000GB
mongodb_tutorial  0.000GB
test              0.000GB
데이터베이스 제거
db.dropDatabase()
> use mongodb_tutorial // 제거하기전에 선택이 되어있어야함
switched to db mongodb_tutorial
> db.dropDatabase()
{ "dropped" : "mongodb_tutorial", "ok" : 1 }
> show dbs
codelab  0.000GB
local    0.000GB
test     0.000GB
컬렉션 생성
db.createCollection(name, [options])
> use mongodb_tutorial
switched to db mongodb_tutorial
> db.createCollection("books")
{ "ok" : 1 }
// 따로 메소드를 사용하지 않아도 document 를 추가하면 자동으로 컬렉션 생성됩니다
db.people.insert({"name": "velopert"})
WriteResult({ "nInserted" : 1 })
> show collections // 컬렉션 목록 보기
books
people
컬렉션 제거
db.collection_name.drop();
> db.people.drop()
true
> show collections
books
Document 삽입
db.collection_name.insert(document);
> db.books.insert({"name": "NodeJS Guide", "author": "Velopert"})
WriteResult({ "nInserted" : 1 })
// 배열 형태로 전달해주면 여러개 삽입 가능
> db.books.insert([
    { "name": "Book1", author: "Velopert" },
    { "name": "Book2", author: "Velopert" }
    ])
BulkWriteResult({
        "writeErrors" : [ ],
        "writeConcernErrors" : [ ],
        "nInserted" : 2,
        "nUpserted" : 0,
        "nMatched" : 0,
        "nModified" : 0,
        "nRemoved" : 0,
        "upserted" : [ ]
})
db.books.find() // 조회
Document 제거
db.collection_name.remove(criteria, [justOne]);
> db.books.remove({ "name": "NodeJS Guide" })
WriteResult({ "nRemoved" : 1 })
> db.books.find()
{ "_id" : ObjectId("57d97facb27d7d46a3403f4c"), "name" : "Book2", "author" : "Velopert" }
{ "_id" : ObjectId("57d98054b27d7d46a3403f4d"), "name" : "Book1", "author" : "Velopert" }
> db.books.remove({ "author": "Velopert" }, true) // justOne 의 기본값은 false 입니다
WriteResult({ "nRemoved" : 1 })
> db.books.find()
{ "_id" : ObjectId("57d98054b27d7d46a3403f4d"), "name" : "Book1", "author" : "Velopert" }
Document 조회
db.collection_name.find([query], [projection])
// mock data 추가
> db.numbers.insert([
    { value: 1 }, { value: 5 }, { value: 12 },
    { value: 12 }, { value: 6 }, { value: 643 },
    { value: 144 }, { value: 32 }, { value: 56 },
    { value: 23 }, { value: 33 }, { value: 56 }
]);
> db.numbers.find() // 모든 document 조회
> db.books.find().pretty() // 깔끔한 형식으로 조회
// numbers 는 key 가 하나밖에 없어서 pretty() 해도 똑같습니다
> db.numbers.find({ "value": 56  }) // value 가 56 인 document를 조회
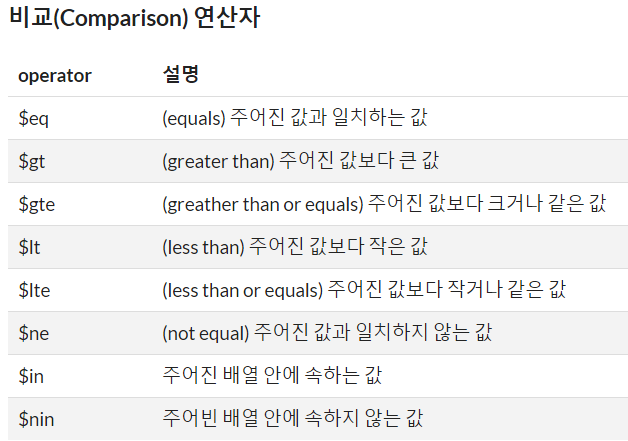
> db.numbers.find({ "value": { $gt: 100 } }) // value 가 100 이상인 document 를 조회
// 여기서 $gt 는 쿼리 연산자!
> db.numbers.find({"value": { $gt: 0, $lt: 100 } })  // 0~100 사이의 document 조회
> db.numbers.find({"value": { $gt: 0, $lt: 100, $nin: [12, 33] } }) // 0~100 사이이고, 12, 33 이 아닌
// mock data 추가
> db.articles.insert([
{
"title" : "article01",
"content" : "content01",
"writer" : "Velopert",
"likes" : 0,
"comments" : [ ]
},
{
"title" : "article02",
"content" : "content02",
"writer" : "Alpha",
"likes" : 23,
"comments" : [
{
"name" : "Bravo",
"message" : "Hey Man!"
}
]
},
{
"title" : "article03",
"content" : "content03",
"writer" : "Bravo",
"likes" : 40,
"comments" : [
{
"name" : "Charlie",
"message" : "Hey Man!"
},
{
"name" : "Delta",
"message" : "Hey Man!"
}
]
}
])
> db.articles.find({ $or: [ { "title": "article01" }, { "writer": "Alpha" } ] })
> db.articles.find( { $and: [ { "writer": "Velopert" }, { "likes": { $lt: 10 } } ] } )
// and 의 경우엔 이렇게도 가능합니다.
> db.articles.find( { "writer": "Velopert", "likes": { $lt: 10 } } )
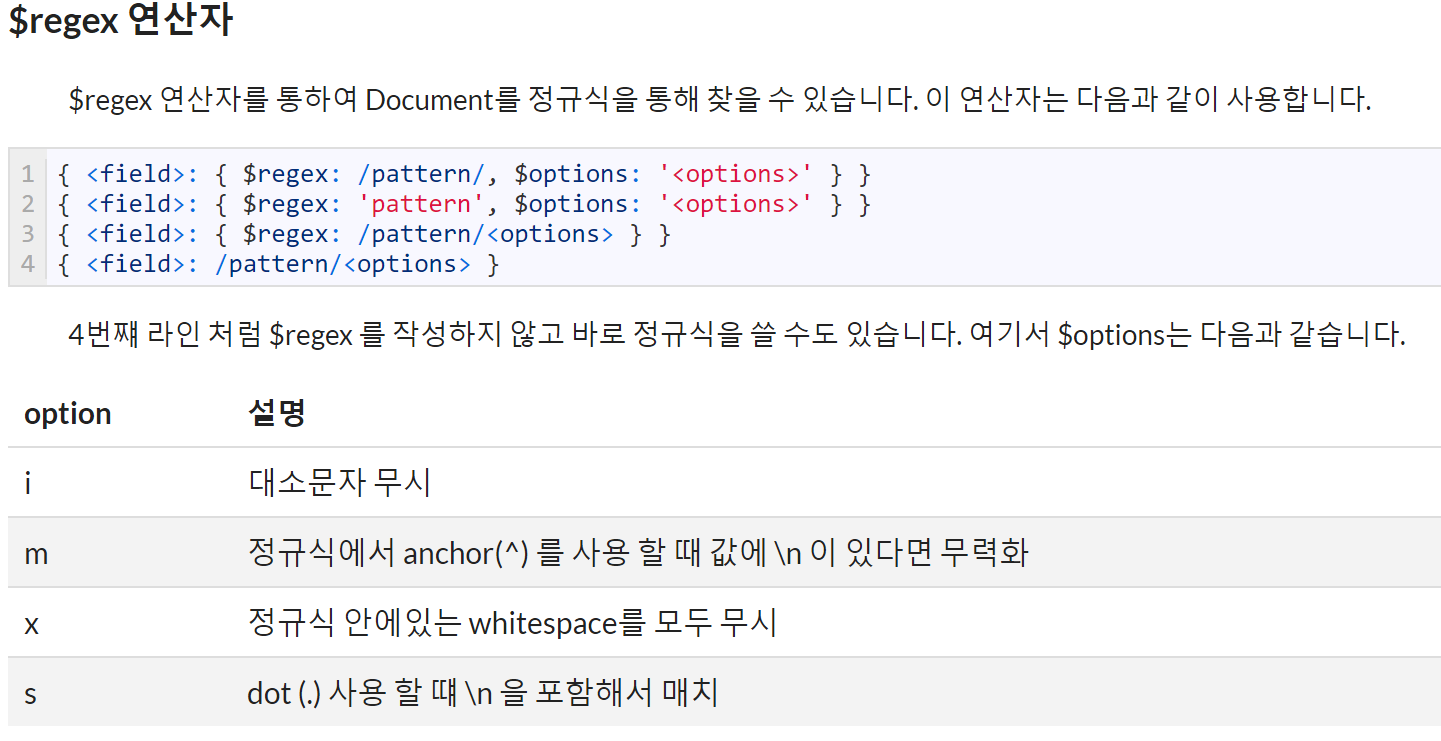
> db.articles.find( { "title" : /article0[1-2]/ } )
> db.articles.find( { "writer": /velopert/i } )
$where 연산자
javascript expression 을 사용 할 수 있습니다.
> db.articles.find( { $where: "this.comments.length == 0" } ).pretty()
{
        "_id" : ObjectId("57d98f44c7746792605a1ea1"),
        "title" : "article01",
        "content" : "content01",
        "writer" : "Velopert",
        "likes" : 0,
        "comments" : [ ]
}
$elemMatch 연산자
subdocument (embedded document) 배열을 쿼리할때 사용됩니다.
// comments 중 “Charlie” 가 작성한 덧글이 있는 Document 조회
> db.articles.find( { "comments": { $elemMatch: { "name": "Charlie" } } } )
배열이 아닌 Embedded Document 를 쿼리할 때
db.users.insert(  {
    "username": "velopert",
    "name": { "first": "M.J.", "last": "K."},
    "language": ["korean", "english", "chinese"]
  })
Document 가 아닌 배열을 쿼리 할 때
db.users.find({ "name.first" : "M.J. "})db.users.find({ "language": "korean"})Document 조회
db.collection_name.find([query], [projection])
// article의 title과 content 만 조회
> db.articles.find( { } , { "_id": false, "title": true, "content": true } )
{ "title" : "article01", "content" : "content01" }
{ "title" : "article02", "content" : "content02" }
{ "title" : "article03", "content" : "content03" }
$slice 연산자
subdocument 배열을 읽을 때 limit 설정을 합니다
// title 값이 article03 인 Document 에서 덧글은 하나만 보이게 출력
db.articles.find({"title": "article03"}, {comments: {$slice: 1}}).pretty()
{
        "_id" : ObjectId("56c0ab6c639be5292edab0c6"),
        "title" : "article03",
        "content" : "content03",
        "writer" : "Bravo",
        "likes" : 40,
        "comments" : [
                {
                        "name" : "Charlie",
                        "message" : "Hey Man!"
                }
        ]
}
$elemMatch 연산자
query 에서 사용 할 때랑 역할이 좀 다릅니다.
배열 중, 특정 subdocument 만 출력을 합니다.
// Charlie 가 작성한 덧글이 있는 Document 조회 (projection 설정 안함)
> db.articles.find(
    {
        "comments": {
            $elemMatch: { "name": "Charlie" }
        }
    },
    {
        "title": true,
        "comments.name": true,
        "comments.message": true
    }
)
// 결과: Charlie 유저 말고도 다른 유저들의 덧글도 출력합니다
$elemMatch 연산자
query 에서 사용 할 때랑 역할이 좀 다릅니다.
배열 중, 특정 subdocument 만 출력을 합니다.
// comments 중 “Charlie” 가 작성한 덧글이 있는 Document 중 제목, 그리고 Charlie의 덧글만 조회
>  db.articles.find(
     {
         "comments": {
             $elemMatch: { "name": "Charlie" }
         }
     },
     {
         "title": true,
         "comments": {
             $elemMatch: { "name": "Charlie" }
         },
         "comments.name": true,
         "comments.message": true
     }
 )
// 굳.
sort, limit, skip
sort()
> db.numbers.find().sort({"value": 1})
{ "_id" : ObjectId("57d9825bc7746792605a1e92"), "value" : 1 }
// ..... 오름차순으로 정렬
{ "_id" : ObjectId("57d9825bc7746792605a1e97"), "value" : 643 }

> db.numbers.find().sort({"value": -1})
{ "_id" : ObjectId("57d9825bc7746792605a1e97"), "value" : 643 }
// .....  내림차순으로 정렬
{ "_id" : ObjectId("57d9825bc7746792605a1e92"), "value" : 1 }
limit()
> db.numbers.find().limit(3) // 3개만 보여줍니다.
{ "_id" : ObjectId("57d9825bc7746792605a1e92"), "value" : 1 }
{ "_id" : ObjectId("57d9825bc7746792605a1e93"), "value" : 5 }
{ "_id" : ObjectId("57d9825bc7746792605a1e94"), "value" : 12 }
skip()
> db.numbers.find().skip(2) // 2개는 생략하고 그 다음부터 출력합니다.
{ "_id" : ObjectId("57d9825bc7746792605a1e94"), "value" : 12 }
{ "_id" : ObjectId("57d9825bc7746792605a1e95"), "value" : 12 }
{ "_id" : ObjectId("57d9825bc7746792605a1e96"), "value" : 6 }
{ "_id" : ObjectId("57d9825bc7746792605a1e97"), "value" : 643 }
{ "_id" : ObjectId("57d9825bc7746792605a1e98"), "value" : 144 }
{ "_id" : ObjectId("57d9825bc7746792605a1e99"), "value" : 32 }
{ "_id" : ObjectId("57d9825bc7746792605a1e9a"), "value" : 56 }
{ "_id" : ObjectId("57d9825bc7746792605a1e9b"), "value" : 23 }
{ "_id" : ObjectId("57d9825bc7746792605a1e9c"), "value" : 33 }
{ "_id" : ObjectId("57d9825bc7746792605a1e9d"), "value" : 56 }
응용
// 방금 배운 메소드들을 중첩해서 사용 할 수도 있습니다.
> db.numbers.find().sort({"value": 1}).skip(2).limit(2);
{ "_id" : ObjectId("57d9825bc7746792605a1e96"), "value" : 6 }
{ "_id" : ObjectId("57d9825bc7746792605a1e94"), "value" : 12 }

// MongoDB 클라이언트는 자바스크립트 기반이라, 이 안에서 함수를 만들 수도 있습니다.
// 이를 통하여 페이징 함수를 만들어봅시다.

> var showPage = function(page){ return db.numbers.find().sort( { "value": 1 } ).skip((page-1)*2).limit(2) }
> showPage(1)
{ "_id" : ObjectId("57d9825bc7746792605a1e92"), "value" : 1 }
{ "_id" : ObjectId("57d9825bc7746792605a1e93"), "value" : 5 }
> showPage(2)
{ "_id" : ObjectId("57d9825bc7746792605a1e96"), "value" : 6 }
{ "_id" : ObjectId("57d9825bc7746792605a1e94"), "value" : 12 }
> showPage(3)
{ "_id" : ObjectId("57d9825bc7746792605a1e95"), "value" : 12 }
{ "_id" : ObjectId("57d9825bc7746792605a1e9b"), "value" : 23 }
데이터 수정, update()
샘플 데이터 추가
db.people.insert( [
    { name: "Abet", age: 19 },
    { name: "Betty", age: 20 },
    { name: "Charlie", age: 23, skills: [ "mongodb", "nodejs"] },
    { name: "David", age: 23, score: 20 }
])
특정 field 업데이트 하기
// Abet document 의 age를 20으로 변경한다
> db.people.update( { name: "Abet" }, { $set: { age: 20 } } )
WriteResult({ "nMatched" : 1, "nUpserted" : 0, "nModified" : 1 })
document 를 replace 하기
// Betty document를 새로운 document로 대체한다.
> db.people.update( { name: "Betty" }, { "name": "Betty 2nd", age: 1 })
WriteResult({ "nMatched" : 1, "nUpserted" : 0, "nModified" : 1 })
특정 field 제거하기
// David document의 score field를 제거한다
> db.people.update( { name: "David" }, { $unset: { score: 1 } } )
WriteResult({ "nMatched" : 1, "nUpserted" : 0, "nModified" : 1 })
존재하지 않으면 새로 추가
// upsert 옵션을 설정하여 Elly document가 존재하지 않으면 새로 추가
> db.people.update( { name: "Elly" }, { name: "Elly", age: 17 }, { upsert: true } )
WriteResult({
        "nMatched" : 0,
        "nUpserted" : 1,
        "nModified" : 0,
        "_id" : ObjectId("56c893ffc694e4e7c8594240")
})
배열 field 에 값 추가하기
// Charlie document의 skills 배열에 "angularjs" 추가
> db.people.update(
    { name: "Charlie" },
    { $push: { skills: "angularjs" } }
    )
WriteResult({ "nMatched" : 1, "nUpserted" : 0, "nModified" : 1 })
배열 field 에 값 추가하기 + 정렬
// Charlie document의 skills에 "c++" 와 "java" 를 추가하고 알파벳순으로 정렬
> db.people.update(
    { name: "Charlie" },
    { $push: {
        skills: {
            $each: [ "c++", "java" ],
            $sort: 1
        }
      }
    }
    )
WriteResult({ "nMatched" : 1, "nUpserted" : 0, "nModified" : 1 })
배열 field 에 값 제거하기
// Charlie document에서 skills 값의 mongodb 제거
> db.people.update(
    { name: "Charlie" },
    { $pull: { skills: "mongodb" } }
 )
배열 field 에 값 여러개 제거
// Charlie document에서 skills 배열 중 "angularjs" 와 "java" 제거
> db.people.update(
    { name: "Charlie" },
    { $pull: { skills: { $in: ["angularjs", "java" ] } } }
)
WriteResult({ "nMatched" : 1, "nUpserted" : 0, "nModified" : 1 })