網頁班
VScode, HTML, CSS, JS
講師自我介紹

翁釩予
- 成電38th 教學+網管
- 打競程 演算法 python 網頁設計
- APCS 4+3
- discord: @mlgnotcool
- 興趣:玩麥塊、寫程式、影片剪輯、打爵士鼓
- 21215 (我現在在班上是當邊緣人的狀態)

前置作業
(第一堂課我會先講一遍
之後上課時先都幫我一樣用好)
上課前要幹嘛???
上課時間:3:30 - 4:10 (如果我沒遲到的話)
上課前:幫我先把vscode還有檔案都先準備好
(第一堂課我會先講)
上課注意事項:
有問題都可以問我 (不然上課沒人回有點尷尬)

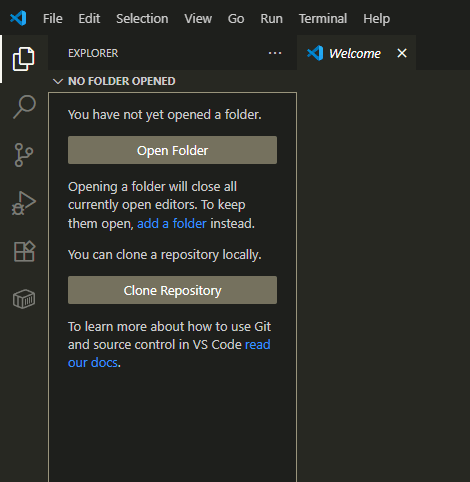
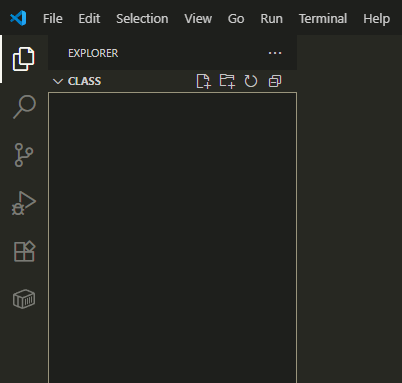
前置作業
前置作業
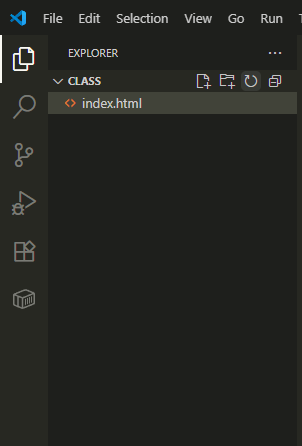
1. 幫我創一個資料夾
(只要記得在哪就好)

code的檔案都會在這裡

前置作業
2. 打開vscode
3. 打開剛剛創的資料夾
(左上角)
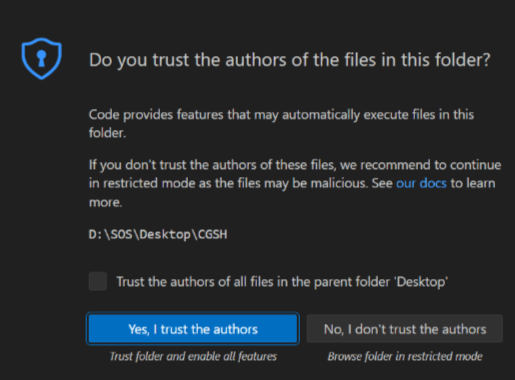
如果出現這個幫我點藍色的:
前置作業
4.創建檔案
按下創建檔案:
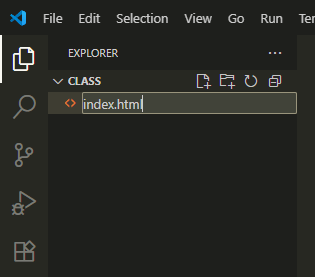
命名規則:你的檔案名稱.副檔名
目前會用到的有:
.html .css .js
前置作業
5. 下載插件 (Live server)
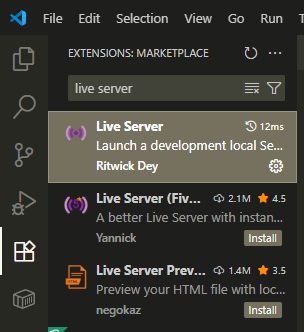
點這裡
按第一個
前置作業
5. 下載插件 (Live server)
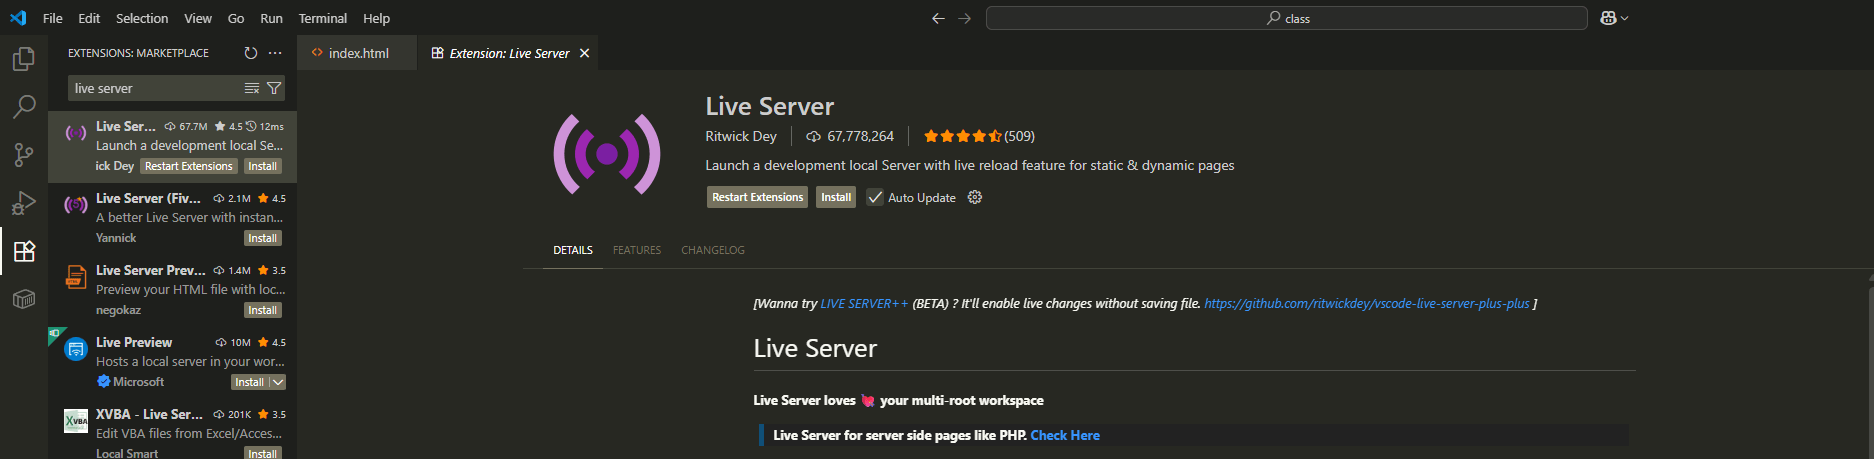
按下載
前置作業
6. 使用Live Server
Live server可以讓你跑你寫的網站,
並且會及時更新你新的code
(記得要先儲存)
右下角
接下來會在google打開你的網站

前置作業
7. 一些快捷鍵 (以防有人不知道)
- Ctrl + S 儲存
- Ctrl + Z 回復上一步
- Ctrl + C 複製
- Ctrl + V 貼上
- Ctrl + X 剪下
- Ctrl + Y 重作 (不小心按到回復時)

HTML 第1周
基礎架構
-
<html>
-
<head>
-
<body>

HTML
- Hypertext markup language
- 超文本標記語言
- 網站的骨架
- 描述網站的結構
- 告訴網站有什麼元素
- .HTML
先幫我創一個叫
"(檔案名稱).html"
的檔案

創建檔案:
HTML 格式
<標記名> ...內容放在這裡... < /標記名>
<>之間也可以夾很多層,例如:
<標記名1><標記名2></標記名2></標記名1>
<標記名> 內容放在這裡 </標記名>

<h1> ;) </h1>
HTML 格式
<!DOCTYPE html>
<html>

	<head>
    	...
    </head>

    <body>
    	...
    </body>

</html>-
<!DOCTYPE html> 聲明
-
<html> HTML文件之根元素-root element
-
<head> 頁面原數據-metadata
-
<body> 網頁主要內容
<!DOCTYPE>
和瀏覽器聲明這是什麼類型的檔案,幫助瀏覽器正確判斷檔案類型
我們這裡的HTML 5聲明是
<!DOCTYPE html>
(其實聽不懂也沒關係,只要記得加就好了)
HTML 基礎架構
HTML 格式
<!DOCTYPE html>
<html lang="en">
<head>
    <meta charset="UTF-8">
    <meta name="viewport" content="width=device-width, initial-scale=1.0">
    <title>Document</title>
</head>
<body>

</body>
</html>
vscode打上
! enter
<html lang = "en">
設定元素的語系,en是English
<!DOCTYPE html>
<html lang="en">
<head>
    <meta charset="UTF-8">
    <meta name="viewport" content="width=device-width, initial-scale=1.0">
    <title>Document</title>
</head>
<body>

</body>
</html>
<head>
可以放一些網站的基本設定
<!DOCTYPE html>
<html lang="en">
<head>
    <meta charset="UTF-8">
    <meta name="viewport" content="width=device-width, initial-scale=1.0">
    <title>Document</title>
</head>
<body>

</body>
</html>
以下聽不懂沒關係,只要會複製和改就好了:
<meta charset="UTF-8">
字符編碼 讓網站可以正確顯示某些字
<meta name="viewport" content="width=device-width, initial-scale=1.0">
幫助控制網頁在其他裝置上不同的寬度、比例、大小縮放
<meta name="viewport" content="width=device-width, initial-scale=1.0">
幫助控制網頁在其他裝置上不同的寬度、比例、大小縮放
什麼意思?
我們來用用看Google模擬器
google 模擬器
按f12
按這個按鍵
這裡可以改你螢幕的大小
這樣可以測試你網站在不同裝置上長的樣子
<!DOCTYPE html>
<html lang="en">
<head>
    <meta charset="UTF-8">
    <meta name="viewport" content="width=device-width, initial-scale=1.0">

    <title>idk what to put here</title>
    <link href="./funny.png" rel="icon">
</head>
<body>

</body>
</html>
一些其他的設定:
<title>
顯示在網頁標籤的名稱
<link href="檔案目錄" rel="icon">
顯示在網頁標籤的圖案

<title>
最後會長這樣:
<HEAD>
一些其他的<meta>
<meta name="author" content="mlgnotcool">
<meta http-equiv="refresh" content="10">
<meta name="keywords" content="idk what to put here ;)">
<meta name="description" content="我是內容 我是內容 我是內容 我是內容">
author: 指定作者
refresh: 指定每隔10秒刷新一次頁面
keyword: 提供關鍵字 搜索引擎利用這些關鍵字來找尋網頁
description: 提供對網頁的描述 顯示在搜索引擎的搜索結果中
實作時間!
用剛剛學的東西
做出一個可以運行的網頁
先不用內容 只要有title就好了
<!DOCTYPE html>
<html lang="en">
<head>
    <meta charset="UTF-8">
    <meta name="viewport" content="width=device-width, initial-scale=1.0">
    <meta name="author" content="mlgnotcool">
    <meta http-equiv="refresh" content="10">
    <meta name="keywords" content="idk what to put here ;)">
    <meta name="description" content="我是內容 我是內容 我是內容 我是內容">

    <title>idk what to put here</title>
    <link href="./funny.png" rel="icon">
</head>
<body>

</body>
</html>
(不要抄 你們要自己寫寫看)

HTML 第2周
<body> 架構
<img>
<iframe>
<ul>
<ol>
<table>
<h1> - <h6>
<p>
<br>
<hr>
<a>
Body 是什麼?
來放你網站元素的地方
(就是你可以看到的東西)
<!DOCTYPE html>
<html lang="en">
<head>
    <meta charset="UTF-8">
    <meta name="viewport" content="width=device-width, initial-scale=1.0">
    <meta name="author" content="mlgnotcool">
    <meta http-equiv="refresh" content="10">
    <meta name="keywords" content="idk what to put here ;)">
    <meta name="description" content="我是內容 我是內容 我是內容 我是內容">

    <title>idk what to put here</title>
    <link href="./funny.png" rel="icon">
</head>
<body>

</body>
</html>
<h1> - <h6>
<body>
    <h1>我是h1</h1>
    <h2>我是h2</h2>
    <h3>我是h3</h3>
    <h4>我是h4</h4>
    <h5>我是h5</h5>
    <h6>我是h6</h6>
</body>
最後會長這樣:
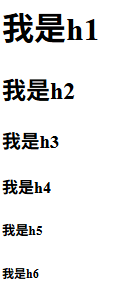
這是組成網站文字最重要的tag
<p>
<p>Hello 我是一個paragraph</p>最後會長這樣:

簡單來說,也是一個組成文字的東西
<h1> vs <p>
到這裡,一定會有人問說<h1>和<p>的差別在哪呢?
<br>
    <p>你有想過網站是如何做出來的嗎?你有曾經想做一個屬於自己的網站嗎?<br>
        這門課會帶你從0開始,教你如何使用HTML、CSS、JavaScript,並一步一步帶著你寫出一個有美感網頁 ! 不管有沒有寫過程式,都可以來參加!<br>
        這堂課最一開始會帶你學習HTML,帶著你學習如何使用HTML寫出最基礎的網頁!再來會帶你使用CSS來美化你的網頁,讓網頁瞬間升級 !<br>
        最後教你用JavaScript讓網頁可以動起來,且在課程中都會搭配著小實作,讓大家更加熟悉學習到的東西。<br>
        在課程的最後會讓大家自己設計一個網頁,也讓大家可以在課程的最後創造出屬於自己的網頁 !</p>

    <h1>hello1</h1>
    <br>
    <h1>hello2</h1>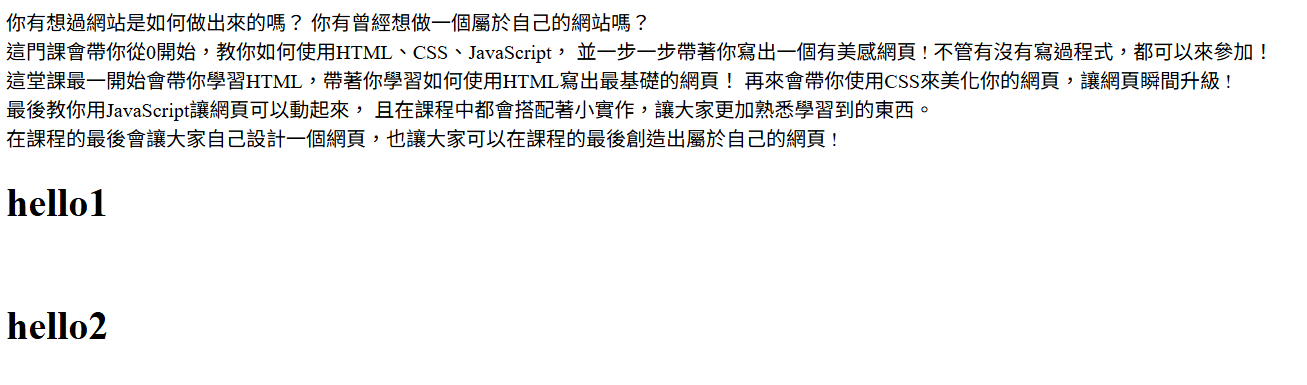
可以當作換行或是一個空格
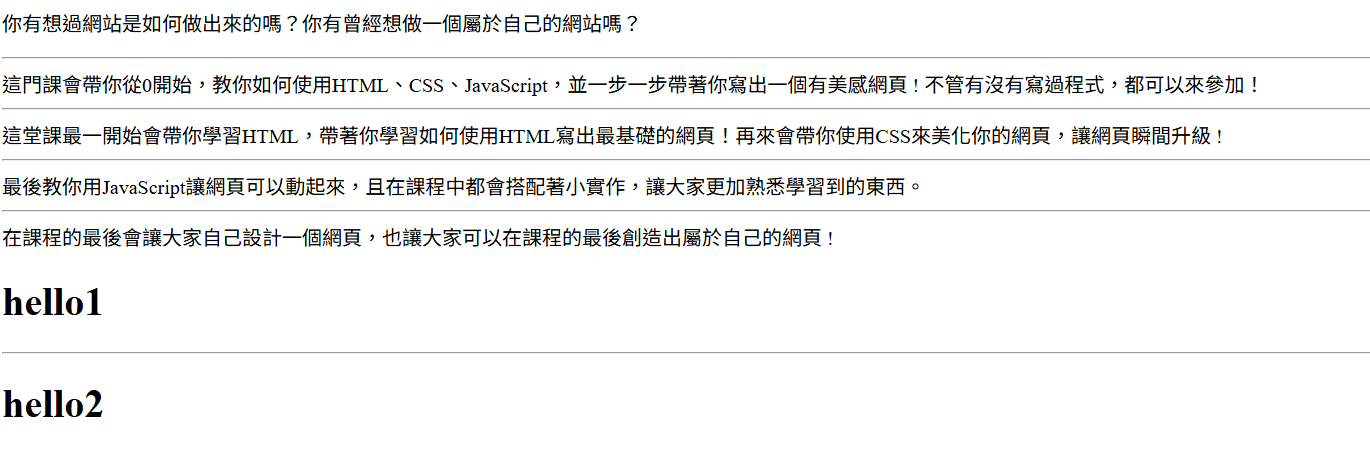
<HR>
    <p>你有想過網站是如何做出來的嗎?你有曾經想做一個屬於自己的網站嗎?<hr>
        這門課會帶你從0開始,教你如何使用HTML、CSS、JavaScript,並一步一步帶著你寫出一個有美感網頁 ! 不管有沒有寫過程式,都可以來參加!<hr>
        這堂課最一開始會帶你學習HTML,帶著你學習如何使用HTML寫出最基礎的網頁!再來會帶你使用CSS來美化你的網頁,讓網頁瞬間升級 !<hr>
        最後教你用JavaScript讓網頁可以動起來,且在課程中都會搭配著小實作,讓大家更加熟悉學習到的東西。<hr>
        在課程的最後會讓大家自己設計一個網頁,也讓大家可以在課程的最後創造出屬於自己的網頁 !</p>

    <h1>hello1</h1>
    <hr>
    <h1>hello2</h1>
可以當作一個分隔線
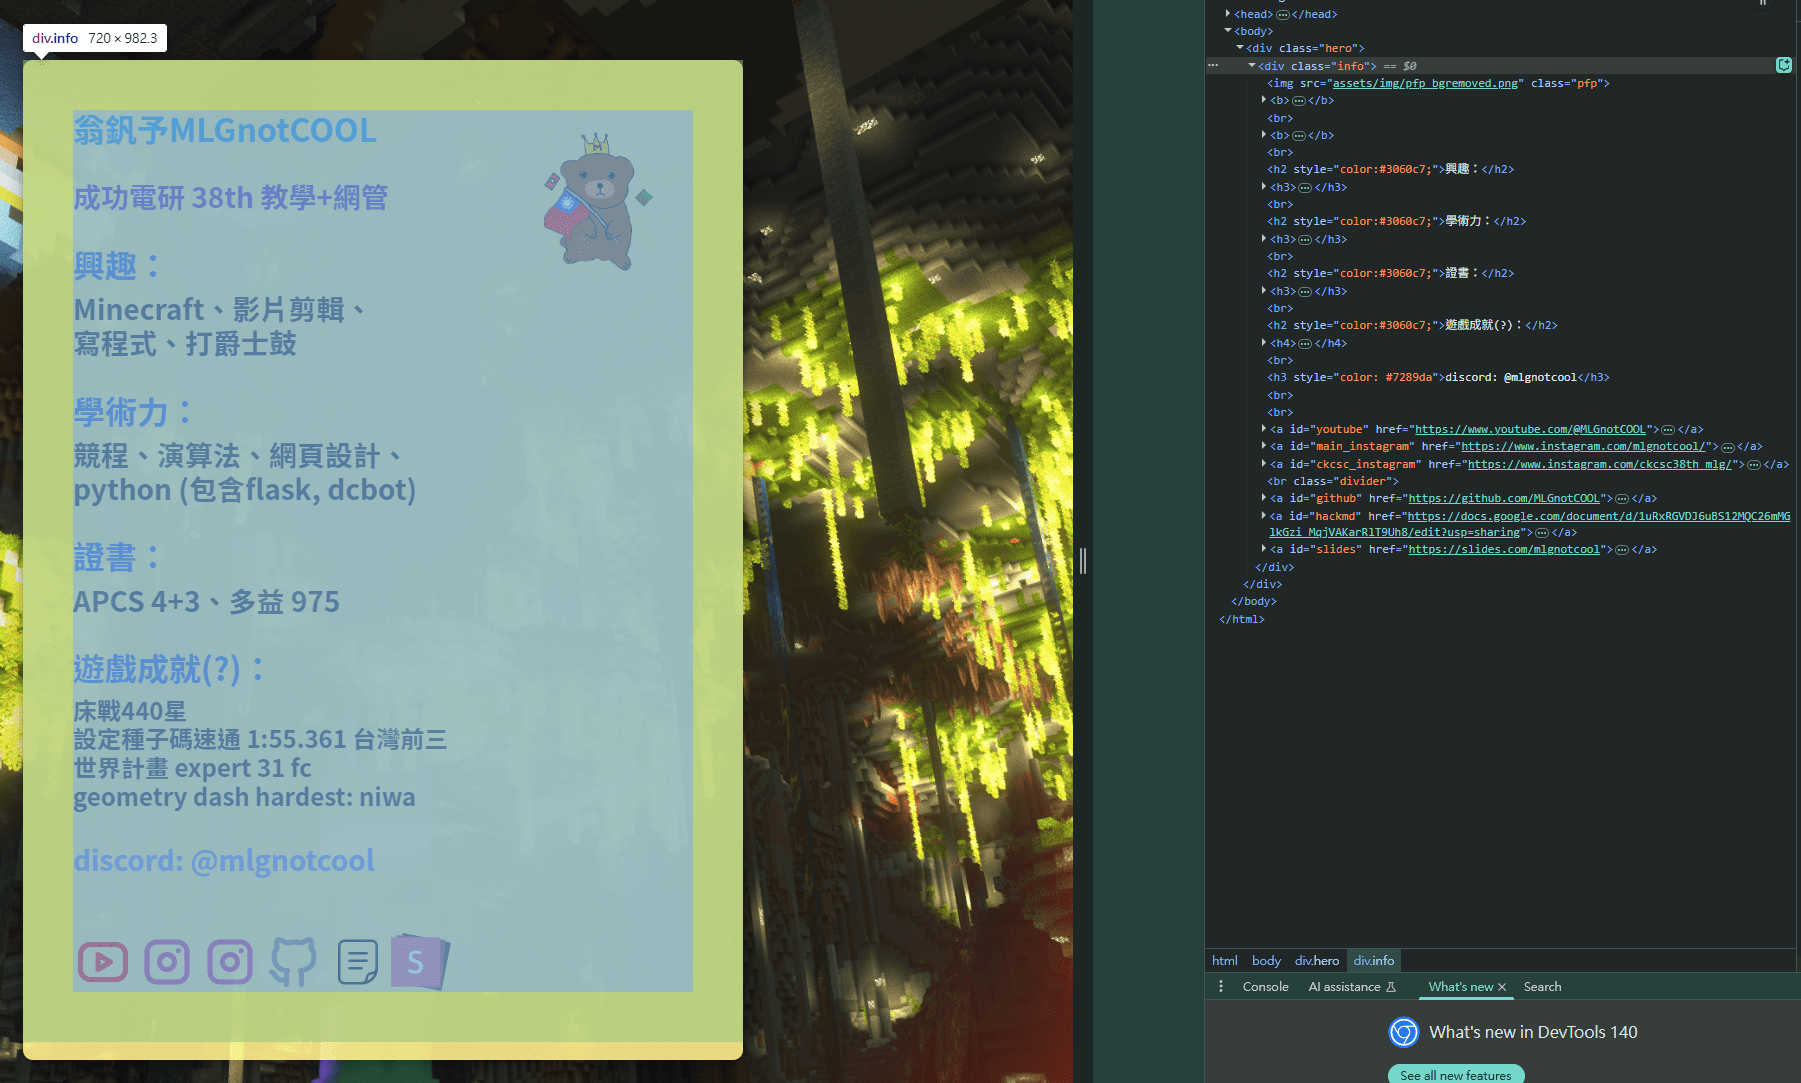
<a>
<a href="https://mlgnotcool.github.io/about/">我的自我解紹網站!</a>
可以當作一個連結
不一定要是文字,包在其他tag裡也可以
實作一:
幫我做一個單純有文字的網站,然後確定可以跑:
(舉例來說,可以做個自我介紹的網站):
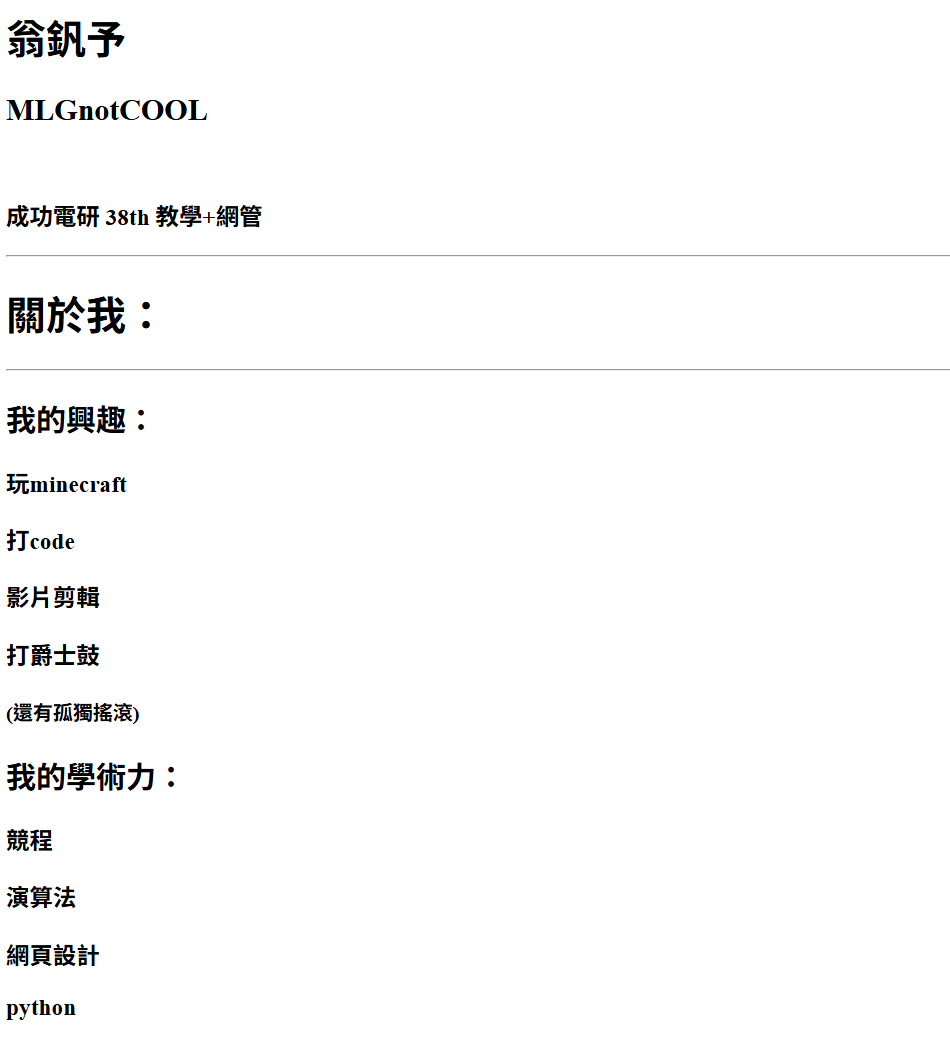
實作一:
解答:
幫我做一個單純有文字的網站,然後確定可以跑:
(舉例來說,可以做個自我介紹的網站):
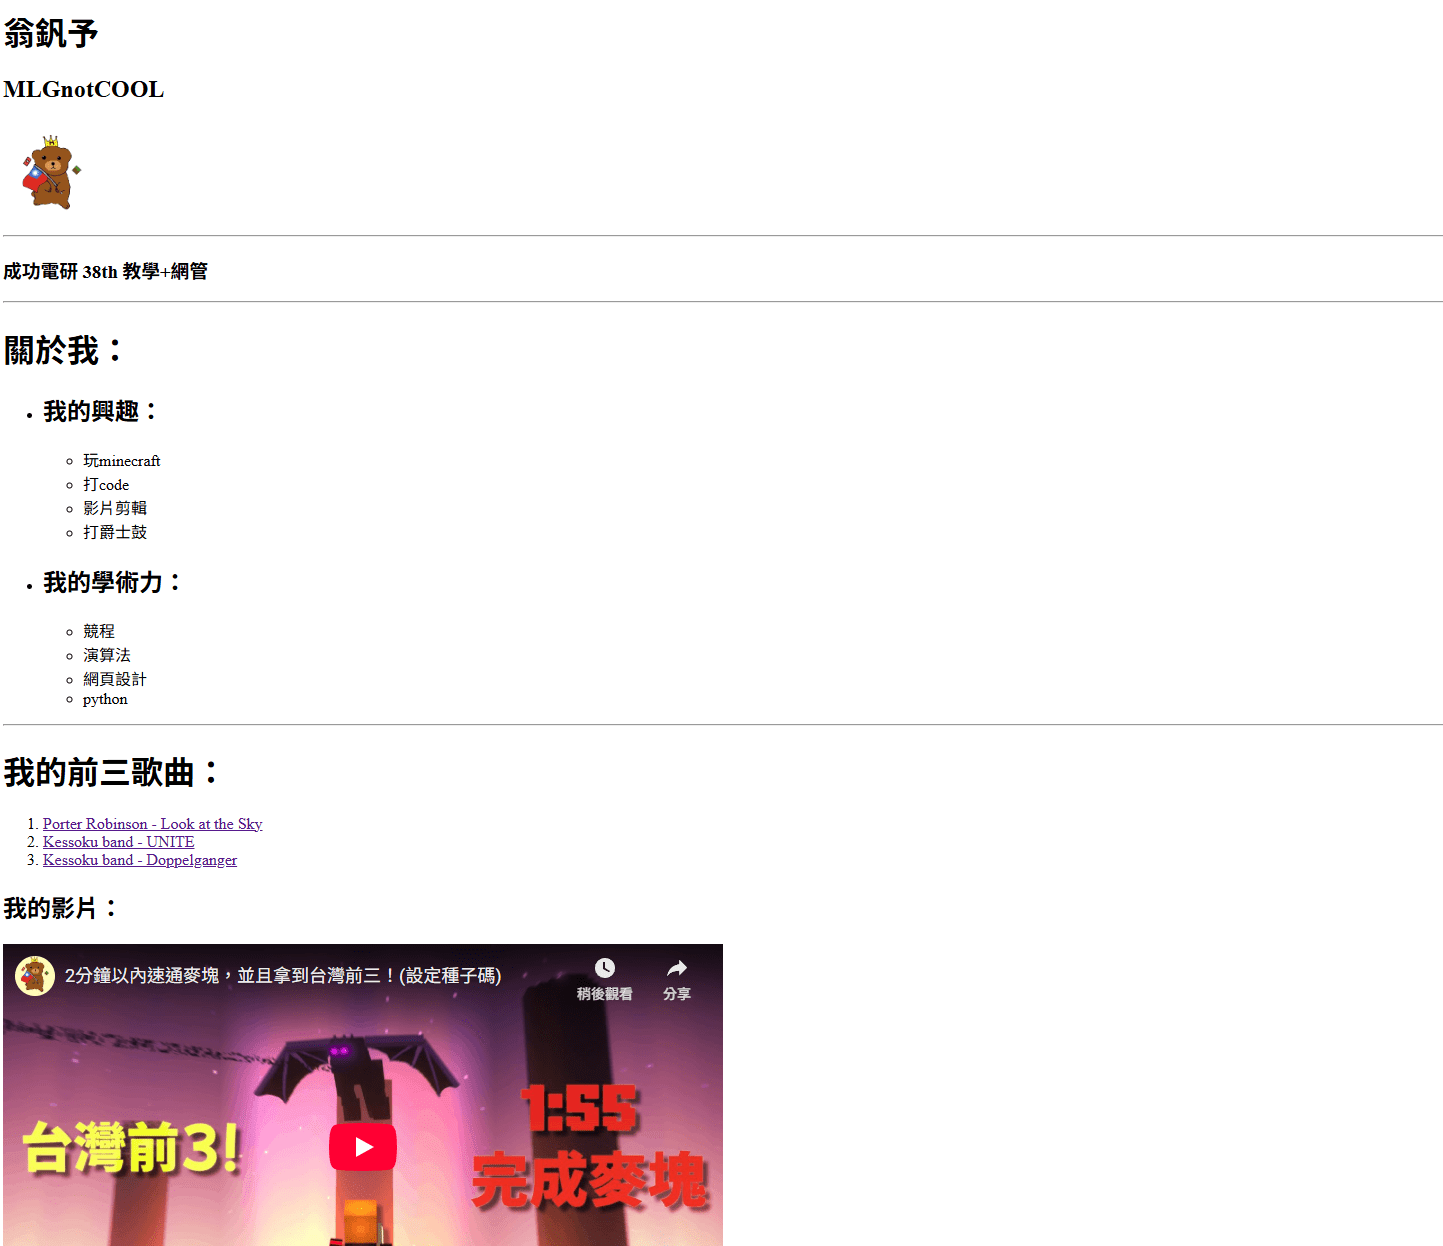
<!DOCTYPE html>
<html lang="en">
<head>
    <meta charset="UTF-8">
    <meta name="viewport" content="width=device-width, initial-scale=1.0">
    <meta name="author" content="mlgnotcool">
    <meta name="keywords" content="成電38th 網頁班">
    <meta name="description" content="我是內容 我是內容 我是內容 我是內容">

    <title>網頁班</title>
    <link href="./images/funny.png" rel="icon">
</head>
<body>
    <h1>翁釩予</h1>
    <h2>MLGnotCOOL</h2>
    <br>
    <h3>成功電研 38th 教學+網管</h3>
    <hr>

    <h1>關於我:</h1>
    <hr>
    <h2>我的興趣:</h2>
    <h3>玩minecraft</h3>
    <h3>打code</h3>
    <h3>影片剪輯</h3>
    <h3>打爵士鼓</h3>
    <h4>(還有孤獨搖滾)</h4>

    <h2>我的學術力:</h2>
    <h3>競程</h3>
    <h3>演算法</h3>
    <h3>網頁設計</h3>
    <h3>python</h3>

</body>
</html>
<img>
但再說明之前,我要先解釋一個檔案再電腦中的途徑
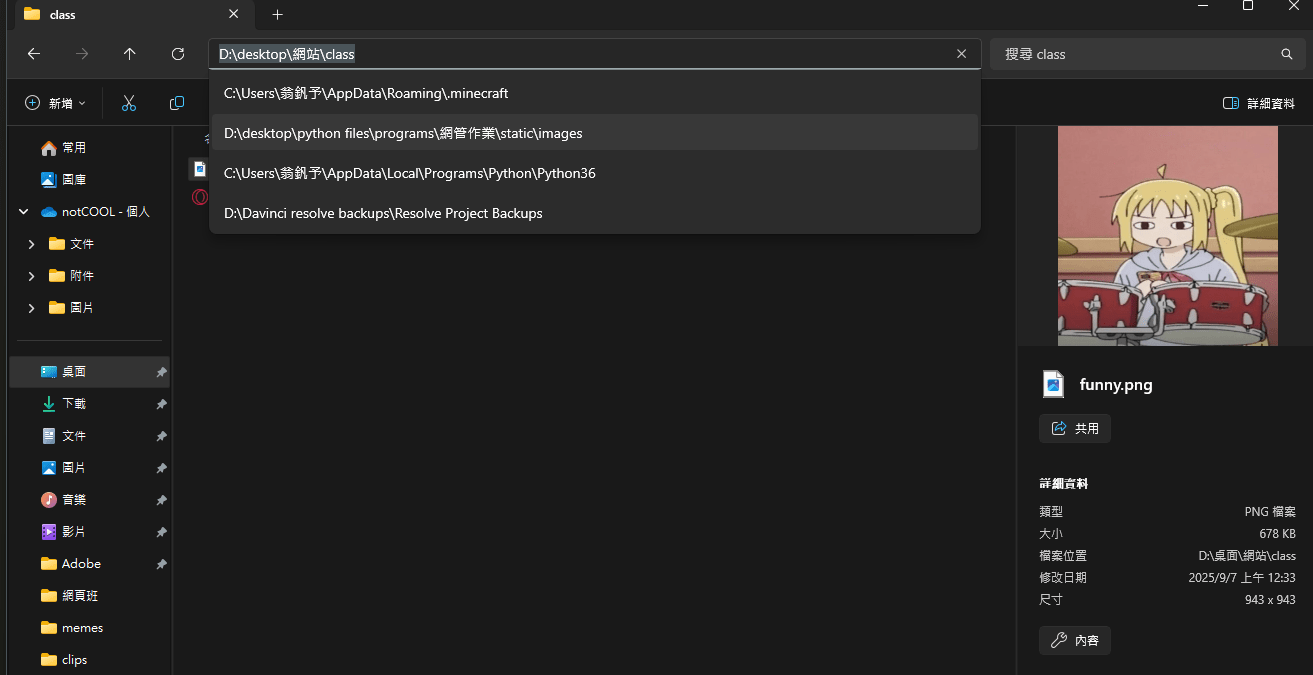
假設我這裡有一個檔案:
他的途徑就會是他在電腦中的位置:
所以就會是 "D:/desktop/網站/class"
知道路徑就可以讓程式碼知道要找到哪個檔案
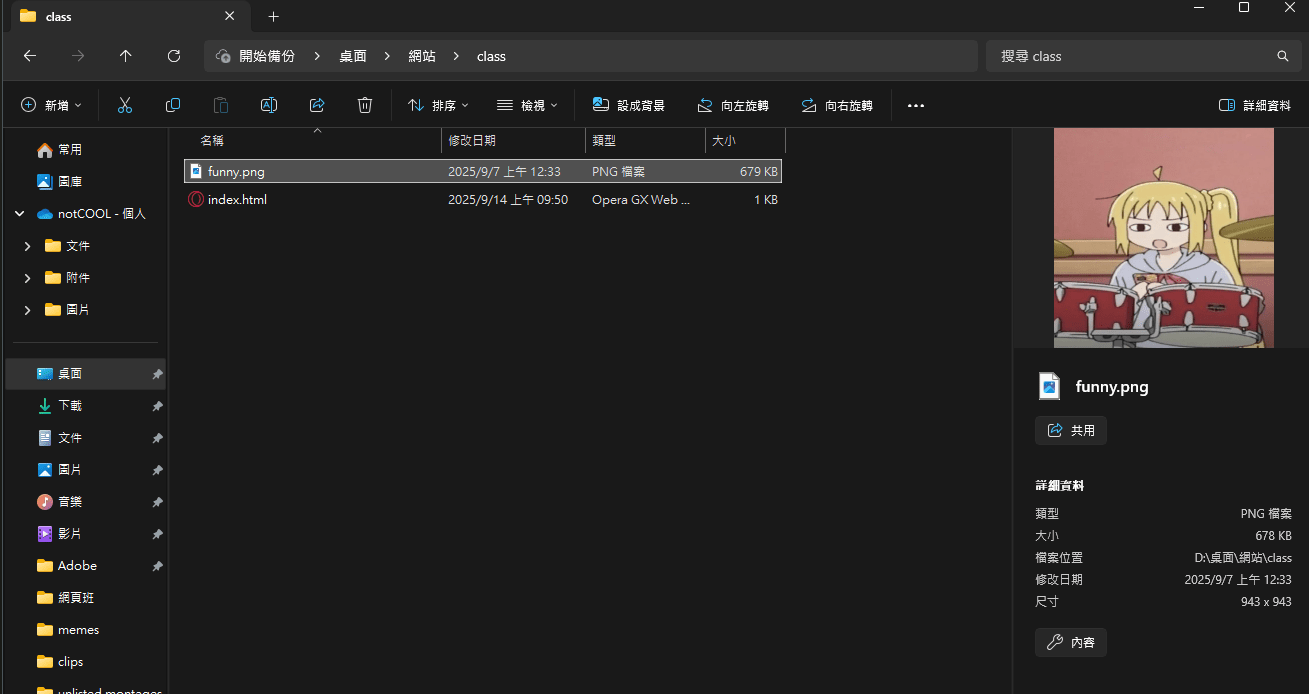
<img>
但再說明之前,我要先解釋一個檔案再電腦中的途徑
那要怎麼從一個檔案走到另一個檔案呢?
(讓html知道我們的檔案在哪裡)
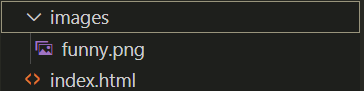
假設我們要從index.html走到funny.png:
一些要知道的小知識:
"." - 現在這個資料夾
"/" - 要走的途徑
".." - 返回上一層資料夾
所以就會是:(拿上禮拜的icon來當例子)
<link href="./images/funny.png" rel="icon"><img>
<img src="./images/funny.png">
對 他就是一張圖片
<iframe>
可以讓你在網頁中嵌入其他網頁的東西
每個網站嵌入的方式都不太一樣,我用youtube的來舉例
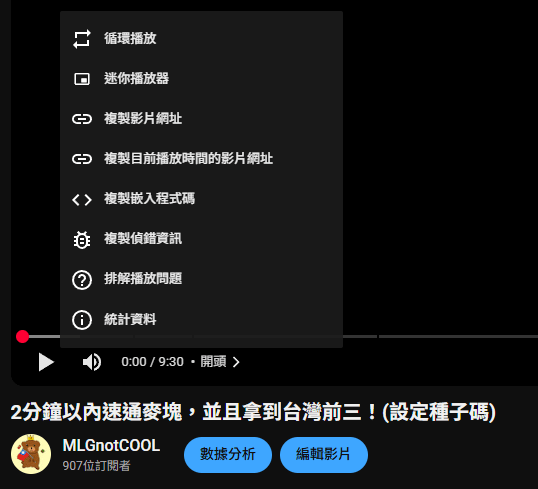
找到你要的影片:
然後按右鍵 然後再按這個 >
<iframe>
<iframe width="1840" height="985" src="https://www.youtube.com/embed/LTqcz68lVNE" title="2分鐘以內速通麥塊,並且拿到台灣前三!(設定種子碼)" frameborder="0" allow="accelerometer; autoplay; clipboard-write; encrypted-media; gyroscope; picture-in-picture; web-share" referrerpolicy="strict-origin-when-cross-origin" allowfullscreen></iframe>他會複製一大串程式碼,複製到你的code裡就好了
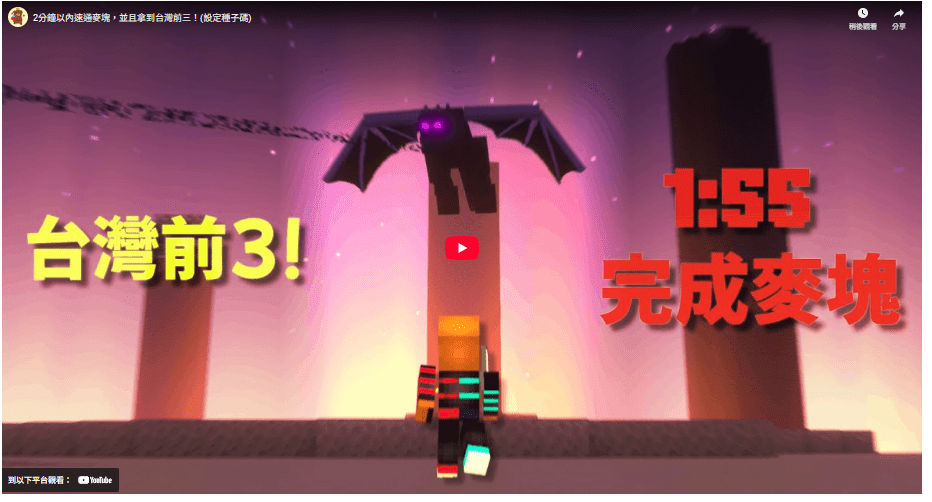
最後影片就能正常顯示了!
<ul>
	<h1>我的興趣:</h1>
    <ul>
        <li>玩minecraft</li>
        <li>打code</li>
        <li>影片剪輯</li>
        <li>打爵士鼓</li>
    </ul>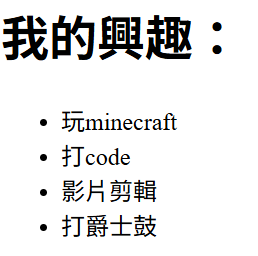
可以當做一個無序的清單
<ol>
    <h1>我的前三歌曲:</h1>
    <ol>
        <li><a href="https://www.youtube.com/watch?v=PuMz4v5PYKc">Porter Robinson - Look at the Sky</a></li>
        <li><a href="https://www.youtube.com/watch?v=FnhedPLxksQ">Kessoku band - UNITE</a></li>
        <li><a href="https://www.youtube.com/watch?v=UEwjYcGe0WU">Kessoku band - Doppelganger</a></li>
    </ol>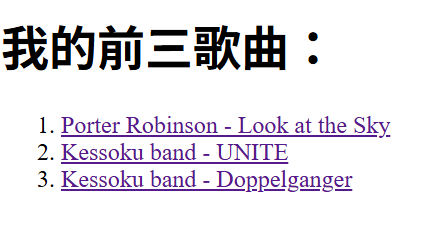
可以當做一個有序的清單
<table>
    <table>
        <caption>成電38th上學期 社課資訊統計</caption>
        <tr>
            <th>\ </th>
            <th>算法班</th>
            <th>網頁班</th>
            <th>python班</th>
        </tr>
        <tr>
            <th>講師</th>
            <td>吳承樺</td>
            <td>翁釩予</td>
            <td>蕭映宇、林瑋浩</td>
        </tr>
        <tr>
            <th>人數</th>
            <td>22</td>
            <td>16</td>
            <td>15</td>
        </tr>
</table>- <caption> 代表表格標題
- <tr> 代表列
- <th> 代表標題
- 標題字體會加粗
- <td>代表表內元素
- 表格線:CSS

實作時間!
有幾項先提醒:
1. google 是一個很好用的東西,如果有什麼不會都可以查
2. 有幾個東西我沒講到,例如:<b>,自己都可以去查查看
3. 發揮想像力,不用做的很好看沒關係 (因為我還沒教CSS)
用剛剛學的東西
做出一個HTML的網頁
(不要抄 你們要自己寫寫看)
實作時間!
給一個範例好了:
做出一個自我介紹的網站 (盡量包含我剛剛有講的東西)
實作時間!
<!DOCTYPE html>
<html lang="en">
<head>
    <meta charset="UTF-8">
    <meta name="viewport" content="width=device-width, initial-scale=1.0">
    <meta name="author" content="mlgnotcool">
    <meta name="keywords" content="成電38th 網頁班">
    <meta name="description" content="我是內容 我是內容 我是內容 我是內容">

    <title>網頁班</title>
    <link href="./images/funny.png" rel="icon">
</head>
<body>
    <h1>翁釩予</h1>
    <h2>MLGnotCOOL</h2>
    <img src="./images/pfp_bgremoved.png" width="100px">
    <hr>
    <h3>成功電研 38th 教學+網管</h3>
    <hr>

    <h1>關於我:</h1>
    <ul>
        <li><h2>我的興趣:</h2></li>
        <ul>
            <li>玩minecraft</li>
            <li>打code</li>
            <li>影片剪輯</li>
            <li>打爵士鼓</li>
        </ul>

        <li><h2>我的學術力:</h2></li>
        <ul>
            <li>競程</li>
            <li>演算法</li>
            <li>網頁設計</li>
            <li>python</li>
        </ul>
    </ul>

    <hr>

    <h1>我的前三歌曲:</h1>
    <ol>
        <li><a href="https://www.youtube.com/watch?v=PuMz4v5PYKc">Porter Robinson - Look at the Sky</a></li>
        <li><a href="https://www.youtube.com/watch?v=FnhedPLxksQ">Kessoku band - UNITE</a></li>
        <li><a href="https://www.youtube.com/watch?v=UEwjYcGe0WU">Kessoku band - Doppelganger</a></li>
    </ol>

    <h2>我的影片:</h2>
    <iframe width="720" height="405" src="https://www.youtube.com/embed/LTqcz68lVNE" title="2分鐘以內速通麥塊,並且拿到台灣前三!(設定種子碼)" frameborder="0" allow="accelerometer; autoplay; clipboard-write; encrypted-media; gyroscope; picture-in-picture; web-share" referrerpolicy="strict-origin-when-cross-origin" allowfullscreen></iframe>
</body>
</html>
HTML 第3周
<body> 架構
<div>
<span>
(HTML註解)
+HTML複習
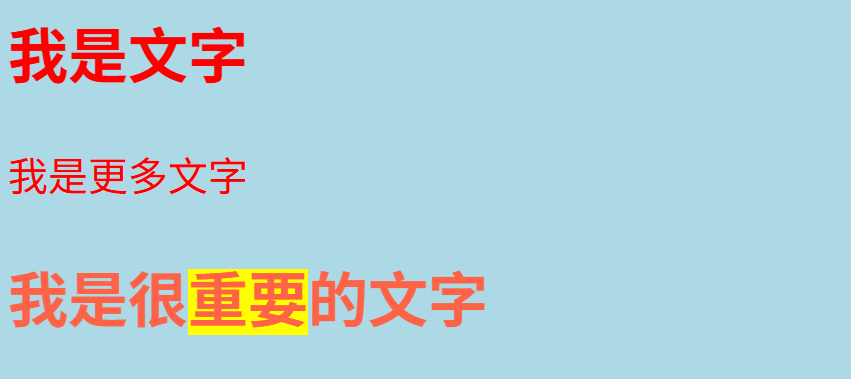
<div> 和 <span>是什麼?
可以幫我們程式區分的東西:
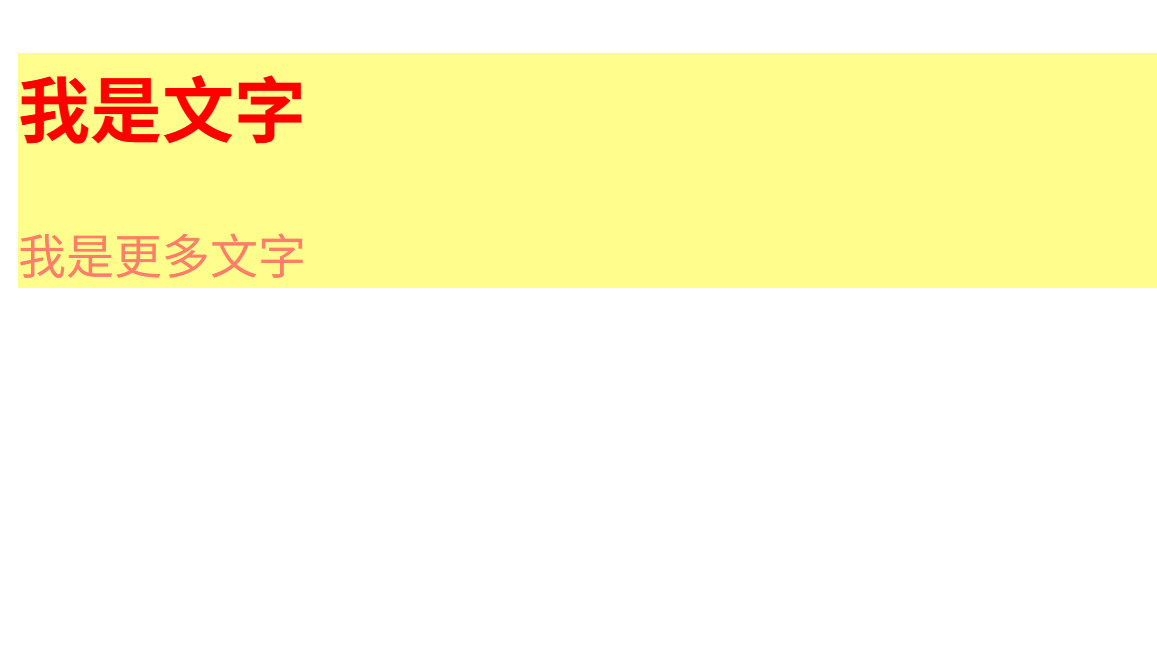
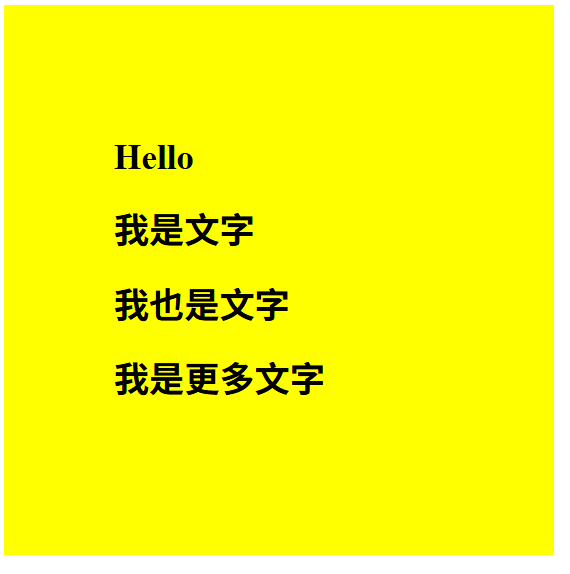
    <div>
        <h2>我是文字</h2>
        <p>我是更多文字</p>
    </div>

    <h2>我是很<span>重要</span>的文字</h2>
那可以拿來做什麼呢?
CSS可以使用 (下禮拜揭曉)
DIV
通常用於一整個大區塊,可以更改整個區塊的東西
(背景顏色、大小等)
背景這個黃色東西
是一整個div >
舉例來說:
用我們剛剛的f12來看網站的程式碼
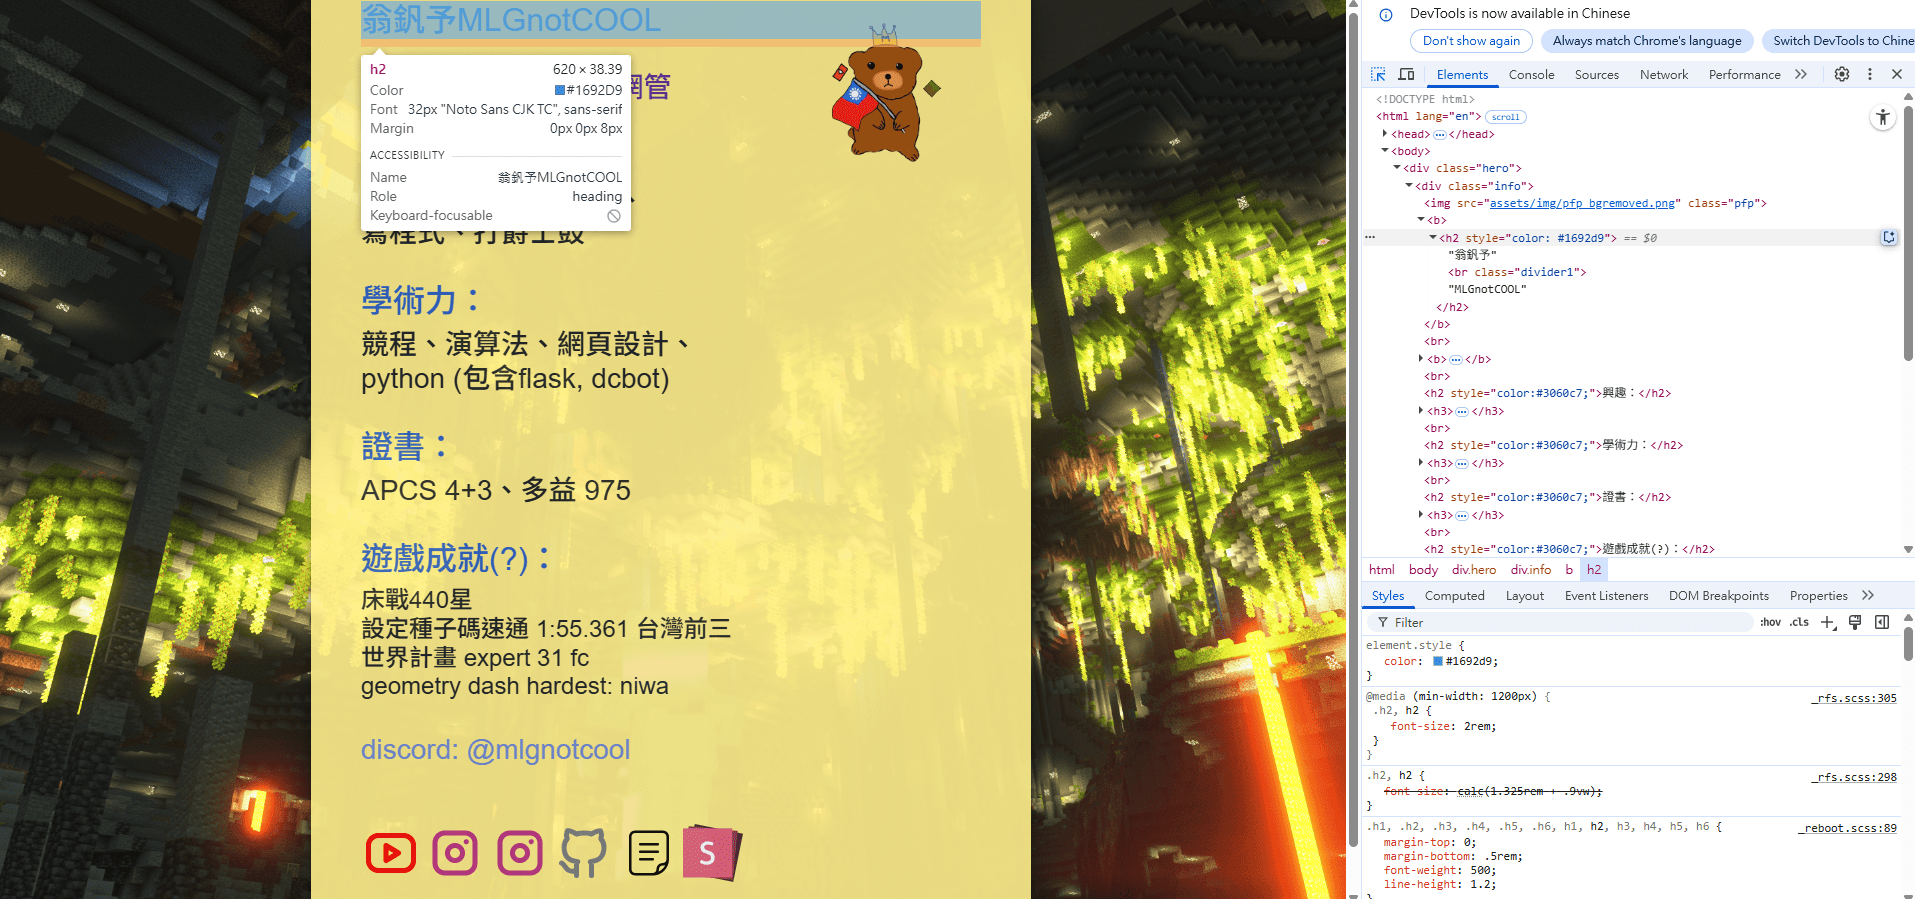
這是一個元素 ->
你看到的東西都在body裡面
span
通常用於一的行內的東西,可以更改一個小區塊的東西
(文字顏色等)
"重要"被包在一個span裡面>
<h3>我是很<span>重要</span>的文字</h3>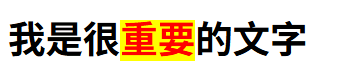
HTML註解
(插入一個小東西)
<!-- 你要註解的東西 -->可以放在HTML的任何地方,幫你的HTML作註解
給下一個人看的時候有可能可以有幫助
實作:
幫我在html中加加看div和span,可以用f12檢查看看
<!DOCTYPE html>
<html lang="en">
<head>
    <title>網頁班</title>
</head>
<body>
    <div>
      	<h2>我是文字</h2>
      	<p>我是更多文字</p>
  	</div>

    <h3>我是很<span>重要</span>的文字</h3>
</body>
</html>
HTML複習時間:
<標記名> 內容放在這裡 </標記名>

<h1> ;) </h1>
HTML格式:
<!DOCTYPE html>
<html>

	<head>
    	...
    </head>

    <body>
    	...
    </body>

</html>-
<!DOCTYPE html> 聲明
-
<html> HTML文件之根元素-root element
-
<head> 頁面原數據-metadata
-
<body> 網頁主要內容
<head>
    <meta charset="UTF-8">
    <meta name="viewport" content="width=device-width, initial-scale=1.0">
    <meta name="author" content="mlgnotcool">
    <meta http-equiv="refresh" content="10">
    <meta name="keywords" content="idk what to put here ;)">
    <meta name="description" content="我是內容 我是內容 我是內容 我是內容">

    <title>idk what to put here</title>
    <link href="./funny.png" rel="icon">
</head>
HTML複習時間:
head的一些東西:
走路徑我就不在講一遍
HTML複習時間:
一些body裡的tag
    <h1>翁釩予</h1>
    <h2>MLGnotCOOL</h2>
	<br>
    <img src="./images/pfp_bgremoved.png" width="100px">

    <ul>
        <li><h2>我的興趣:</h2></li>
        <ul>
            <li>玩minecraft</li>
            <li>打code</li>
            <li>影片剪輯</li>
            <li>打爵士鼓</li>
        </ul>
    </ul>

    <hr>

    <h1>我的前三歌曲:</h1>
    <ol>
        <li><a href="https://www.youtube.com/watch?v=PuMz4v5PYKc">Porter Robinson - Look at the Sky</a></li>
        <li><a href="https://www.youtube.com/watch?v=FnhedPLxksQ">Kessoku band - UNITE</a></li>
        <li><a href="https://www.youtube.com/watch?v=UEwjYcGe0WU">Kessoku band - Doppelganger</a></li>
    </ol>

    <h2>我的影片:</h2>
    <iframe width="720" height="405" src="https://www.youtube.com/embed/LTqcz68lVNE" title="2分鐘以內速通麥塊,並且拿到台灣前三!(設定種子碼)" frameborder="0" allow="accelerometer; autoplay; clipboard-write; encrypted-media; gyroscope; picture-in-picture; web-share" referrerpolicy="strict-origin-when-cross-origin" allowfullscreen></iframe>
文字
空格
圖片
無序list
有序list
嵌入
分行
連結
HTML複習時間:
實作
HTML說完了!
用我們學到的HTML知識,製作出一個網站出來!
(發揮創意 都可以做)
css 第4周
css基礎架構
如何把HTML連到CSS檔案
CSS基礎架構
內聯 外嵌
選擇器
id
class

CSS
- Cascading Style Sheets
- 階層式樣式表
- 網站的外觀美編
- .css
如何使用CSS?
主要有兩種方式:
內聯
外嵌
內聯
直接加在html的tag裡面
<div style="background:#FFFE8C">
	<h2 style="color:red">我是文字</h2>
    <p style="color:#FF7E69">我是更多文字</p>
</div>
格式:
style="要改的東西: 要改成的值"
color - 文字顏色
background - 背景顏色
實作一:
可以幫我試試看剛剛講的內聯 幫文字加個顏色
<!DOCTYPE html>
<html lang="en">
<head>
    <title>網頁班</title>

    <link href="./styles.css" rel="stylesheet">
</head>
<body>
    <div style="background:#FFFE8C">
      	<h2 style="color:red">我是文字</h2>
      	<p style="color:#FF7E69">我是更多文字</p>
  	</div>

    <h2>我是很<span style="color:red">重要</span>的文字</h2>
</body>
</html>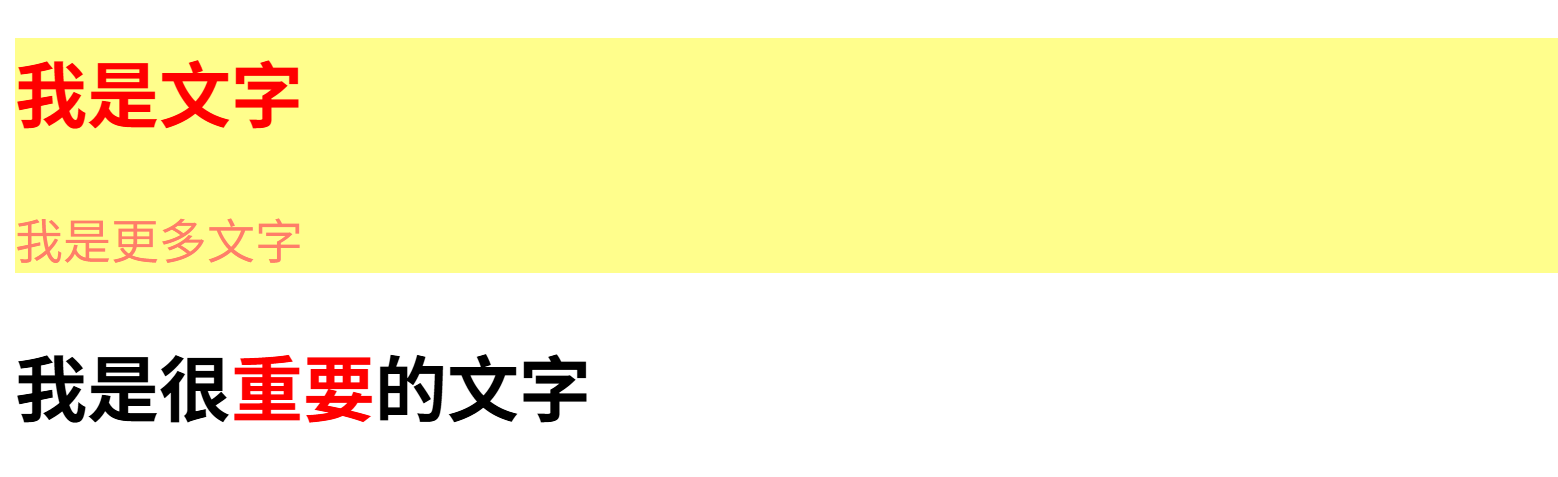
先幫我創一個叫
"(檔案名稱).css"
的檔案

創建檔案:
外嵌
如何將css檔案連到html檔案?
<head>
	<link href="./styles.css" rel="stylesheet">
</head>
在head裡加入這一行就好了
這是檔案路徑 相信你們都會走了
外嵌
檔案位置
標明說這個連到的
檔案是CSS檔案
CSS 格式
選擇器 {
	要更改的東西;
}

h1 {
	color: red;
}
選擇器可以是很多東西
ex: h1, p, div, img (前面有講過的都可以)
也可以是id, class (等一下會講)
選擇HTML中
h1這個東西 ->
<- 將它顏色改成紅色
基礎 選擇器
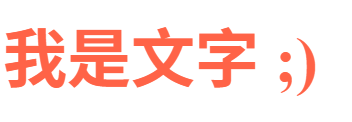
舉例 - h1:
<h1>我是文字 ;)</h1>h1 {
color: tomato;
}
基礎 選擇器
舉例 - div:
<div>
	<h2>我是文字</h2>
	<p>我是更多文字</p>
 </div>
div {
background: #FFFE8C;
}
基礎 選擇器
舉例 - span:
<h3>我是很<span>重要</span>的文字</h3>span {
color: red;
background: yellow;
}基礎 選擇器
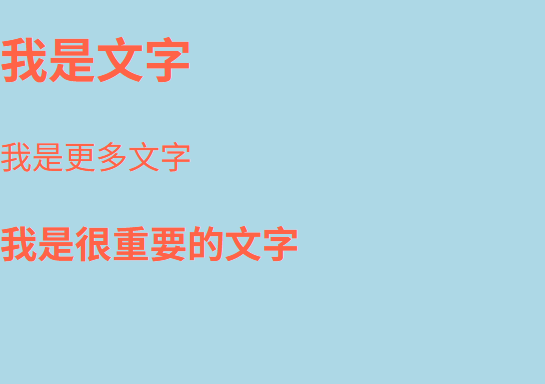
舉例 - Body:
<body>
<div>
<h2>我是文字</h2>
<p>我是更多文字</p>
</div>
<h3>我是很<span>重要</span>的文字</h3>
</body>body {
background: lightblue;
color: tomato;
}
實作二:
使用剛剛教的外嵌 來幫html加上一些顏色
提示:
color - 更改元素顏色
background - 更改背景顏色
實作二:
使用剛剛教的外嵌 來幫html加上一些顏色
<!DOCTYPE html>
<html lang="en">
<head>
<title>網頁班</title>
<link href="./styles.css" rel="stylesheet">
</head>
<body>
<div>
<h2>我是文字</h2>
<p>我是更多文字</p>
</div>
<h3>我是很<span>重要</span>的文字</h3>
</body>
</html>body {
background: lightblue;
}
div {
    background: #FFFE8C;
}
h2 {
color: red;
}
p {
color: #FF7E89;
}
span {
    color: red;
    background: yellow;
}解答:
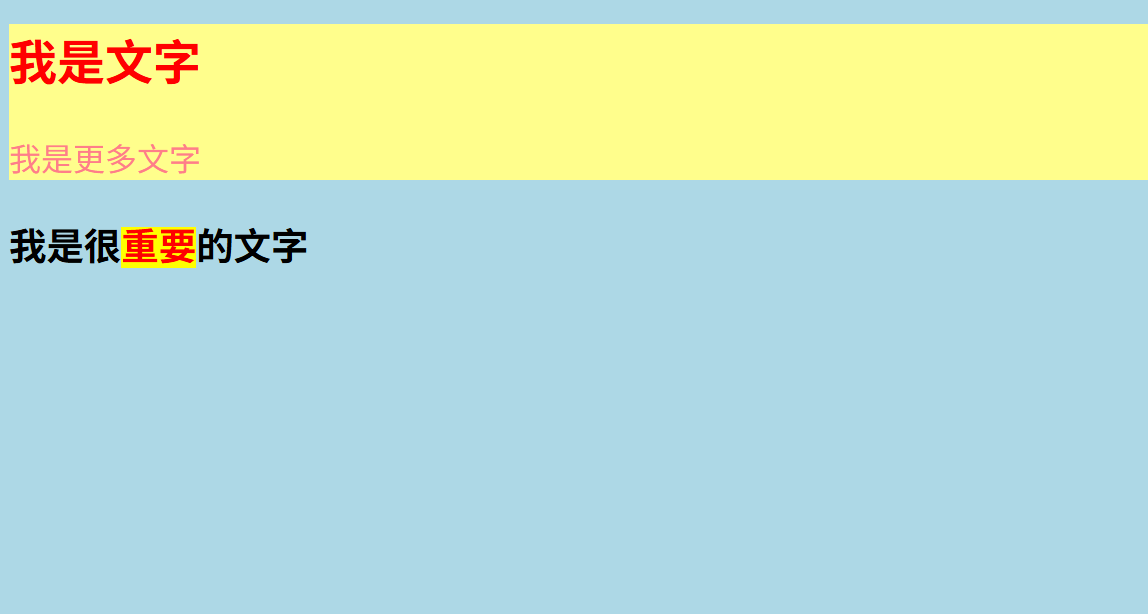
id、class
    <div id="div1">
        <h2 class="text">我是文字</h2>
        <p class="text">我是更多文字</p>
    </div>

    <h2>我是很<span id="span1">重要</span>的文字</h2></body>
給予我們tag一些分類
id - 只能使用於一個上
class - 可以使用於很多個
那分類可以做什麼呢?
CSS中更仔細分類
.text {
	color: red;
}

#span1 {
	color: tomato;
  	background: yellow;
}
id和class選擇器
class -> 用 .
id -> 用 #
如何在CSS中選擇呢?
    <div id="div1">
        <h2 class="text">我是文字</h2>
        <p class="text">我是更多文字</p>
    </div>

    <h2>我是很<span id="span1">重要</span>的文字</h2></body>
實作三:
用用看id和class,幫我們的文字和背景加個顏色
實作三:
用用看id和class,幫我們的文字和背景加個顏色
<!DOCTYPE html>
<html lang="en">
<head>
    <title>網頁班</title>

    <link href="./styles.css" rel="stylesheet">
</head>
<body>
    <div id="div1">
        <h2 class="text">我是文字</h2>
        <p class="text">我是更多文字</p>
    </div>

    <h2>我是很<span id="span1">重要</span>的文字</h2></body>
</body>
</html>
body {
background: lightblue;
color: tomato;
}
.text {
color: red;
}
#span1 {
color: tomato;
background: yellow;
}解答:
css 第5周
color
opacity
background
text
選擇器 {
	要更改的東西;
}

h1 {
	color: red;
}
還記得我上禮拜說的CSS選擇器嗎?
我們接下來就要開始介紹元素可以改什麼東西了!
color
來設定我們元素的顏色 (如文字)
<h2 id="text">我是文字</h2>#text {
color: red;
}
color
顏色表示的各種方法
h1 {
	color : tomato;

	color: RGB(255, 99, 71);

	color: #ff6347;

	color: hsl(0, 100%, 50%);
}
1. 顏色名稱
2. RGB值
3. hex code 色碼
4. HSL
color
顏色名稱
h1 {
	color : yellow;
}
顧名思義,可以直接打上顏色的名稱
color
RGB值
h1 {
	color: RGB(255, 99, 71);
}
r - 紅色
G - 綠色
B - 藍色
值可以在0-255之間,代表RGB的各個值
color
#000000
這個叫做hex code
每格代表一個1-16 (0~F) 的數字
每兩格代表一個數字
#紅色 綠色 藍色
每個顏色會有16*16=256種強度
hex code
h1 {
	color: #ff6347;
}
color
裡面的三個值代表的是:
(色相, 飽和度, 亮度)
hsl
h1 {
	color: hsl(0, 100%, 50%);
}- 色調:色環上從 0 ~ 360 的度數
- 飽和度: 0% 表示完全灰色,100% 表示純色。
- 亮度: 0% 表示沒有光(黑色)100% 表示完全亮度(白色)
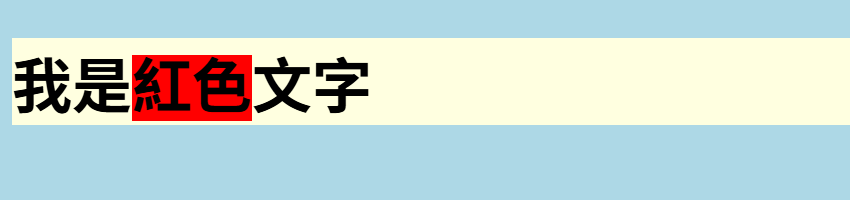
background (color)
來設定我們背景的東西 (如顏色)
<body>
    <div id="div1">
        <h2>我是<span id="red-text">紅色</span>文字</h2>
    </div>
</body>
body {
background-color: lightblue;
}
#div1 {
background-color: lightyellow;
}
#red-text {
background-color: red;
}
opacity
    <h1 id="text1">我是文字1</h1>
    <h1 id="text2">我是文字2</h1>
    <h1 id="text3">我是文字3</h1>
    <h1 id="text4">我是文字4</h1>
#text1 {
background-color: lightblue;
opacity: 0.1;
}
#text2 {
background-color: lightblue;
opacity: 0.4;
}
#text3 {
background-color: lightblue;
opacity: 0.7;
}
#text4 {
background-color: lightblue;
opacity: 1.0;
}
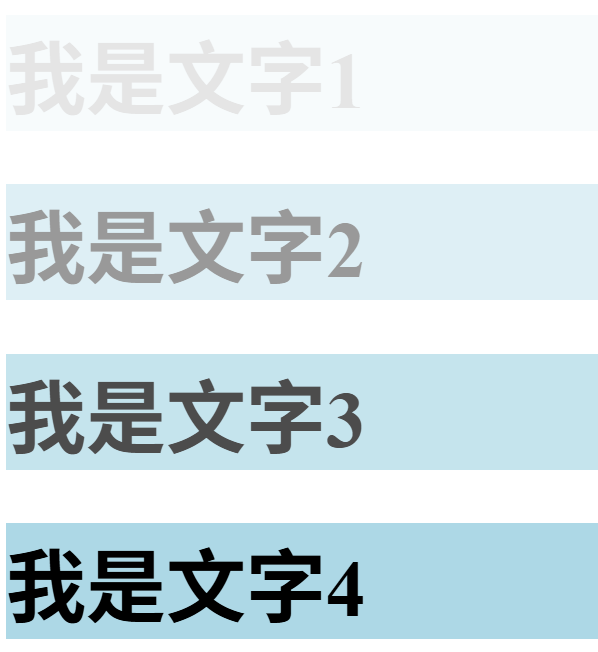
可以是一個0-1的值
來調東西透明度的
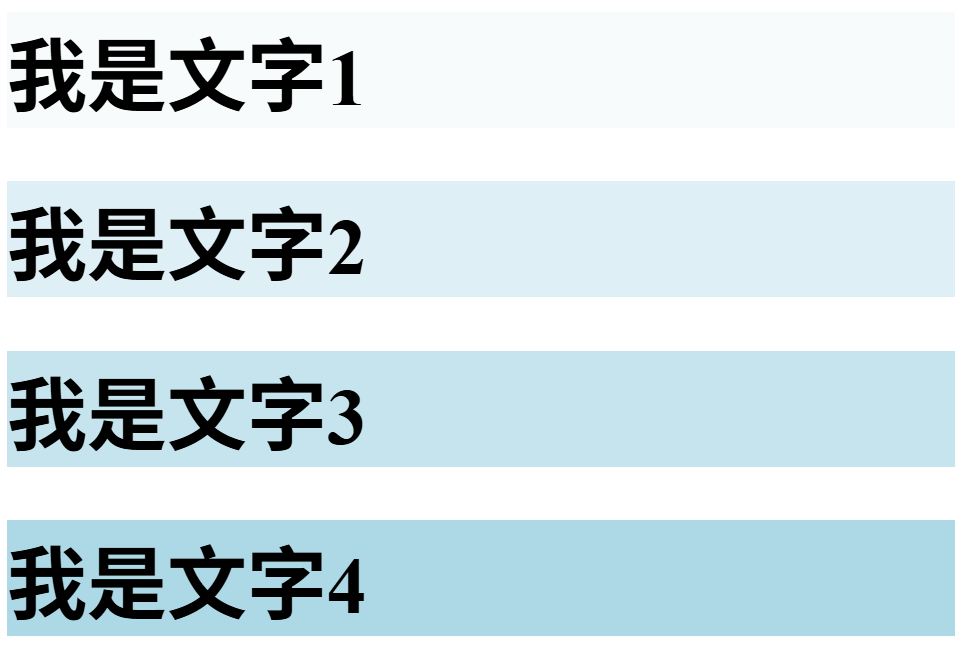
opacity
#text1 {
    background-color: rgba(173, 216, 230, 0.1);
}

#text2 {
    background-color: rgba(173, 216, 230, 0.4);
}

#text3 {
    background-color: rgba(173, 216, 230, 0.7);
}

#text4 {
    background-color: rgba(173, 216, 230, 1.0);
}
可以用rgba
rgba(紅 , 綠 , 藍 , 透明度)
那如果我們只想要背景改呢?
實作一:
試試看我們剛剛學的color和background-color
加個顏色,也可以玩玩看color picker
(和上週差不多,我就不給範例code了)
(顧名思義 就是文字)
我會講文字比較常用到的
剩下都會在連結裡面,可以自己去看看
TExt
COLOR
<h2 id="text">我是文字</h2>#text {
color: red;
}對 就是我們剛剛介紹的
TExt
font-family
<h2 id="text">我是文字</h2>#text {
font-family: monospace;
}
改變文字的字體
TExt
font-size
    <!-- 以下的文字不是我自願加的 -->
    <!-- 我來看有沒有人看得懂我在幹嘛 -->
    <h2 id="text1">君と集まって星座になれたら</h2>
    <h2 id="text2">いつまでも いくつまでも</h2>
    <h2 id="text3">ドッペルゲンガーは言った</h2>
#text1 {
font-size: 60px;
}
#text2 {
font-size: 40px;
}
#text3 {
font-size: 20px;
}改變文字的大小
px -> 像素

TExt
font-style
    <h2 id="text1">君と集まって星座になれたら</h2>
    <h2 id="text2">ドッペルゲンガーは言った</h2>
#text1 {
font-style: normal;
}
#text2 {
font-style: italic;
}
改變文字的樣子 (變斜體)
TExt
font-weight
    <h2 id="text1">君と集まって星座になれたら</h2>
    <h2 id="text2">いつまでも いくつまでも</h2>
    <h2 id="text3">ドッペルゲンガーは言った</h2>
#text1 {
font-weight: normal;
}
#text2 {
font-weight: lighter;
}
#text3 {
font-weight: bold;
}
改變文字的樣子 (變粗體、細體)

TExt
text-align
    <h2 id="text1">君と集まって星座になれたら</h2>
    <h2 id="text2">いつまでも いくつまでも</h2>
    <h2 id="text3">ドッペルゲンガーは言った</h2>
#text1 {
text-align: start;
}
#text2 {
text-align: center;
}
#text3 {
text-align: right;
}

實作二:
用我們剛剛學的文字,幫你的文字加上一些美編!
css 第6周
width
height
background-image
border
width heigth
改變元素的長寬
    <div id="big-text">
        <h1 id="text1">我是文字1</h1>
        <h1 id="text2">我是文字2</h1>
    </div>
#big-text {
background-color: lightblue;
width: 500px;
height: 250px;
}width heigth
div {
    width: 50px;
    width: 50%;

    width: 50vw;
    height: 50vh;

    height: 2em;
    height: 2rem;
}
width: 寬度
height: 長度
width heigth
px
div {
    width: 50px;
}一種絕對長度的表示方法
有時候不建議使用,不同的裝置或比例有可能跑版
width heigth
%
div {
    width: 50%;
}
母元素 :元素上面一層的元素,
例如div包著h1,那個div就是h1的母元素
這個元素與他母元素的百分比
width heigth
vw vh
div {
    width: 50vw;
    height: 50vh;
}
viewport:視窗大小
元素對於viewport的百分比,
舉例來說:viewport 50px 寬,1vw = 0.5px
width heigth
em rem
div {
    width: 2em;
    height: 2rem;
}
em:
對於元素的母元素的font-size比例
舉例來說:2em = 2倍母元素的font-size
很重要,em和rem可以做出不會跑版的東西
background (image)
設定一個元素的背景圖片

body {
    background-image: url("./images/wallpaper.png");
}
語法:url("圖片路徑")
background (image)
一些常用到的東西:
body {
    background-image: url("./images/wallpaper.png");
    background-repeat: no-repeat;
    background-size: cover;
}
background-repeat: no-repeat;
讓圖片不會重複
background-size: cover;
讓放大縮小不會影響它
border
border - 邊框
可以更改我們元素的邊框
#big-text {
    background-color: lightblue;
    width: 30%;
    height: 30%;

    border-style: solid;
}
border
有很多種border-style,可以自己點連結看看
(我不會一個一個講,應該也記不起來 )
border
border-width
#big-text {
    background-color: lightblue;
    width: 30%;
    height: 30%;

    border-style: solid;
    border-width: 10px;
}
更改邊框的寬度
border
border-color
#big-text {
    background-color: lightblue;
    width: 30%;
    height: 30%;

    border-style: solid;
    border-color: tomato;
}
border
border-radius
#big-text {
    background-color: lightblue;
    width: 30%;
    height: 30%;

    border-style: solid;
    border-radius: 5px;
}
更改邊框的圓角邊框
實作
用我們目前交的東西,來幫我們的網站加個美編
ex: 背景圖片,邊框,背景顏色等
<!DOCTYPE html>
<html lang="en">
<head>
    <meta charset="UTF-8">
    <meta name="viewport" content="width=device-width, initial-scale=1.0">
    <title>網頁班</title>

    <link href="./styles.css" rel="stylesheet">
</head>
<body>
    <div class="whole">
    <div id="top">
        <h1>翁釩予</h1>
        <h2>MLGnotCOOL</h2>
        <br>
        <img src="./images/pfp_bgremoved.png" width="100px">
    </div>

    <br>

    <div id="interests">
        <ul>
            <li><h2>我的興趣:</h2></li>
            <ul>
                <li>玩minecraft</li>
                <li>打code</li>
                <li>影片剪輯</li>
                <li>打爵士鼓</li>
            </ul>
        </ul>
    </div>

    <hr>

    <div id="top-songs">
        <h1>我的前三歌曲:</h1>
        <ol>
            <li><a href="https://www.youtube.com/watch?v=PuMz4v5PYKc">Porter Robinson - Look at the Sky</a></li>
            <li><a href="https://www.youtube.com/watch?v=FnhedPLxksQ">Kessoku band - UNITE</a></li>
            <li><a href="https://www.youtube.com/watch?v=UEwjYcGe0WU">Kessoku band - Doppelganger</a></li>
        </ol>
    </div>
    </div>
</body>
</html>
body {
background-image: url("./images/wallpaper.png");
background-repeat: no-repeat;
background-size: cover;
}
.whole {
background-color: rgba(255, 255, 224, 0.8);
width: 30vw;
}
#top {
border-style: solid;
border-width: 5px;
border-radius: 10px;
border-color: tomato;
width: 20vw;
text-align: center;
}
#interests {
border-style: dotted;
border-width: 5px;
border-radius: 10px;
width: 20vw;
}
#top-songs {
border-style: dashed;
border-width: 5px;
border-radius: 10px;
width: 20vw;
}實作
用我們目前交的東西,來幫我們的網站加個美編
ex: 背景圖片,邊框,背景顏色等

css 第7周
Box Model
margin
padding
還記得上禮拜我們學到的調整元素大小嗎?
那如果我想改他們之間的間距呢?
margin
改變 元素與元素 之間的邊界間距
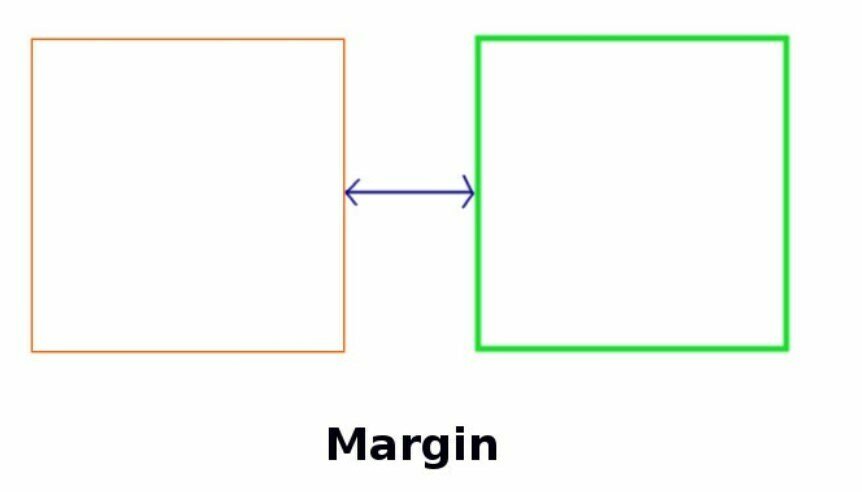
margin
margin: 100px;語法:
後面要放的是長度
(我上禮拜說過了 相信你們都會了 )
margin
margin-top: 100px;
margin-bottom: 100px;
margin-left: 0px;
margin-right: 50px;
更多語法:
當然,可以自己改變每一邊的長度
margin
舉例來說:
我們這裡有一個沒有margin的網站:
我給上面的div:
margin-bottom: 100px;就會變這樣:
100px 的 margin ->
實作一:
玩玩看margin,給你的div一些間距吧!
(我就延續上次的範例)
body {
    background-image: url("./images/wallpaper.png");
    background-repeat: no-repeat;
    background-size: cover;
}

.whole {
    background-color: rgba(255, 255, 224, 0.8);
    width: 30vw;

    margin-top: 50px;
    margin-left: 35vw;
}

#top {
    border-style: solid;
    border-width: 5px;
    border-radius: 10px;
    border-color: tomato;

    width: 20vw;
    text-align: center;

    margin-left: 7em;
    margin-bottom: 50px;
}

#interests {
    border-style: dotted;
    border-width: 5px;
    border-radius: 10px;

    width: 20vw;

    margin-left: 7em;
    margin-bottom: 25px;
}

#top-songs {
    border-style: dashed;
    border-width: 5px;
    border-radius: 10px;

    width: 20vw;

    margin-left: 7em;
    margin-top: 25px;
}
padding
改變 元素內所有內容與元素自身 的邊界間距

padding
padding: 100px;語法:
後面要放的是長度
(其實就和margin一樣 )
padding
padding-top: 100px;
padding-bottom: 100px;
padding-left: 0px;
padding-right: 50px;
更多語法:
當然,可以自己改變每一邊的長度
padding
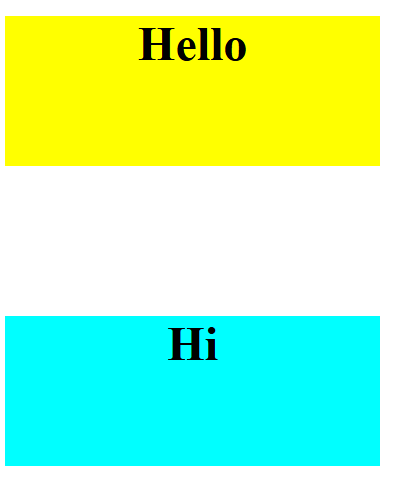
我們這裡有一個沒有padding的div:
我給div:
padding: 100px;就會變這樣:
舉例來說:
100px 的 padding ->
margin + padding
最後講個東西 :P
margin 和 padding 是很神奇的東西 (我自己也搞不太懂),
大部分的時間都是慢慢摸索,看那些數字可以用出最好的排版
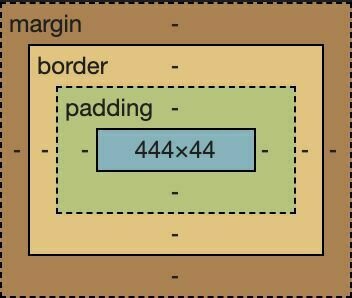
box model
介紹一個小東西
我們學完padding, margin, border之後
這些東西和起來就叫做box model,給個圖看看:
實作二:
玩玩看box model,給你的網站一些排版吧!
(我就延續上次的範例)
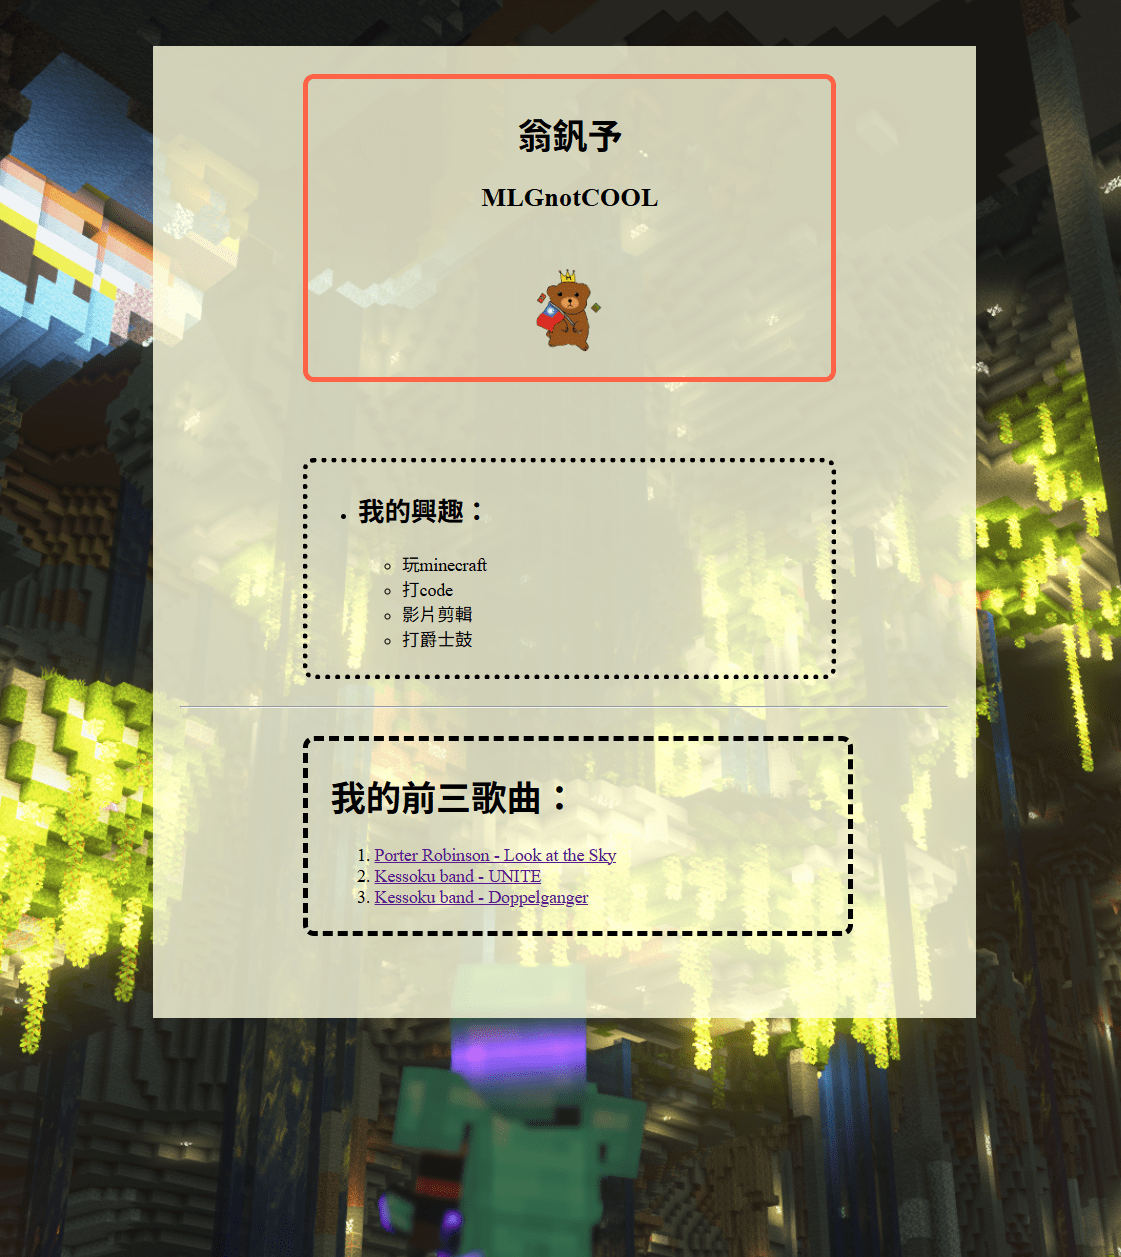
<!DOCTYPE html>
<html lang="en">
<head>
    <meta charset="UTF-8">
    <meta name="viewport" content="width=device-width, initial-scale=1.0">
    <title>網頁班</title>

    <link href="./styles.css" rel="stylesheet">
</head>
<body>
    <div class="whole">
    <div id="top">
        <h1>翁釩予</h1>
        <h2>MLGnotCOOL</h2>
        <br>
        <img src="./images/pfp_bgremoved.png" width="100px">
    </div>

    <br>

    <div id="interests">
        <ul>
            <li><h2>我的興趣:</h2></li>
            <ul>
                <li>玩minecraft</li>
                <li>打code</li>
                <li>影片剪輯</li>
                <li>打爵士鼓</li>
            </ul>
        </ul>
    </div>

    <hr>

    <div id="top-songs">
        <h1>我的前三歌曲:</h1>
        <ol>
            <li><a href="https://www.youtube.com/watch?v=PuMz4v5PYKc">Porter Robinson - Look at the Sky</a></li>
            <li><a href="https://www.youtube.com/watch?v=FnhedPLxksQ">Kessoku band - UNITE</a></li>
            <li><a href="https://www.youtube.com/watch?v=UEwjYcGe0WU">Kessoku band - Doppelganger</a></li>
        </ol>
    </div>
    </div>
</body>
</html>
body {
background-image: url("./images/wallpaper.png");
background-repeat: no-repeat;
background-size: cover;
}
.whole {
background-color: rgba(255, 255, 224, 0.8);
width: 30vw;
margin-top: 50px;
margin-left: 35vw;
padding: 25px;
}
#top {
border-style: solid;
border-width: 5px;
border-radius: 10px;
border-color: tomato;
width: 20vw;
text-align: center;
margin-left: 7em;
margin-bottom: 50px;
padding: 5px;
}
#interests {
border-style: dotted;
border-width: 5px;
border-radius: 10px;
width: 20vw;
margin-left: 7em;
margin-bottom: 25px;
padding: 5px;
}
#top-songs {
border-style: dashed;
border-width: 5px;
border-radius: 10px;
width: 20vw;
margin-left: 7em;
margin-top: 25px;
margin-bottom: 50px;
padding: 5px;
padding-left: 20px;
}實作二:
玩玩看box model,給你的網站一些排版吧!
(我就延續上次的範例)
body {
    background-image: url("./images/wallpaper.png");
    background-repeat: no-repeat;
    background-size: cover;
}

.whole {
    background-color: rgba(255, 255, 224, 0.8);
    width: 30vw;

    margin-top: 50px;
    margin-left: 35vw;

    padding: 25px;
}

#top {
    border-style: solid;
    border-width: 5px;
    border-radius: 10px;
    border-color: tomato;

    width: 20vw;
    text-align: center;

    margin-left: 7em;
    margin-bottom: 50px;

    padding: 5px;
}

#interests {
    border-style: dotted;
    border-width: 5px;
    border-radius: 10px;

    width: 20vw;

    margin-left: 7em;
    margin-bottom: 25px;

    padding: 5px;
}

#top-songs {
    border-style: dashed;
    border-width: 5px;
    border-radius: 10px;

    width: 20vw;

    margin-left: 7em;
    margin-top: 25px;
    margin-bottom: 50px;

    padding: 5px;
    padding-left: 20px;
}css 第8周
position
display
偽類
position
改變 元素 的位置
position: static;
position: relative;
position: absolute;
position: fixed;
position: sticky;
有這5種的表示方式:
position
static
div {
    position: static;
}
原本css的預設值
就是和沒改一樣
position
relative
div {
    position: relative;

  	left: 30px;
  	top: 50px;
}會和它原本的位置有相對的移動
可以由 top, bottom, left, right 去移動
移動不會影響其他元素
將div往原本的位置移動
left 30px
top 50px
position
absolute
div {
	position: absolute;

  	top: 50%;
  	left: 50%;
}會是在網頁中的絕對位置
不會受原本的位置影響
可以由 top, bottom, left, right 去移動
移動不會影響其他元素
將div置中
position
fixed
div {
    position: fixed;

    bottom: 0;
  	right: 0;
}會在網頁的某個固定位置
放大縮小 滑動都不會影響它的位置
可以由 top, bottom, left, right 去移動
將div固定在右下角
position
sticky
div {
	position: sticky;
}
有時候是absolute,有時候是fixed
看有沒有要超出視窗決定
如果在視窗內,他會正常的顯示
如過要離開視窗時,會"黏"在視窗的邊框
實作一
去這個網站玩玩看 (對我講的有點抽象):
https://www.w3schools.com/css/css_positioning.asp
然後可以自己玩玩看position
(範例扣都在網站,我就不給了 :P)
display
改變 元素 的顯示模式
display: inline;
display: block;
display: inline-block;接下來會介紹
inline, block, inline-block
是什麼
display
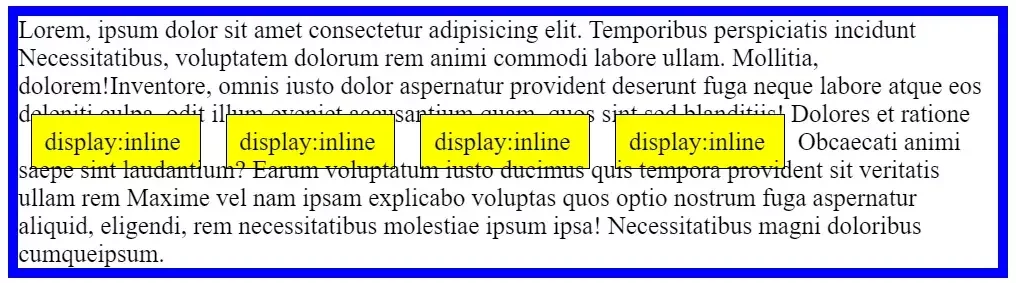
inline
div {
    display: inline;
}
Inline行內元素
.元素可在同一行內呈現,圖片或文字均不換行,
也不會 影響其版面配置
.不可設定長寬,元素的寬高由它的內容撐開
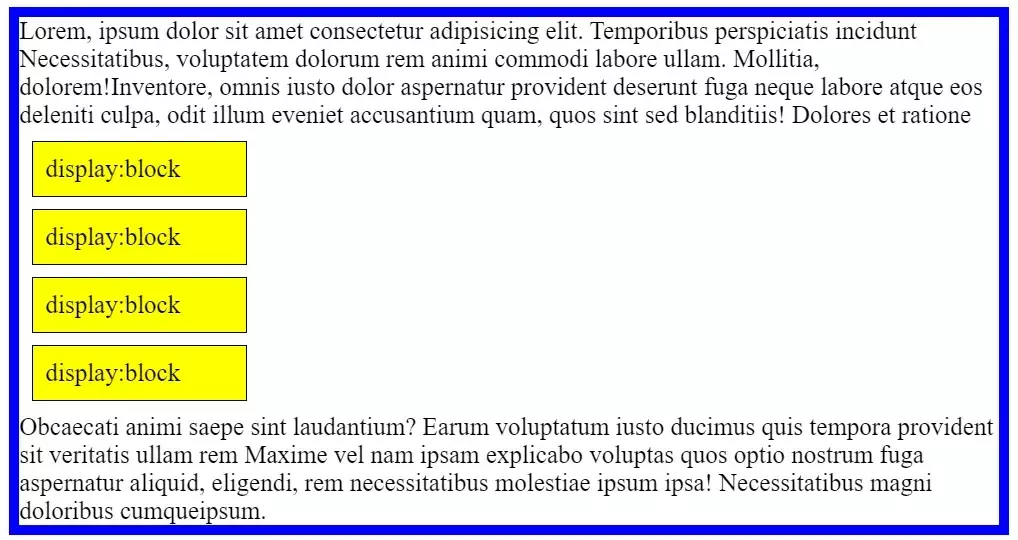
display
block
div {
    display: block;
}
Block區塊元素
.元素寬度預設會撐到最大,使其占滿整個容器
.可以設定長寬/margin/padding,
但仍會占滿一整行
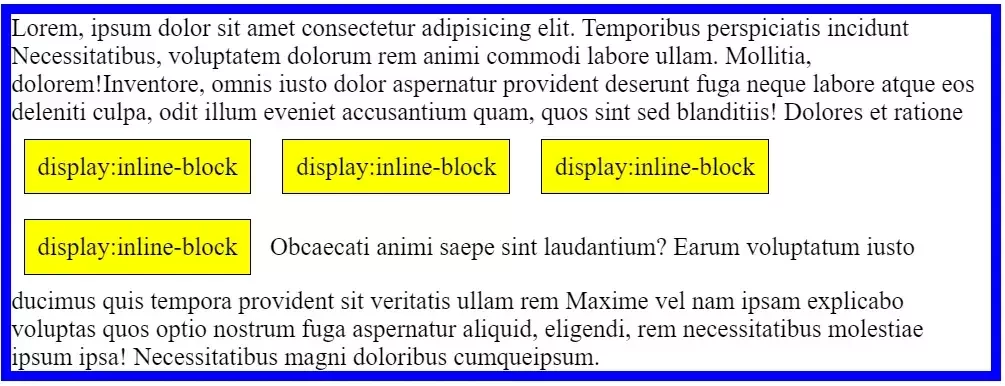
display
inline-block
div {
    display: inline-block;
}
inline-block 行內區塊
.以inline的方式呈現,但同時擁有block的屬性
.可設定元素的寬高/margin/padding
.可水平排列
偽類
pseudo-classes
根據元素的狀態變化使用 CSS
我們最常用的只有一個 :hover
(可以去查查看有沒有其他的 我其實不知道)
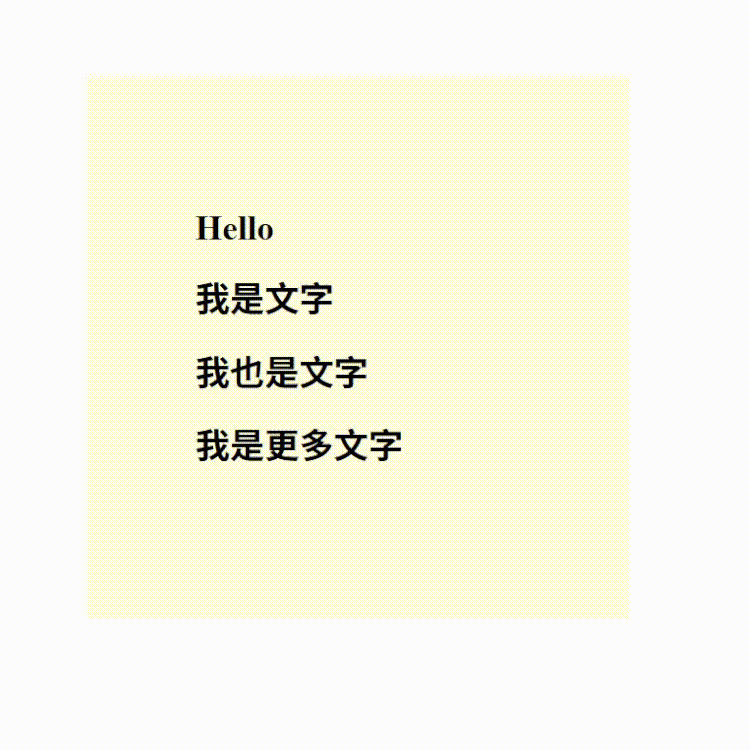
#div1:hover{

}
當我們滑鼠放到div上的時候,會改變這div的css
偽類
pseudo-classes
#div1 {
    background-color: lightyellow;
    width: 300px;
    height: 300px;

    padding: 100px;
    margin: 100px;

    transition: 0.3s;
}

#div1:hover{
    background-color: lightblue;
    transition: 0.3s;
    scale: 1.2;
}
可以給他transition時間 (轉場時間)
scale是改變他的大小
實作二
我們CSS講完了!
大致上可以做出一個有美編的簡單網站了
剩下時間就給你們複習吧!
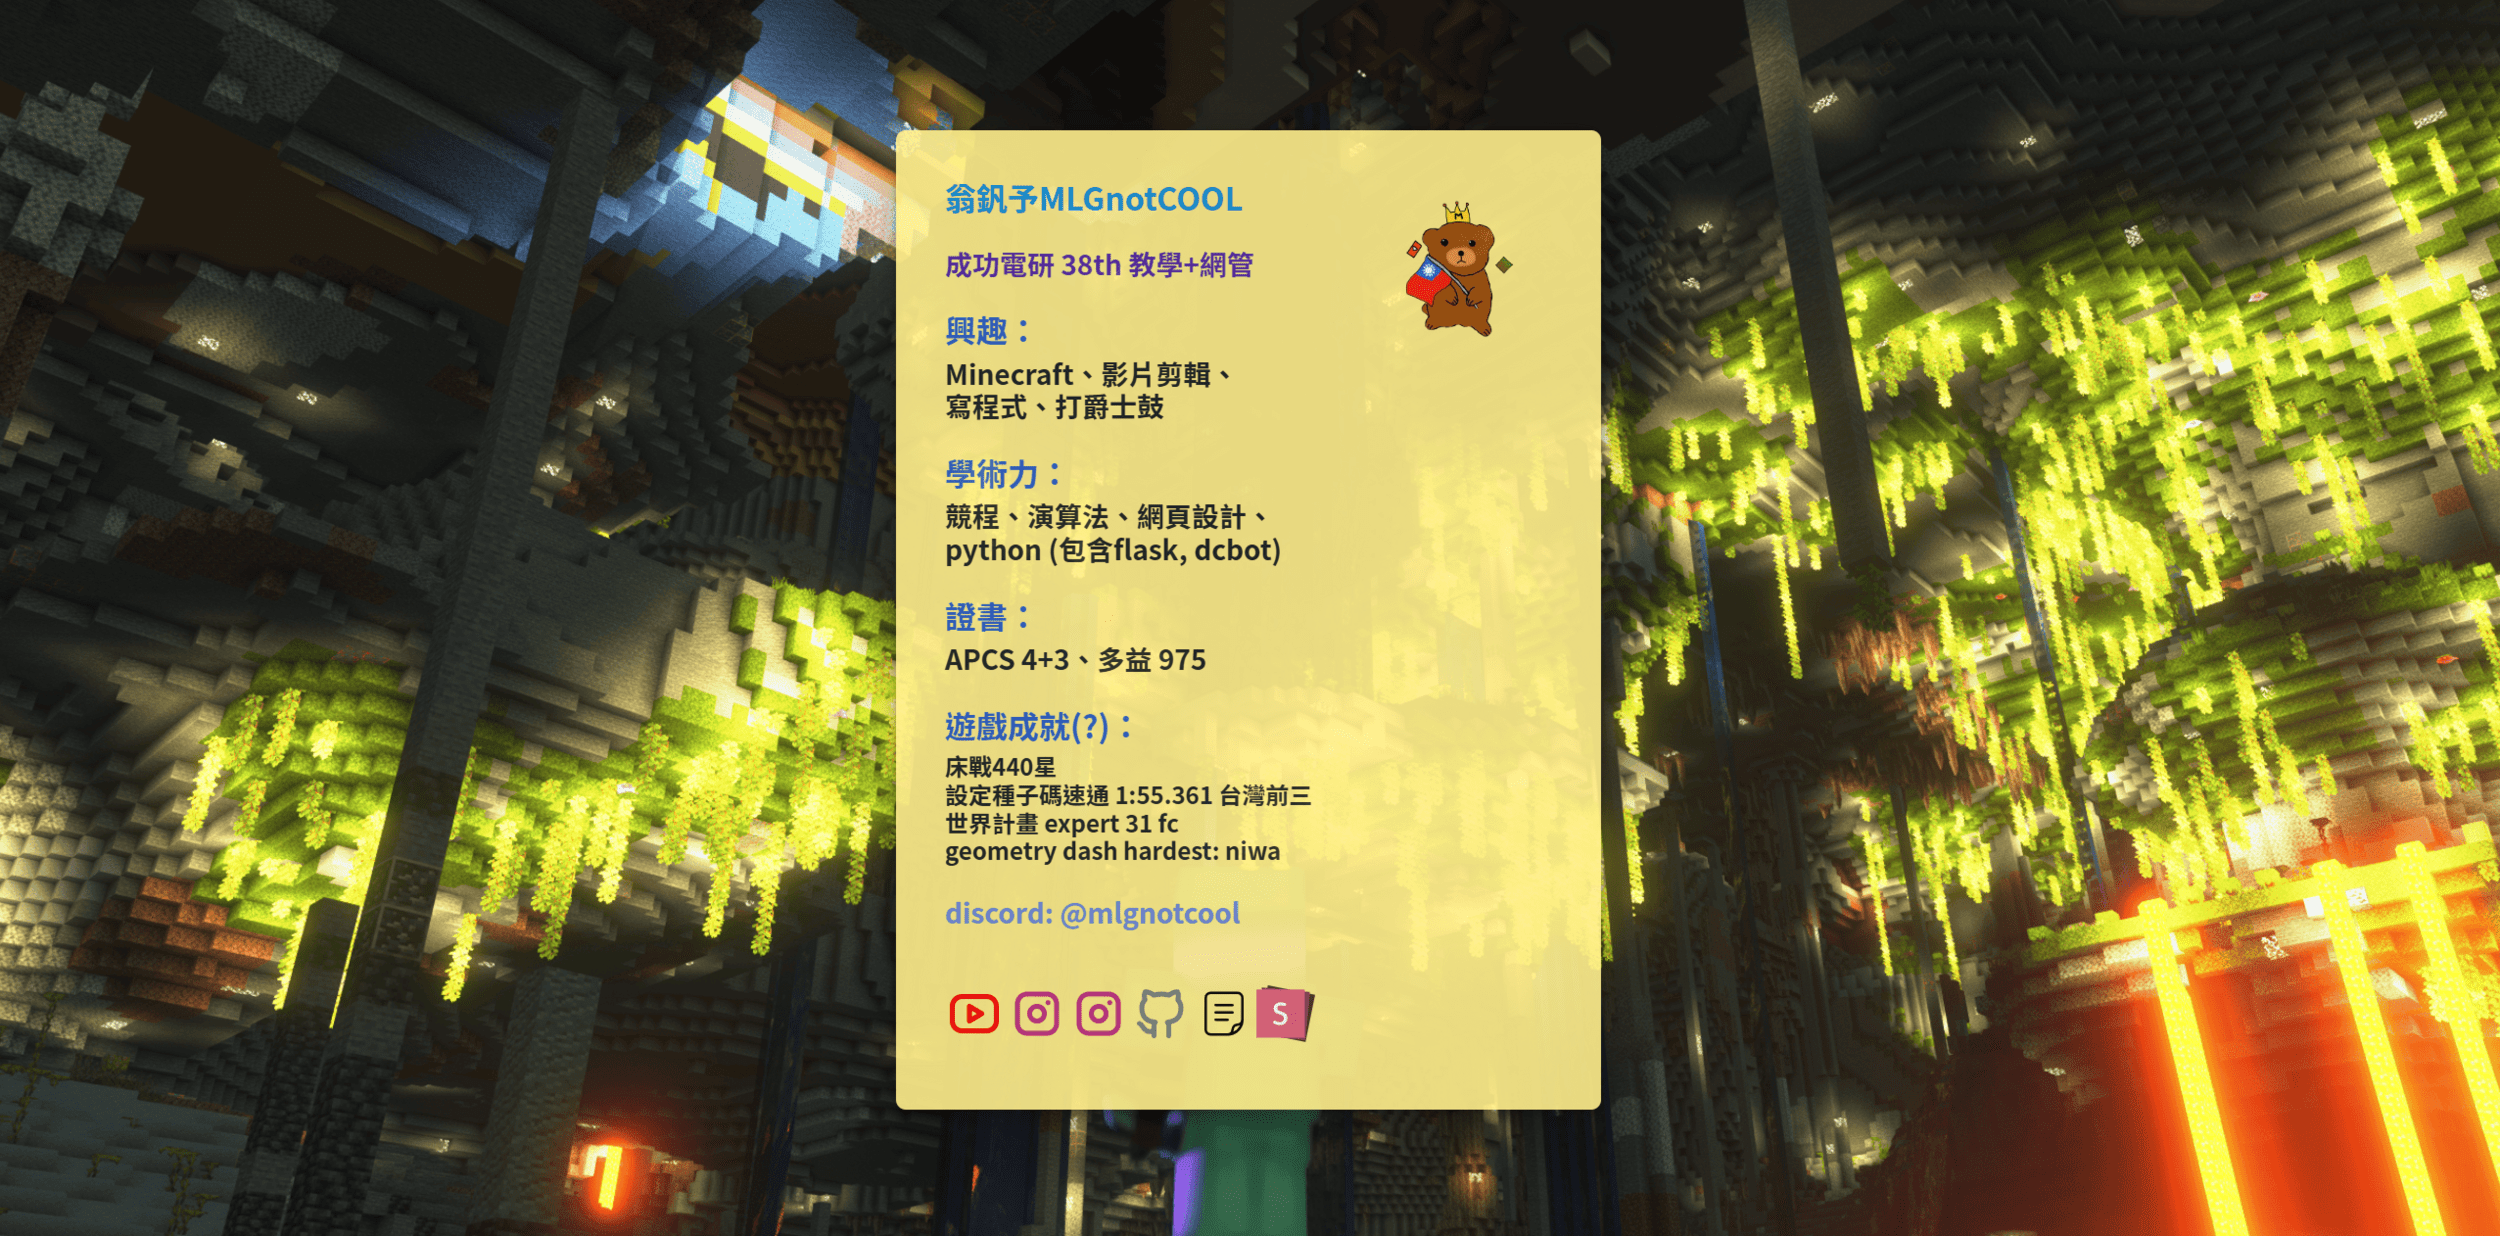
這裡是我只用HTML, CSS做出的自我介紹網站:
實作二
JS 第9周
JS介紹
JS 基礎語法
JS
- Javascript
- 是一種程式語言
- 網站的動畫
- .js
如何使用 JS

首先,先創一個檔案
副檔名要是 .js
<body>
  <script src="./main.js"></script>
</body>
接下來在你html的body的最後面
加這行(和css很像)
這是檔案路徑 應該不用我再講一次了吧 :P
如何看你的JS有沒有連到
如何使用 JS
在你的JS加入這行:
alert("Hello World!");進入網站的時候就會有一個alert:
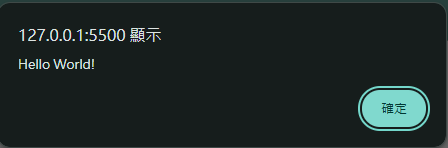
記得 一定要加分號!
console
如何使用 JS
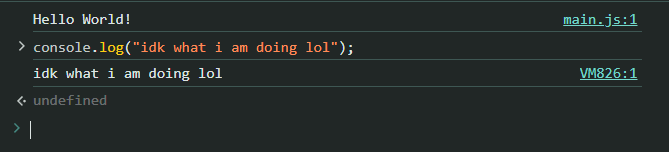
試試看在你的JS加入這行:
console.log("Hello World!");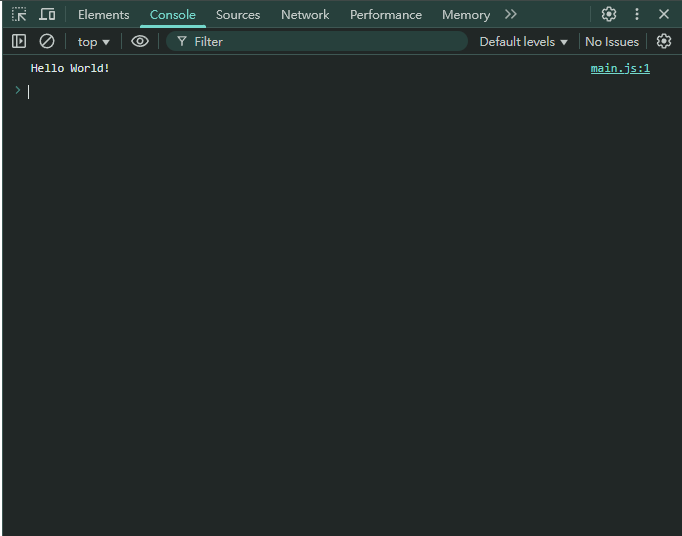
按f12,按上面有一個叫console的鍵:
就會發現有我們剛剛那個打的東西
(console.log() 有點像python的print)
實作一
把js的檔案架好,
並且將試試看剛剛提到的alert()和console.log()
也可以玩玩看那個console有什麼東西
js 基礎語法
首先要記得一件事:
js 的每行後面都要加一個 ;
console.log("Hello World!");js
js 資料類別
1 - Number 數字
顧名思義,是存數字的
可以存很多種數字,如整數、小數等
2 - String 字串
是存文字的,要用 " "或 ' ' 包起來
如:"Hello", ':P'
3 - Boolean 布林值
true / false
真 / 假
js
js 資料類別
小考驗時間:
請問以下會分別輸出什麼:
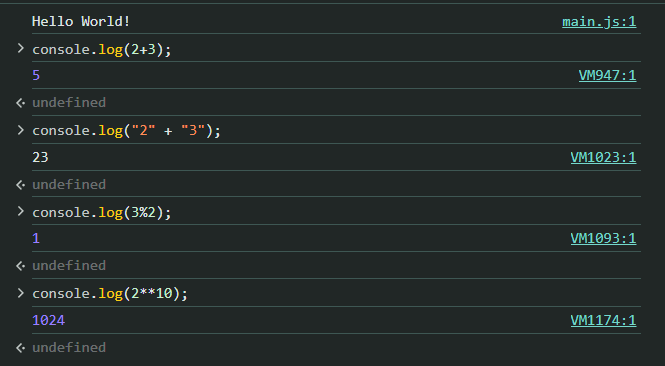
console.log(11 + 22);
console.log("11" + "22");
答案:
33 和 "1122"
因為上面是數字,下面是字串
js
js 運算子
- + 兩數相加 e.x. 2+3 => 5
- - 兩數相減 e.x. 3-2 => 0
- * 兩數相乘 e.x. 3*2 => 6
-
/ 兩數相除 e.x. 5/2 => 2.5
註:除法除下來的資料型態都為浮點數 - % 兩數相除後取餘數 e.x. 5%2 => 1
- ** A**B = A的B次方 e.x. 5**2 => 25
console.log(2+3); //5
console.log(3-2); //1
console.log(3*2); //6
console.log(5/2); //2.5
console.log(5%2); //1
console.log(5**2); //25
實作二
試試看我們剛剛學到的東西
把答案console.log出來!
js
js 變數
格式
let/var/const 自訂的變數名稱 = 值;
let x = 5;
var x = 5;
const x = 5;
變數名稱不可以有特殊符號 且第一個字母不可以是數字
js
js 變數
var
比較舊
不建議使用
let
可以取代 var
通常99%都用這個
const
常數 不能被改變
在程式碼裡面是不能被改變的變數
var x = 5;const x = 5;let x = 5;js
js 變數
var x = 5;= 是什麼?
意思不是數學的 等於
是 賦值
意義:賦予x一個值為5

js
js if
if 顧名思義 就是可以判斷一格東西是否為真
語法:
let x = 5;

if (x < 5){
    console.log("x is smaller than 5");
}else if (x == 5){
    console.log("x is equal to 5");
}else{
    console.log("x is greater than 5");
}會一個一個比下去,如果符合的話就會執行裡面的東西
else if 可以一直接,不一定只有一個,也可能沒有
也可以沒有 else
js
js for
for 可以對一段程式重複執行
語法:
for (let i=0; i<4; i++){
    console.log(i);
}
預設; 要符合的條件; 每次回圈要執行的東西
補充:
i++ -> i=i+1
i += 2 -> i=i+2

實作三-1
試試看我們剛剛學到的東西
試試看if和for迴圈!
實作三-2
因為我們還沒交怎麼在網站用js
所以我們來寫個 js 的題目吧
假設我給你5個正數的陣列,幫我判斷哪個數字是最大的:
實作三-2
let arr = [1, 5, 6, 8, 5];
let ans = 0;

for (let i = 0; i < 5; ++i){
    if (arr[i] > ans){
        ans = arr[i];
    }
}

console.log(ans);
解答:
JS 第10周
on click
function
getElementById()
getElementsByClassName()
先講一個新的HTML tag
<button>
(顧名思義就是一個按鈕)
    <button>
        <div><h1>Hello</h1></div>
    </button>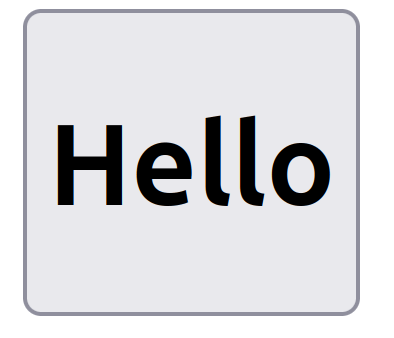
onclick
那我們的button可以作什麼呢
可以連到我們的JS去做事情
    <button onclick="click_btn()">
        <div><h1>Hello</h1></div>
    </button>
onclick -> 按下時
"...()" 裡面的東西 -> 一個function 等一下介紹
當我們按下這個按鈕時,會跑一個叫"click_btn"的function
function
函式(有點像數學的那個)
呼叫的時侯可以執行一段程式碼
function idk(){
    //function
    alert("Hello World");
}

idk(); //calls the funcion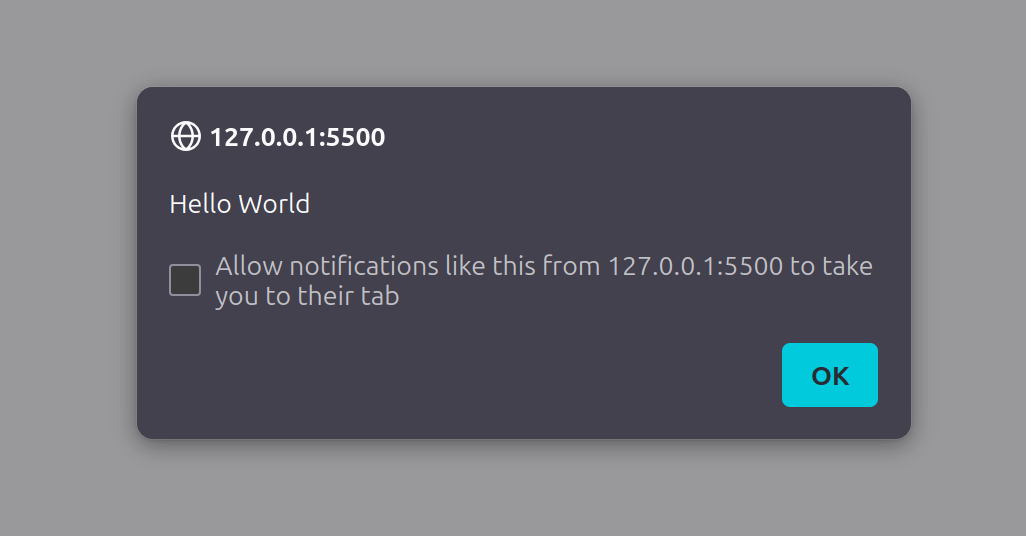
function
合併我們剛剛學的東西
我們按下button時可以在JS執行一段程式
    <button onclick="click_btn()">
        <div><h1>Hello</h1></div>
    </button>
function click_btn(){
alert("Hello World");
}實作一
製作一個按鈕
在按下的時侯可以alert和console一些東西
小(沒有用)的補充:
prompt:讓使用者在alert時可以輸入東西
function click_btn(){
    const input = prompt("your name?");
    alert(input);
}
getElementById()
getElementsByClassName()
可以從 id 或 class 取得我們要的物件
    <div id="div1">
        <h1 class="text">Hello</h1>
    </div>
const div1 = document.getElementById("div1");
const text = document.getElementsByClassName("text");getElementById()
getElementsByClassName()
那我們可以對這些東西作甚麼呢?
const text = document.getElementById("text");

text.style.color="red";
我們可以更改一個元素的css
(前面學到的都可以)
"元素".style."css要改的" = "要改成的值"
getElementById()
getElementsByClassName()
那我們可以對這些東西作甚麼呢?
const text = document.getElementById("text");

text.style.display = "none";
我們可以更改一個元素的很多東西
ex: 隱藏東西
結合我們剛剛學到的東西
我們製作一個按鈕,在按下時可以對元素作改變:
ex: 按下時隱藏和顯示div
<body>
    <div id="div1">
        <h1>Hello</h1>
    </div>

    <button onclick="toggle_div()">toggles div</button>

    <script src="./main.js"></script>
</body>
function toggle_div(){
const div1 = document.getElementById("div1");
if (div1.style.display == "none"){
div1.style.display = "block";
}else{
div1.style.display = "none";
}
}結合我們剛剛學到的東西
我們製作一個按鈕,在按下時可以對元素作改變:
ex: 按下時改變顏色 (補充input)
<body>
<div>
<h1 id="text">Hello</h1>
</div>
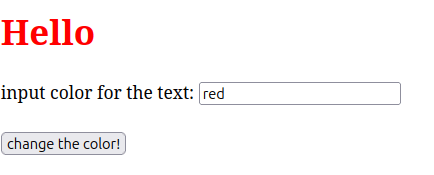
input color for the text: <input id="text_color"> <br><br>
<button onclick="change_color()">change the color!</button>
<script src="./main.js"></script>
</body>function change_color(){
const input = document.getElementById("text_color").value;
const text = document.getElementById("text");
text.style.color = input;
}
結合我們剛剛學到的東西
我們製作一個按鈕,在按下時可以對元素作改變:
ex: 我們社網的球球動畫
實作二
製作一個輸入和按鈕
在按下時確認輸入的是否為一串特定的字串
(有點像密碼)
(當然網站不會這樣存密碼 都在後端的)
正確的話要顯示正確
錯誤的話要顯示錯誤
實作二
<!DOCTYPE html>
<html lang="en">
<head>
    <meta charset="UTF-8">
    <meta name="viewport" content="width=device-width, initial-scale=1.0">
    <title>Document</title>

    <link href="./style.css" rel="stylesheet">
</head>
<body>
    <h1 id="correct_text">Correct!</h1>
    <h1 id="incorrect_text">Incorrect!</h1>

    input secret word: <input id="secret"> <br><br>
    <button onclick="sumbit()">sumbit!</button>

    <script src="./main.js"></script>
</body>
</html>
#correct_text{
color: greenyellow;
display: none;
}
#incorrect_text{
color: tomato;
display: none;
}實作二
const password = "asdfjkl;";

function sumbit(){
    const passcode = document.getElementById("secret").value;

    if (passcode == password){
        document.getElementById("correct_text").style.display = "block";
        document.getElementById("incorrect_text").style.display = "none";
    }else{
        document.getElementById("correct_text").style.display = "none";
        document.getElementById("incorrect_text").style.display = "block";
    }
}
先自己打打看一遍
可以複製貼上玩看看
實作三
JS 講完了!
在你的網站加入javascript動畫吧
(其實還有很多我沒講 尤其是js的其他framework
有興趣可以自己去看看 jquery, react, vue 之類的東西,我在這裡就不講了)
github 第11周
push
pull
clone
commit
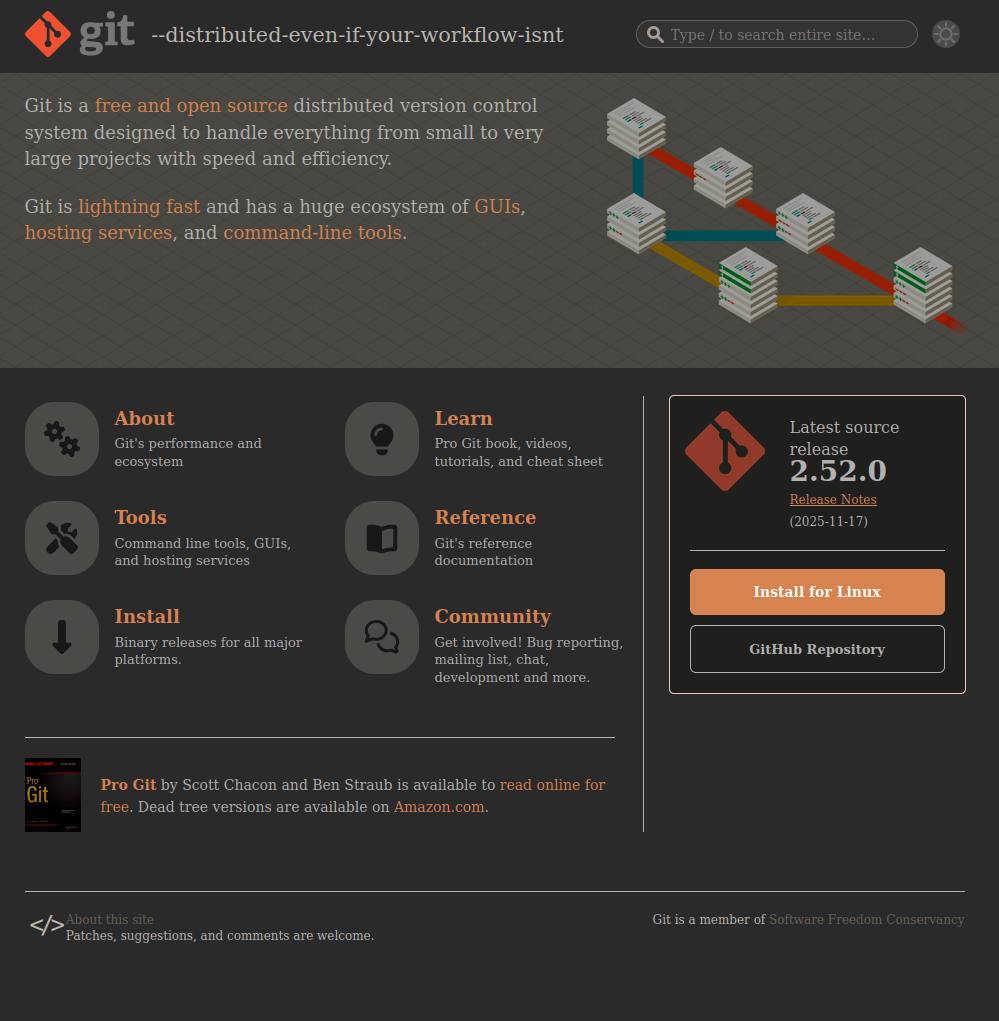
GIT
git是一個分散式版本控制軟體,最初由林納斯·托瓦茲創作,於2005年以GPL授權條款釋出。最初目的是為了更好地管理Linux核心開發而設計。
版本控制
就是版本控制 :U
const p = [1, 2, 3, 4, 5];
console.log(p[0]);

//initial commit
假設我們commit了一個新東西
版本控制
就是版本控制 :U
const p = [1, 2, 3, 4, 5];
console.log(p[1]);
alert("Hello!");

//commit #2
我們可以新增或刪除東西
並且作一個新的commit
const p = [1, 2, 3, 4, 5];
for (int i=1; i<=4; i++){
  console.log(p[i]);
}

//commit #3
版本控制
就是版本控制 :U
const p = [1, 2, 3, 4, 5];
console.log(p[0]);

//initial commit
也可以回去之前的commit
GIT
簡單來說 git 是一個版本控制系統,
有非常多好用的功能,在職場上或公司一定會用到
還有作專案什麼的都非常好用
me when job
GitHub是一個線上軟體原始碼代管服務平台,用於公開程式或軟體的代碼。使用Git作為版本控制軟體 (所以我才先講git)

簡單來說,github是一個可以遠端上傳和分享程式碼的網站,並且是用git來版本控制的。
先幫我註冊一個帳號,以後寫專案都可以用到
GIThub
名詞介紹
(當你會講這些的時後別人就會覺得你很強)
| 名詞 | 解釋 |
|---|---|
| commit | 提交一個版本的程式 |
| clone | 從遠端複製一份程式到本地 |
| pull | 將遠端的程式更新到本地 |
| push | 將本地的更新送到遠端 |
| fetch | 跟pull差不多 但只會下載不更新 |
| revert | 取消commit的內容 |
GIThub
名詞介紹
(當你會講這些的時後別人就會覺得你很強)
| 名稱 | 用途 |
|---|---|
| merge | 將兩個不同人的commit合併 |
| branch | 讓兩個不同目的的程式分開 |
| fork | 將別人的程式複製一份變自己的(用於contribute) |
| pull request | 將自己做好的內容請求合併 |
GIThub
那我們怎麼使用呢?

github desktop
版本管理很方便
vscode 內建的
使用非常簡單
(主要介紹這個)
GIThub
vscode + github
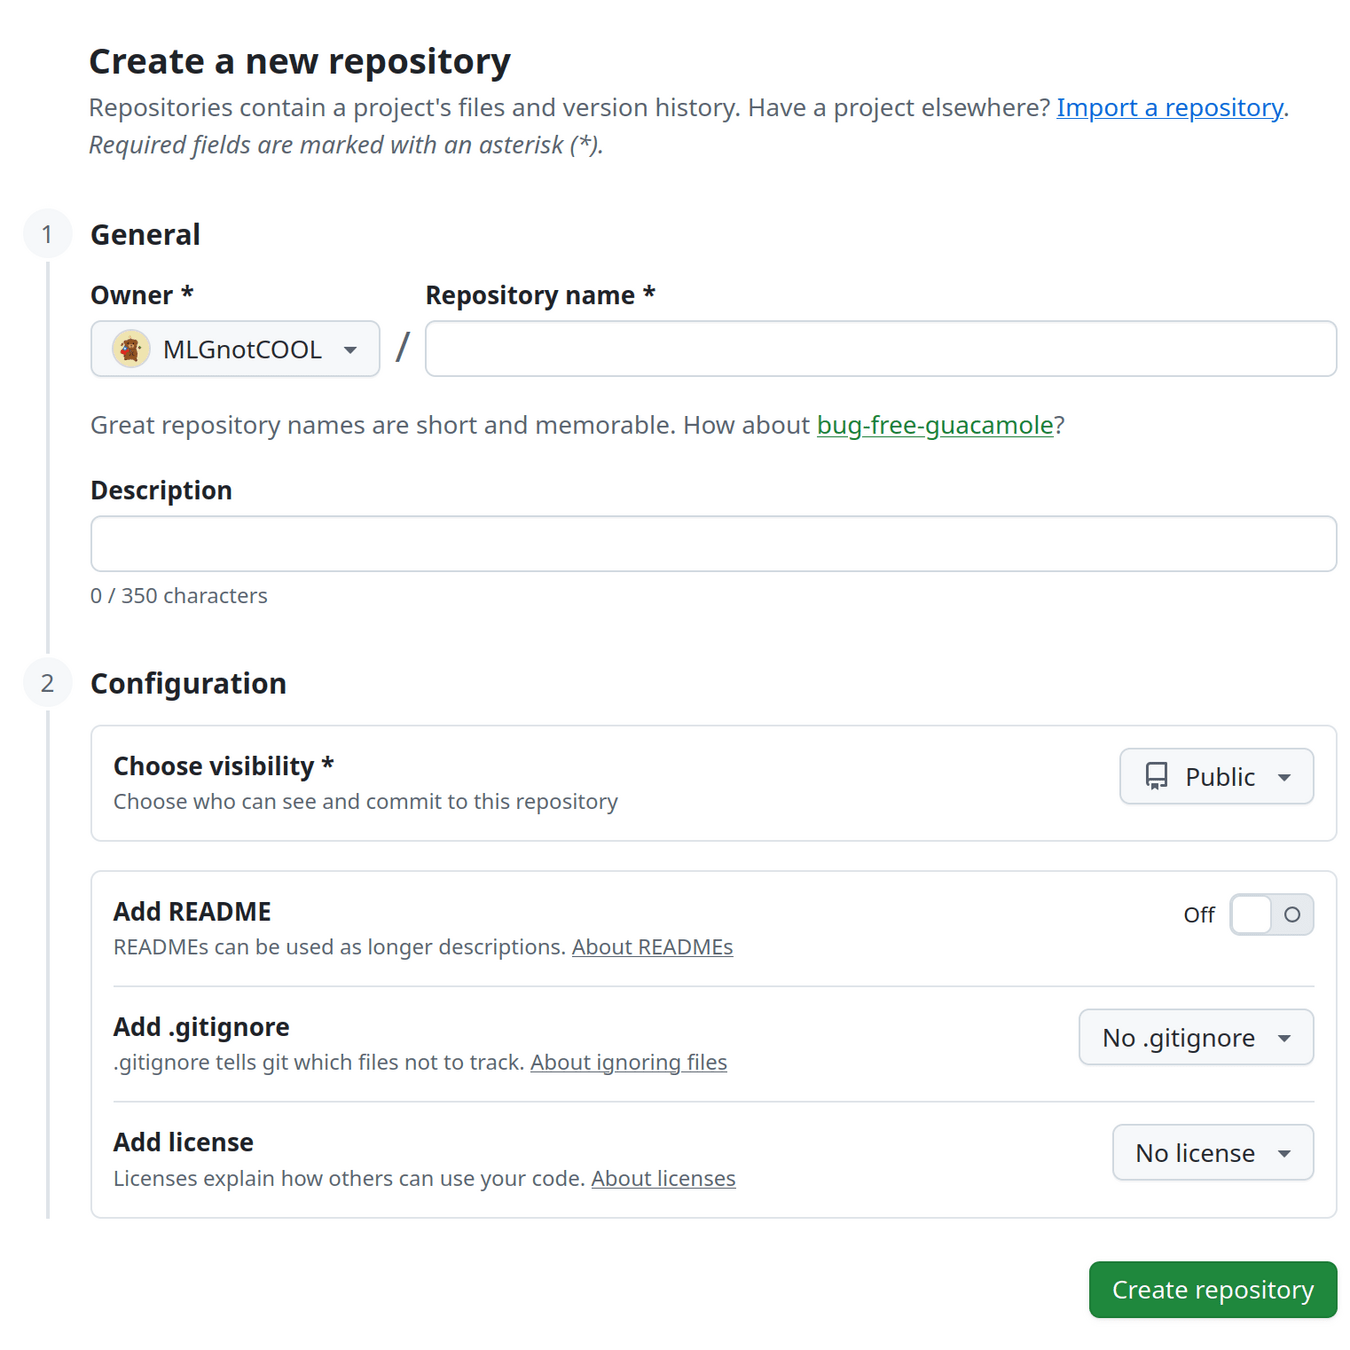
先在左邊按 "New" 創一個新的repo
GIThub
vscode + github
填入你repo的名稱(下面的可以先不管)
GIThub
vscode + github
GIThub
vscode + github
接下來要把這個repo clone到你的vscode
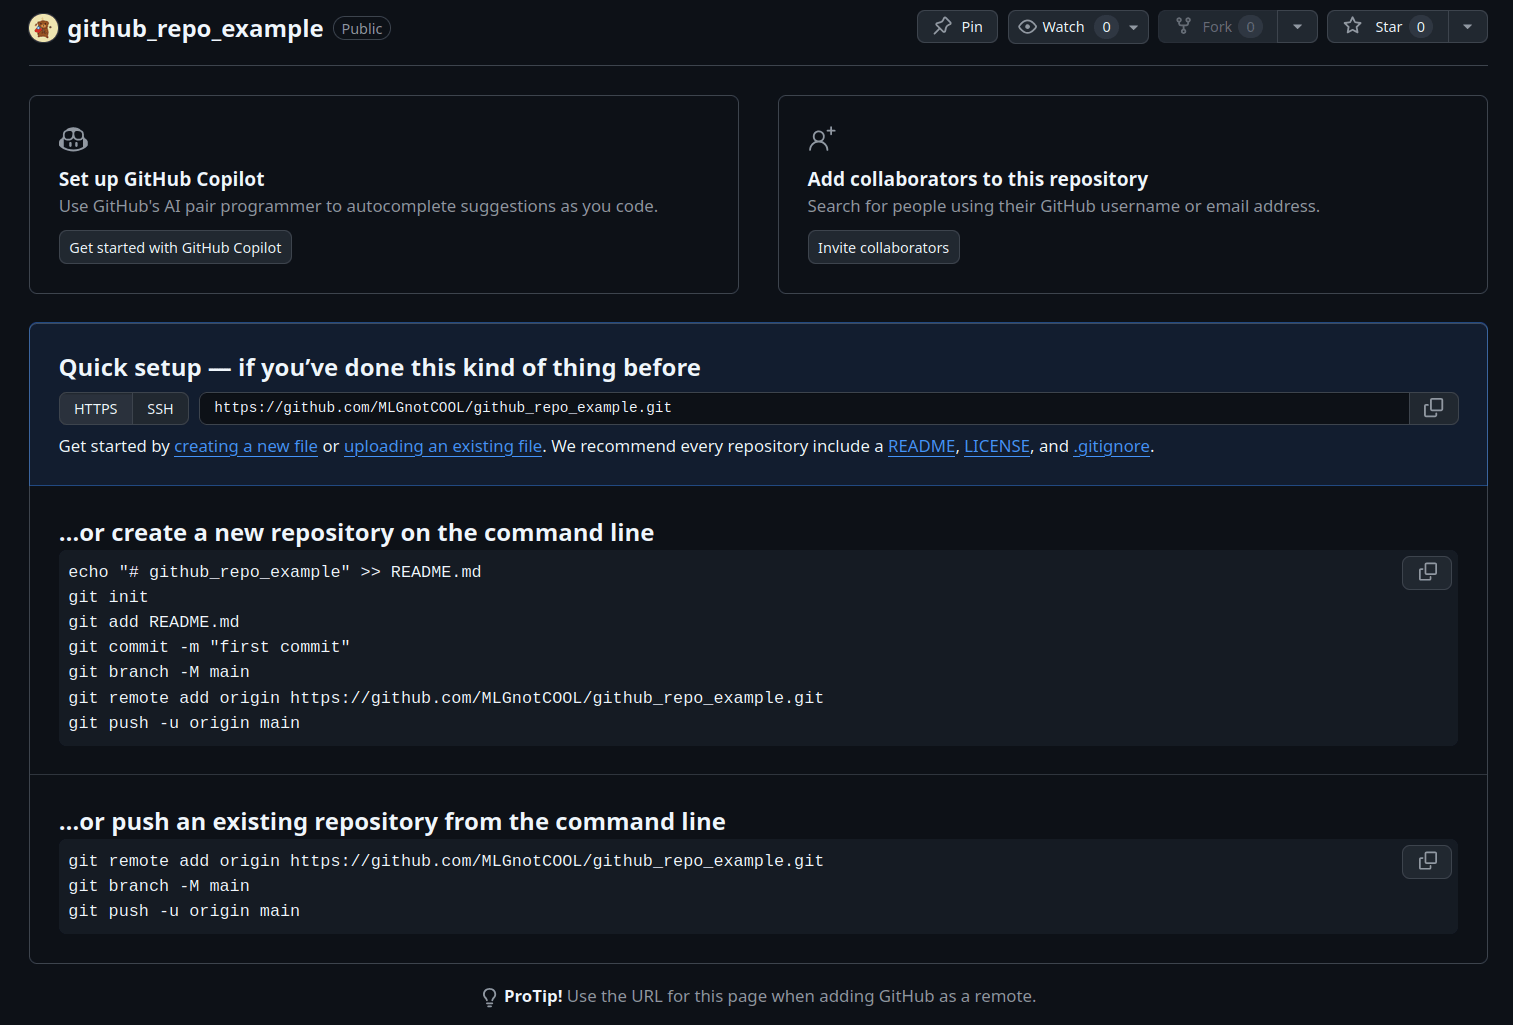
新的repo
已經有commit的repo
GIThub
vscode + github
接下來要把這個repo clone到你的vscode

在vscode按下 "ctrl + shift + p"
打入git clone 然後按下enter
選擇你資料夾要在的位置
GIThub
vscode + github
接下來要在vscode設定你的github帳號

在你的terminal打入這兩的指令
git config --global user.name "您的姓名"
git config --global user.email "您的Email"
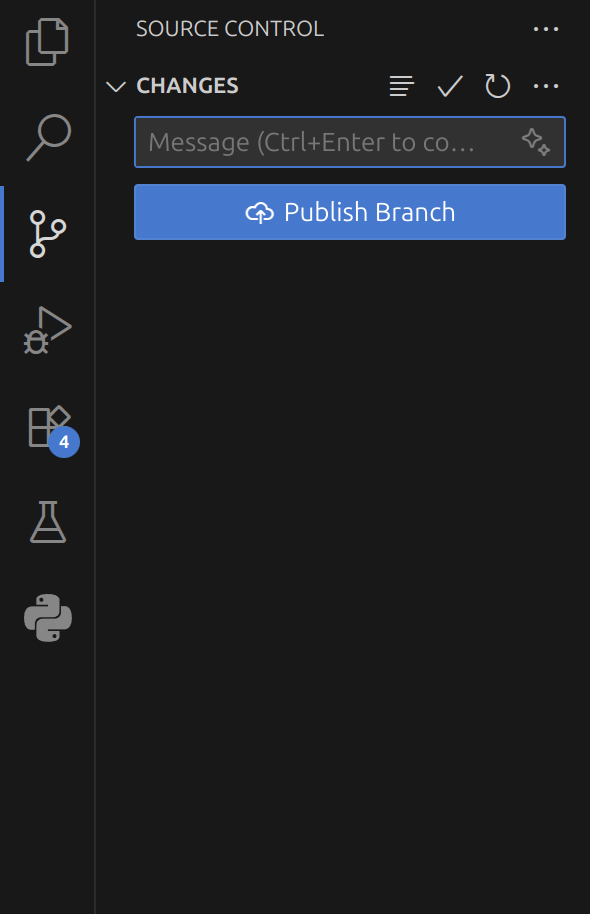
GIThub
vscode + github
在準備好你的第一個commit之後
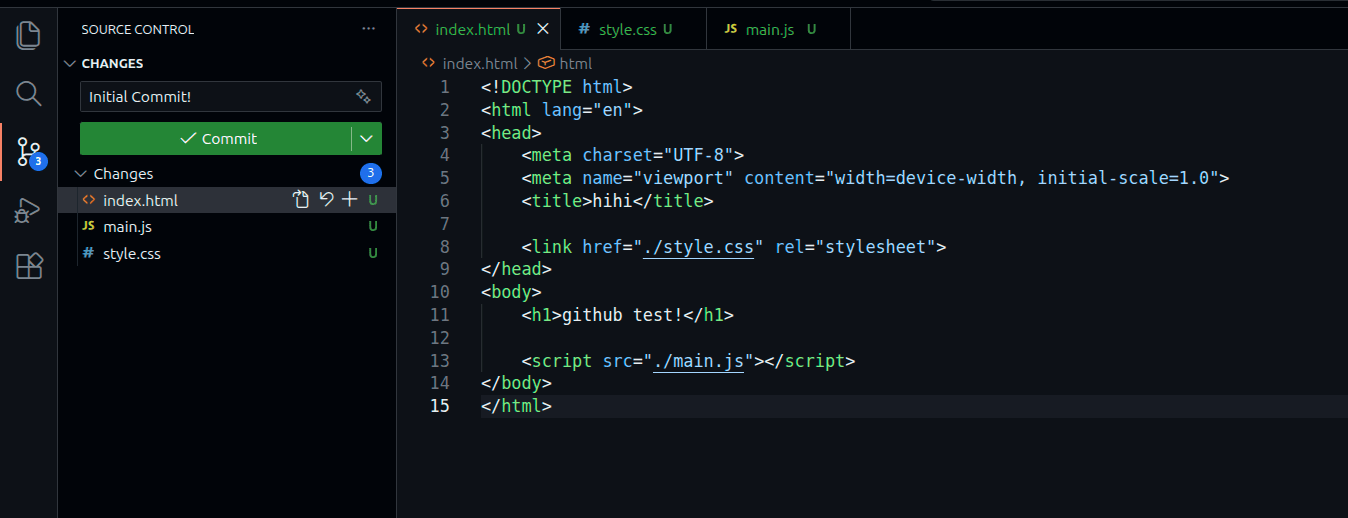
打入你的commit名稱 並且按下綠色按鈕
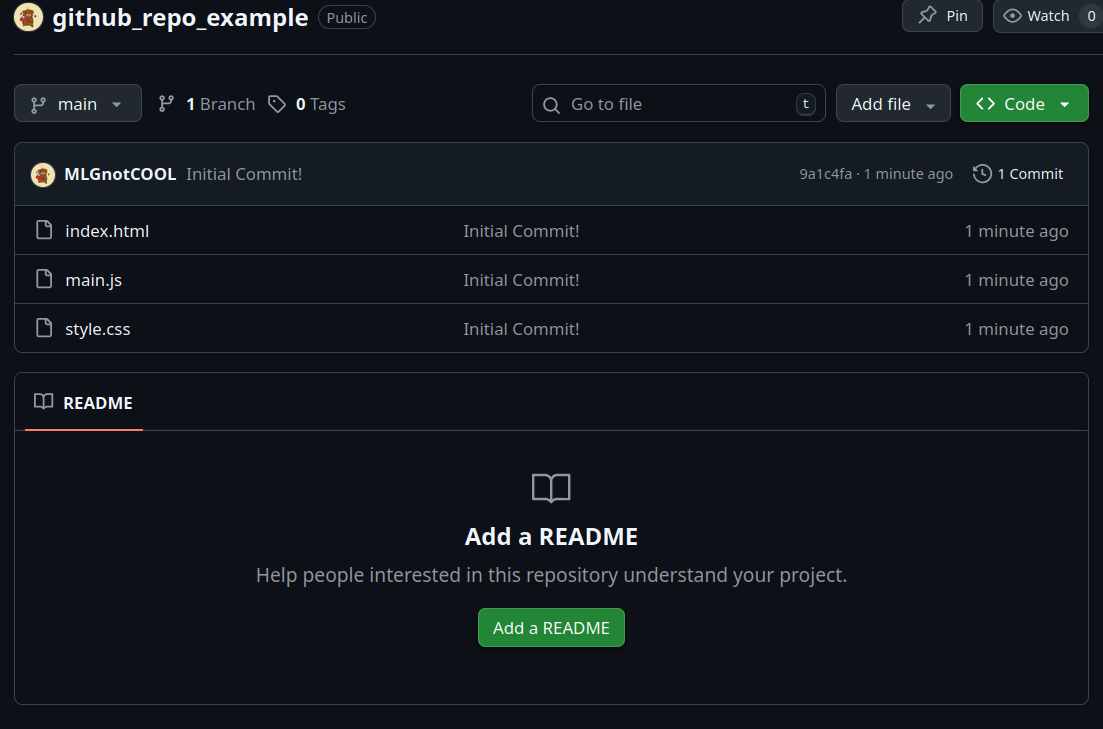
在登入之後就成功的push到github了!
GIThub
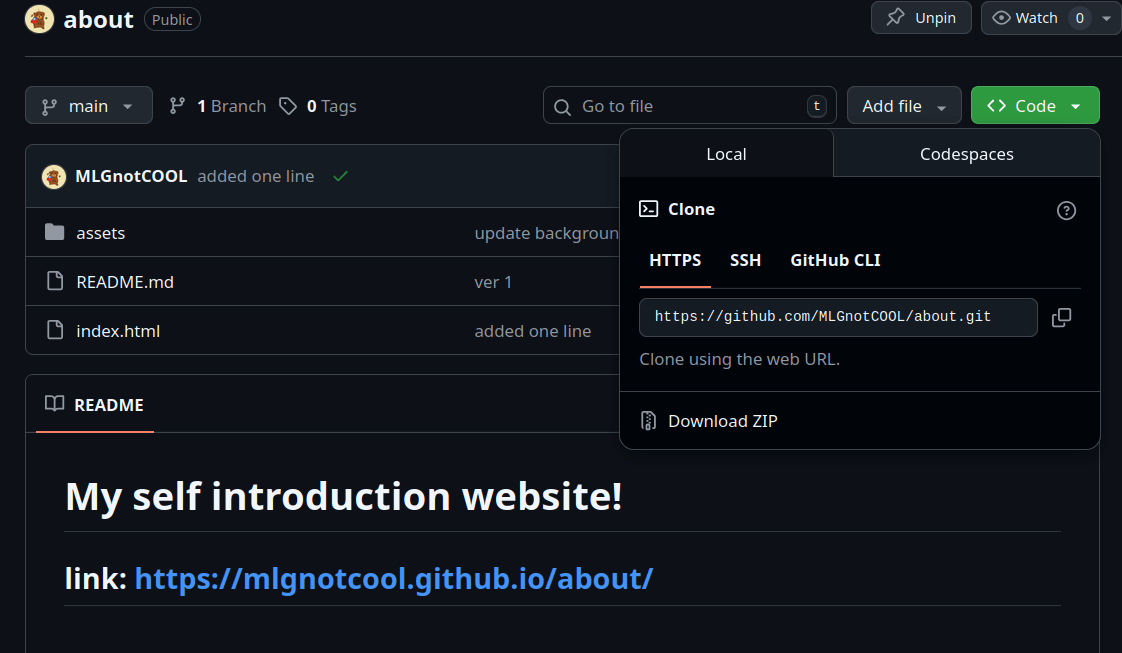
vscode + github
成功在github上看到你的commit了!
GIThub
github
我們通常會在repo加一些特定檔案:
README.md
加入底下可以說明的東西
(格式是markdown如果想學可以自己去看看)
.gitignore
push時github會忽略的東西
常用於不能公開的東西 像是token之類的

github 第11周
用github架靜態網頁
GIThub
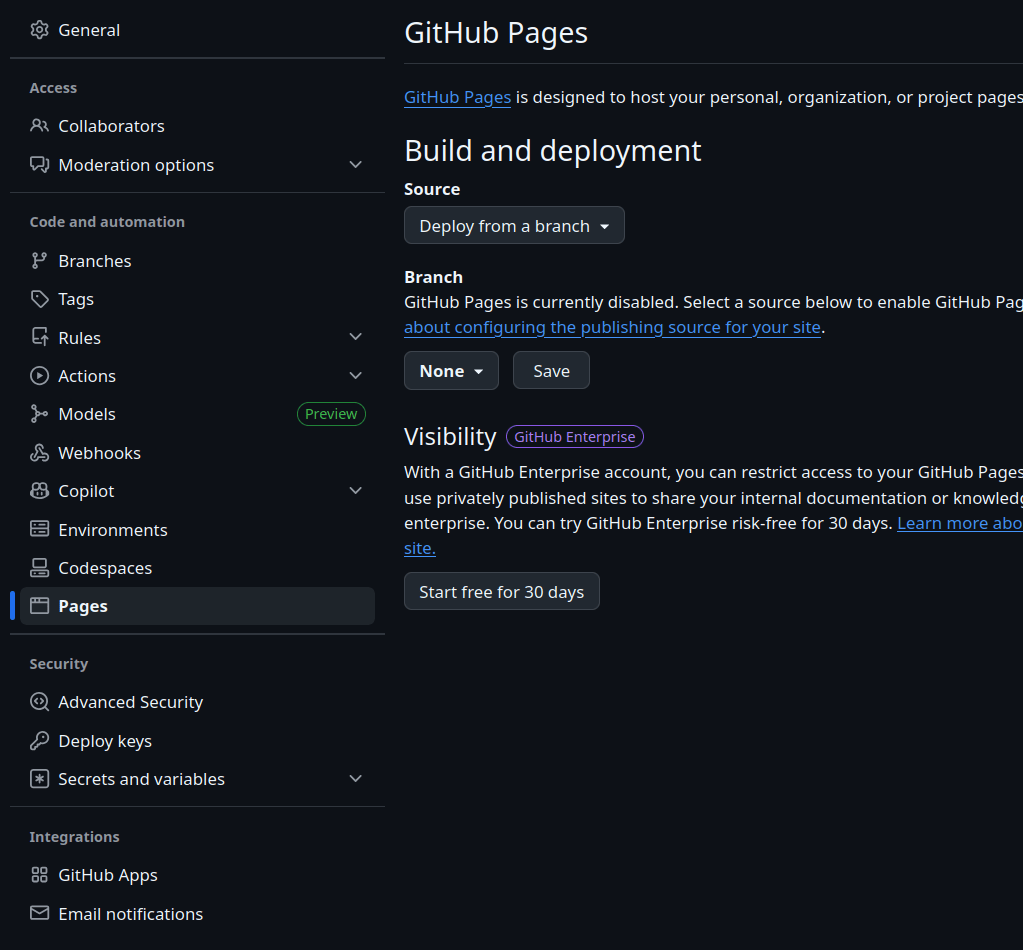
github 架靜態網站
github 有一個非常好用的功能
就是可以免費架靜態網站
記得 html檔案要取名成 "index.html"
GIThub
github

按下上面的 "Settings"
GIThub
github
按下左邊的 "pages"
GIThub
github
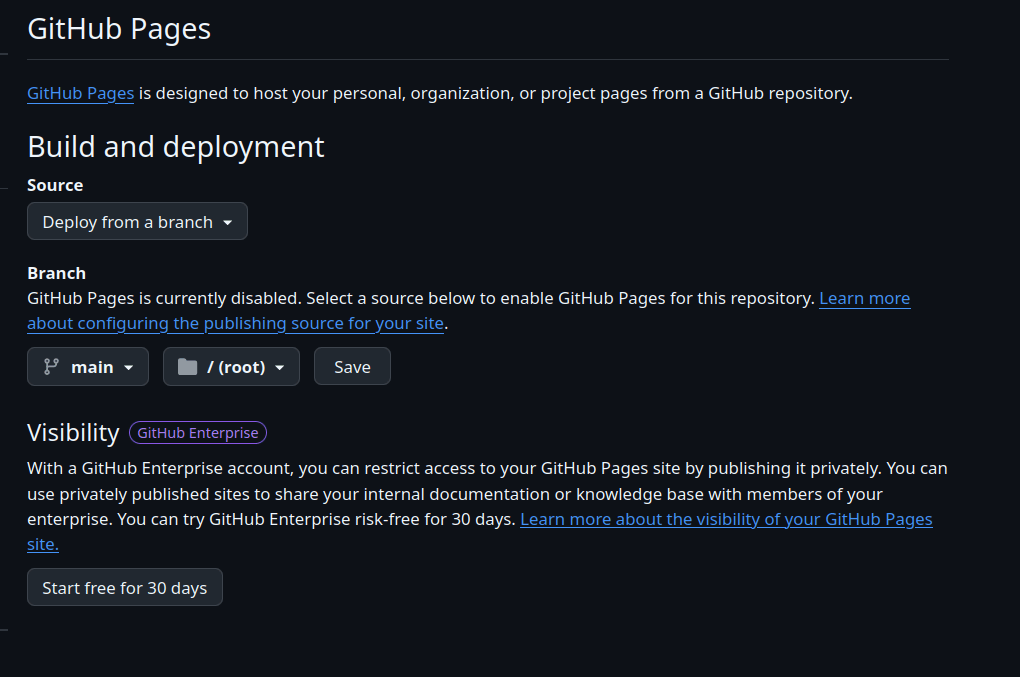
把Branch設成你要用的 (預設是main)
並且按下 Save
GIThub
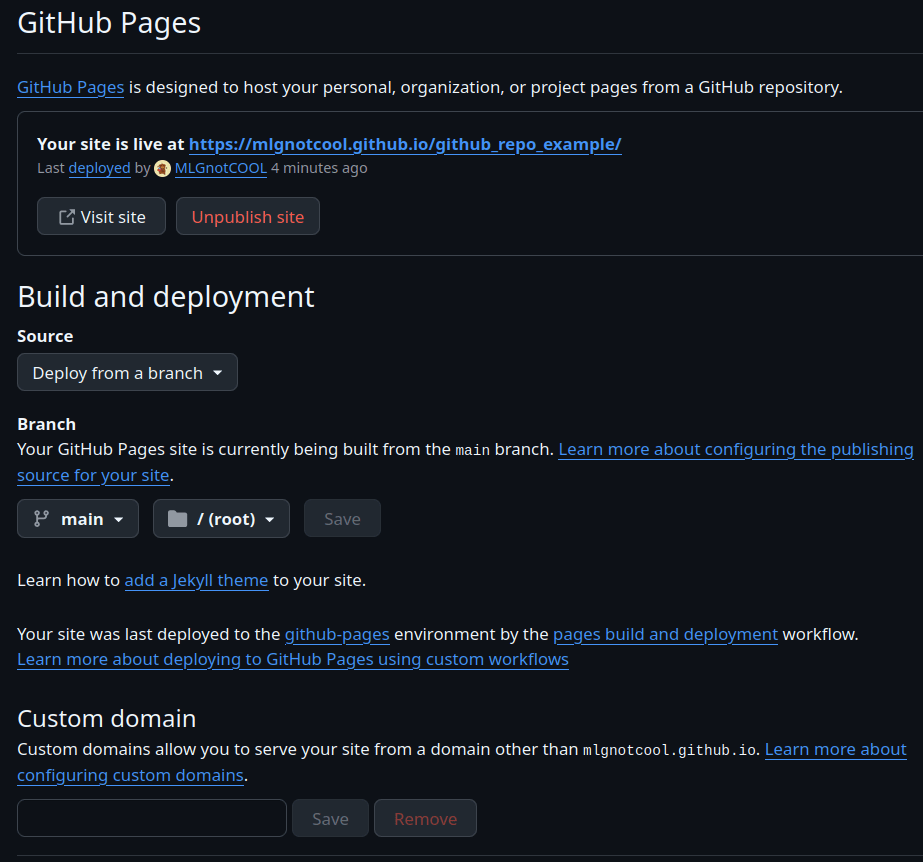
github
每次commit之後 就會自動更新網站了
通常更新要幾分鐘
連結一樣在pages那
github 第12周
pull
push時遇到conflict
GIT
架設我們有兩台電腦 還有github
現在電腦1有我們原本的檔案 並且把他push到github了
commit #1
commit #1
GIT
我們現在要在電腦2修改這個repo
首先當然要先把他clone下來 (上禮拜有教)
git clone
commit #1
commit #1
commit #1
GIT
我們把電腦二的新版本push到github
git push
commit #1
commit #2
commit #2
GIT
我們現在在電腦一更新我們的檔案 試著push到github
commit #2-2
(從commit #1修改的)
commit #2
commit #2
git push
GIT
但我們就遇到了一個問題!
就是github現在的兩個commit有衝突 導致我們現在沒辦法成功的push
最簡單的方法 (如果你自己個人作小專案的話)
就是在每次要對版本作更新前,先將最新的版本 git pull下來
(關於pull是什麼 上禮拜講過了 流程和clone差不多 只是要選pull就好了)
你也可以用terminal直接 git push --force,直接把原本的commit覆蓋掉,但不太建議這樣作
也可以用vscode幫你顯示哪裡有conflict,一個一個去解決
(遇到的時候都可以查google,我就不多加解釋了)
GIT
我們也可以創一個新的Branch
關於Branch是什麼呢?影片
如果我下禮拜有時間的話,我就多補充
因為當比較多人要在同個repo上工作,才會用到Branch, merge, rebase等功能
個人的project不太會用到