ReactJS

What is React?
- Component based library from Facebook
- Only handles your front-end UI
- Lightweight, performant , efficient, minimal code to accomplish amazing things
- Handles updates with Virtual DOM diffs
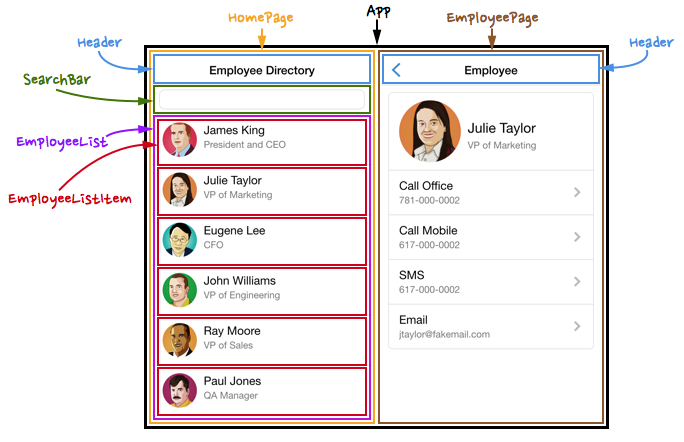
- Component heirarchy of data flowing downwards to children
Setting Up
Start using React and ReactDOM by including the Facebook Links or the CDN in the head of your HTML file.
<script src="https://fb.me/react-15.0.1.js"></script>
<script src="https://fb.me/react-dom-15.0.1.js"></script>
<script src="https://cdnjs.cloudflare.com/ajax/libs/babel-core/5.6.15/browser.js"></script>

<!-- Or use the CDN -->

<script src="https://cdnjs.cloudflare.com/ajax/libs/react/15.0.1/react.js"></script>
<script src="https://cdnjs.cloudflare.com/ajax/libs/react/15.0.1/react-dom.js"></script>
<script src="https://cdnjs.cloudflare.com/ajax/libs/babel-core/5.6.15/browser.js"></script>
Include the React core library.
<script src="https://cdnjs.cloudflare.com/ajax/libs/react/15.0.1/react.js"></script>Include React-dom to render components to the DOM.
<script src="https://cdnjs.cloudflare.com/ajax/libs/react/15.0.1/react-dom.js"></script><script src="https://cdnjs.cloudflare.com/ajax/libs/babel-core/5.6.15/browser.js"></script>Lastly, include Babel-core to compile our JSX.
React Components & ReactDOM.render()
Very important to think of your entire UI as components.

The render() method is required and must return an element(s) to be rendered
var SimpleComponent = React.createClass({
  render: function(){
    return (
      React.createElement('h1', {className: 'hello'}, 'Hello React!!')
    );
  }
});
To create components in React, we use the React.createClass() method.
ReactDOM.render(
  React.createElement('h1', { className: "hello" }, 'Hello React!!'),
  document.getElementById("content");
);
React-dom gives us the render() method that acts as the main entry point for our components to render!
When compiled to the browser...
<body>
  <div id="content">
    <h1 class="hello">Hello React!!</h1>
  </div>
</body>
JSX
React comes with the ability to use JSX ( JavaScript syntax ) to render HTML elements.
Although JSX looks like HTML, it is very important to note that IT IS NOT HTML! It's an XML like language that compiles to JS!
JSX Examples
// attach function handlers
return (
  <Form
    onSubmit={this.handleSubmit}
  />
);

// conditional statements
return (
  { true ?
    <div>
      <h1>You can see me if state data exists</h1>
    </div>
   : null }
);

// comments
return (
  <Nav>
    { /* child comment wrapped by curly braces */}
  </Nav>
);

// boolean attr.
return (
  <input
    type="button"
    disabled={false}
  />
);

// style attr.
return (
  <div className="container">
  </div>
);
var SimpleComponent = React.createClass({
render: function(){
return(
<div className="container">
<h1 className="hello>Hello React!!</h1>
<div>
);
}
});
// Rendering SimpleComponent
ReactDOM.render(
<SimpleComponent/>,
<document.getElementById("content")
);JSX to Render Components
When defining components, capitalize so that JSX will recognize as a component and not an HTML tag.
Nesting Components in JSX
var ChildComponent = React.createClass({
  render: function(){
    return (
      <div>
        <h1>Child Component</h1>
      </div>
    );
  }
});

var ParentComponent = React.createClass({
  render: function(){
    return (
      <div className="container">
        <ChildComponent/>
      </div>
    )
  }
});
Props
React uses props to pass values from the parent component to its children.
var ParentComponent = React.createClass({
  render: function(){
    return(
      <ChildComponent
        name="John" />
    );
  }
});

var ChildComponent = React.createClass({
  render: function(){
   return(
     <h1>My name is {this.props.name}!!</h1>
   );
  }
});
this.props.children give us all of the components children that it encompasses when used.
var ParentComponent = React.createClass({
  render: function(){
    return(
      <ChildComponent>
        {this.props.data}
      </ChildComponent>
    );
  }
});

var ChildComponent = React.createClass({
  render: function(){
    return(
      <div className="child-data">
        {/* Hello React!! */}
        {this.props.children}
      </div>
    );
  }
});

ReactDOM.render(
  <ParentComponent data="Hello React!">,
  document.getElementById("content")
);
Component State
Setting the state object allows us to store values in memory on the component that we can use or pass to children.
var SimpleComponent = React.createClass({
  getInitialState: function(){
    return {
      email: '';  // setting initial state object
    }
  },
  render: function(){
     return(
       <div>
         <h2>{this.state.email}</h2>
       </div>
    );
  }
});
In order to add values to the state object, we use this.setState().
this.setState({numbers: [1, 2, 3]});
And we can retrieve these values using this.state.
this.state.numbers // returns [1, 2, 3]getInitialState: function(){
return { numbers: [] }
}Event Handlers
React allows us to attach event handlers to our JSX elements.
var SimpleComponent = React.createClass({
  handleFullNameChange: function(event){
    // event.target.value gives input value
  }
  render: function(){
    return (
      <div>
        <form>
          <input
            type="text"
            name="full-name"
            placeholder="Full Name"
            onChange={this.handleFullNameChange}
        </form>
      </div>
    );
  }
});
Passing Prop Handlers to Children
var ParentComponent = React.createClass({
  handleEmailSubmit: function(){
    // submit email to server
  },
  render: function(){
    return(
      <ChildComponent
        onUserSubmit={this.handleEmailSubmit} />
    );
  }
});

var ChildComponent = React.createClass({
  getInitialState: function(){
    return { email: ''};
  },
  this.handleEmailChange: function(event){
    this.setState({email: event.target.value})
  },
  this.handleSubmit: function(){
    this.props.onUserSubmit({email: this.state.email})
  },
  render: function() {
    return(
      <form className="email-form" onSubmit={this.handleSubmit}>
        <input
          value={this.state.email}
          onChange={this.handleEmailChange}
      </form>
    );
  }
});
Iterators
JavaScripts functional array methods help us dynamically generate JSX.
Array.prototype.some()
Array.prototype.every()
Array.prototype.forEach()
Array.prototype.filter()
Array.prototype.map()
Array.prototype.filter()
Array.prototype.reduce()
...
var ChildList = React.createClass({
render: function(){
var user = this.props.userData;
return(
<div>
<h1>{user.firstName}</h1>
<h2>{user.email}</h2>
</div>
);
}
});
var ParentComponent = React.createClass({
render: function(){
var usersArray = this.state.data;
return(
<div>
{usersArray.map(function(user, idx){
return <ChildList key={idx} userData={user} />
})}
</div>
);
}
});Taking advantage of JavaScripts map array method and returning the ChildList component on each iteration.
Lifecycle Methods
var SimpleComponent = React.createClass({
  getInitialState: function(){
     return { data: [] };
  },
  componentWillMount: function() {
    $.ajax({
      url: /* some endpoint */,
      dataType: 'json',
      success: function(data) {
        this.setState({data: data});
      }.bind(this),
      error: function(status, err) {
        console.error(status, err.toString());
      }.bind(this)
    });
  },
  render: function(){
    return (
      <div>{this.state.data}</div>
    );
  }
});
The optional componentWillMount() method is automatically invoked right before the component is rendered.
Another optional lifecycle method is componentDidMount(), invoked after the initial rendering of the component occurs
var SimpleComponent = React.createClass({
  getInitialState: function(){
    return { data: [] }
  },
  handleUpdates: function(){
    $.ajax({
      url: /* some endpoint */,
      dataType: 'json',
      success: function(data) {
        this.setState({data: data});
      }.bind(this),
      error: function(status, err) {
        console.error(status, err.toString());
      }.bind(this)
    });
  },
  componentDidMount: function(){
    this.handleUpdates();
    setInterval(this.handleCommentUpdates, 3000);
  },
  render: function(){
    return (
      <div>{this.state.data}</div>
    );
  }
});